JulianB
-
Posts
85 -
Joined
-
Last visited
Everything posted by JulianB
-
Agreed...initially I couldn't really find anything under £500, but I kept a few alerts on and eventually the right one popped up (buying the jaws separately I found helped too). The older Novopress generally goes for 50-150 for just the pressing gun - the first one I had sourced from eBay was a low starting bid and no interest whatsoever, so I ended up getting it for an absolute bargain...but that sadly got stolen when we were burgled and the next one I watched went for over 3 times the original price I had paid! Now that I keep my eyes out for the press fittings, I do notice them quite a bit when I pop into places - a friend mentioned that down in London, most plumbers have switched over to them rather than solder given the advantages, however I can understand that it will take some time to trickle through to all plumbers seeing as buying new they're in the thousands! My original plan was to sell on my kit once I've finished the build, however it was such a joy to work with, I've decided that it deserves to stay in my collection!
-
In the end I went for the Novopress EFP2 - one of the older models...slightly bulkier but I found it great for my application (which was quite tight!). I had also purchased a Novopress Eco 301 which came in for a bit more money but ended up returning it as saw no advantage over the older EFP2. As for the jaws...the difficulty I found was precisely knowing whether the jaws will fit a particular model... I couldn't really find much online, and in the end I went for a gamble and bought a Geberit 3 jaw kit (15, 22, 28mm M profile) which came good! I did have to buy and return a few jaws along the way...but it saved me quite a bit of money!
-
The pressfit tool was a godsend! I did quite a bit of hunting online to find one at a reasonable price (~£400 with 3 jaws and deburring tool), and it definitely paid for itself in piece of mind, speed and ease of use. I marked every single fitting to ensure that the pipe was inserted to the correct depth prior to pressing, and that was really it. The only word of caution is that you need to be pretty much perpendicular / square to the pipe run when pressing the fitting; I attempted one at a bit of an angle and the back of the fitting didn't quite press to the same shape so I ended up replacing it. The other thing that can happen if you're not quite square is that it rotates the fitting as it clamps which could be troublesome if it's a 45 or 90 bend...this also only happened to me once, but I also made it a point to press bends before any tee's or straight connectors to give me the freedom to make any adjustments downstream! Lastly...the jaws I was using could happily wrap around the fitting with the pipe clipped into place on the wall, however some of my pipe runs which ran close to one another were a little too tight for it... I found that I had to plan which sections I pressed prior to clipping in place, and which sections I pressed in place when dealing with these close proximity runs...it just takes a little bit of thinking to ensure you've got your pressing sequence right if in a tight space like in my case... Either way, big thumbs up from my side
-
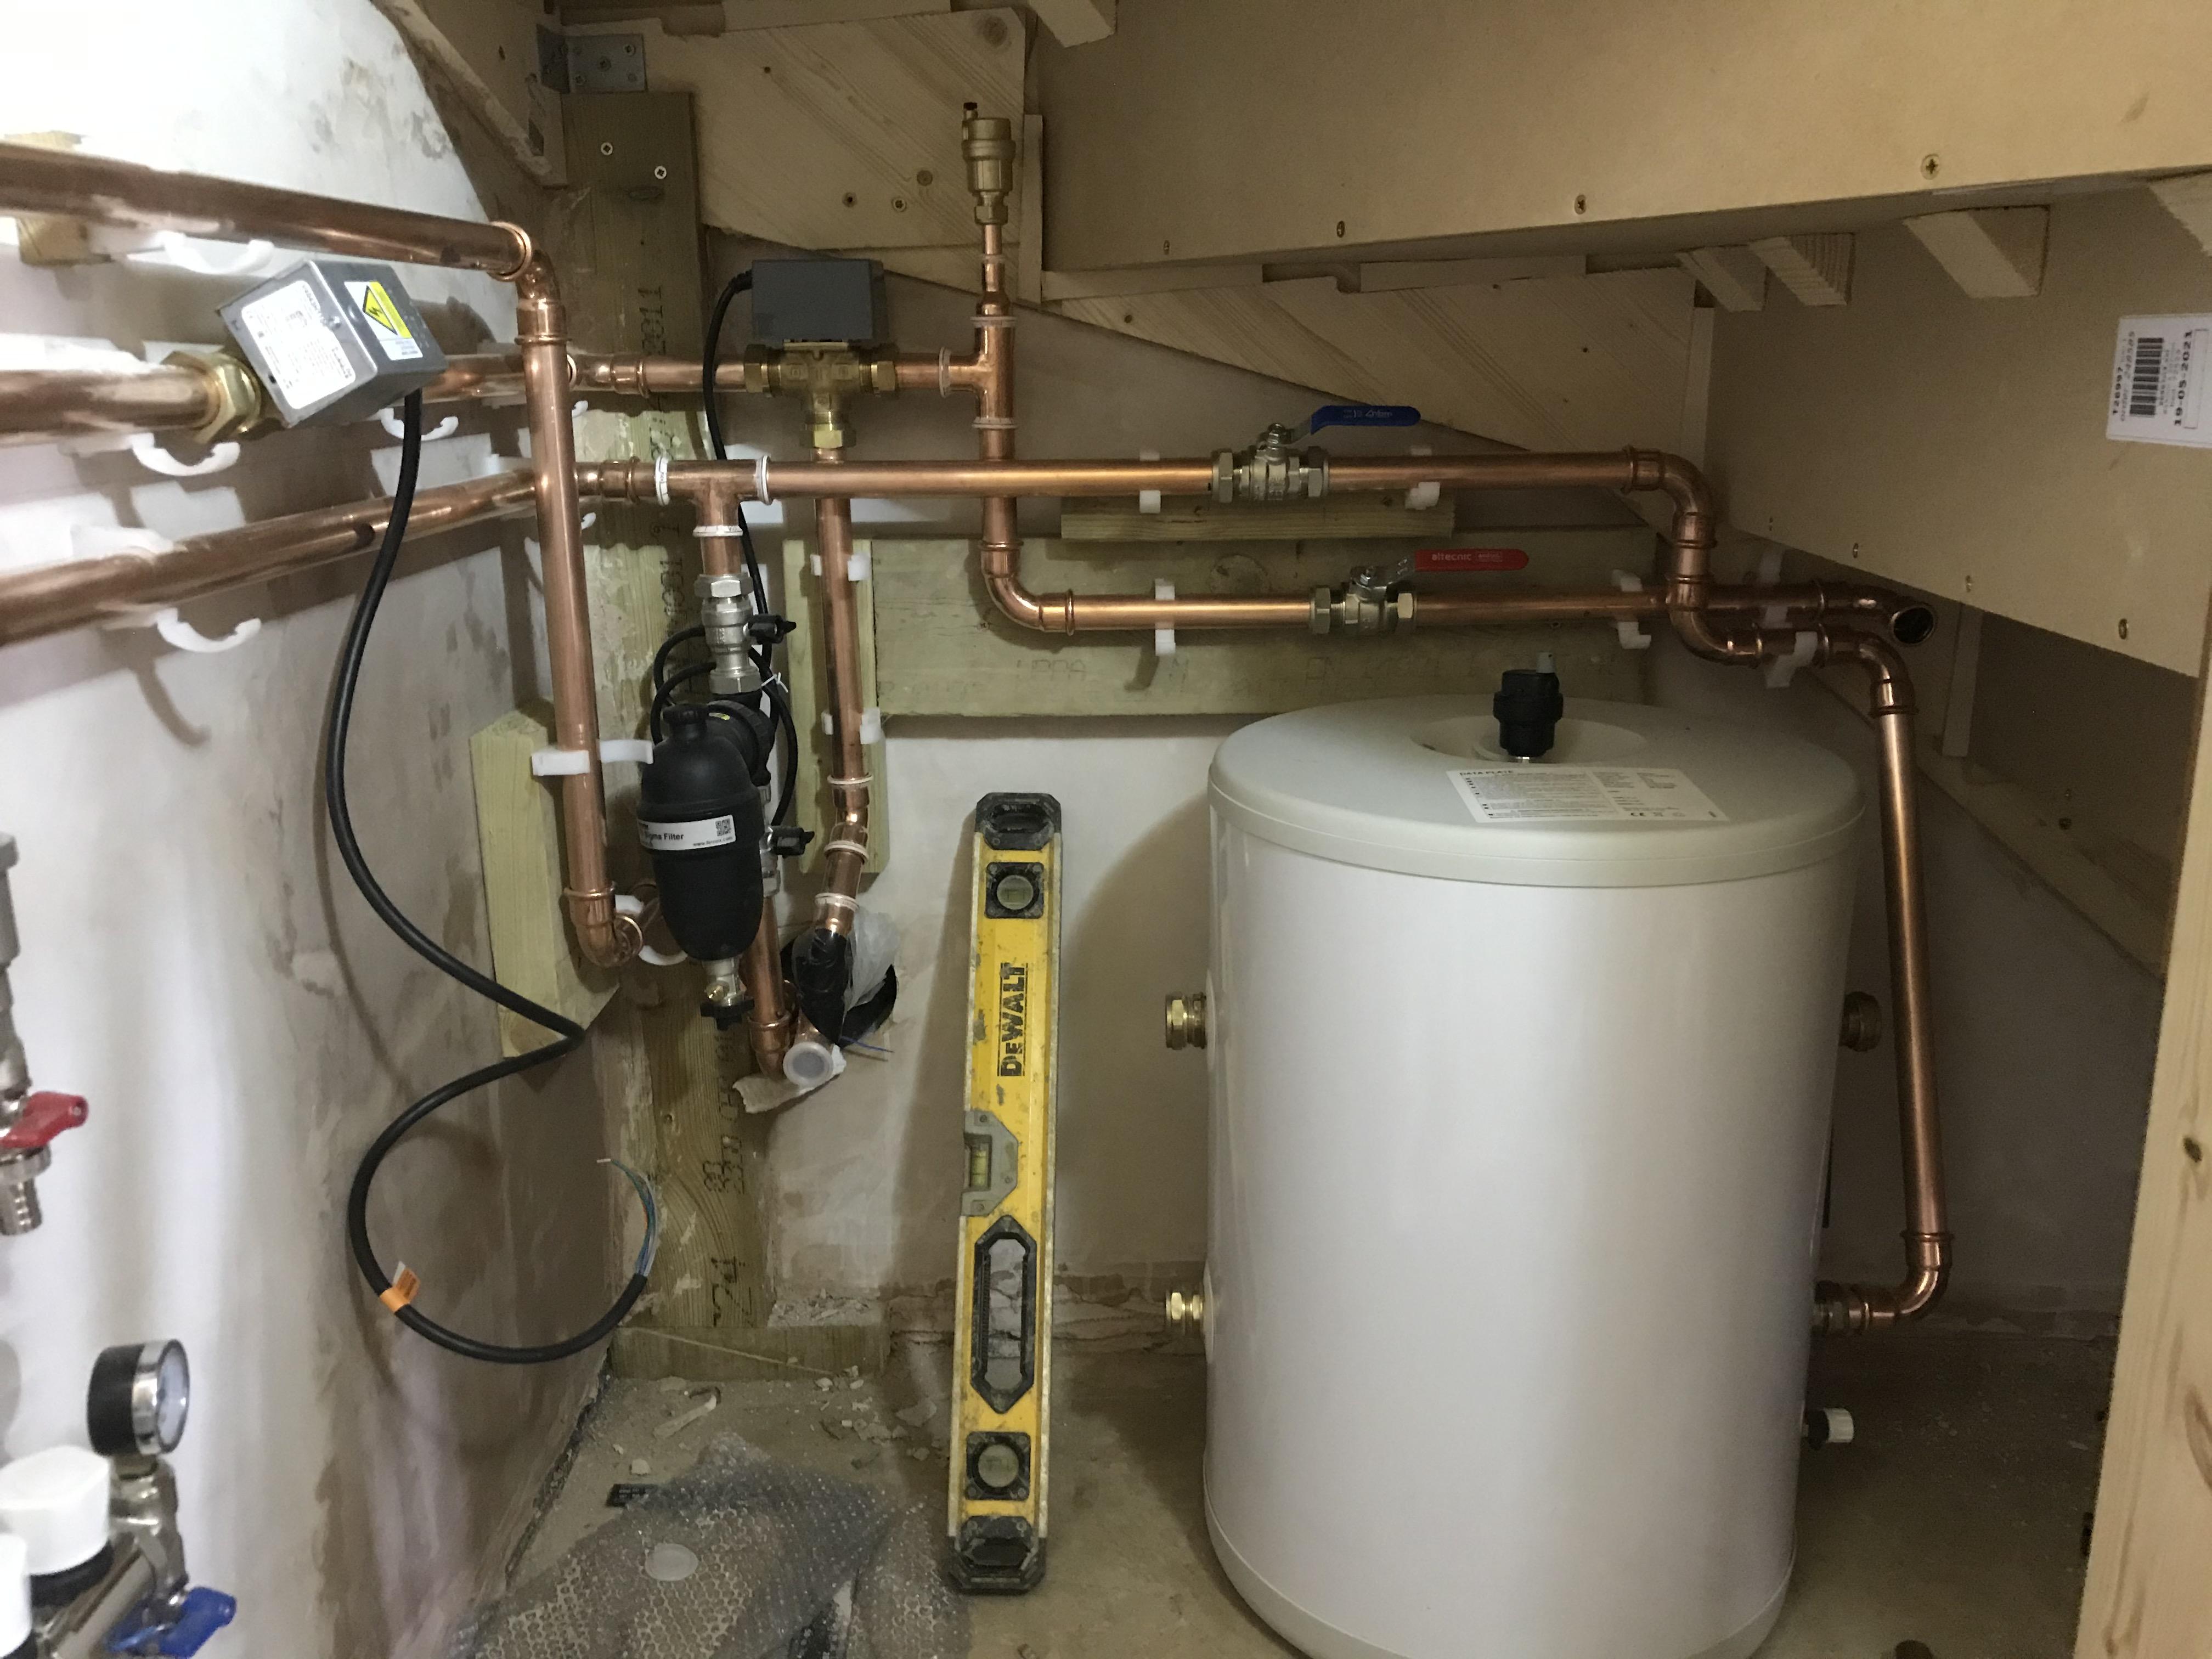
Hi Triassic! Touch wood so far so good...since my last update, I have also fitted the armaflex pipe lagging in 9mm in line with Peter's advice, and tested out the two relief valves to ensure that I didn't get any splash back out of the tundish (running 22 >28mm Tundish which is a fair size). I've wired it all in and gone through the set up / commissioning procedure which was fairly painless; the one area which wasn't as per the manual was the 3 way valve wiring; I found that it needs both white and grey wires connected to a single terminal on the ASHP motherboard. I've also run a contactor to take the no voltage short circuit from the high limit stat (UVC) to the ASHP which wasn't explained either. The only thing I'm not terribly keen on is the fact that the 2 way motorised valve which is down stream of the 3 way valve on the Hot water side and in line with the high limit stat is always energised, however was told this is the done thing!
-
The D2 run to the right is 2 metres to the termination point by the way!
-
Thanks! I had to squeeze it in up there due to being tight on the 300mm pipe on D2...Thought about another Tundish...will look into it again Interesting that it's BREGs requirement...does that include the Central heating side or just downstream of 3 way valve to UVC (& back)? Tundish currently runs out near the flow and return of the HP, and will terminate above ground in some form of cage (adjacent to the ASHP). The tundish is 22 -> 28mm, and I just managed to get away with the 300mm straight pipe for D2 before going off to the right.
-
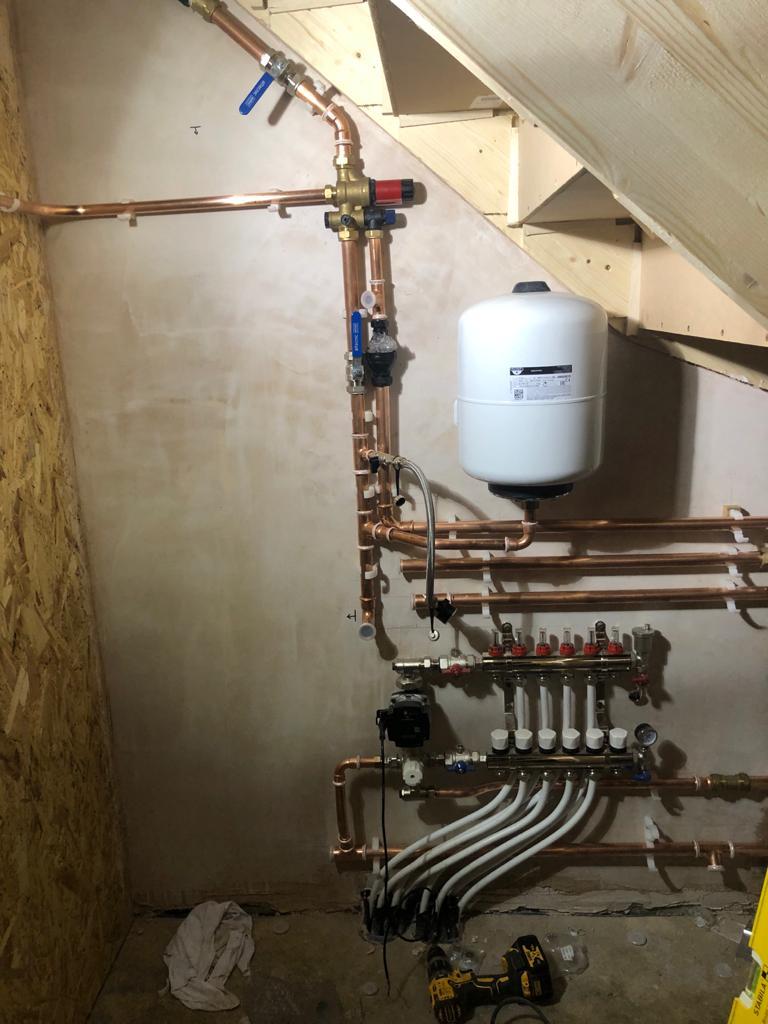
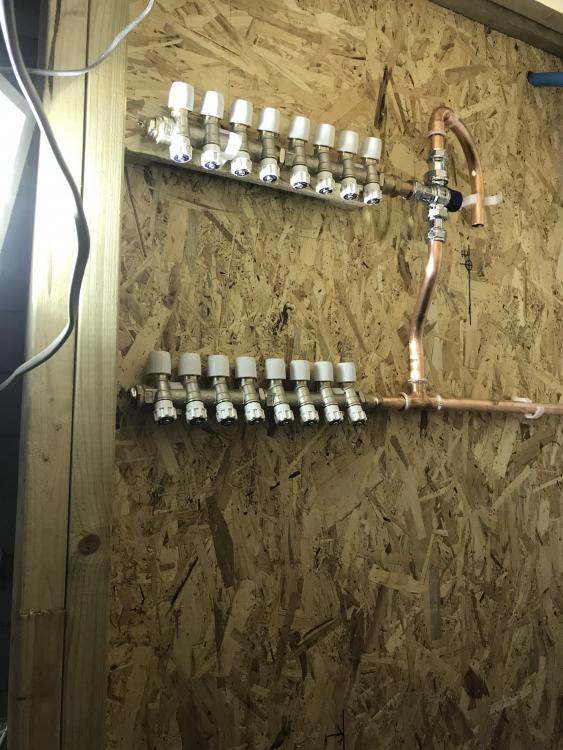
Thanks! Things get a little busier once the UVC comes in! Thanks Peter - I was thinking worst case scenario would be that I insulate just the flow runs? All the pipework is within the thermal envelope of the building if it helps...would be it a show stopper if half of the pipework was uninsulated? All cold water pipes go upwards, but I've stepped the hot water manifold outwards above it so that I can slot the cold water pipes underneath without too much fuss; taking my inspiration of a photo shared on here a while back Photo added of 250L UVC in the picture to give some perspective on that side of things!
-
I managed to make a start on the plumbing this weekend after having put it off for a while - I sourced the wrong type of pressing jaws for my Novopress gun, so all joints are currently loose (and more importantly can be taken apart again if I've missed something!). Comments welcome!


-
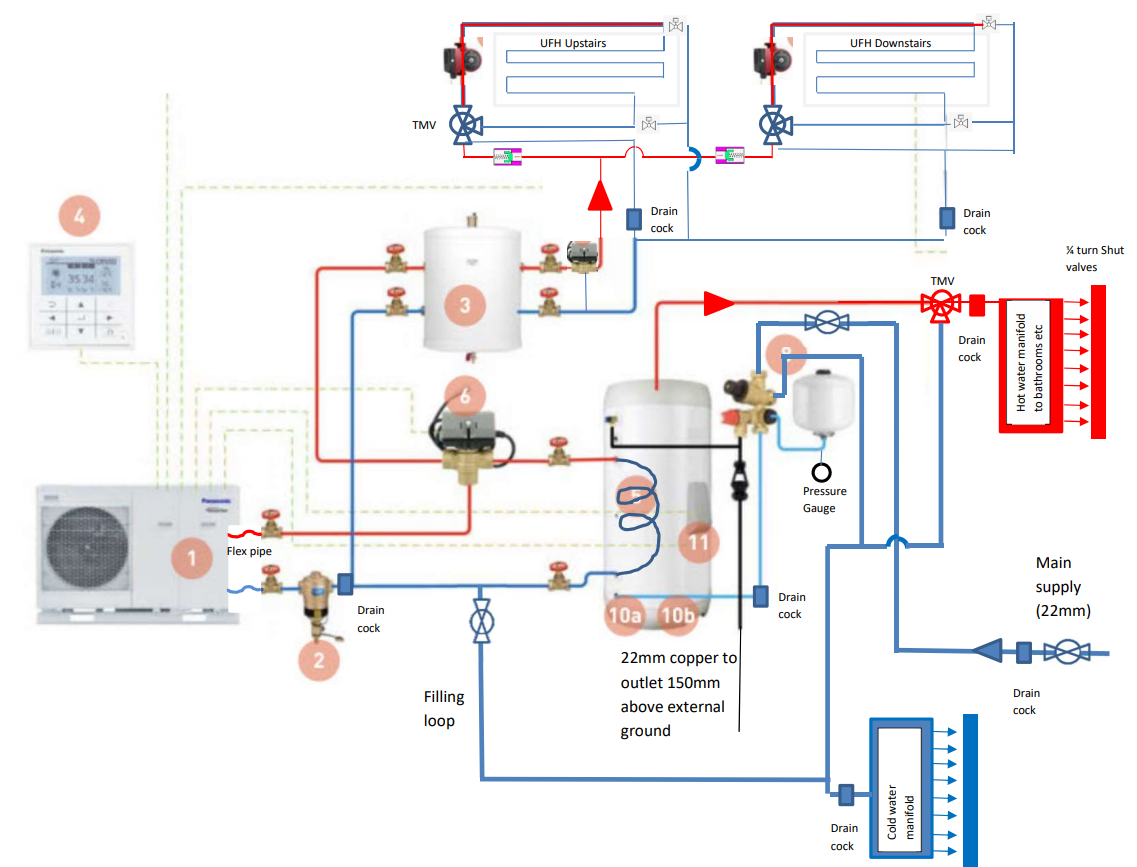
Morning Pete, How had you gotten on with your install? I'm just about to embark on a similar process with my TCAP (9kW), and thought I'd share my thoughts having read through the latest 2021 Pan installation manual and spoken to Secon Solar. In a nutshell, they have advised to treat the central heating side of the system as two separate parts. On the HP side, we connect the 3 port valve, UVC stat & immersion heater. These will allow the HP to switch between DHW and CH, control to UVC tank temp and water flow temperature for the CH side which feeds into the buffer tank (which is the critical part of this approach). My understanding is that we will then call on that buffer tank 'heat' when needed through the wiring centre; UFH pumps, room stats will be hooked up to this side, and operate as a seperate entity (i.e. no connection to the HP). Presumably when UFH (in my case) fires up as the thermostats 'asks' for heat, this will begin to draw heat off the buffer tank, which in turn sets off the HP to regain that heat in the buffer eventually. Thoughts?
-
Interesting! I'll need to pull up the lengths of my UFH across both floors, but from memory the fluid volume was ~100L. I wonder if there would be any knock on affects from daisy chaining one manifold to another on split levels...worth some thought if you were able to get the right fittings to connect from one end of a flow rail to the second... In all honesty I was meant to, but it fell off the quote due to budget constraints...do you reckon it is worth having? I intend on doing the entire commissioning of the ASHP and what not myself, so having a hand of God in the form of someone from Panasonic being able to remote in and access settings could ease the pressure. Did you look at shop soiled items? I got my UVC with some slight scratching for around £200 cheaper, still under warranty etc. I believe both UVC and buffer tank came in at £900ish +VAT.
-
Purchased the bare cylinder, primarily to offer me slightly greater freedom in packaging it under my staircase...if I had the luxury of a pump room, I would have loved the pre plumbed solution! With regards to the single manifold for both floors, it did cross my mind...I wasn't sure if a single pump was man enough for the entire set of runs, and I think I aired on the side of caution...thoughts?
-

-
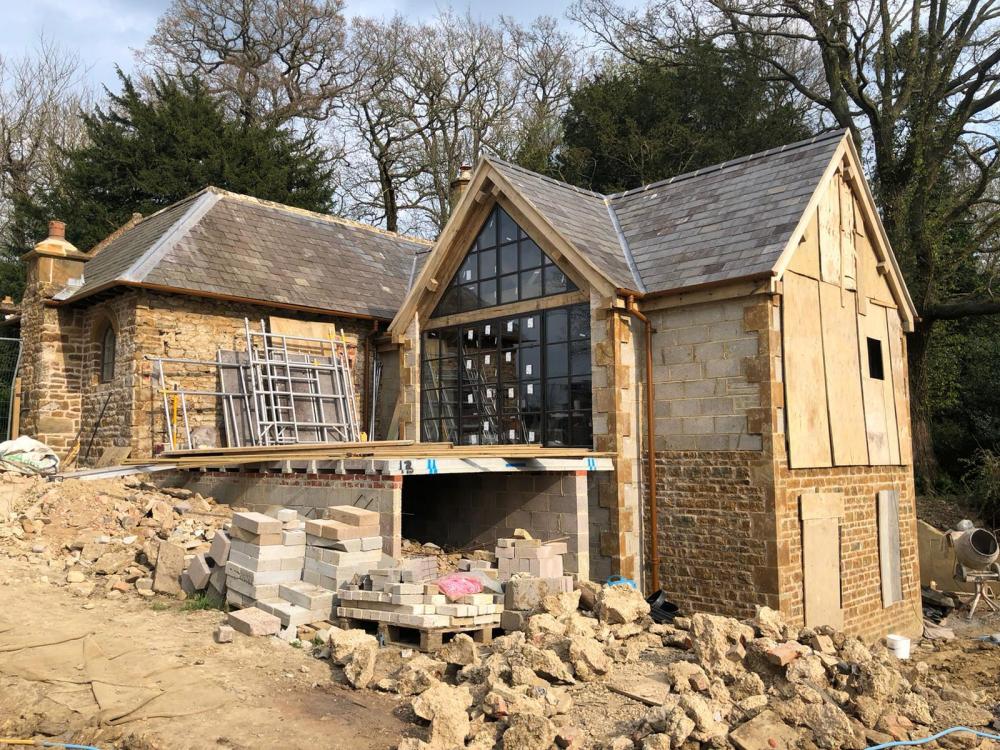
Thanks for that Joe! Looks lovely! I've attached a pic of our current window layout for comparison...the rearward gable faces South East...and we sit at the top of a valley which gives us quite a nice fresh breeze throughout the year! Also hoping the up side down approach will keep the lower level bedrooms cooler. I know the feeling! I'm originally from a tiny island in the mediterranean surrounded by sea water (although ambient temperatures were quite abit higher!) Thank you! We actually live on site in a caravan, but I was at work at the time, and my wife had popped out to the pharmacy late morning. Oh well, hopefully the insurance company are kind to us!
-
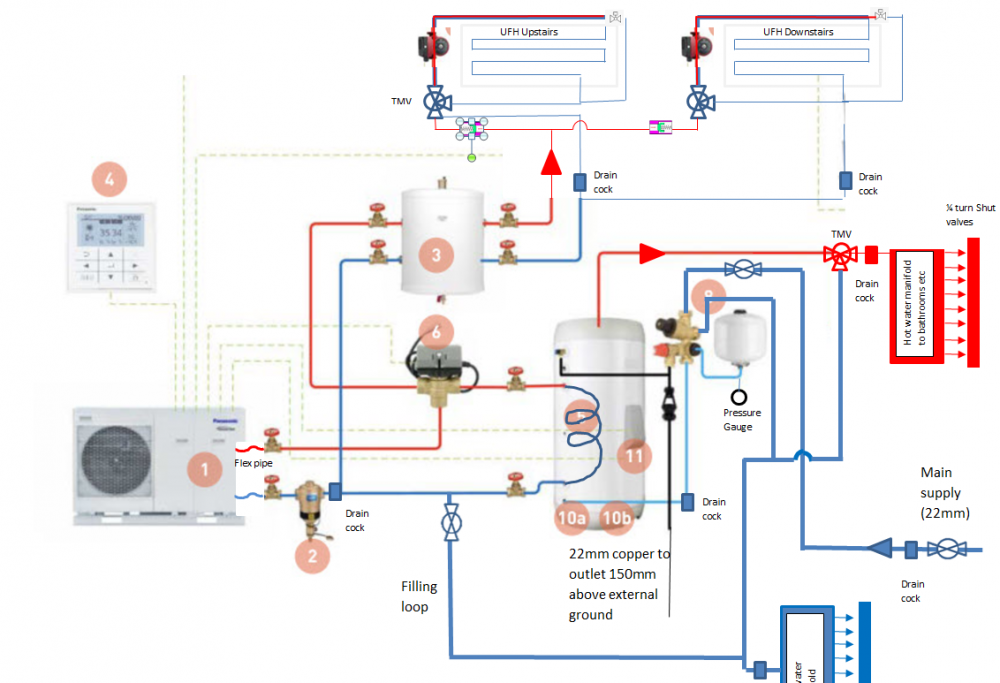
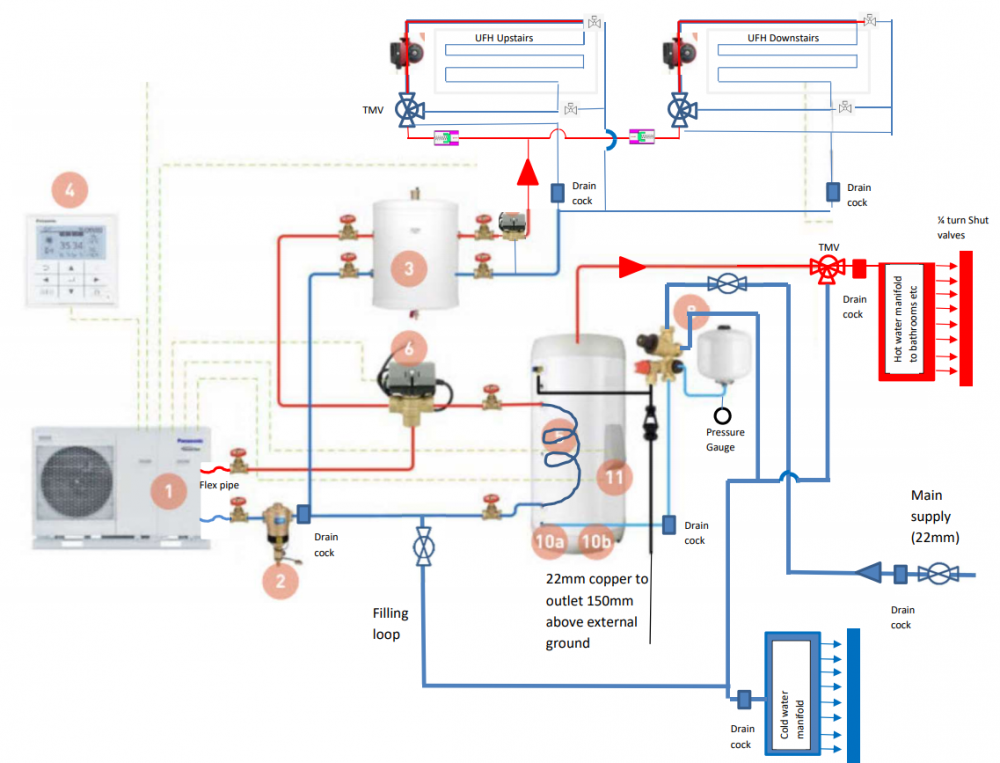
Apologies for the radio silence, was burgled a couple of weeks back when I was last writing this response in my lunch break. Unfortunately, they have cleared us out of all our power tools which we have slowly accumulated over the self-build (and more importantly my Novopress pressing tool and 28mm jaws which I was planning to use for this job *tear rolling down cheek*). Hopefully one day they will get what’s coming to them…We had an alarm with PIR CAMs, but they merrily got to work with the Alarm’s siren blaring…On a positive note they didn’t touch my corner full of brand new carefully labelled boxing containing all of the heating system components! Back to plumbing…It is interesting the point you raise Nick regarding the fact that the primary circulation pump in-built into the ASHP might not actually be capable of circulating the fluid downstream of the buffer. Naturally if I can avoid having to put a secondary pump after the buffer tank (and all the other knock on components) I would, partly down to cost and partly down to additional plumbing, wiring etc…however equally I do want to get it right first time and not have to break into the system wet and deal with draining and what not. The risk from my better half and 3 daughters is also very dangerous…the few things I’ve learnt in life is never to cross a Scottish lass (or her offspring)! Understood re. auto by pass valves – do you reckon it is worth me going back to the supplier and confirming whether this ‘off the shelf’ configuration which Panasonic recommend is likely to require the secondary pump (not to sound ungrateful for your advice, more to get it in writing if they think it should work as is). I’ve re-drawn the return leg of this valve to the return of the manifold rather than upstream of the mixing valve? Does that mean I require just one auto by pass valve on the flow side of the manifold. Also, with these manifold pumps (mine is a GrunFos), when not pumping, would they still allow flow through them if say the secondary pump is running, or are they pretty much a shut valve? Thanks for the info joe! Reassuring to hear! What sort of solar gain would you say your house gets? I'm really hoping not to have to go down the cooling mode route of the ASHP. I have since had a reply from SALUS confirming that their wiring centre can happily toggle between heating and cooling mode (aside from the ASHP). This will basically switch the thermostats to cooling mode which will have pre set cooling temperature set points, which will then activate a mode where the UFH manifolds are turned on however the wiring centre doesn't call the ASHP for heat. Sounds like it may have legs! Those are check valves / one way valves, as recommended by our Welsh wizard! I ended up getting everything from Seconsolar, which I found to be great and recommended by a few others on here too. They normally only sell to trade so there was an element of sweet talking involved! In the end I went for their shop floor soiled UVC, which is a JOULE CYCLONE HIGH GAIN 250L UVC Ofcourse Simon, I wouldn't say it is my finest work, simply done in word copy and pasting symbols etc from here, there and everywhere. Goodluck!UFHv6.pdf UFHv6.docx
-
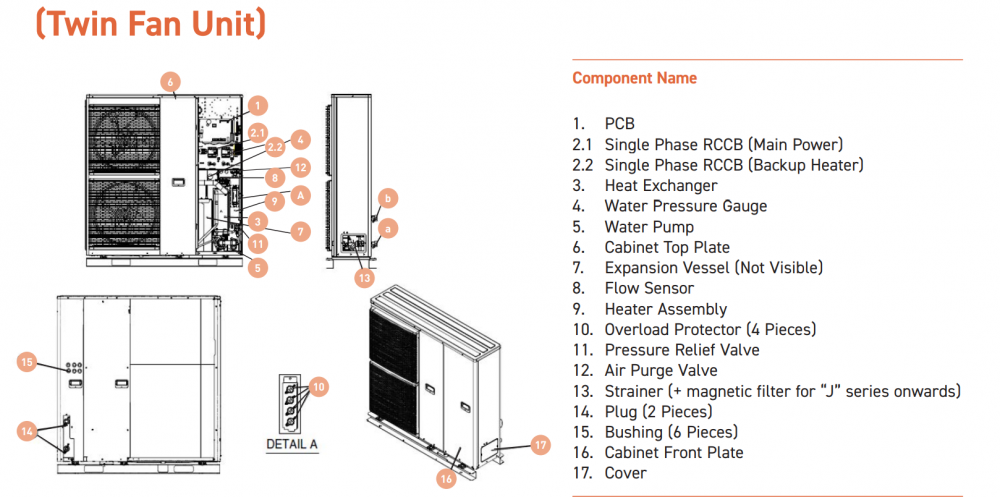
Thanks Pete! I originally had one drawn in but I removed it as there is one inbuilt in the Pan ASHP which caters for up to 200L (part of the reason why I went with the Panasonic unit as I'm so tight on space!). Was initially going with Ecodan but this swayed it for me!
-
Morning Nick, Thanks for the reply! I’ve re-read your post a few times now to let it settle in, but I don’t think I’m fully there yet with my understanding (pardon my ignorance!). Current grey areas: What is a 2 tapping version – does this imply single inlet and outlet off the tank, rather than the Panasonic supplied 2 inlet / 2 outlet version that I have bought (PAW-BTANK50L) Secondary pump – if my understanding is correct, this is only needed in this alternative ‘circulation mode’ when wanting to even out floor temps, and hence the inbuilt pump in the ASHP would not play any part. Would the risk of not having this secondary pump be that I couldn’t guarantee circulation between buffer tank and UFH manifolds? Would there be any other risks? I’m not sure what size an additional 2 pipe buffer would be, but I am very tight on packaging under the stairs unfortunately…would there be any benefit in running a simple bypass across the flow and return buffer tank with a 3 way switch (non-Mid switch) which I’ve temporarily drawn on my cobbled together schematic? Good point re. condensation bomb – at present I’m not planning to run the ASHP in cooling mode at any stage, but part of me would want to future proof the system in the event things get a lot hotter than I expected? Part of me wants – would a by-pass in parallel with the buffer tank potentially work, or would the ASHP complain about flow rates given that I’ve removed that hydraulic separation between ASHP and my UFH system? I’m expected my UFH volume to be in the order of 100L without buffer. What would be the main purpose of the auto by pass valves be – if I’ve understood correctly these will bypass to an alternative flow path after a critical pressure is reached? Are these at all aimed at softening any of the transients in the system when valves are opening and closing, or have I missed the mark? Whilst on the subject of transients, if my memory serves me correctly, did we say to avoid NO valves as these create quite a large water hammer? Sorry again for my terrible schematic. For reference the buffer and lower ground level manifold will both be located under the stairs (within a meter of one another), whilst the upper level UFH manifold will be an approx. 2-3metre run up the wall and into the living room above. If I can help it, I'd also like to avoid having to incorporate a smart home automation system to control it all as I am trying my best to keep it as simple / straightforward as possible!

-
Thanks! What were your thoughts on the flow path if a zone valve wasn't present on either inlet or outlet and the pumps were fired up? Would the UFH loops still circulate?
-
Hi Peter, My original intention was to not run cooling mode on the ASHP, and solely rely on shifting the heat around the house to combat any overheating risks. I imagine after once we have our first summer in the house we'll have a good idea if that alone is enough.
-
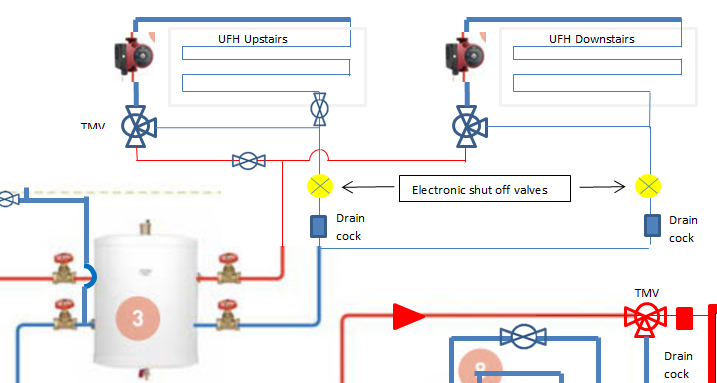
Morning All, I've been having a good read through the Panasonic TCAP manual, together with the SALUS RF wiring centre / thermostats and have noticed cooling mode functionality, which activates the UFH pumps together with manifold actuators without calling for heat. The switching between heating and cooling relies on a simple no voltage changeover switch in the wiring centre , and thermostats are able to store set points for both heating and cooling mode simultaneously. I'm wondering whether this functionality makes the JHarris re-circulation mode pretty straight forward. I've emailled Salus to confirm compatibility with my intended use and will report back on the outcome, however it might be a hopeful solution at avoiding a separate home automation control system. In my attempt to keep things as simple as possible, my thoughts have now turned to the electronic shut off valves. Specifically, their removal... Am I right in thinking that if I do switch on the UFH pumps / manifold actuators without any shut valves present, the pumps would potentially 'suck' from both the return leg of the UFH manifold, and also the buffer tank (which I imagine is the path of least resistance?). Seeing as the pumps are also technically 'pushing' the flow into the 'flow' side of the UFH manifold, wouldn't that ensure that I would still be circulating the fluid through the UFH loops, as there is no other path it could choose? If this is the case, would this be a preferred option, as you are incorporating the buffer tank into your 'circulation' mode, and hence have a greater volume of fluid from which to manage any potential over heating risk etc?
-
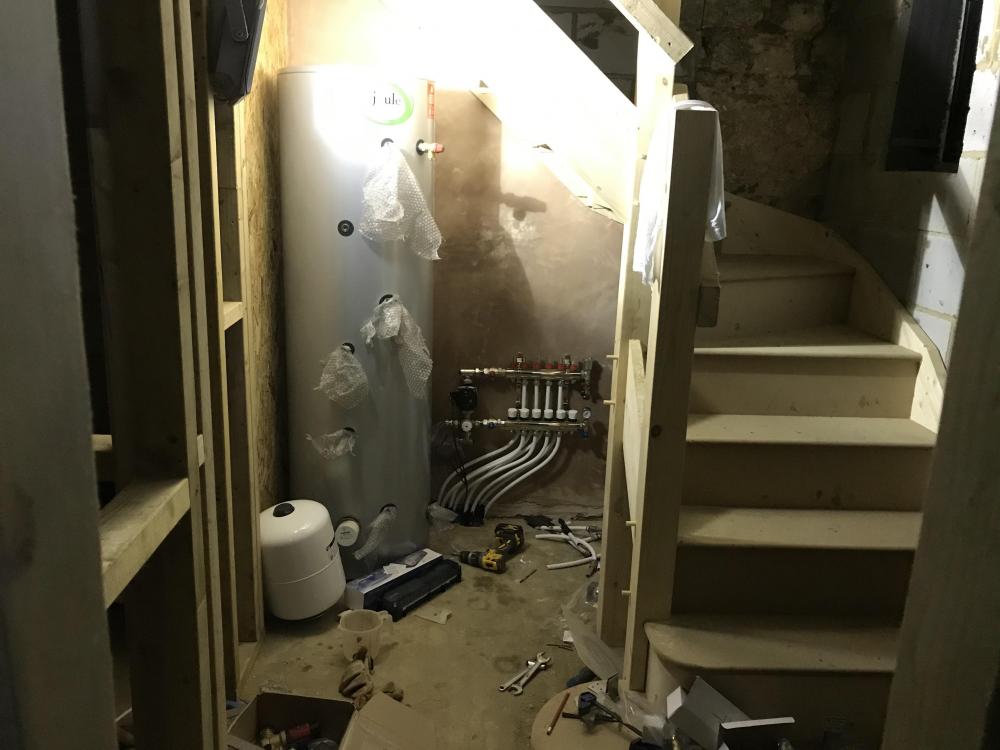
Evening All, I've finally received all my central heating components (ASHP, Buffer tank, UFH pipework, Manifolds, UVC etc etc) and am wondering how best to tackle the next phase... I'm planning to install the UVC, buffer tank & UFH manifold for that level under the staircase (which isn't there yet), and depending on how snug I can get it all to fit whilst still being accessible, will then dictate where my stud partition wall to my bathroom will end up (I will be gluing down the sole plates so hopefully this should not impact UFH layout too much). My dilemma comes as follows: The floor still needs to be screeded and UFH pipes laid - precise positioning of UFH manifold will be established once I can get UVC etc in place for a dry run on packaging overhead The stairs can then go in once the floor is screeded, or alternative installed before hand and packed to the FFL height and then unpacked and suspended for the day of screeding (unless the moisture is likely to damage it?) I've read some posts where gentle UFH some time after screeding will greatly help with drying times (implying heating is up and running by the screeding stage) I could mount buffer tank and all central heating pipework to the wall under the staircase to avoid them having any impact on screeding, however the wall in question is still currently bare blockwork I could wet plaster or D&D the wall prior to fitting buffer tank and corresponding pipework, however must ensure plaster ends approx. 20mm above FFL? Based on the above thought process...would it be wisest to -> wet plaster (or possible D&D) wall -> install buffer tank / pipework, plumb in central heating (minus UVC) -> lay insulation, UFH & screed -> install staircase -> install UVC and fire system up (bearing in mind G3 checks etc)? Whilst also on the subject of plumbing and screeding... to complicate matters, I will have 2 bathrooms on this ground floor level (upside down house), and am wondering whether there would be any harm in shuttering the shower tray areas prior to screeding to provide greater flexibility on waste pipe layout / tray height. If I later opt for a raised tray, I could simply fill in these areas or would this be frowned upon due to breaking the continuous layer and creating a flush joint?
-
Acceptable flow rate for UVC system at MDPE pipe
JulianB replied to JulianB's topic in General Plumbing
Thanks Nick! Reassuring to hear (thought i was going to have to sleep in the garage if it all went wrong and the wife came looking) This actually all started from me trawling the forum this morning in deciding whether to go with 10 or 15mm plastic pipe for toilets and basin hot / cold tap as I need to run some pipes under a floor before I limecrete it! From memory your comments were in favour of sticking to 10mm for all taps / toilet cisterns, and then jump up to 15mm for the kitchen tap / dishwasher, and shower / bath supplies? I'll be going down the route of a manifold for both hot and cold (balanced) feeds. Sorry to be straying off topic! -
Morning All, Sorry if this has been covered already but I can't seem to find the information I am looking for... I've just tested the flow rate of my new 25mm MDPE supply at the internal stopcock (25mm MDPE stopcock) and it's coming in at approx. 36l/min (bucket test). I haven't been able to measure the static or dynamic pressure with the tools / equipment I've got to hand, which is where things get tricky. Before taking the old plumbing system apart, I recall the supply pressure being quite high as I had turned the PRV quite high (as a quick test / finale for the old plumbing pipework) and recall ~5-6barG on the gauge (without much of a drop when opening a tap). Is my 36l/min flow rate fairly pointless without accurate static / dynamic pressures, or can I rest easy that my UVC system isn't going to be a total flop? Thanks! Julian
-
Thanks Adam! I had actually looked at some marmox products when we were building up the perimeter wall off the beam and block...good stuff! Will check with SE...wondering if anyone has ever gone sole plate straight to B&B (with DPC in between ofcourse) as I can see a benefit to then filling the void it creates with insulation again (to screed level). Am I at risk of rotting the soleplate in that scenario?
-
Another bump for this thread! Interested to know what build up people go with if stud walling before screeding! We're in a bit of a catch 22 as we would ideally like to put up partition walls and the staircase after we screed, however are not entirely sure if we will be able to squeeze all the ASHP / UVC gubbins under the staircase and hence in an ideal world would like the staircase to be in place to know the exact placement of the UVC etc in order to better position the UFH manifold for that floor which will also live in this area (DOH!). If we do go down the stud walls on B&B floor prior to insulation / screeding, would there be a need to build up the soleplate to above screed level, or would you simply shutter with ply on either side of the stud partition, and leave the sole plate buried some 150mm? I guess the benefit of this approach would be that you can then fit some rigid PIR strips to make up the height from top face of sole plate to top of screed, and then place noggins at the screed level to act as the psuedo sole plate for fixing boards and what not to ? For reference my build up will be 100-120mm PIR and 50mm screed. Also, on another note, has anyone ever installed partition walls to the top face of the insulation layer, as presumably once the screed has been poured they aren't going anywhere?
-
House is ~130m^2 in total, with 2 bathrooms and 1 WC. The 97L I quoted was off the UFH supplier's system.