Hilldes
-
Posts
375 -
Joined
-
Last visited
Everything posted by Hilldes
-
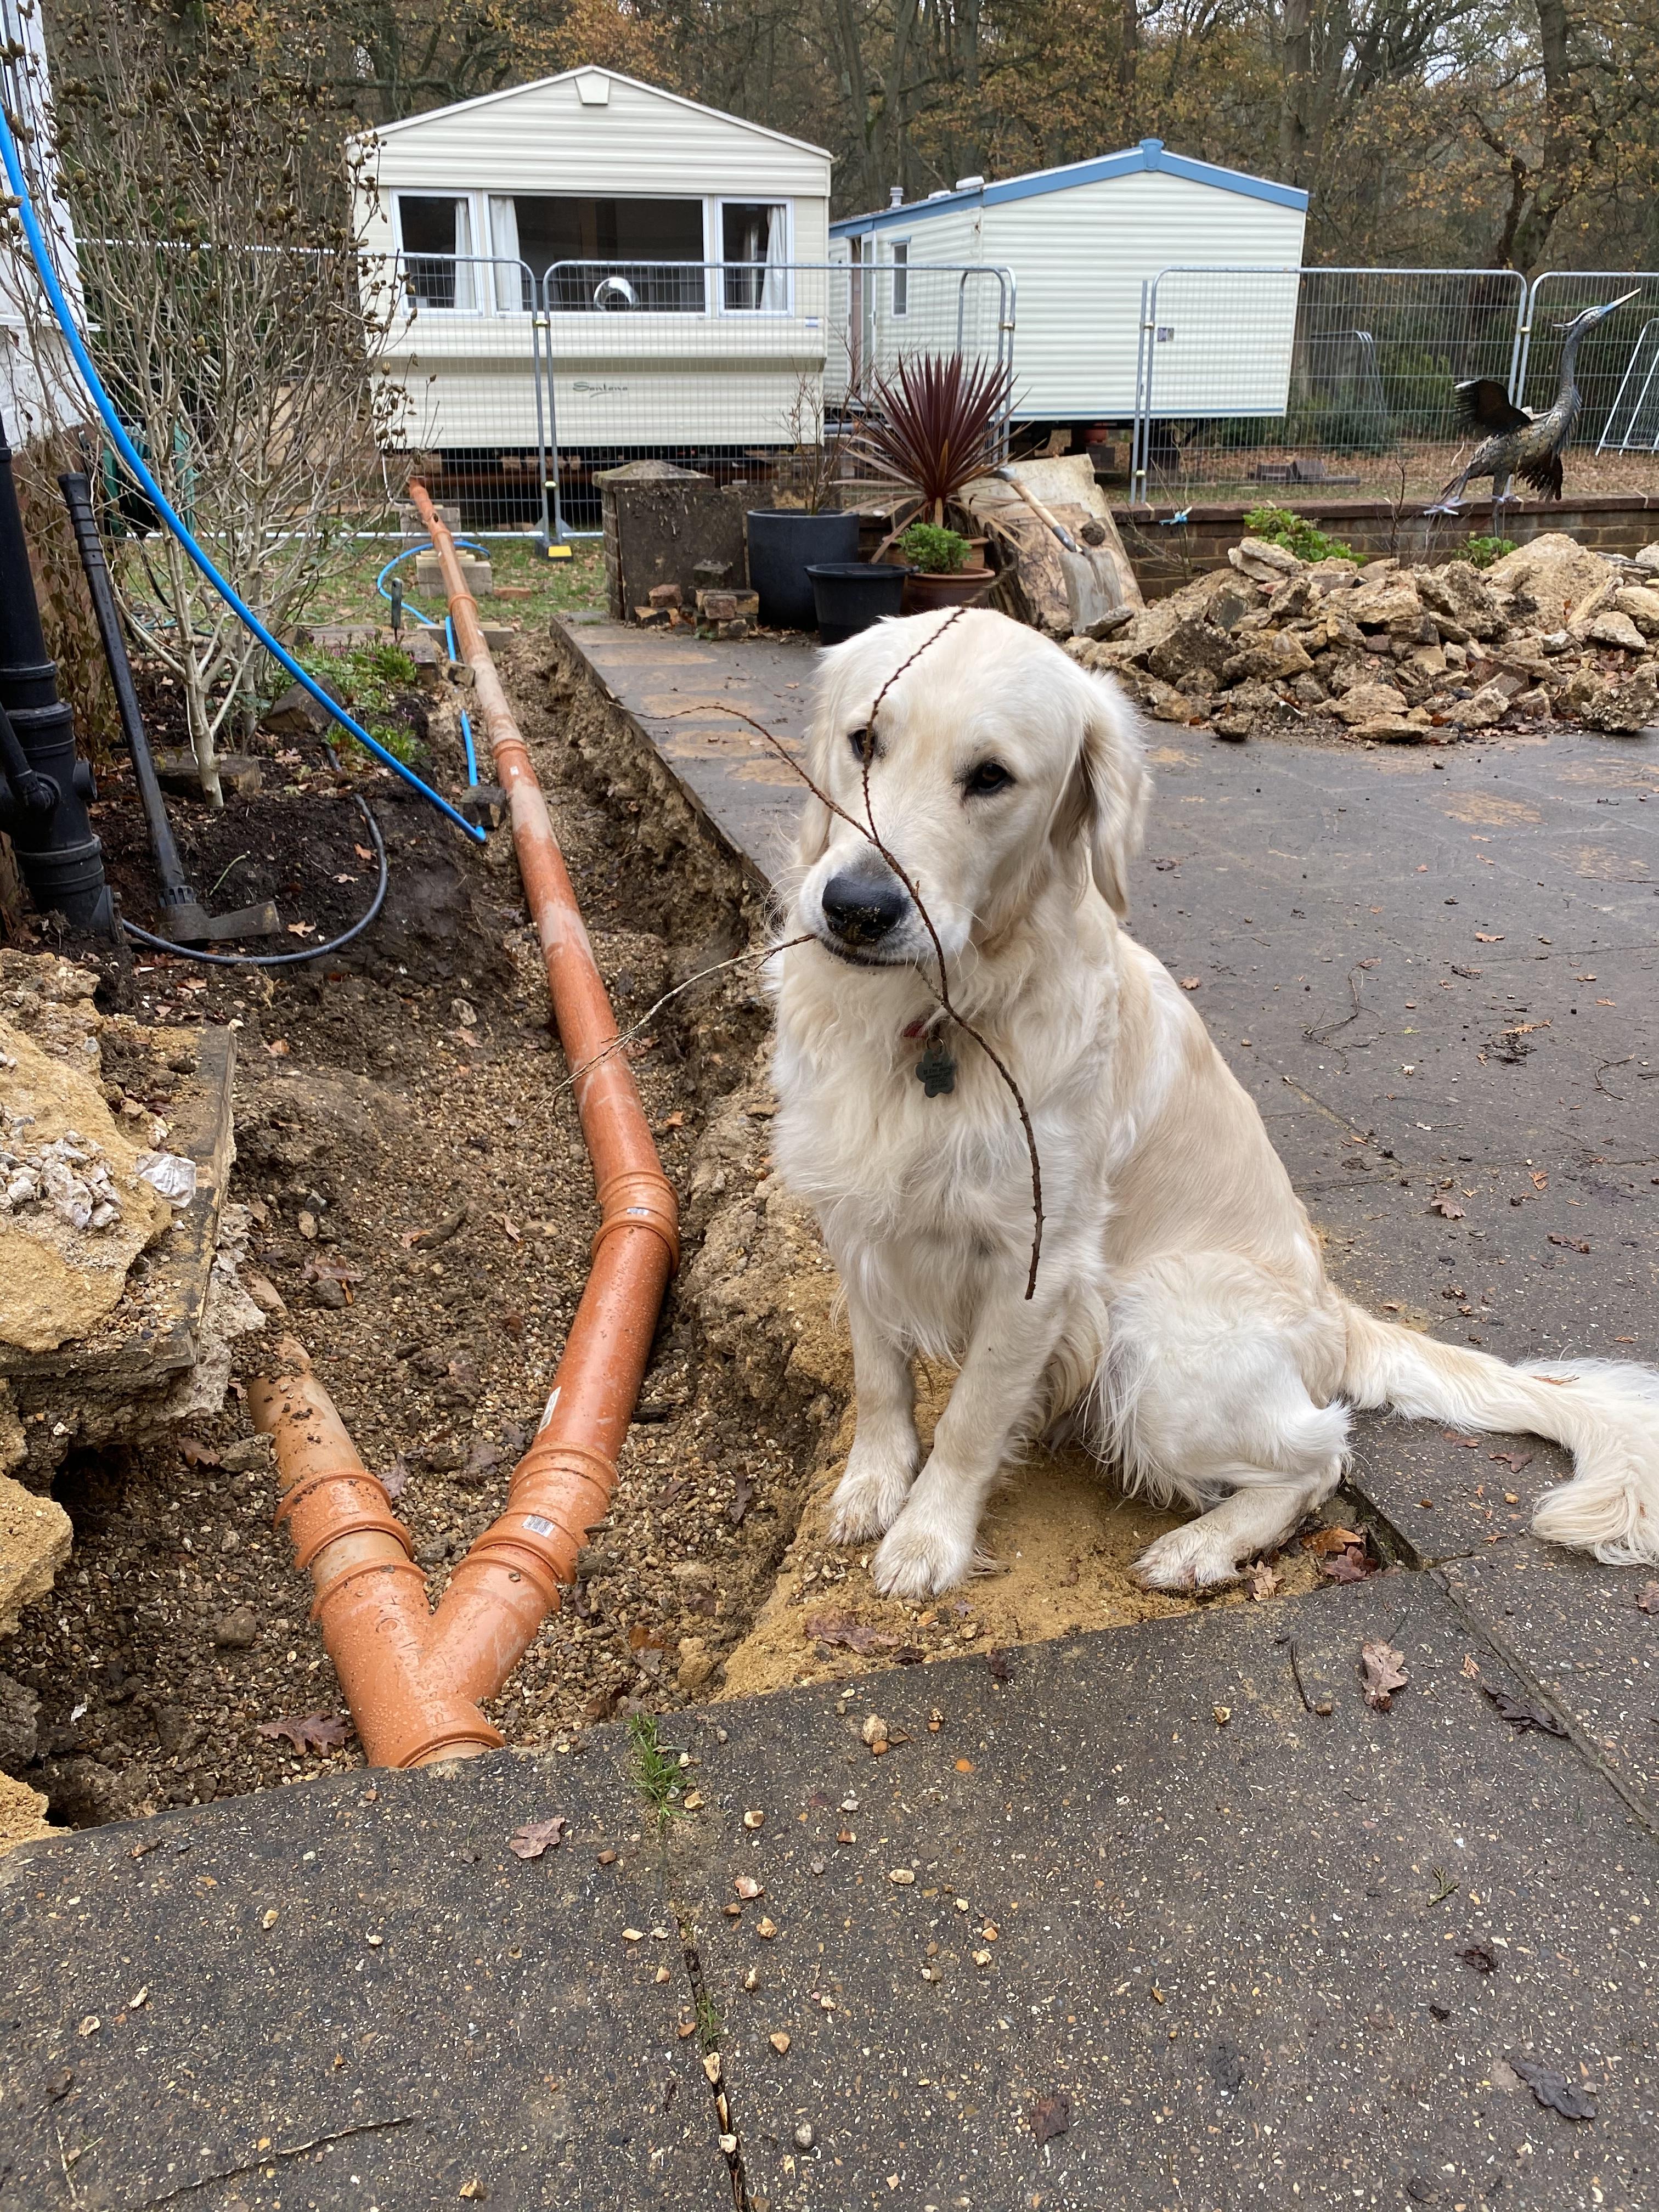
@Russell griffiths total run of foul drain pipe to the vans is 28m. Laid at min 1:80 fall. Not helped by the fact that the existing drains I’m connecting into are shallow (about 400mm below ground level see y junction in this new pic) and also the lawn at the back where the vans are slopes downhill slighty.

-
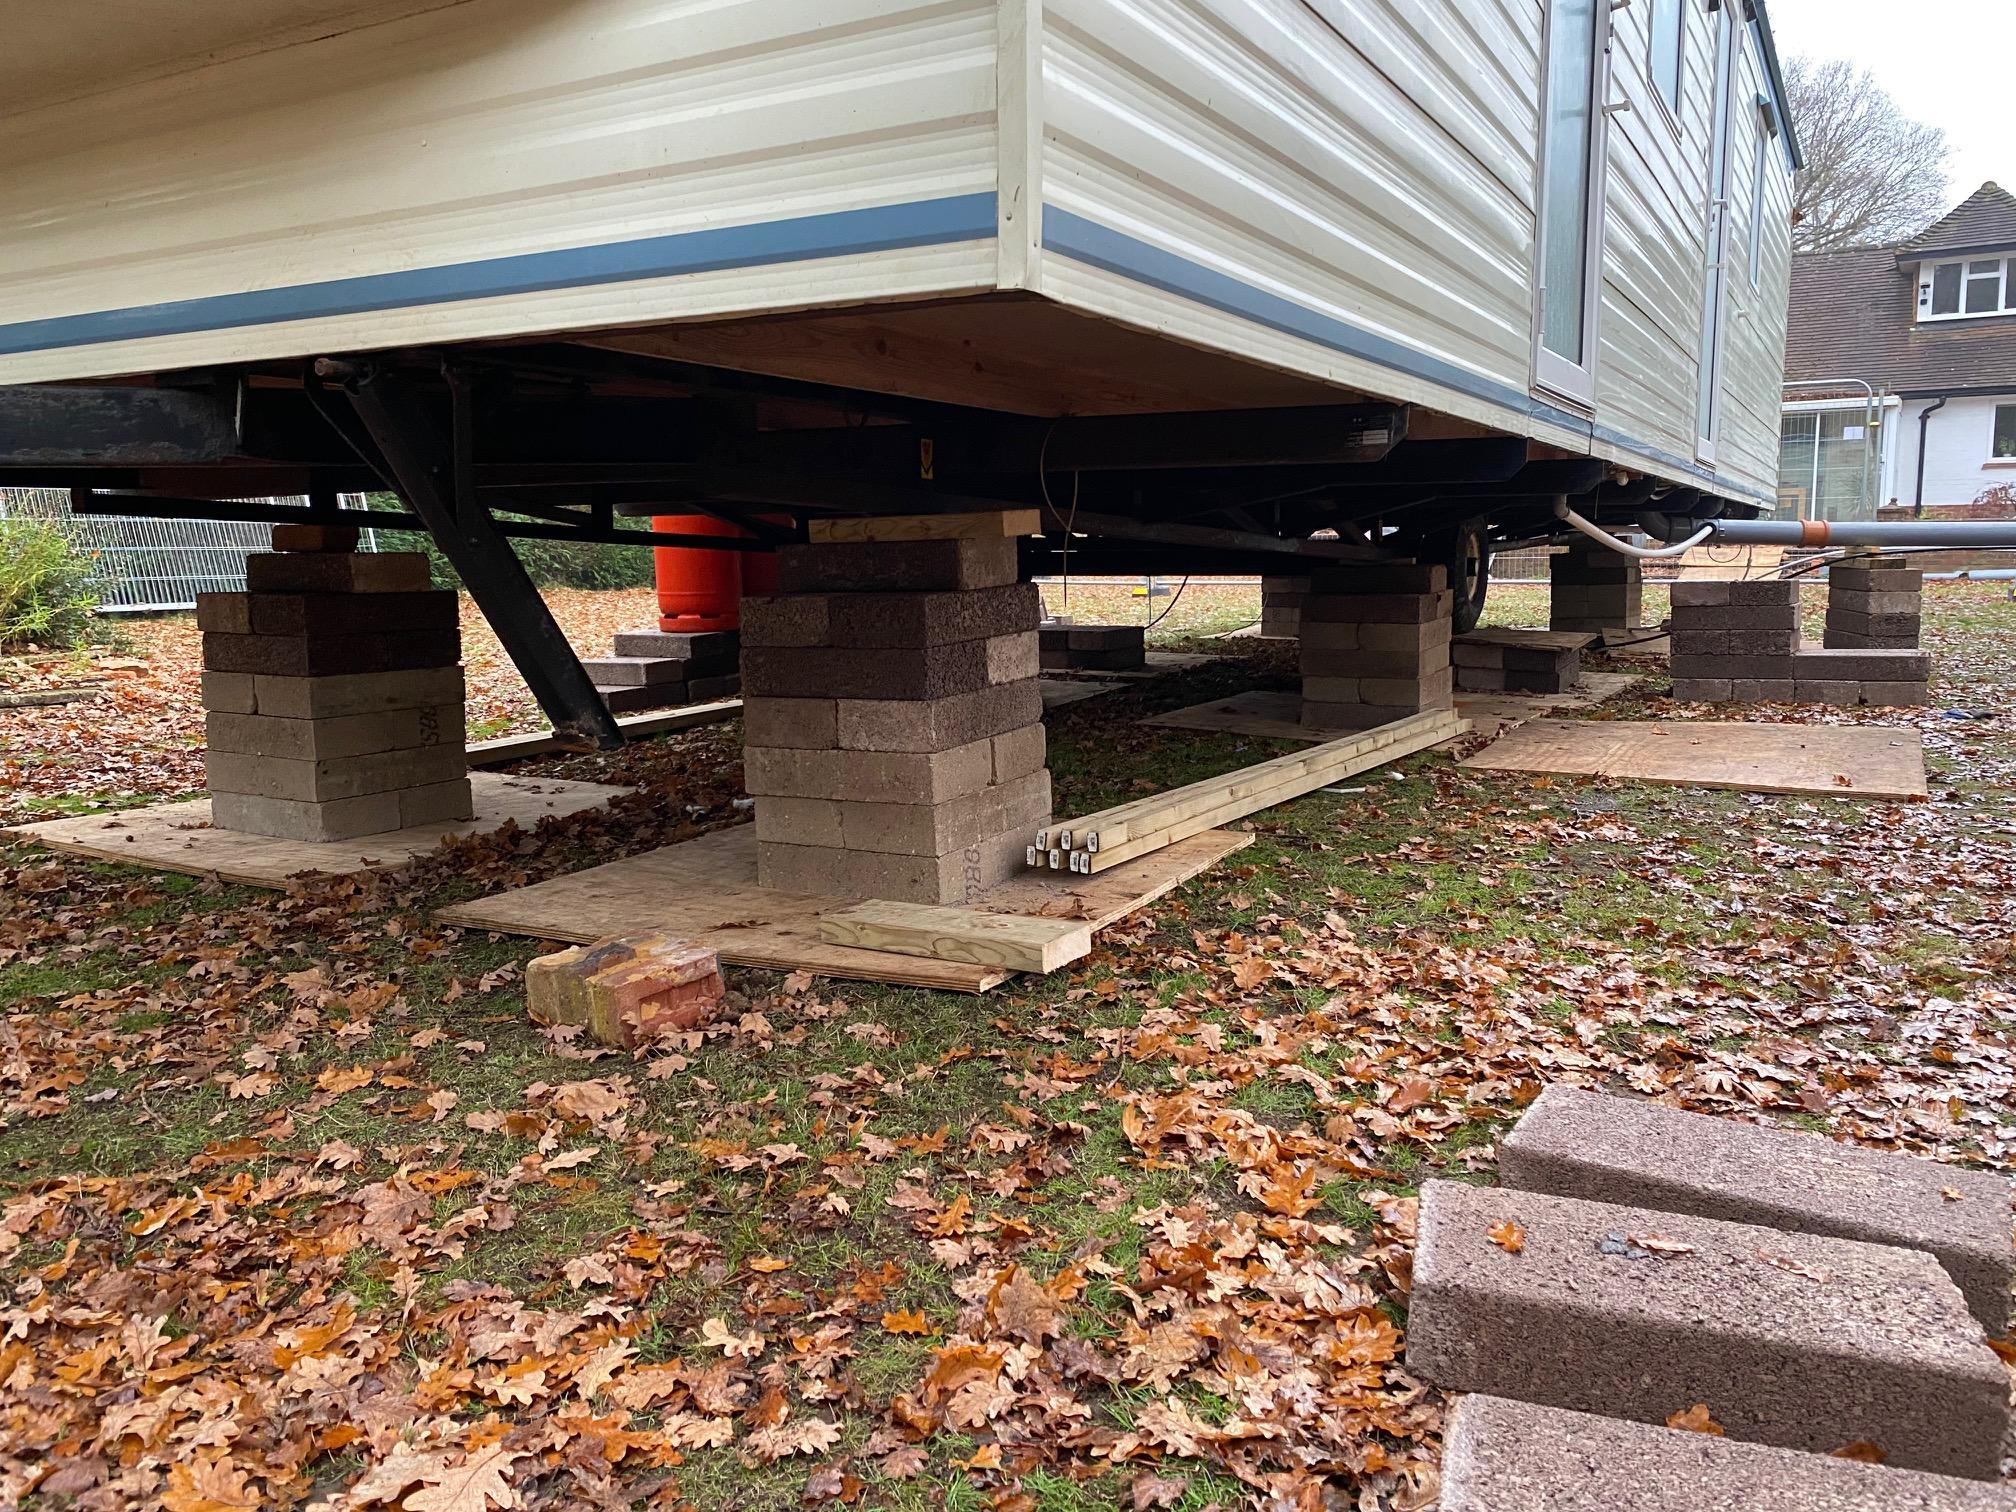
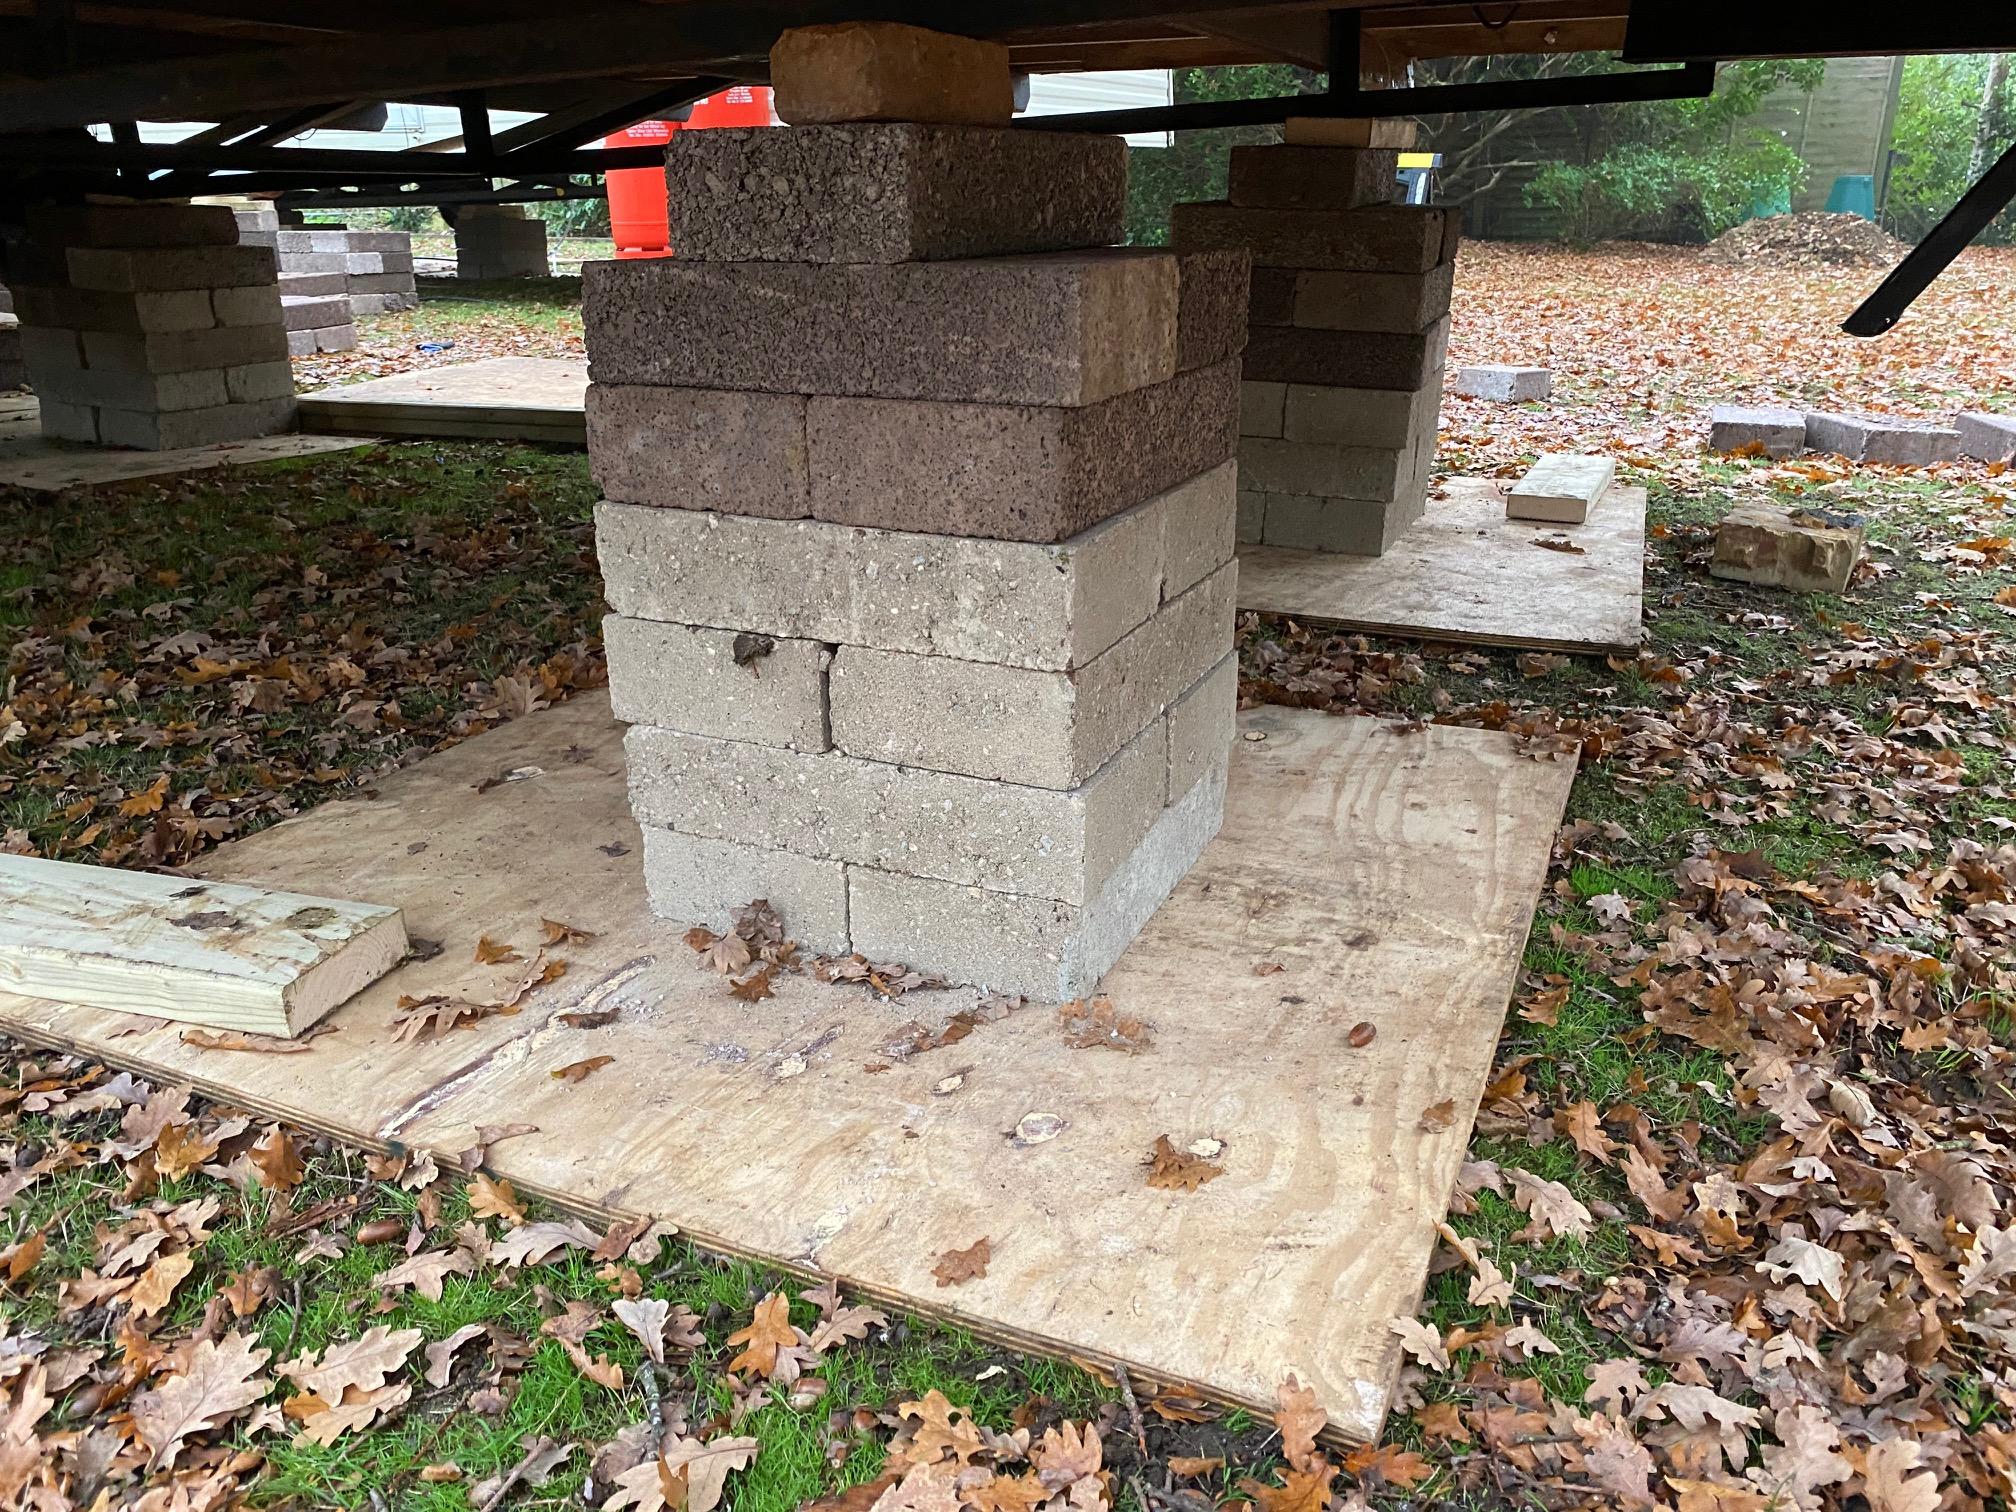
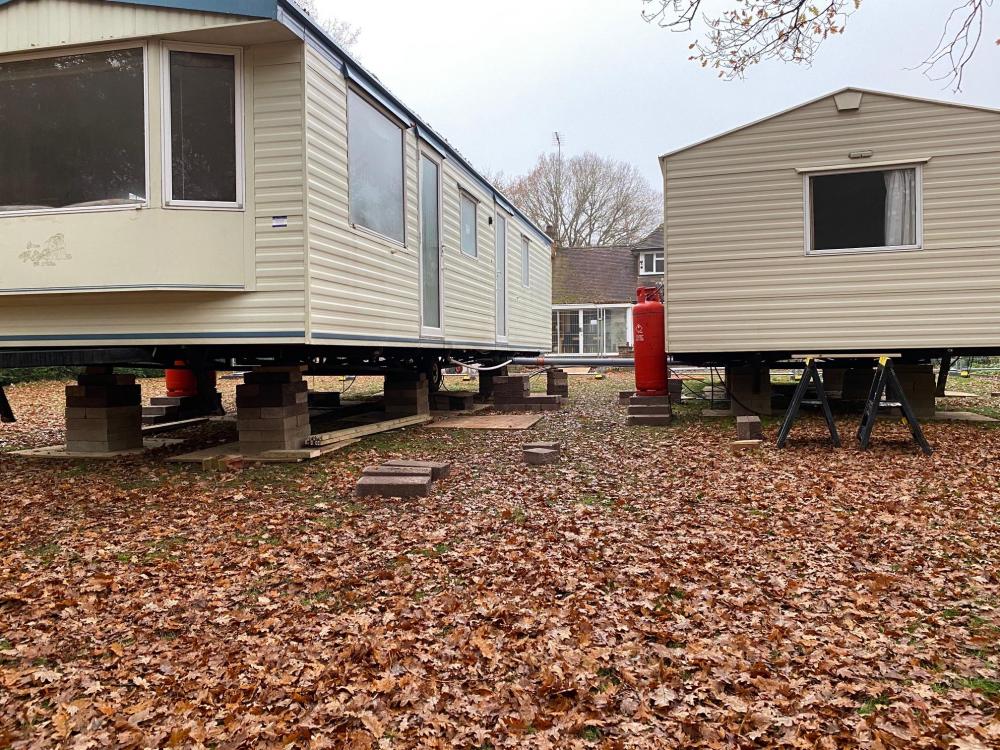
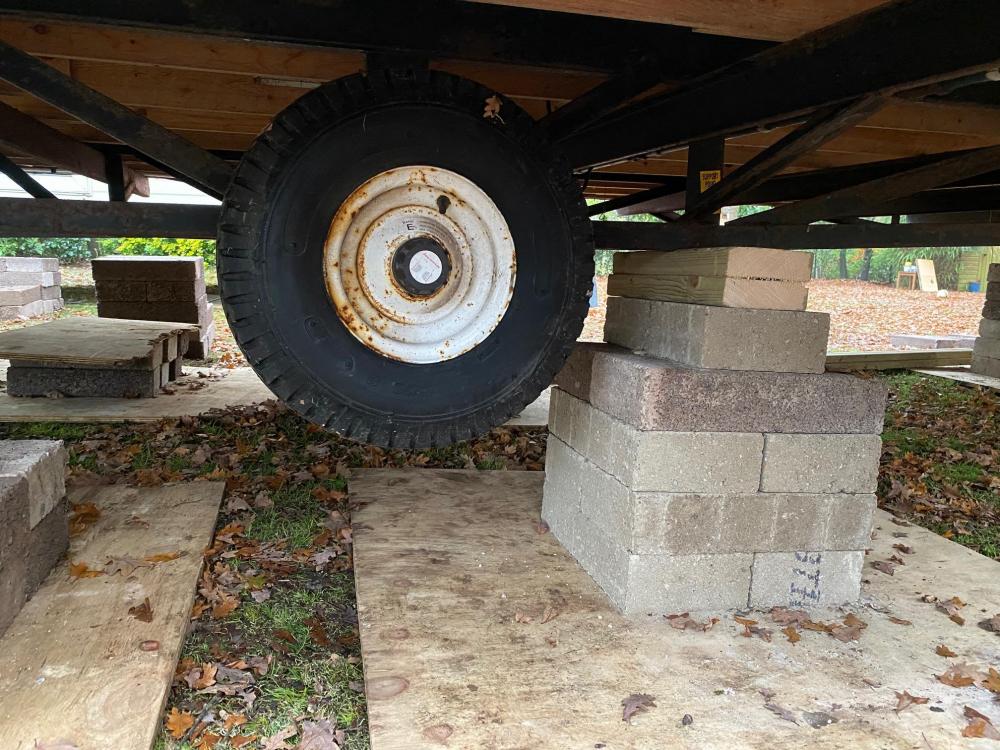
We now have our static caravans in place and services connected. In order to get the fall for the foul drainage, we've had to raise the vans on stacks of dry laid concrete blocks. I'm a bit concerned about the height of the 'stilts' needed and the potential for the vans to be blown off in string winds (although we are in a relatively sheltered location). Options are: Leave as is beef up the blocks Lower vans and add pumping station (not too keen on this as circa £1K) Here are some pics...


-
Thanks @PeterStarck I saw your crushing on site post a while back and was going to look it up again. How big was the property you demolished to produce the 50 tons? Our is a 1950s bungalow with a 158m2 footprint, concrete slab and block and brick walls (blocks are the blue 'breeze' blocks). It sounds like you needed a finer crush than us - I think our 6F2 is max 75mm chunks. At least we'll be crushing in winter so people will have windows closed. Also taking Dave's numbers above for the number of truck loads we'd need to take the uncrushed masonry off site and transport 6F2 back to site, that would be a lot of truck loads on our small/quiet road.
-
Thanks @Dave Jones that is really helpful, I can see the logistical challenges now. Because of tree root protection we may need more like a 1 or 3 ton dumper which would be a lot of trips. I'll see what we can do with the demolition contractor crushing the existing bungalow on site to reduce costs of 6F2 as that is the big ticket item. He's actually quoted me just an extra £500 to crush on site (which one on the groundworker's that did quote says is way too low as the crushing will take 5 to 6 days - but that is another story). I'll also talk with the piling contractor about maybe reducing depth of the 6F2. The point you make about schedule is really important - I can't delay the piling contractor once we have firmed upon their start date. While I'd love to play with a digger, I'm not sure that would be the best option for schedule alone.
-
Thanks @Faz and @Gus Potter based in Surrey and looking at options such as demolition contractor crushing the masonry from the bungalow we are demolishing on site to produce the 6f2. I hear that crushing on site can be noisy for the neighbours but this will need to be balanced with transporting rubble off site and transporting 6f2 back to site. Much of the excavation will be required anyway as we need a 300mm void under the beam and block floor due to clay soil and oak trees - would only need to remove a couple of inches of the 6f2 to get the 300mm void. Does anyone have experience of DIYing work like this with no previous digger driving experience? Any view on what size digger would be best? Would need small dumper as will need to drive across tree root protection areas.
-
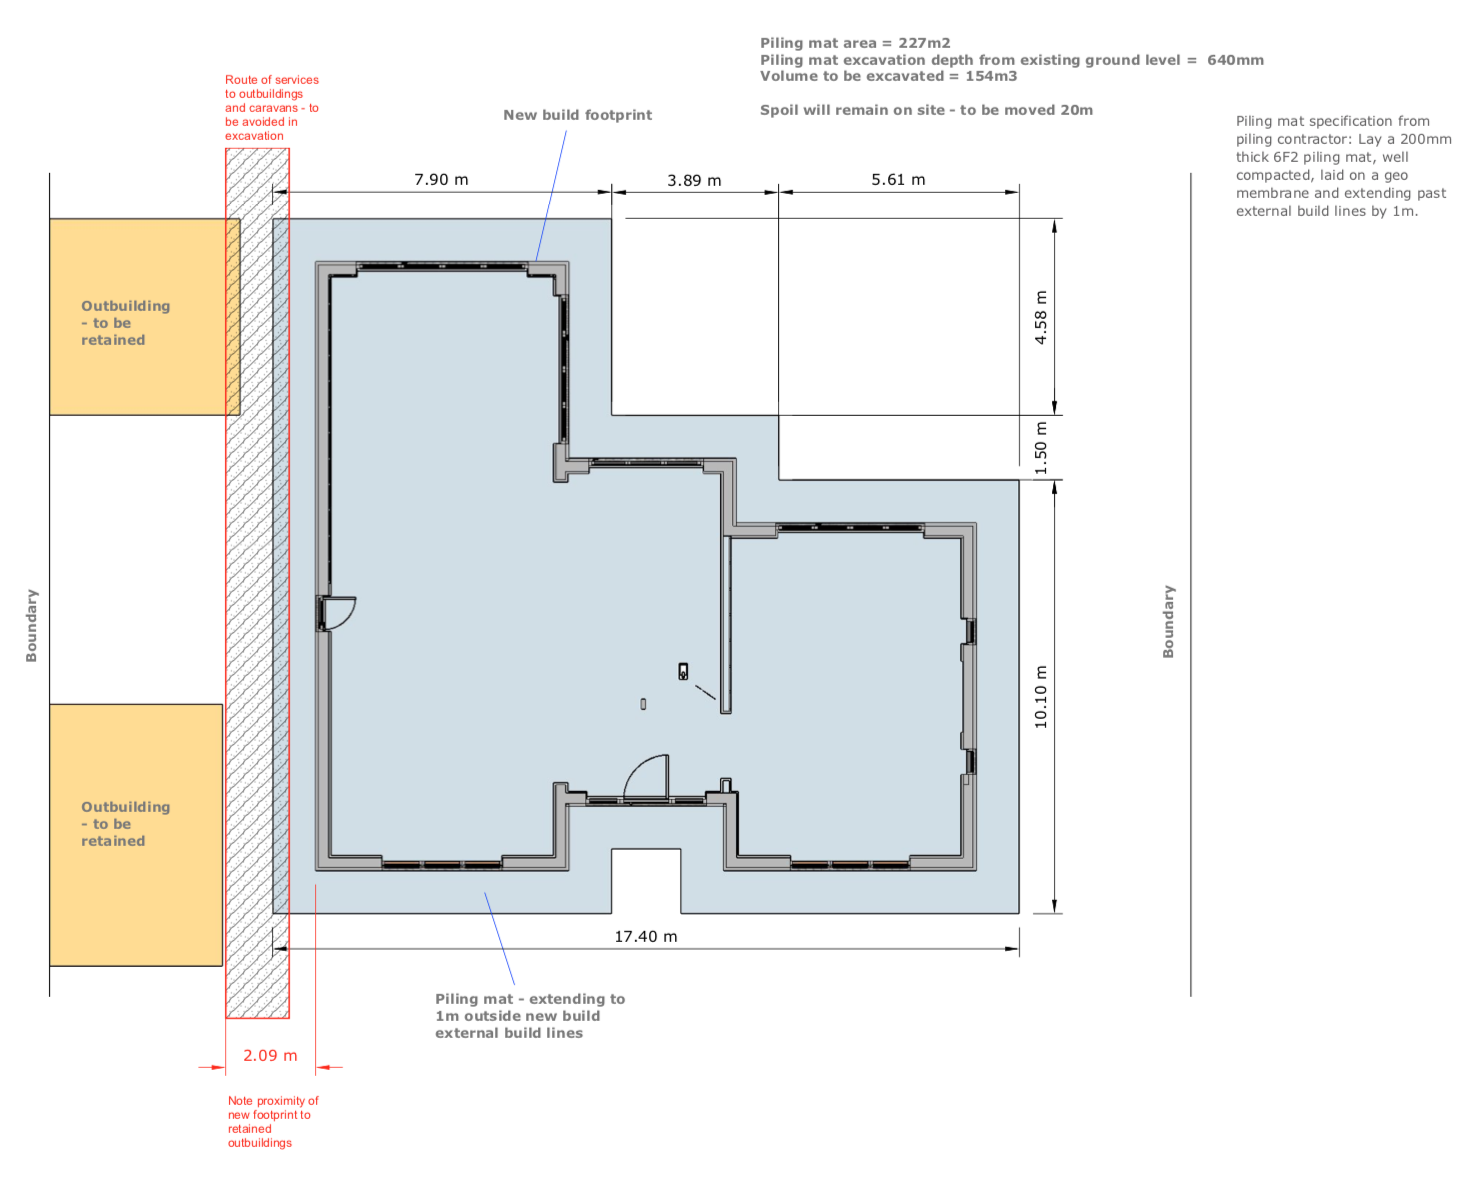
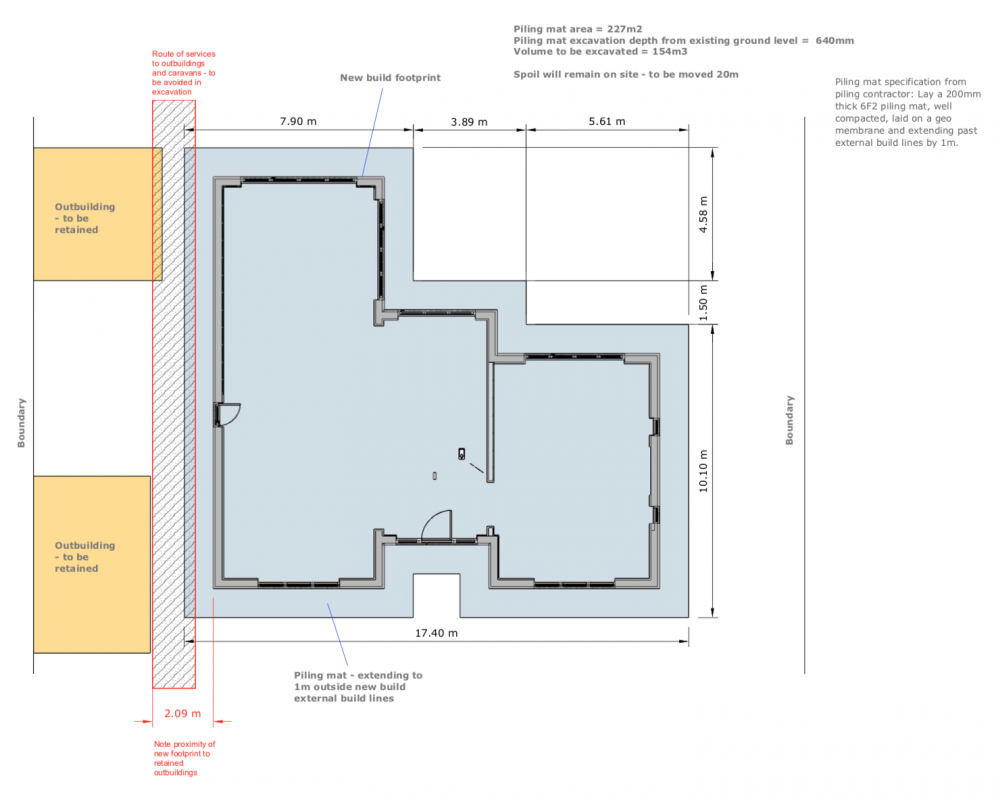
Struggling to control groundworks costs at present. I know that some of the greatest unkowns with a build are below ground, but generally I'm finding groundworkers either don't wish to quote or are quoting prices that I see as high - and collectively for all elements of ground works are much higher than I had budgeted. Here is one example - the piling mat specified by the piling contractor. See attached specification. I've been quoted £8.5K for the excavation (moving spoil on site) and supply and laying 200mm of 6F2. Note the level of the 6F2 needs to be relatively accurate and will sit level with the top of the reinforced concrete ground beam that will link the piles. Any ideas how I can bring this cost down. e.g. is this DIY-able by hiring a digger and dumber truck for a few days?
-
I’ve just gone with private BC via Protek. Works out cheaper than local authority because the Protek technical audit fee drops with private BC. I got quotes for both local authority and private BC for comparison.
-
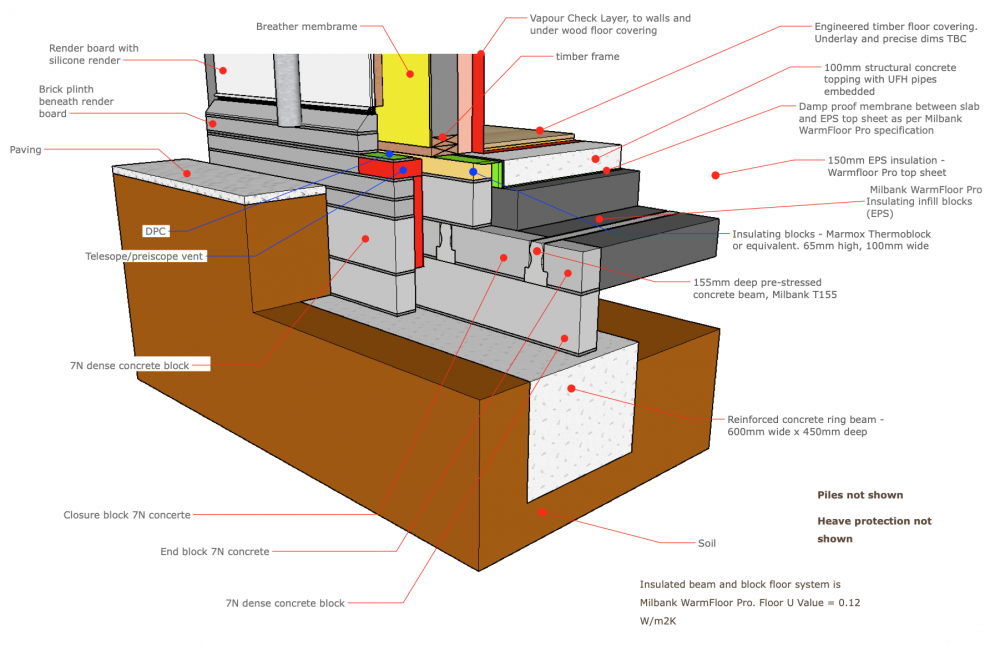
Please review my foundation/floor/wall junction detailing
Hilldes replied to Hilldes's topic in Foundations
Good point @Temp The non load bearing internal walls will be built on top of the concrete topping. The load bearing internal walls will have a section of ring beam supporting them. That detailing is next on my list, current thinking is the concrete/marmox block courses would extend up to support these LB internal walls in the same way as the external walls, but open to suggestions. P.S. flooring will be timber. -
Please review my foundation/floor/wall junction detailing
Hilldes replied to Hilldes's topic in Foundations
Thank @A_L that might br just what I need! -
Please review my foundation/floor/wall junction detailing
Hilldes replied to Hilldes's topic in Foundations
Thanks @Carrerahill how about 25mm EPS filing half the 50mm cavity, or no insulation? -
Please review my foundation/floor/wall junction detailing
Hilldes replied to Hilldes's topic in Foundations
Thanks so much for your help @Mr Punter From my basic knowledge of floor build up (all gleaned from this site by the way ?)...Thin polyethylene "slip"? sheet over EPS topsheet - to stop concrete flowing through joins in insulation and no issue if this is punctured by the UFH clips. This would assume the DPM (e.g. 1200 gauge Visqueen) would be below the EPS top sheet. The BBA cert says DPM should be above the top sheet. I think you said that too? Too many membranes ? -
Please review my foundation/floor/wall junction detailing
Hilldes replied to Hilldes's topic in Foundations
Thanks @Mr Punter agree that will meet the spec in the BBA cert. Only downside is that if I clip the pipes to the insulation that will puncture the DPM - from other threads on here most appeared to say that was not advisable but one view (might have been nickfromwales) was that it is relatively common for ufh pipe clips to puncture the DPM and they essentially sealed the hole they made. -
Please review my foundation/floor/wall junction detailing
Hilldes replied to Hilldes's topic in Foundations
@Moonshine That is why I was asking in the other post if I was missing something on the costs. Travis Perkins un-discounted cost for just the beams + 7N concrete infill blocks is little different in price to the Milbank system -which includes the EPS top sheet - so no need to buy PIR. And little difference in overall depth as yours. Still wondering if I'm missing something. -
Please review my foundation/floor/wall junction detailing
Hilldes replied to Hilldes's topic in Foundations
@Mr Punter BBA cert attached. It's an add one as its logged in the name of the insulation manufacturer. Warmfloor BBA certificate.pdf -
Please review my foundation/floor/wall junction detailing
Hilldes replied to Hilldes's topic in Foundations
Thanks @Moonshine. 140mm blocks are in the next version of the drawing. You are right about fixings into the Marmox - will see how the timber frame supplier will fix the sole plate. Thanks for the point on Marmox alignment with insulation as opposed to screed - I hadn't seen the diagram and will look into that. Floor target U value is 0.13W/m2K, ideally 0.11W/m2K Cost of the insulated B&B system - see above reply to Mr Punter with link to separate thread on cost of the insulated B&B versus conventional B&B. I was surprised how little price difference there was. Ring beam - good point will add text to refer to the structural design. Thanks for the BRE link - will spend a few hours there ? -
Please review my foundation/floor/wall junction detailing
Hilldes replied to Hilldes's topic in Foundations
Thanks @Mr Punter Assuming you mean cost of the insulated B&B? Cost is similar to conventional beam and block. This thread covered the cost. I'm not seriously considering 190mm concrete - just showing what I would need to do to meet the terms of the BBA spec and manufacturers installation instructions. 75mm concrete with mesh 25mm from bottom might normally work, but won't meet the terms of the BBA spec and installation instructions. I'm thinking if I don't strictly follow any of the conditions in the BBA cert it would be placement of the DPM below as opposed to above the EPS top sheet - as having DPM between the beams and the covering insulation layer appears fairly standard. This is my option 3 above. -
Please review my foundation/floor/wall junction detailing
Hilldes replied to Hilldes's topic in Foundations
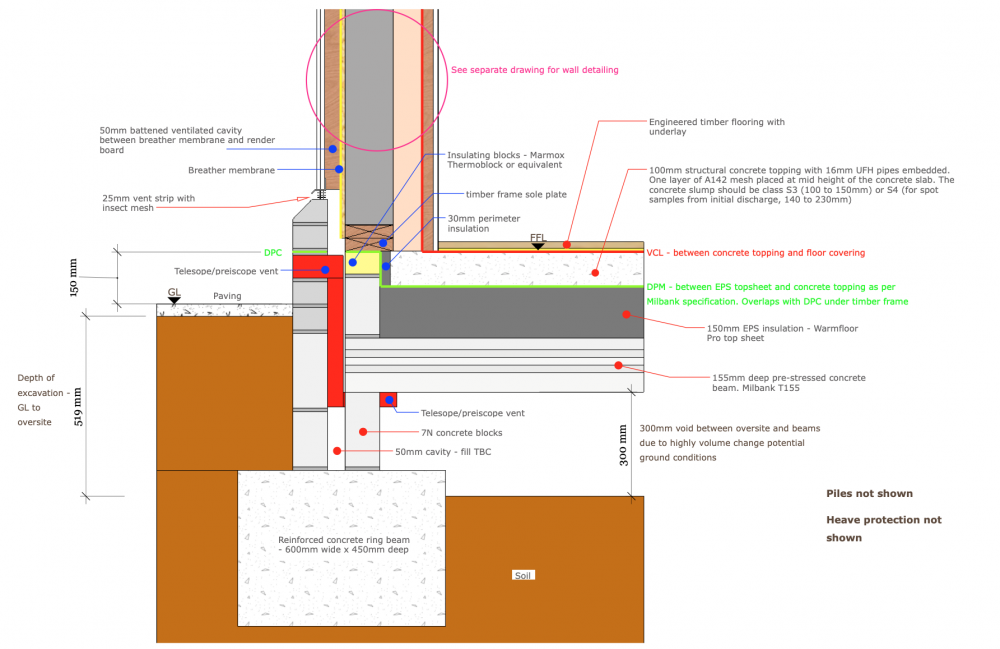
Could do with a bit more advice on this one please - relating to the structural concrete topping and UFH. These are constraints from the suppliers: The need to have 75mm concrete above the UFH pipes [Milbank installation instructions and BBA cert] The A142 mesh at half the depth of the concrete [Milbank installation instructions and BBA cert] The need to have the DPM above the EPS topsheet [Milbank installation instructions and BBA cert] UFH pipes as close to the EPS top sheet as possible, i.e. as low down in the slab as possible [Wunda] So here are my options to meet some/all the above constraints: Stick with A142 reinforcement and still cable tie UFH pipes to the top of the mesh. Downside: concrete topping will need to be circa 190mm deep to give 75mm cover above UFH pipes and have the A142 mesh positioned at mid height of the concrete topping. Downside 190mm deep concrete as opposed to 100mm. Staple UFH pipes through DPM into the EPS top sheet. Downside: staples puncture the DPM. A142 mesh chairs need to avoid UFH pipes. Staple UFH pipes through a thinner slip sheet into the EPS top sheet, moving the DPM below the EPS topsheet. Downside: DPM not in location specified on BBA cert. A142 mesh chairs need to avoid UFH pipes. Mount UFH pipes in plastic pipe trays. Downside: A142 mesh chairs need to sit on plastic pipe trays. Options 2, 3 and 4 could be simplified by using fibre reinforcement to concrete as opposed to A142 mesh. Tried to get quotes from Cemex and they don't do any of the fibre reinforcements in the Milbank BBA cert (see below). Any thoughts please? @tonyshouse @Mr Punter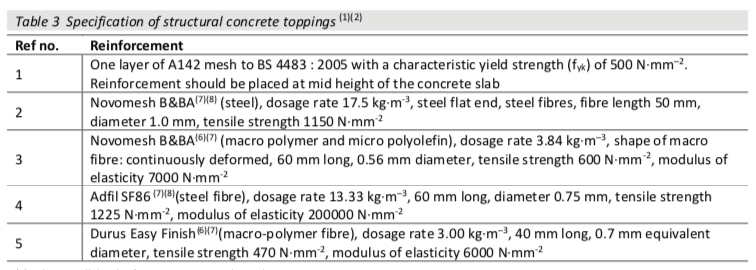
-
High Flow duct sizes
Hilldes replied to Hilldes's topic in Mechanical Ventilation with Heat Recovery (MVHR)
Thanks @Alexphd1 that is what I’m inclined to do. I did question this with the supplier but I don’t think they got it. -
Thanks @willbish that is my thinking too. We won't need much in the way of heat output. I guess the only downside might be the entire ceiling void will be warm - warming cables, water piped etc.
-
Working on the MVHR spec with supplier. I've selected the option for Vent Axia Sentinel Kinetic High Flow MVHR unit. House is 260m2. The Vent Axia Sentinel Kinetic High Flow has larger 180mm spigots (150mm are more common I think). The design features 180mm ducts and grills for the intake and exhaust to atmosphere. For the internal supply and extract, the distribution boxes have been specced with 150mm spigots. An adaptor will be supplied to step down from the 180mm spigots on the MVHR unit to the 150mm spigots on the distribution boxes. Stepping down from 180mm to 1500mm sounds like it defeats the point of the ***High Flow***. Does this sound right?
-
Working through spec for 1st floor UFH with Wunda. Most likely will go for F04 spreader plates fixed to top of posi joists. In the data sheet, the F04 has a layer of EPS immediately under the spreader plate. EPS is supported on battens fixed to the joists. Not keen on additional effort to fix the EPS. Asked if I could omit the EPS as will have 100mm mineral wool acoustic insulation below the spreader plate between each joist. Answer was yes, but essential the mineral wool is immediately below the spreader plate. I'm thinking the mineral wool will lie on the ceiling plasterboard, so will be around 140mm below the spreader plate. Anyone encountered this and found a solution? Any major issue with the mineral wool being some way below the spreader plate?
-
Please review my foundation/floor/wall junction detailing
Hilldes replied to Hilldes's topic in Foundations
Thanks @Mr Punter I'll check the Marmox data sheet. I vaguely recall it stating the Marmox block must not be wider than the blocks beneath it, but will check. Unless there are 140mm wide dense concrete blocks? -
Please review my foundation/floor/wall junction detailing
Hilldes replied to Hilldes's topic in Foundations
Thanks @tonyshouse, will look at EPS in the cavity. I guess no problem in filling the cavity so 50mm EPS. Can I actually bridge the DPC with EPS? Perimeter insulation of 100mm sounds good given the wall make up - so this will be under the PIR wall insulation (the pink colour) and the service cavity. -
Please review my foundation/floor/wall junction detailing
Hilldes replied to Hilldes's topic in Foundations
Thanks @Mr Punter, will look at detailing cavity tray and weep holes - have not seen these in detailing for TF with render board external skin, but I guess water could enter the cavity and needs to go somewhere. Sole plate fixing - will add these details when TF design completes. Interestingly, Marmox state that if the sole plate is "nailed" down then this can't go through the Termoblock. So the Thermoblock would need to go lower in the wall, and a 7N concrete block under the sole plate to take the "nail" - which I guess means the concrete block is colder and more risk of interstitial condensation at the sole plate DPC. The non standard height blocks - I've not been comfortable with this either. Will look at using on standard height blocks at least for the inner skin. -
Almost ready to submit this to Building Control. Any comments much appreciated... Piling and ring beam will have separate detailed drawings.