Hilldes
-
Posts
375 -
Joined
-
Last visited
Everything posted by Hilldes
-
Been struggling to locate plinth bricks. The house will be all white render and grey aluminium window frames, so not keen on red plinth bricks that most retailers appear to stock. Can't locate alternatives by web search - e.g. grey bricks. Anybody know of suppliers of alternative colours of plinth bricks...or... Alternative detailing below the rendered finish at DPC level (e.g. extend render board down to the ground beam and fix brick slips).. Here is the detailing as designed:

-
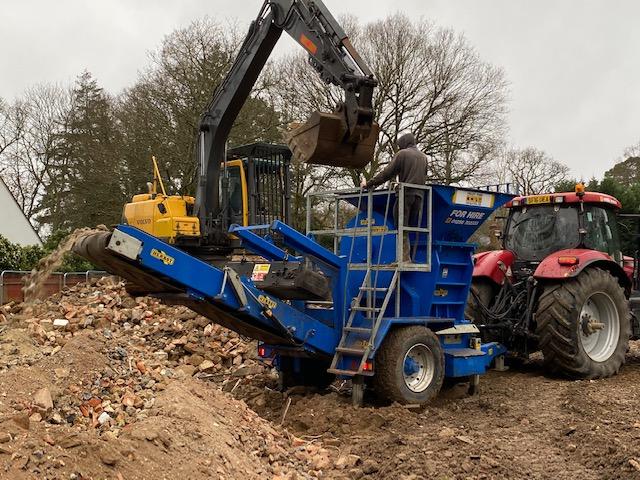
The crunching munching machine is on site today...
-
Here is my experience this year - I wish there had been more on here to help guide the supplier selection process... Kingspan Timber Solutions- very helpful but ultimately could not get price down to a reasonable level for the insulated frame. Did have reasonably priced options for a weathertight package. The only supplier I came across that offered 89mm studs as opposed to 140mm - to be fair they did offer their 140mm stud option but noting above point on price. Not many options for insulation: basically PIR for TF with no option for uninsulated frame - I preferred a mix of mineral wool and PIR. I raised a few questions on here about claimed U values - some uncertainty as to whether U values could be achieved in practice given specifications. Liked the idea of a SIPs roof but it required purlins that would have been intrusive with our 1.5 storie design. Flemming - price was too high. Ecosips - helpful and reasonably priced SIPs solution. Put off SIPs as limitted experience of this on Buildhub - perhaps even some misunderstanding. Would have struggled to hit target u values with SIPs alone - would need additional insulation such as PIR. Solo - a very close second in terms of best price and very helpful and responsive. Was very little experience of them on Buildhub that I could find. Went with MBC uninsulated frame as best price and a great reputation on Buildhub. In their quote they offered various costed insulation options for standard 140mm timber frame and a separate option for the passive frame (with Larsen truss frame and Warmcell insulation) - very nice but beyond my budget. Have completed frame design and now in manufacture- positive experience so far.
-
Thanks @PeterW will take that into account for the final design for BCO. I was originally concerned that I needed to take the most direct route to the road due to shallow drain runs, but after taking some levels yesterday, I now have a bit more fall to play with once outside the house footprint.
-
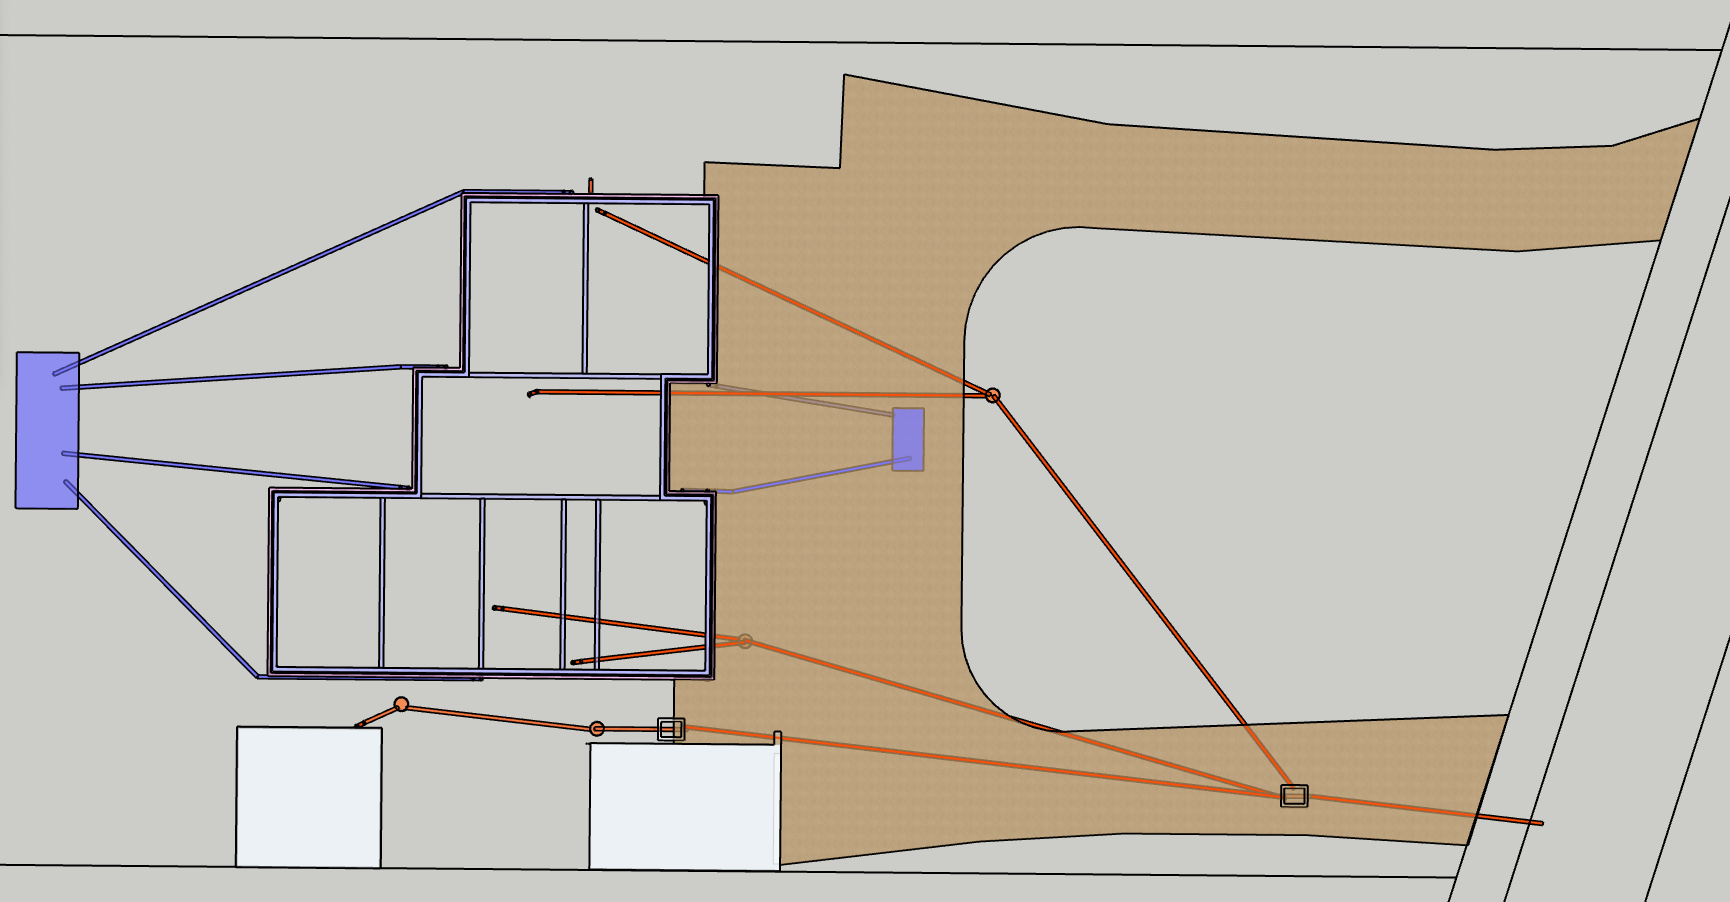
Updated design... @PeterW any real value in adding a rodding eye at the topmost stack, this is a 14m run to IC4. The next stack down the page is a similar length run to IC4.
-
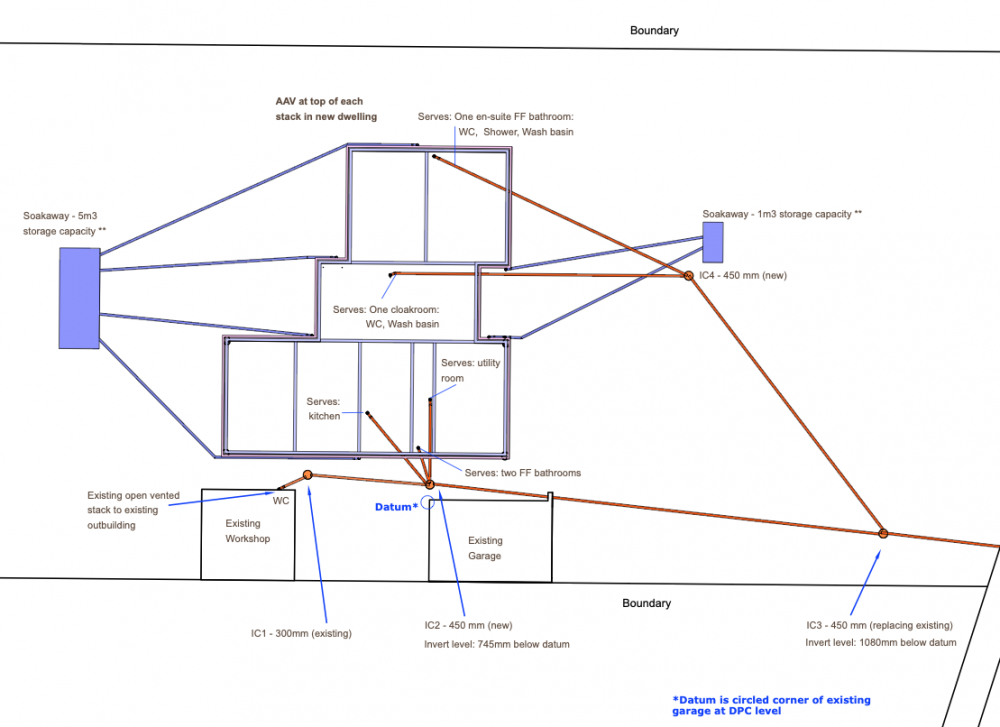
@PeterW stacks annotated with rooms they serve:
-
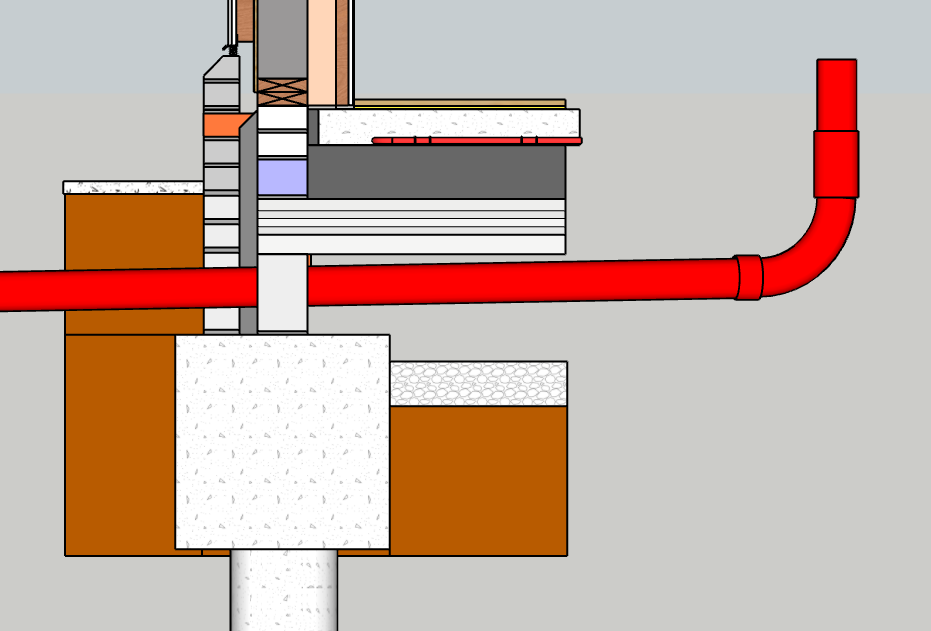
Thanks @Dave Jones, agree that is a neater solution (assuming you mean) all 4 stacks in the house going to IC2. The main challenge with that is distance from the uppermost stack to exit the perimeter wall at the bottom of the diagram - the distance is such that the foul pipe would need to penetrate the ring beam. This cross section below shows that I have only the depth of one concrete block of fall, from underside of the B&B floor to the ring beam. P.S. a ground worker that visited site to quote advised bringing the pipes out the front (right on the diagram) as I had them all coming out near IC2 in an earlier design that I shared with him. Not sure what his reasoning was - maybe the congested services in the vicinity of IC2 and the need to encase the foul pipes in concrete because they run parallel with and close to the house and outbuilding foundations.
-
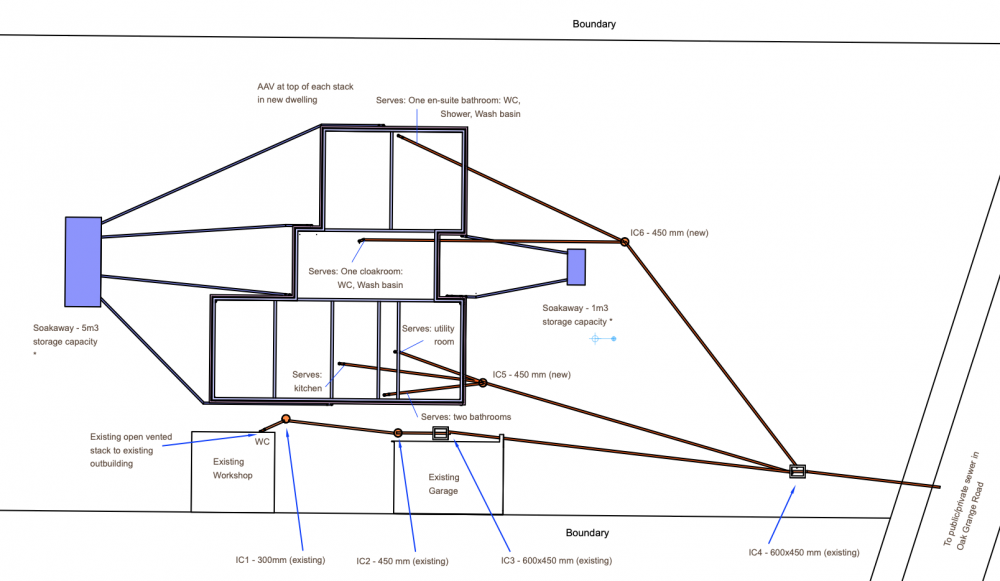
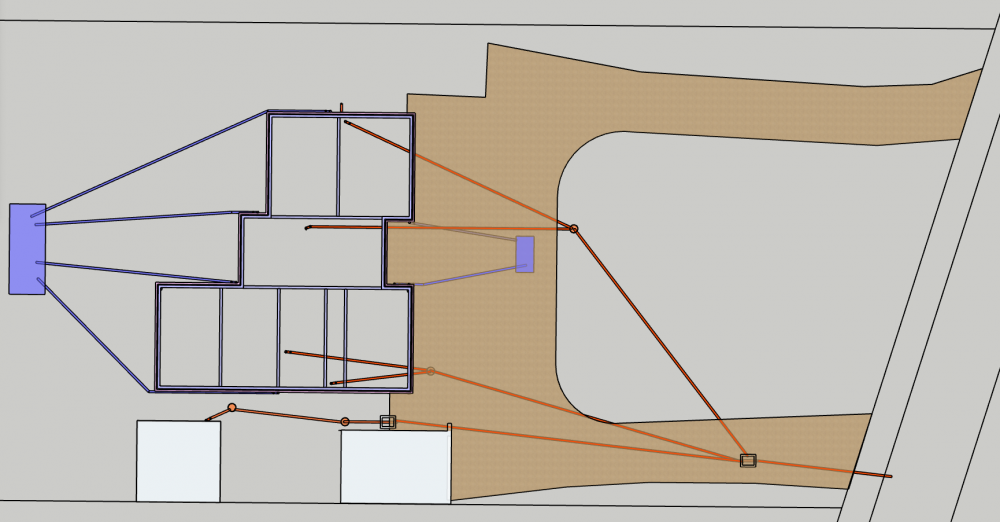
Here is my draft drainage layout, shortly to send to building control... There are a few considerations: The pipe runs under the house can have limited fall - as they need to go under the beam and block floor and over the ring beam - so basically one course of concrete blocks + mortar = 225mm. At a min fall of 1:80 this limits the distance from stack to point of exit foundations to approx 7m. The ground workers have said we can run services through the ring beam (RC ground beam) but I'm keen to minimise this. The exiting foul drains are relatively shallow - e.g. the exciting IC closest to the road (IC4) has an invert level of just 8080mm below ground level. So need the pipe runs to be relatively direct from new house to IC4 (or connection at the road boundary). All the pipes between new house and outbuildings are existing - and these connect to our static caravans in the back garden (not shown) and site WC as shown in the outbuilding - so these need to remain until new build completion. It will get quite busy with services in the side access between new house and outbuildings - e.g. gas end electric need to be routed from the existing garage into the plant room in the new house, and water supply will need to come to the plant room from the front too. The plant room will be located at the lowest foul stack in the diagram. Trying to minimise the number of ICs in the driveway - which is a U shape (in 2nd pic). Prefer to site in borders or lawn where the can be obscured e.g. with plant pots. Any views welcome.

-
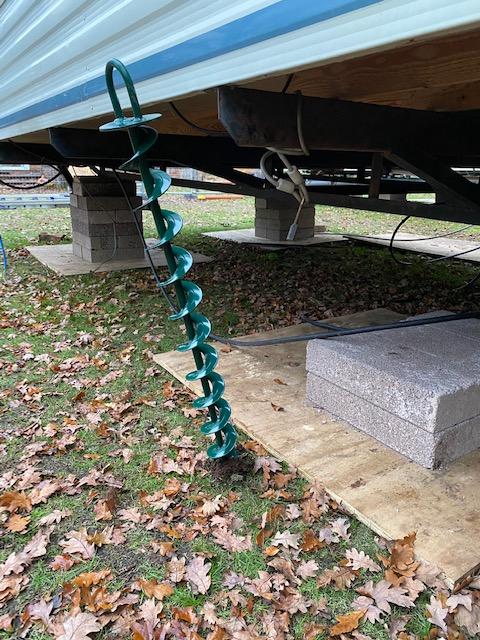
Just installed a ground anchor. I bought only one as I was not sure they would work with our soil - it is littered with flint and other stones (when digging you are absolutely guaranteed to hit one with every entry of the shovel).On the 5th attempt, the ground anchor found a route through the stones and feels very firm (allegedly can handle 1.2 tons with the 900mm version I bought). I could fell it hitting stones, but I think it pushed them aside. Will now buy 3 more and the ratchet straps to tie the vans down. Will cost £250 in total but a small price to pay for peace of mind.

-
Affinity water came out the next day to fit a new stop tap, even connected up my temporary MDPE. Very impressed with their service - came to my rescue within 45 mins of breaking the old tap and new tap installed next day - all at no charge. The guys commented they got a bit wet installing it because of our high water pressure. I must measure static pressure/flow rate again as it seems even higher since we now have 20mm MDPE all the way from the road. When we have completed demolition and the new piling and ring beam, I'll dig a trench and run 32mm MDPE from the new Toby.

-
I measured static pressure and flow rate at 5 Bar and 15 lites per min, I think I would have got wet!
-
Seen those clamps on line and wondered where they could be used - good to know if needed, thanks.
-
Yeah I think the way to tell is look at the sequence, should be: live supply, stop cock, meter, then to house. I could see the blue MDPE went into the stop cock ?. Will ask Affinity Water if we can change orientation of the Toby when they replace the stop cock, I guess they will need to remove the Toby to replace the stop cock anyway. It may be as it is because the Toby is on the road side of the water main and it would need to move from what is technically the verge onto our drive to reconfigure it.
-
Two interesting events on site today. Fortuitously, some idiot (who shall remain nameless) snapped the main stock cock lever off by over-tightening in the off direction. So had to call out Affinity water who temporarily turned back on again so we have caravan and site supply, but still have not diverted from the house to be demolished. Affinity will try to schedule a new stop cock fitting tomorrow so we can proceed to sever supply to the house. In the nameless person's defence, turning the stop cock off with normal torque did not fully isolate the supply, so kept turning more until the metal T piece snapped off the tap. All I could think is the dribble that was still coming from the pipe may have been from the pipework in the house even though the stock cock in the house was firmly turned off - or the main stop cock at the boundary really did not seal in the off position. Secondly you are probably wondering why I started the above with "fortuitously", given its a bit of a PITA. The other thing the water engineer said was if I had severed that blue pipe (in pics in previous posts) as planned I'd have got wet. Why I asked? Because that is the LIVE side he replied. It turns out the blue MDPE in pics from 'tar ball' to Toby is the live feed into the stop cock and the feed to the property comes out the other side of the Toby and doubles back into our driveway. Phew that was a narrow escape! Will hopefully locate the pipe on the correct side of the Toby when Affinity Water dig to replace the stop cock. @PeterW, @Conor, @Bitpipe, @joe90
-
Thanks @PeterW I've been carefully prising away some of the 'tar ball' it is very tough and has started to seep where the blue MDPE goes into it so I stopped. I have about 8 inches of MDPE to play with and some of that goes through a good 45 degree bend down into the tar ball - which may have deformed as it curved and I guess may not make a good joint. I plan to sever the MDPE as close to the tar ball as I can. If the coupler join leaks leaks because the pipe is deformed, then I'll cut some off and join closer to the Toby. Last resort would be to try to remove the white nut at the toby and push the new MDPE pipe straight in there.
-
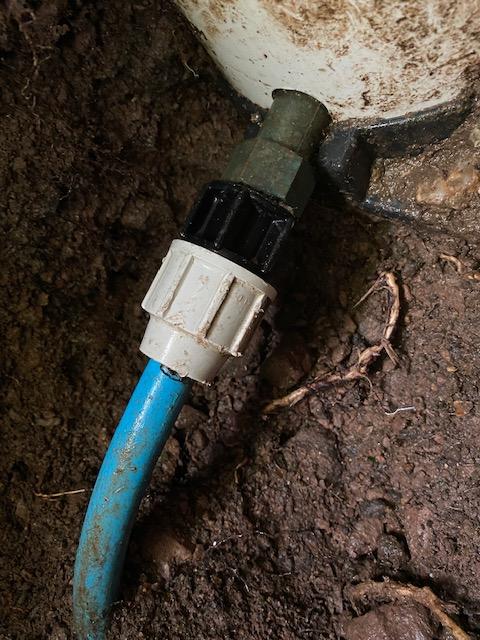
Ah @Conor and @PeterW got it. The new pics shows the full connection to the Toby. So basically I won't open the white connector. I'll just sever the blue MDPE and connect to it with a new coupler. I measured the MDPE and its nearer 21mm actual O/D so assume that is 20mm pipe. Thanks also @Bitpipe I'll need to dig a bit more around the 'tar ball' to get enough room for the new coupler on the existing MDPE. Got the inserts and cutters.
-
Thanks @Conor will dig out a bit more around the connector to see what's what. I'll only get one shot at this because I'll need to remove the existing section of MDPE in order to get the right angle into the Toby. If the white connector is a full coupler then I can see how I can remove the whole coupler and fix a new coupler to the remaining pipe into the stop cock. If the white coupler is more an integral part of the stock cock/Toby then I guess I'll need to reuse it and insert my own pipe into it?
-
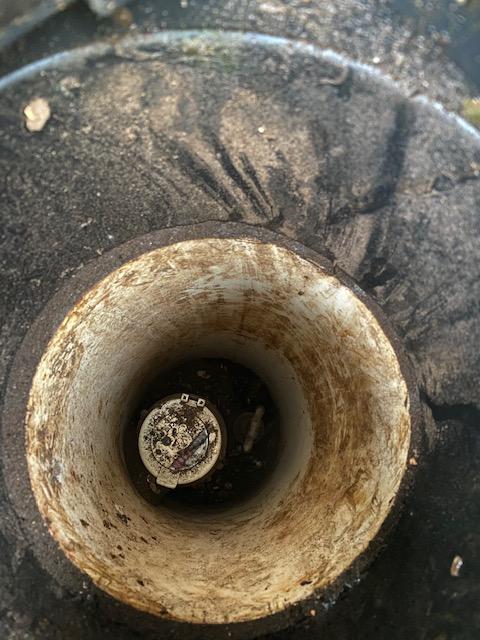
So the good news is there is MDPE at the Toby. Haven't measured it yet but looks about 20mm. The question is how to sever and connect the new pipe. In the new pic the white connector goes into the Toby - the stopcock. The lower part of the pic shows the blue MDPE starting to go downhill and going into some form of solid tar like substance which I guess might be a seal around the join to the iron pipe. Can I just disconnect the white connector and put in the new MDPE pipe?
-
Thanks @joe90 and @PeterW this needs to work quickly and reliably so I'll dig by the meter and see what's there to connect to. On question on the "Toby" (I'm guessing this is the unit containing the water meter and stop cock) Peter this is technically on the verge at the boundary, can I connect direct to this or does this need the water company?
-
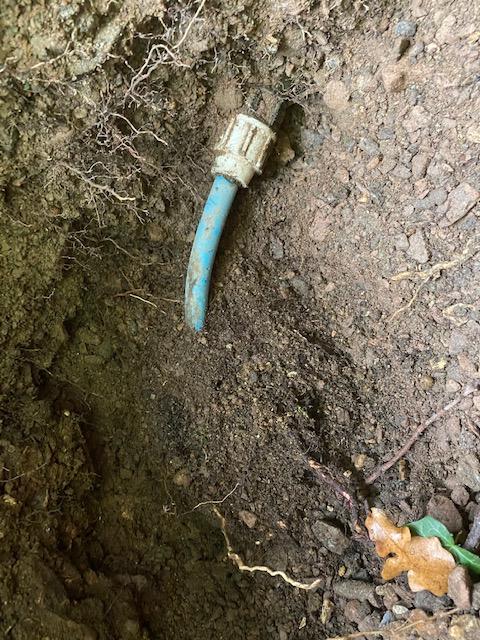
The job in the next couple of days is to sever water supply to the house before demolition and to retain the supply to caravans and outbuildings. I've located what I believe to the the water supply pipe - see pic. The upper pipe, broken with yellow plastic insert is the gas pipe, the rusty metal pipe below this must be the water pipe? At the bottom is the newly diverted electric supply cable. If this is the water pipe, its outside diameter is 28mm (0.93 inches). A couple of questions please: What size MDPE to iron connector do I need please (the iron pipe size)? How do I cut and prepare the the pipe - sand area to but cut to remove loose rust, cut with angle grinder, the remove burs inside and out with files? I'm also considering connection right back at the water meter/stop cock at the boundary - see other pic. Yet to dig to explore the type of pipe connection here. I'm guessing this is a later addition to the 1950's supply in the other pic. This is a bit just-in-time for demolition staring Monday, so looking for a quick solution for now and something longer term for the build later next week. I can easily isolate supply at the stop cock, but can't be without water on site.

-
https://www.shutterstock.com/image-photo/noahs-ark-construction-186687086 ?
-
@Russell griffithsWe are in a technically in a flood zone ?♂️.
-
@PeterW something like this.... https://www.leachs.com/scaffold-fixings-anchor-testing/big-ben-heavy-duty-hurricane-ground-anchor-choose-your-length?code=AF-6300-900&gclid=EAIaIQobChMIwZ3arpCm7QIV2PhRCh3USQUNEAQYASABEgKq0PD_BwE
-
Thanks @epsilonGreedy good to know this is not excessively high. I’ll be keeping a very close eye on the stacks and the the 18mm ply at the bases. The weight per stack sounds about right - I think the empty 12x36 vans are 5 tons. SWMBO and the kids I think have added another ton or two already ?
-
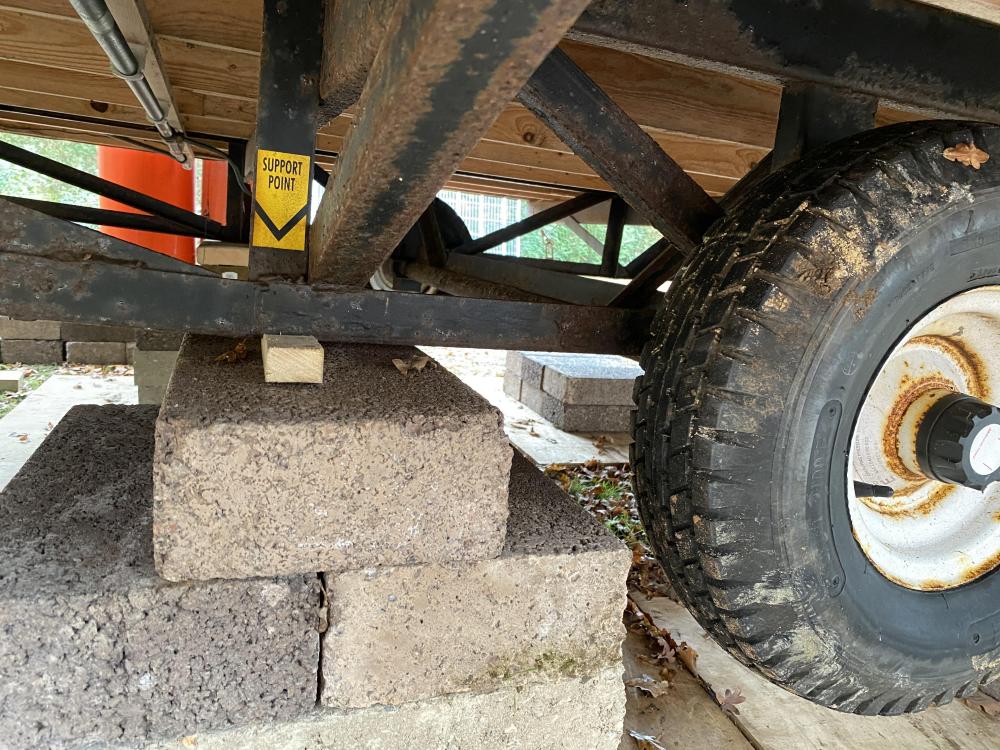
Thanks @ProDave you are right the wheels are only raised by about 30cm. The photo I took was from the high end of the vans where the lawn slopes and there are more blocks (and further to fall). Have used marked the jacking and support points either side of the axle for jacking, will add more blocks as we only have 6 piers per van at present and there are marked support points that don't have any. I remember a picture from a holiday park after a gale/storm a few years back where static carvans had been tossed around like toys, which is what is making me a bit uneasy.