


richo106
-
Posts
794 -
Joined
-
Last visited
Everything posted by richo106
-
Shower Enclosure - Extraction
richo106 replied to richo106's topic in Bathrooms, Ensuites & Wetrooms
Thank you all for the replies, this has certainly left me wondering how to do mine I have uploaded my bathroom layout, i have bought everything apart from the shower tray (going for the kudos 2) just need to decide on size This is going to be the kids bathroom so conscious they wont be as careful as us, I will be tiling both wall and floor I am not keep on the flappy doors if i am honest, what would you guys do shower size/glass enclosure wise if this was yours? Many Thanks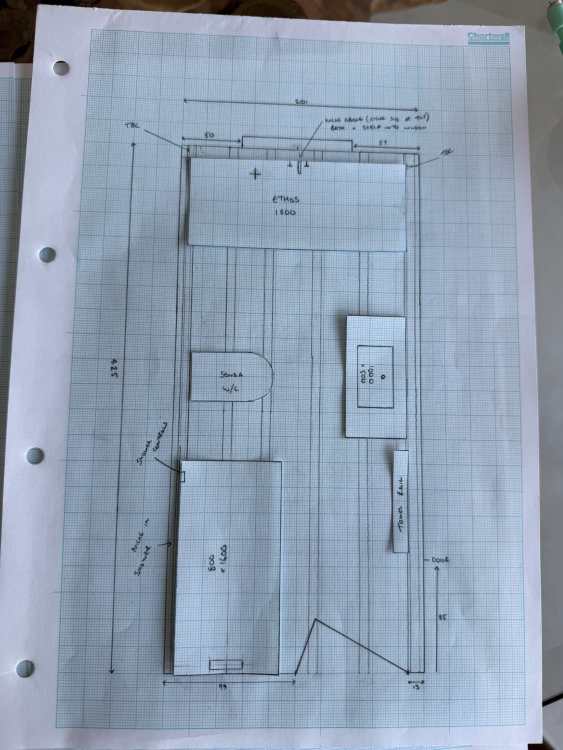
-
Shower Enclosure - Extraction
richo106 replied to richo106's topic in Bathrooms, Ensuites & Wetrooms
Hi @Nickfromwales Thanks for the reply, I won't be able to move the extract point within the enclosure Another option I am thinking is to leave a small gap between the ceiling and glass, in your opinion what is a reasonable gap? Thanks again -
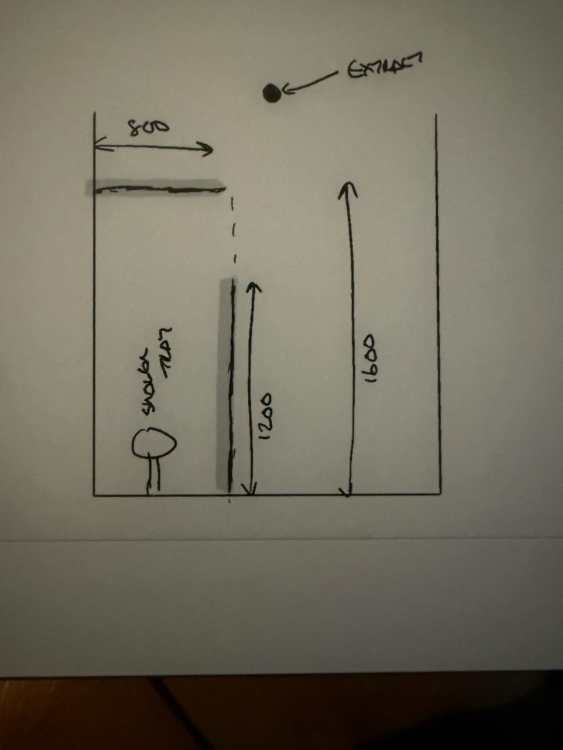
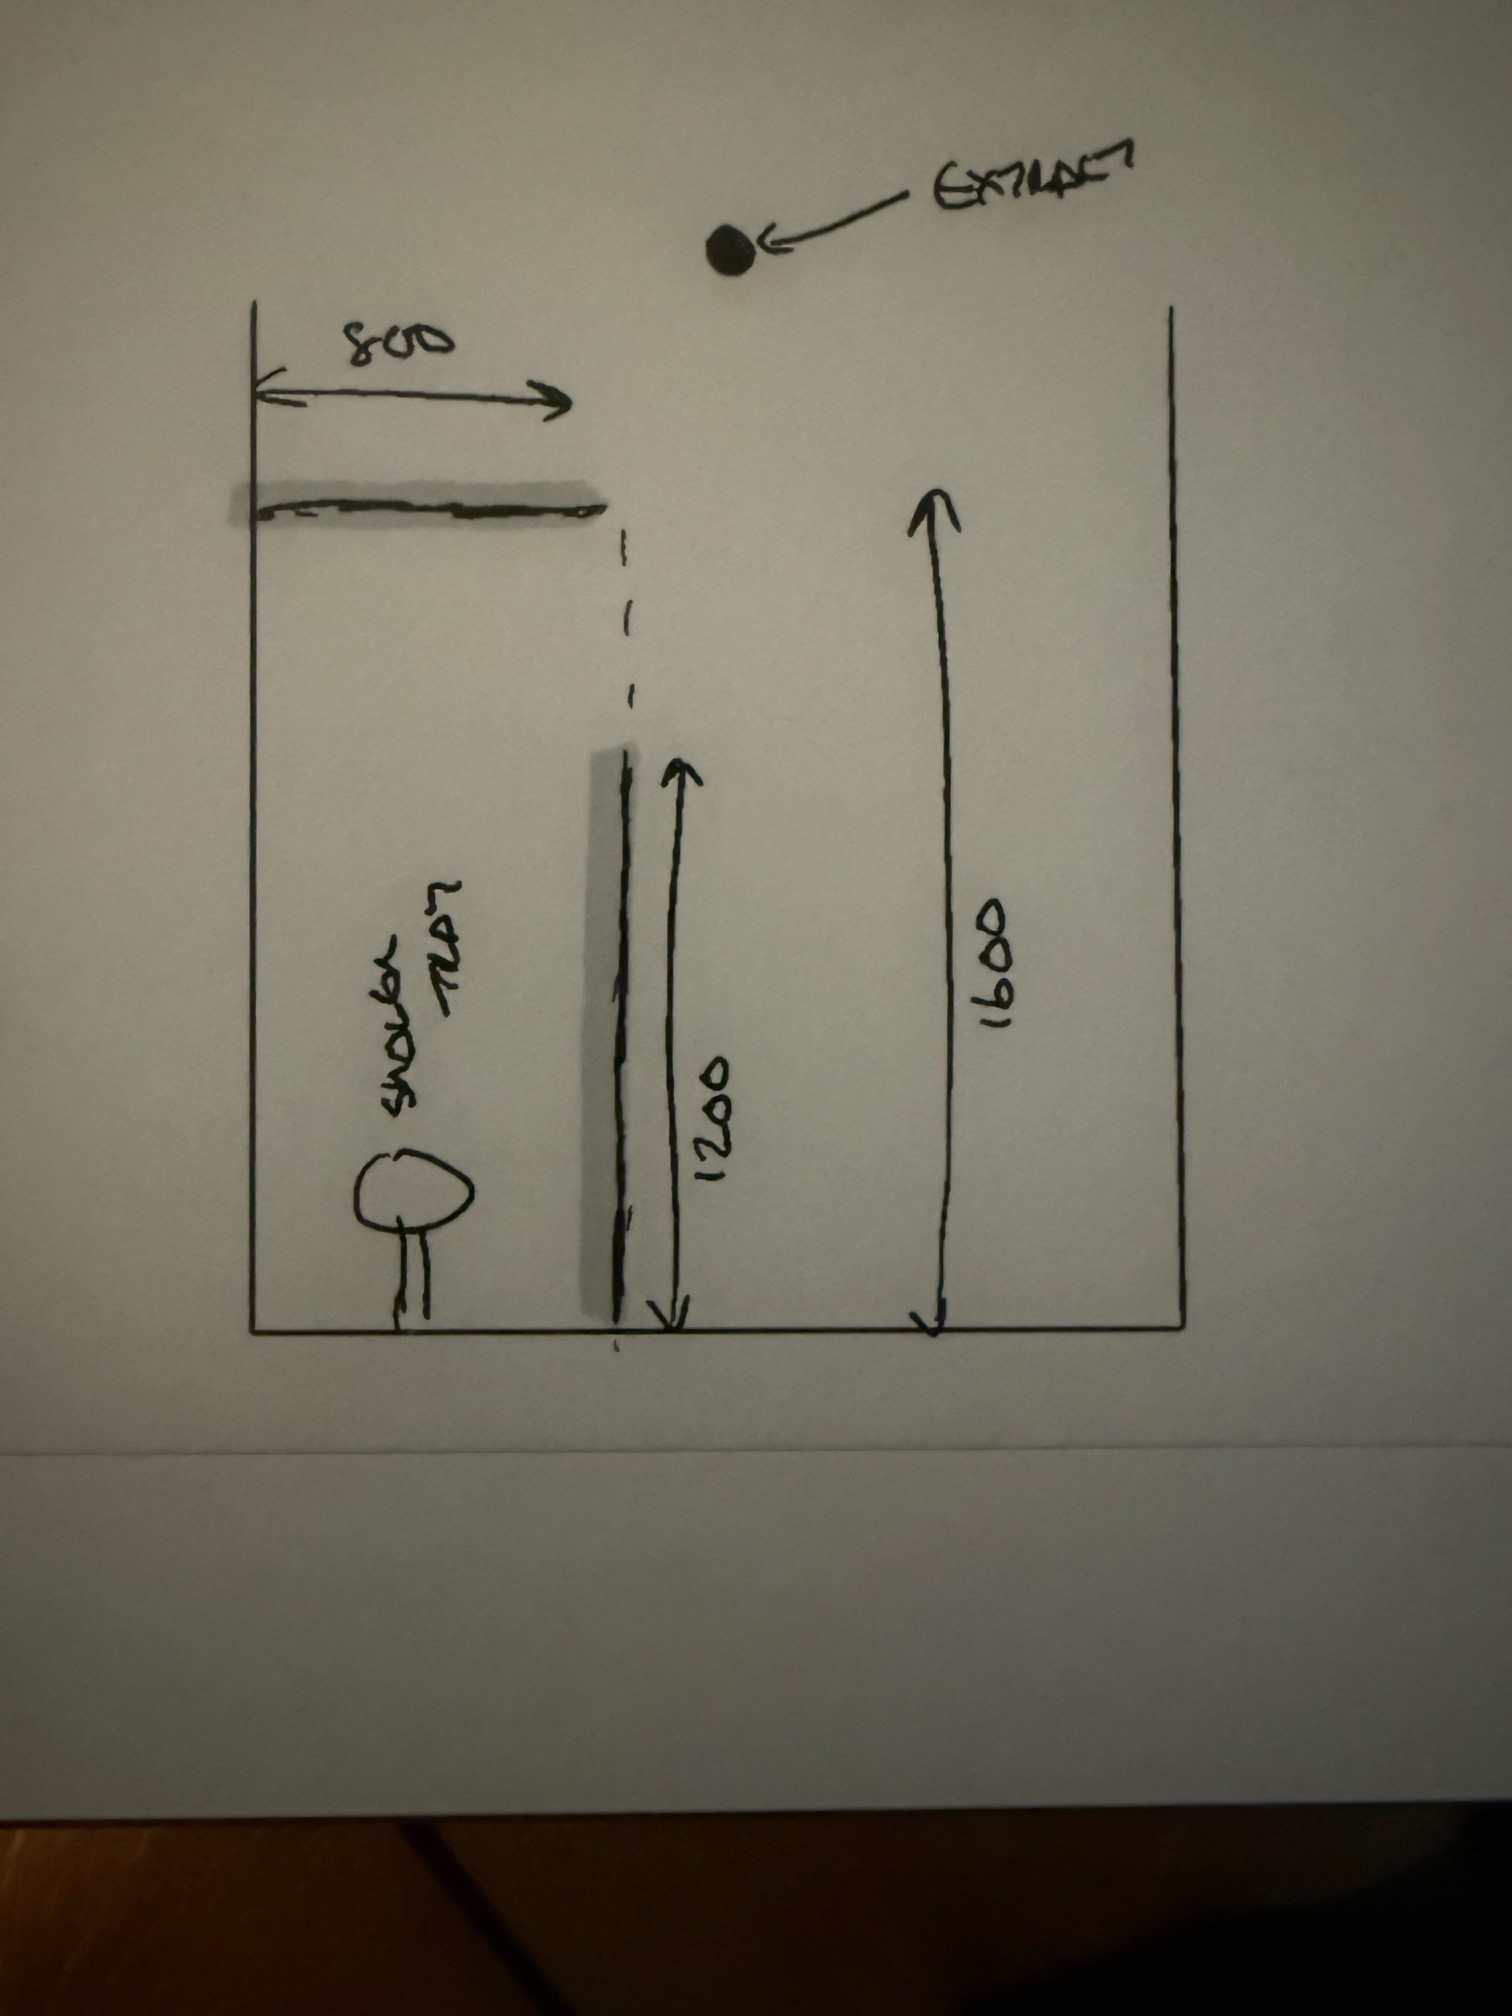
Hi All I am just designing the final details for my bathroom, we are having a 800 x 1600 shower enclosure. We don't want a flappy door but just a 400 gap to walk through so thinking 1200 glass one side and 800 on the end. However the mrs wants floor to ceiling glass rather the kits offline which are around 2m tall. With the enclosure having a permanent opening would there be any condensation/extraction issues? I have MVHR in the house Please see pic of extract location within the bathroom Any advice/opinions welcome Many Thanks
-
Hi All I have a hot water cylinder with a hot water recirc pump, this pump has been working perfectly but last week I noticed it is noisy when it runs now. I think it maybe air in the system (no idea how it got in there) On the video when I close the valve on the return leg the pump noise goes and runs smooth does this point to air in the hot water system? What is the best way to get rid of the air? Any advice or information greatly appreciated on this. Many Thanks IMG_9261.mov
-
This is the exact one I have picked as a back up, are you pleased with it? As pleased as you can be with a shower tray anyway
-
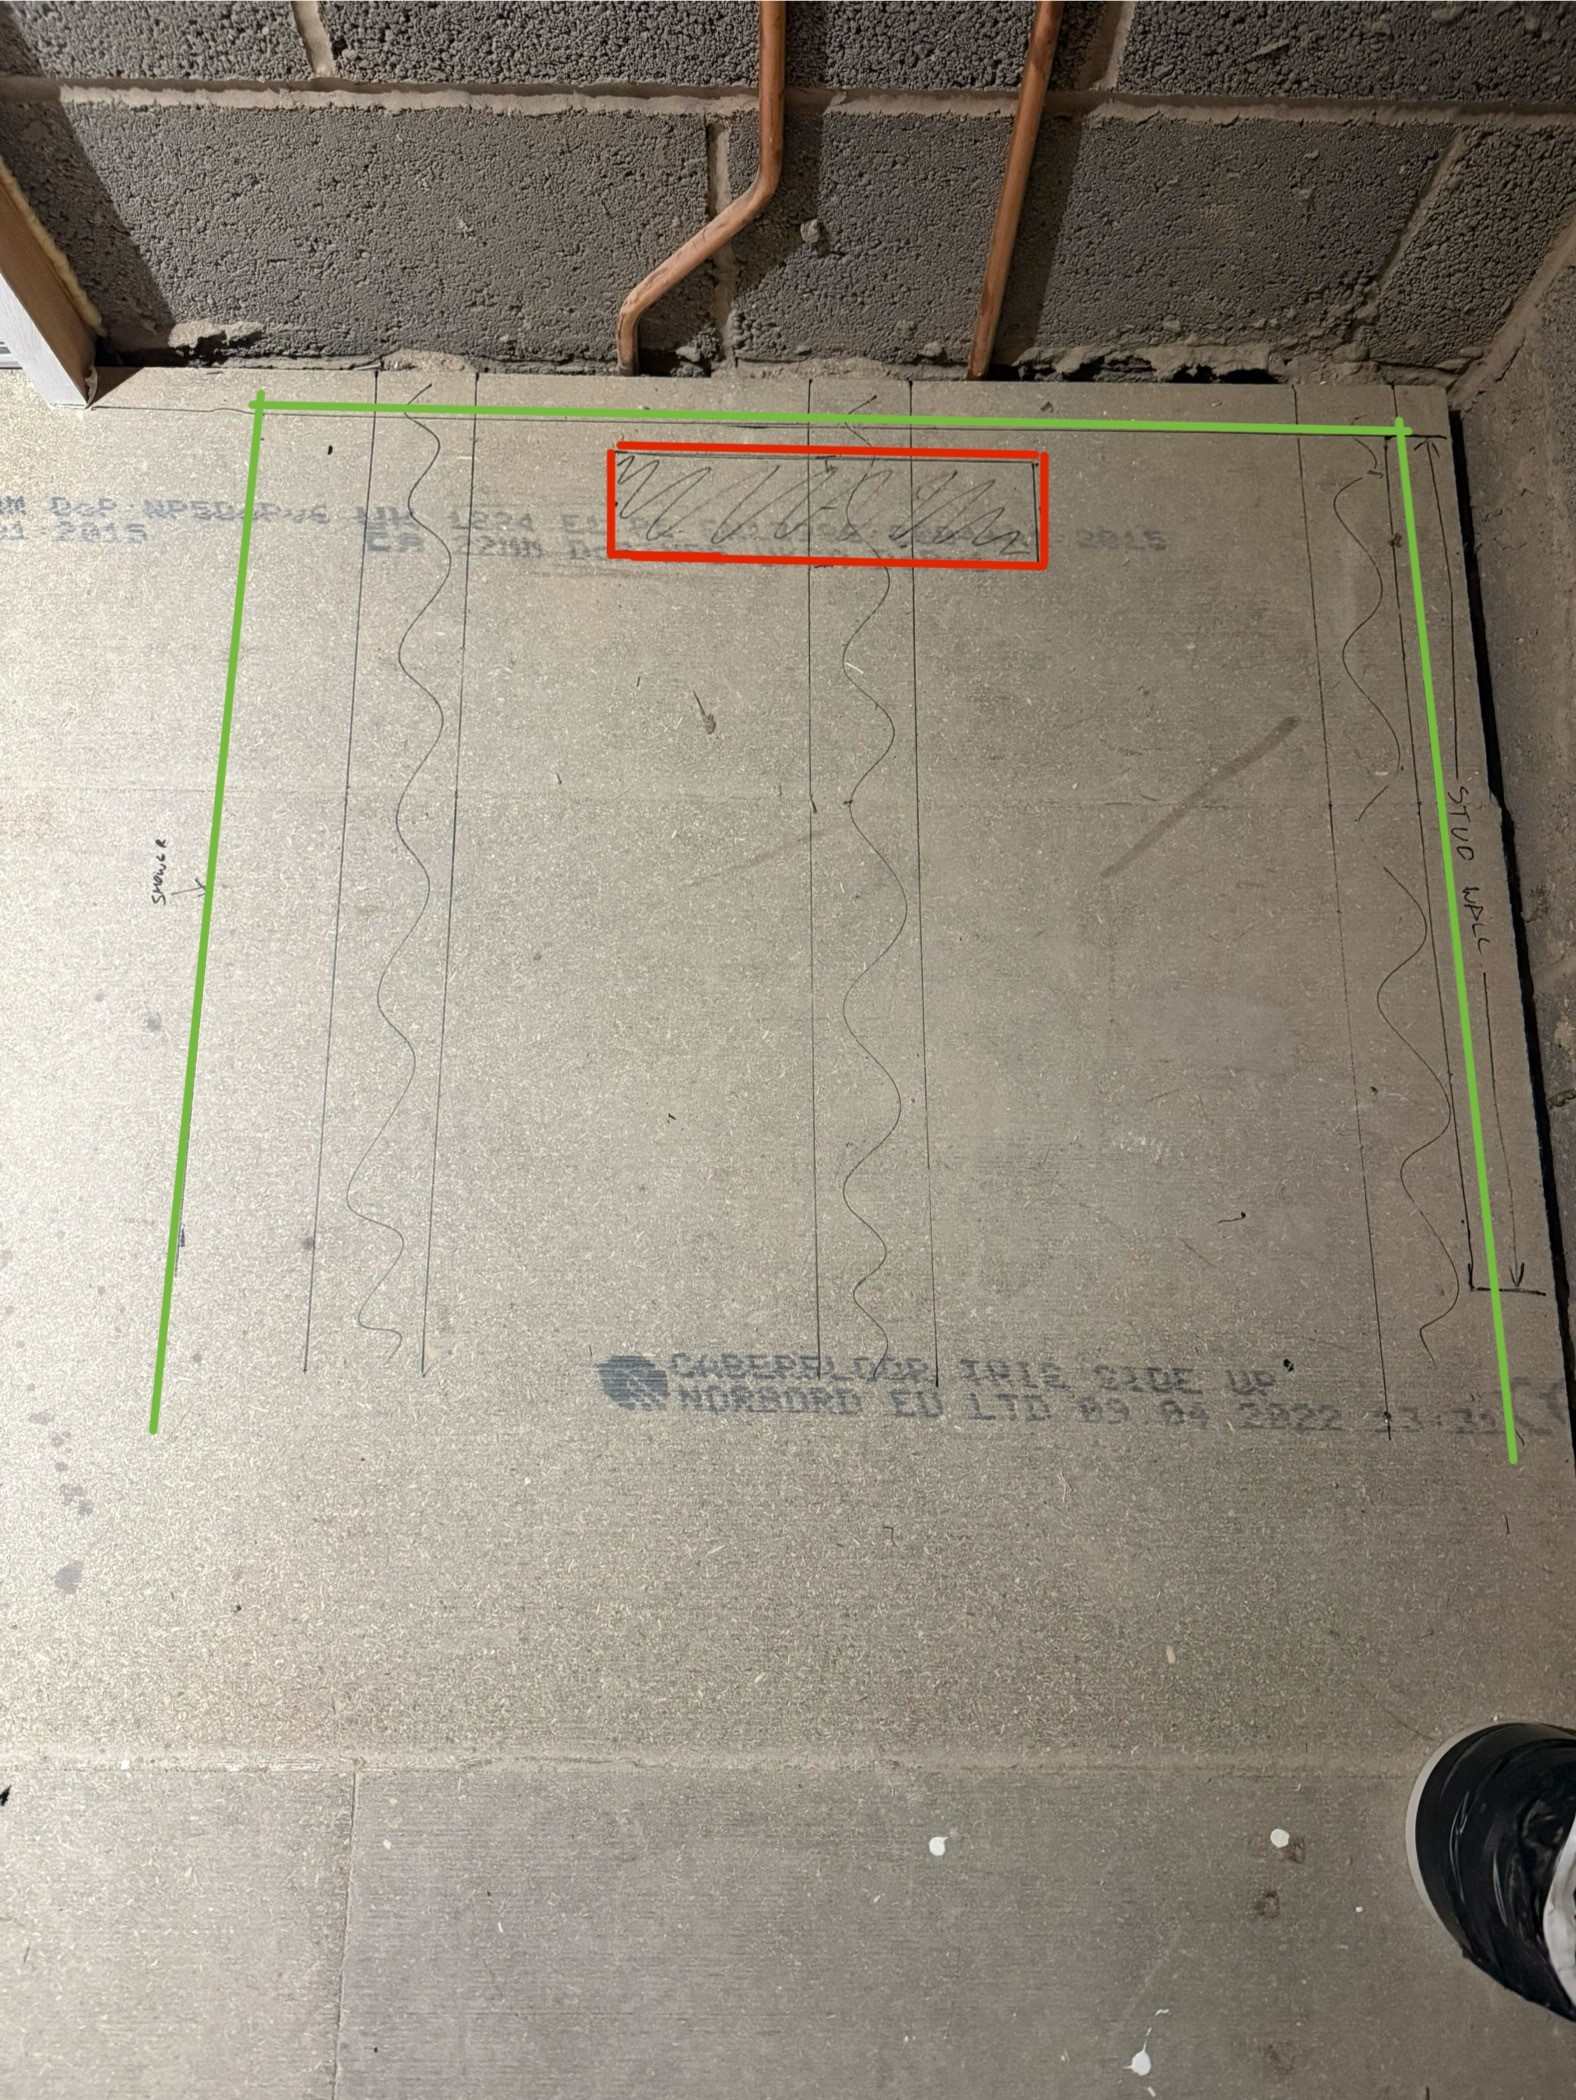
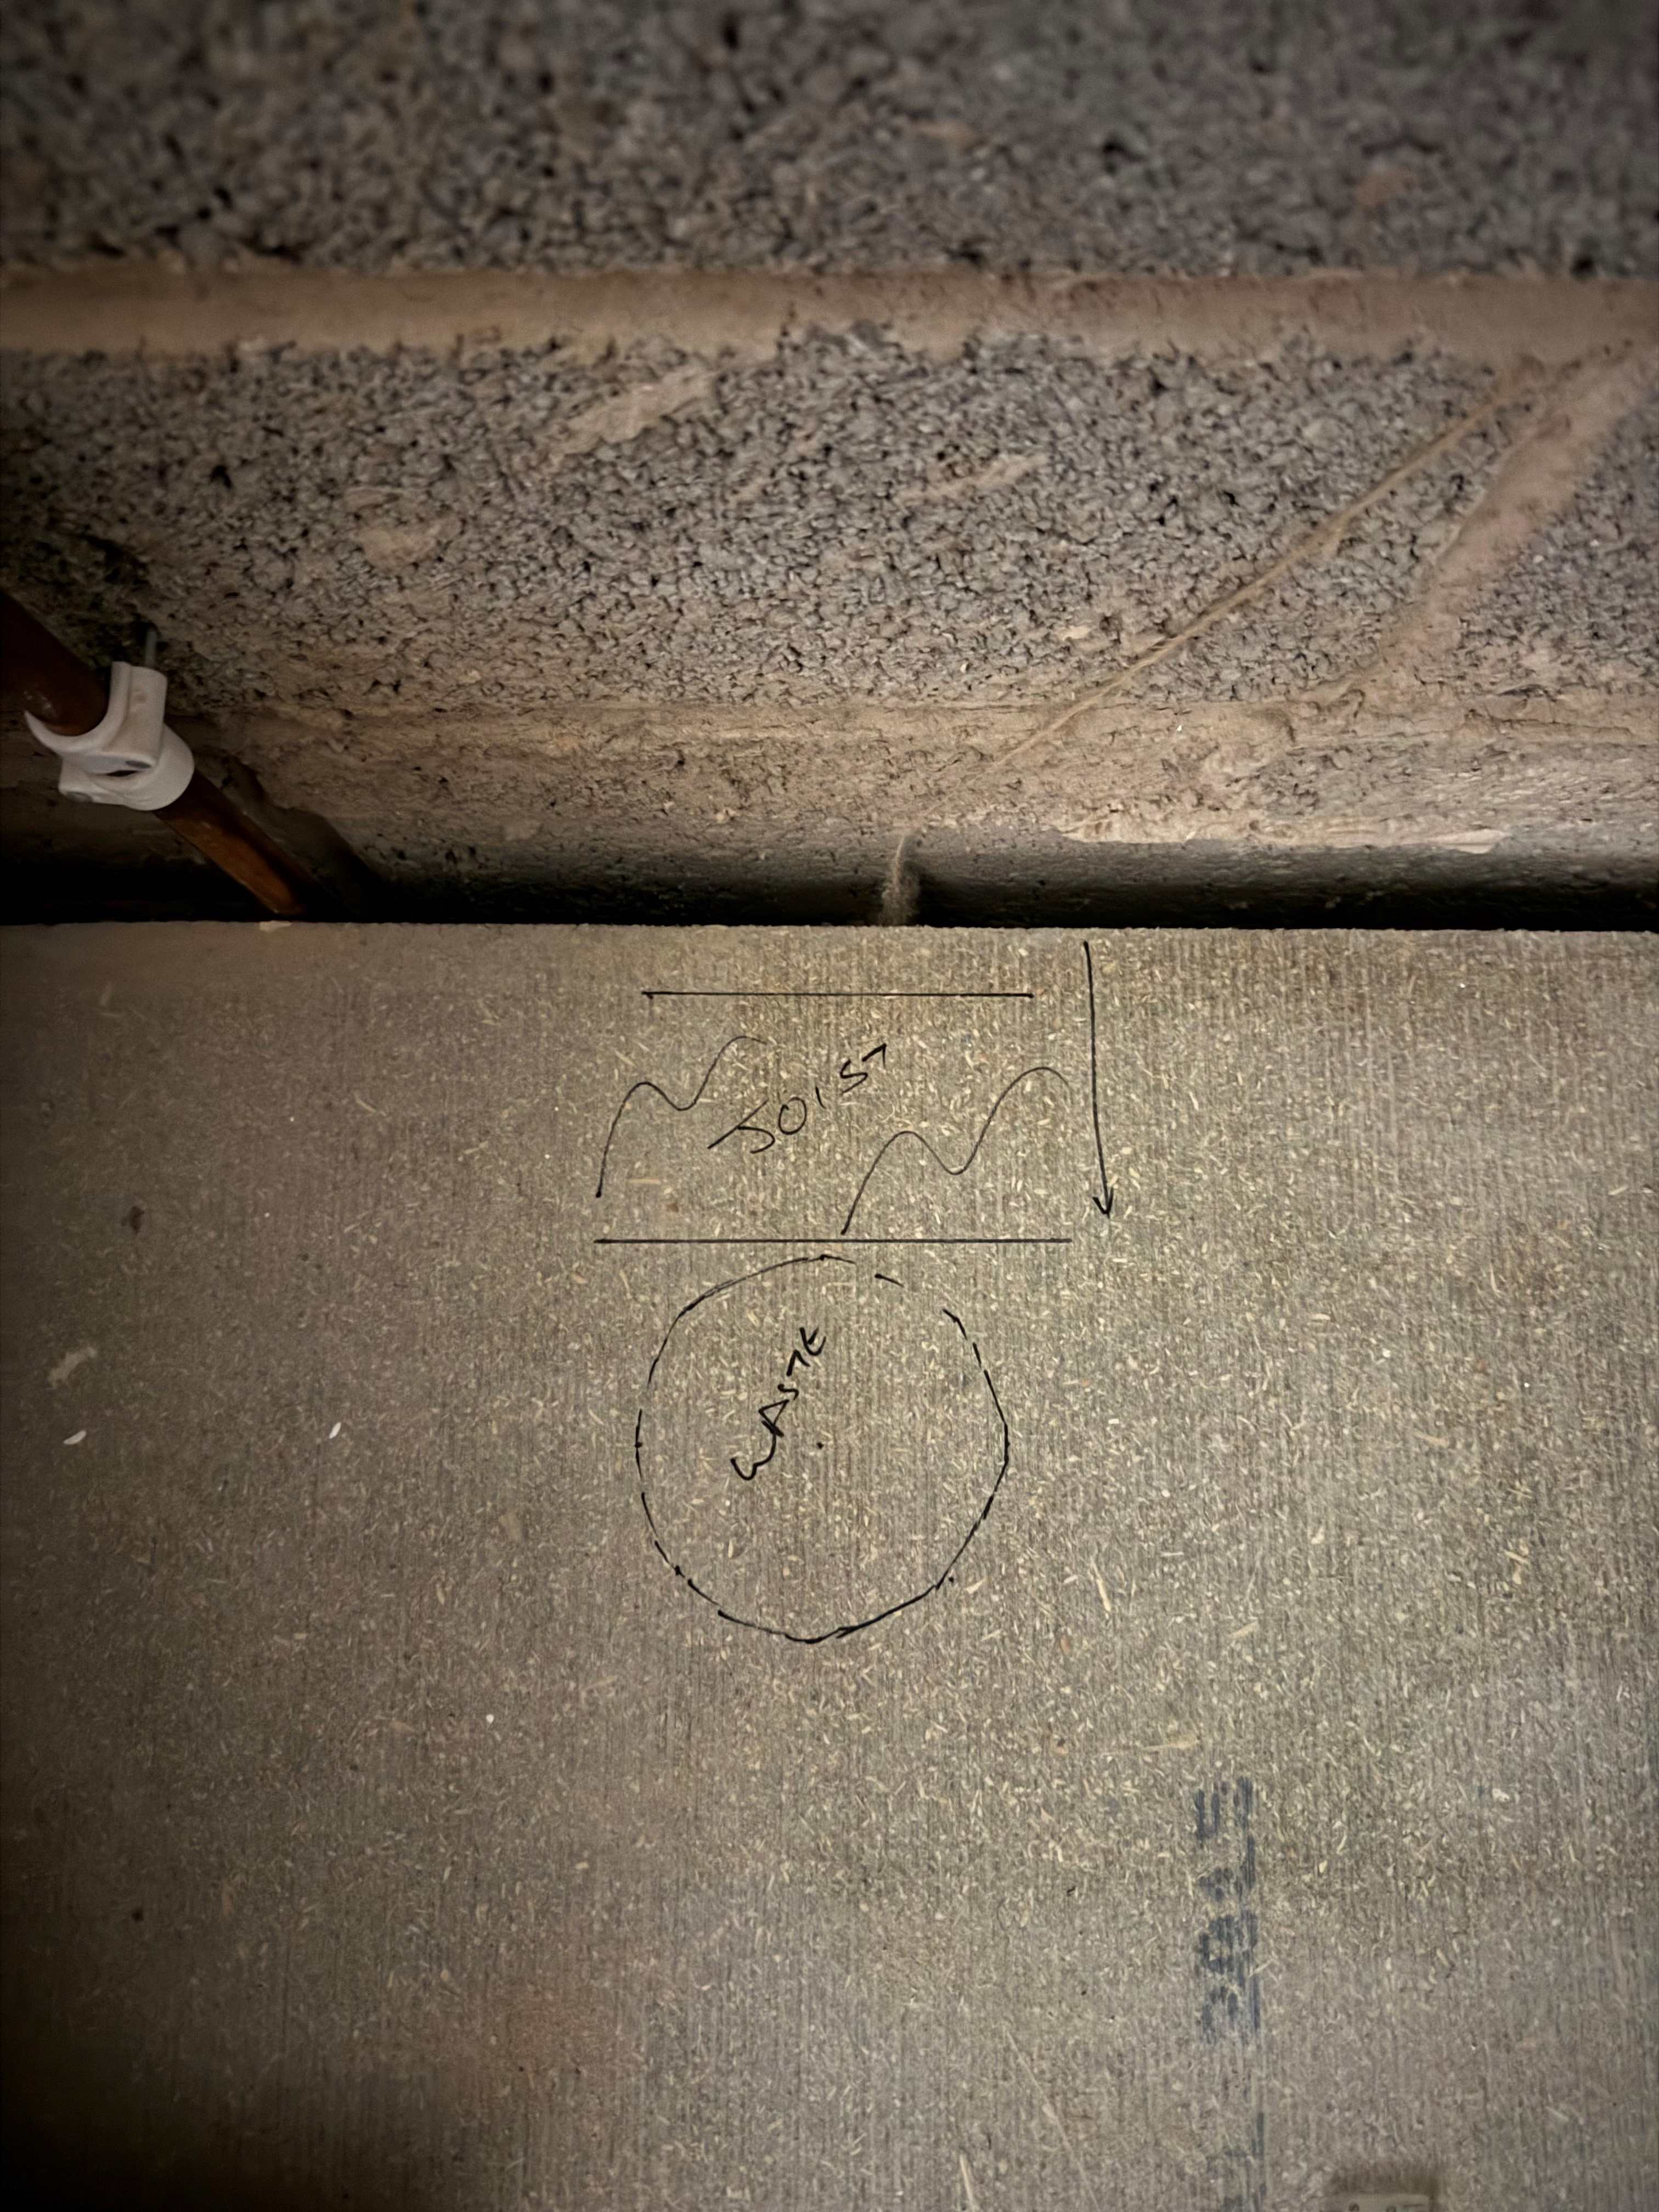
Hi All I am in need of some help if possible. Basically I am installing a new bathroom in my house and I am ready to order the materials for it and was just looking at the wastes etc.. But when i measured it out the waste for my shower falls perfectly on a joist. Please see attached photo, green lines being the shower and the red rectangle being the waste that is needed (if I go with that shower) The posi joists are PS9, 75x225mm @ 400 centres. My question is do I simply just have to a pick a different shower tray with waste that will fit between my joists? Or is there a way to 'engineer' this out so the top section of the posi joist can be removed to make way for my waste?(my preferred option as this with match all the other bathroom items) Any advice/information on this will be greatly appreciated, When looking on the internet its not looking hopeful i can touch my posi joists but would love to get a definitive answer Many Thanks

-
Hi All I have a Vent Axia Sentinel MVHR unit that is housed in the loft, this was only commissioned just over a year ago. For the last few weeks/month my MVHR has been making a lot more noise. Like a motor/fan bearing rattle sound. I will attach a short video of the noise I have changed the filters 6 monthly, is there anything I can do to investigate/rectify the noise/fault? Any ideas or suggestions greatly appreciated MVHR - Noise.MOV
-
It already has 22mm T & G chipboard floorboard above, all the floor will be tiled and then bath sat on the tiles I will put some extra noggins and strongback's in like suggested Thanks again
-
My joists are already in place so i can't span them block to block like my current ones. But the ceilings below are not installed so i can anything below to secure/improve them
-
Hi All I am just designing my main bathroom and we have found a freestanding bath we like. One concern I have is the weight of it! The bath is 180kg, capacity to overflow is 400L and guessing got the allow for 2 adults (worst case) so quite a lot of weight The bath will definitely site on 4 joists and more likely 5 joists (see attached layout) They are posi joists at 400 centres, 75x225mm Is this weight spread over those joists anything to worry about? If so how would i check/confirm this? Many Thanks

-
Hi We currently have a quooker tap installed and we love it much more than we thought to be honest I am now looking at adding the quooker cube to add chilled filter water and sparkling water I was just wondering if any one on BH has a cube and what their opinion would be on it? Is it worth the money? Many Thanks
-
Good Morning All I had my patio installed back end of last year and wanted my patio level with the kitchen floor so when I open my bi folds its level (ish), in my naivety and obviously the oversight of the installer nothing was said regarding levels/DPC etc and now I've looked further into this its not right with it being nowhere near the 150mm below required . BC have been round and to be honest it poked his head out and just said nice job and moved. So it's all been signed off Please see attached pictures However I want to make sure I attempt to rectify this before it could possibly cause me issues down the line. The main area that I have any kind of splash up the wall in the rain is the chimney due to it dripping off the top Obviously in hindsight my blues/DPC level would be 2 courses up, I am really struggling with how to rectify this and not look bodged! I don't really want a 150mm deep trench around house So any expert ideas/advice would be amazing on this Is there some kind of render I could put externally? We like the look of this to finish it off anyway but don't know if this could kill 2 birds? Could I take the first row off and install a DPC up the wall? The garage is fine but as these are existing blues they need tidying up and was waiting to see what I did with the rest Many Thanks
.thumb.jpg.31c2066d876f555d0e7d98ea668ec88c.jpg)
.thumb.jpg.3bdbfeef1b6538b680ba5948d5febd79.jpg)
.thumb.jpg.148ee6cd810c4dd382779c760d6fb61b.jpg)
-
Bathroom Layout - Too Narrow?
richo106 replied to richo106's topic in Bathrooms, Ensuites & Wetrooms
Unfortunately its joisted the same the other side, as this was my first build project joist locations wasn't considered and i just accepted the posi drawing that was given. Obviously this is just one of the many lessons learnt throughout the build. My idea was to install a drain connector flush with the floorboards - https://www.screwfix.com/p/mcalpine-push-fit-single-socket-drain-connector-black-110mm/4255V?tc=OT2&gad_source=1&gbraid=0AAAAAD8IdPyBDb62AI3EMbaFBjKf8DRXf&gclid=EAIaIQobChMIvcHl257rjAMVdZJoCR3srxruEAQYAiABEgIW8vD_BwE&gclsrc=aw.ds Then a space saving swan neck pan connector - https://www.snhtradecentre.co.uk/product/mcalpine-90-degree-space-saving-pan-connector-wc-conq/ Will this allow me to get the toilet back to the level of the joist or so do you think? Please my dodgy drawing below, I am hoping my green line will be the line of the tiled wall? Is this doable? Certainly any other ways to do this would be greatly appreciated.thumb.jpg.3f9dded67e1bd27b95ccd2adb39fe1dc.jpg)
-
Bathroom Layout - Too Narrow?
richo106 replied to richo106's topic in Bathrooms, Ensuites & Wetrooms
That's the posi joist below -
Bathroom Layout - Too Narrow?
richo106 replied to richo106's topic in Bathrooms, Ensuites & Wetrooms
Didn't attached picture!
-
Bathroom Layout - Too Narrow?
richo106 replied to richo106's topic in Bathrooms, Ensuites & Wetrooms
Yes all walls of the bathroom are breeze block, certainly no need to apologies I left this important detail out! -
Bathroom Layout - Too Narrow?
richo106 replied to richo106's topic in Bathrooms, Ensuites & Wetrooms
One thing I could really do with some advice on is which would be the best toilet type to lose as little of the room as possible. I am more concerned about the level of the tiled wall, i could do with the finished wall as close to the breeze block as possible I have attached a photo below, due the position of my joists the centre of toilet waste is around 160mm into the room. Would it be best to have a closed coupled back to the wall or wall hung? https://www.lussostone.com/toilets-c5/senza-close-coupled-rimless-toilet-with-soft-close-seat-p4457 https://www.lussostone.com/toilets-c5/senza-back-to-wall-rimless-toilet-with-concealed-cistern-and-brushed-stainless-flush-plate-p5060 https://www.lussostone.com/toilets-c5/senza-wall-hung-rimless-toilet-with-concealed-cistern-frame-and-brushed-stainless-flush-plate-p5063 These are my options but i can't for the life of me work out which will be best! Any advice on this question would be amazing -
Bathroom Layout - Too Narrow?
richo106 replied to richo106's topic in Bathrooms, Ensuites & Wetrooms
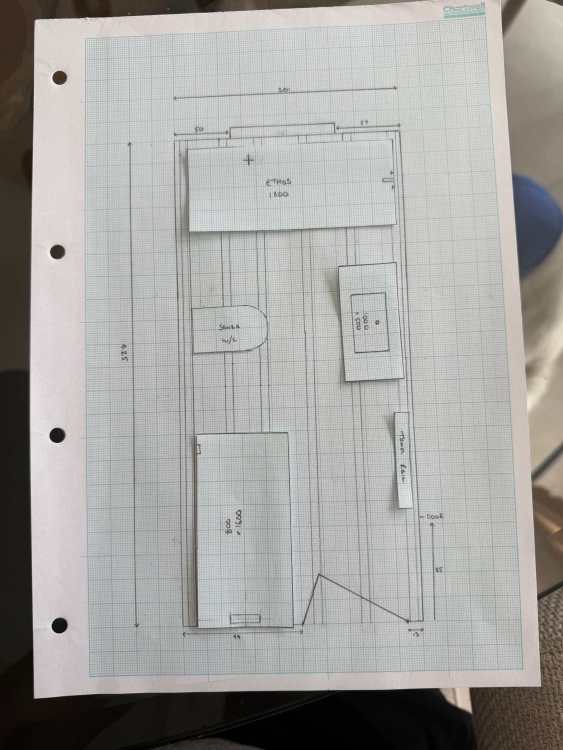
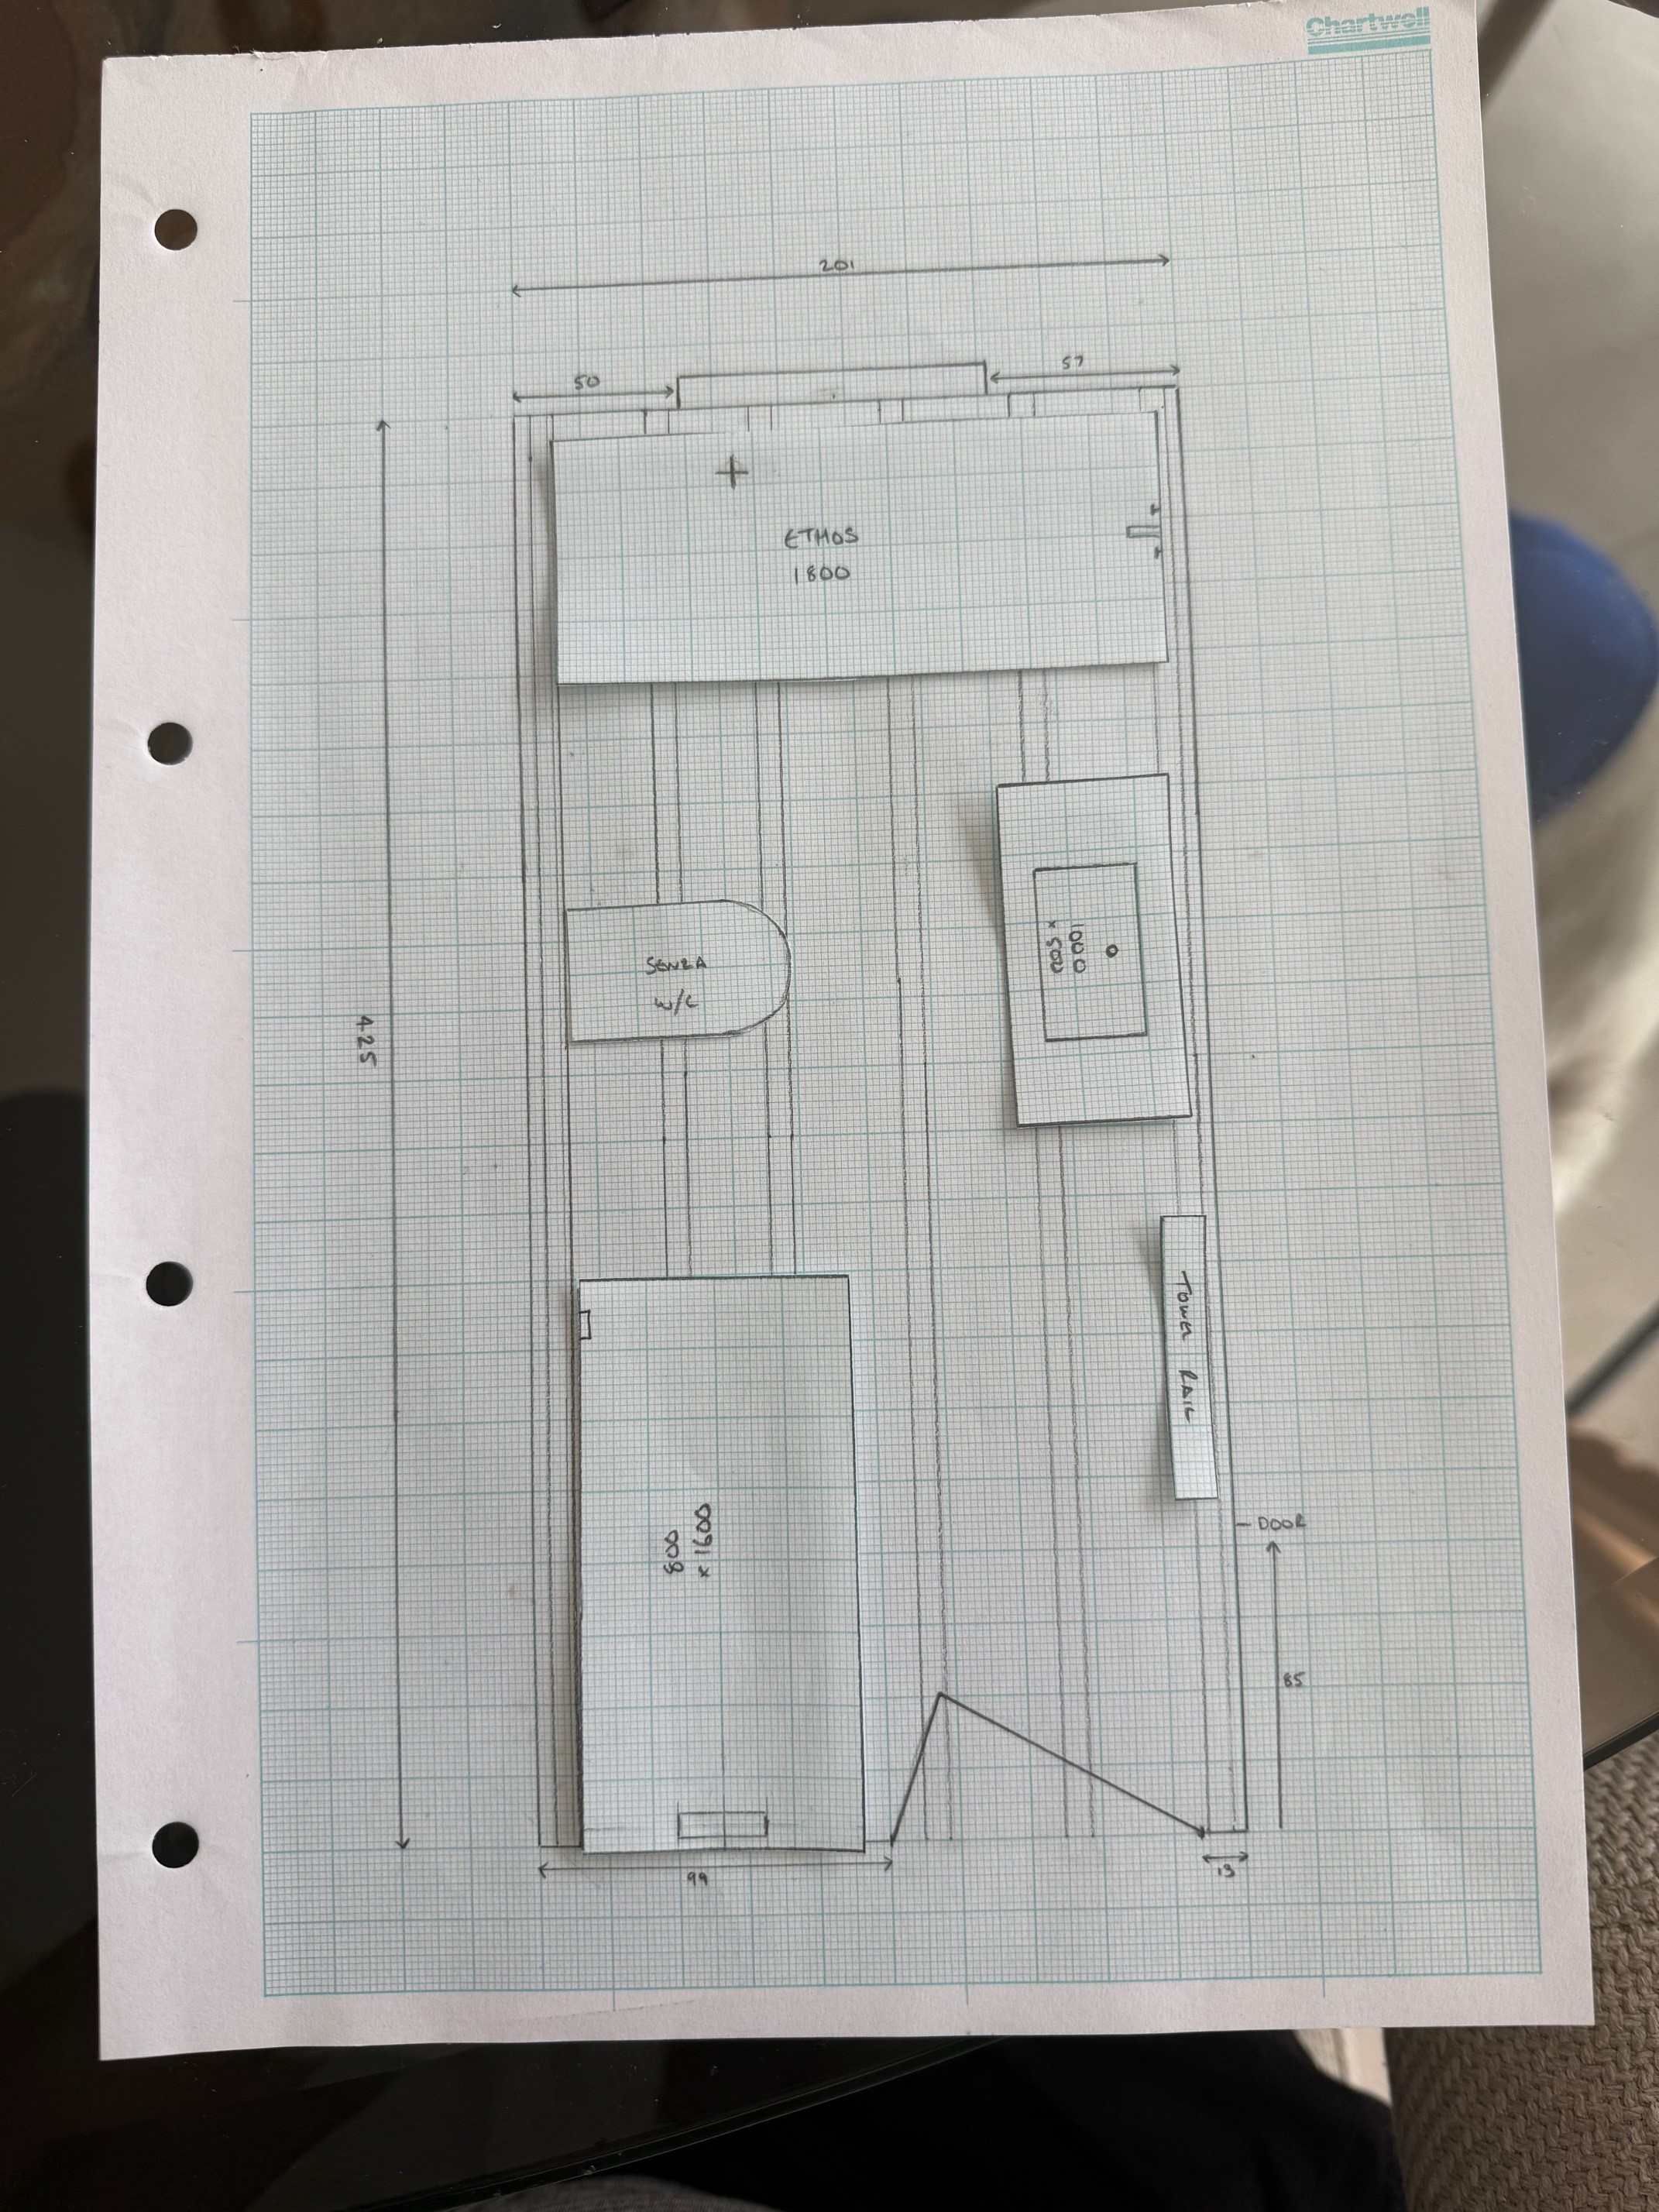
Hi all, thank you all for your feedback been very useful! In terms of situation its completely empty, floorboards down, plastered ceiling and spots, breeze block walls. The biggest issue for me is trying to dodge the posi joists with the wastes! I have attached my marked up plan which shows Niches (in red), shower valves (blue cross) Towel rail (green - just next to where door opens to), Heated mirror (yellow) I am not a fan of shower doors so want 2 fixed pieces of glass in place (black) I don't need specific extraction as have MVHR installed. We have a freestanding bath in our en-suite but as this will be primarily our kids bathroom we wanted the bath a tight fit, we are going for a rectangle freestanding bath - https://www.lussostone.com/stone-resin-baths-c1/ethos-freestanding-stone-bath-1800mm-p309 Like the look of yours @bungledlow, but have a couple of bad experiences with wet rooms albeit being poor install related issues! Yes good point on storage, we will be having a vanity unit but only half shelving type.thumb.jpg.c0b55c2dcb99175a0675c470daf7204e.jpg)
-
Hi All We have been living in our house almost a year now and not paid any attention to my humidity sensor until the other day i had a quick look and its 36% Its a pretty well insulation and quite air tight house (some leaks), with MVHR Is the humidity of 36% too low? Over the last year (as expected) everything has started to dry out and hopefully finished now Any feedback/information on this at all? Many Thanks
-
Hi All We have finally got round to starting our main bathroom I have drawn it up and with the wife chose majority of the items we would like in there, however my one concern is the gap between the toiler and vanity unit too small? It will be 645mm We want the 1800mm bath to fit tight between the walls and where the waste comes up of the toilet it will be about there anyway by the time its studded off etc. We can reduce the size of the shower tray to either 800 x 1500 or 800 x 1400 to help with a little bit of room. Please see attached layout, pretty much anything can move apart from the toilet that has to be on the left hand side Any ideas/feedback would be greatly appreciated
-
Hi All We are going to be designing and hopefully doing our driveway in the new year. We are going to go block paving and now we are just looking at lighting as its very dark on my driveway area One option we were looking at is the drive over spot lights, has any body got these and happy with them? Or would a bollard type light be better? Could any recommend any driveway lights they have used at all? Speaking to the driveway guy (not an electrician) as there is soft dig either side of the edge of my driveway he said on some previous jobs the electrician has ran SWA between the lights in a wiska JB with magic gel and then flexed out the light. Then buried the JB and cables adjacent to the light in the driveway. Is this the standard way of doing it? best install method? Any advice/information greatly appreciated on this as obviously its not an easy/cheap fix if you want to change it Many Thanks
-
Hi All I have been away for a few days so now back at looking at my heating I tried to increase my flow rate on my UFH heating but only managed to increase it slightly to just over 2 in the end (embarrassingly my mrs loved it when I unscrewed it too far without thinking and I got a nice splash in the face!) One thing I am still tweaking is my weather compensation curve, its currently on 35 deg -5 to 25 deg 15 deg. But in error I set my downstairs thermostats to 22.5 and with a 1 deg hysteresis it was bouncing off it which I am guessing this is something we want to avoid. I have now changed all my house thermostats to 23.5, just confirming that the aim of using the weather compensation is that the UFH runs 24/7 and keeps the house a nice temperature - hopefully around 22.5/23 ish Is this how you guys run UFH with ASHP? Thanks again
-
Thank you @Gary68 I have confirmed all my actuators are working as they should.
-
Thanks again @JohnMo I will try both of these later when I get home I know when I looked yesterday my flow rate of my upstairs manifold was around 2L/m
-
I ran 24/7 since 7pm last night using weather comp (35 deg 0 and below) my ground floor heated up lovely and hit 22.5 within 2 hours and kept hitting it and going off through the night...is this right? However my upstairs is really struggling to heat up when the doors are shut to the bedrooms (e.g my daughers bedroom didnt get above 16.5 deg) but now its at 20 deg ish with all the doors open My gut feeling is that my upstairs UFH is just undersized/ineffective especially when its cold outside Currently I can't change the individual flow temps to the upstairs and downstairs UFH as they are off a common buffer temp but one options i thought down the line was to run my buffer at a higher temp and then blend the d/s UFH to reduce temp? Any ideas at all what to try next to try and improve my upstairs heating level? as when waking up this morning it felt cold getting out of bed (with temp ranging from 16.5 - 18) especially with the heating running all night and has been on 24/7 since Tuesday morning (apart from 4pm - 7pm daily) My set points are 22.5 downstairs and 20 deg upstairs, do these seem ok?


.jpg.c599658d442d35db01564703dfab44f1.jpg)
.jpg.4a19542ee755e0beedd113cf1baaf091.jpg)
.jpg.90c900cced6775cbf464bf3f51ae4a36.jpg)
.jpg.e0243b9a56b305c815fbcdc40d387131.jpg)

.jpg.4f7f13ebf366d2ea2b8ade6af09e5ffd.jpg)
