


Loz
-
Posts
99 -
Joined
-
Last visited
Everything posted by Loz
-
I had a rep from Dural come round who was in the area and he came up with what should be done, decoupling mat, flexible adhesive and also went for expansion joints in the large doorways and also a couple of strategically placed micro joints (an epoxy sealant that is same colour as grout but more flexible) one of which followed large crack as best as possible as laid tiles such that there was a joint running mainly with it. The company that poured the screed also came back and ground out the crack a bit, poured resin in and put some metal cross stitches in - think this was particularly good for the crack that looked like might run some more in the future. We are 6 months back in property with UFH being used a lot in the recent cold snap and nothing appeared so far - I do worry a bit now and then a crack will appear but seems to be a good solution that is holding up - in fact think had a bit of a lucky escape as the original tiler who is a bit old school was not going to use a decoupling mat or any doorway joints as far as I could tell and this seems to be pretty standard for screed UFH nowadays. Good luck, Loz
-
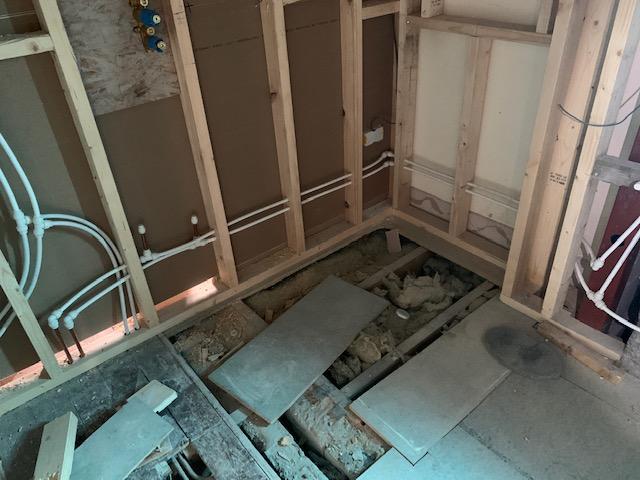
Hi, Recently posted on problem I had with a single radiator in new extension in this post and thought I had solved problems with suggestions on balancing system on this forum - thanks for help so far. To re-cap we have an old 1950's house with 10mm pipework to the rads that are plumbed in parallel. We recently added a two storey side extension which has pretty much broken us financially and mentally. The house is all finished, plastered, tiled and painted and we have been having problems with the heating system (I wish I had spent more time testing before reaching this stage !). As part of the works we had a new Baxi 800 series system boiler installed with 15mm pipework coming off the existing flow and returns (28mm copper) - although not exactly sure where they came off. So the main problem is that in our new bedroom the radiator has not been working. If I turn off most of the rads in the house and with boiler pressure at 2.0 (baxi docs recommend 1.5) I can get that rad working and flow and return are correct way round for that rad. I have been balancing and bleeding system to death for over a week and what I have found is that as I start to open lockshields even a tiny bit to get a rad to work at some point the problem radiator will stop or if it works another rad stops working. Have done the balancing in order I think they now heat up after investigating and watched umpteem videos and read tons of internet postings. The root of the issue I believe is the pipework to the problem radiator, the picture below shows the pipework: The pipes in question are the two coming up from floor in all white speedfit. They go into a T-junction, the downward T runs about a metre to a towel radiator in bathroom (the studs are an ensuite) then the other two pipes run upwards to the attic, from here another small rad is T-d off down a wall and back up and that rad doesn't really work either but the main issue is then those pipes carry on up to the top of a vaulted ceiling, and then back down to the floor level seen in pictures, it is one hell of an up and down run and just don't think the pump/flow has enough gumption to get water up, over, down, round the rad and back up. Looking at it now not sure why the plumber didn't just follow the hot/cold mains water pipework round as the problem rad is only 2m away at same level on opposite wall or simply run them in floor, probably took more effort and tons more pipe to do it how it has been done. With severe tweaking of other rads and boiler pressure at 2 I can get hot water to the inlet of the rad but never round and back from the return unless I kill other rads which don't want to do as a freezing house as it is. Given the towel rad run from the bottom of those T's is so close could the return be going up the pipe and stopping the flow/return of the other rad ? Any ideas on what I can do ? The bathroom floor in picture is now tiled and finished. I have worked out I can get from the problem radiator to the boiler by opening up a non tiled wall and bringing down a newly finished kitchen ceiling and lots of drilling through to garage but a lot of upheaval and mess and cost. I could then tap that rad into the main flow and return right next to boiler somehow going into the 28mm pipe - just worried that might steal all the flow from the furthest rads in the system which are in the coldest rooms. I can by removing a wardrobe and a portion of plaster (pretty easy) get to those T-junctions - is an option to plumb those 3 rads in series so they act as one long pipe effectively or am I on a loser with the big up and over flow in the vaulted ceiling ? Guess no way of upping the pump in the boiler doesn't seem to be any speed settings in documentation, there was lots of discussion on size of boiler and those are coming back to haunt me now - wish I had sized pump and everything separately as we are freezing ! Any advice greatly appreciated. Many thanks Lawrence

-
Thanks for all replies, I spoke to a couple of builders and does seem limestone chippings are what predominantly used for all sorts of drainage in west wales, they are washed and have gone for those, it is not a massive trench/drain doing so if needed to be sorted again further down the line then wouldn't be the end of the world, seems what everyone uses here - maybe being washed and where they come from locally the shedding of loads of sticky dust isn't so much of a problem, if there was 20mm gravel locally at a decent price would likely have gone for that. Many thanks again, great forum, Lawrence
-
Just realised the second gravel link isn't available locally - would need to go for gravel at 3 times the price of the limestone chippings - any advice greatly appreciated, Lawrence
-
Hi, Dug trench for French drain in clay where flowerbeds are, was about to order the chippings/gravel and have totally confused myself on material and size, the suppliers been using seem to have only limestone chippings and been reading on some posts that this is not suitable as pourous and can create deposits over time, another supplier has decorative gravel - on all the sites with limestone chippings they do say suitable for drainage but on sites on french drains say not to use limestone - would the second link be good- is that the right size - was going to line trench with geo textile fabric and also the pipe, only wanted to go for one type of aggregate if possible, Any advice greatly appreciated, Lawrence
-
Well good news, I now have all the radiators working, the problem one which is a stupid designer radiator I regret buying seems to love to trap air, the bleed valve is at correct end but there were cold patches at other end, did loosen the big nut to let air out, would probably benefit from a bleed valve each end, even now there seems to be parts of it that don't get fully hot, there are thin pipes running up and down at the back and you can feel that not all hot but the radiator as a whole is no longer stone cold, running pressure at 2 - not sure if that is too high but seemed to help overall. Have a slight dread feeling that those high up loops in vaulted ceiling will trap air at some point but for moment it is celebration time ! Many thanks for all the help, Lawrence
-
Trying it right now - turned all rads off this morning and left the troubled one full open and yes did force water through - made lots of gurgling noises and heated up - flow side got hot first and then return so seems is plumbed correctly in terms of flow and return, been turning each rad on in turn with quarter to half turn on one side and TRV to where roughly would want it if everything good, been leaving it a while between each one and trying to do it in order from boiler as far as I understand the plumbing, dreading the troubled one going off, so far so good but have a few of the big ones to got yet which are quite far from boiler, football slowed me down a bit, thanks for help so far and will report back....
-
Pretty sure there are no bleed valves, I can get to the pipes in the attic - possibly not at the highest point though, had read about airlock but thought by having just that rad and trying to force it through would have some joy but guess could be one on the return at the top of the bend as water shoots out when bleeding so no issue on flow, will try original plumber but not been a great journey. Could my thought on flow and return being swapped have any mileage ? Many thanks, Loz
-
Hi thanks for quick reply, I have had all the rads off at both sides and don't think water has ever been properly circulating but will try again just to be sure, I have dug out a picture of the plumbing in question which is all white speedfit, you can see on left the t junction where at the bottom two out of the T go to the towel rail which works fine, the top two go up and over the vaulted ceiling and down the other side to an h block at the bottom of the rad, is there any way what I would be seeing would happen if the flow and return were crossed into the radiator that isn't working as the installation diagram found for it suggests a flow direction. Kind of hoping this is it as with careful measuring and cutting out the back of a fitted ikea wardrobe and into the plaster board I can get to those T junctions. Many thanks, Lawrence
-
Hi, We have just had an extension/renovation project completed and been having problems with one radiator. Have watched a number of videos on balancing the system and had a few goes. Have also been bleeding system like no tomorrow. The one radiator in question was plumbed in a less than ideal way now I look back at it. In between it and the heating system is an ensuite with a high vaulted ceiling, it would have been easy with a few holes to plumb the radiator in the floor but instead ran up far wall of ensuite along top of vaulted ceiling and down to the radiator. No matter what I do I can't get the water flowing in that radiator, the inlet is red hot and when bleeding the radiator can get hot water into it but the outlet never gets hot. Today had my partner filling the system keeping it at 2 bar why I bled the radiator filling 4 2 litre milk cartoons a few times - I do hear air hissing out along with strong jet of hot water but starting to think the air noise is just the noise due to pressure and bleed valve being open as whilst it does ease off have now repeated the above a few times and radiator is getting hotter but not the return flow -think just slowly filling it with hot water that isn't going anywhere. I am thinking there is just not enough power to get the water up over the vaulted ceiling, round the radiator and back up. It would be a nightmare to change the flow as everything tiled (floor, walls), painted etc, there is one possible route but does mean holes in new ceilings and walls and a lot of work but before thinking about that wandered if anyone had any thoughts on anything else missing ? Many Thanks, Loz
-
Thanks for taking time to reply, sounds more likely than the first response, given there is water in that spot then would add up, what spooked me is directly above the combined sewer pipe, maybe does lead down and trapped as no smell, guess this ends with excavating down or camera along to see if anything joining in at that point. Many thanks, Lawrence
-
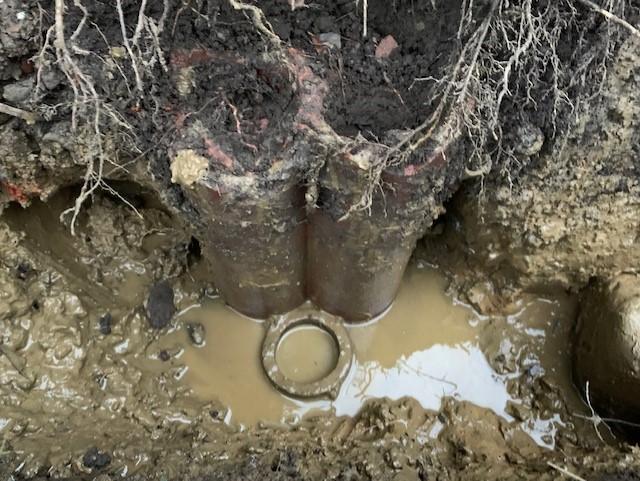
Hi, Was digging a trench in garden to help alleviate a drainage issue, got bit carried away and starting digging further away from where water had been collating in recent prolonged rain, we are in heavy clay soil. Then discovered what turned out to be a triple clay pipe, coming up vertically from ground, as you can see from picture two bigger pipes and a smaller one. The two big ones are broken at top and filled with soil, the smaller one had mud and stones in - managed to get some out and poke a thin rod down but ran out of rod at about 30cm, anything thicker can't get past mud. Now I wouldn't be overly worried other than two things, there seems to be water collating there - not normally noticed it - garden has always been wet due to clay but is no where else at moment after couple of dry days. There is no smell to it - reason I mention that is that seems to be directly above the sewer line from next door that runs under my garden, there is a manhole his side that is accessible and a buried one in my garden, these pipes are about 1.5m from neighbors and 2.6 from our buried manhole. We are on combined water and sewer system as 1950's houses. Any ideas what they could be - never seen three pipes like that - guessing this may end up with a camera from my neighbors side to see if any chamber or any connection below where the pipes were but thought would post in case anyone seen anything like those before: Any thought, tips, ideas greatly appreciated, Many thanks, Loz
-
Thanks for all the replies, it doesn't drape down into guttering, seems to be flapping about in between, is a steep pitch so hoping bulk of water making it into guttering, will have a careful look when next raining which given in Wales won't be long ! Those eaves trays look good but guess too late now and face with just getting roofers to trim the felt back so not flapping in wind, Many thanks, Loz
-
Hi, Had a new double height extension with pitched roof and all looked good, the grey felt material pokes out under the new roof tiles couple of inches in places towards guttering, when wind is in certain direction and strength as it is quite tight along the length of the roof it flaps/vibrates in the wind and as it is our main bedroom is driving us nuts when it happens, should this have been attached up to the edge of the roof tiles or is it just a case of getting up there and trimming it back flush with the edge of the roof tiles ? Many thanks, Loz
-
I was wandering if at this point most floors are covered over so cracks aren't seen, tiler is using a quality matting - has gone for Dural as has links to the technical guy, seems the alternative to ditra mentioned above - they do seem to be the two main players. Many thanks for all replies, been really helpful
-
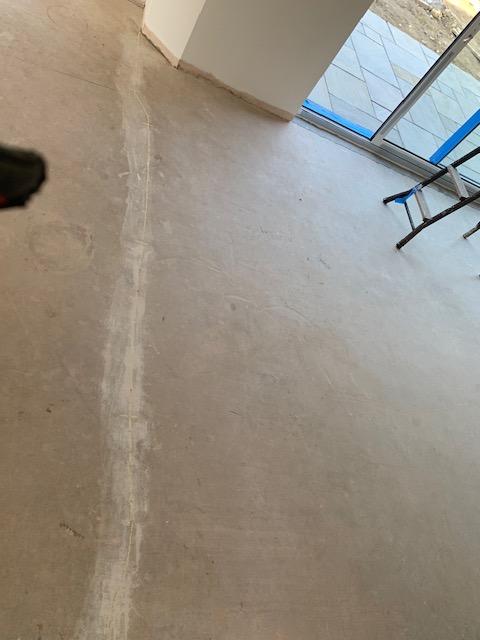
Here are pictures of the cracks now repaired, the original one between the two buildings was about a 1mm and there should have been a joint there but the other new one (first picture) was less than a mm:
-
-
I guess just not sure where any new cracks could appear and think would look weird to have too many just in case as not a particularly large space, just really worried now that the new crack is the start of a nightmare (not been a lucky build so far) and can't see an obvious reason why it appeared where it did and then doubled in size despite it appearing and enlarging with UFH having been off 2 weeks, I really wish someone involve din build had mentioned not to turn it above 45, the screed guy said on his system you can't physically turn it up above 40 whereas on mine goes to 65, gutted as been painful so far and not sure whether to just gamble now and go for matting and tiling and hope for best, just can't face having to rip it up at later stage especially as tiling the entire ground floor, Loz
-
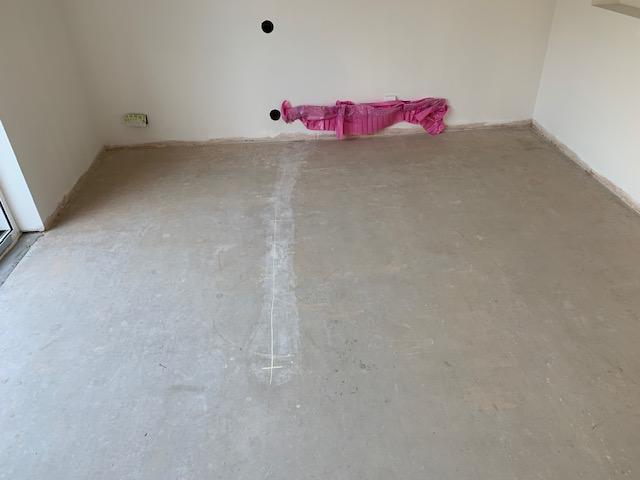
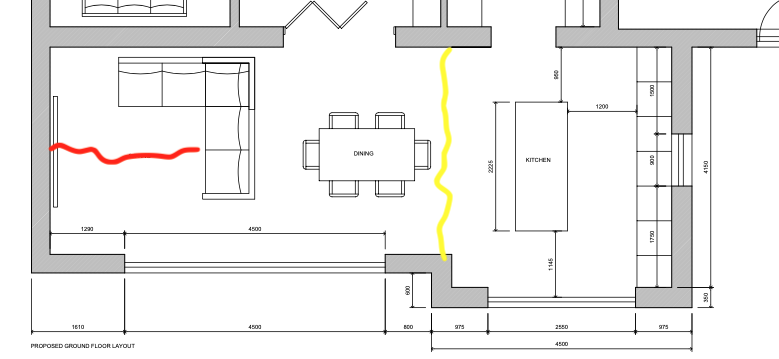
Thanks for replies, the floor was pretty much dry, the first couple of months from October there were no windows just OSB boards so was pretty damp and then probably took til February to get underfloor on, was reading 0.7/0.8 few weeks back when whacked the heating right up to try speed up last bit - thought would be bulletproof at this point. Have included plan layout of ground floor - first crack in yellow appeared after turned heating off from 65 to zero ready for tiling, may have had a lucky escape as original tiler wasn't going to use matting and maybe that was an accident waiting to happen as is the joint between the two zones and two different rooms on join between new double height extension and existing single storey. New tiler is going to line tile join up on crack and use some special joint there. the new crack comes off existing external wall no where near any entrances or stress points, may have been shallower there and also there is no under floor loops for 50cm off the wall. The UFH been off for two weeks and crack started last week and doubled in length over weekend. Has now been slightly disced out and stitched with resin. Concern is will any more appear after tiling and could the 65 degree heat compromised the screed - they screed company said a chemical reaction happens above 55 degrees which compromises it but couldn't elaborate. Not sure if matting would have saved me from new crack given the additional measure taking on the first crack, guess not a lot I can do but any input might help reduce or increase stress and worry levels ! Loz
-
Thanks, thats what I was hoping other than the new crack that has appeared over weekend (UFH been off for 2 weeks) is in a place that can't be explained, I was kind of happy with the other one between the two zones/rooms but the new one runs off centre of wall at one end of the room no where near any entrances, screed guy had no idea why would have happened and just concerned that having had it up too high that more will start appearing after tiling, Loz
-
Hi, Been having a bit of a nightmare with liquid screed poured 6 months ago, had it sanded at the month mark but took ages to get underfloor heating working - probably at 3 month mark. Then turned it up couple of degrees a day until water temp was about 45 degrees and left it permanently on, tiler checked moisture level each week and was taking ages to dry out to the 0.5 mark. Stupidly in last couple of weeks when really needed floor tiling started increasing temp of water a bit more each day to 65 degrees - I was unaware that was a problem. When I turned UFH heating off sure enough a crack appeared (6 month mark) between the two heating zones. Screed company came round and have been really good and said they should have put expansion point between two zones, lightly disced it out and poured resin in crack. Tiler is using matting and putting some sort of special joint where crack is. Problem is since then another crack has appeared in a strange place that no explanation for - has also now had resin put in. Screed company says above 55 degrees something happens to screed and now really worried I have screwed up the entire floor. Tiler is due to start Monday and is going to mat (Dural) the whole floor - should I be worried that long term going to have problems - to be honest not sure what other option I have. Wish knew about max temp and also should have gradually turned it down rather than just switching it off, any advice greatly appreciated, Loz
-
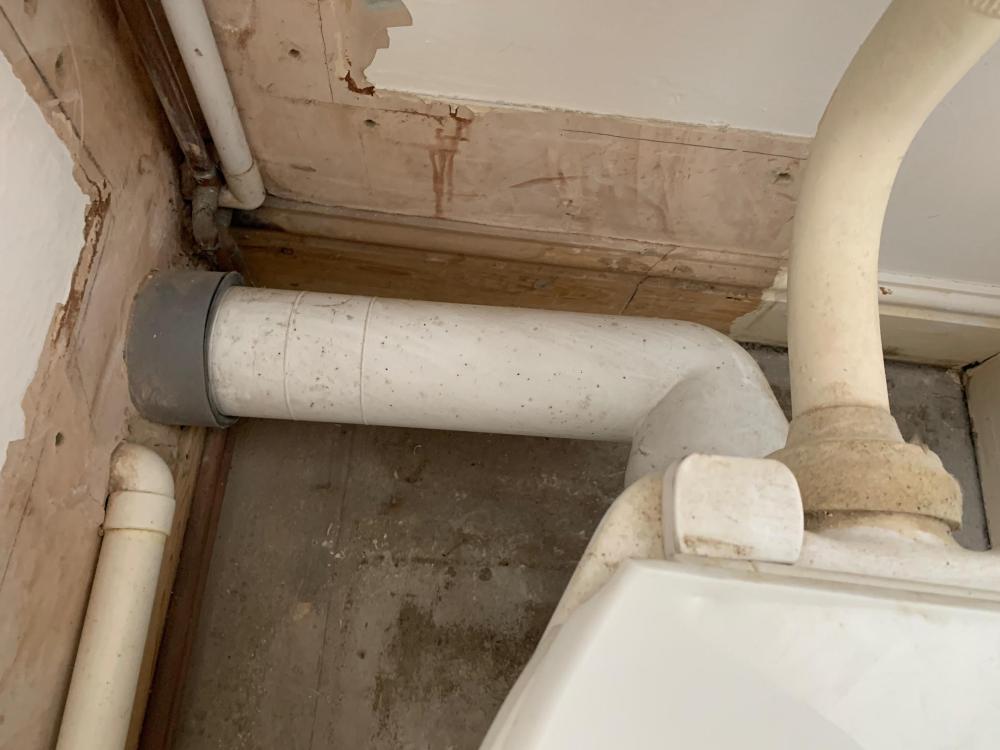
Apologies can now see been a bit dumb here - I was thinking the grey pipe showing was some sort of special piece that I needed to join inside using 3.5" pipe can now see that something like this would do the job : Right angled flexible pan connector. Guess I can then go the close coupled toilet and then just come off the wall to go into the grey pipe by the side wall and box it all in - think prefer that to going for a boxed in closet toilet, many thanks for all the replies, very new to the plumbing side of life, Loz
-
Thanks for quick replies, unfortunately the toilet can't change orientation as a narrow cloakroom so need a 90 degree bend as the waste is on the side wall. The big white pipe in picture is 3.5"/90mm and goes into the grey plastic T that is sized to take it so can't see how could change this to a 110 without some sort of adapter. There doesn't seem to be any 90 degree bends with flexible adaptors on the market in an all in one piece, have found a 3.5 to 4 inch adapter that could then attach onto but can't get head round going from bigger to smaller as won't waste collect on the rim where they meet inside. Many thanks, Lawrence
-
Hi, Started to renovate downstairs cloak room which thought was going to be relatively easy and then removed boxing around toilet waste. I'll be honest I don't know much about plumbing which I am about to demonstrate ! There is a grey plastic waste part that comes into cloakroom from outside, being plastic assumed this was relatively recent but starting to doubt that as the white pipe shown in picture going into it is what I now believe to be 3.5 inches rather than what seems to the new standard 110mm from googling replacement pan connectors as wanted a new toilet. Started off assuming was going for a close coupled full access toilet and was just going to replace the plumbing to/from it and re-box it. Annoyingly the soil pipe is a bit of a distance off the wall - too much to get a close coupled back against the wall and make a 90 degree turn into that waste - started looking at flexible connectors but they are all 110 and not sure if bending into wall to get toilet flush (no pun intended) to rear wall and then back out to get into waste would be a great flow. Now thinking of going for a boxed in cistern but still not sure of how best to connect new pan connector to that 3.5 inch pipe including a right angled bend. Seen on other posts a 3.5 inch to 110 adapter but can't get my head round going from bigger pipe to smaller - won't stuff just collect on rim of the join. The access to the grey waste thing that goes into the ground outside the house is not great and has hedge in front/over it so don't think can easily be replaced with 110. Any advice greatly appreciated as sure missing something obvious: Thanks, Loz
-
Thanks for reply, that is what starting to think as well, go with everything flexible and hope for the best ! Many thanks, Loz

