Kilt
-
Posts
117 -
Joined
-
Last visited
Everything posted by Kilt
-
Plastic pipe leak at compression joint on isolating vavle
Kilt replied to Gooman's topic in General Plumbing
+1 for This. If does t fix, you need to take it off and check there’s a liner in there. you can use PTFE on the olive as well. -
Two pumps running in tandem. They’re set to 4 bar and we don’t have any pressure issues. however life would be so much simpler if we did have a tank & pump per property! ?
-
We’ve just had a new manifold installed on our water supply, to provide us with Toby’s, but there is a dead leg to end of manifold, attaching it to a unused pipe. Leg is maybe 400mm-1000mm in length. we have a private break tank and private pumps, but original water comes from local board, so water is treated. the manifold supplies several properties, so there’s a lot of water flowing through it. im going to go back to installer of manifold and ask same question, but wanted a few extra (better) brains on matter. Is the dead leg anything to worry about? 50-60mm mdpe at 400mm is what about 1 litre?
-
Nothing to do window no cavity tray installed. it’s a traditional 1700 rubble built barn converted 20 years ago. we’ve replaced a rotten window, they’d created a crude tray out of dpc between plasterboard and lintels. we re-pointed last summer, wall was in horrific state, could put fists into gaps. still leaks. Only way is to install a tray or Harl and lime wash. we’re going for latter as it’ll be a full waterproof jacket that will see us out and is what would traditionally have been done.
-
We decided to go with a charted surveyor to come out and he said same. Insufficient mortar above, beyond and behind the lintel. Voiding enabling water to penetrate. Had endoscope and thermal cameras out to find issues. Last storm we had close to 15 litres come through onto window head (its was a +12h storm, with localised flooding and 70mph winds)! Recommendation is for Lime harling, lime wash, and slate drip detail above the big lintel; it's what traditionally would have been applied, if this barn had been built as a house in 1700's. Going to be VERY expensive, but hopefully fix the issue. Utter kicker but everything crossed it finally fixes leak.
-
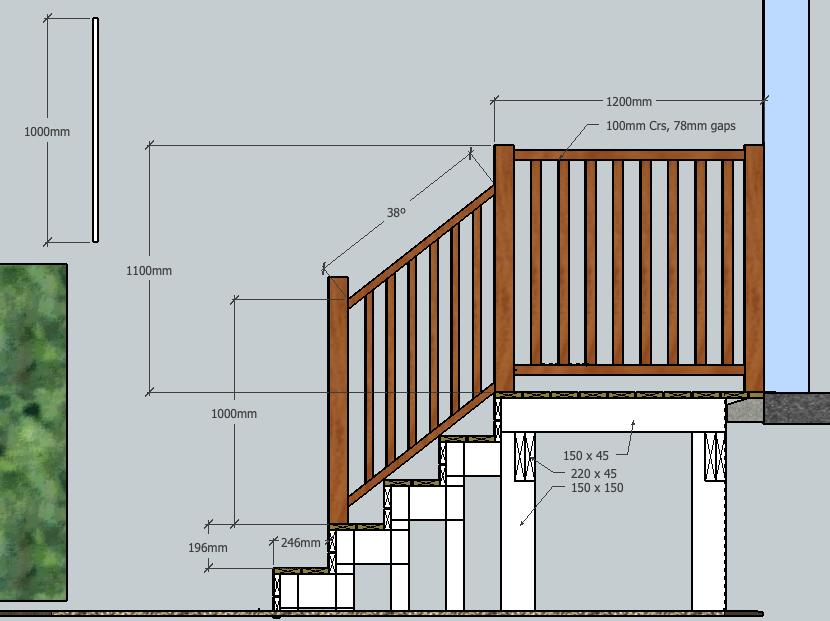
same. However, this is a consideration in a planning application and would probably be flagged. Might need to build fence up or lower deck. If you can keep quiet I would, however if anyone complains, you'll be fined.. think fines about £1000 now.. I've had to go through planning for decking myself, as I was altering a window into a door and had a warrant open (meaning the cat-was-out-of-the-bag), and the cost of that of applications was about £300 when you factor in time of drawings etc. What's dimensions of your corner posts? It looks a cracking job by the way. What's the metal work they're sitting on? Are the rim joists/cross just bolted to corner posts, or are they lap joints? I had to have lap joints as well as bolts. As mentioned, you need 100mm or less gap between balustrades, if you're 125mm spindle centres, you might be ok. You also need to ensure there isn't 100mm gap between stair stinger/treds and balustrade/base rail. Steps need to meet minimum requirements (look up, as gets complicated quickly). As over permitted height, I think Handrail needs to be 1100mm above deck floor level, you need 1200mm from a door threshold to top of first step and in Scotland, (as a FYI), your balustrade must be vertical (reduce kids climbing ). Attached my approved (scottish) planning app drawing. Pretty simple to pass, so don't think you'll have issues, but there are boxes that have to be ticked! (lap joints etc).
-
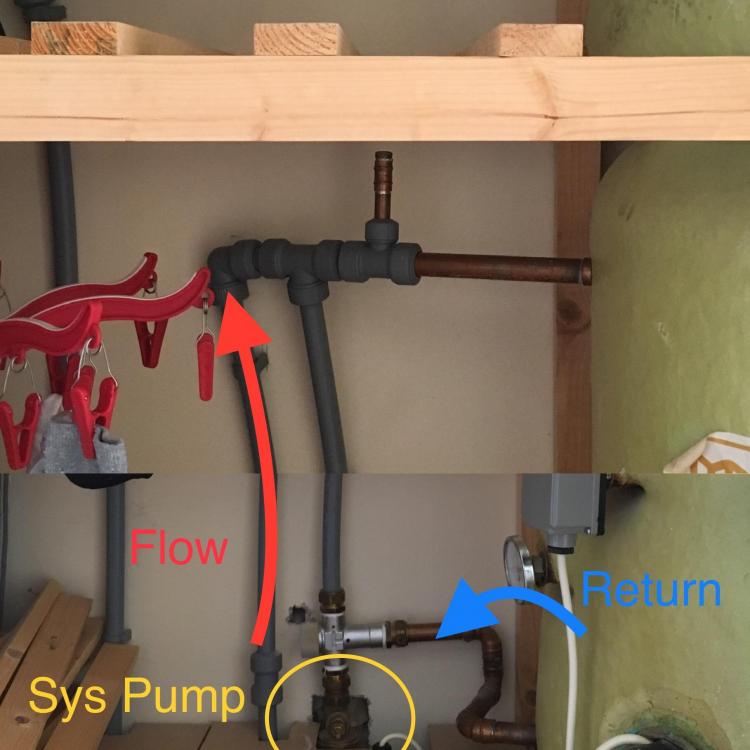
If You zoom in they’ve plumbed it correctly in terms of flow - h= flow from boiler c = return from TS m = return back to boiler
-
I should clarify, above photo is of previous installation. This tank was ripped out 2 years ago. our new tank and pump is as per original drawing. I just recently found the old photo and couldn’t work out why the ORIGINAL system had been plumbed this way. Makes no sense to me.
-
Apologies for resurrecting this old post, but I found a old photo of our old setup, and I can’t figure out why they did this. can someone far cleverer explain thinking on this pipe work?
-
The thermal store is unvented, we have ball valve in part of tank for automatic fill, so by comments, there’s isn’t a coil for system, it just heats the whole 200ltr directly? it’s a McDonald Thermflow multi fuel cylinder manual doesn’t state/show a coil for system, but nor does it for UFH circuit, however our old store failed on the UFH coil (got a hole) and we got a direct replacement.
-
If you were to guess, where do you think circuits combine, within the thermal store? I can’t find anywhere else they join (yet), however there’s about 20-30% of pipe work I’ve yet to uncover (would mean trashing another bathroom).
-
Thanks... as thought, it’s like a standard system fill/pressurise. Any thoughts on how system flow/return is filled/pressurised?
-
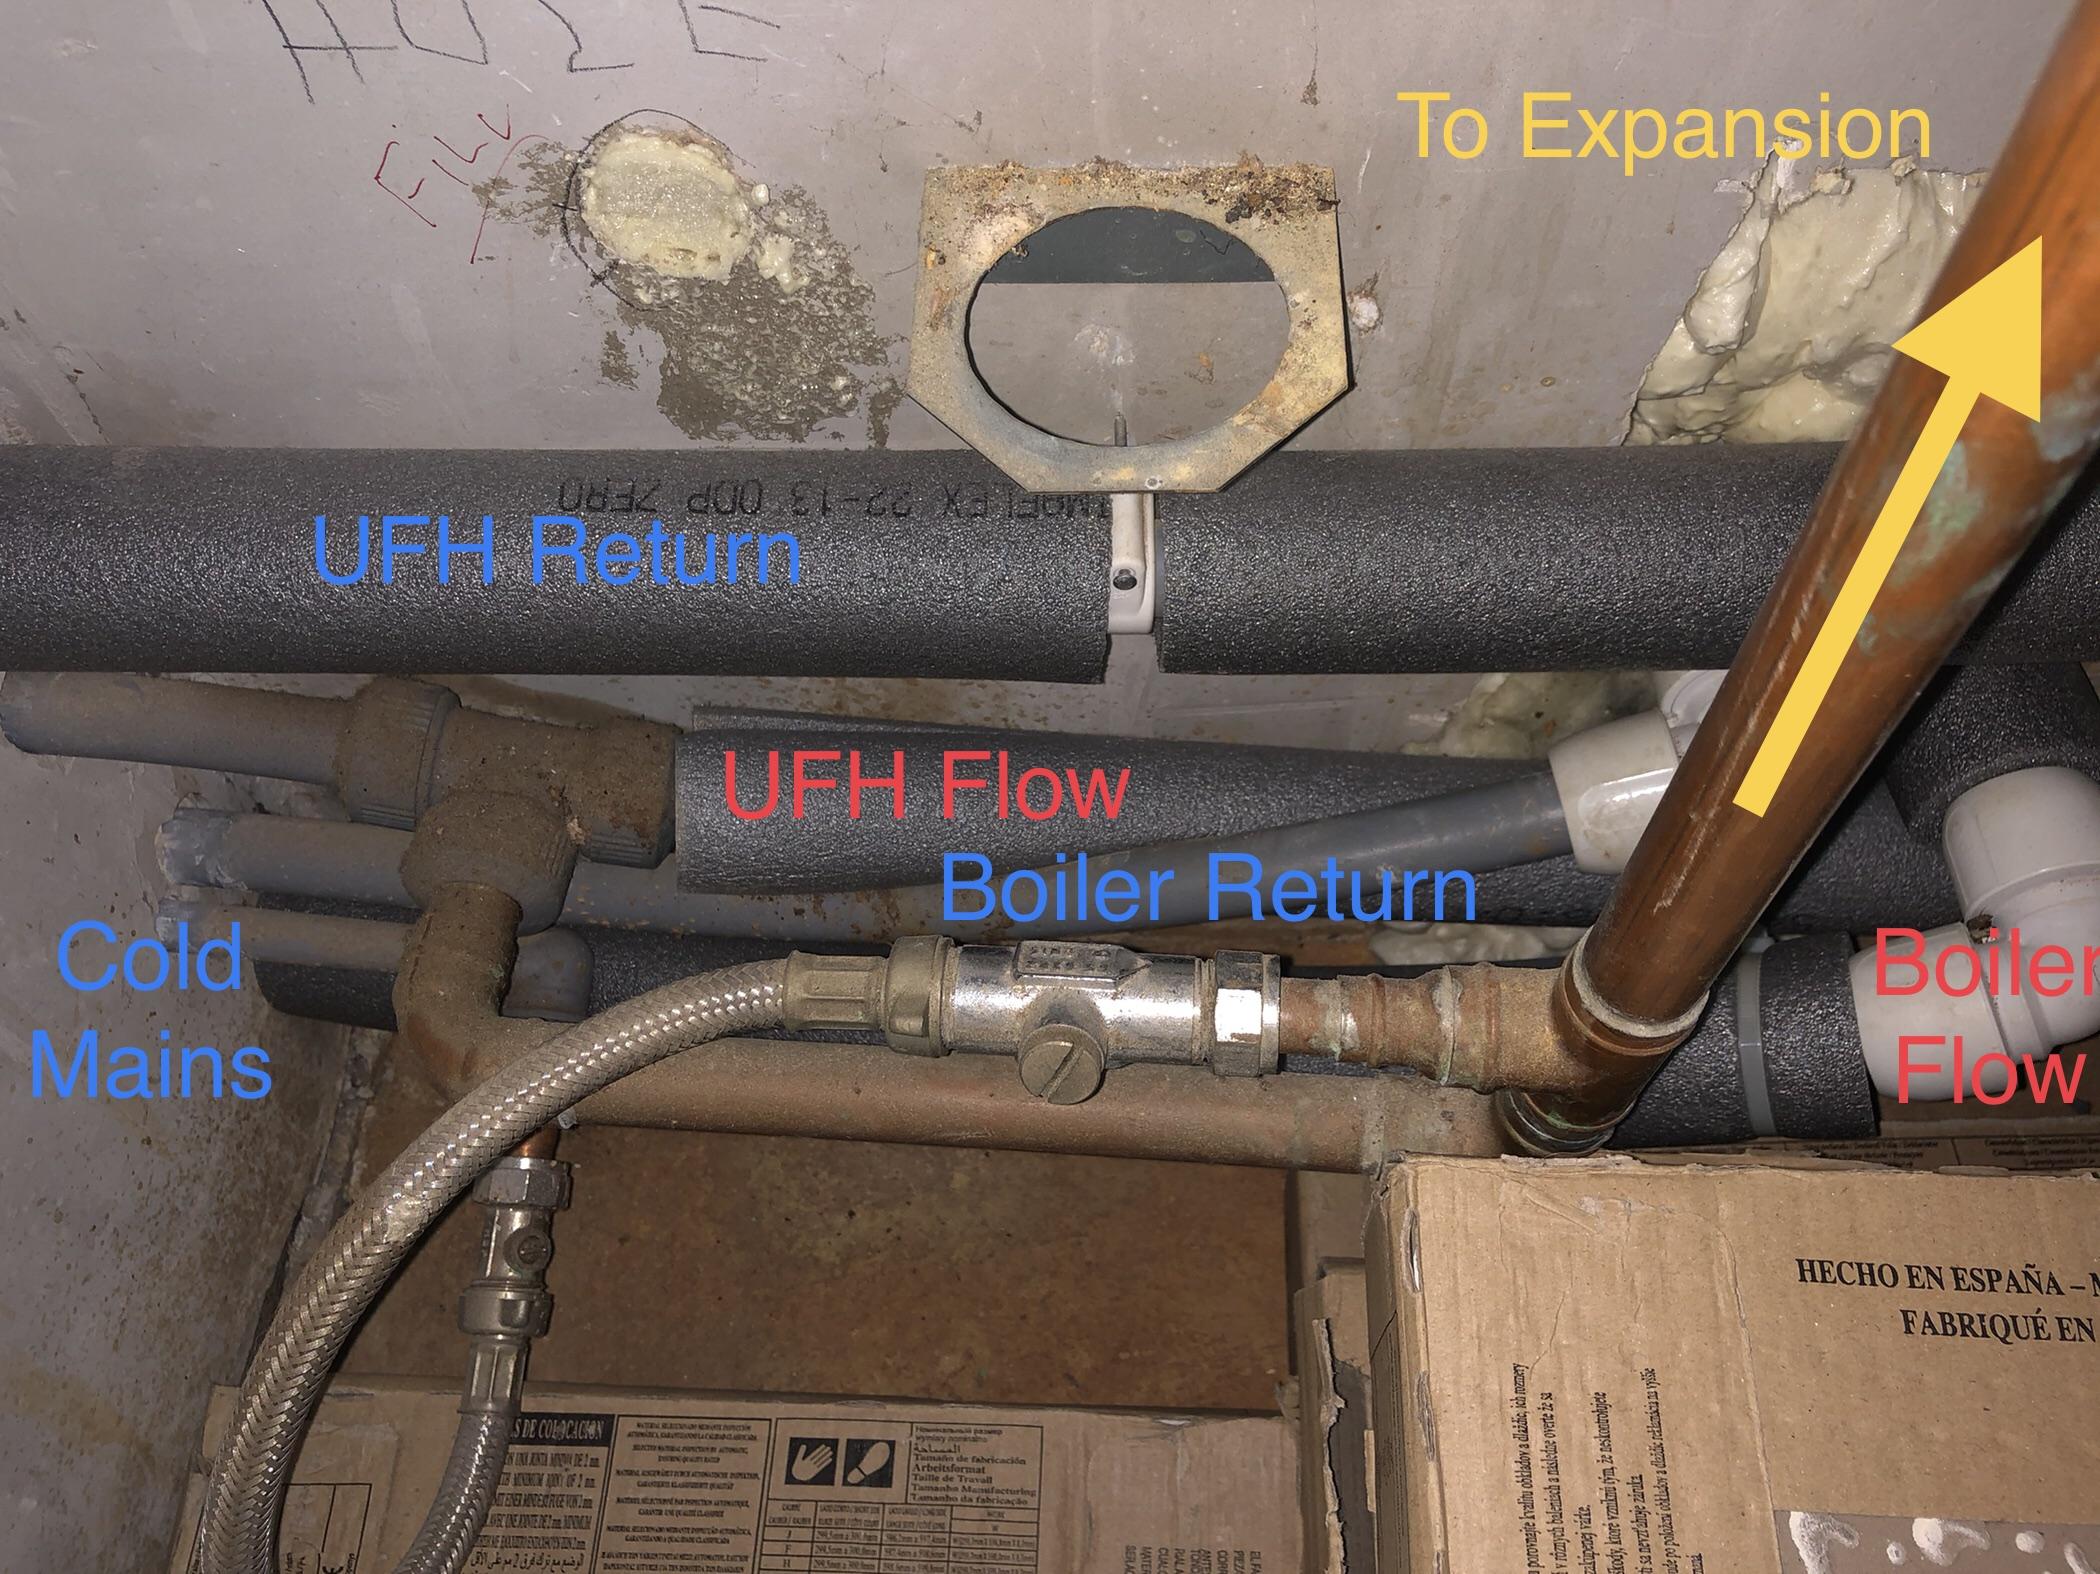
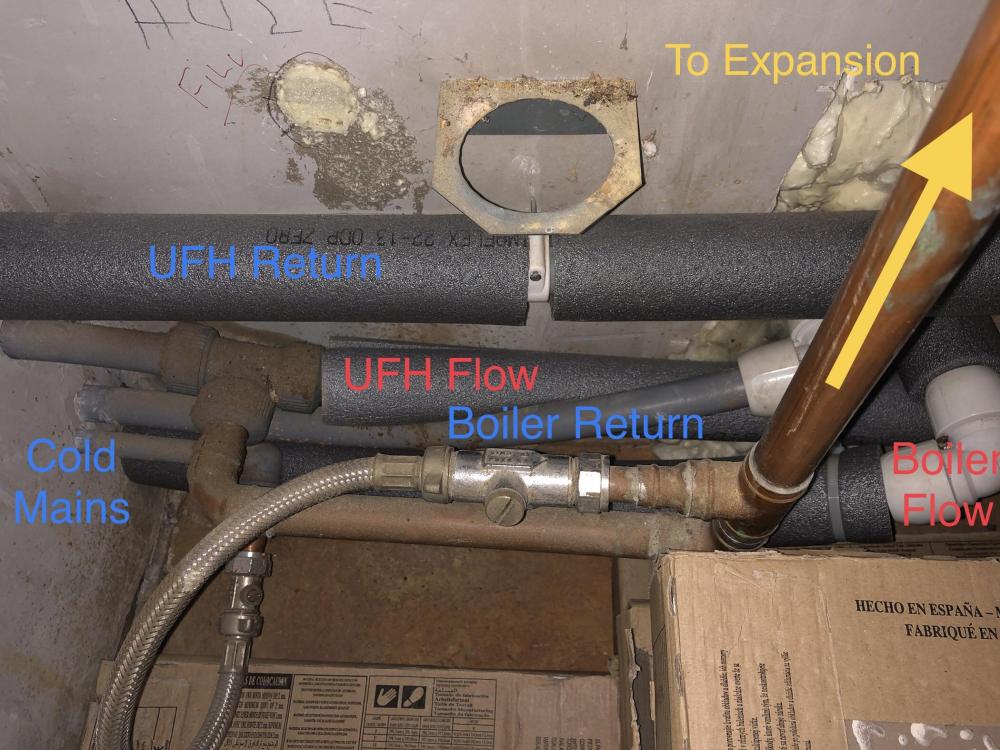
I’ve a couple of UFH manifolds, feeding 16 zones, 3 of which are rads. I’ve gutted a bathroom and popped one of the rads off. When I come to put new rad on, I’m going to have to refill and re-pressurise the circuit/manifold. A bit of research suggests this is normally done via a hydraulic hand test pump on the manifold in question. However I believe my system has a built in pressurising system (see photo and labels). so no need for buying a hydraulic pump. is this correct? If this is correct, I can’t work out how the boiler circuit is filled/pressurised. Not issue at moment, but trying to learn. System is: oil boiler -> thermal store (filled by gravity/header tank) thermal store has system heating coil, UFH coil, as well as solid-fuel coil (unused) and standard immersion. many thanks.
-
As the span is 5m, I’m not sure oak would be able to cut the mustard and help prop up the joists, and rooms above. also I don’t know what costs are oak v’s steel. also finding builder who’d use it. With covid and it barmy for trades, it’s taken 6m just to get to quote stage. Timber frame is sat on foundations, scree/UFH within the timber kit.
-
its a timber kit internally. its a (very bad) barn conversion (circa 2000). New timbers throughout, except for roof joists and rafters. They're original, for some reason.. amount of woodworm, I'd have replaced them, it's not like its a listed building.
-
ha ha! I like your thinking. Maybe when we get a new roof? We'd prob need a 18m long steel in the roof to support the pulling up beam.. roof beams are 300 years old and riddled with woodworm, I worry then can handle my weight when I'm up there.
-
SE spec 200mm (+7")which is what builder also initially stated. I'm playing around at moment, with possible bringing whole wall out 200mm, and building "niche's" or bookcases into the wall or just a meter section to enable furniture to go against steel.
-
all of this, except ceiling is already down. Plus we've a biscuit mix wet UFH on first floor (whole reason we have sagging joists I think). Finally I was give a estimated electrician bill of well over a grand, as it'd be several days work. Don't get me wrong, I'm not trying to do things on the cheap-n-cheerful, a grand doesn't sound much in "Building budgets" scheme of things.. If I had builders that were willing to quote on installing joists, it'd be an acceptable consideration. But none have said it would work, SE's have agreed and would involve some form of access from above. If i could get sparky in, re-wire and have no beams visible, that would be my ideal option. It's just not one that we have budget for or tradesmen willing to do.
-
Yeah SE said no need for warrant or planning, as you're "fixing" issues. I initially was under impression that Uprights, would be lost as much as possible in the wall, but that was when I thought they'd be sat on foundations. As builder wants to attach to vertical timber kit, via thunderbolts, the uprights are going to be 100% proud of wall. There's options to maybe build out the wall to totally hide it...
-
This is my major concern, which led me to post here. Sat on scree and PIR just doesn't feel right. I'd feel much happier if uprights could be dug down to concrete/rebar foundations. Its just the unknown UFH pipe routing, that'd be a really bad day if that got damaged. It was done before we had the property. I think central beam, clad in "decorative [insert current fashionable wood]" is probably an option. It would lend itself well to this property. Joists? with 80% of house wiring going through the current joists (solid ), it'd be an expensive electrician bill. This was my first thought. Nice and tidy and strong. I've discussed making flitch beams with SE, but no-one wants to touch putting new joists in, due to all the wiring and services (I've had 4 joiners/builders and 2 SE's out). I think there's just no room to get new or supplemental joists in. SE said as well, with the ceiling sagging, the bathroom walls above will have become load bearing. If ceiling space were totally void, then maybe pois' in would be an option.. just being led here by professional advice and costs.
-
I have a SE plans for improving deflection of first floor joists, which is to cut joists, and insert an RSJ, sat on pad stones.. However due to services and punching through the timber kit to external stone work to build pad stones, the cost of work is significant, and will probably require a massive re-wire, as 80% of electrics run through the joists being cut. An alternative option by builder which is far less invasive (and thus cheaper), is under-slign an RSJ onto vertical steels, which are thunderbolt to the external timber kit walls (which will be beefed up). We have a screed floor with UFH, so digging down to foundations would be tricky (dangerous). The span is 5m The deflection is bad, however SE said the house isn't going to fall down. So any repair is purely to stop bounce, and level the 1st floor up, as it has also sagged. The repairs don't need to be structural, if that makes sense. I simply can't afford the SE's "invisible" option, as so many services would need to be cut/altered and I don't mind having the RSJs encroaching on the room, but I'm just putting it on here to get some thoughts. The bathrooms (above this room) have leaked 2-3 times with previous owners, as I have ripped out one of the bathroom and found evidence of the previous decor/mould. This has to be due to the deflection and movement. After it was built, the centre joists have sagged/settled by over 30mm, which will have caused some serious issues in a bathroom!!!
-
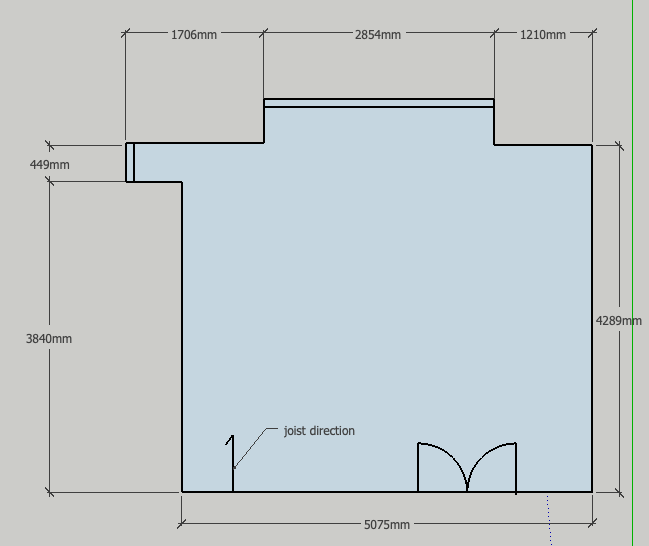
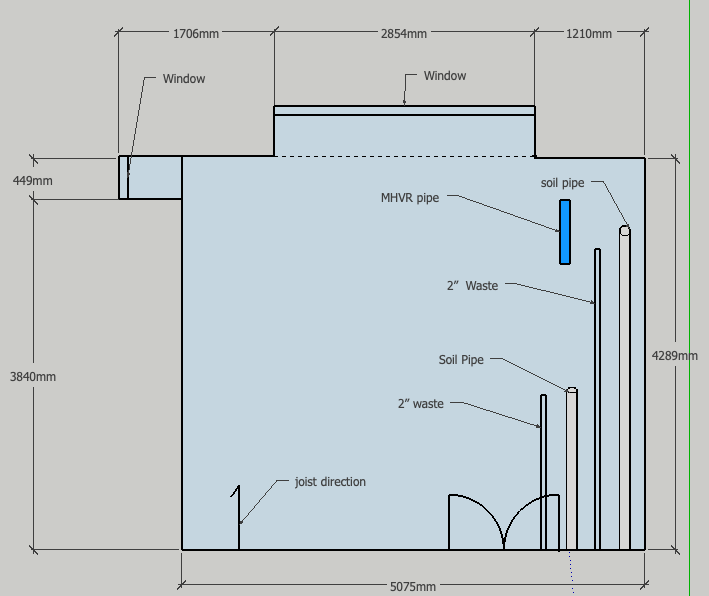
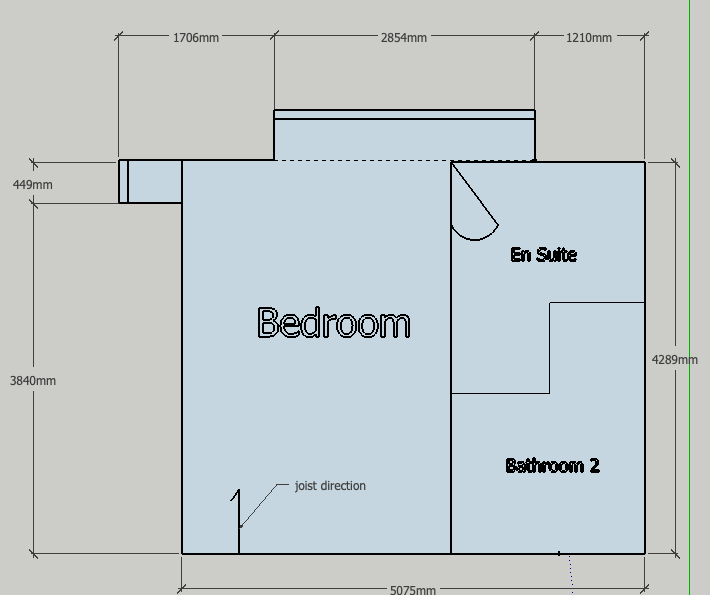
Thanks for reply.. I’d love to, but It’s a money thing, however no ones mentioned L beams. Hmm. Running through joists we have 2 x soils, 2 x 2” wastes, 1 x MVHR and 90% of wiring for house. it’d mean a massive electrical rewire, and cutting soils to slot rsj in, then pop through rsj. SE suggested slotting an rsj in 3/4 into span, which would solve drainage issues, but we’d still need 4 rings and 2 light circuits cut. Plus joists are bananas, so cutting 3/4 doesn’t fix 1st floor bow. In bathroom, we have 35mm fall over 1.8m from wall to doorway. underslung rsj either in a goal-post or pad-stone seems to be easiest option. no rewiring, no joist cutting, levels 1st floor (by 10-20mm), no alterations to drainage, and only a loss of 150-200mm down centre of room. its not ideal, but Ceiling is 2400, so not horrific.
-
I wondered is there any options for installing lights in/around an rsj? I was think LED strip or something like that, recessed into first layer of PB, but tbh, it doesn’t need to be that powerful a light. Just token really. Living Room is 4.4m x 5m and we’re going to have to under-sling an RsJ to stop some terrible deflection in bedroom and bathrooms above. We currently have 6 spots in the LR (2 rows of 3 spots) but the Rsj will take up the current position of spots, I plan to put 8 spots back in (4 rows of 2 spots). just worried rsj will cast a shadow down middle of room.
-
Yeah, this is my inclination too. I get where trade recommendations for harling are coming from, it’s traditional, and what would have been in place here, if it had been a dwelling at time of construction. But at that cost.. a tray is going to be cheaper and will achieve same result. We don’t have any damp issues else where.
-
My major concerns with any lead flashing is the potential for the lead to stain window below. I agree, it’d be a great solution, but with the weather this gable gets, we’re going to get lead sulphate building up on the glass. That’s an utter sod to get off. My neighbour has a fully cloudy Velux due lead staining. Yeah +£10k seems ridiculous.. but it was full works of Hot lime, lime wash, steam cleaning of organic material etc. scafolding was a good 1/4 of price. it’s also been suggested to install a slate detail, maybe course of 3 in brick pattern to act as “a tray” and to create a further drip point.