


DNA
-
Posts
40 -
Joined
-
Last visited
Everything posted by DNA
-
Hi Peter I thought that would have been the obvious way to go and couldn't really see anything wrong with it - though I've also started to relax about the external DPC now at 225mm as well - if its only a rain issue. To be honest I'd be amazed if we have damp issues as we have a DPC beneath the beams and also a tray from the top of the beams down again to the outside leaf and then another pair of DPC's now potentially going in above that at 225mm. Hopefully BC offier wont have an issue though.
-
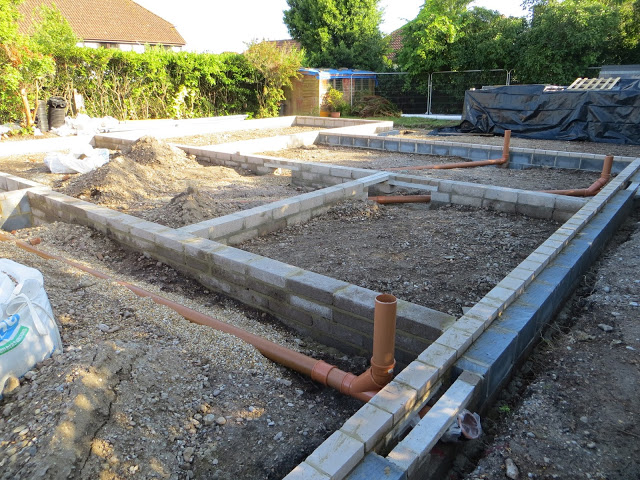
Hi Everyone, Been absent for a bit working on something else so build has been a bit slow - back on the case now though so we are off again! However, we have had to go to 225mm floor beams due to spans / springing etc which apart from cost brings a couple more headaches. One of those is setting the DPC levels. Weve run some brick around the outside which is OK but to keep the DPC at 150mm above outside level we either: Option 1 - have to cut 100's of thermal block down to 150mm for the internal skin and internal walls... what a waste of time or Option2 - set the DPC at 225mm - ie one whole thermal block - no cutting just get on with it. Insulation and screed are 140mm +60mm +15mm tiles - so should be ok Anybody see a problem with this - I'm sure the DPC above path is a minimum of 150mm to prevent rain splashing only Thanks guys
-
Well spotted Peter, I was moving the ensuite to make it easier for my initial drainage plan as ensuite and dressing room are pretty interchangable right now. I was interested in you view on the garge as well as I wasn't sure how I felt about an outside drainage line coming back in if you follow me. I was also trying to keep all of the drainage inside as the outside path is going to be full of services / rainwater and if the engineers has his way a great big 600mm dia twin wall pipe to act as a tank. So here's an updated version - its getting simpler now which is good. Ive kept the main lines inside but do you think we can get rid of any more rodding points? Ensuite lines up now too!Final_revised_cad_drawing_8116 REVISED DRAINAGE markup for BEAM and BLOCK option Test2 .pdf
-
Hi Peter. So here's my proposed layout. Any thoughts would be appreciated guys as meeting BCO this afternoon - foul drain in blue only as I am still thinking about surface water as have to use a 6m3 attenuation tank - still working out where it should best go Final_revised_cad_drawing_8116 REVISED DRAINAGE markup for BEAM and BLOCK option Test .pdf
-
Thanks Peter. This one always catches me out as I'm always concious of keeping lines straight through to make rodding easier. So laying the 45 Y on its side I could then revert to a rest bend to come into it. I did think about those settlement filltings Peter as if my building moves 150mm I won't be worrying about the drainage!
-
Hi Peter. I was thinking more about how to close up the holes in the walls for them to be vermin proof etc. Can't think of much else except cement based board bonded onto the blockwork or something. Or next option would be to build a short section of pipe into the wall with connectors both sides to allow it to flex. Not sure if I can use rest bends now either Peter as I need to get the rodding points through to the outside. Several of my risers will sit right above the main line out of the building so I was planning to use a 45 branch 45 bend and a settlement coupler to exit the floor beam blockwork - like those below


-
Hi Nick. Thanks for the advice. I'm with you on this as the space under the block and beam floor lets me have very straight pipe runs and I really like the through rodding ability from both ends. I'm not on good ground either Ian with soft spots and high water table so it avoids things like path settlement & surface water drainage cross overs etc. As you say, workmanship and doing it right will be the most important issues. So, i'll be compacting the area under the internal lines, teram and 10mm gravel all through and rest bends / joints / junctions on a slab with mortar to pin them in place. What are your thoughts on pipe exits through cavity walls Nick? The obvious seems to be lintels leaving a fairly big square hole though I cant believe that someone hasn't come up with a better idea yet. What would you use to seal the holes - I can only think of some cement board?
-
Hi Nick, Will get the BCO up next week and I've dropped the tecnical inspector a note too. However, if its a reasonably acceptable approach then the workmanship issues don't worry me. I'd still bed everything to falls on 10mm gravel and and set the rest bends out on bases / paving slabs etc. I usually like to pin them in with a brick or two as well so that they cant move if rodded etc - might do the same with the pipe as well. Other than that though I was just wondering what else others would do in setting the pipes out and keeping them in place and also how they felt about drainage done this way
-
Thats what I thought Onoff - saves loads on inspection chambers in paths etc and just cuts down on the number of bends and places where blockages start. It would work really well for me as luckily enough most of my drain runs are straight lines so I can get away with only two external manholes and a few rodding points. Also just less clutter in the paths making it easier for services / surface water gulleys etc. Anyone got any details of how the floor under the beams should be prepared or are we just talking some pea gravel and mortar to pin the rest bends in place?
-
Hi Vijay & everyone else, Sorry to open this tread up again but reading it and alot of other posts has caused me to have a rethink about my drainage layout. I'm having a block and beam floor and so far had planned for each internal stack to exit out to an inspection chamber through the cavity wall. However, looking at your drawing you have a lot more drainage internal under the floor than I had planned. If I took this approach it could save a lot in terms of chambers / having to stop up exit points etc. Since I started searching though I have now found an even more efficient approach in the attached - blog about Strawberry Tree Lodge (apologies to the owner of this but I did try to post a link to the blog but it wouldn't work). Here you can see that they have lined drainage stacks up internally and then exited one end to an inspection chamber and then at the other to a rodding point (see bottom right) - saving on chambers and external drain runs etc. Any thoughts on this anyone as I like the idea but have to get my head around having the runs under the floor
-
Hi Peter. I'll have a read as it will no doubt cover issues that I'm only just thinking about right now
-
Thanks both. I'll take a look. I did look as Isolohr initially I just coudnt make the numbers add up.
-
That was pretty much my floor structure CC45 but I still like the groundslab approach which I've done before but on that job I laid PIR and UFH in a screed on top of the concrete. Its putting the UFH in the concrete slab as Jeremy suggested thats got me thinking now. Which BM did you use Peter as I only took the first google price to start thinking about this. Anyone used Jablite 'Fillmaster' as well as its a single 300mm slab?
-
Sounds familiar Simon and just about where I am right now - though haven't coughed up for the infil yet! I've also got some as dug spoil from the reduced site area which I'd love to also just put back beneath the beams - its exactly where it came from and its just another cost to get rid of it.
-
Have you got any section details of your roof Dave as it sounds very effective. Not sure if I've the room to fit it in but it sounds a good solution
-
Thought so Simon. Interesting floor srtucture on your plans though. Why did the engineer specify blinded hardcore beneath the beams as one of the benefits is avoiding the need for infill etc
-
Sorry Dave not a big fan of timber especially on the ground floor
-
I got a range of tetris prices last week ranging from something like £20 for 90mm (i think) through to 160mm at £28. - Insulation only though - no beams. What's interesting about Jeremy's suggestion it the fact that I have got some big spans and on the margins of 150mm beams - another ground slab reason
-
I think I need a beer now as this has caused me to really re-think! I also just did a quick google on EPS and its circa £20 / 100mm sheet. So i'm going to price up the following: Block and beam with options of concrete block or aircrete block and both with 110mm PIR and UFH in 60mm liquid screed; 100mm mesh re-enforced ground slab powerfloated with UFH on 300mm EPS on compacted type 1 MOT; Also going to have a look at Tetris with Block and beam and 75mm mesh re-enforced structural screed; Any other options chaps in case I miss something
-
I'm just going through costs now Jeremy. I had originally planned for a ground slab but the ammount of fill needed means that its pretty much more expensive than block and beam. Not sure I like the using the groundslab for the underfloor heating though. Its a lot thicker than a screed and will be less responsive - I know the underfloor heating is meant to maintain an ambient temp but some responsiveness makes it much more user friendly. I'm also not sure about heat losses as with insulation of top of the beams you essentially isolate the beams from the heated interior - so cold beams / hot screed kind of principle
-
I clearly need to read up on what seems to be the dark arts of insulation. More urgently, I'm trying to make my mind up about tetris vs PIR slab insulation over my beam and block. I had already made my mind up on this but insulation pricing is causing a re-think. Any experiences chaps? ....I'm working through a cost exercise right now.
-
I'll have a look at that article as PUR is probably the default choice on this build too. Looks like I need to read up on the forums again. So what would be better than PUR then .. presumably YBS superquilt or something?
-
Just to thow another viewpoint out there chaps, I'm really concious that a lot of effort is still going into reducing heating costs. However, in already living in my last self-build, I'm seem to be getting more concerned these days oover solar / thermal gain and the need for ventilation/cooling. I have some direct experience. One bedroom in the attic for example, despite loads of PUR is still too hot in summer months and yet the rest of the house is nice and cool because of its heavy traditional masonrey construction. It will be interesting to see if views change before too long to consider how we deal with overheating rather than just reduction in heating.
-
Hi Nick, already on the case with air tightness. I used Manthorpe joist seals in my last build and they worked really well. I tend to add some expanding foam around them when their fitted and then inspect this the next day to take off any surplus that might have pushed into the cavity before we carry on with the blockwork manthorp.pdf
-
Probably not a bad deal on 7 houses but so much depends on the configuration of the house and its size which affect the number of heads and pipework and mains supply size etc. The trouble with self build is that we often build bigger houses and include more details etc. My manifold cupboard for example would have needed a sprinkler head inside it because one of its internal dimensions was over the 1m limit.
