


john0wingnut
-
Posts
131 -
Joined
-
Last visited
Everything posted by john0wingnut
-
What did you end up going with? Im going through the same decision process and was eyeing up the Duco Focus box, which has Co2/humidity controlled valves for each duct run. Similar principle to passivent in the other link above, but valves are in the unit rather than on the extract grill
-
Sizing MVHR
john0wingnut replied to sonicboom's topic in Mechanical Ventilation with Heat Recovery (MVHR)
All trickle vents are open. Doors are undercut by 15mm. I should have also said glazing also has condensation. Windows are on the to do list and I will ensure are done correctly, but you could be right as it could be empty behind the silicone currently. I am running a dehumidifier to keep humidity in check which is 250w an hour, plus heat loss via dMEV, so my thought process was the MVHR would bring down humidity, recover heat and cost less to run than the humidifier currently. I do accept there is a fair amount of work involved and initial outlay though. BPC also stock the duco focus box now which is essentially demand controlled MEV, which I was also considering, but once you add in all the required control valves on top of the fan box, your looking at the cost of a decent MVHR unit. -
Sizing MVHR
john0wingnut replied to sonicboom's topic in Mechanical Ventilation with Heat Recovery (MVHR)
Might be a silly question, but could one not dial back the MVHR to provide the minimal amount of ventilation required? Thus not over ventilating if it is a leaky house? I am having this exact debate in my head at the minute; currently have trickle vents and 4 dMev fans (3 wet rooms and 1 kitchen). Co2 levels are fine but humidity is constantly 56-60% and various rooms are getting a fair amount of condensation / mold on the window frames / reveals. Bungalow is 170m2 and trickle rate on the fans is 11 l/s x4, so only just under 51 l/s required by BR. So I was contemplating putting MVHR in as I know that brings the humidity down. -
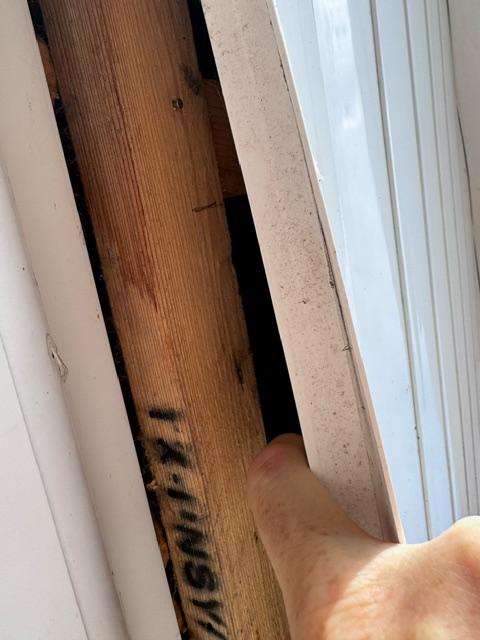
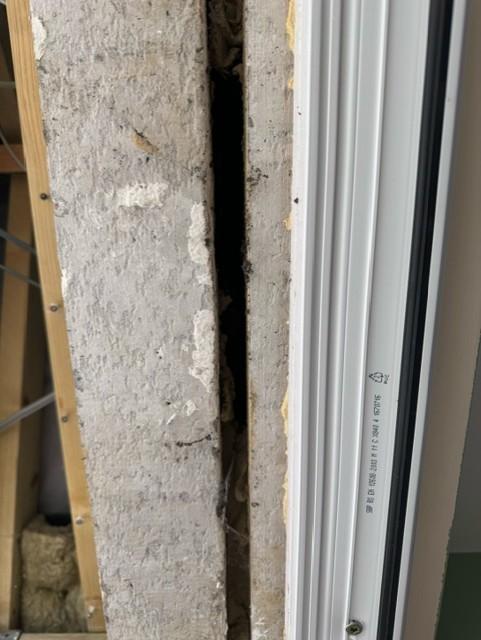
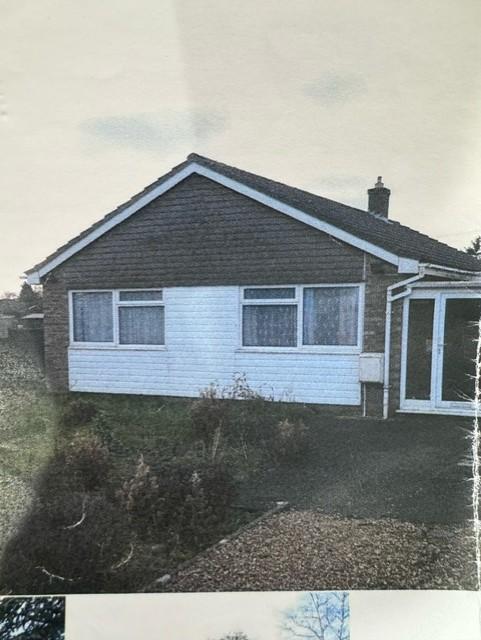
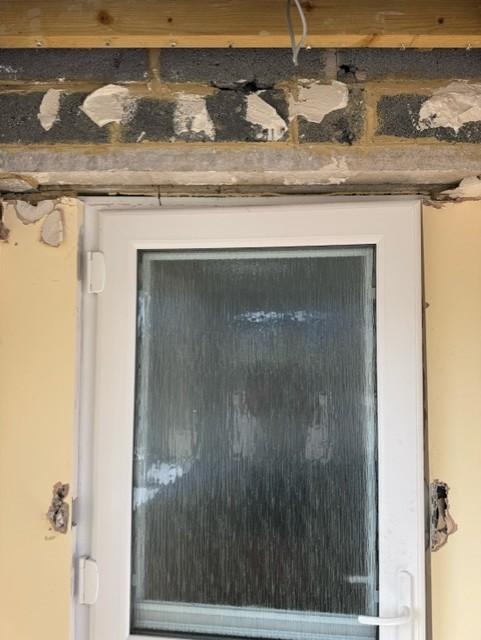
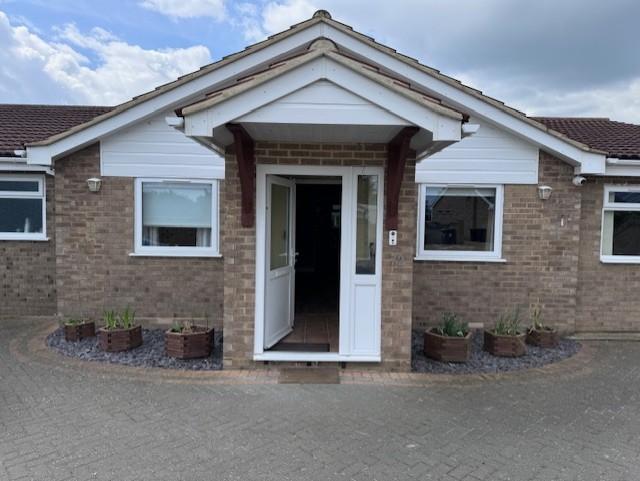
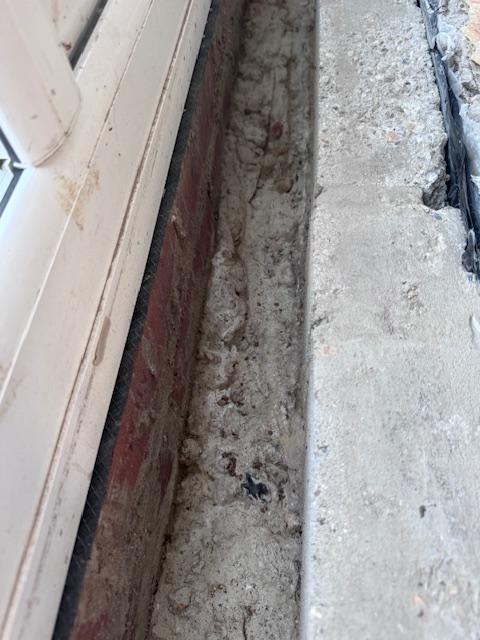
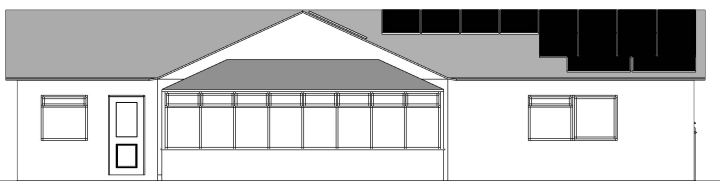
Evening all, Hopefully I have put this is the correct part of the forum. We are in the process of renovating our bungalow, and we are currently focusing on the front of the house. Plan was to add wood fibre EWI to the gable and porch, then clad the gable and render the porch, to improve insulation and appearance. Originally a 1970s bungalow, and previous owners carried out various extensions and alterations to it. Below is an original picture and a current picture of the front of the house: The gable wall was fully cladded with exception of the corner returns of masonry from the side walls. Prior owners opened up the wall and put a porch on, and essentially stitched the new outer leaf into the original, up to where the window lintels are. Above this it remains original block, which is inset about 30-40mm depending on where you measure across the front, to allow for the cladding and battens. I pulled a window cavity closer out and can confirm full fill cavity batts have been used up to the window lintels Now, inside the porch, we have an inner door to the house. Above this there are 2 concrete lintels, with about 20-25mm gap between them. Through this gap, I can see all the way up the gable cavity and there is a constant draft coming through............. explains why the porch was always cold. I can currently think of 2 options to resolve this, which I have put below, but would appreciate what others think of those options and/or if there are any other ways others would approach it: 1) Should I remove the plastic cladding, battens and block outer leaf above the lintels, and then rebuild with blocks aligned to the outer leaf and full fill with cavity batts, up the gable, and use something like Siga Fentrim tape to seal off that gap in the concrete lintels, then install my EWI / new cladding to the whole gable end. 2) Should I remove the plastic cladding and leave the upper block work and battens as is (eg inset), seal off the lintel gap and then get upper gable cavity filled with EPS beads, and then install the EWI and new cladding over the top of the existing inset blocks / battens? Many thanks John
-
Airtightness detailing - Timber frame to Masonry
john0wingnut replied to john0wingnut's topic in Timber Frame
I might just buy a load of 15mm wide 1-7mm expanding foam tape and use as required then. -
Airtightness detailing - Timber frame to Masonry
john0wingnut replied to john0wingnut's topic in Timber Frame
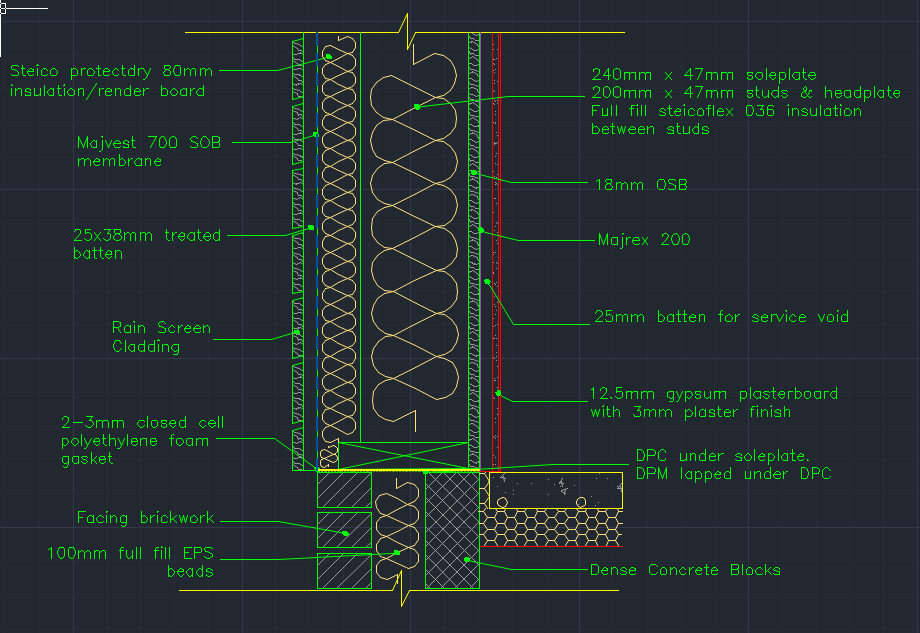
Internally I will be using SIGA Majrex 200, and the advice with that is to is use Fentrim tape or Primur tape to bond the membrane to the brick, and then use Sicrall tape on all the other corners / joins between membrane etc. This membrane will also be taped to the DPM. Externally I will be using SIGA Majvest 700 Black UV membrane. This will be taped to the roof deck before timber hard edge fitted, and I will also tape the deck joints with wigluv or fentrim tape Re DPC junction, I had planned to leave excess DPC hanging out, then bring it up over the Steico Protect boards and tape external membrane to it. Not sure if that will work mind. The DPC is at the minimum 150mm above FGL, and cladding also finishes at this level on the detail, so if I taped down over that joint onto the bricks, I would end up seeing the tape as it would be lower than the cladding. Re Masonry junctions: Roof deck - was going to use expanding foam tape in this gap. Walls - external membrane brought behind and around first batten, SIGA primur sealant put in gap, then pushed against masonry, and screwed in. Expanding foam tape could also be used here. What I wasnt sure about is whether one needs to detail each element as you go, or just belt and braces internally / externally with membranes and all is well, so to speak -
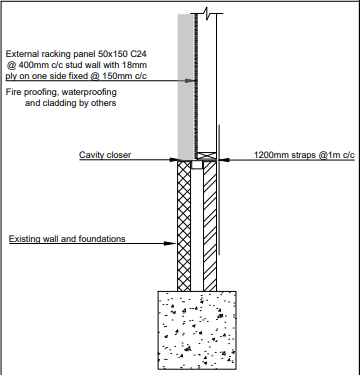
Hi all My timber frame extension will be coming off of a masonry gable end and sitting over a brick / block foundation to DPC level. Should one be using flexifoam / expanding foam tape behind the ledger board / under the soleplate / between first stud and masonry etc to ensure airtightness? I've also seen that one could use EPDM / Neoprene foam which can come in varying widths and thicknesses. Might sound daft to ask, but if using a foam tape, should one apply 2 rows to the timber, so the timber is pulled in flat to the masonry / block? Eg if you put a foam tape only on the outside edge, it may angle the timber slightly when tightened in/down. Or am I massively over thinking this?
-
Placement of bifold / slider - cavity wall foundation
john0wingnut replied to john0wingnut's topic in Doors & Door Frames
I decided they are going on the outer skin, so reveal matches the windows. I managed to remove the inner skin of blocks across the bifold width today and levelled off the cavity infill to match that of the floor slab. I then cut down some new blocks to the level of the concrete slab / infill and have cemented them in. Tomorrow I will lay DPM, fit some perimeter insulation and take 100mm PIR across to the outer skin, slip sheet over top then screed it. -
Placement of bifold / slider - cavity wall foundation
john0wingnut replied to john0wingnut's topic in Doors & Door Frames
So get some 100mm marmox blocks and put them in the cavity area, and backfill the remainder with concrete, and thus sit the bifold over the cavity area? -
Hi all Wanted to gauge the best approach as to where to site a bifold or slider within the depth of the wall, when one is contending with a 100mm cavity. The wall detail is below. This TF is being put onto existing foundations from our conservatory, and thus I am building it over the brick / block and 100mm cavity already there. From foundations (which have been checked by SE) there is 2 courses of dense concrete block and 6 courses of facing bricks, then DPC. 3 courses are above the ground. Interestingly the concrete infill has been done up to 4 courses of bricks - see pic below which shows the current state of it (current conservatory upvc / glazing not removed yet) ........... and yep, going to need to fix the DPC / DPM that the previous lot have hacked out!! I am aware of armatherm, compacfoam and phonotherm as solutions for supporting a bifold over a cavity, however, given the state of the current concrete infill, I would need chip some out and then use some sort of liquid self level to level this off to use compacfoam / armatherm, and phonotherm would raise the door 25mm which affects threshold height. If I stick them on the outer leaf, there is the minor issue of floor tiling over the block / cavity area. This was done previously over the cavity with a cavity closer by prior owners and all the tiles had cracked. If I stick them on the inner block, I need and huge sill and will have huge reveals. Thoughts welcome.
-
Timber Frame Wall build up for extension
john0wingnut replied to southcoastseagull's topic in New House & Self Build Design
Hey Ive now gone down the route of wood fibre insulation and sheathing boards as it’s all breathable. I used that ubakus tool mentioned above to get my u values sorted etc and it’s also useful to demonstrate phase shifting of heat through the walls and humidity control etc. John -
Timber Frame Soleplate overhanging cavity
john0wingnut replied to john0wingnut's topic in General Structural Issues
Hi all. It was actually the BCO who raised the issue with the overhang and asked me to discuss with the SE. I was also directed towards info from Trada / NHBC / LABC which advises of 20mm max overhang. The dwarf walls are 9 courses high, but do have a banked concrete infill which is just under the height of 1 internal block. SE came back with a new plan of using an IG9 lintel, but that just adds more complexity, so decided to go with a timber wide enough to span the cavity. I came across Steico joists in walls, which looked like a good option, which I am now exploring. Not exactly building merchant purchase, but there is a firm not too far from me that supplies them. Ive sent my frame plans to We Build Eco, who can then work those into a timber frame kit, which they cut in their factory then ship it up for building onsite. Also includes all sheathing, insulation, membranes, tapes and fixings etc. Will see what they come back to me with. I may well do it myself, or get a local chippy to build the frame, then I take it from there and finish it off. -
Timber Frame Soleplate overhanging cavity
john0wingnut replied to john0wingnut's topic in General Structural Issues
They were quoting me for it yes. Something like £250, so in the grand scheme of things for my rear extension / porch its a small cost for the extra belt and braces, so I may still do it. Just in contact with We Build Eco now to see whether they will quote me for a shell kit, which I can then build myself. -
Well, I spoke too soon. Transpires that the original house, 1970s build, has an extra brick course on the left side vs the right. Im not even sure how that happens, given bricks are done in lines. So I have 2560mm from DPC to undercloak board on the left, and 2440mm on the right, which makes the above plan impossible now, as the fascia boards will never align. So I think my only option now is to lower the wall plate to 2350mm, then mount rafters on hangers on inside to allow enough space to fit a new tiled roof under the current one.
-
Timber Frame Soleplate overhanging cavity
john0wingnut replied to john0wingnut's topic in General Structural Issues
Exactly my plan When the conservatory was built they have put some wool batts in the cavity, however, its not been done very well. I pulled out one section and can see to the bottom, where the banked concrete infill is. My plan was to remove the lot, then fill the entire thing with polybeads. Majpell could be removed as you say. It wasnt in my plan originally, as, like you say, I was going to tape the OSB joints, but when I spoke with the insultation supplier, they advised adding it. John -
Timber Frame Soleplate overhanging cavity
john0wingnut replied to john0wingnut's topic in General Structural Issues
Pretty much what I’m now going to do. 240mm I joist frame. Cladding Battens Tyvek UV Facade 40mm Steico Duodry 240mm I joist with full fill steicoflex 36 18mm OSB Majpel 5 membrane 40mm service void with steicoflex 36 PB and skim -
Timber Frame Soleplate overhanging cavity
john0wingnut replied to john0wingnut's topic in General Structural Issues
The dwarf walls are already built and in place, as they were part of the conservatory, so there wont be a 140mm block, as its 100mm. The external face of the new TF will be vertical cladding, so masonry outer is staying as it is, with new TF dropped on top. -
Morning Looking for some advice from the forum. I am doing a conversion of my conservatory into a proper room, so a rear extension. Existing foundation and dwarf walls are being retained, and the plan is for a timber frame to be put on top. SE have put forward their plans which shows the 150mm TF sitting on the 100mm block and 50mm overhanging the cavity unsupported, see below. I queried this BCO when drawings were being reviewed by them, and they responded, advising they would expect the soleplate to be over both internal and external leaf's. I subsequently raised this with the SE, who asks to speak with BCO directly, only to be told BCO don't get involved with design aspects of the building, so wouldn't comment. I feel like piggy in the middle now, and not quite sure what to do, and whether what the SE has put forward is ok? As an aside, I had planned to put a row of Marmox blocks on top of the exiting wall, however, their guidance states max 20mm overhang and TF central over the block. Ive also read online that if one has the rafters notched to the outside of the wall plate, this could cause an eccentric load on wall, given the 33% unsupported. I also had a read through the LABC manual which sites 20mm max for 140mm studs............. Keen to hear the views / thoughts / advice from others on hear.
-
The width has in theory been reduced, as the 150mm timber frame will be sat on the inner block leaf (all be it there is a query re that being allowable due to blocks only being 100mm and thus a 50mm overhang into the cavity), where as windows are currently sat on the outer leaf. One thing I have now come across is a "Dutch Gable" where one essentially extends the existing roof at the base, then form a hip part way up. This I think will solve my problem
-
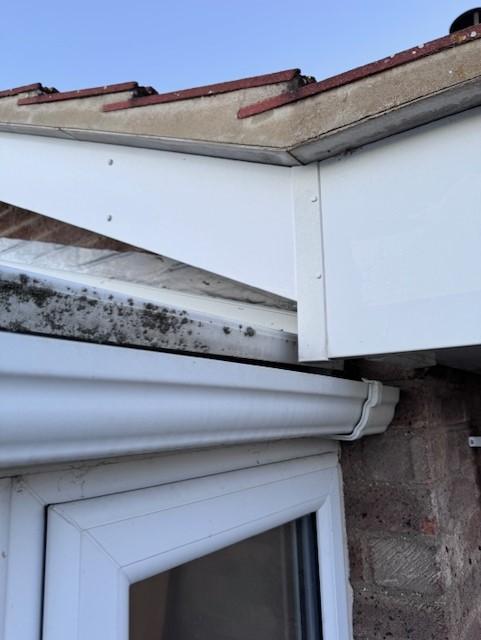
Evening, Looking for some help with a slight conundrum I have. Below is a view of the side of my house, showing the existing conservatory, with lean to, hipped roof. I am removing the polycarbonate roof and glass, retaining the dwarf walls and foundations. New timber frame walls and roof will then be going on. Below is the SE's roof design thus far. T3s surround the rooflites. H1 are hips. T2 are headers over the doors / windows. SE has specified roof timbers in 200 x 50, as span across the room is 3.4m. Jack rafters are max 1 meter span Now the issue at hand is the space between the new timberframe head plate, and the existing gable wall undercloak board is limited. The current conservatory window / door frames are 2100mm high, top frame is about 80 mm, then roof is about 60mm, so total height is 2240mm. There is then a 35mm gap and then 165mm barge board. Ive done a rough sketch below showing the new timber frame against the gable wall, with the top of the top plate siting at 2400mm. This leaves about 120mm to play with for rafters and roof covering, which doesnt currently work, given the SE wants 200mm rafters. Gable End Detail.pdf My only solution at present is to reduce the top plate height to 2350mm and change the rafters to 150mm. Im pretty sure the jack rafters could be 150mm, given minimal span, but haven't asked the SE yet. If anyone has got any other ideas / thoughts, I am all ears. John

-
Timber Frame Wall build up for extension
john0wingnut replied to southcoastseagull's topic in New House & Self Build Design
I’m currently going through the same process for my rear extension / new porch. My current plan is your thick option A, then tape the 25mm PIR layer to act as a VCL. 150mm studs, 120mm PIR inside and 30mm clear cavity. As above, I was advised to use rigid wood fibre insulation if I wanted to go the external route as it’s breathable. John -
I’ve just gone and looked up some of those posts by Brendon. Very interesting esp some of those live videos with data. Im tempted to get my system re plumbed with buffer removed now my system is fully de-zoned.
-
I’ve got the flows to a good point now. 2 rooms slightly higher than others, so will adjust down slightly, but others all at within .3 degs of each other. Im am also slowly adjusting the WC curve down, as most rooms still too warm.
-
Excellent. So I am on the right track. Currently on setting 3, it is very quiet. If I put it on 6 it makes an awful humming / whine sound
-
Hi all Im after a bit of a sense check on my UFH system pump setup / flow rate. System: ASHP is a 12kw Nibe F2040. SMO 20 controller 100L Buffer, plumbed as a 3 port. Wilo Yonos PARA pump with max 6m head supplying 2x manifolds. 175 sqm of UFH slab 17 loops, now fully de-zoned Heatloss from my calcs is 8.3kw at -3/20 dT5 Flow rate would thus be 1.41m3/hr or 23.6l/min I fully opened all the flow meters on all 17 loops, put the Wilo pump on max and then totalled all the flow rates up on each flow meter and got a total of 34l/min, which i then converted to 2.04m3/hr. Reading that max flow rate off of the Wilo Yonos Constant pressure pump graph at max setting gives a head of 3.5. https://www.ufht.co.uk/wp-content/uploads/2018/03/yonos-manual.pdf page 14 I then put the red dial on constant pressure no. 3 and got a total of 24.7l/min Is this then the correct setting for the UFH pump? Many thanks John
