David001
-
Posts
88 -
Joined
-
Last visited
Everything posted by David001
-
Is this tube of Silicone Sealant probably "dead"?
David001 replied to David001's topic in Waterproofing & Sealants
@JohnMo, if I open it and it's still fluid I'll then seal it thoroughly and keep it indoors, but is it likely still to be usable in a couple of months time? -
In a few months time I will need some silicone lead and gutter sealant, and have found that I have an unopened tube of "Dow Corning, Trade Mate, Silicone Lead and Gutter Sealant", but I know that I bought it sometime between 2007 and 2014, and it's been sitting in the cold of a garage every winter since then. So, Can anybody with experience of this particular product tell me if it's likely still to be usable? Pic below. Thank you. David.

-
What fixings may I need to stop leaks?
David001 replied to David001's topic in Roofing, Tiling & Slating
@saveasteading, thanks for all your answers. Your 2 photos have made things clear. Thanks also for the tip re. using a ladder as a potentially helpful obstruction. I will tread carefully! David. -
What fixings may I need to stop leaks?
David001 replied to David001's topic in Roofing, Tiling & Slating
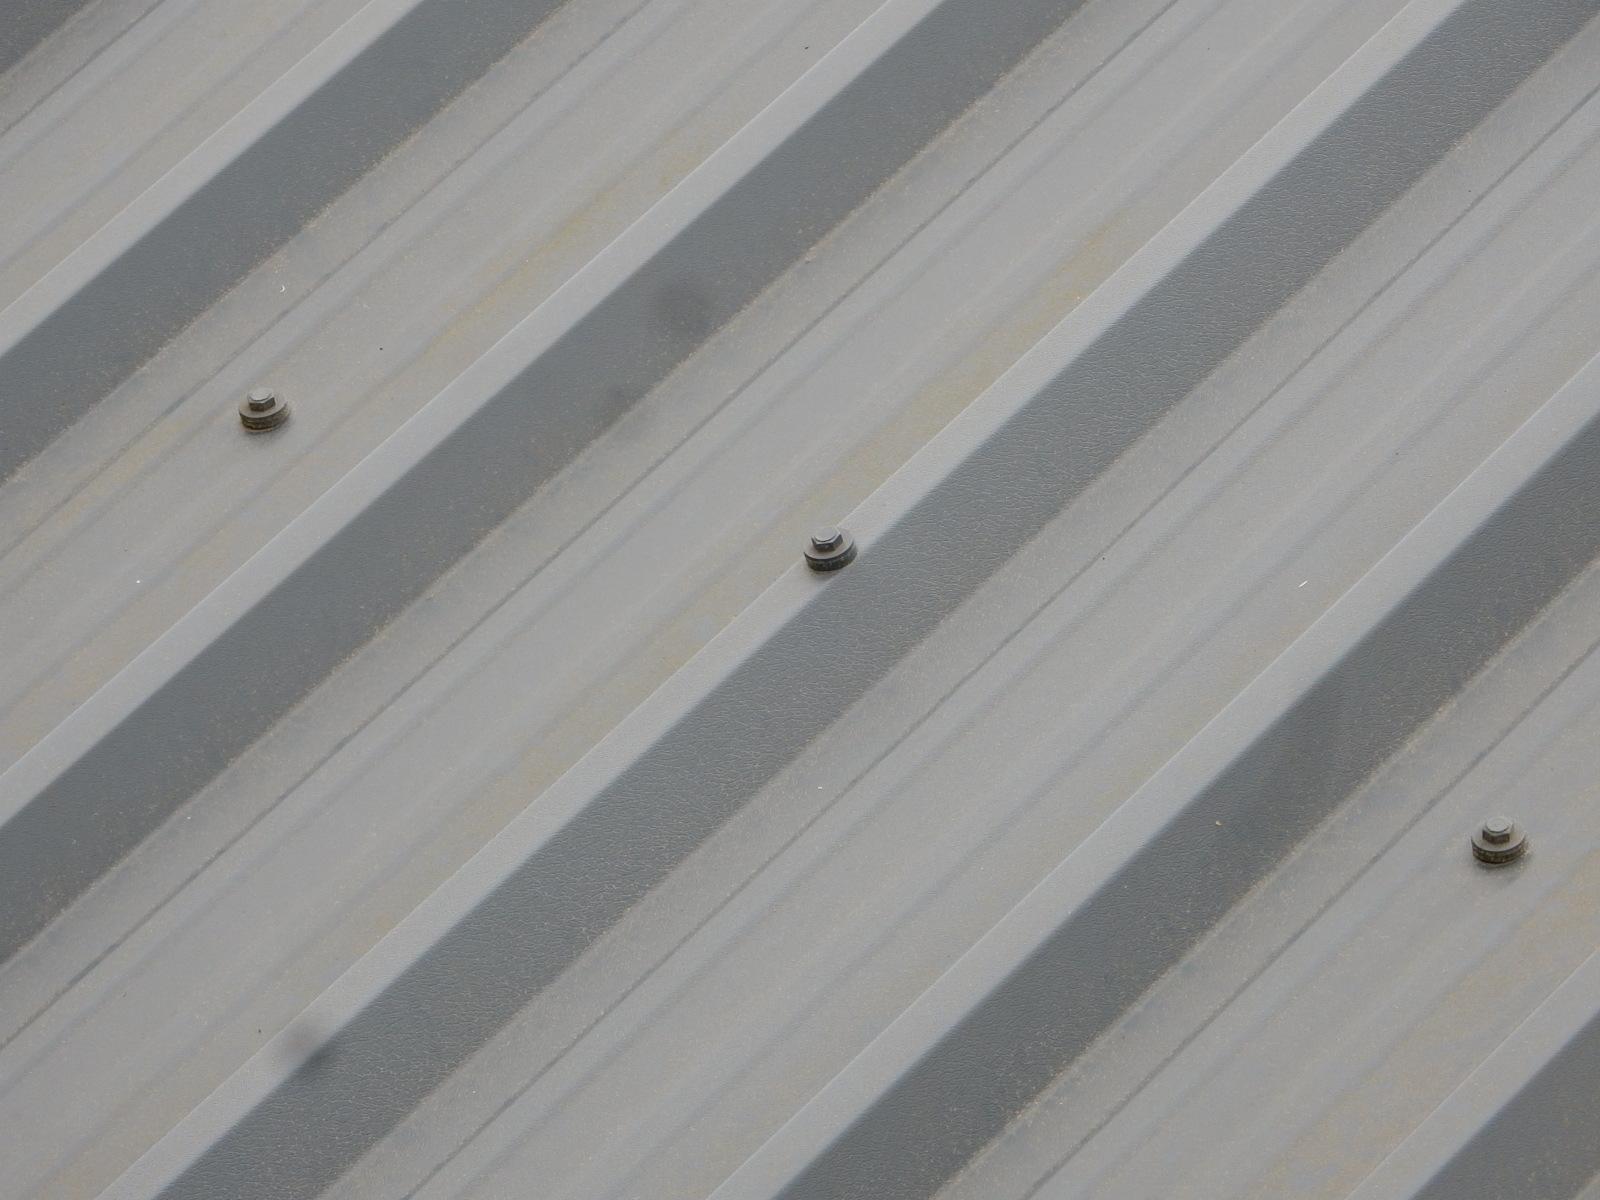
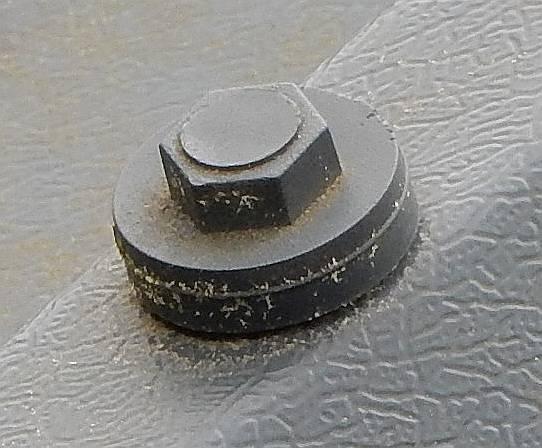
Thanks, everyone. @saveasteading, marking the floor where the drips land is good tip! (I took photos of the four wet spots on the very wide ceiling but your method will be much more helpful.) Is that black hexagonal top just "for show"? Is everything in pic 3, above, just a "slip-on" head with a washer beneath it protecting a screw? If so, should I prize off by inserting a screwdriver underneath the washer, or between the head and the washer? I'm just a 70-yr-old homeowner ho can attend to basic repairs. My tools are no more than a range of spanners, screwdrivers, hammers and other basic items. I don't know what a "clutch drill" is. 😁 Can I remedy the situation with the tools I have? THANK YOU. David. -
What fixings may I need to stop leaks?
David001 replied to David001's topic in Roofing, Tiling & Slating
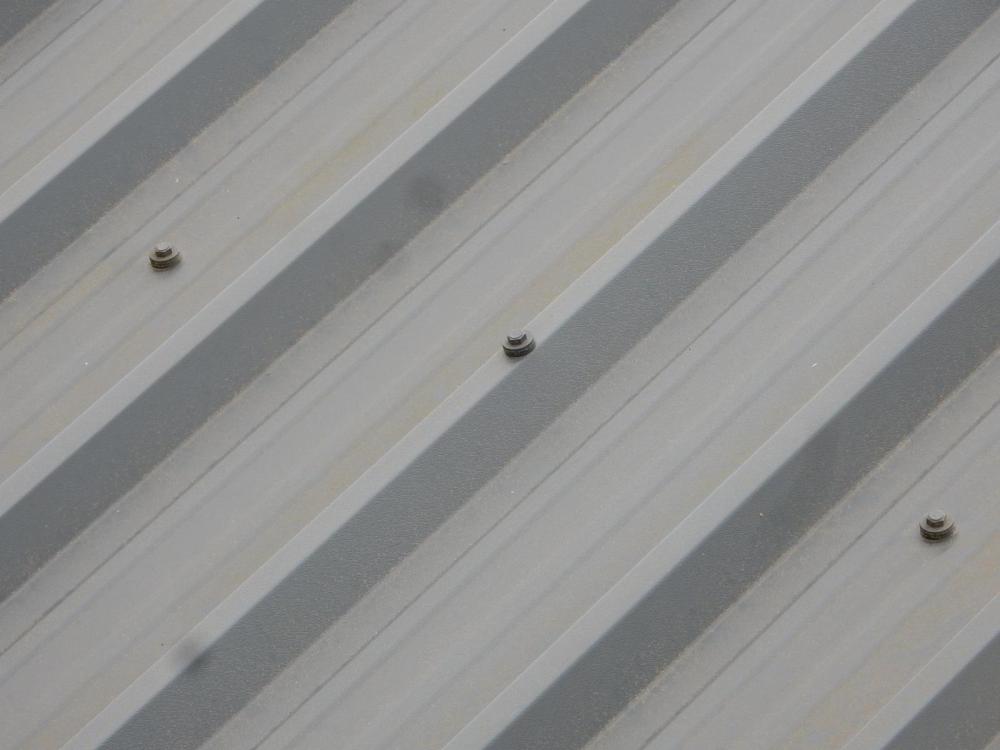
Thanks, everyone above, @Tom, @ProDave, and @Mr Punter, for your comments and advice. Yes, the man who put up that building, and who put its roof on, was a shoddy worker. It was a DIY job by a man who had spent his working life in an office, he then retired to the countryside, and was certainly confident that he could do all sorts of things. He had a lot of confidence, but in so many places around this property I've come across evidence of really shoddy decision-making and substandard workmanship. I zoomed in one of the fixings for the close-up without having decided which particular fixing to focus on. It seems from what you have said that I luckily focussed the camera on a fixing which shows the washer is not flush against the panel as it should be. So it seems that as soon as there's a warm dry day I ought to get up on the roof with a spanner and tighten each head so the washers are snug on the sheet, and then see whether there is any leaking after that. 1. Are the fixings above the EDPM washer made of plastic or metal? 2. If while I am checking them all and tightening them some of them break, are they standard? What would I look for online to order replacements, please? 3. Do I need to be careful where I put my weight? Where would be best to place my feet? Thanks. -
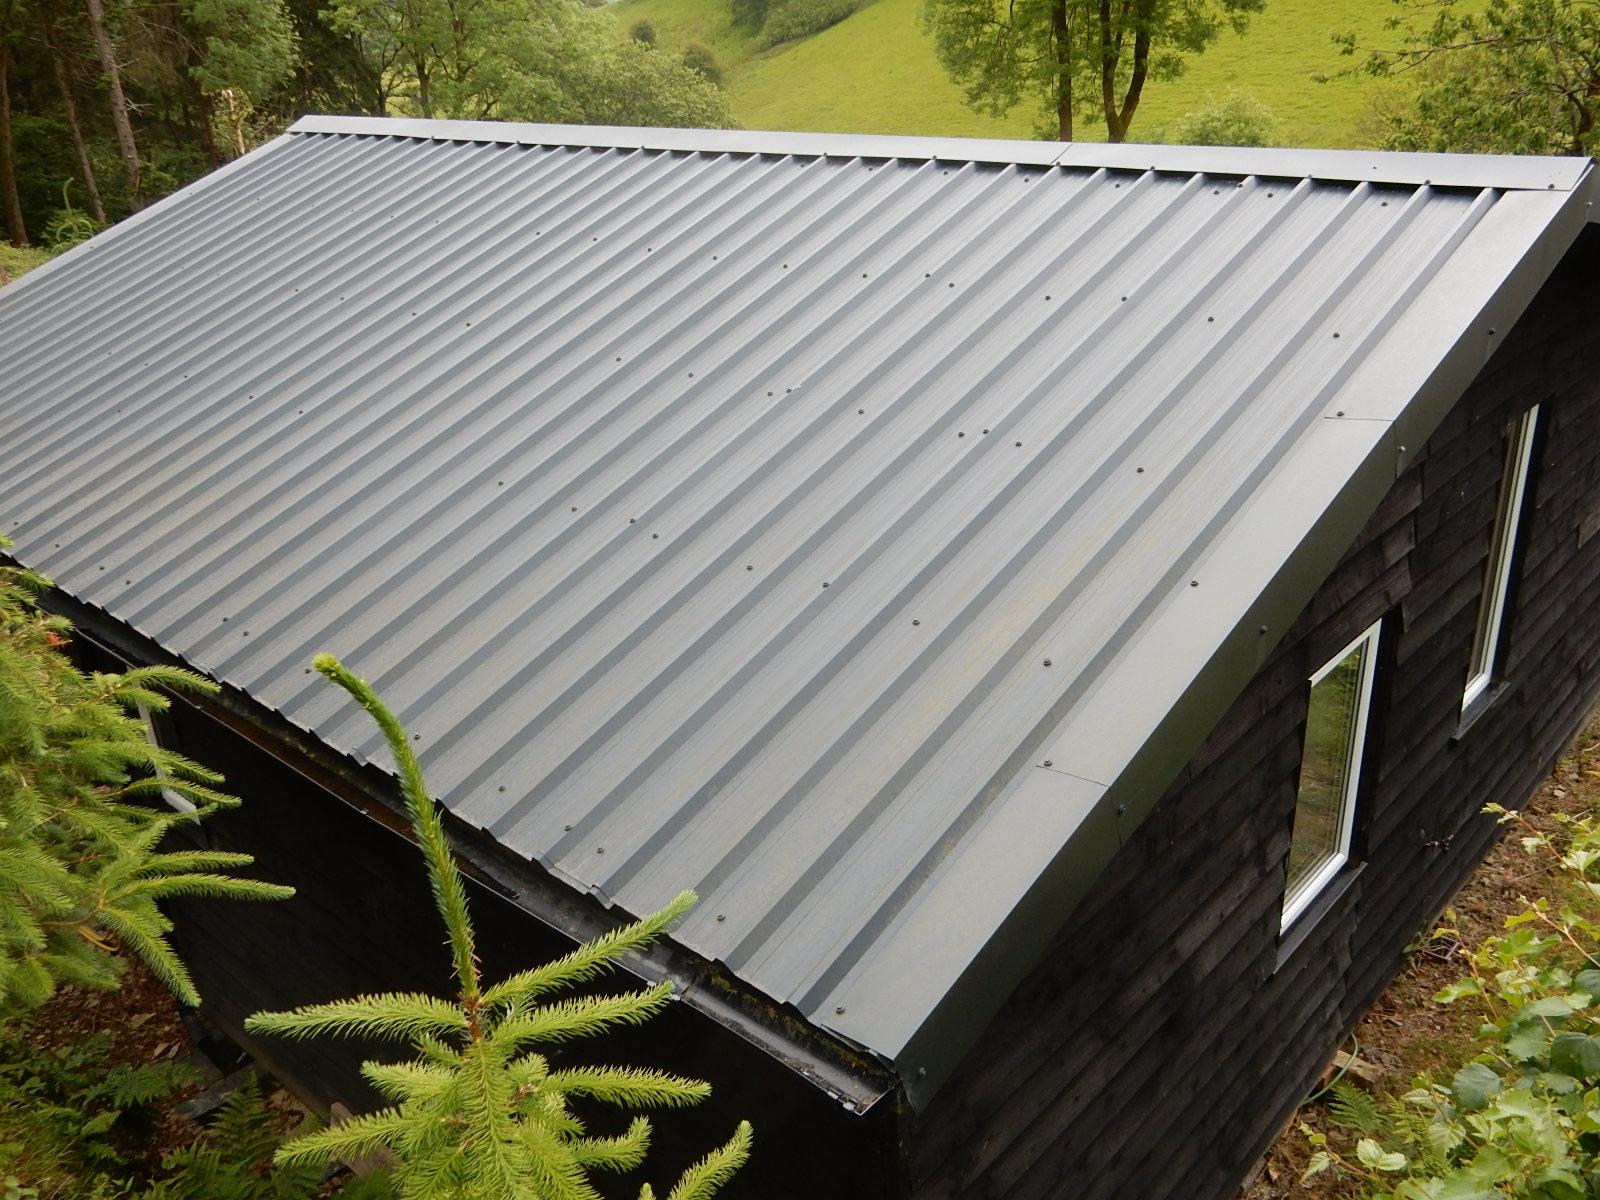
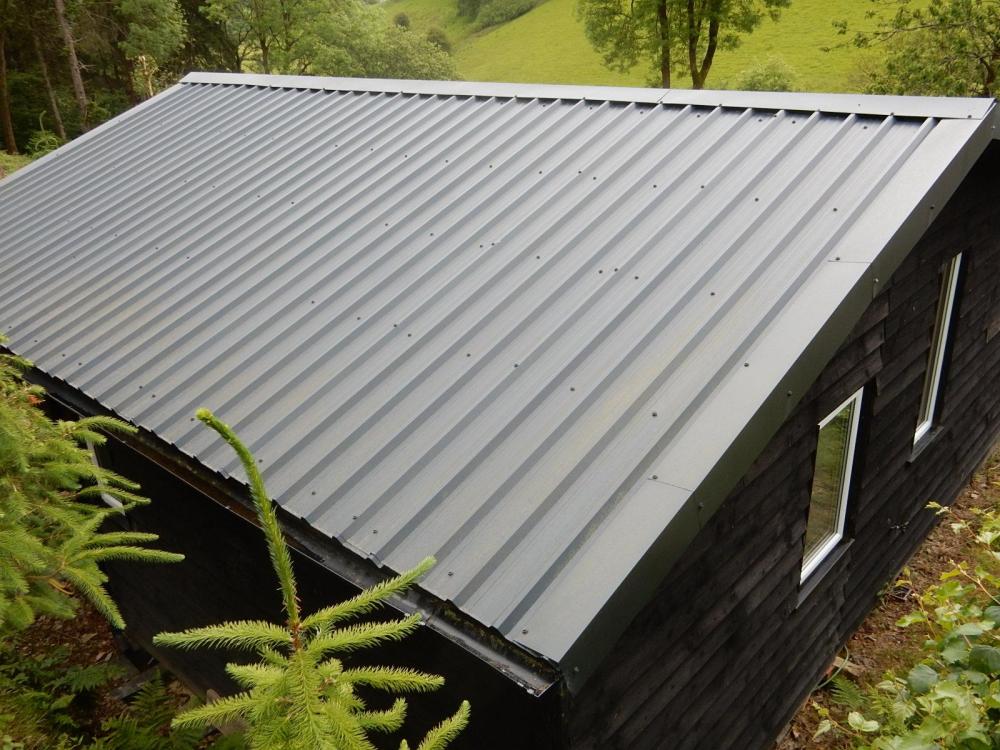
Hello everyone. The roof of our outbuilding is of the metal industrial kind shown in the pic below. Last winter there were four wet spots on the ceiling below this roof showing that water had leaked in. So I can only imagine that the water got in through four of the fixings which hold the roof in place. The outbuilding was erected 12 years ago. Is it possible that some of the fixings have deteriorated, so as to let in rainwater? If so, I am thinking that perhaps I may be able to replace them myself, provided it's not difficult to do. Are there things I will need to be careful to do, and not do (beside falling off the roof!)? Or will I need to ask a roofer to do it? Thanks! David.
-
In case it is of help to someone, we had no option but to use only 25mm-thick PIR boards on the exterior of our brick, solid-wall, Victorian house, each board's edges sealed with foam, and then all overlaid with TLX thermal blanket. Our narrow soffits, and tops of our windows being immediately adjacent to the soffits, meant we had to confine ourselves to the above method, overlaid with timber cladding. The thermal benefit indoors of the above method has already been considerable. We're looking forward to the depths of next winter.
-
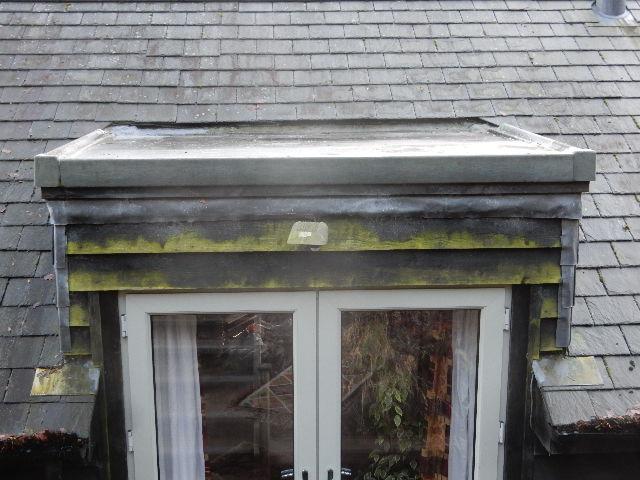
@SteamyTea, your suggestion of re-coating is very interesting. Thank you for your help. As I mentioned, I thankfully stopped the leak by spreading a layer of a roofing "gunge" over the cracked area. I did it crudely (the finish is not at all smooth, but is full of ridges from the spatula I used). So I can see sense in the idea of having the whole dormer-roof "simply" coated with a thick layer of a liquid fibreglass. On the negative side this would mean sticking with the slant of the roof going towards the centre of the house, but on the positive side I imagine it would save a contractor having to pull up the existing roof (and thereby possibly causing all sorts of knock-on problems). But if using pour-on (liquid) fibreglass, how would the vertical edges of the dormer be treated? Is there a method of pouring the fibreglass over the edges so that it runs uniformly down the sides but catching it before it falls elsewhere? When I first got up onto the dormer to try and find the source of the leak I immediately noticed a bit of stick-on, aluminum-like, flashing close to the area where the fibreglass was cracked, evidence that the previous owner had also tried to deal with a leak in the same area. I looked all around the edges of this (cheap) adhesive-flashing but it seemed to be well-adhered, without any openings through which rain-water might be passing. If a thick coat of liquid fibreglass were applied to the whole dormer roof could it also be applied over that small area of cheap adhesive-flashing? Thank you very much for your help.
-
We've bought a house that had a "flat" dormer-roof fitted into a sloping ceiling to create an emergency exit from a first floor room. This was done 12 years ago and the roof of the dormer was covered with fibreglass. Since last autumn water's been coming in through the ceiling, directly under a corner of the dormer-roof. I got a ladder out and climbed up to see what's going on. The surface of the fibreglass in the area above the leak looks almost glass-like, i.e. somewhat milky and transparent, seemingly made of ice-like brittle plastic, and in its surface are numerous cracks and crevices. The dormer roof slants slightly toward the centre of the house, so that rainwater runs towards the centre of the house but exits right and left of the dormer, then off down the slate tiles on both sides of the dormer to the gutters. I think the leak has been caused by autumn leaf-fall, which is huge, when lots of dead leaves get caught in the exit area, so the rain-water banks up a bit, and then on very cold days and nights the mess of leaves and water freezes, probably causing the cracking in the fibreglass directly beneath. The rest of the fibreglass surface of the dormer-roof looks as if it is in good condition. A builder has recommended laying a new timber framework over the dormer so that the new roof-surface will slope away from the centre of the house, directing rain-water to a new gutter on the edge of the dormer, which would then empty into the already existing gutters at the edge of the main roof. As for the surface, the builder said fibreglass or rubber would be suitable. I've since done a bit of research and read that fibreglass is poured onto a dormer in liquid form, so if that's the case I imagine it would flow over the edge of the dormer into the gutter and cause mayhem. The house is 350 metres above sea-level, so it's pretty cold here most of the year, as well as wet. The dormer is on the north-facing side of the house, so it doesn't get much radiation in winter. The photo below shows the state of the fibreglass in the area where the leak has existed (and which I have temporarily covered with a roof sealant). The photo below shows the dormer as it currently is. What should I go for? Fibreglass or rubber? Thank you!

-
Ventilation behind timber-cladding over thermal insulation.
David001 replied to David001's topic in Ventilation
@Mr Punter, thanks for the warning re. the flammability of TLX. I will hope we have no fires in the area this summer! @Alan Ambrose, thanks for the link to the aluminium rodent mesh. I am ordering some pronto! -
Ventilation behind timber-cladding over thermal insulation.
David001 replied to David001's topic in Ventilation
@ToughButterCup, thanks for the clarification! I know what you're dealing with. We have had a carpet soaked in water due to a mouse wanting a drink out of a plastic pipe in a wall. We have had an area of ceiling cave in due to a squirrel driving the lid of an attic water-tank onto the ball-cock. Now we have cameras in two attics and are able to see how many times the blighters return to the bait before they "no longer return". Come the summer I'll be on my knees at ground level around the exterior of the house to try to find where they are getting in, although last week I witnessed a squirrel using a downpipe to get himself from ground level to the soffit above where he disappeared, so I need to check all around the soffits as well, and then mesh all entry points. It's a battle, isn't it? -
Ventilation behind timber-cladding over thermal insulation.
David001 replied to David001's topic in Ventilation
Many thanks, @ToughButterCup and @Kelvin. After reading your replies and then doing some research online I have decided that I will request the builder to fill all the gaps, to ensure no ingress of any form of wildlife. However, after having read that professional Canadian housebuilders don't believe in ventilating at the top of such cladding, and because there is no observable deterioration in the cladding that was added to my house's modern extension 12 years ago, I won't insist on vents being fitted to the top of the cladding currently being added to the other part of the house. @ToughButterCup, thanks for your photo of the damage done by insects. I can't afford for any creatures to nibble into the delicate silver-foiled blanketing on the other side of the cladding. How tempting it would be for them to snuggle inside it in the winter - and possibly break the thermal seal that is costing us thousands! -
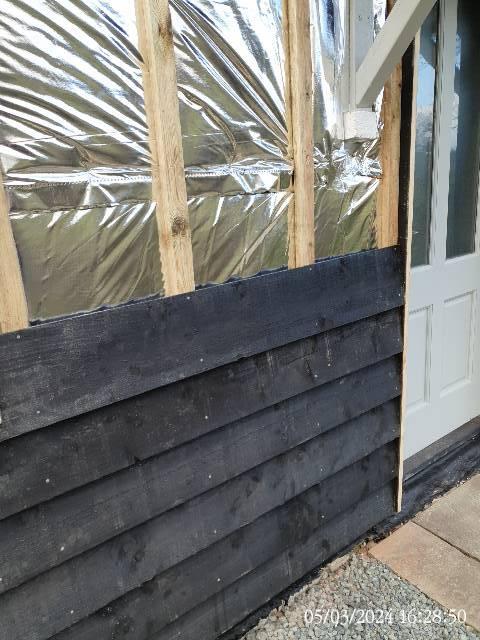
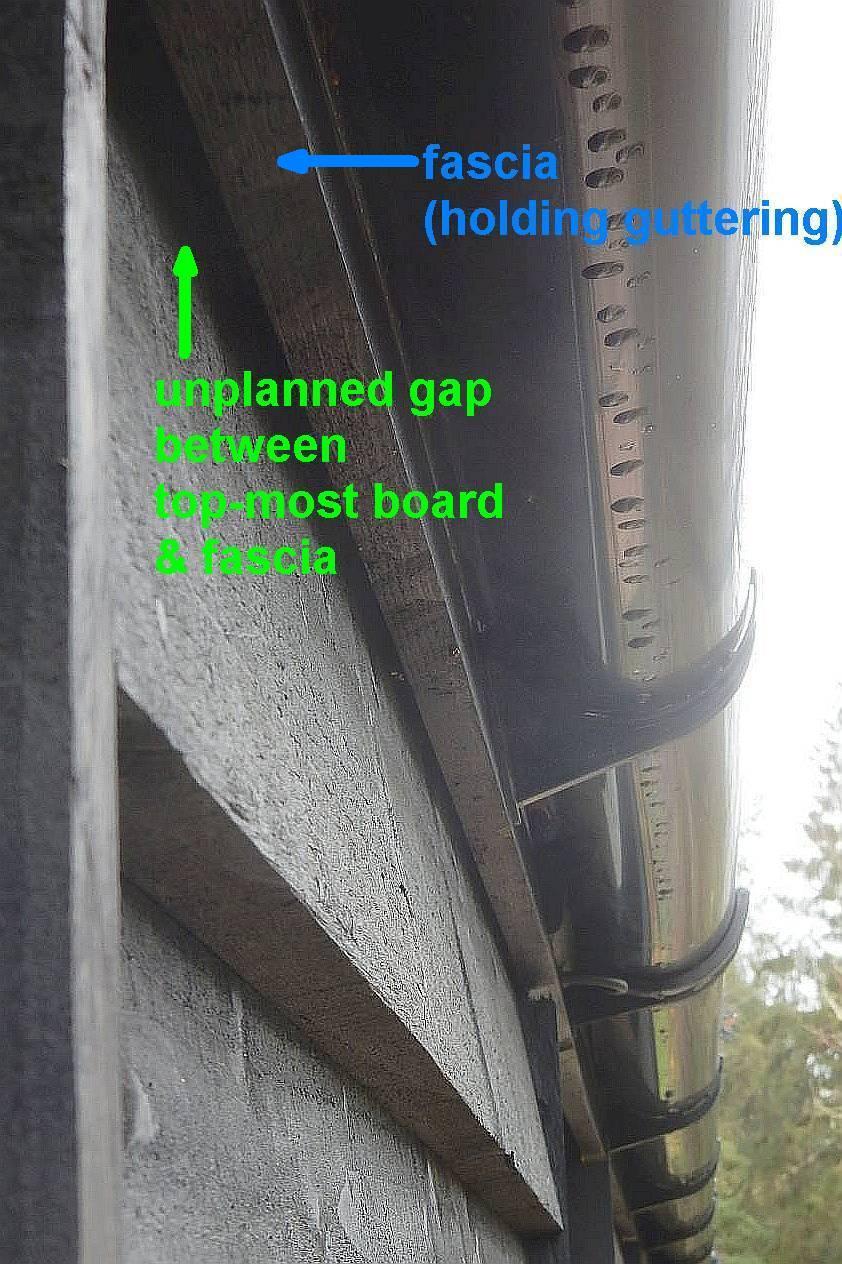
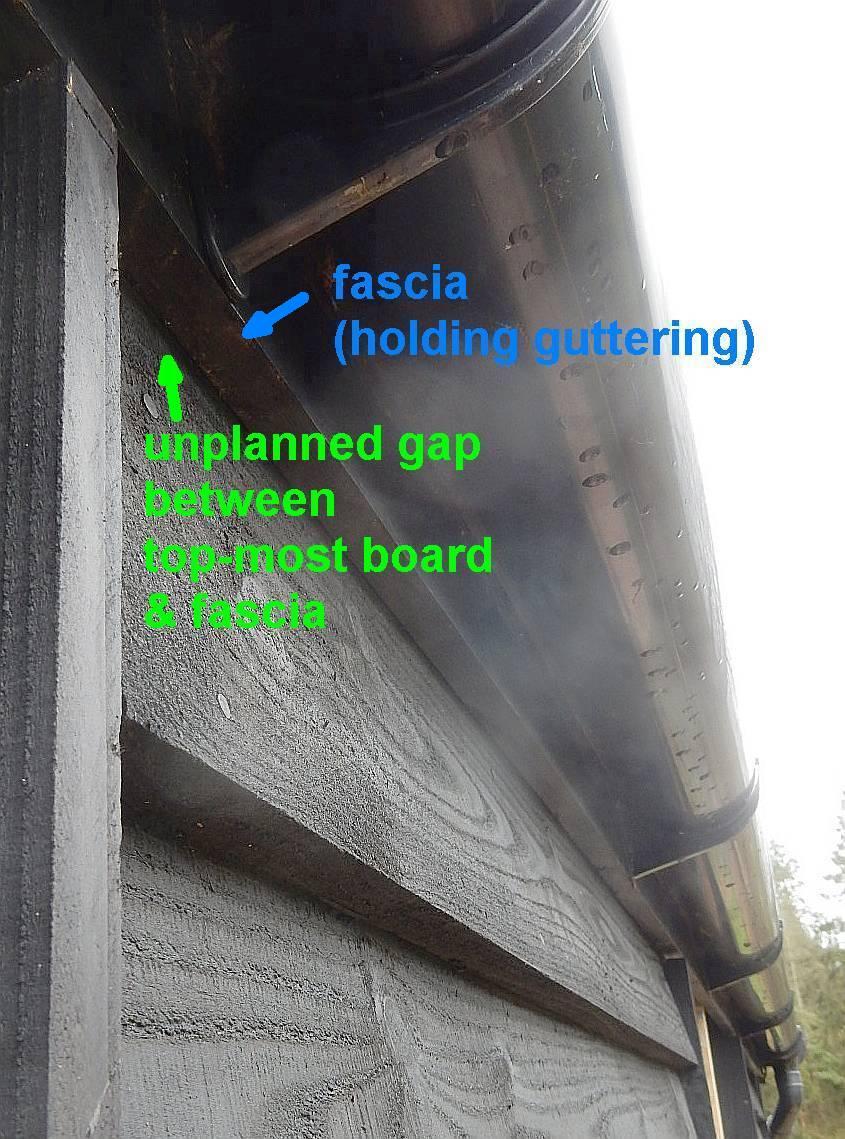
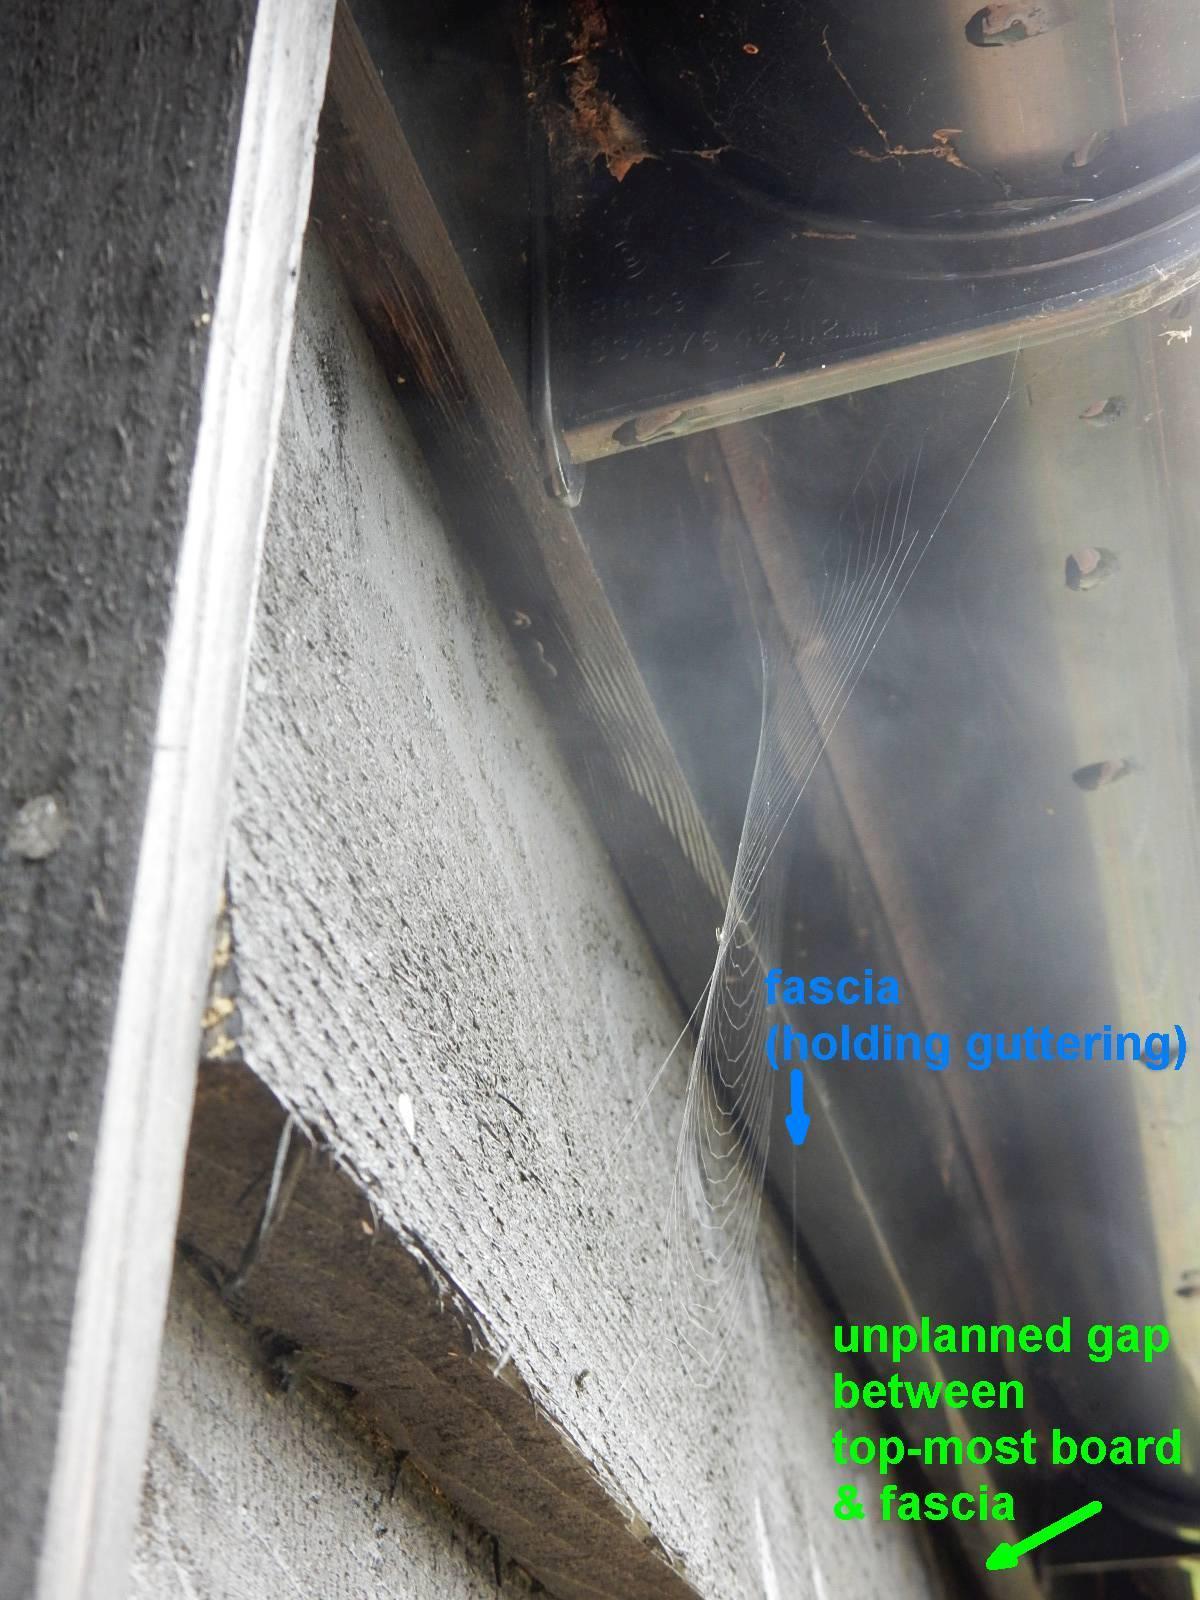
My question is: should there be intentional, planned, gaps or vents along the top of a wall of timber-cladding, so that air and moisture rising up behind the timber-cladding can escape? Or is a continuous air-gap around the bottom of the timber-cladding sufficient for ventilation? Just above ground level there is a 25mm ventilation gap between my house's thermal insulation and timber-cladding, but there are no intentional ventilation gaps at the tops of the walls, close to the soffits. I've assumed that air should be able to enter through the gap at the bottom, then rise behind the timber-cladding, and then exit via planned gaps or vents in or near the top-most board, close to the soffits. A very good carpenter has just finished nailing feather-edged boards (timber-cladding) over thermal insulation which has been placed around our house (PIR boards, covered by "TLX Silver" blanketing). The timber-cladding has been nailed onto vertical wooden battens 25mms thick, so that between the outer surface of the TLX silver blanketing and the backs of the cladding boards there is a 25mm ventilation gap from the bottom of the two-storey house up to the soffits. See the photo of the thermal insulation with the timber-cladding being added over it. To reduce the possibility of the boards "cupping", two steps have been taken: before the boards were nailed in place not only were their fronts painted but their backs also; and, secondly, the boards are nailed to the battens not only along their top edges but along their bottom edges as well. I expected that the carpenter would make provision for rising air and moisture behind the cladding to escape in the area of the soffit. But it seems that the top-most board may touch the underside of the soffit (blocking egress there). And probably because of the somewhat "wonky" surface of the old house, the top-most board, which slips up behind soffit's fascia, is not always hard against the back side fascia, thus leaving a gap - which some creatures may use to get behind the cladding (and possibly damage the delicate surface of the TLX thermal blanketing). Just above ground level the 25mm gap between the bottom edge of the bottom-most board and the TLX blanketing has been fitted with netting to stop creatures creeping up behind the timber-cladding. My feeling is that to ensure no creatures can get behind the cladding, the unplanned gaps (marked in green on the photos) should be filled with black filler or black foam, and that every metre or two along the top-most board a couple of wide holes should be drilled and then covered with a rain-proof and insect-proof vent cover, to allow moisture and warm air to escape. However on another part of my house, which was clad by its previous owners 12 years ago, I see that no provision at all was made in the area of the soffits for the escape of air from behind the cladding, and the external appearance of the 12-year-old cladding seems to be in good shape. What do you think? Should I request only that the gaps be filled to keep out creatures? Or should I request that the gaps be filled and that vents be added to boards directly beneath the soffits?