David001
-
Posts
88 -
Joined
-
Last visited
Everything posted by David001
-
Ordering a window seal panel for an air-conditioning vent.
David001 replied to David001's topic in Ventilation
@elite, yes, I now think I will go for the 4mm acrylic sheet which many people use for this purpose, but I won't use the usual velcro strips because I've read quite a number of reviews saying that they come unstuck in the heat, and if you go to renew them you find a nasty lot of glue left on the acrylic which is difficult to remove without using a solvent which wrecks the finish of the acrylic. So I think it had better be acrylic sheet plus window-clips. 24 Pack 3/8 Inch White Window Screen Clips and Storm Window Clips, Offset Retainer Clips for Securing Window Screens and Storm Door Panels with Easy Installation : Amazon.co.uk: DIY & Tools I'm looking for bits to bind the end of the vent tube to the panel. The closest I've got so far is a kit for a tumble dryer but the AC tube vent is 15cms in diameter. Wall Vent PVC Kit Tumble Dryer External Extractor Black Gravity Grille 4" 100mm | eBay UK Surely the fitting exists somewhere? If there isn't a louvre on the end then there needs to be an insect mesh and a guard to stop rain slipping down the tube and into the machine (not that there will be a sudden downpour during a heatwave, but you never know, do you?) -
Ordering a window seal panel for an air-conditioning vent.
David001 replied to David001's topic in Ventilation
@Nickfromwales, the business is to open the window outwards when it's hot and the AC is going to be used, then place a panel or board against the inside of the frame of the window and clip it in place, then to pop the ventilation tube through the round hole in the panel/board. The glazed unit will be untouched. The uPVC frames are sturdy and thick, nevertheless I think you're right in triggering the idea that if the panel is, let's say, a heavy and thick piece of plywood, then there could be some degree of stress placed on the frame. So I think I will go with the 4mm acrylic panel solution, which seems to be commonly used for this purpose. -
Ordering a window seal panel for an air-conditioning vent.
David001 replied to David001's topic in Ventilation
@Nickfromwales, thanks, as ever. Our window is on the first floor and miles from humanity, so there will be no security risk, but thanks for the thought. The room's exterior is timber-framed, insulation panels, with horizontal boarding, so a bit messy to create a hole beneath the window. Other thoughts? -
Every year for a few weeks the bedroom in the timber-framed part of our house is too hot to sleep in. We have a small portable Pifco air-conditioning unit with a flexible (but somewhat unbending) vent which is about one a half metres long. So we ought to use this AC more effectively. So, when it's hot, I'm sold on the following method of air-conditioning: opening the window (our windows are outward-moving casements), attaching a solid panel to the inside of the window-frame (by way of window-clips), inserting one end of the "flexible" hose through a circular hole in the panel, switching on the air-conditioner. There are a few challenges: There will be considerable drag from the weight and pull of the ventilation hose. This drag will pull on the panel. The panel will be kept in place against the window frame by two window-clips along each edge of the panel (the panel will be 82cms high and 44cms wide), but the clips are small things which ought to suffer from as little backward pulling as possible, otherwise they eventually come out of the uPVC frames . Also, if the panel is cut from a sheet of clear acrylic (to let in light during the day), the panel could bend a bit in the area where the vent is dragging on it. It seems that some people use a 4mm acrylic sheet to make such panels, but I'm inclined to pay more and order a 10mm-thick sheet. An alternative would be to order a sheet of plywood and paint it. It wouldn't let light in during the day, but given that the panel would only be in position for a few weeks in summer, that wouldn't be a problem. However, the length of the shaft of available window-clips has to be considered. I've found some on Amazon which would hold a panel which is 10mm thick firmly in place. What is the thickness of the thinnest plywood? Any advice on any of this?

-
@ProDave, our package is called "Part Fibre", which means there's fibre to the village cabinet, and copper up into the surrounding valleys (Welsh valleys). Thanks to @SteamyTea I've now seen on YouTube that moving the socket is simple, and that drilling through the wall would be the most testing part.
-
Hello. Do I have to ask for a BT engineer to move a BT broadband socket, or an electrician do ti? Our broadband/phone cable comes from a pole on the nearby lane to just below the roof above the 1st floor. Then it travels west about 20 metres along the front of the house before passing through the wall of the room at the extreme west end of the house. As the house is long and narrow, this arrangement isn't helpful. It was probably made like this because the previous owner had an office in that room at the extreme west end, and can't have had a wish for wifi reception at the extreme east end of the house. Wifi throughout the house would surely be much better if the cable entered the house halfway along the frontage. I imagine that "all" that needs to be done is: - drill a hole through the 10" wall of the house (wood-board, Kingspan insulation board, plywood board, internal plaster) - shorten the cable then draw it through the hole - reposition the BT socket on the wall, and attach the cable to it. - seal round the cable on the exterior side of the wall. Is this something a local electrician could easily do? To make wifi reception throughout the house as good as possible, should the new socket be positioned upstairs or downstairs? If the socket were to be upstairs, it would be in the large living-room in the middle of the house and the router attached to it could feed the TV directly via an ethernet cable. If the socket is positioned downstairs, it would be in a small room but still be in the middle of the house. Thank you for advice.
-
Bad roofing job: how should I proceed?
David001 replied to David001's topic in Roofing, Tiling & Slating
@Spinny, 20260529_195248.mp4 20260529_195153.mp4 Thanks for nudging me towards collecting more useful evidence. -
Bad roofing job: how should I proceed?
David001 replied to David001's topic in Roofing, Tiling & Slating
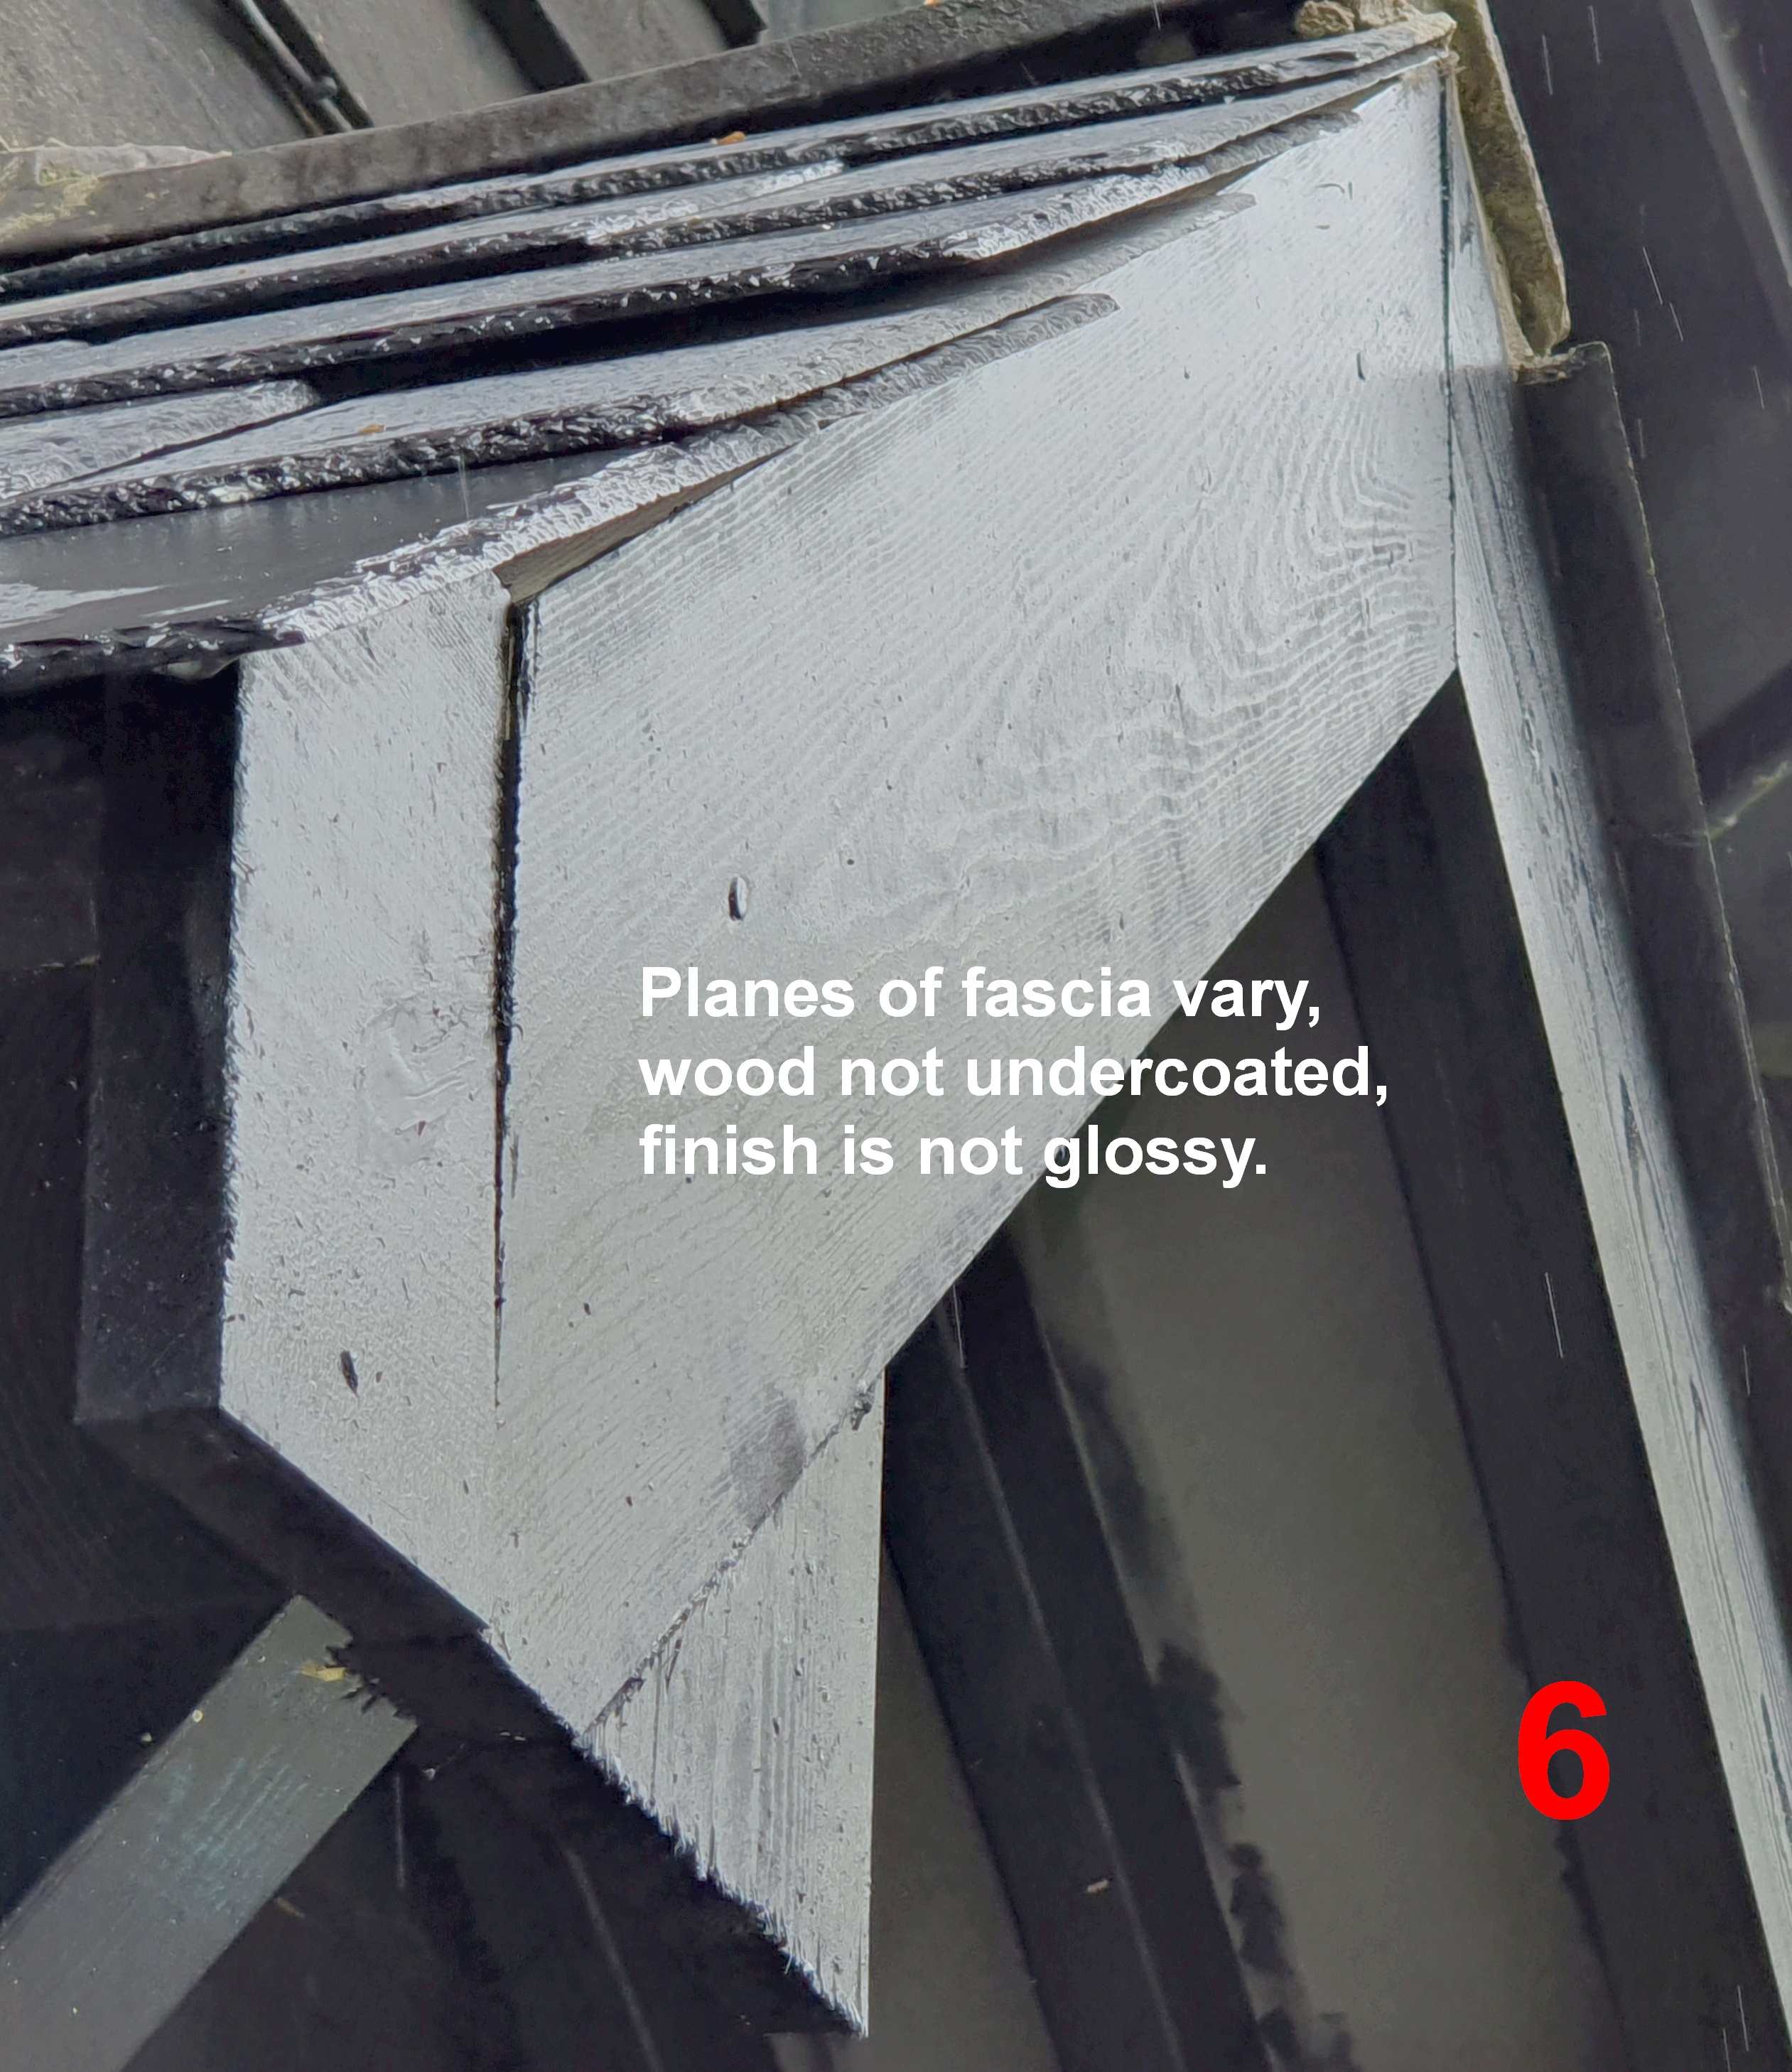
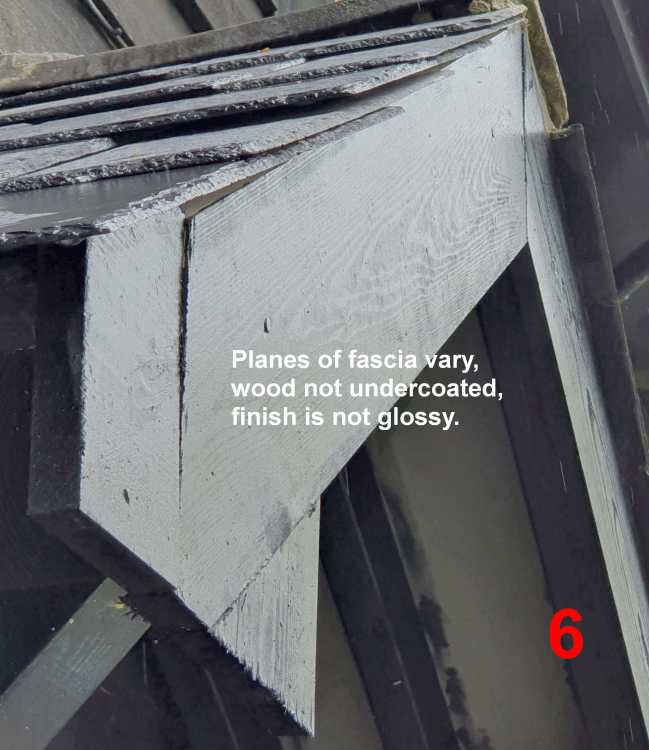
@Spinny, thank you. Why did I not think of doing such a valuable thing and with the camera close at hand! Another thing I did not think of doing is actually shaking the triangular added on "wings" at the lowest points of the two fascia boards! That was done last night by the professional carpenter who came to look at the work. He found that those triangles could easily be moved back and forth! Why? Because they've been stuck on with something like the rubber sealant which was used elsewhere! UNBELIEVABLE. It's as if the philosophy of the two workers is: build something that LOOKS LIKE what the customer wants, then squeeze payment out of them as quickly as possible. -
Bad roofing job: how should I proceed?
David001 replied to David001's topic in Roofing, Tiling & Slating
@Mr Punter, thanks. That is exactly how I felt when I discovered what they had done. I simply could not trust them to truly remedy all their faults. I think the work proves that they are unable to judge the quality of their own work. Locating and arranging the new company, documenting all the faults, continuing to have to deal with the project: it has all eaten up further time and energy. Does this warrant refusing to pay the outstanding ⅔? What would you do in these circumstances? -
Bad roofing job: how should I proceed?
David001 replied to David001's topic in Roofing, Tiling & Slating
@BotusBuild, thanks. I paid ⅓ at end of first day's work. Am awaiting the quote of a recommended builder to make good all the flaws (but probably as you say too redo everything except they basic structure). Should I refuse to pay the outstanding ⅔, or should I only pay whatever is left over once the making good has been completed? What would you suggest? -
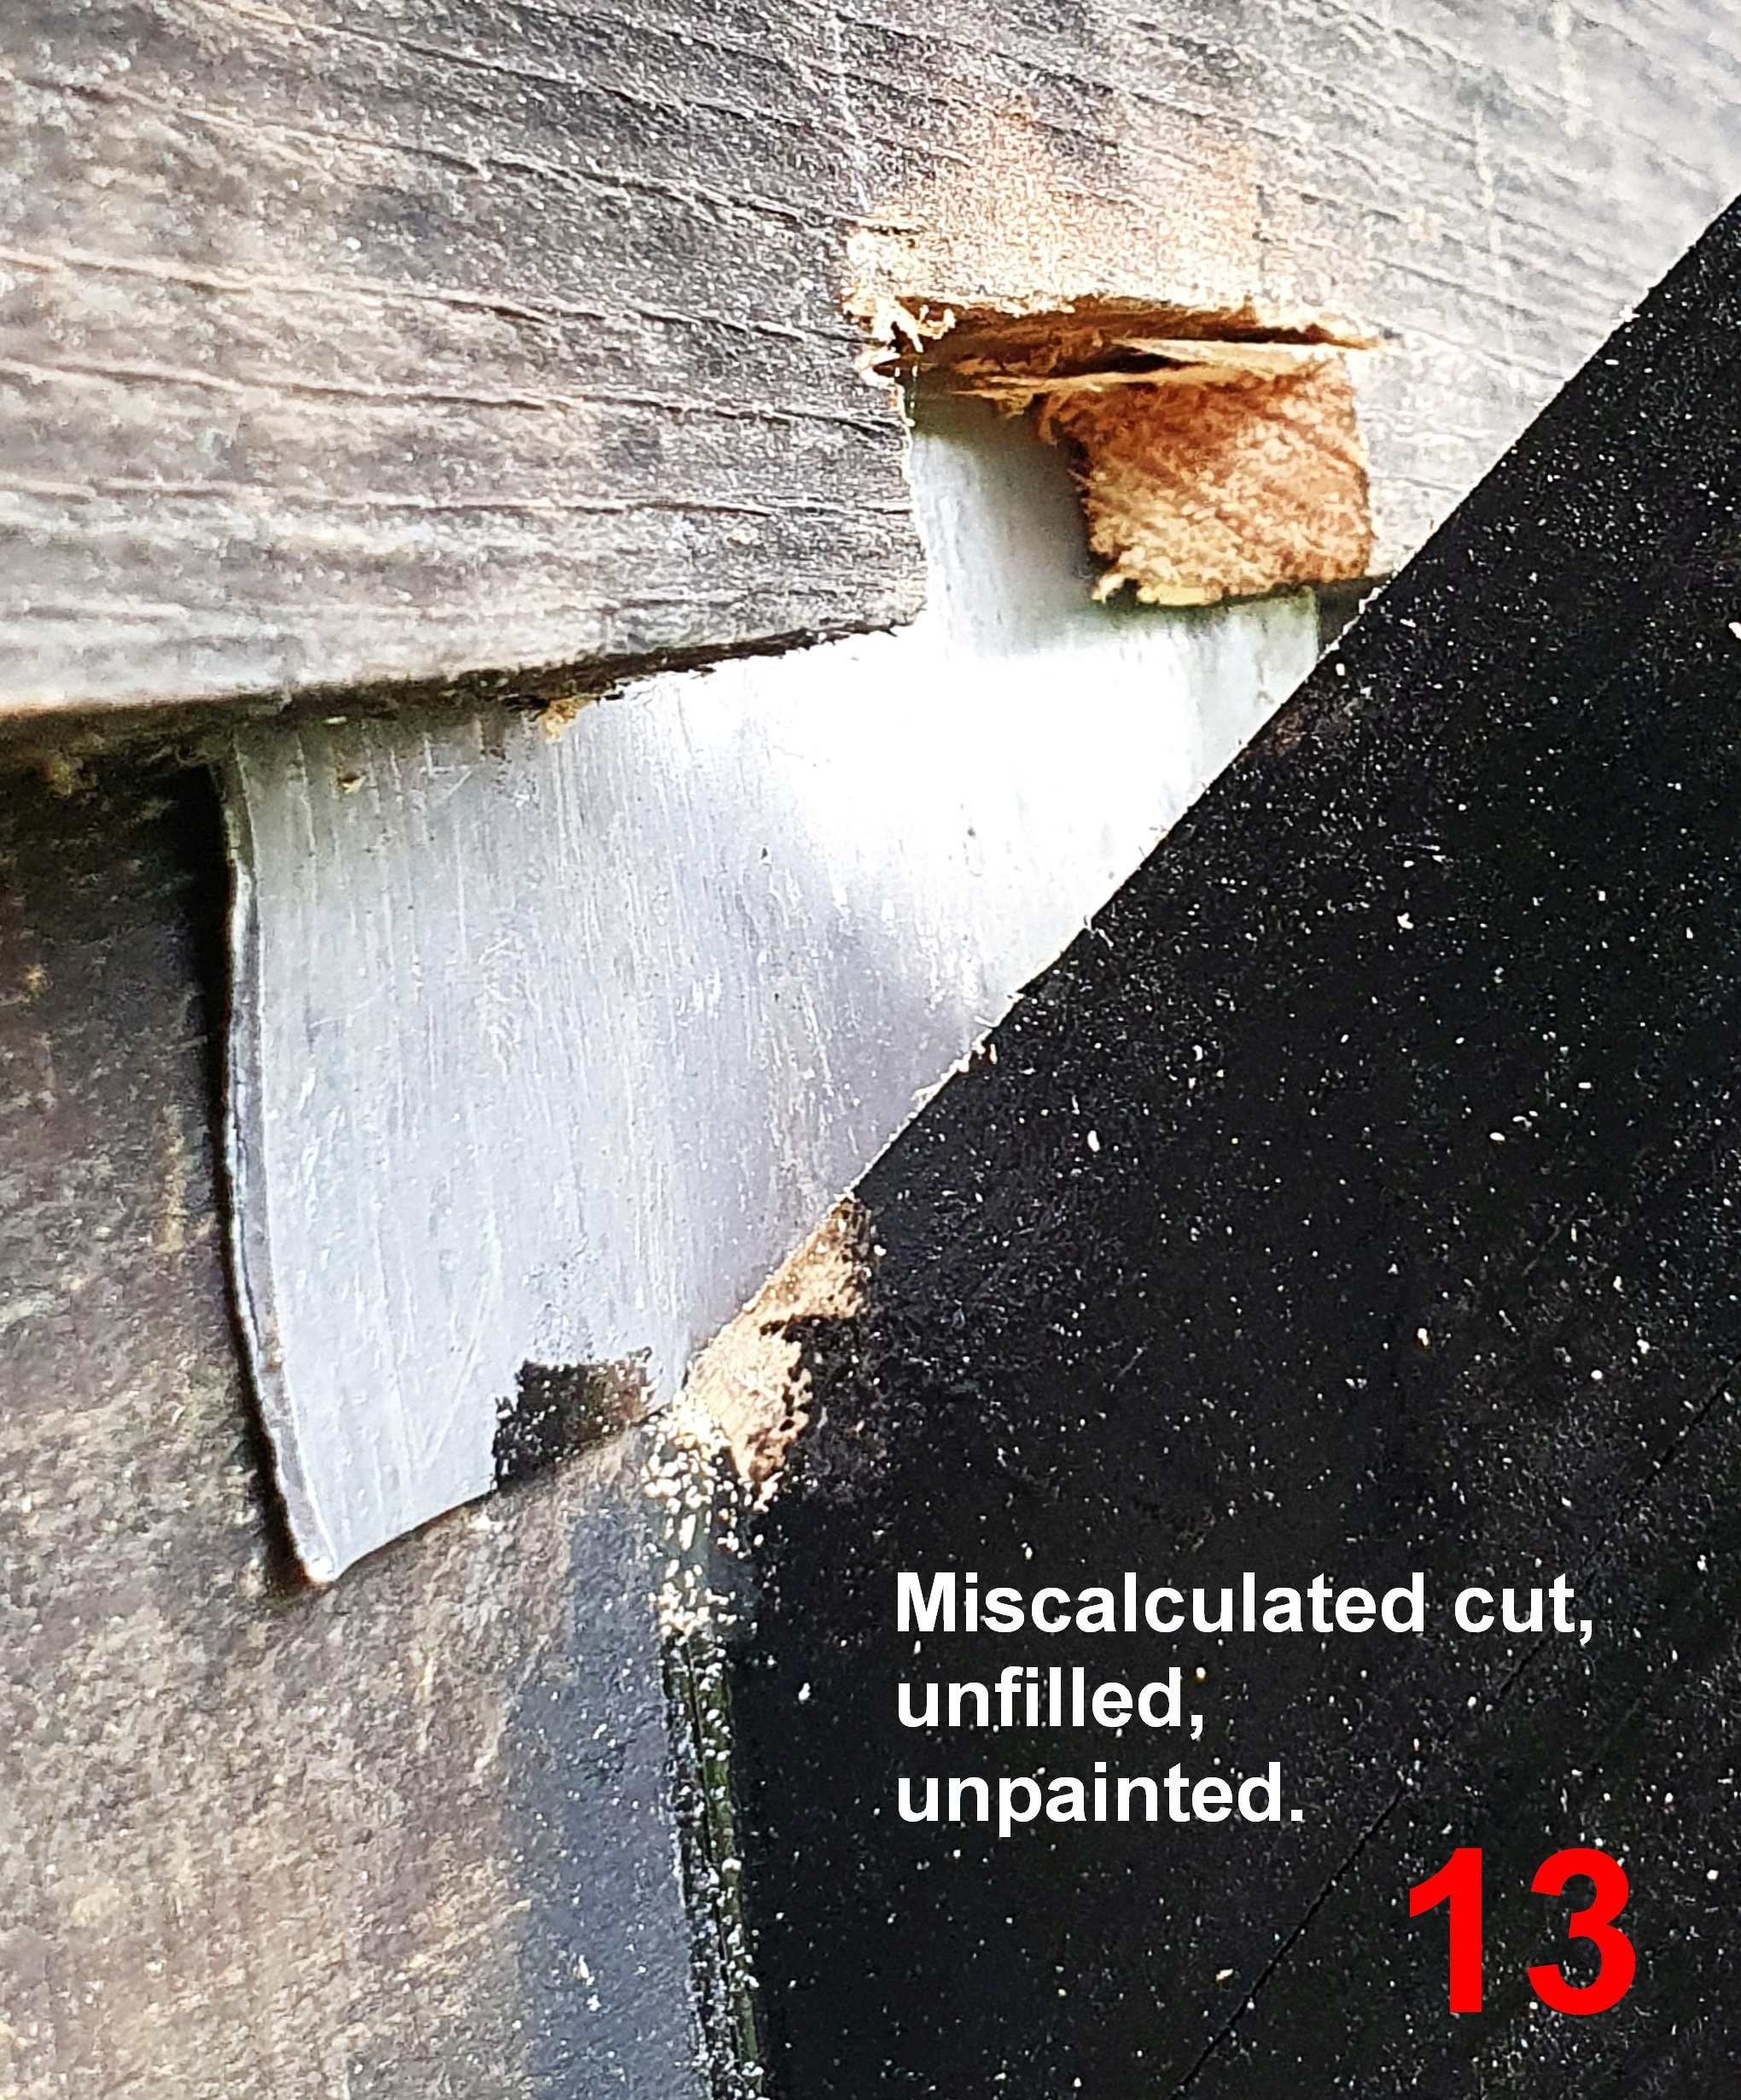
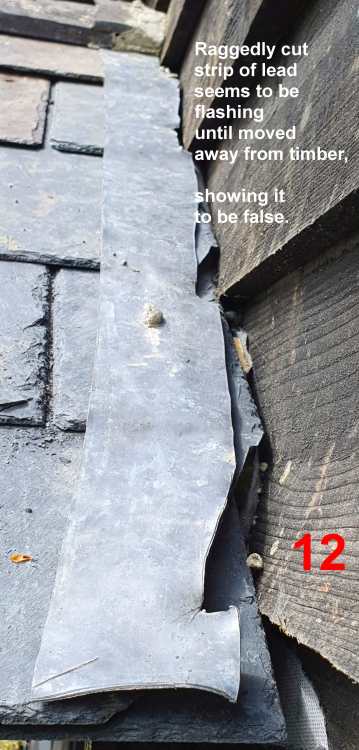
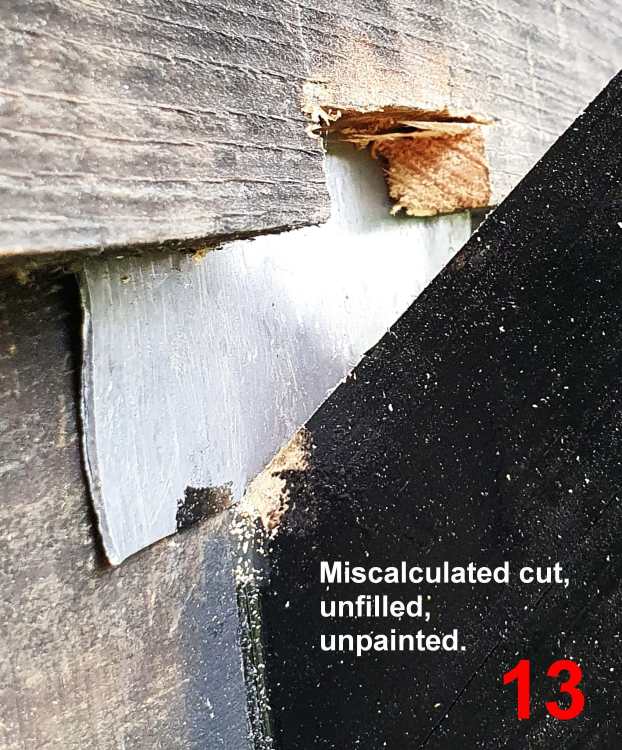
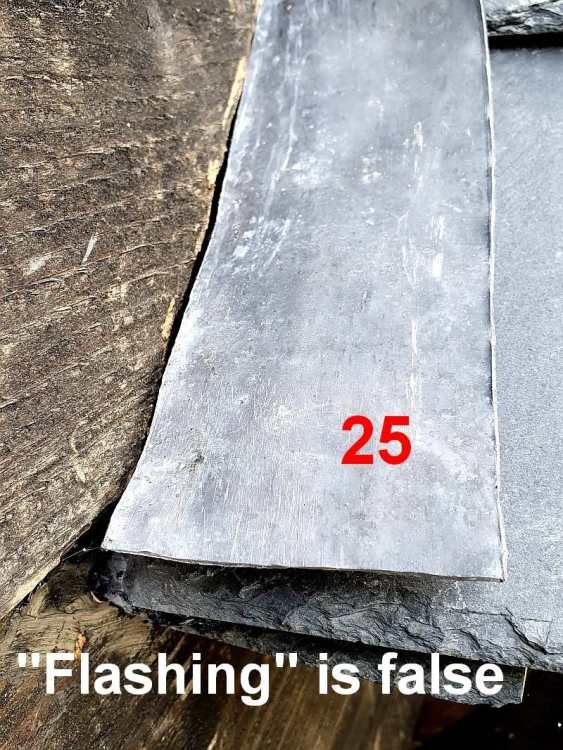
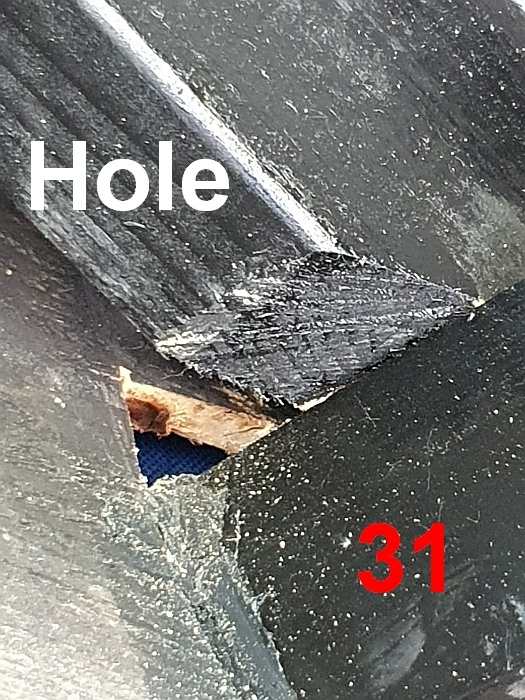
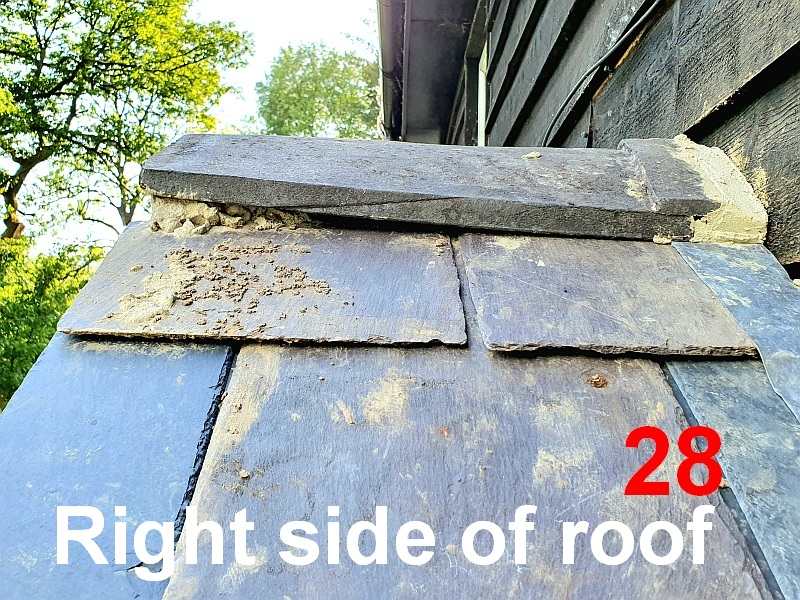
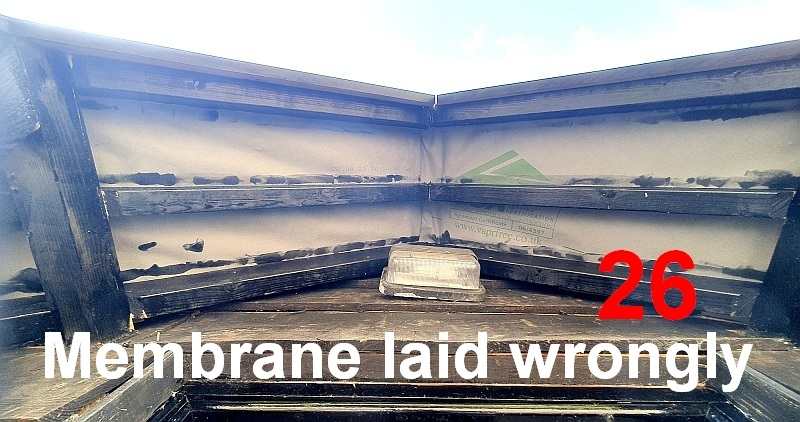
A certain building company, which claims to be professional, has left me with a shoddy porch hood. I paid them one third at the end of the first day of work. I have not paid them the remaining two thirds. Please have a look at the worst examples of their work. (There are a total of 32 similarly serious flaws. I have asked another roofer to look at the porch, and a carpenter is soon to look at the woodwork. PLEASE could I have people's opinions as to how to proceed?

-
Unfortunately I have just had a porch hood added over an external door and there are unbelievable flaws in the construction. I'm not certain which side of the roofing membrane should be facing up and which side should be facing down. The photos below show that the two pieces have been laid differently. Which side is correct? As the porch-hood is open to the atmosphere, how important is it that both pieces are correctly laid? (Another flaw is that there is a visible hole in a tile on the right side of the porch. It may not be the only hole.)


-
Sorry. I meant, thanks for pointing me to the gap which there seems to be under the ridge!
-
Many thanks @Gus Potter @SteamyTea @saveasteading for pointing me to the gap which there seems to beneath the ridge.
-
@Gus Potter& @Nickfromwales Thanks for asking for a photo. I hope this one will do.
-
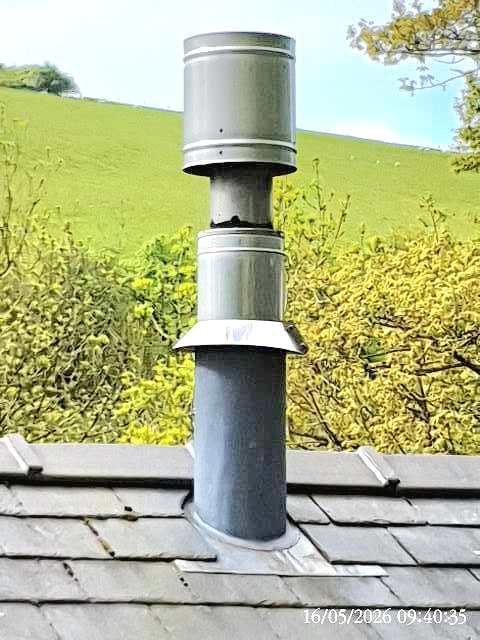
Once during the recent winter, when the wind and rain were vicious and rather horizontal, I noticed some drips of water trickle down the outside of the stainless-steel wood-burner vent inside a bedroom. So this summer I intend to get up on the almost flat dormer roof which is close to the stainless-steel chimney and fill any small holes I can find around the vent. I imagine it needs to be something flexible, but also something that won't react badly when the metal is warm (when the fire below is burning). What product should I use, please?
-
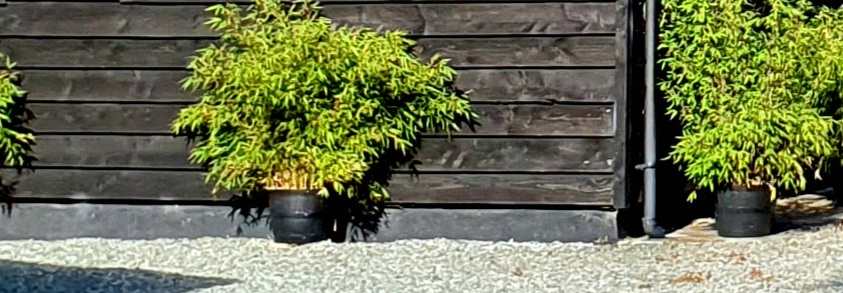
Mice, shrews, voles! Somehow they all get into our house and make their way up into the walls and attic. A couple of years ago one of them nibbled a plastic pipe in an upstairs wall and caused a leak which saturated the plaster of an upstairs wall and the downstairs wall directly beneath, as well the carpets of both adjacent rooms! So it's time to close the "front door"! The trouble is: where IS their "front door"? Somewhere around the perimeter of the house, the little devils are clearly able to make their way up the 8 inches of plaster between the shingle and the first board of timber-cladding, as in the photo. Where they go after that we'll never know, but behind the cladding there must be one or more holes allowing them into the house. So what's needed is a guard of some kind. It must be attached between the top of the grey plaster and the bottom of the first board. It must be firmly and permanently attached. It shouldn't have holes or gaps in it greater than 6 mm. It must allow air to ventilate the cavity behind the boards. It must stop determined rodents from making it onto the outer surface of the boards, so that they can't climb until they find a gap between the boards. It should come in long strips, so that there will be as few joins as possible. It should be black (or be painted black), so that no part of it will be visible. And: It mustn't be chewable. It mustn't rust. It mustn't be an eye-sore. Are there any other requirements? Any recommendations, please?
-
How to make a shower-cubicle floor waterproof?
David001 replied to David001's topic in Bathrooms, Ensuites & Wetrooms
@Nickfromwales, I took the plunge five days ago, nervously monitoring the state of the ceiling below the shower afterwards. So far, there's no sign of water, but if there's a leak from the shower and it's only a slight leak then it may take several weeks to penetrate the plasterboard ceiling of the room below. But so far so good, and I'm inclined to think the problem was the leaking tank in the cupboard directly beside the shower. I've checked the point of the leak on the tank and it's still dry. So I'm hoping that in a couple of weeks' time it will be safe to paint some stain-block over the brown stains on the ceiling of the room below, and then paint over that. Thanks for nudging me into summoning up the courage to test the shower! 😅 -
Hello. The house we bought four years ago has 10 Velux skylights. We never open them, but in the summer we open the narrow flap along the top of the odd one, to enable some ventilation. The problem is that for the past three or four months tiny moths and the odd mosquito have been spotted inside the house when there should not be any - other than the odd quick one that might dart in while an external door is briefly open. We live in an area which still has a considerable insect population, so after being assailed by moths and mosquitoes in bed at night during our first months in this house, we spent quite a bit on insect-proof screens on key windows (windows which we need to open for ventilation). So there should be no insects anywhere in the house. Yet some have recently started getting in. The question is how? The only thing we can think is that some of the insect filters in the Velux skylights may be letting them in. The previous owners installed the skylights in 2012 and Velux states on its website that the insect-proof strip and the padded tape along the top of the skylights need to be replaced every four or five years. Did the previous owners ever maintain the skylights in this way? I very much doubt it. So the moths and mosquitoes may be getting by way of this route. Q. 1. Each Velux maintenance kit costs £37, probably with an extra amount for postage. Each kit includes filters and padded tape 2.5m long. So as each window here is 70cms wide, one pack will do 3 windows. So I will need to buy 4 packs, totalling £148. Can the materials be bought at a lower cost somewhere else? Q. 2. Why does the insect gauze need to be replaced? It seems to be made from strong, honeycombed plastic. So why can't it just be rinsed under the tap and put back? Does the honeycombed plastic deteriorate in some way over time? The Velux service kit is available from Velux at the following link: Service kit (ZZZ 220) for VELUX roof windows produced before 2014 I've not owned skylights before, but I think the time has come to get to grips with the ones we now have. Thanks for any help with this situation.

-
How to make a shower-cubicle floor waterproof?
David001 replied to David001's topic in Bathrooms, Ensuites & Wetrooms
@marshian, same here: the leak from near the top of the water-tank had saturated the chip board forming the floor of the water-tank cupboard, so the owner had evidently pulled away the sodden board directly beneath the tank and then lain over it some thin plank-like strips of floor covering . . . which hid the hole and fooled our us and our surveyor! Thankfully the board directly beneath the feet of the tank was dry so the tank was still well-supported, nevertheless the leak from the tank must have been considerable . . . and it was still leaking when we moved in. With all that Nick has contributed, I'm now inclined to think that the dripping from the ceiling below may have been coming from the leaking water-tank and not from the floor of the adjacent shower cubicle. The big test will come soon when I switch on the shower for the first time in ages. Fingers crossed! 😀 -
How to make a shower-cubicle floor waterproof?
David001 replied to David001's topic in Bathrooms, Ensuites & Wetrooms
I reckon the leak occurred just before completion. The previous owner cut a sizeable square out of the ceiling below. Whether he was able to find the point from which the water came, I don't know. But he wedged a small pot-plant dish beneath the L-shaped waste-pipe, presumably to catch drops of water. Then using map-pins, he pinned a sheet of white foam-board over the hole in the ceiling to sort of cover it up! I then came along, peered inside, saw no water in the tray, no dripping, so I asked a contractor who fitted new cupboards in that room to cover and plaster over the hole as well. So, no, I can't now examine the underside of "the tiles". After drilling holes through the grouting, here and there but equally spaced, and then inserting lots of Fixafloor, I placed three big heavy buckets of water on the tiles and left them there for two weeks! But I haven't had the nerve to use that shower since! 😅 https://fixafloor.co.uk/products/fix-a-floor-pro-repair-pack Thanks very much, Nick, for your photo of a former inset into the floor. That probably explains why the cubicle tiles slope a little to the central drain while the tiles outside the bathroom appear to have been stuck to the same stretch of chipboards as are under the carpet of the adjacent room. So if the leak is from the shower cubicle, it's probably from the drain or drainpipe. BUT adjacent to the shower cubicle is the hot-water tank cupboard, and from the side of it I found a leak about nine months ago. That leak looked like it was "ancient" because of encrustation all the way down the path of the dripping water. But where did the water end up? It must have ended up somewhere. Maybe it was that water which appeared in the ceiling area beneath the shower cubicle? I fixed the leak from the hot water tank and there's been no further water dripping from the ceiling below, but of course I haven't had the courage to use the shower! I guess that shower is going to have to be tested sometime soon! 😱 -
How to make a shower-cubicle floor waterproof?
David001 replied to David001's topic in Bathrooms, Ensuites & Wetrooms
@Nickfromwales. that's really helpful. Thanks. One of the pictures on the web-page for that tray shows it straddling several beams (below floor level), which suggests that the tray is incredibly solid and supportive, that it has no "give" in it. Is that right? Because the floor tiles adjacent to the carpet are a little lower than the carpet, I think that if a tray lies below the tiles in the cubicle, the tray must have been deliberately laid a little lower than the tiles in the rest of the bathroom (for the tiles inside and outside the cubicle to be at the same level). Or perhaps no tray was used, but that wouldn't account for the slightly sloping tiles around the central drain, which surely can't have been laid on a uniformly flat surface. You wondered why I'm reluctant to "simply" have the tiles taken up, and having a thorough remedy being implemented. Well, the reason is this. I'm located halfway between Llandrindod Wells and Knighton, so getting people to travel here to do such work is difficult. Most of the nearest people are over the border, in Hereford (80 minutes' drive) or Shrewsbury (90 minutes' drive). So I have had to almost beg people to come and quote for the odd job which I wasn't able to do myself. There's a price to be paid for rural bliss! 😂 -
How to make a shower-cubicle floor waterproof?
David001 replied to David001's topic in Bathrooms, Ensuites & Wetrooms
@Alan Ambrose, the previous owners had done just that just prior to completion, and had then covered the hole with a piece of light paper-board, pinned in place. When we unpinned the board and looked inside we found a small pot-plant dish had been wedged underneath the central drainage point, but it had not a drop of water in it. Then looking closely all through the exposed area we found it was too much of a dense forest of pipes and beams and other bits of wood (as well as several electrical cables!) that it wasn't possible to determine the point at which water had entered from the shower-floor above. So I'm inclined to think that we're going to have to lay a new tiled floor. @Nickfromwales @ProDave @Big Jimbo @Alan Ambrose Would it be possible to give the present floor some thick coats of something long-lasting, pliable, and waterproof (painted on, or some kind of thick pliable waterproof board), and then lay new tiles on top of that? This might save ripping up the current floor. There would then be a slight step up of about an inch from the floor outside the cubicle, but that could be dealt with by replacing the cubicle door (which swings inwards) with a curtain. -
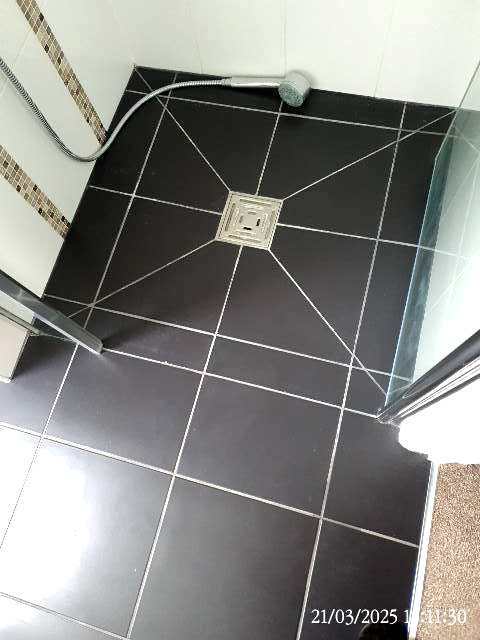
Hi. Can this shower-cubicle floor problem be solved without having to lay a completely new floor? I've bought a home with a first-floor shower-cubicle and quickly found that shower water made its way through to the room below, dripping from the ceiling of that room. I then found that there were some cracks and gaps in the grouting between the black tiles in the cubicle, so I filled them with "flexible" grouting (although it doesn't seem flexible to me). I then noticed that some of the tiles moved downwards a fraction when stood upon - this probably caused the grouting to crack in places. So I made a number of holes in all of the grouting and squeezed into each hole quite a lot of a very powerful glue designed for this kind of situation, hoping to make firm and solid whatever is directly beneath the tiles, or to remove the sponginess beneath the tiles by solidly bridging between the underside of the tiles and whatever is beneath them. But I have not dared to used the shower since then, for fear that water may still get through to the cavity and the ceiling beneath! 🙂 I expect the central tiles were cut into the eight triangles so as to enable each triangle to slope downwards as they do towards the centre, to direct water into the drain. Is there a waterproof product of any kind which could be placed over the tiles to ensure that all water goes into the drain? It would have to be a product which looks smart, and is tough enough to withstand being struck by water every morning and occasionally being scrubbed during cleaning. Thanks a lot for any help given!
-
How to restore 12 year old laminate floor tiles?
David001 replied to David001's topic in Wood & Laminate Flooring
@Temp, thanks for your opinion and for the interesting video. I note that the man used a polyurethane to protect the floors in that house but before then he went to a great deal of trouble to clean the floors. I think that's what I will do: simply clean them several times to remove remaining soil and to expose the original surface of the tiles.