David001
-
Posts
88 -
Joined
-
Last visited
Everything posted by David001
-
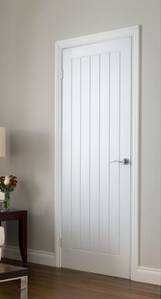
We've bought a house in which all the doors are of the inexpensive, moulded, five-panelled, grained-appearance sort, as at the following page at Wickes: https://www.wickes.co.uk/Wickes-Geneva-White-Grained-Moulded-Cottage-Internal-Door/p/9000218647?_br_psugg_q=door In one bedroom I want to attach to the back of one of these doors a coat-rack board, with just two or three coat-hooks on it, for hanging a couple of dressing-gowns, but I believe that the interior of these doors is composed of something like honeycombed cardboard. So the challenge is to attach the board of a coat-rack securely and permanently to such a door. I want to avoid the possibility of inappropriate fixings becoming loose over time. The front and rear surfaces of the door are firm and strong, but I don't think they are much thicker than 5mm. The total width of the door is 1 and three-quarters of an inch. Has anybody had experience of firmly attaching a coat-rack to this rather flimsy sort of door? Thank you.
-
The previous owners of our house were required by the planning department to fit sprinklers before they could have their building works signed off and certificated so as to sell it to us. Beside the massive inconvenience of channelling pipes throughout the floors and ceilings of a big house the owners had to install a large, dark green, bunded, plastic oil-tank just outside the back door to keep the water in. We had hoped to evade sprinklers when buying an old house, but that wasn't to be the case . . . in Wales. It's connected to electricity and does a noisy self-check once a week. But we are at least safe from a fire burning the house down. Let's hope the climate emergency doesn't result in the surrounding woodland catching fire: the sprinkler system wouldn't save the house then. 🔥
-
How accurate do we need to follow planning outlines?
David001 replied to dan_cup's topic in Planning Permission
When we were buying our current house we discovered that the owners had not signed off building work which they had done in 2012. Our solicitor required the owners to get the work signed off for our peace of mind and so that the documentation will be complete whenever we come to sell. So the owners had to go on their knees in penitence to the county council. The planning department said they would need to inspect the work. They came and found that the work that was done not only infringed the terms of the planning permission which was given but it also infringed terms which had been introduced after the owners had applied for the planning permission! So the owners then had the choice of either quickly getting contractors in to modify the work that was done to bring the building up to the planning officer's requirements, or lose us, their buyers, and probably other potential buyers also. They chose to get the modifications done. And went through hell! For example, one of the completely unexpected things they were required to do was fit a fire-extinguishing sprinkler system throughout the whole house, which meant taking up all the carpets on the first floor and making holes in the ceilings above the first floor so that the pipes could be laid to sprinkler points above each floor. They also had to prepare a huge space inside what was a well-shelved lean-to for a huge tank in which to store the standby water-supply for the sprinklers. So, the moral is: keep completely to the planning permission that has been given, or reach a new written agreement with the council. -
What fixings may I need to stop leaks?
David001 replied to David001's topic in Roofing, Tiling & Slating
@saveasteading, a Technical Advisor at Ejot has advised that they don't offer any TEK screws wider than 6.3mm, and I haven't noticed larger ones on other sites, so I'll order new 19mm washers+neoprene, then just take the screws out, change the washers, and then carefully put the screws back in. I'll be using a spanner, so I guess I need to make sure that I insert the screw only so much that the neo-prene is very slightly compressed. If you have a tip on doing this by spanner, I'd welcome it! Thank you. -
What fixings may I need to stop leaks?
David001 replied to David001's topic in Roofing, Tiling & Slating
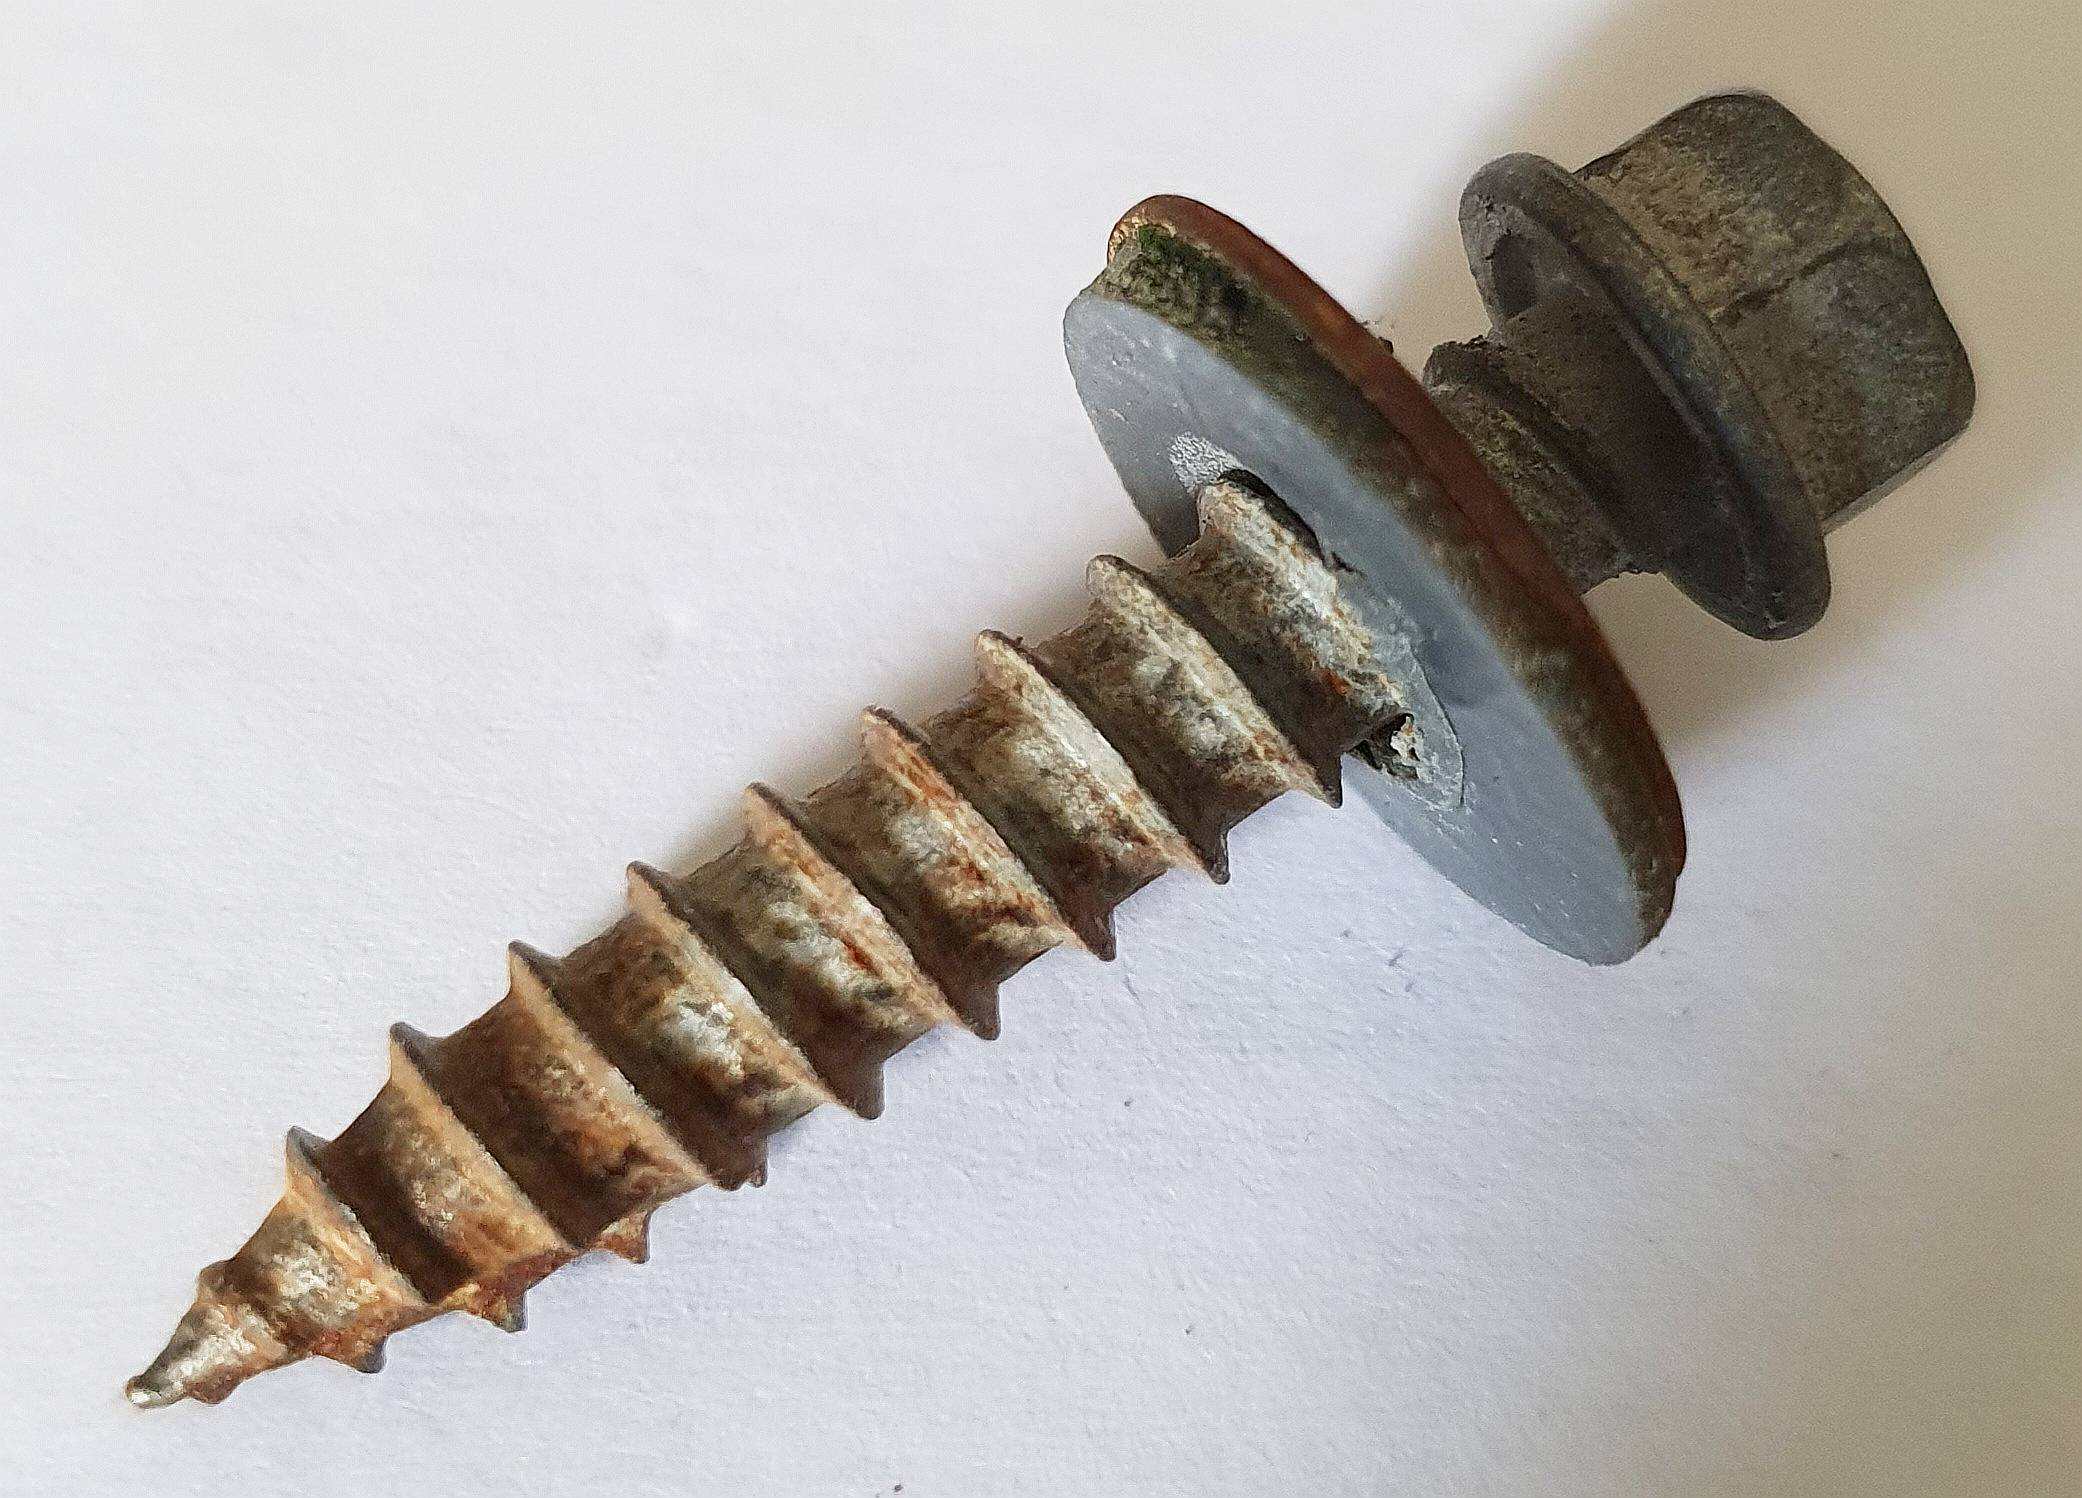
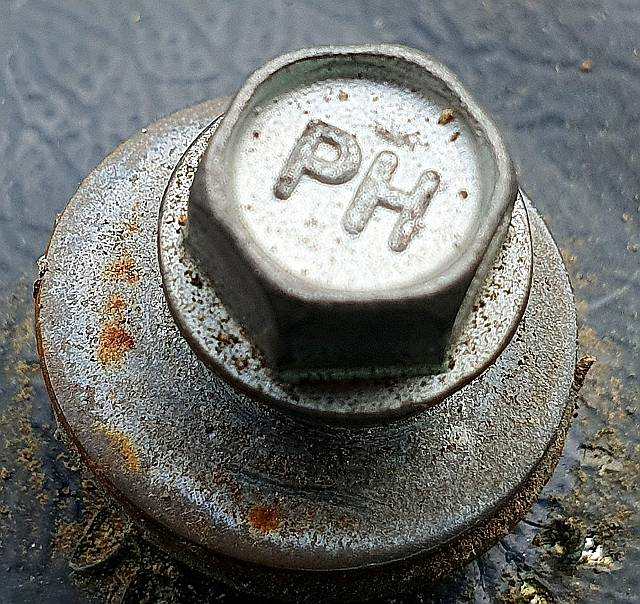
@saveasteading, thanks. I should have photographed my screw from another angle to show the gash in one side of the bottom of the thread, which I think is the "self-cutting point" you have referred to. At several online stores I haven't found a Tek screw with a width larger than 6.3mm. There's smaller (5.5mm). I have found that there are replacement washers for Tek screws for sale, and some are the right size for my existing screws, but so far I've only found them with "bonded rubber" rather than "bonded neoprene". What would be the disadvantages of only replacing the current washers with these (i.e. using the same screws as have already been used)? The number of "turns" or "rings" in the thread of my screw is 12. Fastco.co.uk offers a same-sized screw with a neoprene washer but 14 turns in the thread. I imagine this is not a "coarser" screw? Tcfixings.co.uk offers a same-sized screw with a rubber washer and 10 turns in the thread. So is this "coarser" than my screw, even though it's not wider? Thank you. -
What fixings may I need to stop leaks?
David001 replied to David001's topic in Roofing, Tiling & Slating
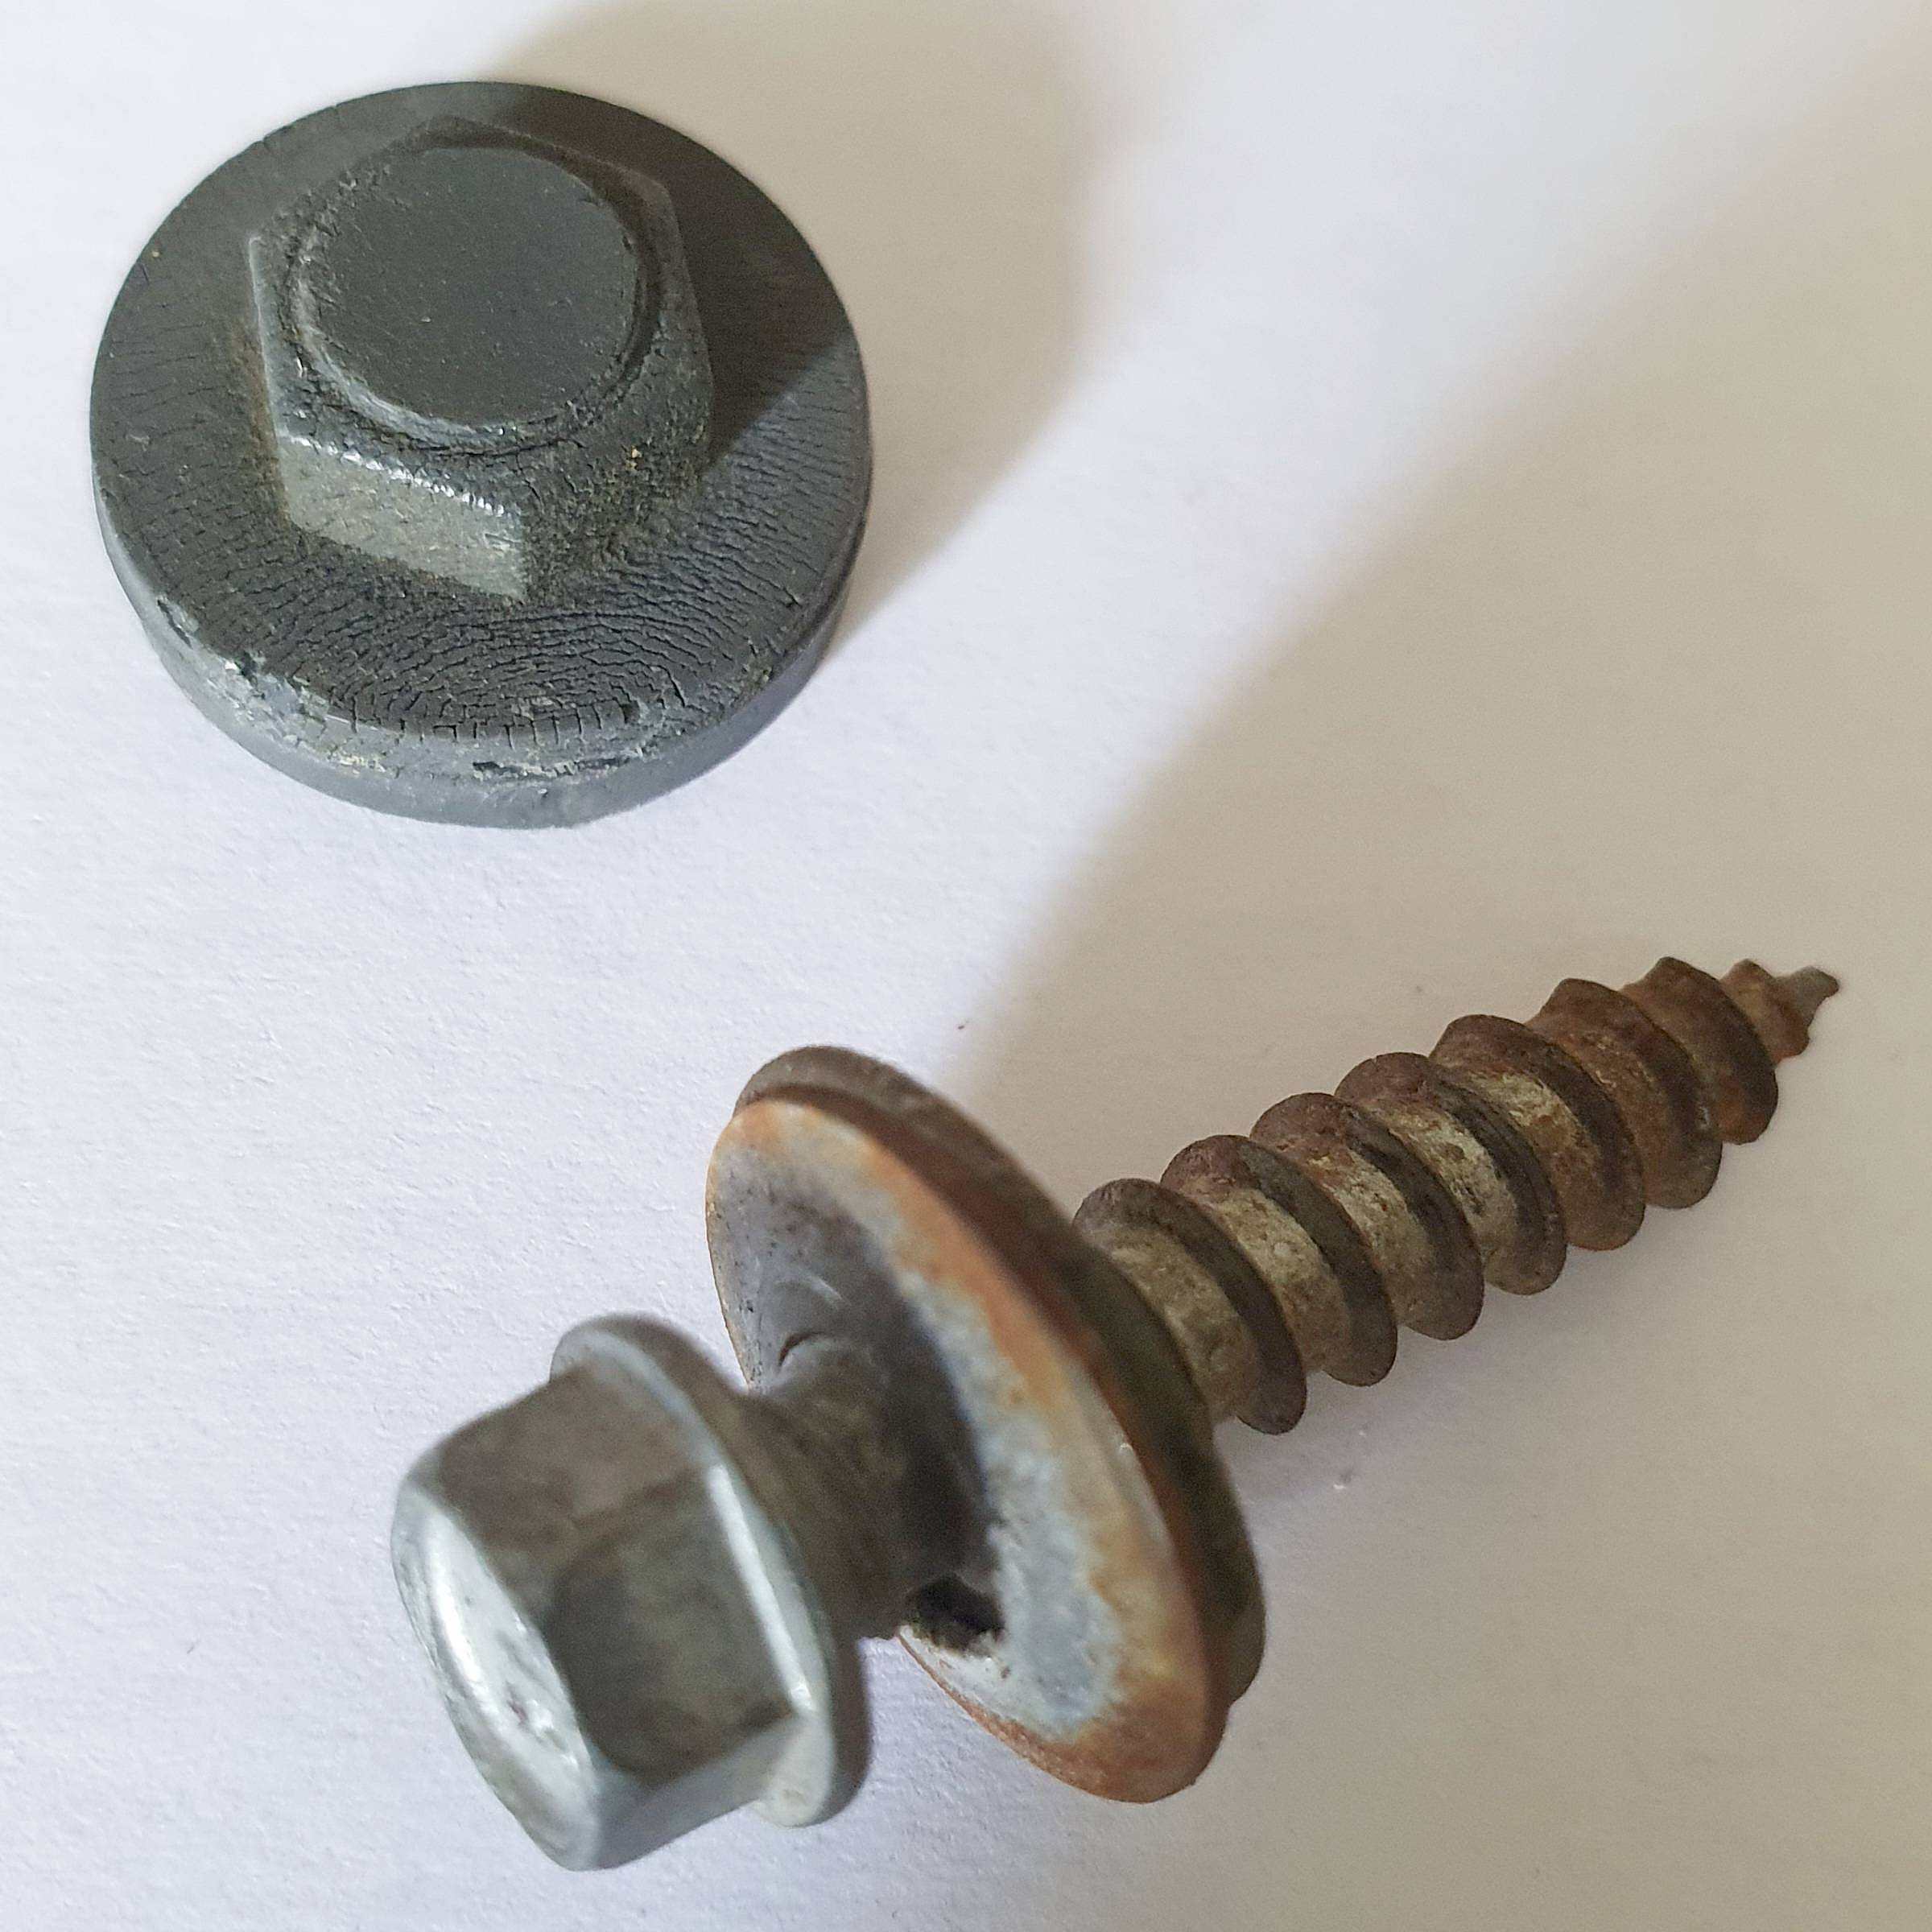
@saveasteading, many thanks for your above advice. I have taken out one of the screws, as in the two pics below. Without the plastic cap, the total length of the screw (from top of the hex head to the sharp tip of the shank) is 3.7cm. The outer width of the thread on the screw (directly under the washers) is either 6mm or 7mm. The diameter of the plastic cap is 1.9cms. Is this a screw which is well-known? Bearing your advice in mind, I think I need now to find a supplier of similar screws which are 3.7cm in length, but which are 7mm or 8mm in diameter at the widest part of the shank. Would that increase of just 1mm be sufficient? When you recommend a coarser thread for the "repair screw", does that mean a shank which has slightly fewer "rings" forming its thread? An USA page includes the following: "a neoprene washer (already light years better than traditional rubber) . . . is independent from the screw head allowing overcorrection during install. They also have a slightly larger and slightly domed metal washer stacked on top which creates an umbrella for the neoprene that guards it against the UV rays that cause cracking. We are seeing screws that at this point can live roughly 50 years if not longer without failed washers. Some companies are now even offering screws with oversized heads and washers with military grade strength that are guaranteed for life" Are neoprene washers available here in the UK? Although the roof would look a bit peculiar with only a handful of its caps being of a different kind and size from the rest, maybe I should use them anyway. I live 90 minutes' drive from the nearest big town, so unfortunately I can't easily visit a specialist fixings shop. Can you recommend a helpful online supplier? Thank you.

-
What fixings may I need to stop leaks?
David001 replied to David001's topic in Roofing, Tiling & Slating
@saveasteading, it's been a busy summer for me and only today have I finally put up a ladder to the roof referred to above and investigated the nearest fixing. Then coming back to your information and images (above) has been most helpful, because your information now makes sense to me. I prized off the plastic cap and saw the metal hex head. I gave that a few anti-clockwise turns with a spanner and then discovered that the round metal washer and a rubber washer are separate from the screw. At first it seemed that the metal washer and rubber washer were fused together, but this must just be the effect of pressure and time. It seems to me that the black rubber washer is so much thinner than the one in your image, above, and in similar images of such screws on the web. Is it likely that the rubber washer shown in my photo below has become thin over time? For this kind of roof is it correct that each hex screw consists of four parts: the screw with its hex head, a metal washer, a rubber washer, and a plastic cap? Would it be unwise for me to remove the screws suspected to be letting in water, change their rubber washers, and then screw them back in? Are rubber washers supplied separately for these hex screws? If so, then as there seem to be different sizes of these hex screws, I would need to find out what size the screws which have been used are. The diameter of the lowest (round) part of the plastic cap is 2cms, or perhaps 19mm, but perhaps that won't help identify the screw. Thank you.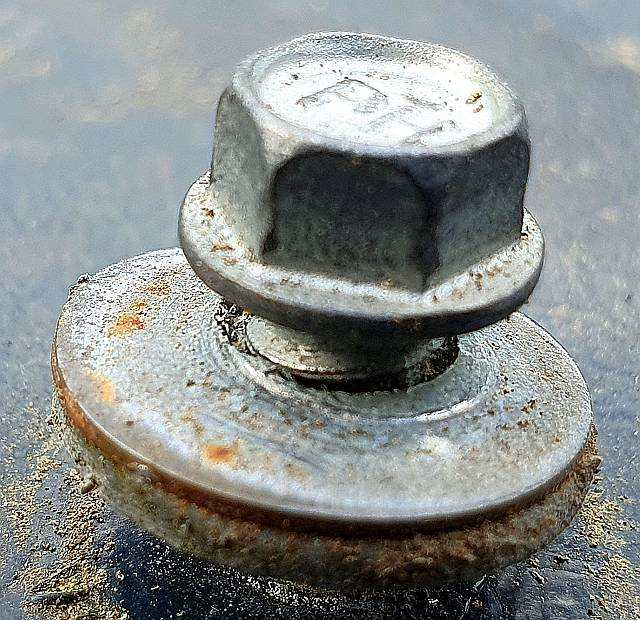
-
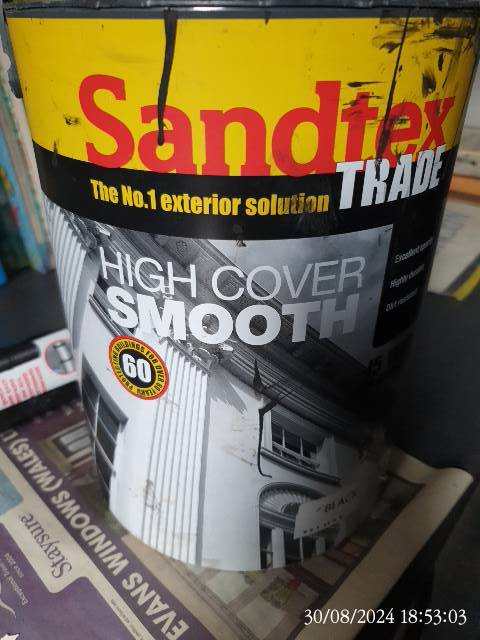
I have white bargeboards which would look much better if they were black. I would normally paint them with gloss paint but I don't have any black gloss paint at the moment. But I do have a large tin of Sandtex in black. The badgeboards are in good condition. The white gloss paint on them is in good shape. So can I blacken these barge boards with the Sandtex? A picture of the paint pot is below. Thanks.
-
How to improve edge of rubber membrane over gutter?
David001 replied to David001's topic in Lofts, Dormers & Loft Conversions
@FuerteStu, indeed! Never again near this house. I am now very glad that I insisted that the old fibreglass roof coverings were well-coated with liquid rubber before the new roof was built on above it. I wonder if the current economic climate, in which many people can't afford to have work done, is causing some contractors to tell customers they are familiar with types of jobs with which they are actually unfamiliar and which they wouldn't ordinarily do. -
How to improve edge of rubber membrane over gutter?
David001 replied to David001's topic in Lofts, Dormers & Loft Conversions
He's separated the baton from the rubber by placing 4 or 5 little piles of spacers (set at intervals) underneath the baton, then he has fixed all in place by driving a screw through the baton and the spacers beneath it, then through the rubber, and into the wood baton under the rubber. I think he's added the baton as a way of hiding, masking, or disguising the little piles of spacers. I think his intention was to hold the rubber firmly down at 5 or 6 points along the top edge of the dormer. I think his first thought may have been to screw a baton directly along the top of the rubber, but then he realised that the baton would be an obstruction to water and debris. So then I think he decided to raise the baton above the rubber by a centimetre or so, by way of using the little piles of spacers. Every year now I will need to get up there with a thin screwdriver and make sure that the open areas between the little piles of spacers (under the baton) are free of debris, moss, etc. -
How to improve edge of rubber membrane over gutter?
David001 replied to David001's topic in Lofts, Dormers & Loft Conversions
Update: the contractor has screwed a long plastic baton to the edge of the top surface of the dormer's edge, to keep the rubber sheet down. They placed spacers between the rubber and the baton, so that rain-water will be able to pass under the baton and then down into the gutter. They did not consider that the gaps between the rubber and the baton will eventually fill with debris gunge, and moss, and that the baton will cause leaves to pile up against its higher side. -
How to improve edge of rubber membrane over gutter?
David001 replied to David001's topic in Lofts, Dormers & Loft Conversions
Thanks, @Russdl. The latest is that the contractor has said that: 1. They prefer not to use a gutter trim because it fades to a grayish white and eventually splits (in which case surely the side trims and the side cladding which they fitted would also fade to a grayish white and split). 2. They have ordered some hot-glue and will come and bond the EDPM to the grey plastic tray which they placed behind it. So I will see what improvement the hot glue makes. The last time I saw hot-glue being used to bond a felt roof onto an extension, a long and powerful blower-torch was being used. If they use the same kind of torch here the plastic and the gutter will melt. Thanks for your help and advice. It's really appreciated. I will update the thread once the hot-glue solution has been tried. -
How to improve edge of rubber membrane over gutter?
David001 replied to David001's topic in Lofts, Dormers & Loft Conversions
@Russdl, thanks for that confirmation of the shoddiness of the work done. As the contractor has been paid, and as he has already spent an extra four days here rectifying most of the mistakes of his assistant, I don't expect to hear from him. So I have wondered how I can "make good". I am thinking along the lines of cutting two fairly heavy planks to the widths of the dormers and then screwing a wooden baton along one edge, to create a solid L-shape. Then I am thinking of injecting some "Roof and Gutter Sealant" all the way along the underside edges of the EDPM, or at least in those spaces where the EDPM is not glued securely to the strip of plastic which the contractor placed behind the rubber. And then I would carefully lay the L-shape along the edge of the dormer with the baton pressing against the vertical edge. I am hoping that after 24 hours I could then lift off the planks, leaving the EDPM permanently fixed to the plastic strips. I have some "Soudal Roof and Gutter Sealant", which is described as: A rubberised, oil based sealant that remains semi flexible after curing. Ideal for applications such as guttering, downpipes, lap joints, chimney stacks and flashings. Excellent adhesion to common roofing materials such as asphalt, bitumen, felt, metals and wood. Will such a "Roof and Gutter Sealant" act as an adhesive on rubber? Will it bond to rubber? If not, could you recommend another product which I could use in the same way, to fix the EDPM to the plastic which has been laid behind it? Thank you. -
How to improve edge of rubber membrane over gutter?
David001 replied to David001's topic in Lofts, Dormers & Loft Conversions
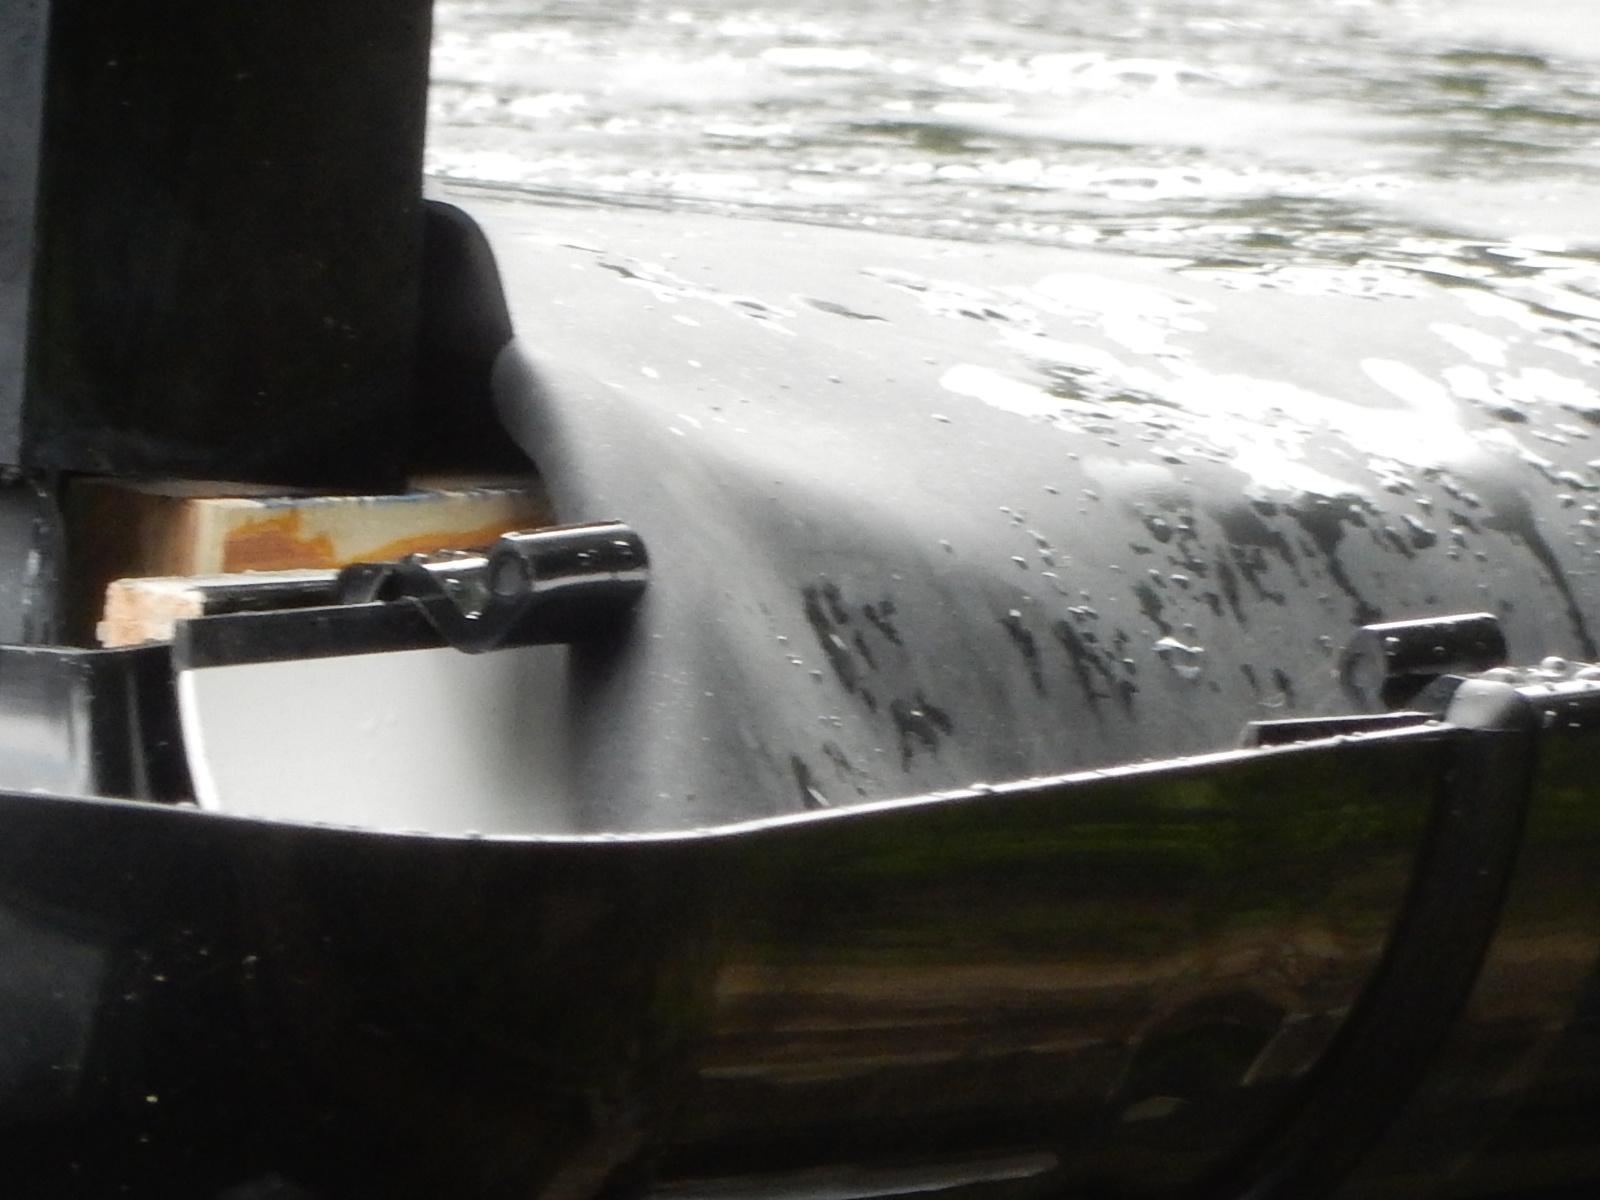
@Russdl, thank you very much for that very clear installation video of the EDPM which you installed. I have invited the contractor to consider the situation and I look forward to his response. This has been a very trying experience. Initially the contractor delegated the work to a rather wild young lad who clad the dormers as below. The first shot shows how the cladding did not follow the original horizontal lines of the slates, and that when he fitted the guttering he aligned it with the slanting cladding, so that the gutter rose up towards the downpipe and so the gutter remained half full of rainwater. The second shot shows how the four corners, on the two gutter edges, were "finished". After I brought these issues to the contractor's attention he and a different assistant came and spent an additional four days rectifying the earlier work - and at some point they trimmed the EDPM right back to the edge of the roof.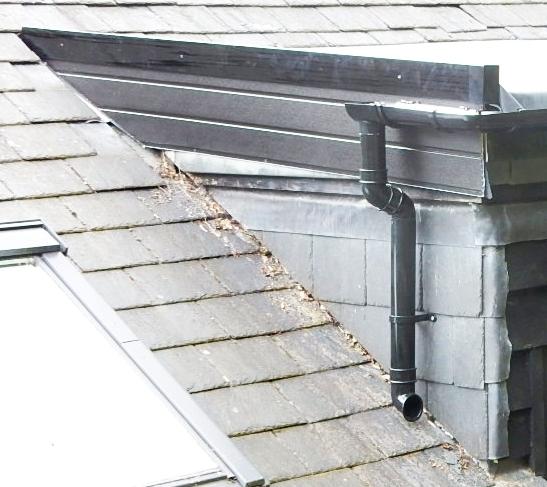

-
How to improve edge of rubber membrane over gutter?
David001 replied to David001's topic in Lofts, Dormers & Loft Conversions
Update, @Russdl, one supplier of an EDPM roofing system has responded by sending me a PDF of instructions as to how to use their system, and it seems to suggest that when it comes to the gutter edge, using their system first of all you screw in a long plastic plate along the vertical edge, and then you attach another long plastic plate by pressing and clipping it on top of the first one. Have I interpreted the directions correctly? Is that how the gutter edge should be treated? -
How to improve edge of rubber membrane over gutter?
David001 replied to David001's topic in Lofts, Dormers & Loft Conversions
@Russdl, thank you! I have googled as you suggested and indeed found that there are such things as "gutter trims". I will get in touch with two companies offering an EDPM roofing system and ask their advice. -
How to improve edge of rubber membrane over gutter?
David001 replied to David001's topic in Lofts, Dormers & Loft Conversions
@Alan Ambrose, yes, I think is glued to the OSB board. -
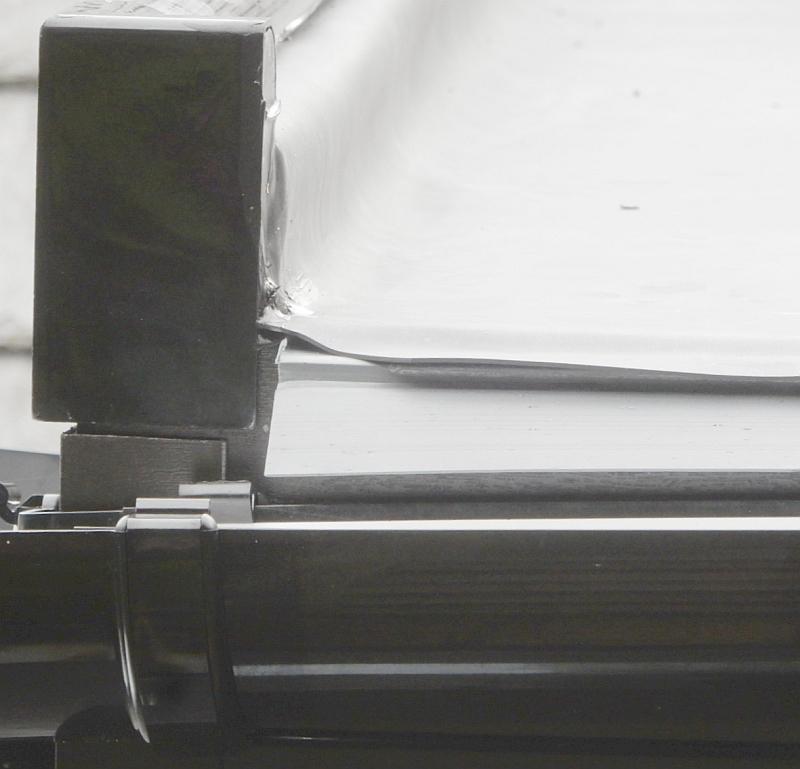
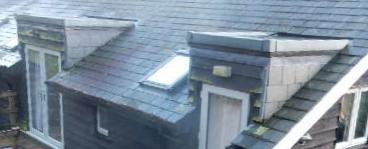
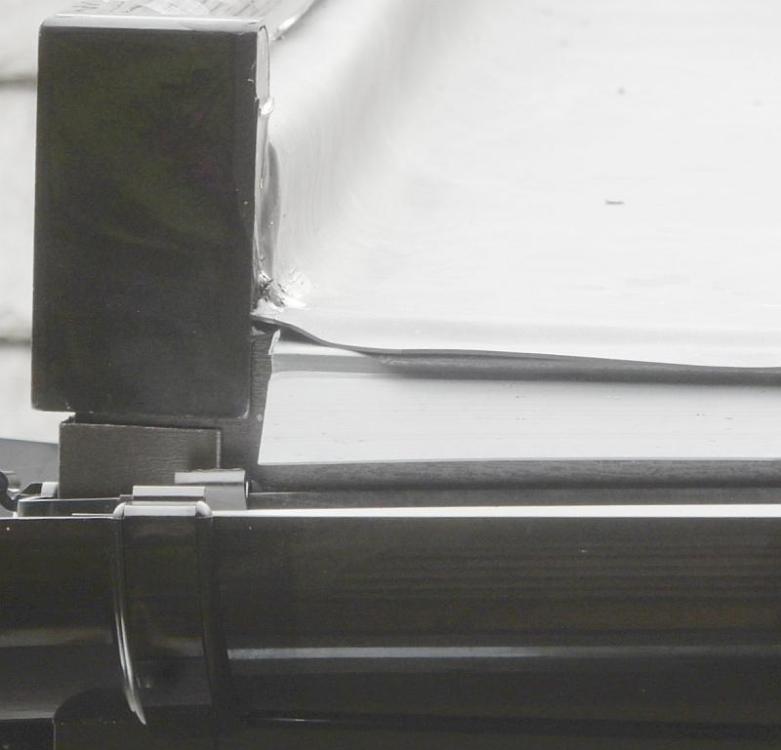
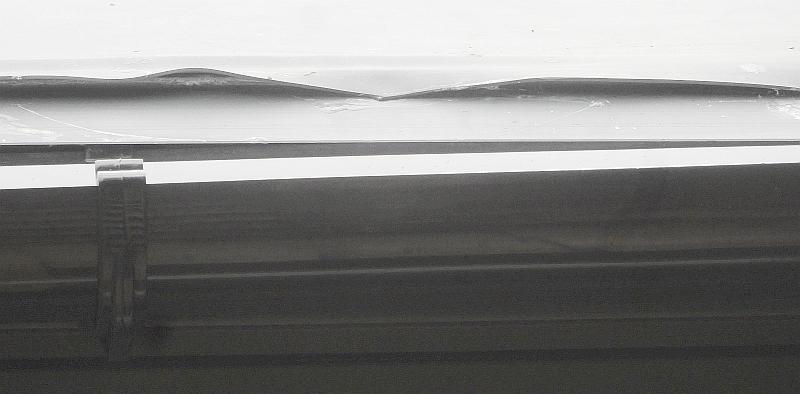
A roofer has fitted new outward-slanting roofs on two dormers here which had always had inward-slanting roofs. The aim of the new outward-slanting roofs was to ensure that falling leaves will no longer settle and clog at the back of the dormers, stopping rainwater from escaping from both roofs, causing trapped water to freeze in water to damage the surface of the dormers, with rain-water then leaking into the rooms below. So the new roofs have achieved the objective except that it seems to me that the roofer cut the EDPM (rubber membrane) a bit short on both new roofs and this could cause problems in the future. I think the roofer should have let the EDPM run over and into the gutter. It seems to me that having cut the EDPM too short, the roofer then tried to remedy the fault by inserting a plastic tray behind the edge of the EDPM. The plastic tray hangs over the gutter. In the photos below you can see that the edge of the EDPM is somewhat wavy, and that there are occasional air-spaces or gaps between it and the plastic tray running behind it. The dormers are north-facing, and I know only too well how easily moss develops in wet crevices on the north-facing side of this house! So I expect that moss will develop in the spaces between the EDPM and the plastic tray, that the moss will eventually press its way further into those spaces so that it reaches the edge of the plastic tray and the surface of the OSB board lying under the EDPM - at which point the OSB will begin to absorb moisture. So what can I do to improve the two edges myself? Photo 1, below: the old dormer roofs, slanting inwards, taking leaves and rain-water towards the centre of the house, for the rainwater to find its way past a mess of clogged leaves so as to escape around the four corners and then flow down eleven slates to the gutters at the bottom of the slates. Photo 2, below: the new dormer roofs, sloping downwards and towards their own gutters, the rainwater then emptying through downpipes on the left side of each dormer (not visible in this photo). Note the visible edge of the EDPM adjacent to each of the two new gutters. Photo 3, below: the left end of one of the two new gutters. See the plastic tray, meant to take all rain-water from the EDPM above it. Photo 4, below: a close-up shot showing the wavy edge of the EDPM, with the plastic tray under it, the new gutter below. I think the EDPM needs to be permanently adhered to the tray, with no gaps between the EDPM and the tray. Thank you for your help. David.

-
@saveasteading, the pergola in the pics above involves solid metal parts only. They're not hollow. But of course I don't know how strong the metal is. A roofing contractor here today advised me that lot of these structures are made from recycled metals and that while they may be "solid metal" the metal itself may not be as strong as it was in its first incarnation. I don't know if that's true or not. Anyway, I take your point that if the feet are absolutely fixed to concrete then any give will have to be in the pergola above.
-
@JohnMo, I would be most grateful if you would explain to me the meaning of "Chemical anchor threaded bar in place". I have imagined that it may mean that I should chemically anchor the threaded bar in position, but I don't know what chemical anchoring entails, or what a threaded bar is. Thanks.
-
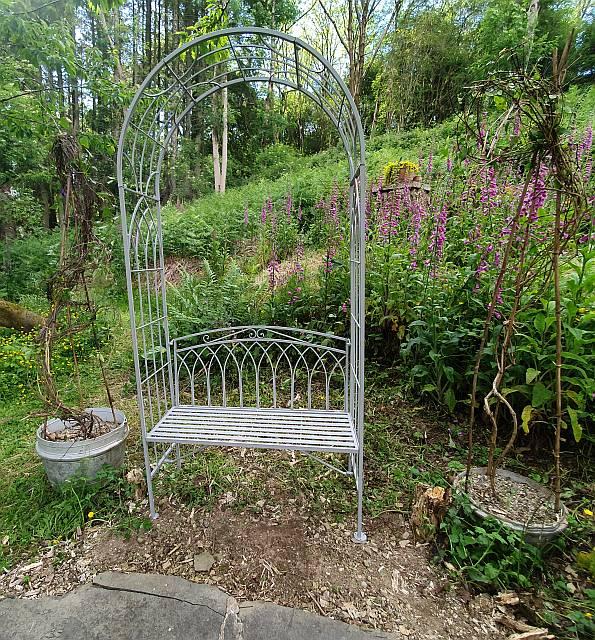
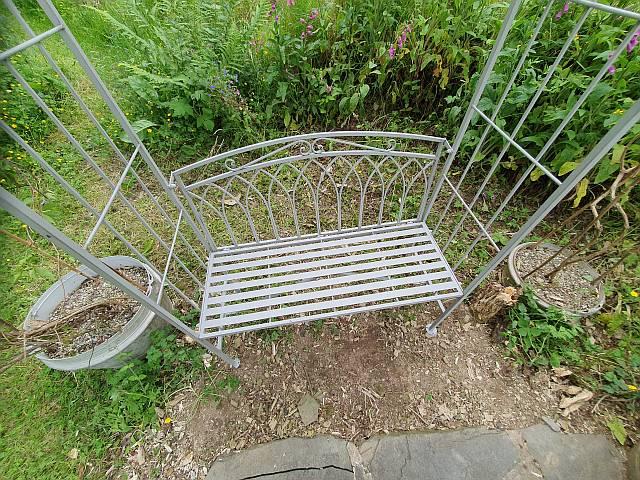
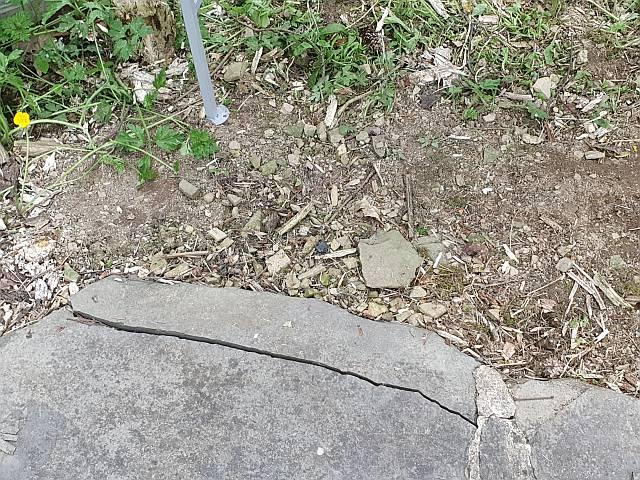
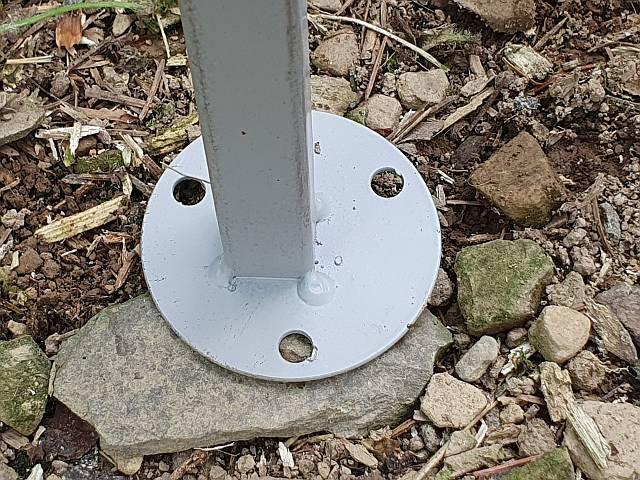
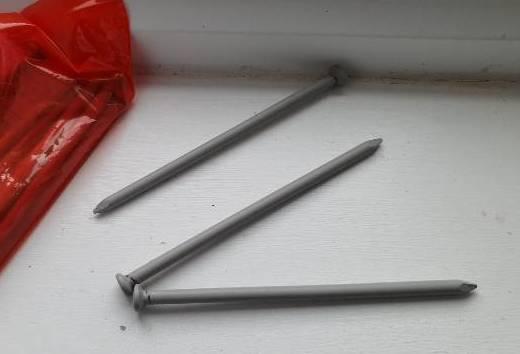
An old wooden seat with a wooden pergola above it (covered with clematis) has over the last 12 years rotted and has also been shunted forwards by gale-force winds, and perhaps by some earth movement, so I have removed the old wooden structure and bought a metal replacement (for just £70 in a sale at Wayfair). Although strong winds will largely blow through the metal-work unobstructed, once the structure is dressed with clematis there will still be some degree of vulnerability in the face of winds. The vulnerability will be mainly due to the pergola's height being 2 metres and only 1 metre from side to side. So my concern now is how to secure the four feet of the seat so that future gale-force winds striking the pergola from behind will not drive it forwards. Also, the position where the pergola is to sit is a small flat area of about 2m x 1.5m, behind which the earth rises up a hillside, and in front of which the hillside falls, meaning that it is possible that over time there may be downward, gravity-led, earth movement. This movement may explain the crack which appeared recently in the thick stone directly in front of the position where the wooden pergola sat. At the end of each leg is a small round horizontal plate, with 3 holes for insertion of the 4" nails which have been supplied. I thought of embedding the feet but it would be best not to lose any of the height of the 4 legs, otherwise the seat will become lower, in relation to the ground. Once the pergola has been secured, I will move the two planters of clematis close to each side and thread the plants through the metalwork. So, how should I go about securing this pergola so that it is stable and level, and so that it is not pushed forwards either by wind or slight earth movement? What steps should I take? Thank you. David. Below: the pergola with the two planters of clematis which will sit close to each of its two sides. Below: a top-down view. Below: a crack in the thick stone in front of the seat, possibly suggesting earth movement. Below: one of the four feet of the structure. Below: 4-inch nails have been supplied to fasten the four feet.
-
Update: 2 curtain poles are now hanging perfectly horizontally on four fixings screwed into brick. Someone above mentioned "chewing up" a rawl plug in order to extract it from the hole. Well, "chewing up" all four rawl plugs but then leaving the chewed-upness in the holes finally enabled me to put the screws in and achieve a very tight fit! Basically, what I ended up doing was splattering the inside of a hole running through brick with bits of the plastic rawl plug, all the plastic sufficiently held together, the destroyed rawl plug no longer turned in the hole, and the screw went in beautifully with a touch of KY jelly on the end of the screw. I must remember this the next time I find myself having to fix something into brick. Thanks for all the help, people.
-
@JohnMo, wouldn't that mean gripping the rawl plug with a screw and then hauling it out by force, even though the plug's 2 plastic wings will resist, and will wreck the plaster?
-
Is there a trick to saving this situation? I'm putting up a curtain rail, and found that behind the plasterboard there is brick. I've drilled into the brick sufficiently deep enough for the supplied rawl plug to go into the hole. But when driving the screw of the curtain rail fixing into the rawl plug, the rawl plug has started turning around! When the curtain rail fixing is fully in the hole it's not rigidly firm. And that's not good enough, is it. The rawl plug has also sunk about a quarter inch into the hole. Because the rawl plug has got two butterfly wings on it I can't haul it out without wrecking the plaster around the hole. Is there a trick for saving this situation, so that I will be able to screw into the role plug and achieve a tight fitting? Thank you. David.
-
Is this tube of Silicone Sealant probably "dead"?
David001 replied to David001's topic in Waterproofing & Sealants
@JohnMoand @garrymartin, thanks for helping my decision-making. Money is short, we live 25 minutes' drive from any shops, and orders from online take weeks to come because the delivery companies don't like coming all the way out here unless they can deliver to a good number of people at the same time. Hence my caution. 😁