GEO-PAR
-
Posts
46 -
Joined
-
Last visited
Everything posted by GEO-PAR
-
Hi guys - As a self builder currently going through this process myself, I’m just doing a little research trying to understand how people handle the VAT reclaim on a DIY self-build. For those who’ve done it: How did you keep track of receipts? Roughly how many did you end up with? Did you use a spreadsheet or software? What was the most stressful part? Would you have paid for something that organised everything and produced a HMRC-ready schedule? I’m not selling anything — just trying to understand the pain points. Thanks
-
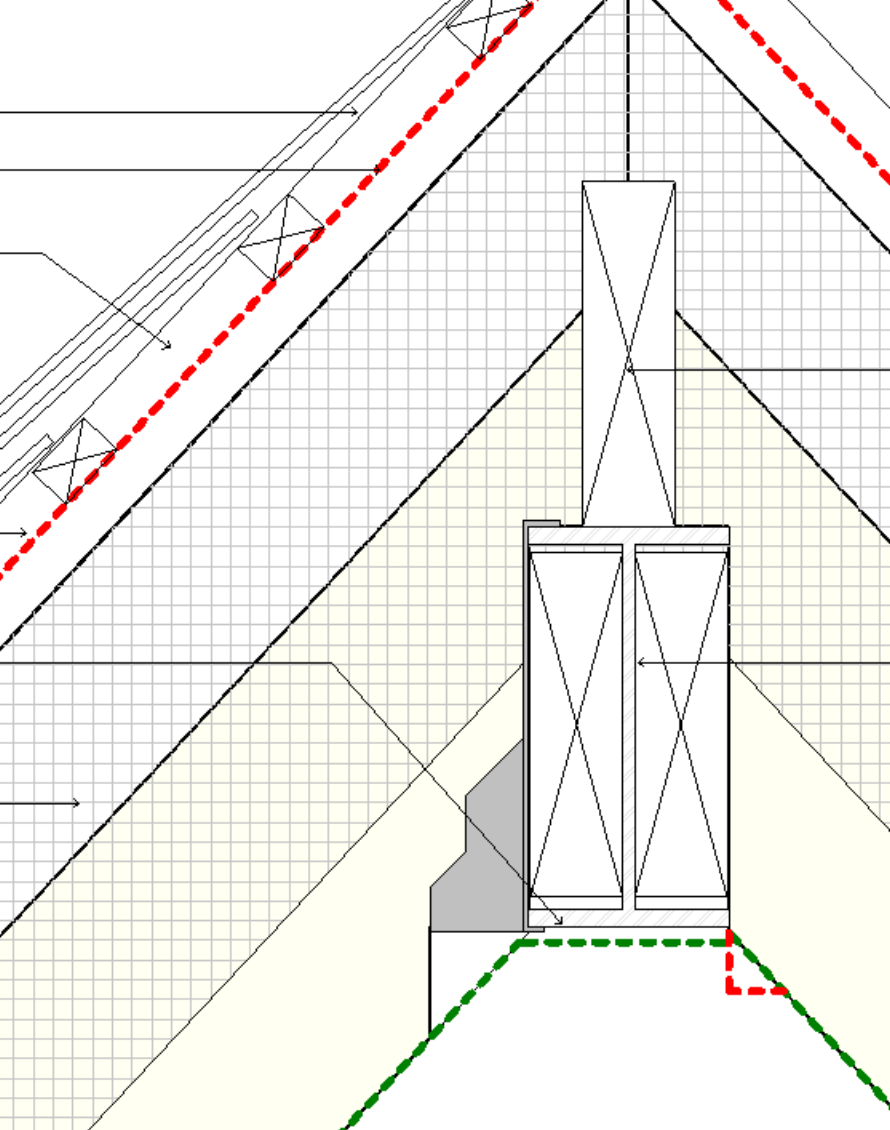
For most of the lintels, I used a 200x200 bit of stone and then put a Birtly SBL200 above with a 10mm gap between the two for the Birtly to deflect. I have one huge lintel that couldn't be done in one piece of stone so I resin bolted 6 pieces to a huge box lintel. I'll try and find some photos on my phone later.
-
I have looked at EPDM but someone said I'd be bonkers going for this with pedestals? And the cost covered VCL, insulation, waterproofing, edges (incl leadwork). Not the pedestals or paving stones.
-
Sorry to bring this up again - I sat on this for a while whilst sorting out other things but planning to get this done over the next few weeks. I had a quote come back at £15k for 30m2 completely square flat roof. The quote is based on the bauder total bitumen system https://www.bauder.co.uk/flat-roof-solutions/reinforced-bituminous-membrane/bauder-total-roof-system Thoughts on this? Feels very steep to me at circa £500 per m2.
-
Hi guys, Any recommendations on the best type of flat roof to go for? Everyone I speak to has a different opinion so I'm sure it will be no different asking the question on here, but still keen to get people's view and reasons why. The roof construction will be concrete hollowcore planks, screed to falls on top, circa 200mm insulation, roof waterproofing (no idea what's best?), pedestals, paving stones. I've been looking at the Bauder total bitumen warm flat roof system, but some other people have said EDPM will be better. One person suggested GRP on the basis it's covered and the sun won't get to it so easily (I know they expand and contract quite considerably). Any thoughts, ideas, etc welcome!

-
Did you get a photo of the final detail? Assume it hasn't fallen down? Same problem 3 years on...
-
I sent this as a sketch to my S.E and he said it was fine to birdsmouth it to sit in the hanger? Yellow is the timber rafter.

-
Anyone's thoughts on doing this? Just using regular joist hangers and putting a cut in to the rafter? I guess it's one for S.E

-
Hi guys, I have a cut roof (ridge steel with timber fixed inside the flange, then rafters fixed to these timbers). I have just been told by S.E I cannot fix my rafters into the timbers inside the steels using 'skew nailing' and that it needs to be joist hung. Looking online, these varying pitch joist hangers seem crazy money? Like £5 plus per hanger? I found this product at a sensible price but it only goes to 30 degrees, whereas I have a 47 degree pitch roof: https://www.strongtie.co.uk/en-UK/products/ridge-rafter-connector-rr Anyone have any ideas? Cheers
-
I appreciate what you're saying that if they're existing, they don't have to meet current building regs but from speaking to various people, it seems like the fire department must have a strategy for all existing houses. Otherwise you wouldn't get household insurance etc etc. I don't know for definite though, so you may well be right. I've had a good look at regs again and the 90m rule appears to be more of a BS9991 thing (which I understand you can decide to use this or ADB). I'm going to adhere to ADB, which states you have to provide an additional hydrant if your house is over 280m2 AND +100 metres from an existing hydrant. I'm more than 100 metres, but not over 280m2. Thus, in theory I feel I shouldn't be affected. I'm therefore hoping a Cat2 sprinkler will satisfy requirements.
-
Yeah I've had the same thoughts. There must be a strategy in place for the other houses though (which are much older and wouldn't even have sprinklers). My FE said he's going to phone the fire department to investigate. Scary stuff when you're mid way through a build.
-
I'm in a similar situation but even worse. I have a 2.3 to 2.4 metre wide track leading to my site. Fire hydrant is about 120-150 metres away from the build (at the end of said track, which I only have access across). Consulted one private fire engineer and he pretty much told me I was screwed. Just consulted another and he said he's seen things like this all the time and we'll be able to work out an engineered strategy with Cat 2 sprinklers. I'm having sleepless nights though as halfway through the build (building regs flagged it earlier this year but I just thought it would be a case of sticking in sprinklers. Things have been manic but just got around to engaging a sprinkler company to design a system and it was flagged I have a much bigger issue with regards to Part B and BS9991). The only thing that's giving me a little hope is that there's already houses a little further down the track so I'm thinking the fire service must have a strat for those houses. Good luck but doesn't sound like the end of the world in your case!
-
Good news you managed to resolve this! I have heard of this kind of thing before and wonder if a way around it is to simply apply for planning again showing the current state of the site as existing and your proposed design as proposed, with a slight amendment that is enough to be considered a 'material change'. You could then claim that what has been constructed already has been done so without planning and is nothing to do with the original application (which they are attempting to claim the CIL on). It would add 8 weeks to the build but give you another go at filling in the cill forms and in affect, you can claim the original permission was never acted upon. Would be a long shot and might need a little more thought, but would be worth a go rather than spending the ridiculous sums being mentioned.
-
I spoke to the fire engineer again with a few more ideas (installing a horizontal dry riser type system, installing a big tank etc and his response is that because its outside of the regs, I won't get it approved, and that i started building at my own risk. Getting very nervous now
-
Sorry for jumping on an old thread but appear to have a very similar issue to what you experience. My build is in the countryside and the closest a fire appliance (truck) can get is 120 metres away (I have a narrow lane of about 2.3 metres leading from the road to the site, which I only have access across as opposed to ownership, and therefore unable to improve/widen access). I contacted a fire engineer asking about sprinklers and received the following response: The only solution I am aware of for these circumstances (subject to the house having no floor greater than 4.5m above ground) is for a sprinkler system to be installed and all points of the inside of the building to be within 90m of where a fire appliance can get to. The distance is reduced if the house has a floor greater than 4.5m above ground, then the acceptable distance is 75m. Wherever the fire appliance gets to, it should also not be further than 20m from the 'main road' junction with your track. My take from this is that because I'm more than 90 metres away, a sprinklered solution won't work? Your comment suggests otherwise though? I'm also in Somerset so keen to hear a little more about your experience!
-
I've not come across Woodcrete before... I just gave it a google and came up with an ICF type system. Is this what you're referring to? Sounds like a good idea, cheers!
-
Cheers - Might give it a go with a trowel but have never plastered before so worry I'll make a right old mess of it and will be super uneven for when I put the joists against the wall? I guess I can give this a go first and resort to a brush if all goes tits up
-
Sorry, another thread about parging (I've been reading through most of them and appreciate there's already a lot). I'm up to first floor level and intend to use posi joists hung off a timber ledger board bolted back to the concrete blockwork. I'm just looking at options for how to achieve airtightness behind the ledger board. Above and below will be wet plaster. The two options I understand I have: + Airtightness paint. Looks like Blowerproof is £50 a tub, and Soudal do a slightly cheaper version at £38 a tub. + Parge Coat. Seems like people have suggested buying a big brush and brushing on a wet mix of sand and cement (anyone know the actual mix?). Appears cheaper than airtight paint but possibility of cracking over time defeating the purpose? I'm trying to get my first floor in before the roof so my brickie can use it as a platform/deck to continue building the inner leaf (trying to minimise time I need scaffolding on site - had a quote an it's not cheap!). The house is only 1.5 storey (rooms in the loft space like a chalet bungalow) so brickie only has a few courses plus the gables to do, which he can do from inside. The issue I have is that after phoning blowerproof, I understand my blockwork has to be dry before painting it on. Anyone know if this the same with applying a parge coat? Cheers!
-
Had a quote come back on making the lintels into stone veneered pre cast - £6k! 🤦♂️ Spoke to my S.E about notching the back of the stone for a steel L Section and he thinks it won't be any different than the original method drawn at the top of this thread. He said if my steel deflects it will crack the stone regardless of whether it's notched in the back or above. He suggested instead sticking with the original plan at the top of this thread, but oversizing the steel catnik CN71A above the stone lintel (so it has like a 300mm bearing instead of 150) and keep about a 10-15mm gap above. I worry it might look a bit shit with my stone jointing being so tight but equally don't want cracked stone lintels with how much they cost! Am I over thinking this?
-
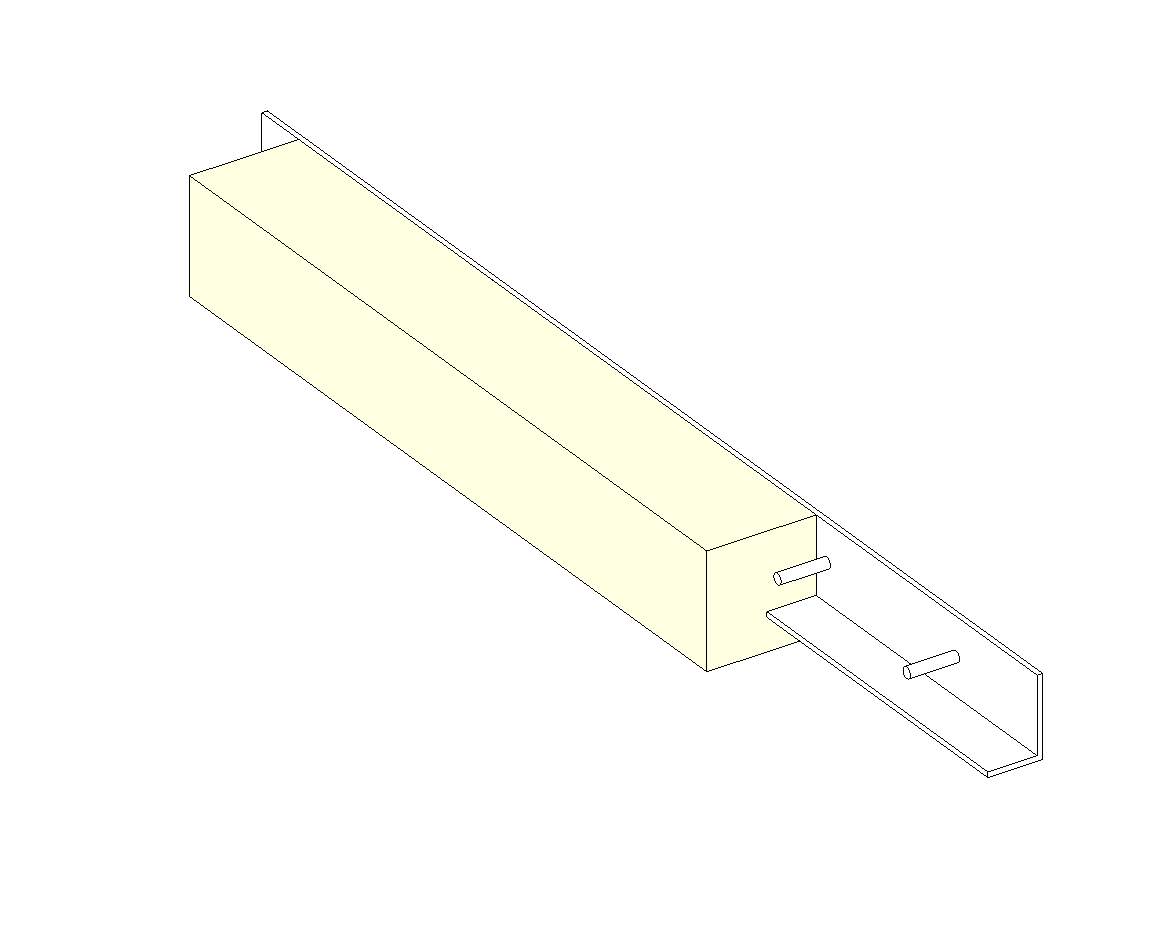
Cheers for all the feedback guys. I don't know if this makes much difference to your suggestions above but my lintels are going to be chunky beasts (I want the traditional cottage look where you get very deep external reveals). For the doors, they're H210 x D325 and for the windows they're H210 x D230. I'm currently exploring two options: 01: Purchase stone in 50mm thickness to act as a veneer. There will be a joint to the underside but i'll need a drip detail anyway so I'm thinking I can obscure as the drip. We did this on a big commercial project I worked on where most of the facade was stone faced precast but we had traditional hand-set stone for the two entrances. They made timber moulds, placed the stones in the mould, and then pour concrete over the top. Unfortunately I'm too small fry for the company that did it to be interested but I have found a much smaller pre-caster that have said they'll price it up. Not 100 percent sure this is going to be the cheapest option but exploring it at the moment. It feels like the most robust option and will enable me to put lifting eyes in so I can telehandler them into position with less risk of damage to the stone. Option 02: This is based on your suggestion above: Metal angle that is cut into the stone. I'm thinking it might be a good idea to weld some rods to the angle and chem fix them to the stone to prevent any rotation or slipping (or am I over thinking / is this a bit daft?). It feels to me like this could be a much cheaper solution to be fair. Not sure what size angle I'll need for my size of lintels - Will have to ask the S.E I guess Cheers

-
Not really sure what you mean - Are you able to sketch? Did you just cut the slot about an inch above the bottom of the brick?
-
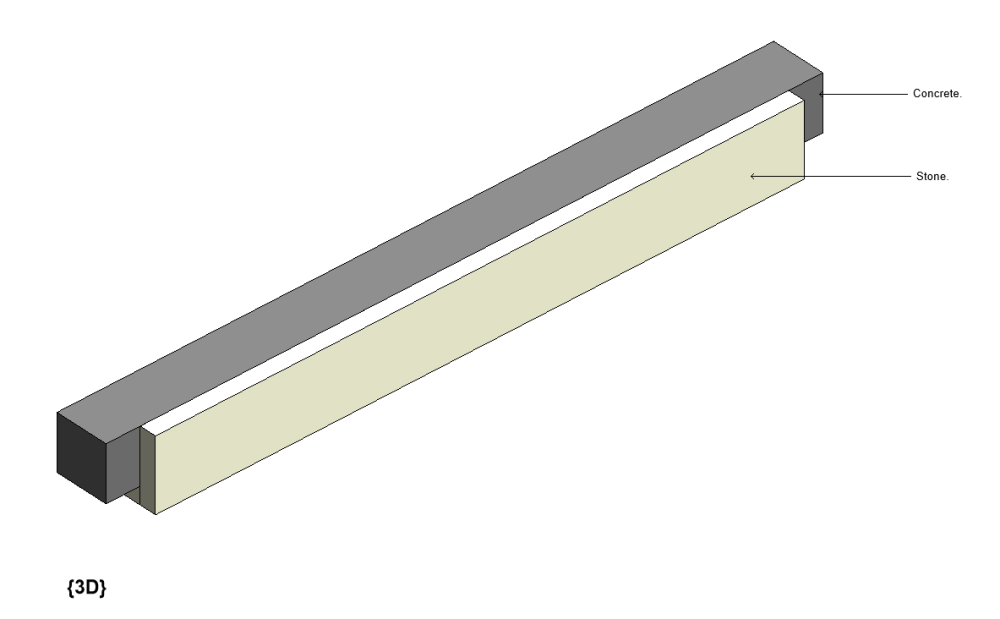
Sorry - Didn't see these additional comments until now. I'm attempting to go down the precast route... 50mm stone veneer to the front and underside (using the joint to form a drip detail) pinned into a reinforced concrete lintel. This way the stone will only need to oversail the opening by 50mm and the concrete can oversail by the typical 150mm. Just exploring the option not so not sure how expensive it will be.
-
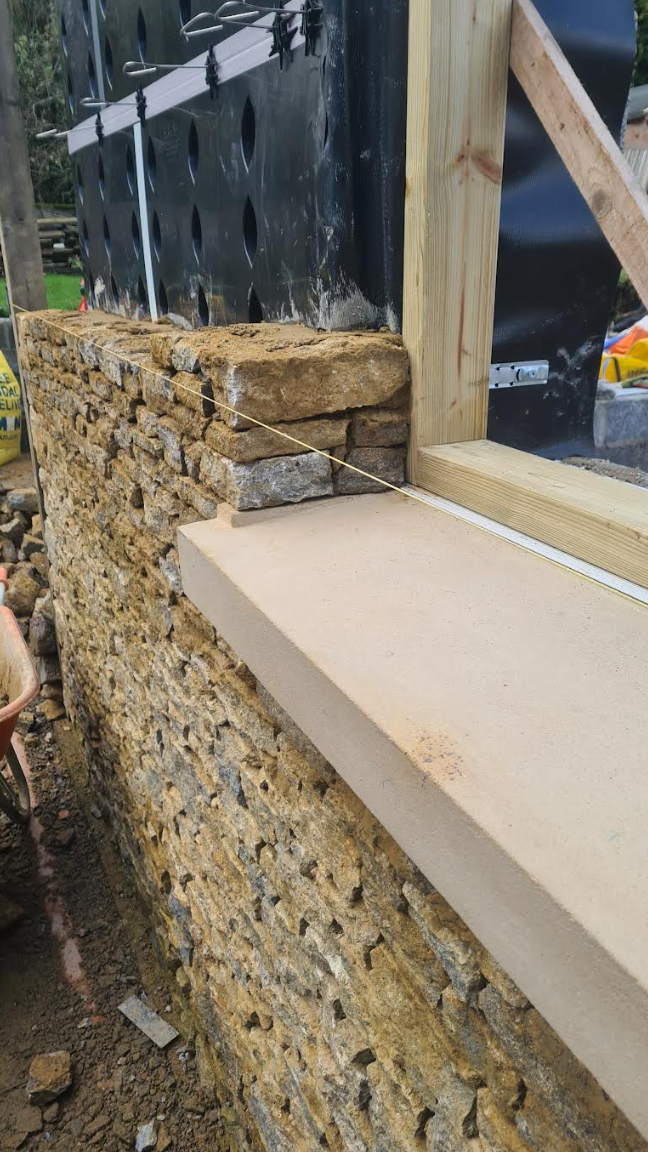
Yeah I think I'm going to boost it up to at least 100 if not 150 like you suggest. I found this picture where the bearing looks about 50mm, but it's granite so being a harder stone, I guess this makes it possible
-
Yeah I appreciate it will make it a whole lot cheaper but it's not a house I'm intending to flip, so want to get it right. But equally think what I've drawn may cause issues. I'm wondering how they managed to achieve this - Super deep reveals with no exposed lintels. My guess is that they cast the stones into some kind of concrete lintel.
-
Okay cheers