Del-inquent
-
Posts
173 -
Joined
-
Last visited
Everything posted by Del-inquent
-
plaster repair patches before skim
Del-inquent replied to Del-inquent's topic in Plastering & Rendering
Thanks Russell. I have a bag of easifill sat here but wasn't sure if it was wise to put under the final skim coat or not. I'll crack on! -
plaster repair patches before skim
Del-inquent replied to Del-inquent's topic in Plastering & Rendering
I did have a look before posting but didn't have much joy unfortunately! Loads on how to do the actual skim, not so much on prepping a less than ideal finish ready for it. -
plaster repair patches before skim
Del-inquent replied to Del-inquent's topic in Plastering & Rendering
Quick bump, anyone got any advice before I just go for it? Be much appreciated if I could get a bit of guidance. -
Disclosure - I've only done small areas of plastering before, I usually get someone in but budget doesn't allow it on this project. I'm going to be (attempting) to skim a couple of walls. They're generally sound but poor finish where previously tiled. In a couple of places, where multiple fixings had been put through the tiles, and in another where some tiles had been glued to the wall with what appears to be epoxy, the plaster came off the scratch coat. The scratch coat is still firmly adhered to the wall, but in these places the plaster was about 5mm thick. Before skimming I assume I need to fill those areas with plaster. Do I just use some of the multifinish to bring them up to level and let set completely or...? Ive also got one wall that is not very flat where a wall has previously been removed. Deviates across a 1m long section by 6mm in a vertical cup. Best way to level that off?
-
Thinnest thin render option. (How to hide some blocks…)
Del-inquent replied to Del-inquent's topic in Plastering & Rendering
Had a chat with EWI today, they said primer, two layers of their base-coat applied with toothed-trowl, acrylic mesh between, I could go as low as 4mm total and it would be absolutely fine. It's like they read your comment! Cheers for putting me on the right path there @Redbeard much appreciated. -
Thinnest thin render option. (How to hide some blocks…)
Del-inquent replied to Del-inquent's topic in Plastering & Rendering
Yes just 75mm blocks without insulation. Rest of the place is full fill cavity so there will be insulation the other side of the blocks, the hope it to purely get a recessed "panel" effect so it looks planned, rather than to cover up the fact you simply can't get bricks to match. The alternative is to fully render the rear elevation and I'm really not wanting to do that! -
Thinnest thin render option. (How to hide some blocks…)
Del-inquent replied to Del-inquent's topic in Plastering & Rendering
yeah was thinking of painting it to match the houses around us, make it look sort of intentional rather than like we’ve just blocked up a doorway and we’re unable to find bricks… cheers I’ll have a look at EWI -
As we can’t find anything like a close match brick wise, we are going to block our doorway up with 75mm blocks to give a 25mm set back from outer face of brickwork, then plan to put some wooden slats on for a vertical planter feature. i was hoping to smooth out and paint blockwork before we put slats on, so it doesn’t look like we’ve screwed wooden slats to a concrete block… what is the absolute thinnest option for of render? Is there any way to keep it a few mm thick only, to retain the reveal?
-
Replacing timber floor with insulation and screed
Del-inquent replied to Del-inquent's topic in General Construction Issues
Not that historic, 60's ish. Definitely has a full DPM all round it, both on external and internal structural walls. I've just had a quote from one screeding company (I'm getting pushed for time and considering getting the screed itself done by a pro rather than do it a room at a time myself) but they reckon they only need 50mm deep if I go for their liquid screed. Bit pricey though! -
Replacing timber floor with insulation and screed
Del-inquent replied to Del-inquent's topic in General Construction Issues
About as air tight as colander at the moment, though in all fairness a lot of that is being rectified in the renovations. Things like the inch gap around the door frame, holes through the walls... -
Replacing timber floor with insulation and screed
Del-inquent replied to Del-inquent's topic in General Construction Issues
Noted on PIR, ta. I'm guessing those who have said about the damp (a S.E, a friend that's a surveyor, a friend that likes pissing on any ideas he didn't come up with) also are thinking of ventilation strategy, but I'm not sure what I'll need. It's having new windows at some point but I doubt the trickle vents are going to pass as much ventilation as the single glazed, glass falling out, rotten twisted framed wooden ones in there at the moment. -
Replacing timber floor with insulation and screed
Del-inquent replied to Del-inquent's topic in General Construction Issues
I'm guessing because at the moment the house leaks like a barn with the doors open and this will cure one of those areas of ventilation 😅 Seriously now the carpets are down we could use the place as a vertical wind tunnel. Not so bad in the summer but winter was... testing. -
Current ground floor is slab, brick dwarf walls, joists, 16mm T&G floorboards. Floorboards are sat 255mm-ish above slab. We have issues with a fair number of joists, replacement floorboards (a fair few would be needed) would have to be machined to spec as there is nothing remotely close available. We would like underfloor heating. Several people both on here and other forums have suggested the same thing: Rip it all out down to slab, level with a bit of sand, DPM on top, 170ish mm of insulation (some said 20mm of sand probably to level slab, so 100mm eps plus 50mm eps on top) pin UFH to it, 85mm-ish screed to bring it back up to same level. I was sold on the idea, but now I've had people telling me this will most likely introduce serious damp into the place, and to just stick PIR between joists (after making good) and re-floor. I get that the suspended floors are draughty as anything and a good amount of wind passes through, but is a screed job likely to cause that serious of an issue? I quite liked the idea of not having to wear snow socks and ski boots when I go for a pee in the middle of the night to stop my feet freezing to the floor.
-
Fitting a long steel in a short hole...
Del-inquent replied to Del-inquent's topic in Lofts, Dormers & Loft Conversions
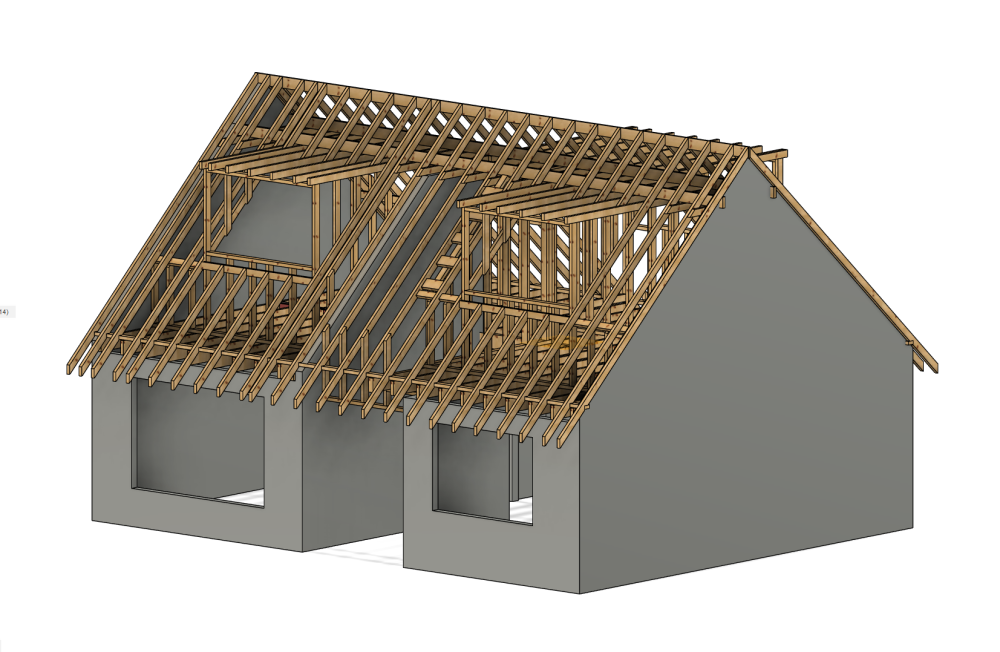
Excuse the rough bodge redraw, basically something like this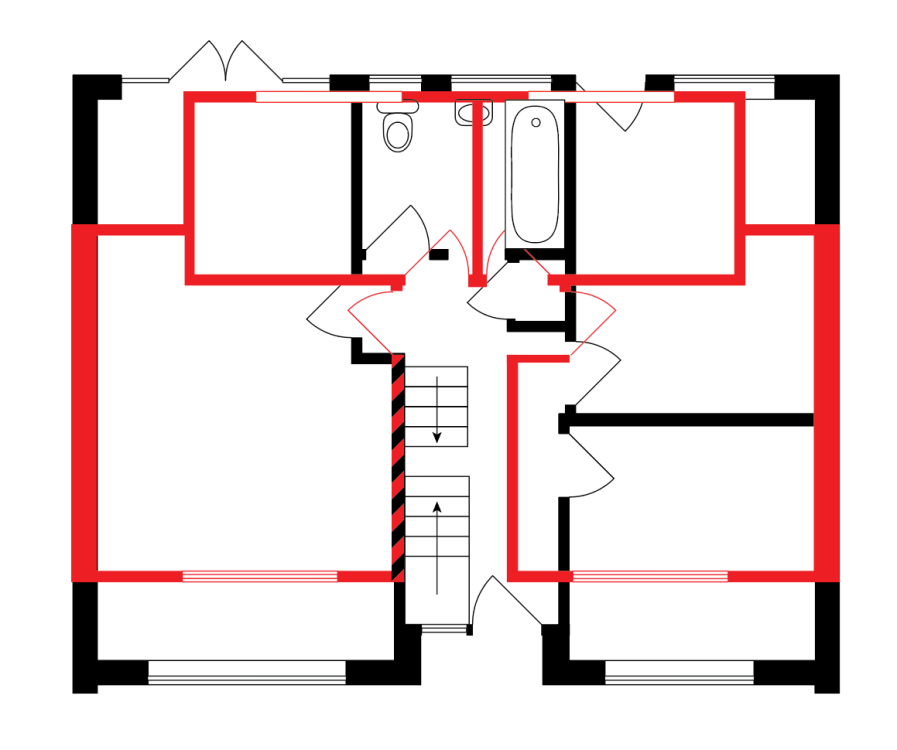
-
Fitting a long steel in a short hole...
Del-inquent replied to Del-inquent's topic in Lofts, Dormers & Loft Conversions
extend the dormer room on both sides to allow the existing small room to be moved sideways and a bathroom be fitted beside it. -
Fitting a long steel in a short hole...
Del-inquent replied to Del-inquent's topic in Lofts, Dormers & Loft Conversions
that’s almost exactly what I asked the second SE, only my support was upright rather than following the existing slope (to open up for the dormer room to be added) the answer was that I still needed steels alongside the purlins, and that is the bit we can’t fit in without taking most (if not all) the roof off. -
Fitting a long steel in a short hole...
Del-inquent replied to Del-inquent's topic in Lofts, Dormers & Loft Conversions
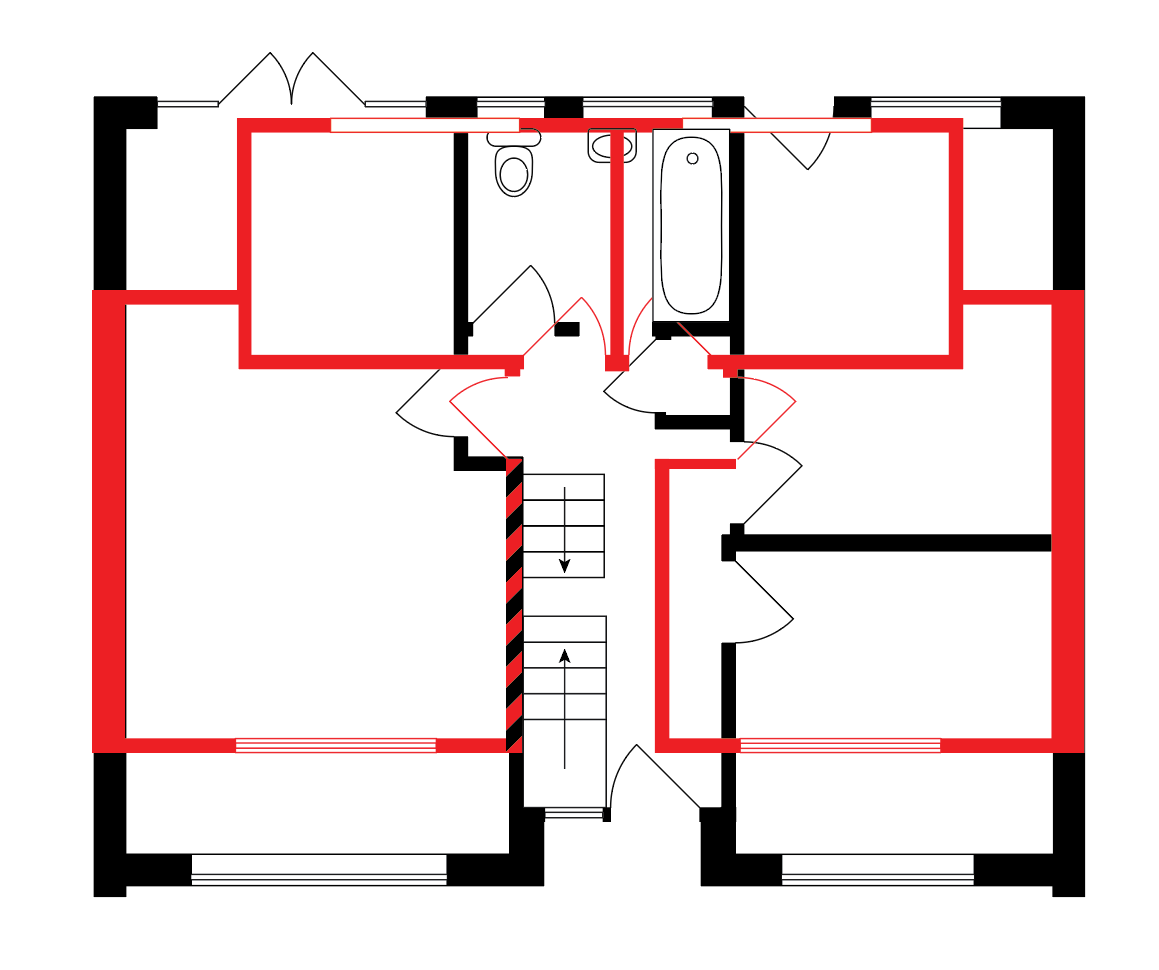
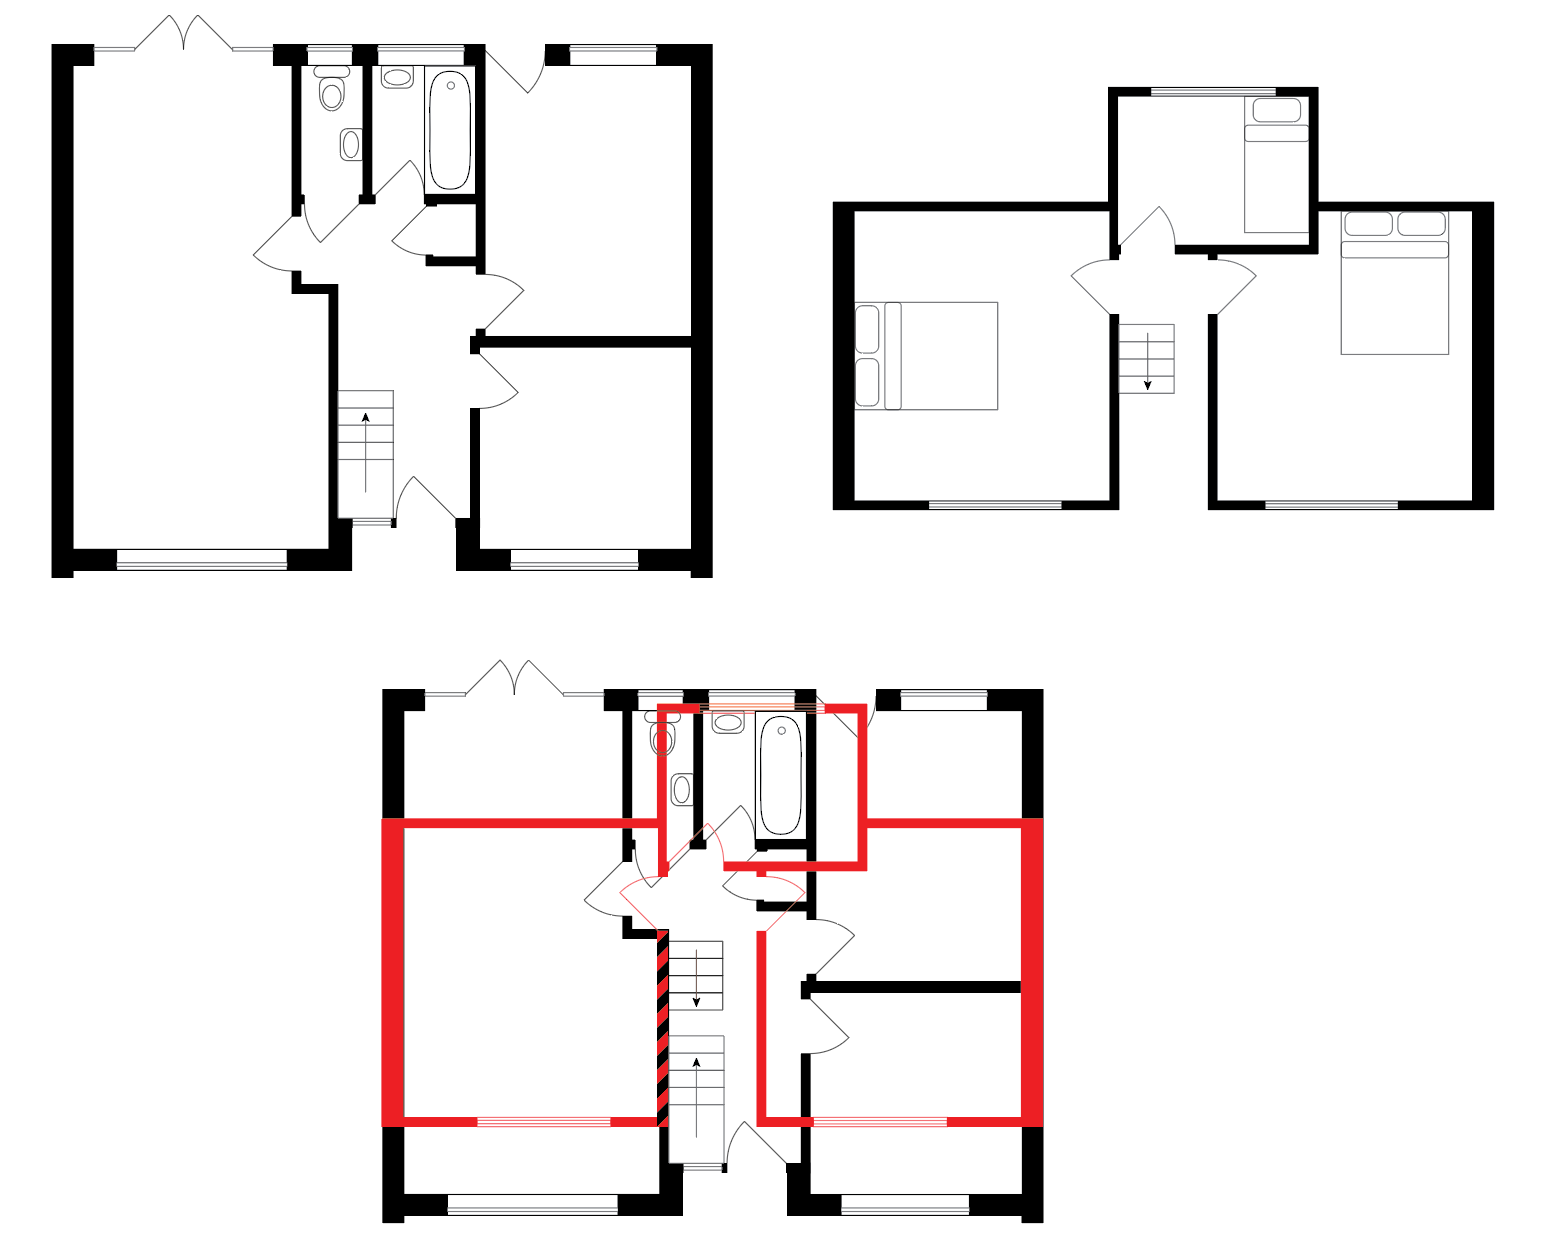
as is... Ground, upper, and overlaid. I've looked at a few alternatives on the proposed, but basically they all revolve around the small room at the back upstairs being moved left or right, with a second room beside it big enough for an upstairs bathroom. I'm willing to entertain anything that allows the addition of an upstairs bathroom, without losing the bedrooms (don't think my offspring would want to sleep in the bath)
-
Fitting a long steel in a short hole...
Del-inquent replied to Del-inquent's topic in Lofts, Dormers & Loft Conversions
One said alongside both purlins, one said under the ridge plate. -
Fitting a long steel in a short hole...
Del-inquent replied to Del-inquent's topic in Lofts, Dormers & Loft Conversions
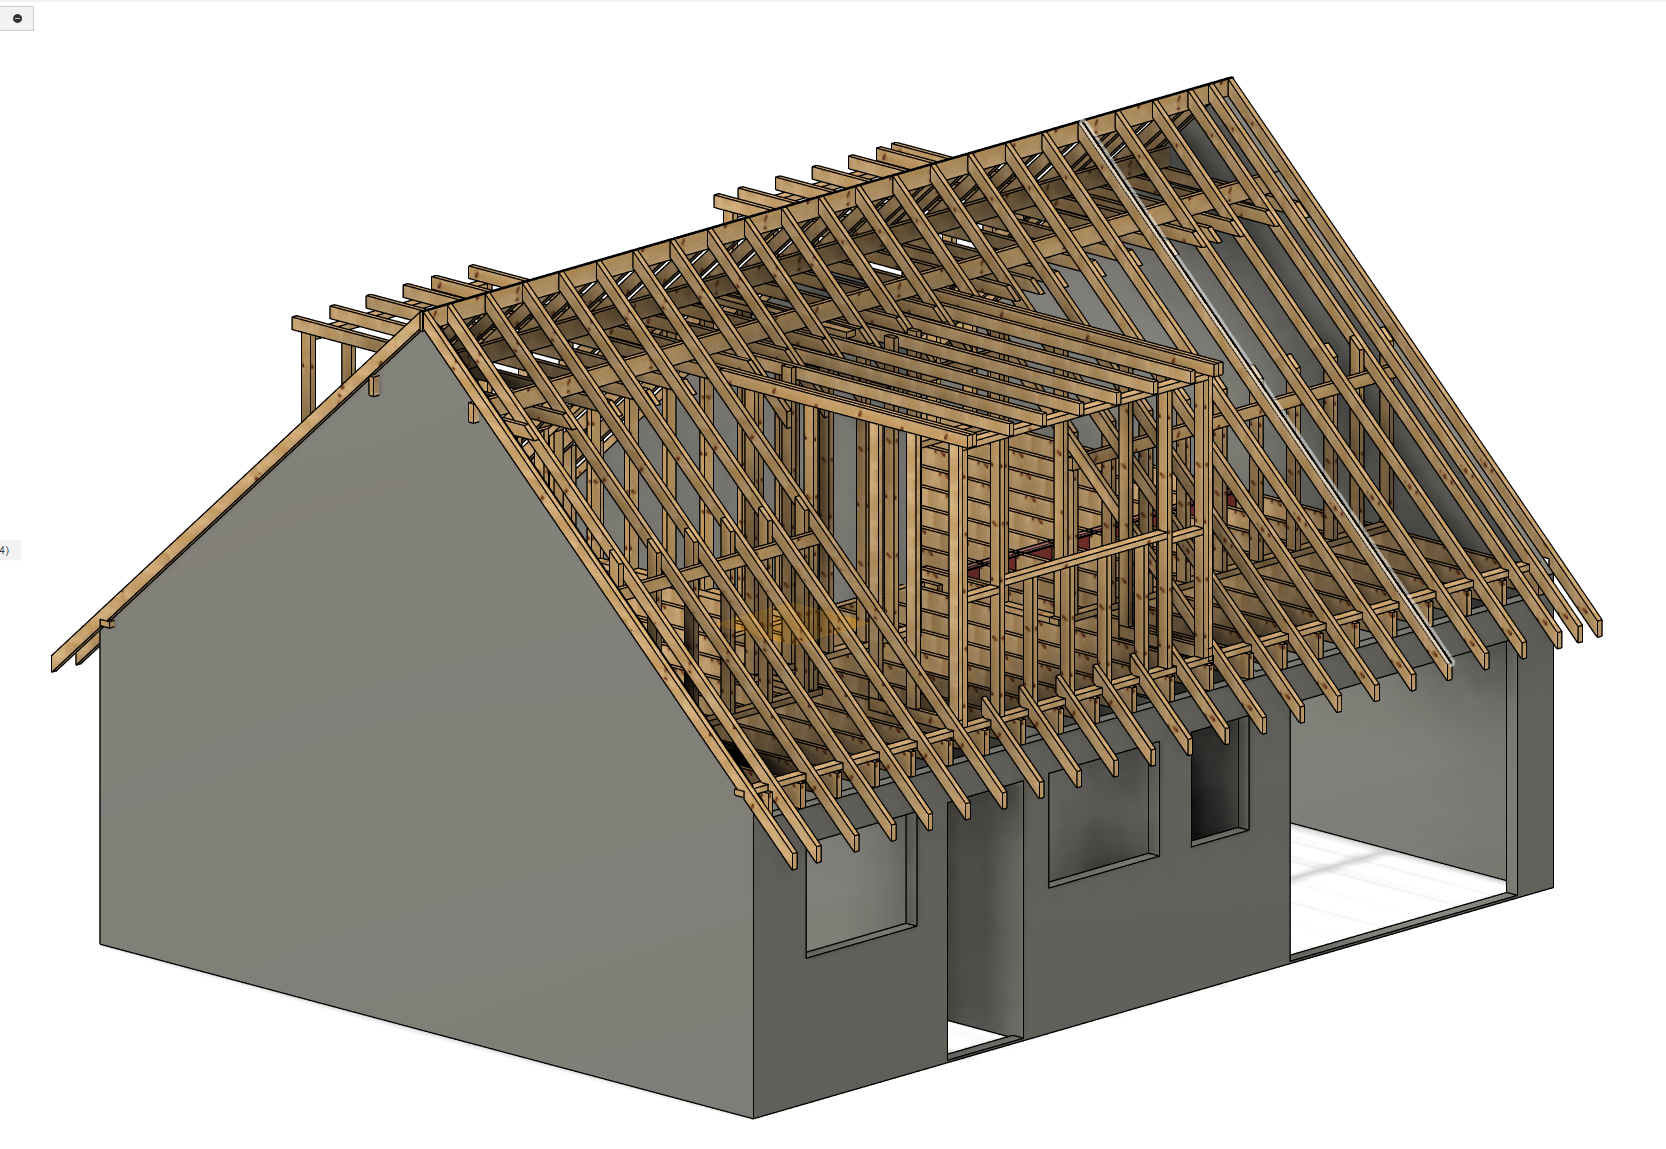
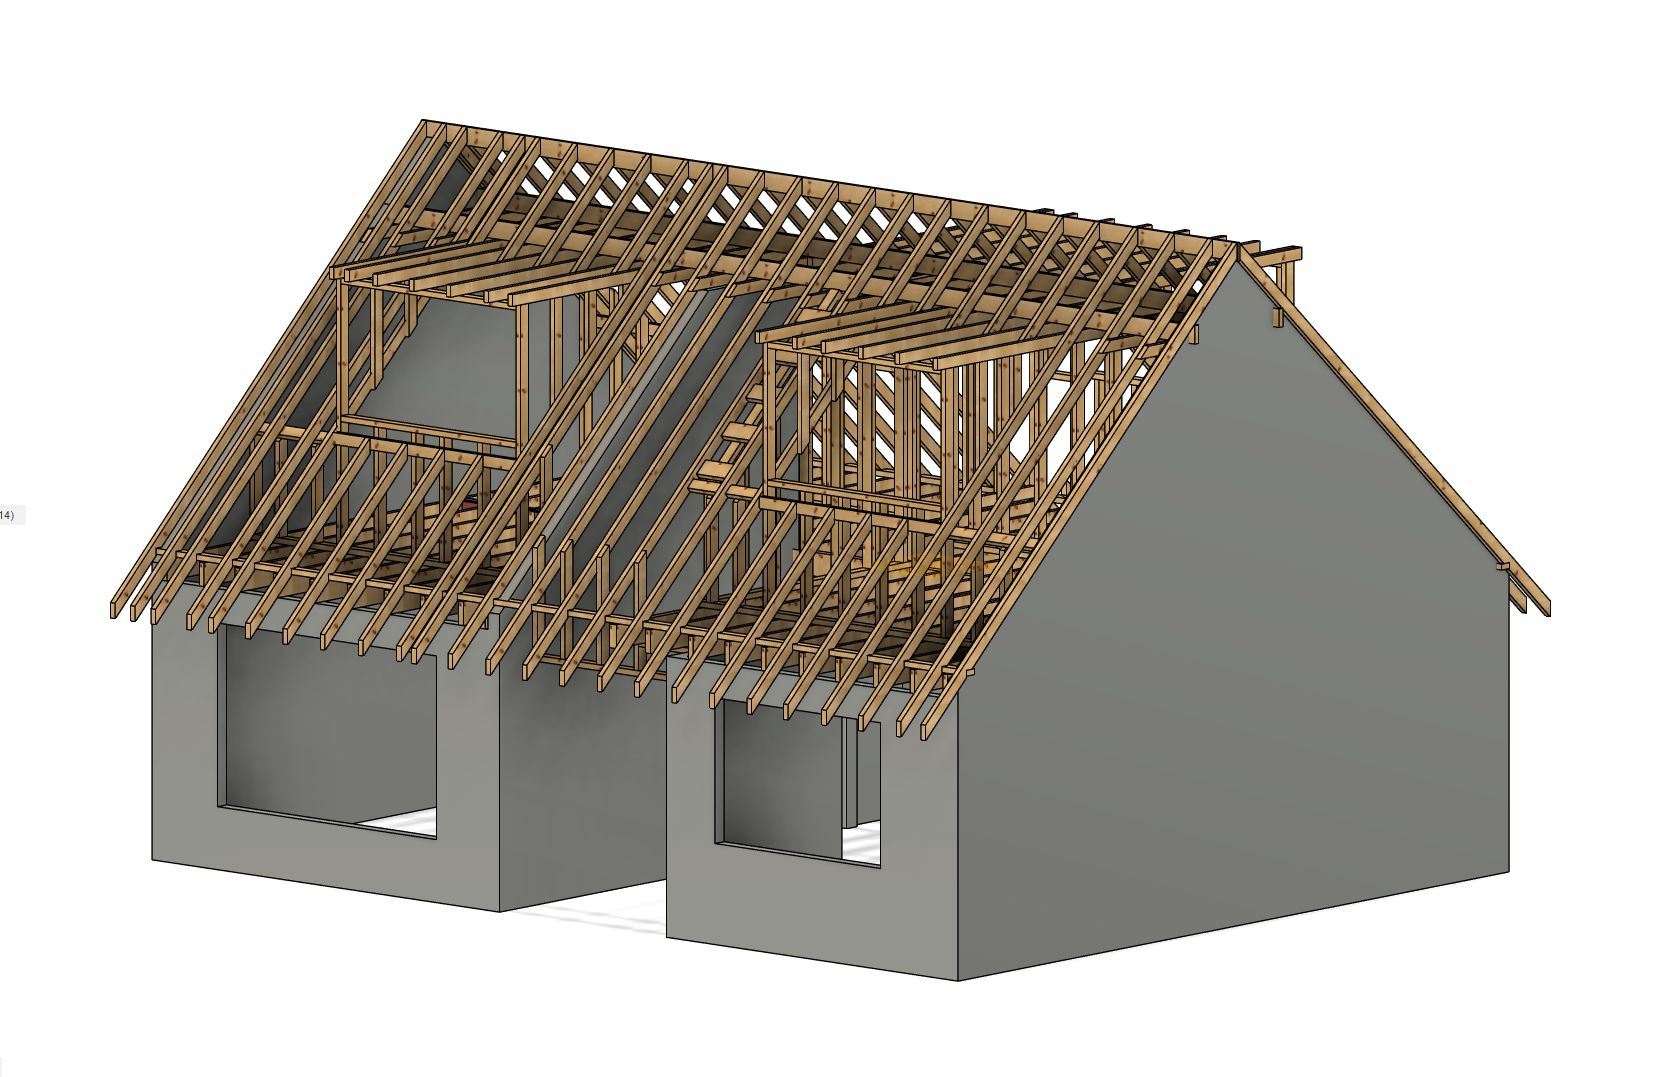
This is the rear dormer I want to make wider first (external leaf removed) and the current front dormer windows. Accurate to 5mm
-
Fitting a long steel in a short hole...
Del-inquent replied to Del-inquent's topic in Lofts, Dormers & Loft Conversions
There is a structural division wall perpendicular to the ridge that goes all the way up to the collars, 3.8m away from the external wall, top of which is about 750mm below the ridge board to the top of the block, though has a collar resting atop it as well. There are other structural walls downstairs, but transmitting the load from ceiling of upstairs to top of wall downstairs would be problematic. Unless you wanted to sleep with a post through the middle of the bed lol. -
Fitting a long steel in a short hole...
Del-inquent replied to Del-inquent's topic in Lofts, Dormers & Loft Conversions
That's what one of the SE's suggested. The other wanted two steel purlins. None of the neighbours I've spoken to have either, but they were done a long time ago. If one has to go in, it has to go in, but I cannot work out how it could be done without taking the entire roof off. The SE's just say that "the builder will be able to do it" when I ask how. When I speak to roofers for quotes, they ask me to ask the SE's how it's supposed to be done 😅 I have had an issue with a SE in the past on a renovation / extension. They wanted about £6k worth of steels put in. Another looked at it, took all the steel out and put in two 8 inch wooden posts instead. Which is what the roofer had suggested when he saw the plans. I guess I've become a little wary of SE's since. -
Fitting a long steel in a short hole...
Del-inquent replied to Del-inquent's topic in Lofts, Dormers & Loft Conversions
At the moment there are two dormer windows on the front, one full room dormer on the back which covers just over 1/3rd of the length of the roof. I want to extend the rear dormer on either side so that I can move the current bedroom along a bit and get a bathroom in beside it. -
Fitting a long steel in a short hole...
Del-inquent replied to Del-inquent's topic in Lofts, Dormers & Loft Conversions
They have been to the site, I paid for it, it was FAR from the cheapest quote. That’s why i asked on it here about. I don’t want to waste more money. I’ve also supplied a full 3D CAD file in advance so they can see the entire structure, and there are no ceilings or floors in the property so they can see every last detail. I've had two tell me I need steels, but for different reasons and in different positions. Both were aware of the issue with getting a steel in. -
Fitting a long steel in a short hole...
Del-inquent replied to Del-inquent's topic in Lofts, Dormers & Loft Conversions
That’s what I want to know! One SE said to support roof from wind load. One said to support weight of roof. Neither seemed to have put any effort into doing any design or calculations, just using a steel to avoid having to. -
Fitting a long steel in a short hole...
Del-inquent replied to Del-inquent's topic in Lofts, Dormers & Loft Conversions
The beam could be supported on an internal wall at 3.8m point. There are 2 futher internal walls downstairs that it could also be split onto. Just. But you still couldn't get any of them in without taking the roof off, at which point you'd just redesign the whole roof. It's not for a major benefit in terms of the house - it's not adding huge amounts of space, it's just allowing us to fit an additional bathroom to help make my life a bit more comfortable due to health issues. The point is, there is no 'attic', there never has been, they were all built as Chalet bungalows with the roof space as rooms, it's just that the neighbours have extended the existing dormers to fit an extra room in what was a useless eaves space. No bouncy floors, no reason for their to be bouncy floors, the joists are more than adequate for the spans.