Del-inquent
-
Posts
170 -
Joined
-
Last visited
Everything posted by Del-inquent
-
I was looking at Spacetherm which comes from 5mm thick upwards, in 5mm increments. I'm not expecting to create a miracle loss of heat through the floor, more just trying to stop the icy blasts coming up quite so easily and thinking that if something simple will be an improvement over just putting the ply down I might as well.
-
Yes ply was going to be screwed down at 150 centres perimeter 300 centres, fortunately no pipes or cables that are less than 75mm below the floor so can go without caution. Ideally I would have taken the floorboards up and insulated between them, however its a large room, the boards are solid but really don't like being lifted (they also appear to have used about 200 nails per plank...) and we have to have the room cleared, the ply down and the stuff back in all in one day.
-
Redoing the floor in one GF room, the existing floorboards are all sound but a bit gappy and VERY draughty, the ventilation is clearly doing its job very well. I have to put 6mm ply down to prep for LVT which I know will take care of the major gap draughts but the floorboards are always very cold in winter, I'm wondering if I could put a thin insulation layer between the floorboards and the ply or if that would be a bad idea. If it is a good idea, what would be recommended?
-
Hadn’t thought of that, certainly a way to claw back a little.
-
We would like to re-roof really but it isn’t in budget, had a tonne of unforseen problems. Think I am a bit stuck really!
-
We've got several area of ceiling down in our Chalet bungalow project so I'm looking at bringing it a bit more up to current spec whilst we're at it. I could have sworn I already asked on here but can't find it so... Problem mostly is they're only 100mm rafters with old Sarking felt on top and don't have a lot of room for insulation. Doors, windows and other badly designed features mean that max I could put below rafters on any pitched section is 30mm (plus 12mm PB). In the flat roof dormer areas (cold roof), I could put potentially up to 75mm below rafters. The dormers form the greatest part of the roof area that is of concern, the pitched areas either side are tiny in comparison. When calculating, is it a case of "all areas must meet minimum" or "the average over all areas must be"? First thoughts are 50mm PIR between rafters to keep 50mm ventilation above and then whatever I can fit where it can be fitted. I could stuff the very top between ceiling and ridge with as much as I wanted, it's not a lot of use for anything else. Is there any more advanced material I should consider that will give considerable increased performance with thinner materials? I contacted Superfoil but their figures were worse than PIR with 50mm between / 25mm PIR + PB under. Any routes to help with calcs and optimising?
-
Toilet into vent stack/Alternative to vent stack?
Del-inquent replied to Del-inquent's topic in Waste & Sewerage
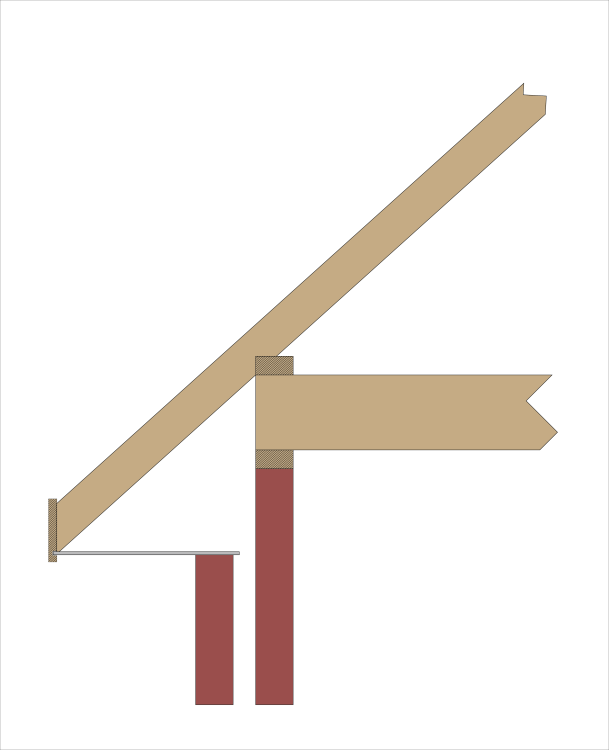
Would it be possible to have the AAV emerge above the roof outside? I simplified the drawing a little, the new bathroom would be located in the rear dormer, the lower part of the stack runs up the outside of the build below the rear dormer, along in the eaves, wobbles around a bit and then up between rafters. If the AAV could go through the top of the eaves and end below the bathroom windows we could save a LOT of hassle. Or, if that's not possible, would the second option on right work?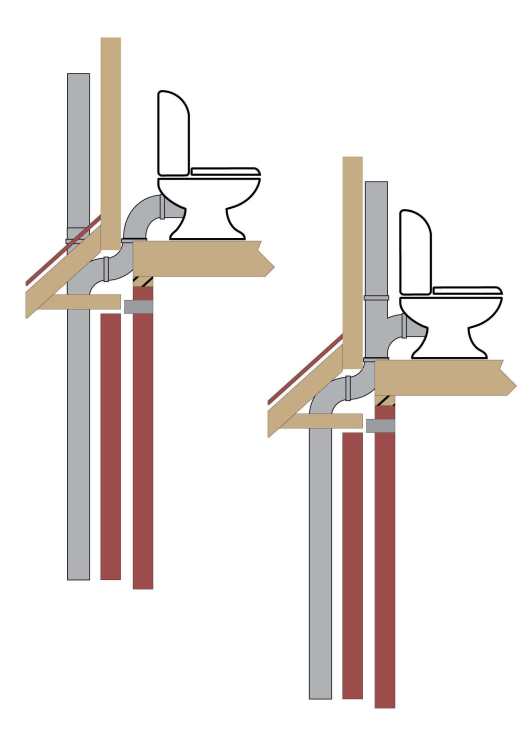
-
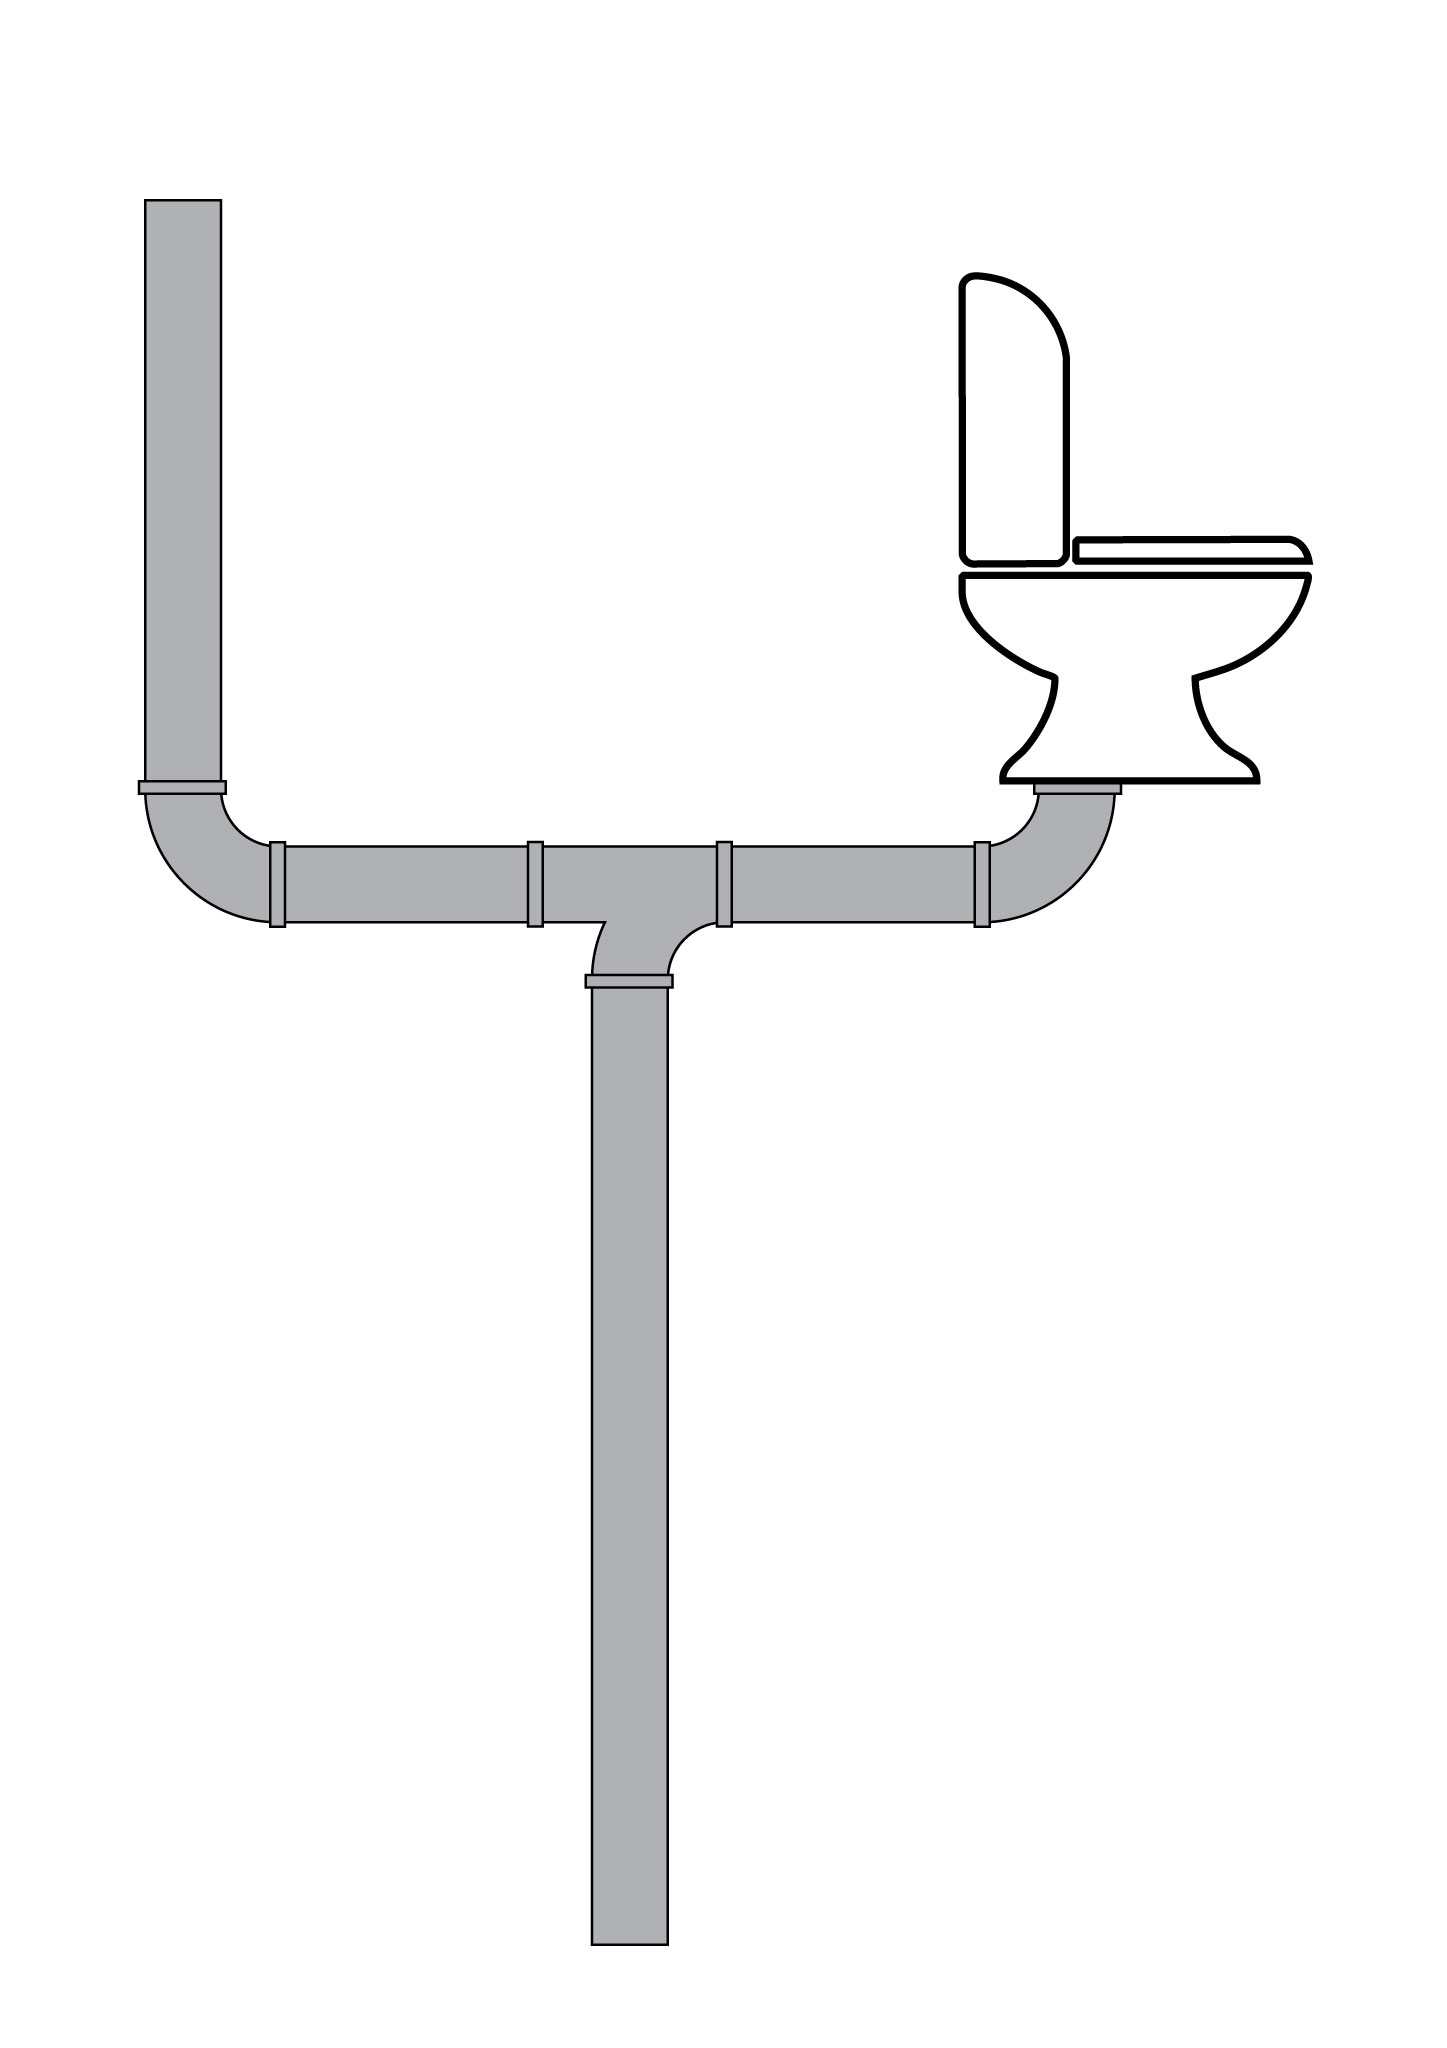
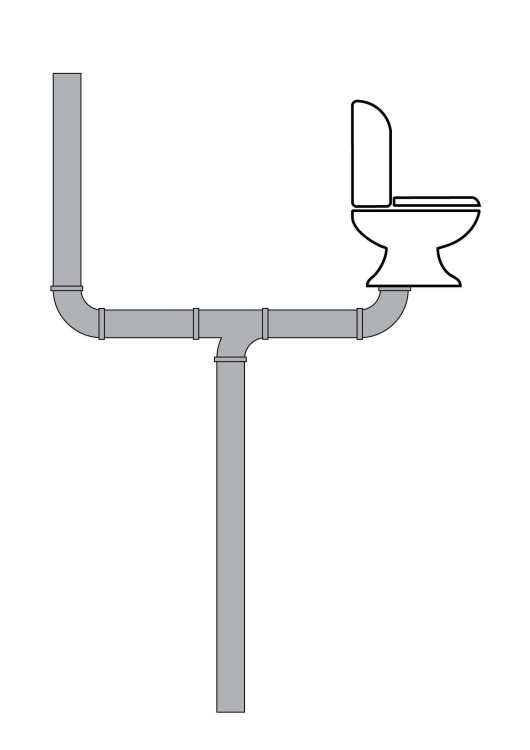
I have no idea what is and isn't possible on this front, I'm just trying to get an idea on how to move forward. At the moment we have a very odd dog-legged vent stack that runs up the outside of our chalet bungalow, goes along inside the eaves, then up between the rafters (sandwiched between the felt and the plasterboard ceilings). In the diagram below the "T" is currently just an elbow pointing left We'd like to fit an upstairs bathroom but the vent stack is in about the only place that a downpipe can be. Can we do something along the lines of the below? Can we get rid of the left hand section by any means? There is zero space to form any other sort of connection that I can think of. I'm open to any and all suggestions at the moment!
-
replacing asbestos cement soffits
Del-inquent replied to Del-inquent's topic in Roofing, Tiling & Slating
A year later... only just got round to attacking this job! All Asbestos now gone, new windows in place, time to replace soffits and facia. The window installer suggested that some additional support at the top of the windows, whilst not strictly necessary, might be worth adding. So the plan now is to make the triangular hangers as previously suggested, sheet of 12mm hardwood ply over the top of those and then the UPVC soffits pinned to the ply. Partly because we can then screw the ply to the top of the window to give a bit more support, but also because the rafters are spaced all over the place so I can just pin the UPVC to the ply equidistantly. Does mean trimming the rafter feet off a bit to accommodate the ply and retain the correct height as the soffit sits on top of the wall / windows, but not too much of a faff I guess. Fortunately the rafters are all in pretty good shape. Question though - would you use treated timber for the hangers or will some CLS do? Cuts the cost by more than half just using CLS (and I have a load spare...) -
Looking for bright ideas. I've been asked to make a custom dish drainer, with a drain plumbed to the waste under the sink. There is only one route the drain could take and is tight to say the least. There is about 25mm gap between the window reveal and where the kitchen worktop will be (yet to be plasterboarded) that in can be permanently attached into and fed down to go under the the sink, much like an overflow, but at the end will need to do a 90 deg turn and then have some type of female fitting preferably with a push-fit seal that ends flush with the plasterboard once fitted, with a hole through plasterboard, so that the drainer can be installed but also removed when needed. I can't use copper as it needs a bit of flex to be pushed down into the void. Obviously zero water pressure and the amount of water going down it is going to be a cupful or so at most, I just can't think of any fitting that I might be able to get off the shelf that is a tight 90 deg, no bigger than 22mm and has a nice push fit seal.
-
replacing asbestos cement soffits
Del-inquent replied to Del-inquent's topic in Roofing, Tiling & Slating
with the budget in its current form I intend to close my eyes and wave the hammer around blindfolded, I can’t afford to find any more problems 😂 -
replacing asbestos cement soffits
Del-inquent replied to Del-inquent's topic in Roofing, Tiling & Slating
Had it tested a couple of weeks back, it’s not AIB just asbestos cement board, non licensed, however I am still getting someone in to do it as I don’t want to. Some things are best left to the pros. -
replacing asbestos cement soffits
Del-inquent replied to Del-inquent's topic in Roofing, Tiling & Slating
They’re in a bad way as is the facia on one end, so work is needed regardless, plus the soffit sit on top of the window frames and have been sealed to it in the past. Ideally I wouldn’t have touched it but it has to be done -
replacing asbestos cement soffits
Del-inquent replied to Del-inquent's topic in Roofing, Tiling & Slating
Interesting, I’d never have thought that would be sufficient on the width but I do have a habit of over-engineering everything. -
replacing asbestos cement soffits
Del-inquent replied to Del-inquent's topic in Roofing, Tiling & Slating
No additional fixings used on yours either?! -
replacing asbestos cement soffits
Del-inquent replied to Del-inquent's topic in Roofing, Tiling & Slating
I guess as it'll be sitting on top of the wall and pinned every 400mm (or thereabouts) plus supported by the fascia, probably should be okay. Can't put a batten on the wall as the wall stops just below soffit height lol -
replacing asbestos cement soffits
Del-inquent replied to Del-inquent's topic in Roofing, Tiling & Slating
Would you bother with any additional support for the soffit - like ply run underneath the batten before the soffit goes on, or just straight up with some soffit? -
We are having all the soffits on our Chalet Bungalow taken out shortly as they're asbestos cement and the window installers want it gone first. I'm just not sure about how to replace them, never done any on a roof structure like this before. There is nothing at all supporting the soffits at the moment, they're just sat upon the external leaf and held in place by a groove on the back of the fascia panel, nothing to attach any replacement to at all. The facia's may well be replaced as well, will have a look at the condition of them once the soffits are down as they're currently capped with UPVC (badly). Soffits are 380mm from wall to fascia. I wanted to replace them with UPVC, cheap and cheerful and as little fuss as possible and if the fascia's do need replacing (pretty likely) I'll use 18mm UPVC ones. How would you approach it?
-
I’ve got a small (very small) area of external blockwork that will be rendered but due to delays it’s not going to be done until next year now. I’d like to seal / prime it now, just to give it some protection from the elements. Whats a good choice of product that can be got in small quantities? Total area is only 2m2 so don’t really want to pay a fortune for a big tub that will only be binned!
-
Cheers both, that makes life a lot easier!
-
Can't get hold of the sparky and need an answer for the kitchen designer on this urgently! A slight deviation from the plan with the boiler install has meant I'm going to have to have a shallow depth cupboard (100mm deep) between countertop and underside of wall cabinets. It'll have a functional door on the front face of it. Can the grid switch for the FF / DW / Fan / Hob ignitor go INSIDE that little cupboard? It would also then make it a lot harder to accidentally switch off the fridge or freezer...
-
plaster repair patches before skim
Del-inquent replied to Del-inquent's topic in Plastering & Rendering
Ah got ya - I need to skim coat as the rest of the wall has lots (seriously lots) of little imperfections all over it, I just wasn't sure what to do about the couple of larger, deeper patches before skimming it. I assume from the depth that trying to do in one hit with the finishing plaster would be a bad idea (would end up 8mm deep in those places! -
plaster repair patches before skim
Del-inquent replied to Del-inquent's topic in Plastering & Rendering
Thanks Russell. I have a bag of easifill sat here but wasn't sure if it was wise to put under the final skim coat or not. I'll crack on! -
plaster repair patches before skim
Del-inquent replied to Del-inquent's topic in Plastering & Rendering
I did have a look before posting but didn't have much joy unfortunately! Loads on how to do the actual skim, not so much on prepping a less than ideal finish ready for it. -
plaster repair patches before skim
Del-inquent replied to Del-inquent's topic in Plastering & Rendering
Quick bump, anyone got any advice before I just go for it? Be much appreciated if I could get a bit of guidance.