Nelliekins
-
Posts
157 -
Joined
-
Last visited
-
Days Won
3
Everything posted by Nelliekins
-
Heating system for an ICF house with UFH
Nelliekins replied to Nelliekins's topic in Other Heating Systems
@PeterW I had a thought about mounting a number of DS18B20 temp sensors in the system in tee (actually branch F) fittings, which might help with fine tuning of the system temps and flow rates. Specifically: - 1 in each of boiler flow & return connections to cylinder - 1 in each of top and bottom connections for coil Is there anywhere else that would be of use to me? I would still have at least 1 cylinder stat (probably 2, with the second at same height as, or just above, the boiler connection at the top, but opposing) so that I don't need the automaton system to keep hot water and heating working! Does this make sense? -
Heating system for an ICF house with UFH
Nelliekins replied to Nelliekins's topic in Other Heating Systems
We have 6m of bifold doors that open out straight into the space above our lightwell so a mezzanine deck wasn't really an option. My plan is to stack the IBCs 2 high to get 4 in there, and it'll all be under the deck... The ladder will go up to an access hatch which will be gas strut supported. If I could make it a walk out area like yours I would do that in a heartbeat, because it'll improve light levels enormously in the basement... Yeah it was the cost of tanks that pushed me towards IBCs... we are in full - tilt "save every penny we can" mode now... If we have to get another lump of cash from the mortgage provider we won't be able to afford to live there! Hence the economy drive, the homebrew heating system and IBCs. Also bought a set of adapters to utilise our excess UFH pipe (we have about 600m left over, so am running 16mm PEX everywhere, for all the hot, cold and RWH pipes inside I can - fittings are 6 quid a pair and pipe is essentially free now it's paid for!). I find it interesting that every sole that has provided their own quantities for supply have overestimated by a typical 20% (be it the floorboards, or the ICF, or the UFH,...) and the stuff I have quantified has always been nearly exactly right... -
Heating system for an ICF house with UFH
Nelliekins replied to Nelliekins's topic in Other Heating Systems
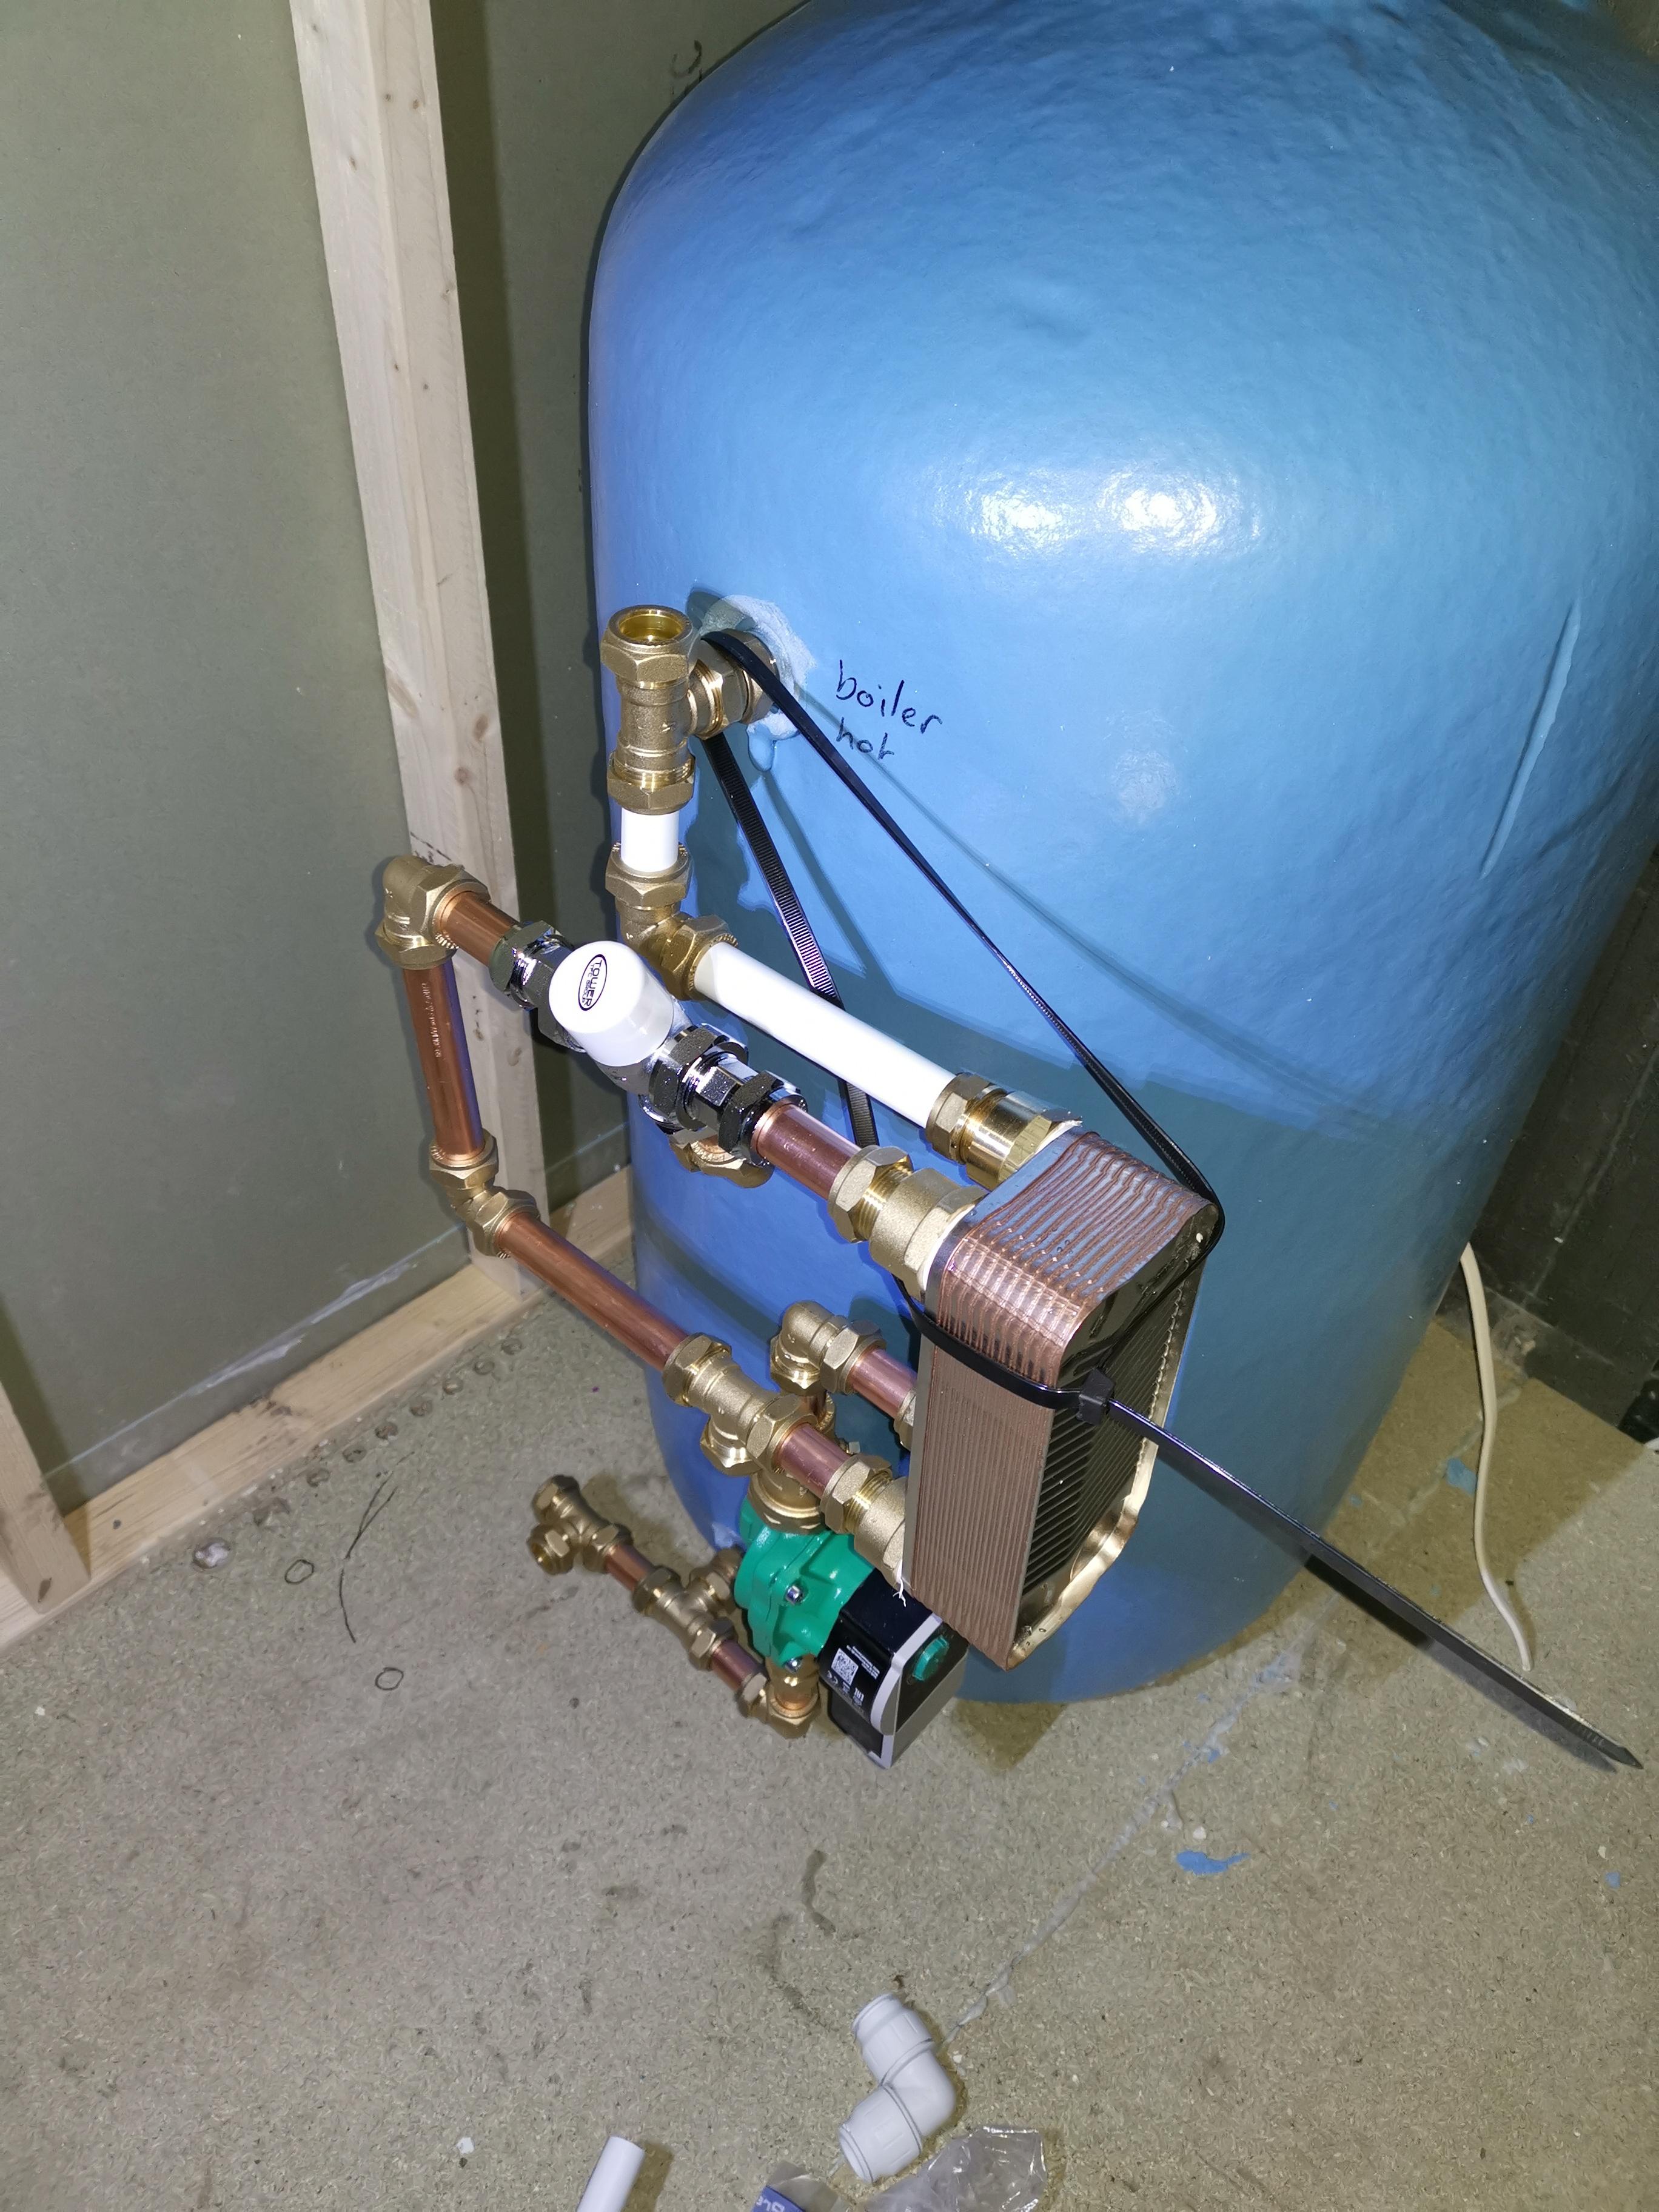
OK, so I have made a start on putting this all together... The PEX pipe adjacent the TMV is a placeholder until I get more check valves, at which time it'll be replaced with copper. Still waiting for flow switch to be delivered, and connections made to boiler which lives in the room below... The series of holes in the floor are for the pipes to go up to the hot water manifold, which will be supplied from the TMV. So, a couple of questions : 1. Should I use a Y strainer in the cold input? I had thought about a magnaclean as an option too, but not sure I would see much if any benefit from it? 2. Any ideas on placement of (and recommendations for make/model of) PRV? 3. Am I right in thinking that the F&E tank needs to be 1m+ above the top of the cylinder, and needs to have at least 5% of the volume of the system it is connected to? Realistically that's about 8L I think. 4. The boiler doesn't appear to have an internal pump, so I have bought a 3rd Wilo Pico pump (one for DHW, one for UFH and one for Boiler)... Sound OK? 5. For the UFH side of things, am I going with a set of 3 position valves (one per manifold)? Where do I position the pump and non return valves so that I can bypass the coil and still circulate water to distribute solar gain?
-
Heating system for an ICF house with UFH
Nelliekins replied to Nelliekins's topic in Other Heating Systems
Looking to copy the IBC part, although we have a window as our secondary means of escape from the basement, as opposed to your door (although a stihl saw and 20 minutes of effort would soon fix that!) We are having a deck over, and have an egress ladder to get out of the lightwell. There will be a hatch with gas strut assistance as well. I think your lightwell is bigger than ours, too - we have 4.1m wide by 2.25m front to back, and 2.8m high (7 courses of logix blocks). -
Heating system for an ICF house with UFH
Nelliekins replied to Nelliekins's topic in Other Heating Systems
The manifolds for hot /cold /RWH will be the Hep2O sectional units that screw together, so that I could get both 15mm and 22mm feeds off the same 3/4" input pipe. That said I do prefer Speedfit for elbows etc - no idea why but the twist lock seems to give me some comfort, and they've never let me down yet. And black/green stripy, since we are doing RWH as well! ? -
Heating system for an ICF house with UFH
Nelliekins replied to Nelliekins's topic in Other Heating Systems
Sorry missed this. Yes to both. PHE is 1" BSPP and tank is all 22mm compression - they even supplied the olives! ? -
Heating system for an ICF house with UFH
Nelliekins replied to Nelliekins's topic in Other Heating Systems
Sorry @PeterW I was at site all day, mainly fitting the UFH loop into the main bathroom, now that Kim has picked a bath at long last. I really don't like the stiff PEX pipe... Should have researched that more before I bought! I am thinking of a mix tbh, with everything connected to boiler or tank in copper + compression, and everything else (eg the hot/cold/RWH manifolds) in push fit. The manifolds are being sited in the laundry alongside the upstairs UFH manifold and the tank, so central isolation of every outlet instead of individual stop taps everywhere... Allows me to commission stuff in stages, and simplify the "RWH backup from mains" side of things. I have about a dozen 22mm push fit elbows and half that number of Tee fittings. I also have a bag full of 15mm & 22mm compression fittings of various types. I tend to prefer push fit if it's all going to be serviceable / accessible, and solder or compression if not... Had 10 out of 12 Floplast push fit 15mm elbows leak in the first 2 weeks, replaced most with Speedfit fittings and a couple with compression and not so much as a drip in the 5 weeks since. Lesson learnt - you get what you pay for. Anyone know of a reason not to use 16mm PEX pipe for hot/cold/RWH feeds around the house? The fittings are only a couple of quid each to convert to 15mm COMPRESSION, and the PEX pipe has WRAS approval, and is good for upto 95C, and I have about 600m of the pipe left over from doing the UFH ? -
There is apparently a different method to calculating the U value for basement walls when the basement (in particular the floor) is heated. The reference I found pointed me to BS EN ISO 13370 and also NHBC Approved Document Basements for Dwellings. There is also an allowance made in the calculations for the insulative properties of the backfill and surrounding earth, both of which vary according to depth apparently.
-
It doesn't, but an offset is applied by Building Control because of the ground temp. It equates to approx 0.06 improvement from memory.
-
"Hi-ho, hi-ho, it's off to work we go"
Nelliekins commented on Nelliekins's blog entry in Clancutt Lodge
I am sure if the boss said "go on a break" they went on a break! I think my hole was bigger though... ? -
"Hi-ho, hi-ho, it's off to work we go"
Nelliekins commented on Nelliekins's blog entry in Clancutt Lodge
The difference with us is that we never set out to achieve passive status. As it happens, we might beef up the insulation in our basement walls shortly, because we are in a position to do so with minimal cost (I will mention it in the blog when we get there - again though it is to do with the remedial action we have had to take...) Odd for the EA to get involved. In fact I am surprised that they even looked at the application at all... Most times they are consulted it gets rubber stamped (I know a fairly senior guy there, and he says they are so under resourced at the moment anything except nuclear and water related works tends to be passed as a matter of course... -
Cheers for the nice comments ? We had a total of 3 full days (8am-4pm) provided by logix UK. I am sure if I picked up the phone as a customer they would offer help if they could, although things between us and Logix UK went a little sour for a while... On a related matter, I can recommend another company much more wholeheartedly with regard to support and assistance. Perhaps a PM is a better way to provide that information, or do the mods not mind if I recommend companies here? I have no affiliation with them, in case it matters...
-
The earth sheltering and the moderate soil temp allow us quite an improvement over above ground walls. What would be 0.23 for above ground ends up at 0.17 for us (the increased depth over a regular basement helped here - the slab is 3.7m below ground level, so we would end up with 9' ceilings to improve the sense of space) Building control have already inspected that and signed off on our EPC side of things (although we haven't discharged it as a planning constraint yet...)
-
The walls are 70mm EPS on both faces. We are getting an effective 0.16/0.17 as the U value, thanks to the fact that we are underground, and have further layers that are added to the wall buildup (mainly due to the leak and subsequent remedial action). The concrete is 254mm thick, which makes the EPS) skinnier than it is.
-
Bingo! ? We put a swellable bar under the wall as per everywhere in the basement, but ignored the vertical joint. Then, when it rained a lot and the lightwell filled up a bit, we were getting water into the basement... But of course we didn't know this until much later in the build, when we thought we were watertight... ? It's plenty strong enough, because there are solid ICF walls above as well that are built as external corners over the joints. Plus the lateral stress on that wall is nil. It's shielded from the weather by a deck over (or will be!). Plus, there are 7 courses of blocks, each with 5" diameter concrete "plugs" with 12mm rebar going through them and then bending in alternating directions once they are in the side wall. Then there are the 22 starter bars set into the slab with liquid concrete anchor. The wall is way stronger than a typical masonry wall above ground, too - the concrete cubed at C68 on the basement mix.
-
Before I carry on, let's answer the question I posed in the last blog entry. I posted this picture of the basement rear wall, showing how we had joined the cross wall to the side wall (following the suggestion of the boss of Logix UK, who had attended site whilst the walls were being assembled (and even assembled some of them himself) as part of our on-site training: The problem here is that this wall is supposed to form part of the watertight barrier of the basement. The concrete had to be continuous. But of course, with this design it wasn't continuous - we only had pockets of concrete, 5" deep, every 16" up the wall. Structurally, it was more than up to the job. From a watertightness perspective, it was about as useful as a chocolate teapot. But we didn't even think about this until much, much later. About 6 months after the concrete pour for the basement walls, in fact. By which time, remedial action became very complicated and very expensive. Let's return to the blog timeline... So, basement walls were constructed in about 8 elapsed days, which amounted to 5.5 days on-site. I was suitably impressed. 2 faces of steel rebar was set into the external walls, at 200mm centres vertically and horizontally. This was at the behest of our waterproofing specialist, who had overruled the SE. From a structural perspective, the SE had calculated that a single face of H12 rebar at 200mm centres was more than adequate to reinforce our 10" thick concrete walls and withhold the ground pressure. Our waterproofing guy said "the more steel the better, because it'll control the cracking better". So, with the steel not actually being that expensive, we ordered double the steel, and put 2 faces in. Thank goodness we did. Remember the bank at the back that was propped on 4 acrows? They were rated at 1 tonne each. 3 days before the concrete pour, they failed overnight. A shelf of clay, weighing perhaps 6 tonnes, forced one of the acrows to deflect enough to destabilise the lot, and the shelf gave way, slid down the back of the excavation, and smashed into the polystyrene wall. Unbelievably, the wall, supported by the ICF bracing system, held. Here's a photo of the damage: The bracing upright was bent to the tune of 10 degrees or so, and most of the studs that interlock the ICF blocks had sheared off. But because of that 2nd face of steel rebar, the wall resisted the impact, and the subsequent dead weight, of the clay against it. It took 2 hours and a few extra steel supports, but we managed to force the blocks back together, and brace it up sufficiently that it would take the concrete pour. And a 3 days later, that's what we did. The concrete pour was moderately uneventful, as these things go. Apart from the pump getting blocked, because a piece of hardened concrete had made it into the mix in the batching plant, and then completely blocked the 3" reducer we were using: It took nearly an hour to dismantle the pump, knock that lump of concrete out, and reassemble the pump. The concrete firm said they'd have to charge us for the concrete wagon sitting outside doing nothing. I replied that was fine, but they were picking up the tab for the pump since they'd blocked it. They said for me not to worry, and apologised for any delays they had caused... Oh, and one more problem - where the T-walls had been made, I hadn't braced the outside of the side walls sufficiently (or at all, truth be told!). This led to some substantial bulging of the side wall in a couple of places, which I had to shore up as a bit of an emergency ? The concrete was poured, and the walls started to harden pretty much as soon as it was poured. Here's the bulging: Ahem. Nothing to see here, move along. ? At least the shoring / bracing held.
-
"Hi-ho, hi-ho, it's off to work we go"
Nelliekins commented on Nelliekins's blog entry in Clancutt Lodge
I quite agree. Although mine has nearly been the end of me. The next instalments of the blog will reveal the reason why... -
So, our slab is down, starter bars set ready for our walls, lovely. Time for some ICF... Nope - more prep work to do first, apparently. The boss from Logix UK came up a couple of weeks prior and gave us some on-site training. "It's just like Lego!", exclaimed I. To be fair, it did seem really simple. I learnt just enough on the first day of training to be dangerous. The basement wall blocks arrived on a pallet truck. Except it was only some of the blocks - they'd forgotten to send the internal wall blocks, and only sent flat panels for us to make most of the blocks ourselves. No biggie - it only took a hammer and 60 seconds of effort to assemble each of the blocks. Shame there were a couple of hundred... So, getting the blocks into our hole was entertaining, though - we started off hand-balling them down a ladder! After we had a few down, we started looking to set the first course. We bolted a set of aluminium track around the perimeter - the track is 72mm outer width and 70mm inner width, which is exactly the same width as the EPS panels for the basement. It came in 3m lengths, so with 16 lengths bolted down, we had a perfect perimeter into which the blocks would sit. Here's the first block going in for a trial fit: Oh, the sharper-eyed among you may have noticed there is what looks like a channel/groove set into the slab, just outside of the starter bars. That was cast into the slab (using lengths of 20mm electrical ducting) to take the Sika swellable water-stop bar, and it was a perfect fit... shame we didn't think to set it into the channel until after we had placed the first course of blocks! DOH! Anyway, the block fit perfectly, so we carried on setting out the entire first course, then realised our mistake and put the swellable bar into its channel (stuck down with some horrendous swellable mastic provided by Sika, that took best part of a week to wash off my hands - oops!) So far, so good. But hand-balling blocks or panels down a ladder wasn't cutting it, given we needed to get several hundred blocks down... so we made a slide! The pairs of timbers were set so that the webs on individual panels fit perfectly between the 2 timbers, keeping them level and preventing them from flying off. Before we knew it, a good chunk of the basement walls were up. Next day, and we continued apace. By the end of the week, most of the basement walls were up and it was time to call it a day. The man from Logix had suggested we cover the tops of the walls temporarily to prevent the swellable bar from getting too wet, so we used the ICF cavity closers - after all, we were relatively sheltered from the wind, so they shouldn't go anywhere... Next day onsite was the following week, and a surprise arrived - the internal wall blocks! Not only that, but the boss of Logix UK arrived with them, to carry on our on-site training... Since he had brought his internal wall blocks and the bracing system with him, I figured he could help with the internal walls. Now, if ever there was a mistake... I don't know if anyone paid attention to the design of the house, but there is this lightwell out the back of the basement. It's designed to serve 3 purposes: To provide a secondary means of escape, in case the basement stairs are on fire (there's a window being put into the back wall) To provide a place to put the rainwater harvesting tank (I'm a notorious cheapskate, and I had noticed that above-ground tanks cost a fraction of the below-ground tanks... ergo, with a lightwell - covered by a deck at ground level - I could house a giant above-ground tank, but keep it out of sight! To provide somewhere to site our perimeter drainage sump (we were going to backfill around the basement walls, with a french drain that flowed into the sump chamber in the lightwell, so that it could be pumped away, and remove hydrostatic pressure from the basement walls "So why is he banging on about the lightwell?" I hear you ask. Good question. Internal T-walls with Logix are made with dedicated T-shaped blocks...in the US and Canada. Over in Blighty, they're not allowed to make those blocks (because Logix UK is a licensing outfit, with very limited production rights), so you have a choice of waiting up to 6 weeks for them to be shipped across the Atlantic, or bodge the T-wall by simply cutting pockets out of the side walls to allow concrete to flow between side and cross walls, and you can put rebar L bars into the wall to tie it all together. Which option do you think I picked? If you look carefully, you can see the pockets cut out of the side walls, and the steel rebar hanging out of the side wall to tie the side and cross walls together. Which would be fine, except this is the external wall of the house. The area to the left of that wall is the basement, and the area to the right of that wall is the lightwell. Now here's a little test for the brighter students among you... what's wrong with this arrangement? Answer in the next blog post! ?
-
"Hi-ho, hi-ho, it's off to work we go"
Nelliekins commented on Nelliekins's blog entry in Clancutt Lodge
That's not even me - it's the foreman of the groundworks firm. I think it was mild panic when he realised the size of the job! ? -
"Hi-ho, hi-ho, it's off to work we go"
Nelliekins commented on Nelliekins's blog entry in Clancutt Lodge
Hmm. Might have to speak to my architect about that... Oh wait, that's me! ? Tbh I hadn't checked, although I know it used to be a requirement to provide a protected stairway for 3rd storey above ground, including self closers. That would be spoiling the surprise in an upcoming episode of the blog... Not long to wait, I promise!! Yeah, 74 x 32T muck away wagons filled to the brim. About 900m3 of spoil shifted, all told. The original reason for the basement was actually because we have 3 poplar trees at the front of the plot - 2 of which are 27.5m tall, and only 12.5m from the house. Building Control were consulted before planning about this and the head honcho there said they'd insist on 3m deep trench foundations with clay heave precautions as a minimum. I said "balls to that, we'll put in a basement"... So we did! The second I said the b... word the missus started planning what would go in it, and thereafter it was just part of the plans. -
Heating system for an ICF house with UFH
Nelliekins replied to Nelliekins's topic in Other Heating Systems
That's fantastic, thanks @PeterW. Even a pillock like me can follow those instructions! ? Better head to screwfix tomorrow then! -
Heating system for an ICF house with UFH
Nelliekins replied to Nelliekins's topic in Other Heating Systems
OK, leave the vent as a vent, got it. So would you suggest tee off both top and bottom (1 pair for boiler, 1 pair for PHE)? Or fit new flanges for the PHE? -
Heating system for an ICF house with UFH
Nelliekins replied to Nelliekins's topic in Other Heating Systems
Thanks @PeterW. I presume I should put a set of gate valves either side of them, to make eventual replacement easier? -
"Hi-ho, hi-ho, it's off to work we go"
Nelliekins commented on Nelliekins's blog entry in Clancutt Lodge
All good points. Our basement was damp, and would have poor drainage if we had any plumbing in there, which is why we don't. The cause of the damp was identified and resolved. We have a fairly large stairwell (roughly 2.5m square) which goes through all 3 floors of the house with a nice big SE-facing window at the top of it (window is 2.2x2.1m) so lots of light in the front. We have a lightwell at the back, with a big window opening into it, which only leaves the cinema room without natural light (winner winner chicken dinner). Emergency escape is through the window at the back - our 7 year old has already used it during a game of hide and seek, so clearly easy enough to use! ? Ventilation for the entire house comes from our MVHR unit - we have supply and extract in every basement space apart from the stairwell. I would guess our valuers agreed with me that the basement feels more like a normal house space than a third floor above ground would, because we don't have to have self closers on doors anywhere, which I find makes a house feel a bit like a public building... High ceilings help this sense of "normal" as well... I daresay if we had 7' ceilings like a lot of basements, it would feel claustrophobic... But we went with 9' ceilings, and it's great. There are problems with building basements, but good design and planning can overcome all of them. The self closing doors is regulated so you can't avoid it (although if you're being a bit naughty you can always remove them after Building Control sign off on the completion certificate). -
Heating system for an ICF house with UFH
Nelliekins replied to Nelliekins's topic in Other Heating Systems
Thanks, @JSHarris - ordered! Any recommendations on pumps - I see Wilo and Grundfos being used in most places, and wouldn't know how to choose between them. Is one brand longer lasting (ie higher MTBF)? Or quieter, I guess that might be nice? Or failing that, cheaper? ? @PeterW and @Nickfromwales - one of you clearly needs to make the first move here. Be brave - BH is here for you! ??❤️????