


Nelliekins
-
Posts
157 -
Joined
-
Last visited
-
Days Won
3
Everything posted by Nelliekins
-
So, our ground floor walls are up, and ready for a concrete pour... almost! Despite our use of Logix ICF blocks, I had fallen in love with the simplicity of the joist hangers used by NUDURA. Essentially, all you do is slot metal plates through slits in the ICF blocks, hook them onto a bit of rebar in the wall, and pour the concrete. Then you wrap the end of your joists in a folded metal U-plate, and put tek-screws through the metal plates, through the U plate and into the joist. The shear strength of the metal plates and the tek-screws is what holds the joists up. So, before the pour, you end up with this: Some people choose to put battens under the joist hanger plates before the pour to stop them moving during. We didn't bother, because the steel rebar was holding them fairly well anyway, although most of them were also screwed to the blocks (we'd finagled the joist spacing to fit the stupid imperial measurements of the Logix blocks, which meant at least one plate for each joist was able to be screwed to a web in the ICF. So, the pour was uneventful in the end, apart from one tiny issue. Under that lovely 45-degree wall at the back of the garage, the block and beam floor was running under the angled wall. Which should be fine, but there must have been a small gap between the blocks somehow. After about 5 minutes of pouring concrete into the internal wall, we were getting a bit confused as to why the concrete level wasn't rising... ... It transpired that a 7N concrete block was now floating inside the wall, and the concrete was pouring through the resulting gap and under the block & beam floor in the garage, filling the void beneath. ? We only realised how far it had flowed under the garage when we started lifting floor blocks. In total, in those 5 minutes, we'd poured just under 3m3 of concrete into the void beneath the garage floor - the void had reduced from an average 750mm height to under 150mm in places! On the plus side, at least it didn't fill the void completely, given we still have to run services under there! Here's a photo showing how much it filled up: Still, the garage walls aren't going to shift anywhere now! And it only cost £300 in spilt concrete... Anyway, the rest of the pour went really well - no big bows (that we could see) and no bursts, despite all of the silly joints we had. Even little bits of PU foam seemed to withhold the weight of the concrete: (No, the string isn't supposed to be tight to the blocks - it was set so that a piece of CLS fit perfectly behind. And yes, that upright should have been screwed to the ICF blocks... except the observant among you will have noticed the webs don't line up between the courses. This was a deliberate decision made by me because of an alignment problem with the joist hangers above the bifold opening, and this seemed to fix it) So, concrete poured, and walls looking good: The internal walls (garage, kitchen and stairwell) were kept 1 course lower so that they could act as a bearing surface for our upstairs floor joists. Seemed like a good idea to me, anyway! Time for another ICF delivery... The big RSJ is for the 6m span between kitchen wall and garage wall, and will carry the load of the first floor joists in the middle 1/3 of the house. All well and good, but the massive trees at the front meant that getting a crane on site wasn't going to happen, and the cost of a crane that could clear the trees from the street was more than a little prohibitive... Time for some back-breaking lifting, because that beam weighs more than 1/4 of a tonne! Some swearing, and the death of a couple of ratchet straps, and the beam was lifted up into place... And the length was perfect - we had less than 10mm tolerance once you allow for the required bearing on the concrete walls! Timbers sailed past the end at the garage - I was too lazy to cut them at the time (and that came laziness back to bite me on the ar$e later in the build!) Say hello to the front of the house! Hallway window, nice doorway and the integral garage all present and correct Before we can carry on building the walls, we need to put the floor joists up and get a floor deck down: And time to start boarding it out: Which would have been easy if it weren't for the fact that the tolerances on the board joints wasn't so woeful: These boards were in the same pack, and the tongues varied by over 3mm. Biggest tongue we found across the lot was 20mm, and the smallest was 12mm. This meant we had to try mix-and-match for the floorboards, which took days longer than it should have... ? Nevertheless, 7 days later, and we had the floor down, and were building walls again. 3 more days, and we were cooking on gas - first floor walls were 2/3 up and we were erecting the bracing again: Time to put some lintels in for the windows (you can see the ICF cavity closer under the rebar links): It was at this point that we realised we had a bit of a problem... our house was too tall! Our planning permission showed a street scene, which had the ridge line of our house lower than next door's house. The drawing had been produced by asking the neighbour to measure the height of his eaves when he was clearing out a gutter - he'd used a tape measure, so I had no reason to doubt his figures... ...But we were out by nearly 600mm on the height. I had to go back one night, and put a laser on a staff, just to see how bad it was. Here's the picture, showing the laser line from the top of a 2.4m staff, shining on the neighbour's chimney: The upshot of this was a third planning application, and lots of sleepless nights, because we had to get a height increase approved (we first tried to use a minor non-material amendment, only to be told by the LPA Planning Services Manager that "a minor non-material amendment was not appropriate for securing an increase in height"... only to find out that the same Planning Services Manager had personally approved an increase in height on Chorley Nissan's planning application using a MNMA only 10 months prior! I wonder who had a nice Christmas present from Chorley Nissan that year?) Still, while we waited for approval (so that we could order the roof trusses) we could crack on with bracing up the first floor openings. And we had a ground floor that was giving us a sense of what it'd be like when it was finished: We were old hands at bracing openings now, having done it for the previous 2 floors of the house! Anyone else think it looks like something from an early 80s arcade game?
-
If it had been me, it would have cost my sanity and what remains of my hair, I suspect... Your thread is legendary, sir! /me doffs cap
-
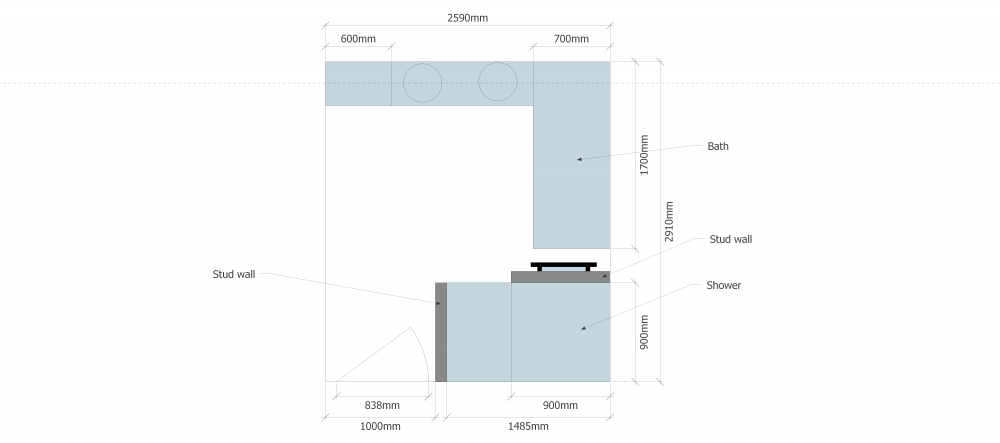
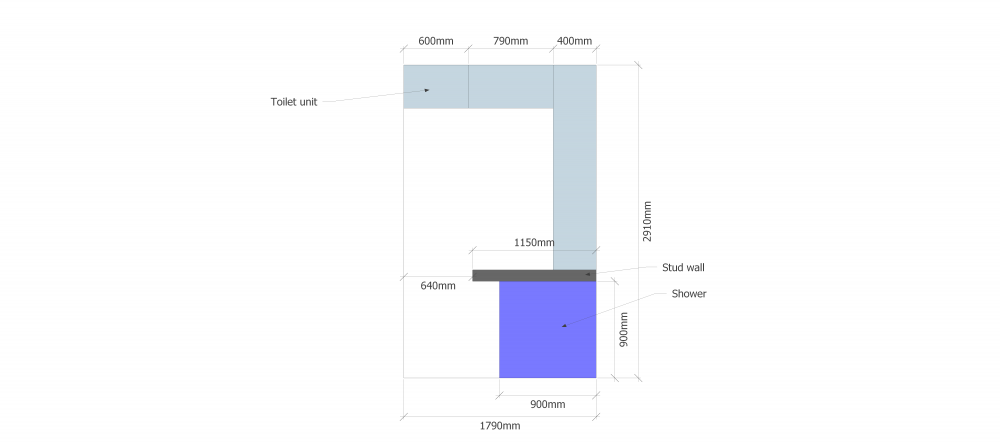
Thanks for all the tips so far. Time to dig a little deeper! Here are the room layouts... Main bathroom first: If I had the danglies for it, I'd have followed @Onoff's fantastic bathroom build... but time and money constraints mean this will be a "for now" job, rather than a "forever" job. The 600mm unit top-left is the toilet cistern cupboard, then 2 sinks (our girls fight over the single sink in the main bathroom here -this is my attempt to alleviate stress in the mornings!). I'm tempted to build out the wall between the bath and shower, and build in storage for shampoo etc, and also an access panel for the shower controls / mixer. That would push the towel rail up above the end of the bath, which isn't really a problem. The en-suite is similar, albeit no bath and it is serviced by a pocket door in the middle of the left-hand wall: (Kim and I don't fight over sinks, but we'll still probably put 2 in - they're going in/on the long cupboard run "above" the shower area.) I would like the shower area to span the full 1790mm (yes - it should have been 1800mm, but I put the pocket door wall in the wrong place because I hadn't allowed for the MR plasterboard - the perils of trying to do too many jobs at the same time!). But SWMBO is "suggesting" (read "demanding upon pain of death") that we have some special former that works well with microcement and only comes in a few sizes... ? The fact that we will be sunken in should allow us to not have to worry about any fall on the rest of the floor - it makes the shower area fully contained at floor level. It's just how best to make sure we don't get leaks, and we don't get mould. Oh, and on the mould front... I've been assuming that it is exacerbated by having the shower area closed off and getting standing water. The stud walls that close off the shower area are going to be stopped at 2m high, so that air will circulate above them (and hopefully the MVHR extract vents being above the shower areas will help). Anything else I can do (as part of the construction) to prevent the mould from appearing in the first place?
-
Wow Jeremy - looks good. I think she'd go for that (apart from the tiled floor, which will either be microcement all over, or vinyl planks like we have in our current house). Cheers for that - good ammo in my argument to not microcement! It costs from approx £55 per m2 installed, so certainly not cheap!
-
Thanks Dave. How do you get the wall-to-floor junction to be waterproof as well - sealant? Our shower areas are both approx 1800x1000mm - do you get panels full width, or do you have vertical joints that have to be sealed somehow?
-
OK, so after a few family issues, Kim and I have restarted first fix in earnest. Heating and hot water system are still ongoing in my other thread, and I will be returning to the blog in the next day or two. But we also need to sort out the design of the 2 bathrooms, and the walk in showers are giving me a headache... Our floor build up is a sub deck of 22mm caber shield, overlaid with 50mm of EPS70 (into which we have laid our UFH - but not under the shower or bath), and then 18mm caber floor on top as a floating floor. So basically an EPS sandwich ? I presume that whether we choose trays or formers, we will have to remove the 18mm floor and the 50mm EPS. Then the drain will go straight through the 22mm subfloor and out between the posi joists. This will naturally create a "sunken shower" - is that a good idea for waterproofing? The idea would be to tank the walls of the shower areas and the sunken floor. Kim doesn't trust tiles or grout or silicone, mainly because every time we have tried in the past (either ourselves or a tiler) we ended up with black mould and its a PITA to redo every year or two. So Kim wants to microcement the lot (which will be £££ that we don't have ?)... I think tanking and tiling should be good enough, although I don't know precisely why we end up with mould all the time! Help! @Nickfromwales - any thoughts on how to approach this? 1. Do we use a former or a tray? Pro's / con's? 2. Do we build up the floor height under the shower, or is the sunken area (68mm down) a useful thing for waterproofing?
-
Heating system for an ICF house with UFH
Nelliekins replied to Nelliekins's topic in Other Heating Systems
Would having just a single pump (or 2 in parallel) work better than 2 separate pumped UFH circuits in this setup? That way we would have a single 3 port diverter valve, with the 3 ports being 1. Flow from coil in DIY heat bank 2. Flow to UFH 3. Return from UFH to coil (teed off?) The pump and the EV would be downstream of the diverter valve. This would allow the EV to stay in circuit no matter what position the valve was in, and also allow us to pump water without heating it (eg to spread heat from solar gain). -
Heating system for an ICF house with UFH
Nelliekins replied to Nelliekins's topic in Other Heating Systems
-
If only that was as bad as it got... That water was simply rainfall over a period of about 2 months, because the basement was still somewhat open to the elements, and would remain that way until the roof was on.
-
It's just dense EPS. Snapping with your hands isn't easy but possible, about the same difficulty to snap as a 38x25 roof batten I'd guess. Depends on the type of block, and the manufacturer. The Logix XRV blocks that we have used above ground are 70mm internal, and 102mm external face. Depends who you ask... Logix say it is slightly more thermally insulative, but our builder (who is very clued up on ICF) says its essentially a con and just a coloring agent...
-
Heating system for an ICF house with UFH
Nelliekins replied to Nelliekins's topic in Other Heating Systems
Right, I have finally arranged for a plumber to come and connect up the boiler. As of Weds, we should have the boiler connected to both the gas and the cyli^H^H^H heat bank. ? I have a F&E tank ready to plumb in above the heat bank, and a manifold ready to connect to the hot water outlet (although that's not needed prior to the boiler being commissioned). I've got a single cylinder stat (a Drayton HTS3) to be positioned approx 6" above the bottom inlet on opposite side of heat bank (as per suggestion by @PeterW), although am still considering having a second stat... I don't seem to be able to find any information on the hysteresis for the stat, but presumably I want it to trigger a demand for heat at around 50C (when the PHE can no longer provide DHW at a high enough temperature), and to tell the boiler it is satisfied at around 65-70C? Do I need 2 stats to achieve this? Once the hot water is working, I need to progress the UFH side of things, which will be done using the coil in the bottom of the heat bank. I'm thinking of 2 pumps - one for the basement+ground floor, and one for the first floor. That separates the 2 types of emitters, and pretty much balances the length of pipe being serviced by each pump (because the basement offsets the integral garage area which isn't heated). So, from the coil, I am thinking we want to have a tee, so that the 2 separate "zones" are parallel. From each leg of the tee, there will be a motorised zone valve followed by a pump, followed by the manifold. Questions: Will the 2 pumps be sufficient? We're only looking at a relatively low flow rate, with a low flow temperature (25-28C), but it's a lot of pipe to pump through... We've got Wilo Pico glandless pumps following the earlier recommendation If we close both zone valves, we'll have effectively sealed off the coil - I presume that since the coil will still be getting hot, we will need a small expansion vessel and a PRV - is that correct? Do we need an expansion vessel for the rest of the UFH circuit as well? IIRC we are intending to run the UFH at 1 bar. I presume that since there is a drain cock fitted to every manifold, we don't need to add additional drainage points for the UFH - is that correct? On the subject of drain cocks, I presume we will need one on the DHW side of things, so we can drain down the heat bank? Anything else I need to know / do? -
Lol...if I write too fast, I'll catch up with real time, and then you'll have to wait more than a few days between updates! ? Don't worry, I'll cover the concrete pour in the next post tonight / tomorrow! In the meantime, I need to get some assistance from @PeterW and @Nickfromwales on my heating system - I have a plumber coming tomorrow to connect up the boiler to the heat bank, and no idea what I am doing!! ?️
-
Right, Christmas came and went - I had spent enough time with my family and friends, recovering from the previous 3 months. It was time to resume on site! ☺️ So, first up - inspect what the basement looked like, now that it was largely enclosed... Big mistake, because it was horrendous: You can see that the water level is approx 2/3 of the way up the first course of blocks, so about 250mm deep. You can also see the bit of EPS that were chipped away to make the 95mm bearing surface for the floor beams, just floating around. Still, nothing that couldn't be remedied, and at least the basement was holding water - that suggested it might be able to keep the water out, too! Now, we were starting to do things that required real tools to be kept on site. When the groundworkers were on site, we had hired a proper site cabin - hot and cold water, cooking facilities, drying room, toilet, etc etc etc. However, now that we were above ground, it was going to be just me and the occasional mate helping out. Kim had off-hired the site cabin, and swapped it for a porta-loo. Can't really keep much in the way of tools in a porta-loo if you don't want them nicked... So we decided to buy a van! It had a few dents, but it was nice enough, and it would hold the tools, generator, etc, safely overnight. Cha-ching! Now, another reason we hadn't made much progress over the holidays was because we were lacking some fairly necessary items to carry on building - the wall blocks. The ground floor ICF blocks were due for delivery the week commencing 11th December 2017. They actually arrived on site on the 12th January 2018, so just over 4 weeks late. This was something of a running theme with Logix, TBH... if you recall, the internal wall blocks for the basement were a few weeks late too (and you'll find out just how late the rest of the blocks were delivered later in the blog!) Still, they turned up eventually: Still, ICF blocks now on site, we were able to progress... A day later, and we were looking at a decent amount of the external walls done (3 courses, most of the way around), and we were starting on the exciting 45-degree wall between the hallway and the garage: 3 courses turned into 4 courses, and all of the window openings started to be formed: (The ladder was our only means of getting into the basement now, but TBH we didn't really care about down there - we just wanted to get the shell completed and progress to watertight as quickly as possible... Regrettably, that was going to be more problematic than anyone could have envisaged at this time!) Anyway, the walls were flying up, even with all the steel reinforcement having to be put in. At least above-ground we only had a single face of steel to worry about (and our builder-turned-consultant pointed out that we didn't really need any steel at all except in lintels, because: the concrete mix we were using was so strong, and because you don't put steel into brick / block walls, which are perfectly acceptable for building houses with But we did it anyway, just in case we ever decided to move the entire house to Jupiter (where 300mph winds area apparently possible, and where, therefore, our level of reinforcement would come in handy). ? (In case you are wondering, the vertical steel isn't in as of this picture - they were all placed once the ICF walls were finished being assembled!) 4 more days on site (although 2 weeks had passed - remembering that I was only part-time at site, and I only had a mate helping me out on weekends), and we were putting up the bracing system again. Here's our exciting 45-degree wall inside the garage: Isn't it lovely? You can also see the fantabulous set of steps I made from a couple of the many many 10" core ICF blocks we had left over, thanks to a considerable over-estimation by Logix. (I needed the steps anyway, because I am a short-arse and couldn't reach to put steel in above 3 courses!) Some more pictures of the ICF going up: Another week passed... And here, at the end of January 2018 is where it got... hmm, let's say interesting... it was time to put in the lintel blocks for the 6m bifolds in the kitchen... It took me 3 days (so 2 weeks in calendar time) to get those blocks up and to sit square, and there was no way on earth they were going to stay like that with all the steel in them... time for some supports to be introduced to the opening! Size 1 acrows every 1m across the opening. They're bearing off the concrete wall below, so no problem taking the weight. We put a single 250x38mm timber across the entire 6m opening, with 11mm OSB cut to 330mm rips on top of that (to support the ICF blocks fully). On the inside, the bracing system stopped the OSB from moving. On the outside, we screwed timbers down from the webs to trap it. Then we jacked up the acrows approx 10mm at a time until everything was perfectly level / square / plumb. For some curious reason, I don't have photos of the steelwork in this wall, but it was prodigious - 2x25mm steel rebar in the bottom of the bottom course of blocks, 2x 12mm steel rebar in the top of the bottom course of blocks, and 2x20mm steel rebar in the top of the top course of blocks. 8mm rebar links every 200mm across the entire opening, plus onto the columns. I lifted and placed nearly all that rebar on my own (because my mate Paul had some family event on, he missed one Saturday, and I figured I could handle it)... big mistake! 7.5m lengths of 25mm rebar are very very unwieldy! I trashed one ICF corner block just resting the first 25mm bar on it while I got up on the scaffolding! Still, 5 hours of sweating and swearing later, plus some help from a more glamorous assistant in the form of Kim, and it was done...just in time for Paul to arrive and see how I'd gotten on! ? Now, for the most part, the ICF walls had gone up fine. Even the 45-degree wall was a doddle. But those of you who were following the basement wall pour will probably remember that we had a couple of places where the basement walls went a little wobbly. This caused us a bit of a headache, because blocks wouldn't sit down properly in those areas. As it turned out, there was also an issue with the blocks not being level in those places either. This led to ever-increasing gaps between joints as we went up above those points, as you can see here: Solving this was quite a problem. We ended up using about half a can of PU foam in the 3 places this had happened, followed by some serious strapping across both faces of the wall to keep it together. I spent several weeks trying to get everything braced (making bucks for the window and door openings), and plumb, and before I knew what had happened, it was the end of March 2018, and time for another concrete pour... Stay tuned for the next exciting instalment!
-
The overspend became unavoidable as soon as the banks of the excavation started to break up, so about 3 weeks in. The sheet pulling and additional muck away was nearly £14k of the increase, and that led to much more cautious groundworks (which is entirely understandable but not ideal when paying them on a day rate!) Maybe that's the lesson here - don't put projects of unknown duration on a day rate! To be honest, it would still have cost £20k, but we would have wiped £75k or more off the final value of the house. We have a 300m2 back garden, a 150m2 front (Inc driveway) and 300m2 of total floor area that would have been 230m2 without the basement. Mind you, the build would have been finished in just over half the time too!
-
Rainwater harvesting doesn't have to be expensive... We had about £2k in the budget to do it, but now think that we an build an entire system for about £350-400 using IBCs... See @Bitpipe's thread on it.
-
Our basement is approx 70m2 across 3 rooms, with 9' ceilings. Yeah sure. Muck away was £14,000. Steel reinforcement was approx £2,500. Concrete was just over £9,000. Concrete pump hire was £2,160 over 3 sessions. Backfill around the basement was approx £5,000. Drainage for the basement perimeter was £2,000 (terram, dimpled membrane, etc). The rest of the £58k was labour and plant hire, and sheet piling. I could have saved £2k on the muck away if I had shopped around. I could have saved £500 on the concrete pump hire, because 2 of the 3 sessions didn't need a boom pump, only a line pump.
-
Lol, the blog is being written retrospectively, but i am sure it'll all come good in the end... ?
-
Yeah that'd have been nice... I project managed the groundworks but was only on site 3 days a week so couldn't be a labourer too much... Once we got to the point of building ICF walls, I was much more involved. The site is almost perfectly flat, so nowhere to put 1440 tonnes of spoil!
-
We have 5.1m above ground and 3.3m below ground, all ICF.
-
And Christmas is a time for reflection, mostly because it was cold and wet and nobody would go to site with me to work! So, in addition to planning some stuff in my head for the upcoming few weeks, I took the opportunity to review the budget... ... And promptly started to cry. We had budgeted £22k for groundworks, based on the estimate from the company doing the works. We had agreed to pay them on a day rate, with 6% overage for the foreman they were supplying - I thought that was a good deal. At the point of completion of the block & beam floor, we had spent £40,231.28 on payments to the groundworks company, and a total of £58,085.79 including materials (backfill stone, concrete, steel rebar, heave protection, etc etc). So, before even laying the first above ground wall block, we were over budget to the tune of £36k... The projected build cost was £250k in total, with a contingency of £25k. So we now had to find a way to reduce the remaining expenditure by £11k, or the build wasn't going to be finished. No pressure then! ? It was at this point that I started looking at cheaper windows (since we had £20k in the budget for them) and internal joinery (Kim wanted oak everything but that was clearly not going to happen now). Oh well, Howden's finest for us then! ? I am not sure what the lesson here is... Maybe don't build a basement? Wot, no pictures? Nothing happened on site for nearly a week, so no (I thought about a gratuitous picture of me in a paper hat, but someone would probably come out with a quip about site safety). If you want pictures, just wait for the next instalment - walls!
-
Certainly did! ? We broke ground on 9th October 2017, and the basement was effectively complete structurally as of 22nd December 2017. That's about 11 weeks all told... We were told at the start by the groundworks team that it would take approximately 4 weeks, so quite a difference! Not even remotely. Because the banks were falling back into the hole, we ended up taking out 74*32 tonne wagons of spoil instead of the predicted 52 wagons. We were paying day rates to the groundworks crew, with a 7 week overrun. We had to sheet pile parts of the excavation for a number of weeks, and hire twice as many pumps as we predicted to keep the dig as dry as possible. We ended up spending 57k on groundworks, and had about 22k in the budget. Our contingency for the entire build was 25k (10%)... I will cover this in more detail in the next blog post, now that we are out of the ground ? Not long to wait, will try to get it done tomorrow! ?
-
That's why it was just myself and a mate who works in the trade and accepted the risk in the hole. We had mitigate risks with ladders within 6' in both directions to escape the excavation if need be, and a banksman watching at all times. I am fairly anal when it comes to ladder safety, and my wife is responsible for safety of a lot of people at her work. We knew the risk, mitigated the risk, and cracked on with the job. That was the safest place right there... He is between concrete walls and sheet piles - zero risk there! The banksman and my mate pulled me out from up top, because there wasn't any way to get me out otherwise! Yeah, I figured that out fairly quickly that day! I lost a boot, but came out unscathed otherwise. I always keep my mobile with me on site, even now.
-
Agreed. But at the time, they were happy to do it all apart from about 15' of pipe across the back wall. There was no access to get sheet piles installed there, and no other way to shore up the excavation. Plus, there was always plenty of warning when it was going to collapse, which is why we had acrows propping the back up for so long.
-
I appreciate your concern. To be honest, the risk was minimal - one of the 2 lads helping me was operating as a banksman the entire time, and the collapses only happened in 3 places in the entire 3 month excavation cycle, 2 of which we shored up properly with sheet piles. The bank had already collapsed at the back, and we had about a week's notice when that went because we saw the cracks forming and propped with acrows, so for the sake of 2 hours of work within the trench, and a banksman watching for new cracks from above, I took the risk. As it happened, there were no further collapses at the back all through the build. The French drain runs into a sump pit dug beneath the slab, with a 2' square access formed through the slab in the rear light well. The water then gets pumped out using submersible pumps to the combined sewer (with the permission of United Utilities and the council).
-
First off - an apology. I've been lax in getting this next instalment posted. Several days away over the holiday season led to several days more trying to sort out family issues, which have since spiralled out of all proportion. I think I have now put the genie back in the bottle, so on with the show. Where were we? Ah yes, we'd poured the basement walls. They'd gone a little wonky (because I was a numpty and failed to install adequate bracing on the outside of internal T-walls), but we had walls that we could build up from. Time for backfill and construction of the remaining foundations (our basement is only 60% of the width of the above-ground house). Before that, we needed to fit a drainage channel around the basement walls & slab. Here's the groundworkers putting the (terram-wrapped) french drain in around the slab/wall junction, which was then covered in 10mm pea gravel to a depth of 500mm, and then 40mm clean limestone: This actually led to one of the most enduring memories of the project to date. I was laying the drain outside the far corner of the basement (where the cave-in nearly smashed the wall apart). The groundworkers had decided that they wouldn't get in that part of the excavation (between the concrete walls and the bank) in case of further cave-ins, so myself and a couple of mates sorted out the drainage channel. Unfortunately, it had rained a lot over the weekend, and was muddy and slippy and wet... Standing on the edge of the slab was precarious to say the least, and I'm not the most svelte individual... Long story short, I fell into the mud. Which sounds funny, but at the time, it was rather terrifying, because of the depth of said mud, and how much effort it took to get me out of the mud. Don't believe me? Here's how deep it was: Took 2 people to lift me out of the mud, and I came out without one of my boots as well, which has never been seen since. I had to walk home, because I didn't have a change of clothes, and I had come to site in the Jag. So over an hour, with outside temps being about 3C, trudging home feeling very sorry for myself. At least my mate lent me a pair of boots! One detail I haven't mentioned prior... The basement walls are 10" thick concrete core, but the above-ground walls were designed to be 6.25" concrete core. The mathematically-astute among you will have already worked out that gives 3.75" (or a touch over 95mm in new money). This was intentional, because I figured I was a clever so-and-so, and could use that 95mm as a bearing surface for concrete floor beams. Genius, eh? Well, maybe. It did give us a nice bearing surface, and it did remove a potential cold join between pours at ground level, so big win there. However it then entailed removal of a large amount of EPS from the inside of the blocks so that the beams would slide along on this concrete (because a crane wouldn't get on site very easily, so we used manual labour to move the beams), so the labour aspect was considerable. It took better part of 2 days to remove the EPS (and resulted in about 3 builders bags worth of EPS fragments sitting in our basement), and another 2 days to set the beams in place and start laying the infill blocks. Here are the beams going on: And here are the floor blocks being laid: Here you can see the EPS having been removed en mass from where the beams had to slide. Don't worry - it's not a giant thermal bridge, because we put EPS back around the beams once they were in situ properly (albeit much later in this story) we have now put insulation above the floor beams for the UFH to sit on top of, and we will shortly be putting insulation under the floor beams in the basement ceilings too (cos we have a load left over) (The big hole is where the stairwell is going, in case you're wondering!) We backfilled at the same time as laying the floor beams. More precisely, because of a battle of wills between the engineer and the groundworkers, we backfilled to approx 50% of depth, then laid the beams (with the walls evenly loaded all round by the backfill to "prevent asymmetric destabilisation and collapse") and finally finished the backfill. 440 tonnes of backfill went in around the basement - that's a lot of stone! Next up was the remaining foundations. Building Control had specified a minimum depth for the mass-fill RC footings for the rest of the house, because of the massive lombardy poplar trees at the front of site. A nice big strip was dug out (2.5m deep at the front, and 1.5m deep at the back of the plot - furthest from the trees), and filled with concrete. The engineer had specified cages of 16mm rebar to make our ground beams that linked the mass-fill footings to the basement walls, with clay heave protection, so we dug out from the clay capping over the backfill, formed shutters with the heave protection, and dropped in our cages: Once the concrete had started to cure in earnest, we laid the first course of blocks on the new foundations, and linked into the basement wall blocks. The steel reinforcement is probably overkill, but better safe than sorry when your engineers starts saying "you don't want the two halves of the house to separate"... The blue pipes were my attempt to ventilate under the block & beam floor that we were going to lay over the new foundations. Turns out that Building Control didn't care a jot about that once they saw how much backfill stone we had placed - not sure why that would matter, but there you go! Concrete was poured in this course of blocks to stabilise everything, and get us ready to carry on with the build. Myself and a couple of mates laid the remaining floor beams in a weekend: That'll do for now - as my Mum used to say: "keep 'em wanting more!"


