DanielShepherd
-
Posts
5 -
Joined
-
Last visited
DanielShepherd's Achievements
New Member (2/5)
1
Reputation
-
Egger Protect - Self Levelling Compound etc
DanielShepherd replied to DanielShepherd's topic in General Flooring
In your opinion not worth the hassle and money of trying to deal with the bonding to subfloor issue? Just make sure the castellated panels can stick down to the Egger Protect I guess! -
I'm having underfloor heating fitted from Nu-Heat and as part of the install i'm getting all the rooms prepped in a 60's bungalow with a 2011 extension. Great fun for me the extension is on a decline and goes out by about 14mm. I'm having the lo-pro system from Nu Heat which is 14mm pipes in a castelated panel cover by self levelling compound at 24mm thick and then tiles on top. If I don't sort the decline in the floor out when we pump the self leveller over the pipes we'll end up with 38mm at some points unfortunately. So I bought some Mapei Renovation Screed in and planned originally to do the entire extension (as it's actually out of wack nearly 50mm from the hall way in total, but that's a different story) I decided against this increase of weight (and mass of work) and treat the room separately with just the 12-14mm of so out to cope with. The flooring in there is Egger Protect chipboard - their P5 product laminated on top and bottom with a waterproof membrane (like melamine?) I was using some XPS sheets to make up 10mm as I already had them so free, less weight on the floor, more insulation and less SLC to use. I did worry they'd just crack going over it - but I primed the floor and poured half a bag over the XPS and the floor just as a tester. The next day I was surprised, the centre of the pour was rock solid on the XPS sheets and it was at the minimum depth of about 3mm, also solid on the Egger Protect. No problem I thought. Nu Heat had sent me Primer G as they had no Eco Prim T Plus in stock, but I checked and it said Primer G was only for porous surfaces, i'd already coated the Egger Protect boards with this so I e-mailed technical support at Mapei to see if I could apply Eco Prim T over the top and all my problems started... They told me... "Waterproof chipboard such as Egger Protect are not suitable to receive any type of primer, these types of chipboard need to be over boarded with either exterior grade plywood or a cement based backer board." Ah - damn. The problem here is I don't want to raise this floor level up too much as the underfloor heating pipes need to continue through from the hall way. I also didn't want to ideally spend more money, more time and add more weight to the floor either. At this point my flooring was going to be Egger Protect -> Mapei Renovation Screed -> Nu-Heat Casterlated panels and pipework -> Nu-Heat Lo Pro Quickset SLC (made by Mapei) -> Tile Adhesive -> Anti Fracture Matting -> Tile Adhesive and finally large format porcelain tiles! Of course the last thing I want is the very bottom of this the renovation screed on the bottom to delaminate from the Egger Protect board and cause faliure - having said that, there's so much weight on top, and so many flexible things - flexible renovation screed, flexible panels and pipes, flexible quickset, flexible adhesive, a flexible mat, more flexible adhesive and a flexible grout that i'm not sure i'd see any issue on the top anyway. I tried to come up with all kinds of solutions. Egger say you can tile directly onto Egger Protect and list some tile adhesive they recommend - I asked Mapei about instead of using Plywood or Cement backer board, could I use 1mm-2mm of a cement based tile adhesive and pour the renovation screed onto that. Yes they initially said before changing to "We would not recommend the proposed system suggested as whilst the Ultraplan Renovation screed 3240 is suitable for use over tile adhesive residues, we would not recommend the use of Mapei Ultraplan Renovation screed 3240 over a complete bed of adhesive as the compressive strength of the product could cause excess stress resulting in the tile adhesive being pulled away from the chipboard surface." I'm not sure how 3mm-6mm of SLC would cause the tile adhesive to be pulled away from the chipboard surface when they recommend laying 10mm of porcelain tile? But I suppose with everything else on top too? Has anyone got any other suggestions. I asked if I could use 3.6mm plywood as it's not going to be structural and it's basically just acting as a bonding board. I also thought a layer of plywood might actually just cause more undulations, more movement etc unless perfectly flat - I'd have to screw it into the chipboards and joists I guess - as any laying with tile adhesive will surely cause the same problem as above...having it ripped away due to the compressive strength. They told me that only 5.5mm marine grade plywood would be suitable and that cement based backer board is even thicker. I'm at a bit of a loss. It's either 3.6mm plywood anyway, don't bother at all and let the SLC over the underfloor heating just go thicker in some areas and deal with the slower response time there, the tile adhesive method, or even sand the laminate layer off the top (LOTS of work), prime that and apply the renovation screen to what is essentially just chipboard now. I can't help but think Mapei are being massively over cautious which is understandable as they don't want to say "yes you can do this" unless it's in their carefully constructed technical guide as it would come back to bite them.
-
Egger Protect has swollen...what now?
DanielShepherd replied to mvincentd's topic in General Flooring
How did this work out for you as no self levelling compounds are supposed to apply to the melamine like coating on Egger Protect. -
Posi-joists on suspended ground floor with large air gap
DanielShepherd replied to DanielShepherd's topic in Heat Insulation
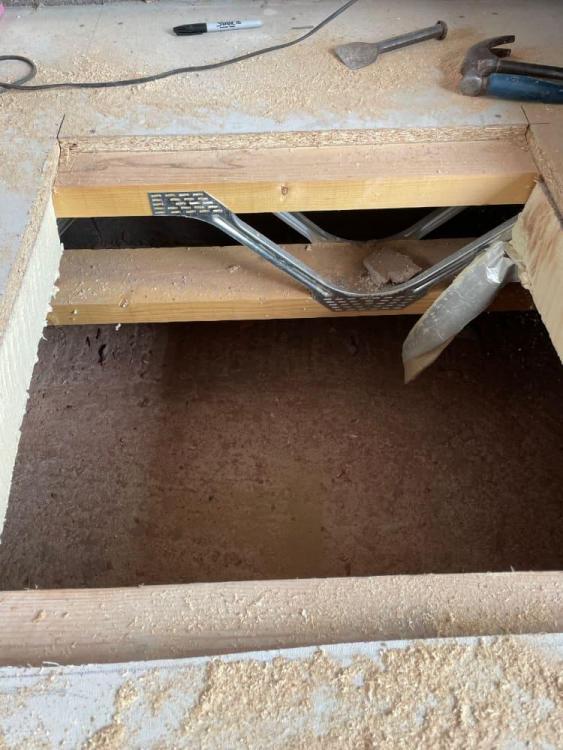
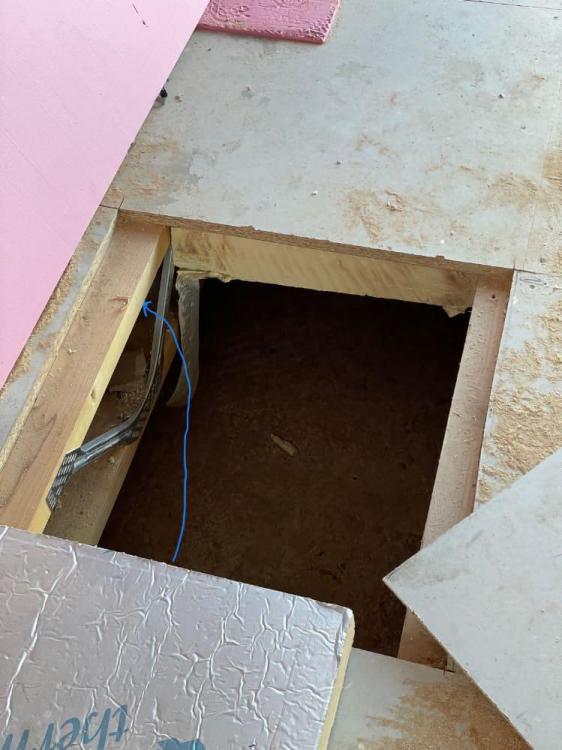
Thanks guys - Posi-joists wouldn't have been my choice for this - although 10 years ago I was nothing to do with the project so. It appears the architecture specified them for some reason. I presume my Dad was sold of the fact they could span the 5 meters easily and would very rigid. But as there's no services to go into them etc it seems more trouble than it's worth. No UFH installed there yet Peter - that's why i'm getting it up in prep. Fortunately there's a good 500m-600m to work underneath so that's no problem, but I am planning on pulling it all up and doing it properly. My only real concern really as I mentioned is if I seal the PIR boards at the bottom - is it ok for the top chord to not have breathable access to the void below? Pushing the PIR board to the bottom would mean the top chord is sealed off from the fresh air flow by the PIR board and the bottom chord. Should I move the PIR up a bit past the bottom chord a little so that in theory the fresh air can make contact with the wool (whatever breathable kind I decide to use to fill the beams with) meaning the top chord could...even though it'd have to travel through 200mm or so of breathable insulation have access to the cold fresh air. Or should I just not worry and seal it all up at the bottom with the knowledge the top chord is insulated with 200mm of insulation anyway? -
Hi, I have an extension built on my home which my Dad, who has since passed away, built in 2011. The extension has always been very very cold compared to the rest of the house. The rest of the house is built on solid floor. We had tight site access so my Dad decided to do a suspended floor rather than a solid thinking it would be easier to get materials on site. I always suspected the floor was the problem as the air gap underneath is about 600mm deep due to the ground level that connects it to the rest of the house. But also upon opening the floor I found it was built on posi-joists. The architects drawings I found stated that it needed to have 100mm of PIR board between each joist, which they did install - but at the top of the joists. As the joists are about 200mm deep this mean it left the bottom 100mm open and allowed the cold air to directly reach the top chord, which is 47mm thick. Effectively this would be like having your outside wall made of 47mm thick wood and then just having plasterboard directly on top. No wonder it was cold! So now I need to figure out a 'safe' way to insulate the joists. What I wanted to do is push the PIR board to the bottom so it was level with the bottom chord - possibly use gapotape too (though that might be unnecessary in this idea) effectively creating an air tight seal at the bottom. Then I was going to put sheep's wool insulation inbetween the metal fixings of each joist - making them full. Finally a sheet of SuperQuilt on top to act as a vapour barrier, an air tight seal for the room and foil to reflect the underfloor heating back - it would also have an air gap between the top of the PIR board and the bottom of the quilt and from the top of the quilt and the chip board subfloor. My biggest question is that in doing this the top chord of the posi-joist would effectively be sealed off from the fresh air void below by the PIR boards. Could that cause any issues with damp/rot? Or does it just mean the top chord is now part of the warm room? (though sealed off from the main room by the vapour barrier) If so I don't see any real way to fully insulate away the issues but also keep the top chord access to the fresh air. I think the only way I can think would be to move the PIR board up so there's a gap just above the bottom chord, but keep it full of sheep's wool so that it's got nearly 200mm of insulation before meeting the top chord - it at least will be in theory then "breathable". The top and bottom chords on the joists are 122mm wide and 47mm thick on 600mm centres. I suspect there will be a school of thought in the best way to go about this. I could find little to nothing regarding insulating posi-joists online with such a large cold air gap below. The architects specified Wolf easi-joist WS200 - I asked them this exactly insulation/breathability question and included the photo. That appeared to be a mistake as apparently whilst identical, these are not official Wolf easi-joists, so he wouldn't answer the question, even on an "in theory with this type of top/bottom chord split". Look forward to hearing thoughts.