Andrewb
-
Posts
23 -
Joined
-
Last visited
Andrewb's Achievements
Member (3/5)
2
Reputation
-
This looks great! I'm also considering recycling polystyrene waste to make beads- some ideas here: https://youtu.be/_DBo9l9YuB0?si=7oH9KW-8xg5DZdOE
-
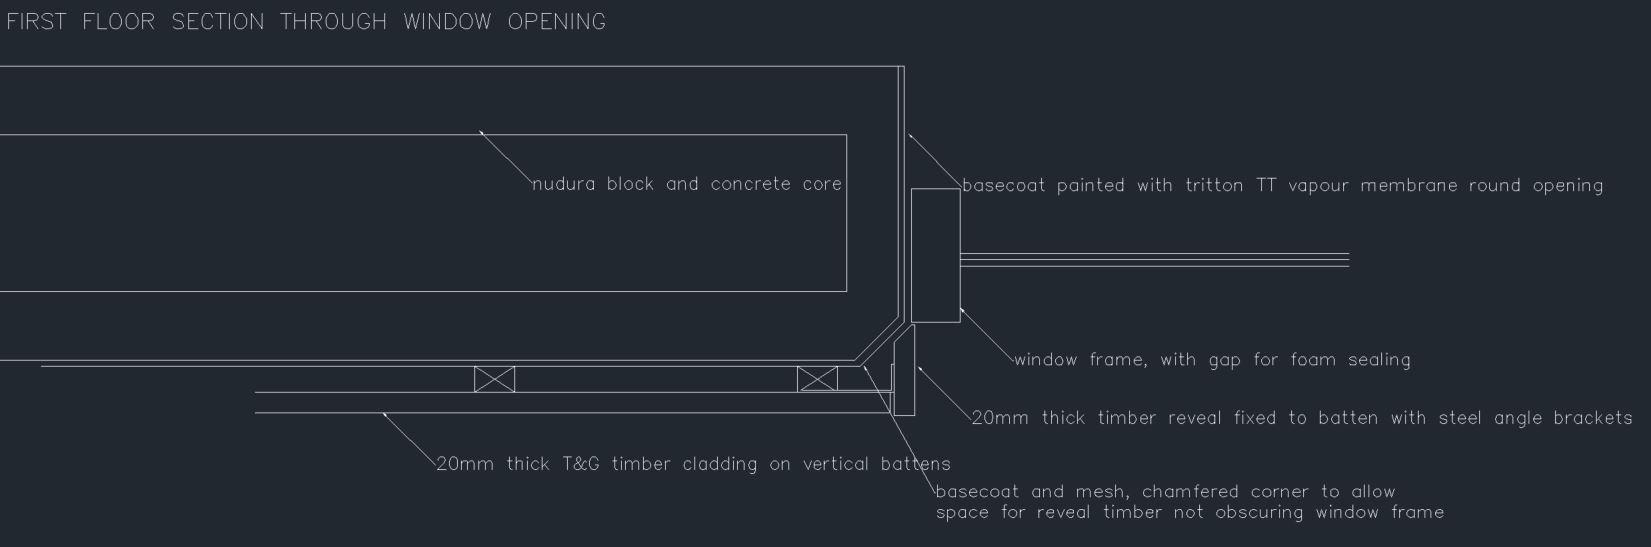
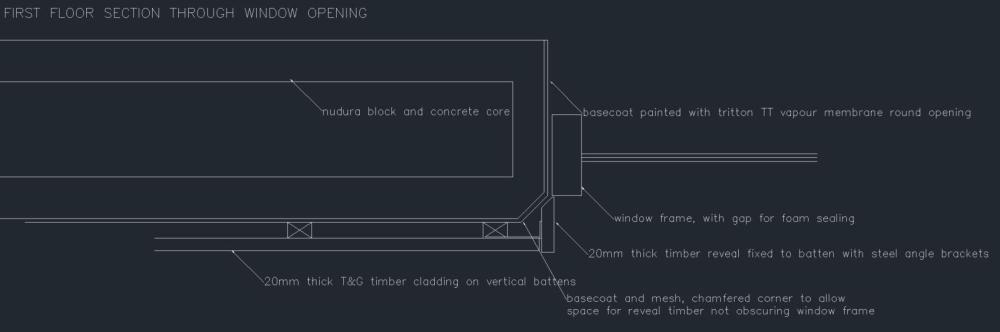
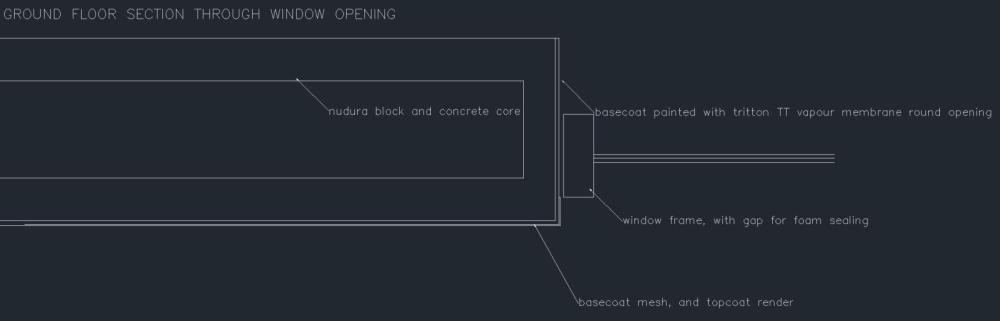
Nudura window reveals with timber cladding
Andrewb replied to Andrewb's topic in Insulated Concrete Formwork (ICF)
Thanks very much for these ideas. Having a common detail and the window bead for rendering both look good. I'm in Gloucestershire near the Severn, a little bit exposed, but not massively. The width of the fixed bit of my Norrsken window frames will only be 29mm, so I don't have a lot of space for an eps check reveal plus bead and I'd end up obscuring it completely, whereas I'd quite like to see a little bit of the frame ( though i do note the thermal points). I'm thinking of skipping the eps, but using the bead to render up to the window and as above skipping having timber in the reveal. However I've seen other threads suggesting rendering all the way through behind the window frame to aid sealing the window. I could still do this - first base coat, then fit window, then fit bead and second base coat and then final render? -
Nudura window reveals with timber cladding
Andrewb replied to Andrewb's topic in Insulated Concrete Formwork (ICF)
Thanks Jamie, re. the point on only 10mm. It is true that it is not a lot and I could reduce the thickness of the timber to help further. However, I was also concerned that the timber hard up against render might get damp. Being a novice, I'm not sure what is normal, is that a legitimate concern? I was going to screw the brackets to the reveal timber from the back first and then fix to the batten (wouldn't be able to take it off again easily, but not a big issue I would have thought). That's a good point, I'll keep that in mind if I go down this route. Thanks -
Good evening, I'm currently working towards getting a survey done by my window company, so trying to get the openings into their finished state and apply a render basecoat. I've been looking at the reveal details and have done some sketches, so it would be great if I could get any feedback on them. The exterior finish is render on the ground floor and timber cladding on the first floor. There are a few windows which are vertically aligned on both floors. The openings in the nudura walls are identical width on both floors, but I'm keen that the cladding upstairs does not obscure the window frames so that everything lines up. Chamfering the EPS seems to be an option to me, but I wondered if others had any thoughts? Any comments on any other aspect also welcome!
-
How much rebar in a Nudura building?
Andrewb replied to Andrewb's topic in Insulated Concrete Formwork (ICF)
Thanks, it's useful to hear from a variety of different projects. Engineer and Nudura have spoken to each other and both are happy with the no rebar design. -
How much rebar in a Nudura building?
Andrewb replied to Andrewb's topic in Insulated Concrete Formwork (ICF)
Thanks for this feedback, quite a lot of variation! Thanks for this point - I'll have a think through this, just to check, but I don't expect the design to be too difficult to implement from that perspective. I have the supplier and SE lined up to talk, so any of my concerns should hopefully be settled after that. I've got some steel prices coming in now and the rebar for my 7 lintels and beams is coming in at just £300. My quick calc is that rebar throughout would be very roughly an additional 2-3x that. Not the biggest cost in the scheme of things, but will avoid if the consensus is that it is pointless! -
Good evening, I understand that all scenarios will be different, but I wondered what people's different experiences with rebar quantities were for builds with Nudura. I will have the standard 6 inch core blocks and am building a two storey 7.5m x 5m extension on strip foundations. My structural design currently only has rebar in the lintels etc. My engineer is experienced with ICF, and I know the Nudura guidance is that reinforcement design is by the structural designer, but my expectation after the nudura training day was that all walls would have horizontals at each course and verticals at regular spacings too. Hence my question to the forum? Any information on people's experiences would be much appreciated. thanks
-
good call, added to the drawing!
-
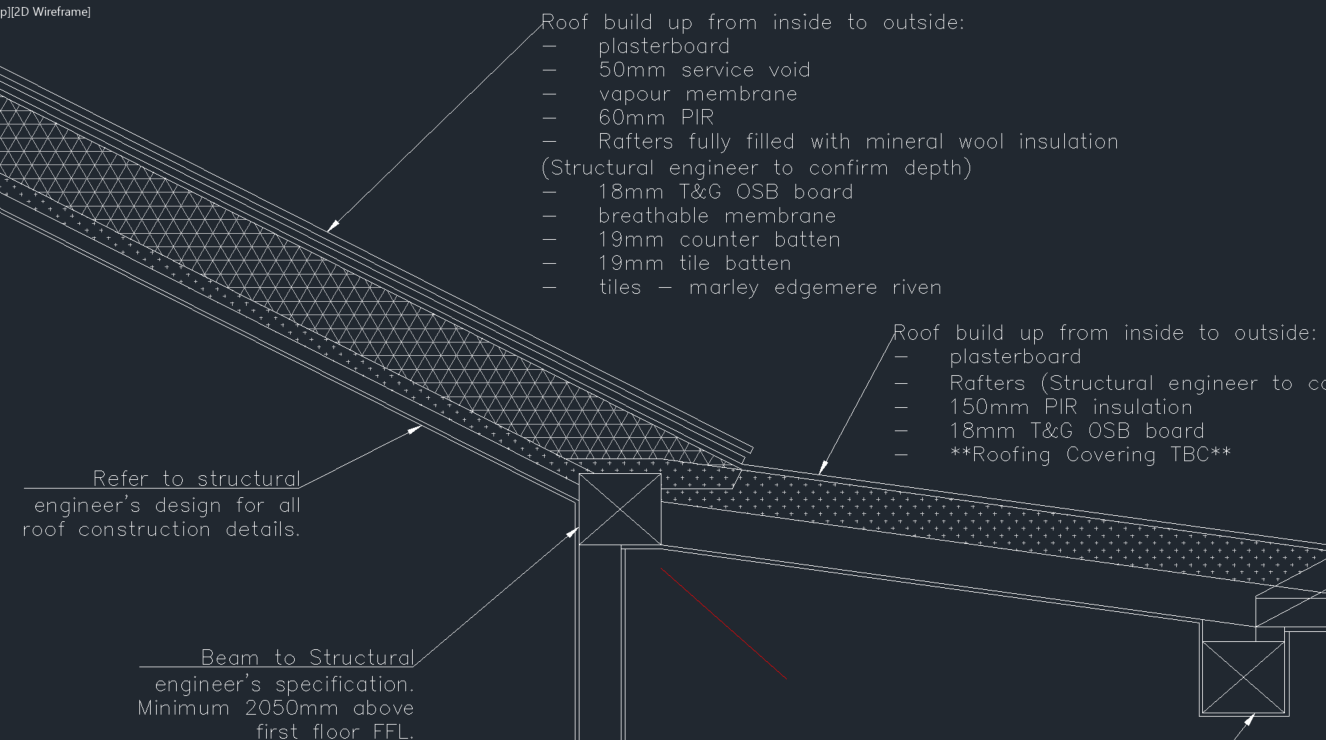
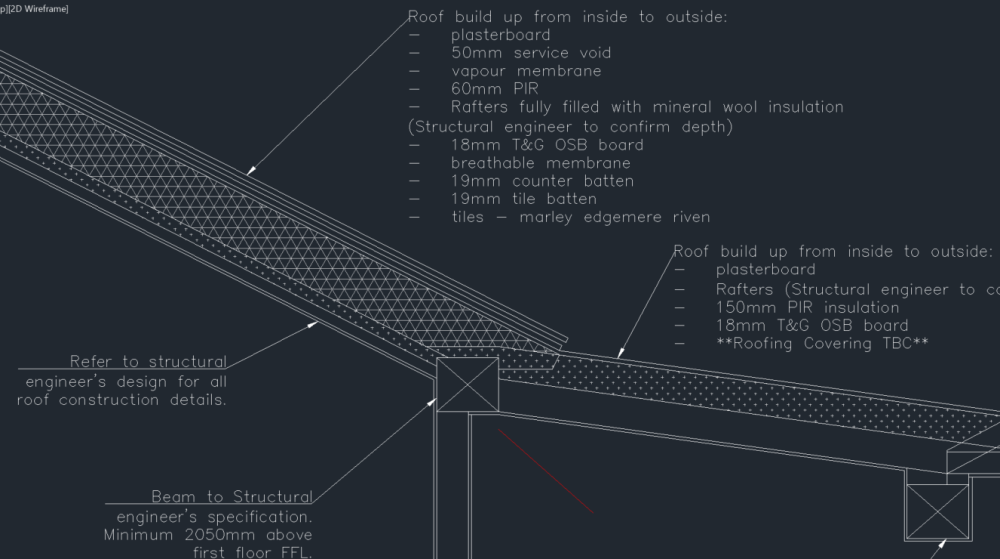
Thanks for this, some useful things to think about there. The VCL over the beam will probably be easier and I could continue it along the wall that the beam will be built into. I'll actually have almost the same as you on the right hand side of the drawing where I join the existing pitched roof, so your detail is very good to see, thanks
-
Good evening, I've got a slightly tricky detail at the junction from a flat roof to a pitched roof, where I have a couple of height constraints. The floor level under the flat roof will step up to the floor level under the pitched roof, so I need to maintain head height on the couple of steps up. I also am trying to not make either roof any higher than they are. My detail laps the warm flat roof PIR insulation over the beam / wall (depending where you are) and the mineral wool between the pitched roof rafters overlaps this. In both the roof areas I am wanting to make the condensation risk low and avoid cold bridges between the 2 roof types. Any feedback or suggestions on my design as it stands would be much appreciated!
-
ICF below ground finish / protection
Andrewb replied to Andrewb's topic in Insulated Concrete Formwork (ICF)
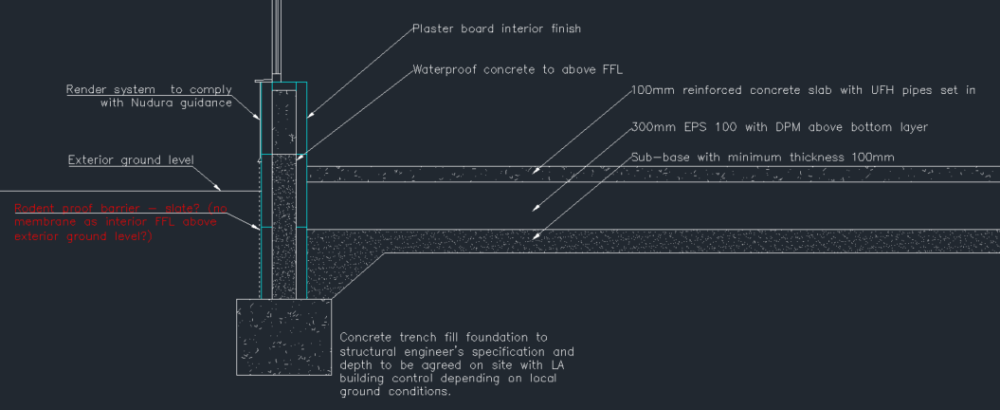
Thanks those are some good ideas to consider. I'm going to use mesh at various new-old house boundaries as a barrier while I've not updated other parts of the house. "Whats stopping them coming up under the type 1 / sub-base?" Good question, hopefully a bit far to burrow? I'm new to this sort of thing, but not seen any details indicating that it's a common concern? -
ICF below ground finish / protection
Andrewb replied to Andrewb's topic in Insulated Concrete Formwork (ICF)
There are rats around (we're next to a farm) they got in the loft last winter, which was pretty unpleasant and had clearly been there with the previous owner. Luckily they've not been too destructive! Would slates be cost effective? -
Good evening, I'm drawing up my design for an extension using Nudura and am wondering what to use as protection from rodents below ground / visible finish below the bottom of the render - as per the red text on the detail below. What have others done in this situation? Any advice would be much appreciated. Also, if you spot anything else that could be improved please let me know!
-
Temporary kitchen and bathroom in garage during build
Andrewb replied to Andrewb's topic in Building Regulations
Thanks Bozza, After a bit more thought and perhaps through the process of writing the question, we're swaying towards the caravan kitchen option after all! Should save me a lot of time and effort! -
Temporary kitchen and bathroom in garage during build
Andrewb posted a topic in Building Regulations
Good evening, The extension we are planning to build will involve demolishing the existing kitchen and bathroom, so I'm considering our options during the build. My preferred option is to fit out the garage with a kitchen and bathroom, rather than a caravan or similar. We have two small children, so going to and fro to a caravan wouldn't work well at all. I'm expecting the build to be relatively slow, with DIY elements, so we won't want to move out during the work. It would also serve as a utility room for a while after the extension, until we get round to doing the extension planned for that area of the house. I would plan to insulate the floor with 150mm PIR to make it level with the house, infill the garage door with an insulated stud wall with window, plasterboard and loftroll the ceiling (pitched roof) and do a simple fit out with kitchen and partitioned room for a shower. Drainage needs to be dug to this location for the future anyway, so will put that in. I thought I would post, to get opinions on this as a general plan - perhaps there are options I've not thought of? And also to ask if there were any particular issues I should be aware of for building regs. Are there any particular regs for temporary accommodation? One part I'm a bit unsure of is infilling the garage door. There's not really any foundation across the garage door, just 200mm of concrete, could that be acceptable for a lightweight construction infilling the gap? Any advice much appreciated!