


Omnibuswoman
-
Posts
489 -
Joined
-
Last visited
-
Days Won
8
Everything posted by Omnibuswoman
-

A question for the tile aficionado's
Omnibuswoman replied to crispy_wafer's topic in Floor Tiles & Tiling
We found a lovely Italian wood effect tile (by Rondine) at CTD a few months ago and negotiated down to £34m2, but didn’t order straight away as it was a bit early. Now CTD have gone into administration and we are kicking ourselves! -
A question for the tile aficionado's
Omnibuswoman replied to crispy_wafer's topic in Floor Tiles & Tiling
We are currently looking at wood effect tiles in Topps. The shelf price for the top-end Elevo is something insane like £64 per m2. Which one did you go with, and how did you get such a good discount? -
The value of this thread is a legacy for future buildhubbers. I relied on previous such threads, and as a result we now have heating mats going under the bathroom tiles for nice cosy toes in the mornings, which was not in our original plan.
-
I would have checked the window cil heights and window sizes more carefully. There are several where I can’t easily reach the handle to open them as they are set too high in the wall. I would also have spent more time on site making sure the workers felt accountable. Looking back, they took the piss quite a bit (late starts and early finishes most days), and as neither I nor the building company owner/site manager were on site much this behaviour continued for too long. I’m now resentful of all of the things they didn’t do which there was plenty of time for them to have done, that I’m having to do myself.
-
Issues with I-joist fitting
Omnibuswoman replied to Omnibuswoman's topic in General Structural Issues
Brief update: The builder has returned from holiday and replied to our email. He said that he is prepared to address the issues without arguing the toss (although he did then go on to point out why he thinks it’s all a big fuss over nothing…) He has said that he won’t replace the little OSB packers that sit under the joists on top of the ground floor wall as he believes the compressive strength is sufficient for them not to compress over time (he quoted a measure of 15.4N/mm2 compressive strength on horizontal use). I don’t have a problem with that. Whilst we didn’t much appreciate the tone of his response, which was rather tetchy and a bit defensive, we are expecting him to now put things right. Watch this space! -
Issues with I-joist fitting
Omnibuswoman replied to Omnibuswoman's topic in General Structural Issues
It’s not OSB on the floor - it’s actually muddy concrete! I think it’s a artefact of the photo that makes it look a lot like OSB. -
Issues with I-joist fitting
Omnibuswoman replied to Omnibuswoman's topic in General Structural Issues
I did wonder that myself@SteamyTea But I imagined not as it’s a question of negligence which he is unlikely to have been indemnified for. -
Issues with I-joist fitting
Omnibuswoman replied to Omnibuswoman's topic in General Structural Issues
yes, it looks as though this is the relevant part…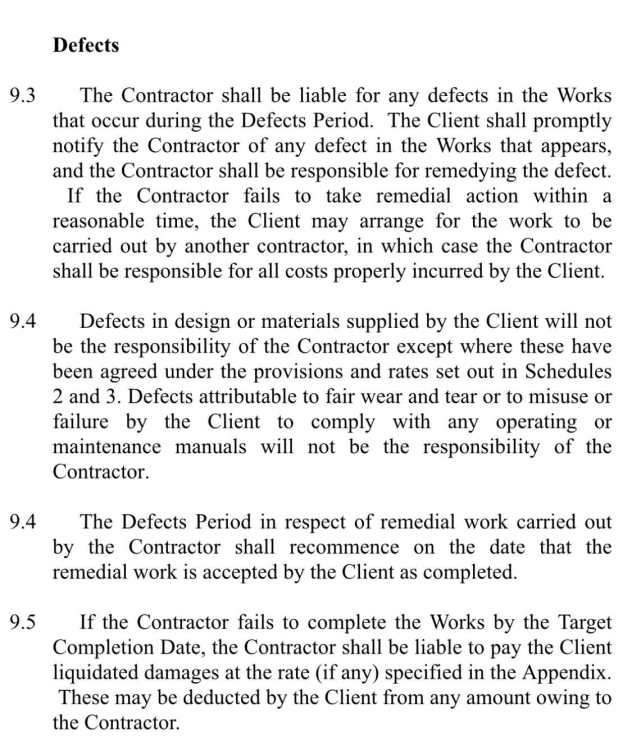
-
Issues with I-joist fitting
Omnibuswoman replied to Omnibuswoman's topic in General Structural Issues
We did, and I may need to fall back on that if he starts developing sloping shoulders… -
Issues with I-joist fitting
Omnibuswoman replied to Omnibuswoman's topic in General Structural Issues
No I’m not qualified in any way, and am having to learn enough about each element as we go along. I have engaged a plumber, electrician and plasterer for these skilled tasks, but HWMBO and I will be doing battens, plasterboard, second fix carpentry, flooring etc. It’s a steep learning curve, and wouldn’t be possible without the enormous amount of fantastic information here on BH, and on t’internet more widely. I’m managing the work at a pace that allows me to learn enough at each point to take it forward with sufficient confidence, but of course there’s no substitute for experience. What I lack is the knowledge about where to plan 10 steps ahead. Luckily I have some people I can ask for help with that thinking. I guess I’m doing what most builders do at the start - make the mistakes as I go and learning from them. What I’m not doing, which I think is less common, is hiding or covering up my mistakes behind a facade or some expanding foam. I try to put things right as I go along. By the time I’ve finished the house, I should just about know enough to build one 😂 -
Issues with I-joist fitting
Omnibuswoman replied to Omnibuswoman's topic in General Structural Issues
yes, this is the most concerning part as, on a quick review of their new website I was surprised to read that he is a qualified engineer. It didn’t specify what kind of engineer though, or qualified to what level. I will continue to insist that a fully qualified structural engineer is the arbiter of what is needed, and how it must be done. -
Issues with I-joist fitting
Omnibuswoman replied to Omnibuswoman's topic in General Structural Issues
No, we ended our contract once the house was weathertight - we are doing the internal works and managing subcontractors for the skilled first /second fix work. Dan, the owner of the building company, was the project manager for the build, and was, or at least should have been, supervising his team. The architect didn’t take any role in supervising the build. My husband and I did the air tightness taping ourselves, and the house passed its first air tightness test with flying colours. 0.28ACH @50pa!! 🎉 Thank you! Yes, I’m relieved that this isn’t all hidden behind plasterboard and plaster that needs to come out!! I’m optimistic that these issues can all be remediated, and hopefully without too much argy-bargy ☺️ -
Issues with I-joist fitting
Omnibuswoman replied to Omnibuswoman's topic in General Structural Issues
I engaged the builder, largely as he had undertaken the passive house design course taught by Peter Warm’s team, but also because he seemed to have good attention to the detail necessary for building to passivhaus standard, and was relatively local to us in Devon… -
Issues with I-joist fitting
Omnibuswoman replied to Omnibuswoman's topic in General Structural Issues
I agree! I certainly have no plans to fund any remediation to correct errors his team made when they built it. -
Issues with I-joist fitting
Omnibuswoman replied to Omnibuswoman's topic in General Structural Issues
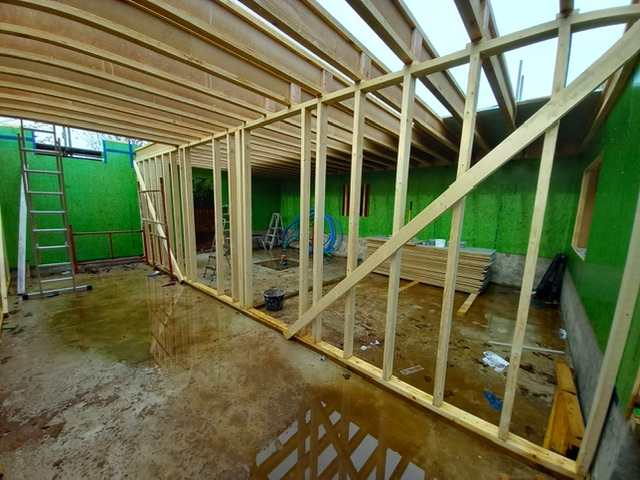
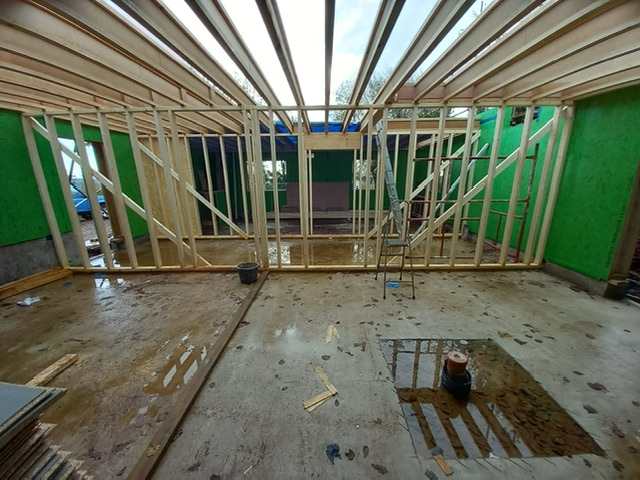
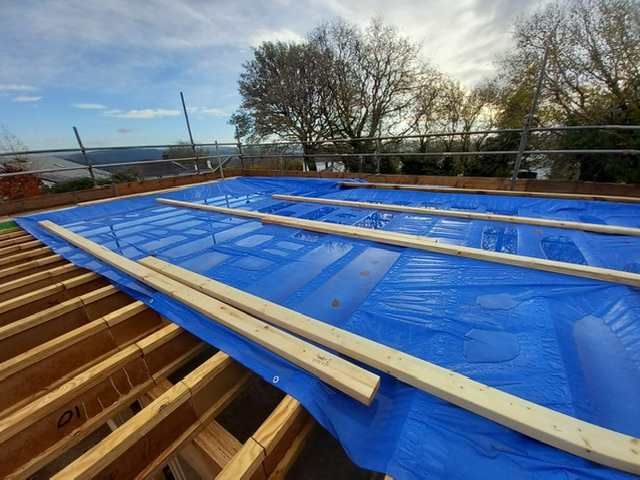
Ps These photos are from Nov 2022 when the structure was going up. The house is now at first fix with all floors complete, roof and windows in place, and eggerboard flooring glued and nailed to the top of the joists, so remediation of some of these issues going to be challenging. -
Issues with I-joist fitting
Omnibuswoman replied to Omnibuswoman's topic in General Structural Issues
There are about 14 of those joists that have been cut. In the photo below you can see the ones that go across the whole length of the house - those are the ones that were cut. You can also see in these pictures the make up of the ground floor supporting walls with only one top plate, and then the joists resting on scraps of OSB because the walls were built short. The sole plates are sat on the load bearing confrere slab. I agree that these don’t look like load bearing walls, but I can’t find any mention in the structural engineering drawings or building regs plans about having a double top plate. i will send the email I’ve written to the builder, and will request a site visit with him and the architect. We may well bring along an independent SE at that point. Sadly we have no financial hold on the builder as we settled the withheld final payment several months ago after the snagging list was complete. These issues have only come to light in the last couple of weeks.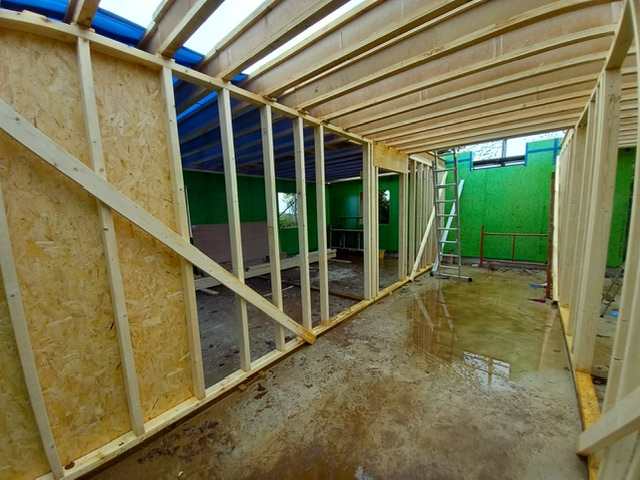
-
Issues with I-joist fitting
Omnibuswoman replied to Omnibuswoman's topic in General Structural Issues
This is our biggest concern - what can we not see that might have been botched… we’ve pored over the photos we took as the build progressed, just to check that the images match the plans. It has severely knocked our confidence in the builder’s skill and attention to detail (which was the key factor in choosing him!), and his general *sucks teeth* “maaah, should be alright” manner when things are pointed out is even more worrying and annoying. I’m sure many of you will have now read the Grenfell report which is a very good illustration of how badly things can go wrong, in ways people cannot imagine, when there is a lack of attention to getting things right. I am sure that the temptation is to think “it couldn’t happen” when something like joist failure is mentioned, but it could happen, if the right set of failures occur. This is why we pay structural engineers to design things!! -
Issues with I-joist fitting
Omnibuswoman replied to Omnibuswoman's topic in General Structural Issues
@ProDave ours were meant to be continuous, but somewhere along the way someone decided to cut them and then stick them back together…!! The solution to the twisting issue is what you have - I-joist pieces or solid LVL plates between each joist. That’s the design detail that should have been built in from the start. -
Issues with I-joist fitting
Omnibuswoman replied to Omnibuswoman's topic in General Structural Issues
Most definitely!! -
Issues with I-joist fitting
Omnibuswoman replied to Omnibuswoman's topic in General Structural Issues
Thanks Steamy. This is just what the technical manager explained yesterday - about the risk of failure by the joists not bearing the forces in the correct plane, and because of the supporting walls not sitting directly atop each other. The joists simply won’t function as they should and this could cause catastrophic joist failure. I’ve drafted and polished the email to the builder. Will see what he has to say in response…. -
Issues with I-joist fitting
Omnibuswoman replied to Omnibuswoman's topic in General Structural Issues
-
Issues with I-joist fitting
Omnibuswoman replied to Omnibuswoman's topic in General Structural Issues
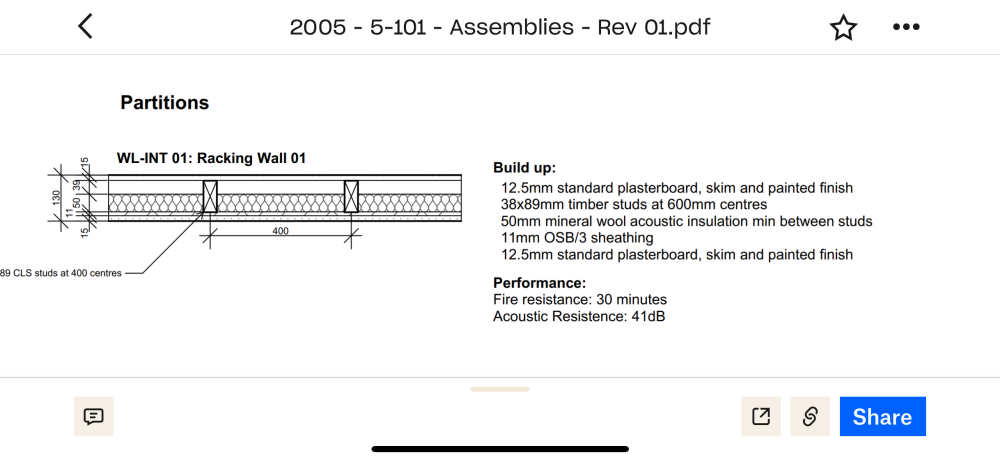
I’ve checked the structural engineer’s drawings and the building control drawings, and while both show a cross section of the wall build-up neither shows the top or sole plate. So I can’t say if they should have a double top plate or not. What I can say is that my workshop, which I built, has a double top plate at one side, and a quadruple one at the other side. My (former builder) uncle reckoned I could have built a second storey on top if I wanted to 😂 -
Issues with I-joist fitting
Omnibuswoman replied to Omnibuswoman's topic in General Structural Issues
Well, the design is to have a continuous joist run the whole length of the house, and not be cut in two and stuck back together… but stiffening plates or joints should be fixed from each side equally, in a staggered formation - top right and bottom left from one side, and the same in reverse from the other. They haven’t done that, but the I-joist technician felt that was the least of our concerns 🤦♀️ He said I-joists are not meant to be cut and “scabbed” together, but it’s would be ok if there was a blocking plate in place between the joists (perpendicular to the direction they run) holding the joists straight. -
Issues with I-joist fitting
Omnibuswoman replied to Omnibuswoman's topic in General Structural Issues
I haven’t approached BC as yet, but will do so if the builder kicks up a stink about rectifying the issues. -
Issues with I-joist fitting
Omnibuswoman replied to Omnibuswoman's topic in General Structural Issues
Thanks Joe. We are anticipating a degree of resistance from the builder, and he has already popped round to have a look at some of the concerns (he’s not aware of all of them yet). He mostly wandered around explaining how these things “should be alright” (I.e. he doesn’t need to remediate them), while HWMBO wandered after him pointing out that we would let the I-joist engineer be the judge of that! The builder seems to be a decent chap, but this is shoddy stuff - not following the plans correctly and not appreciating the significance of getting the structural elements right in order for them to work properly. Best case scenario is a bit of a creaky floor, but worst case is joist failure. I’m sure most builders would tell themselves that it couldn’t happen, and most likely it wouldn’t, but the risk isn’t zero, and I’m not willing to accept living with the uncertainty just because it’s a ball ache to put things right. I’ll draft a polite but firm email and see what comes back…


