Student
-
Posts
47 -
Joined
-
Last visited
Everything posted by Student
-
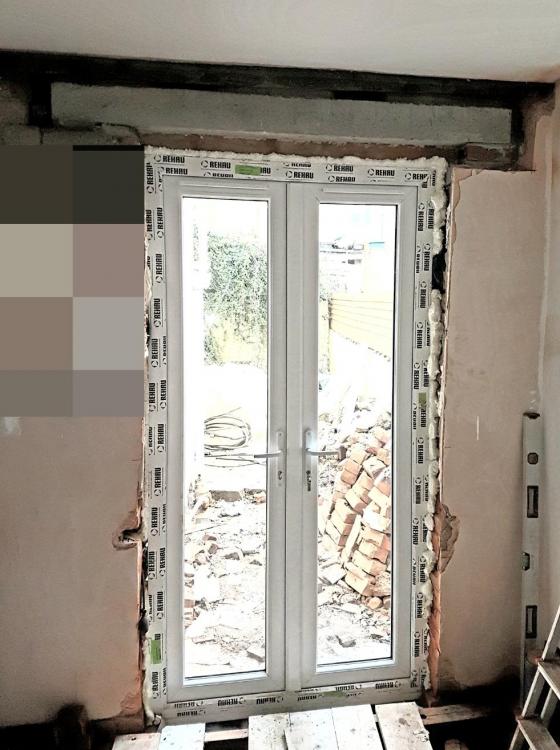
Did this. Used two strongboys and put a concrete lintel underneath the original that I couldn't remove and dry packed it in place. Used a 9 inch grinder and a sledge hammer to open it up. Took a whole day to get them in and need my mate up toe and heel the glass but not too bad a job. Nerve racking at the time though.
-
Reducing size of existing extension
Student replied to Student's topic in House Extensions & Conservatories
My only reason for potentially wanting to knock it down completely is because it's a cold 'room', very thin walls, not insulted. I know I can add those things but almost seems like more sense to start from scratch. I've owned the property 3 years, I'd envision the extension was built well over 20 years ago and when the house was bought, there wasn't a sniff of planning permission for anything that had been done, including knocking through of a supporting wall but the house was cheap and in a good location, so what can you do? Indemnity insurance! In theory, if I were to run a circular saw up the walls and knock down the unwanted sections, anything I should be aware of when tying a new timber framed wall into it? I don't see the point of using blockwork, it's not supporting any weight at all really. corrugated sheet roof and that's it. Won't be putting anything heavy on the walls. -
Reducing size of existing extension
Student replied to Student's topic in House Extensions & Conservatories
Thanks Dave. It runs parallel to a brick garden wall and there's a small gap, maybe an inch or two. My worry is that any new wall placed there would have access issues to the base of the wall. As I say, could potentially secure new wall to the brick garden wall but not sure who it belongs to and if it's of decent construction. Could risk it, but also concerned that damp may be brought through it or would damp proofing measures negate that risk? I hear what you're saying, many have suggested leaving it but halving its size doubles the garden space at the end of it, taking it from somewhere you could store a few bins to somewhere you could put a table a chairs and a bbq, You know how important a bbq is! It's also the only part of the garden that gets decent sun. -
Reducing size of existing extension
Student replied to Student's topic in House Extensions & Conservatories
Any thoughts on this? More info req? cheers -
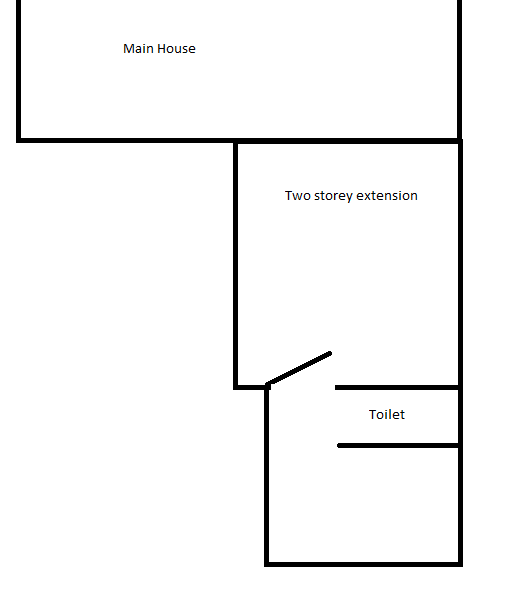
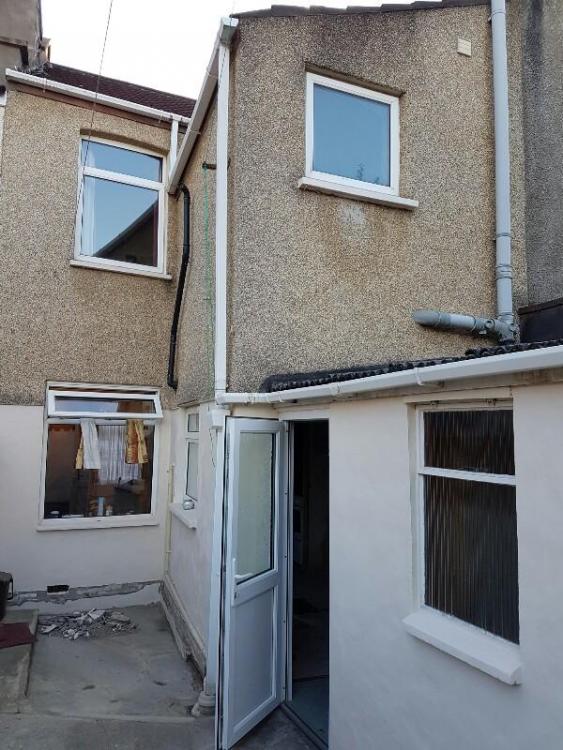
Hey I've got a single storey extension attached to the back of a double storey extension (see image) that I'd like to reduce in Length. It's tacked onto the end of the kitchen and taking up valuable space in a very small courtyard garden. It's an odd construction. The previous owners extended what was an outdoor toilet with concrete blocks (on their side, single skin) but left the exterior wall of the toilet in place and knocked a doorway through from the double extension. I'm looking to reduce it's size by 50% and may or may not keep the toilet in there, we just want the space for a washing machine and a tall freezer and a tiny bit of storage. Should I just completely knock it down at start again? My original, quick and cheap plan was to run a cut off saw along the existing walls, knock down what I don't need and then build a stud wall, insulate and clad. Anyone foresee any issues with this? I'm open to carrying out a better solution in the future but time is of the essence at the moment. The only thing stopping me from knocking it down completely is disposing of the blockwork will be a pain and I don't have access to the party wall side of the extension as there's a brick wall along the boundary of unknown quality. I guess if it was a decent brick wall I could just fix a stud wall straight to it? Appreciate any insight
-
I'm inclined to agree with you there but fear I'll probably be overruled with looks over function on this one unfortunately!
-
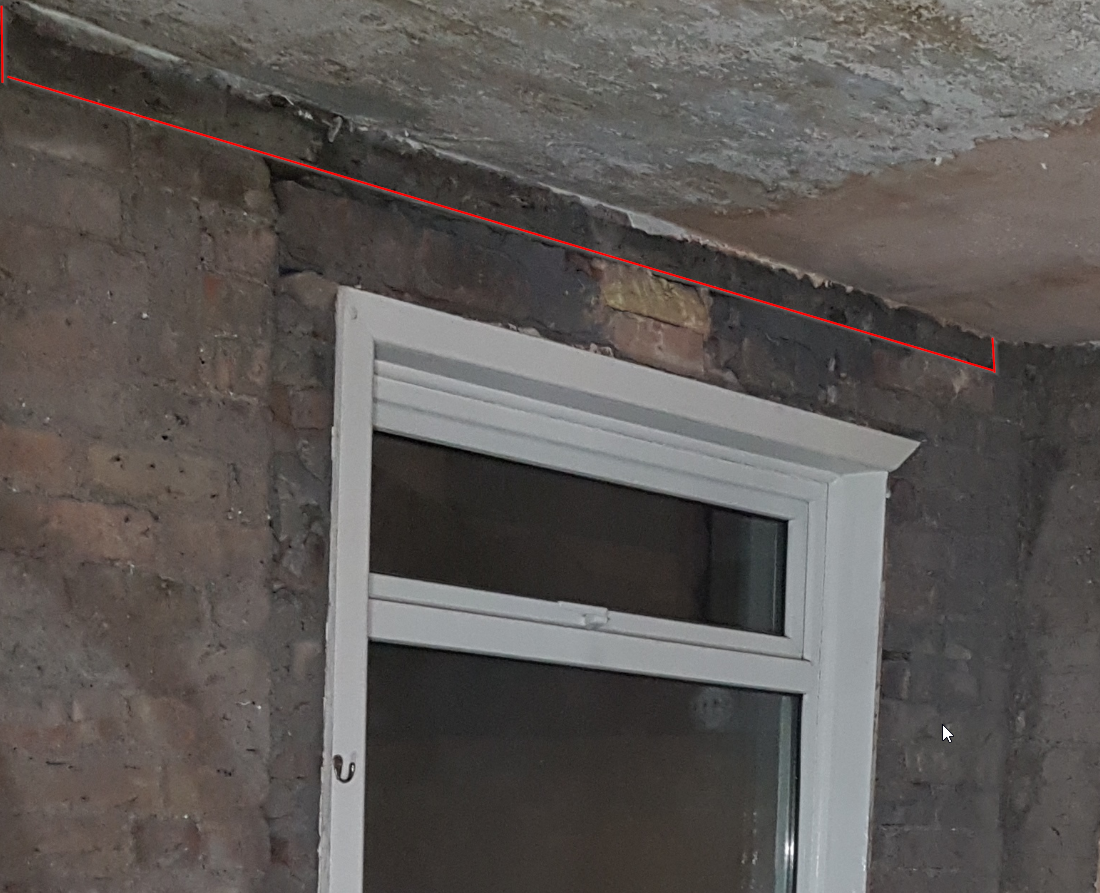
Thanks, I'm going to take out the bricks above the window on the inside and see what the current setup is because on the last lintel I did at this house, the external lintel was resting on the internal one, so I couldn't do the internal one without supporting the external one too and I ended up just replacing both as I had to disturb the outside one. I'd like to just do the internal one for now but I'm not ruling out doing the outside one in the near future, it's just that the internal one is stopping us installing the doors and therefore stopping us from decorating that room. I'd prefer to bed the concrete lintel on mortar (as per the manufacturers instructions) and then dry pack (3:1 mix) above the lintel instead of slate, I preferred this to slate as the load is more evenly distributed. I got good results with pinning with dry packing and then filling the strongboy gaps with mortar after. See any issues with repeating this approach? Also, any comments regarding supporting base for the props?
-
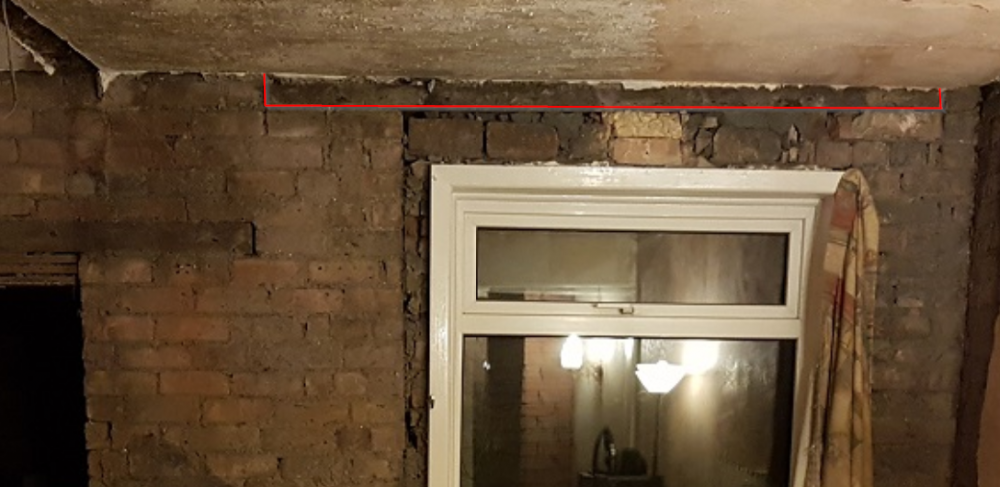
Getting back to this over the next few weeks. I've got a well over-specced lintel ready to put in. Plan on whacking 3 or 4 strongboys in the gap under the existing timber lintel (I've added a few new photos with the lintel in red). Looking at strongboys, they can take 360kg each. Am I correct in thinking that when you're supporting the opening during a lintel replacement, you're not actually supporting the full load? Otherwise I'm going to need like 5 strongboys in that gap to match my lintel strength (17kn/m). Lastly, I've only got a suspended timber floor as a base for the props. and the joists are running parallel to the window wall and the joists aren't particularly beefy. I could really do without having to lift all of the floorboards to get access to the (frankly, quite soft concrete oversite) floor below the timber floor to put a sole board down but is this the best thing to do? the existing joists are only 3x2 and spanning quite large distances. Nothing is easy in this bloody house! Appreciate any tips!

-
Sorry, I spoke a bit soon on this. It lifted the first brick I did but that particular brick was a bit sparse on mortar but the others were fine (solid engineering bricks). Wall plate seems solid, have chiselled sections that were slightly high. Think this thread is all wrapped-up. Thanks to anyone that helped.
-
As I suspected, by attaching the wall plate to the bricks, the bricks are lifting with the wall plate! Argh!
-
Bit of an update, I think it's the wood deflecting causing the creaking and it's only because it's not fixed in place, I think it will be OK once I nail them to the hangers and wall plate on the sleeper wall and it's all solid. New issue *sigh*. Some of the nuts on the left (as you look at the image) ledger plate have come loose. It's definitely not the fixing coming out as they re-torque up fine. I think I made a mistake, there were some gaps behind the board and I filled it with low expansion foam, thinking it would both fill the gap and give a little insulation. I think in reality, it's a little bit too flexible and allowing the nuts to loosen during deflection. What are my options here? I could try and inject behind with something hard setting? Or can I use loctite or similar on the nuts to stop them loosening? God this floor hasn't succumbed easily!
-
I've got a high spot on my sleeper wall plate where one of the joists will sit on it. What's best to take this out with - a planer? I don't think I own a tool that will do it, so will have to buy something regardless. Something cheap and/or something that can be used a lot for the carpentry that is left on the house (lots of doors/frames and repairs to the stairs to be done). Appreciate any help!
-
Curiously it's a few of the hangers on the side that are in full contact that are squeaking!
-
Thanks Peter. I've got timber to provisionally add noggins at mid-span (ish) but it's a very short span at 2.2m and I plan to seal the EPS insulation with expanding foam as advised on here, so I'm wondering if the noggins will be much use? Joist centres are really close at 350mm and there's a sleeper wall supporting at mid-span. I've pretty much taken every action possible to make sure it's solid and it'll be heartbreaking to have it squeak in places when it's stood on!
-
Hi Guys I've gone ahead and built this floor. I've got the joists resting in the hangers (not nailed yet) and when weighting some of the joists, they creak at one of the hangers. I can't quite pinpoint which part of the hanger is creaking but will this likely stop when the joist is nailed in place? I'll be fitting the joists permanently, fitting insulation and floor covering Saturday so want to get to the bottom of this noise before the hangers are no longer accessible. Thanks!
-
Thanks Russell, I'll do that.
-
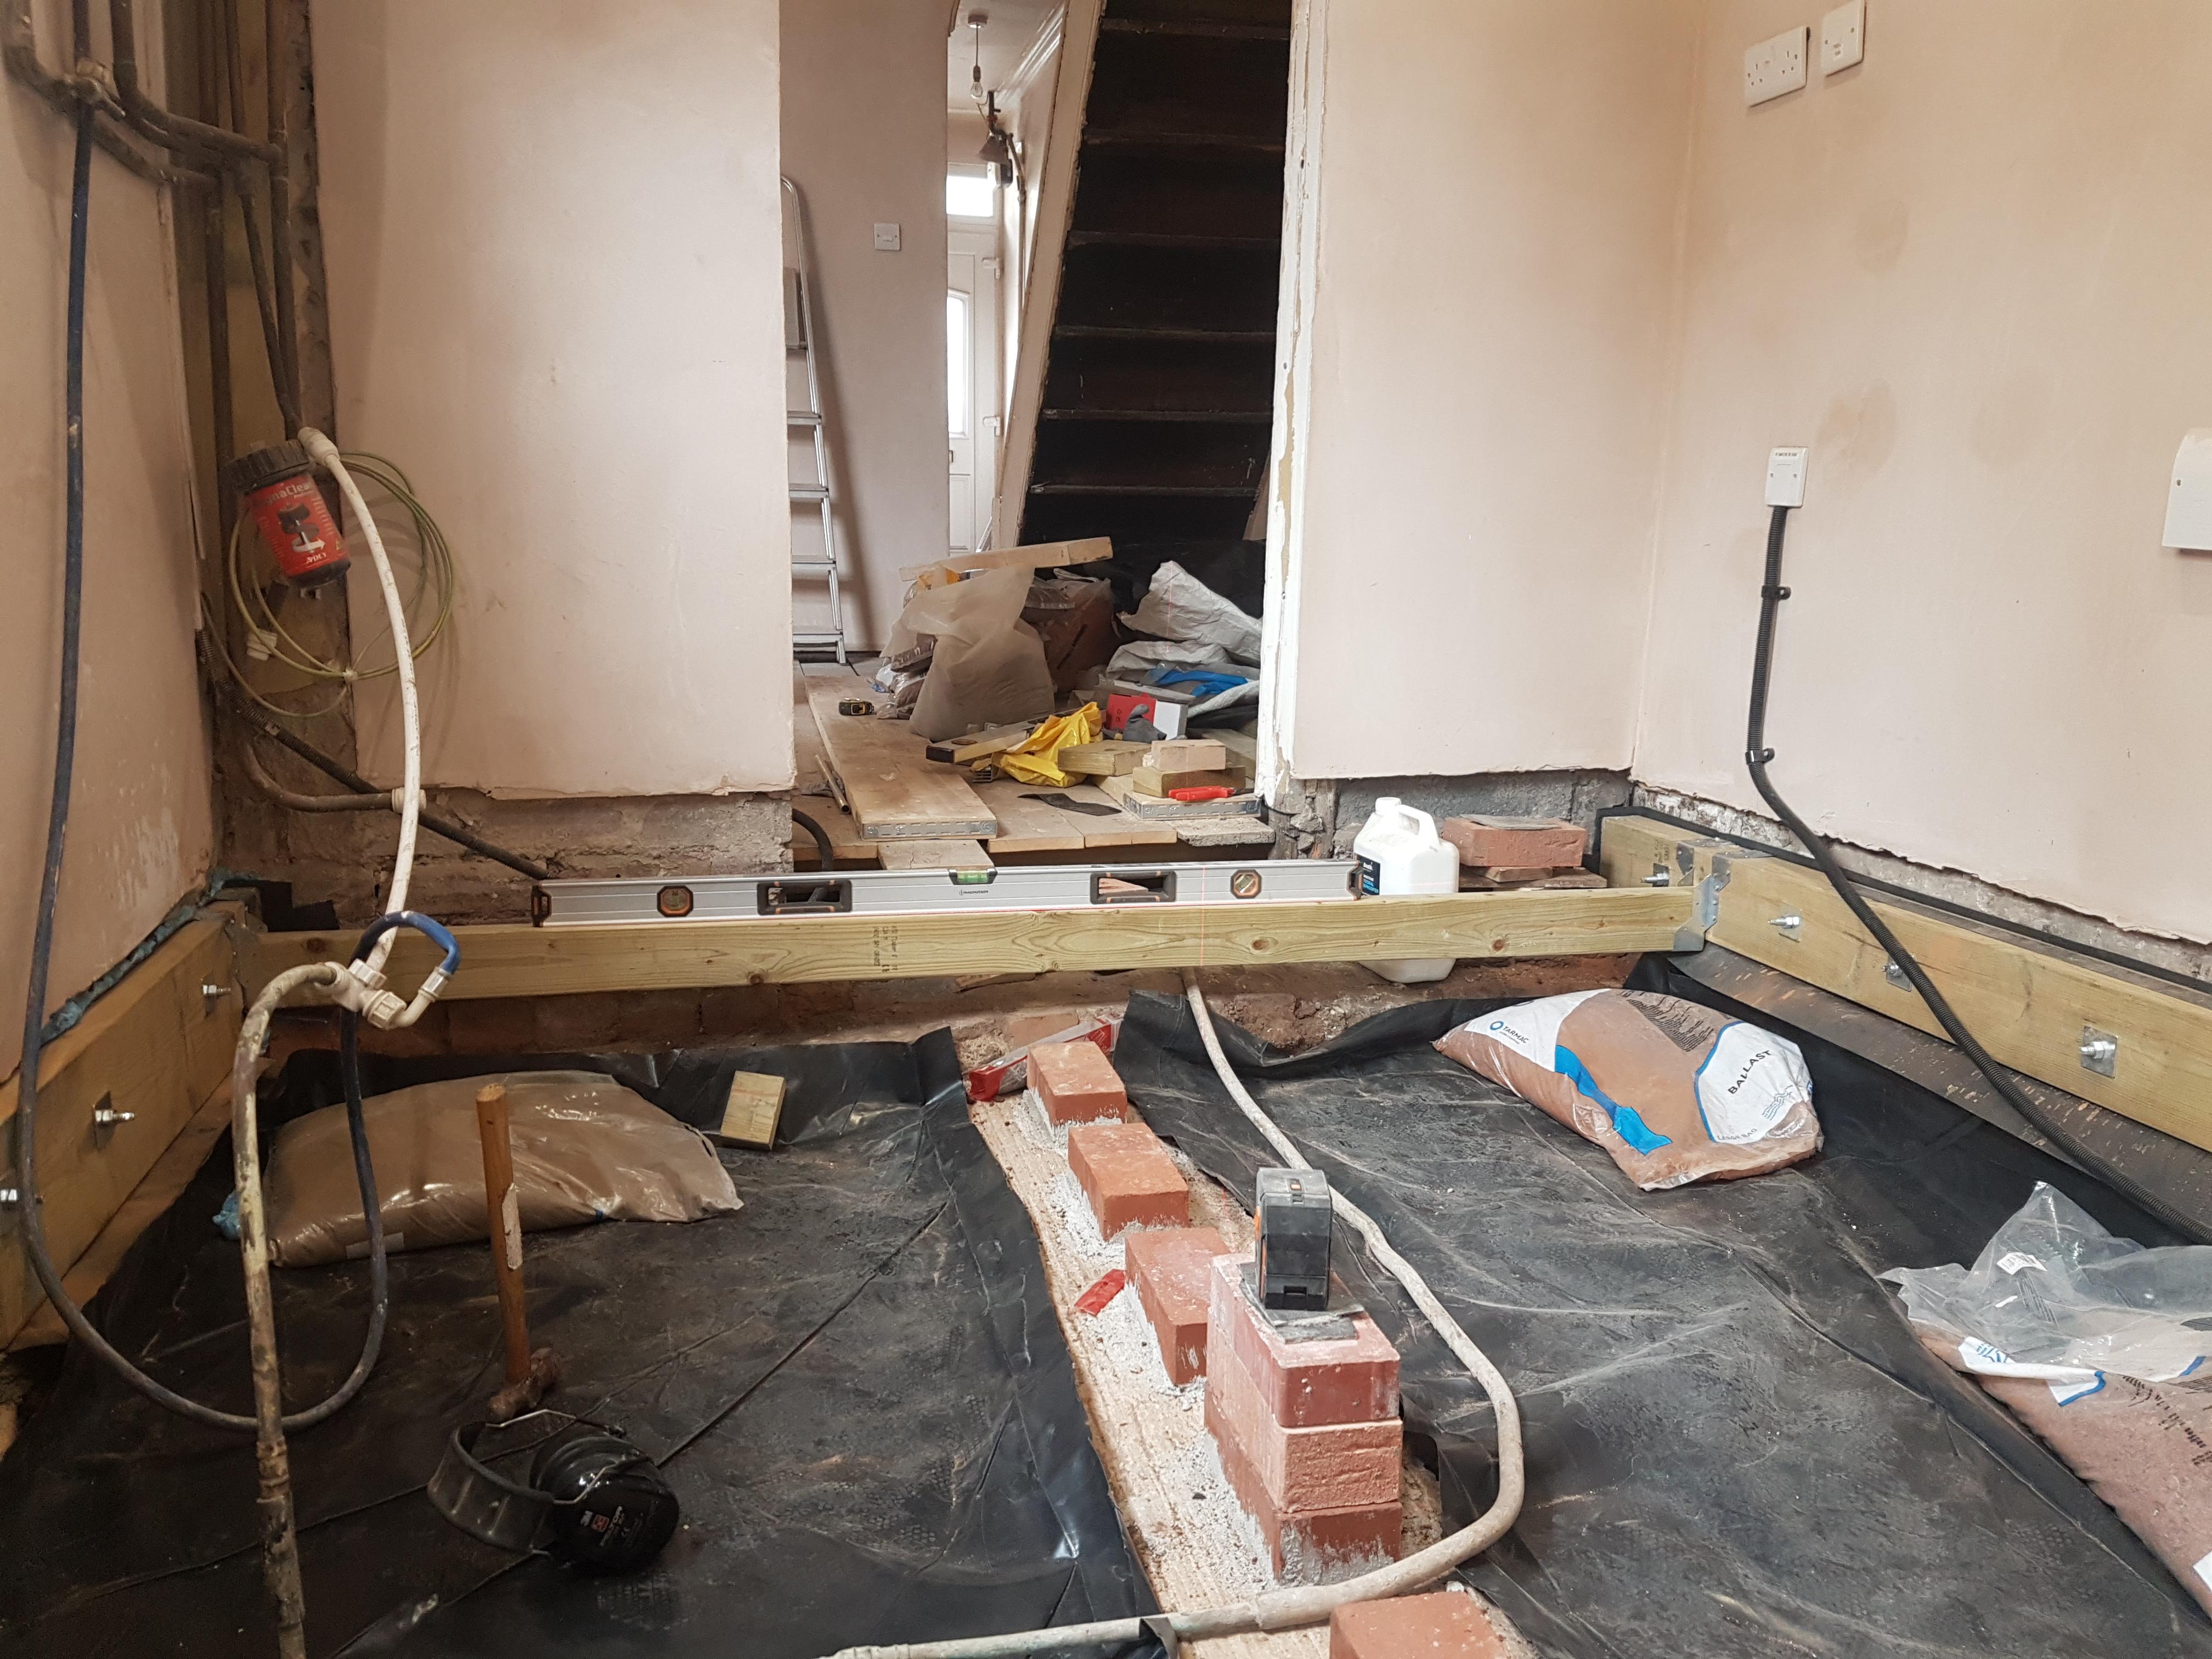
Thanks for the replies. Do you mean the joint depth looks small? Length wise it's cut pretty spot on I think. 100mm joists is all I could get away with leaving 150mm air gap below. With the sleeper wall deflection will be minimal. In retrospect perhaps I should have sacrificed air gap and put larger joists in. I did have concerns about the hanger not being fully against the plate but the plate is resting on brick footings, so I couldn't have anything behind the hanger but I could wedge some timber behind if that's worthwhile? The brick footings are too high and not level there's something like 100mm difference over the span of the room. I have insulation for between the joists and a new water main coiled up and ready to be ran this week but thank you for the recommendations. Thank you for the information on attaching to the wall plate. How should I attach the wall plate to the sleeper wall? Current plan was to lay it on mortar with dpc below it but wonder if I should put some fixings through into the bricks too? Thanks for all your help. It's a bit of a scrappy job and it pains me not to do it perfectly but I really didn't have much luck regarding depth to work with with the footings being so far out of level, etc.
-
It's a bit of an optical illusion, the joists have been installed at a level where there is 40mm between their tops and the floor level in the adjacent room and that's because I've got 40mm worth of floor covering to put on. Unfortunately you can't buy adjustable hangers for 100mm joists because no-one uses 100mm joists on floors but this is a Victorian house and 100mm is actually an upgrade compared to the rest of the ground floor! You can't see because the DPM hides it but the ledger plates are actually sat on brick footings but I've added resin fixings for good measure. Obviously in normal circumstances this arrangement wouldn't work but because it's a kitchen the ledger plate on the RHS will be covered by kitchen cabinets and the ledger plate on the opposite side is below floor level so won't be visible. It's just what I've had to deal with working with what's available on the house, everything is massively out of level. (This was the long story I was hoping to not have to type out)
-
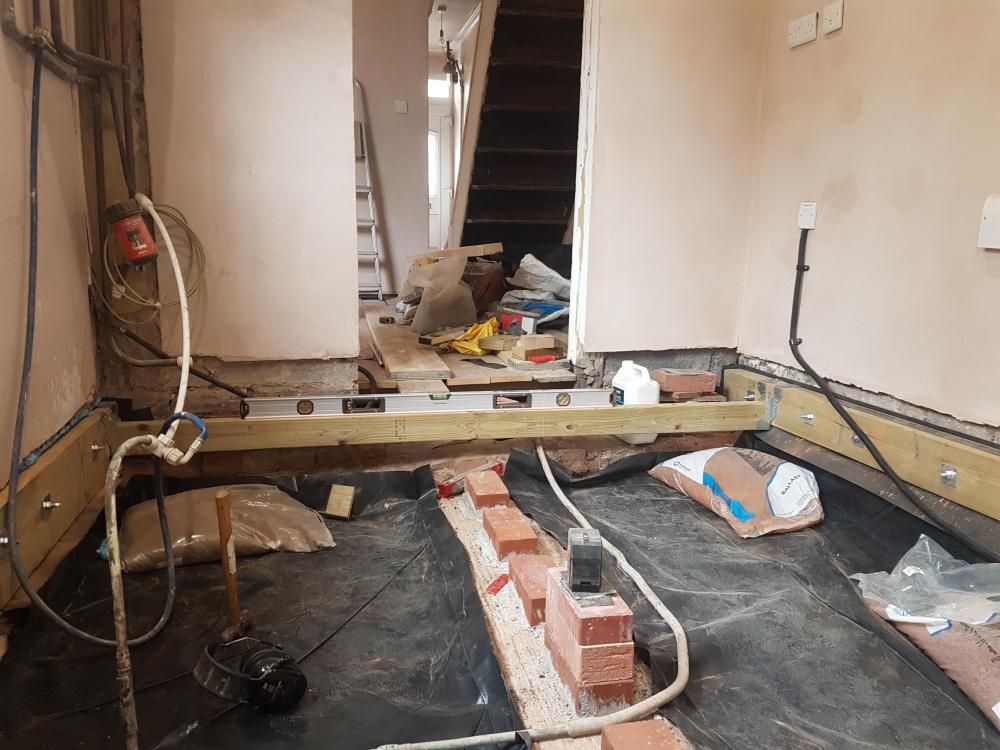
Hi, just rebuilt a suspended floor at my house. Intend to build a sleeper wall mid-span and good job too as there is noticeable flex in the joists at the middle (although that is weighting them individually). It seems that I've either got enough room for a single brick course sleeper with a chunky bit of timber on top, say 3" thick laid on mortar, or two courses with no timber on top or an extremely thin board. Instinct says go for the first option but is also depends whether the joists should be attached to the sleeper wall or whether they just rest on top of it passively. Would you attach it, if so what method? Fixings through the top of the joists and down into the wall plate or through the side of the joists? And wall plate to wall, are concrete screws down into the brick Ok? P.S. Appreciate there's some odd stuff going on with the design in general - it's a long story! Thanks for any help.
-
I was worried about the threads getting filled with crap when pushing through the timber but in retrospect should have brushed the holes in the timber and not only the holes in the wall. Still, I know what to do next time! I actually glad that most of the timber's weight is being supported on a wall below because I don't 100% trust these fixings!
-
I had done the cleaning process thoroughly, I just hadn't put enough resin in. I had 8 threaded rods already in place in a timber and chose to line them up with the holes and push them all in one go, this impeded my view of if excess resin came out of the holes during insertion. I would have preferred not to do it that way but was worried that if all my holes weren't perfectly straight that I'd struggle to get the ledger plate on once the fixings had set. I'd obviously not do it this way in future but at least I found out there were some dodgy fixings now and not once there was no longer access to them! Got lucky.
-
That's very kind of you! I'm actually not that far away (Bristol) but I think it'll be easier to get it from the local hire place, appreciate the offer though.
-
Ha, I didn't get round to it unfortunately. Got held up because half of the chemical fixings I fitted the day before pulled straight out of the wall when tightening. Turns out that assuming the holes were 2/3 full with resin was a bad idea - lesson learned the hard way!! Will attempt to do this after work today...
-
That's fair. To make the decision even easier, I have a spare 140mm concrete lintel in the garden that I didn't end up using for a different window... just the faff of renting props and strongboys...
-
note that the footings are on a Victorian terrace, so they are basically at ground level. Hoping to do this in about an hours time, so any advice would be great. Probably going to risk it if I hear nothing back!! ?