


David001
-
Posts
71 -
Joined
-
Last visited
Everything posted by David001
-
How to make a shower-cubicle floor waterproof?
David001 replied to David001's topic in Bathrooms, Ensuites & Wetrooms
@Nickfromwales, I took the plunge five days ago, nervously monitoring the state of the ceiling below the shower afterwards. So far, there's no sign of water, but if there's a leak from the shower and it's only a slight leak then it may take several weeks to penetrate the plasterboard ceiling of the room below. But so far so good, and I'm inclined to think the problem was the leaking tank in the cupboard directly beside the shower. I've checked the point of the leak on the tank and it's still dry. So I'm hoping that in a couple of weeks' time it will be safe to paint some stain-block over the brown stains on the ceiling of the room below, and then paint over that. Thanks for nudging me into summoning up the courage to test the shower! 😅 -
Hello. The house we bought four years ago has 10 Velux skylights. We never open them, but in the summer we open the narrow flap along the top of the odd one, to enable some ventilation. The problem is that for the past three or four months tiny moths and the odd mosquito have been spotted inside the house when there should not be any - other than the odd quick one that might dart in while an external door is briefly open. We live in an area which still has a considerable insect population, so after being assailed by moths and mosquitoes in bed at night during our first months in this house, we spent quite a bit on insect-proof screens on key windows (windows which we need to open for ventilation). So there should be no insects anywhere in the house. Yet some have recently started getting in. The question is how? The only thing we can think is that some of the insect filters in the Velux skylights may be letting them in. The previous owners installed the skylights in 2012 and Velux states on its website that the insect-proof strip and the padded tape along the top of the skylights need to be replaced every four or five years. Did the previous owners ever maintain the skylights in this way? I very much doubt it. So the moths and mosquitoes may be getting by way of this route. Q. 1. Each Velux maintenance kit costs £37, probably with an extra amount for postage. Each kit includes filters and padded tape 2.5m long. So as each window here is 70cms wide, one pack will do 3 windows. So I will need to buy 4 packs, totalling £148. Can the materials be bought at a lower cost somewhere else? Q. 2. Why does the insect gauze need to be replaced? It seems to be made from strong, honeycombed plastic. So why can't it just be rinsed under the tap and put back? Does the honeycombed plastic deteriorate in some way over time? The Velux service kit is available from Velux at the following link: Service kit (ZZZ 220) for VELUX roof windows produced before 2014 I've not owned skylights before, but I think the time has come to get to grips with the ones we now have. Thanks for any help with this situation.

-
How to make a shower-cubicle floor waterproof?
David001 replied to David001's topic in Bathrooms, Ensuites & Wetrooms
@marshian, same here: the leak from near the top of the water-tank had saturated the chip board forming the floor of the water-tank cupboard, so the owner had evidently pulled away the sodden board directly beneath the tank and then lain over it some thin plank-like strips of floor covering . . . which hid the hole and fooled our us and our surveyor! Thankfully the board directly beneath the feet of the tank was dry so the tank was still well-supported, nevertheless the leak from the tank must have been considerable . . . and it was still leaking when we moved in. With all that Nick has contributed, I'm now inclined to think that the dripping from the ceiling below may have been coming from the leaking water-tank and not from the floor of the adjacent shower cubicle. The big test will come soon when I switch on the shower for the first time in ages. Fingers crossed! 😀 -
How to make a shower-cubicle floor waterproof?
David001 replied to David001's topic in Bathrooms, Ensuites & Wetrooms
I reckon the leak occurred just before completion. The previous owner cut a sizeable square out of the ceiling below. Whether he was able to find the point from which the water came, I don't know. But he wedged a small pot-plant dish beneath the L-shaped waste-pipe, presumably to catch drops of water. Then using map-pins, he pinned a sheet of white foam-board over the hole in the ceiling to sort of cover it up! I then came along, peered inside, saw no water in the tray, no dripping, so I asked a contractor who fitted new cupboards in that room to cover and plaster over the hole as well. So, no, I can't now examine the underside of "the tiles". After drilling holes through the grouting, here and there but equally spaced, and then inserting lots of Fixafloor, I placed three big heavy buckets of water on the tiles and left them there for two weeks! But I haven't had the nerve to use that shower since! 😅 https://fixafloor.co.uk/products/fix-a-floor-pro-repair-pack Thanks very much, Nick, for your photo of a former inset into the floor. That probably explains why the cubicle tiles slope a little to the central drain while the tiles outside the bathroom appear to have been stuck to the same stretch of chipboards as are under the carpet of the adjacent room. So if the leak is from the shower cubicle, it's probably from the drain or drainpipe. BUT adjacent to the shower cubicle is the hot-water tank cupboard, and from the side of it I found a leak about nine months ago. That leak looked like it was "ancient" because of encrustation all the way down the path of the dripping water. But where did the water end up? It must have ended up somewhere. Maybe it was that water which appeared in the ceiling area beneath the shower cubicle? I fixed the leak from the hot water tank and there's been no further water dripping from the ceiling below, but of course I haven't had the courage to use the shower! I guess that shower is going to have to be tested sometime soon! 😱 -
How to make a shower-cubicle floor waterproof?
David001 replied to David001's topic in Bathrooms, Ensuites & Wetrooms
@Nickfromwales. that's really helpful. Thanks. One of the pictures on the web-page for that tray shows it straddling several beams (below floor level), which suggests that the tray is incredibly solid and supportive, that it has no "give" in it. Is that right? Because the floor tiles adjacent to the carpet are a little lower than the carpet, I think that if a tray lies below the tiles in the cubicle, the tray must have been deliberately laid a little lower than the tiles in the rest of the bathroom (for the tiles inside and outside the cubicle to be at the same level). Or perhaps no tray was used, but that wouldn't account for the slightly sloping tiles around the central drain, which surely can't have been laid on a uniformly flat surface. You wondered why I'm reluctant to "simply" have the tiles taken up, and having a thorough remedy being implemented. Well, the reason is this. I'm located halfway between Llandrindod Wells and Knighton, so getting people to travel here to do such work is difficult. Most of the nearest people are over the border, in Hereford (80 minutes' drive) or Shrewsbury (90 minutes' drive). So I have had to almost beg people to come and quote for the odd job which I wasn't able to do myself. There's a price to be paid for rural bliss! 😂 -
How to make a shower-cubicle floor waterproof?
David001 replied to David001's topic in Bathrooms, Ensuites & Wetrooms
@Alan Ambrose, the previous owners had done just that just prior to completion, and had then covered the hole with a piece of light paper-board, pinned in place. When we unpinned the board and looked inside we found a small pot-plant dish had been wedged underneath the central drainage point, but it had not a drop of water in it. Then looking closely all through the exposed area we found it was too much of a dense forest of pipes and beams and other bits of wood (as well as several electrical cables!) that it wasn't possible to determine the point at which water had entered from the shower-floor above. So I'm inclined to think that we're going to have to lay a new tiled floor. @Nickfromwales @ProDave @Big Jimbo @Alan Ambrose Would it be possible to give the present floor some thick coats of something long-lasting, pliable, and waterproof (painted on, or some kind of thick pliable waterproof board), and then lay new tiles on top of that? This might save ripping up the current floor. There would then be a slight step up of about an inch from the floor outside the cubicle, but that could be dealt with by replacing the cubicle door (which swings inwards) with a curtain. -
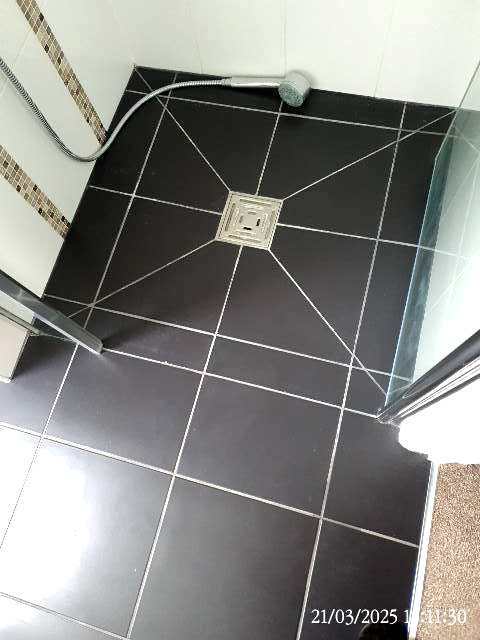
Hi. Can this shower-cubicle floor problem be solved without having to lay a completely new floor? I've bought a home with a first-floor shower-cubicle and quickly found that shower water made its way through to the room below, dripping from the ceiling of that room. I then found that there were some cracks and gaps in the grouting between the black tiles in the cubicle, so I filled them with "flexible" grouting (although it doesn't seem flexible to me). I then noticed that some of the tiles moved downwards a fraction when stood upon - this probably caused the grouting to crack in places. So I made a number of holes in all of the grouting and squeezed into each hole quite a lot of a very powerful glue designed for this kind of situation, hoping to make firm and solid whatever is directly beneath the tiles, or to remove the sponginess beneath the tiles by solidly bridging between the underside of the tiles and whatever is beneath them. But I have not dared to used the shower since then, for fear that water may still get through to the cavity and the ceiling beneath! 🙂 I expect the central tiles were cut into the eight triangles so as to enable each triangle to slope downwards as they do towards the centre, to direct water into the drain. Is there a waterproof product of any kind which could be placed over the tiles to ensure that all water goes into the drain? It would have to be a product which looks smart, and is tough enough to withstand being struck by water every morning and occasionally being scrubbed during cleaning. Thanks a lot for any help given!
-
How to restore 12 year old laminate floor tiles?
David001 replied to David001's topic in Wood & Laminate Flooring
@Temp, thanks for your opinion and for the interesting video. I note that the man used a polyurethane to protect the floors in that house but before then he went to a great deal of trouble to clean the floors. I think that's what I will do: simply clean them several times to remove remaining soil and to expose the original surface of the tiles. -
How to restore 12 year old laminate floor tiles?
David001 replied to David001's topic in Wood & Laminate Flooring
@MikeGrahamT21, thanks for your help. I don't mind the odd bit of joint being darker than the rest. It's the overall look that I would like to improve. So I will simply give the floor several more hard mop-overs. -
How to restore 12 year old laminate floor tiles?
David001 posted a topic in Wood & Laminate Flooring
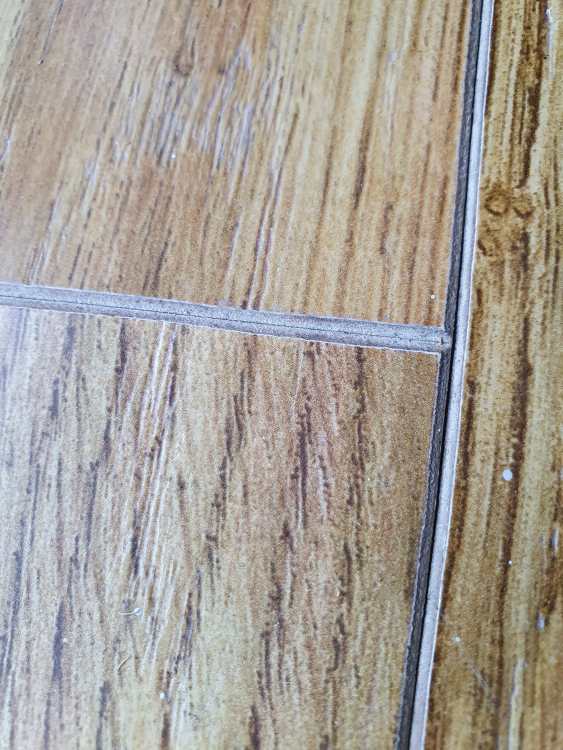
The house we have bought has laminated tiles on the floor of one room. The tiles were laid 13 years ago and their condition suggests they received only an occasional sweeping. The surfaces of the tiles look dry. I have rubbed the floor with warm water (with a couple of drops of washing-up liquid in it) and that operation turned several bucketfuls of water dark grey. So I think the floor is now as clean as it can be made. The photos below show the current appearance of the floor. The close-up suggests that each tile is actually a fibrous board with an impression of real wood imprinted onto it and into it. In some parts of the room some paint was spilt and it's clear that the paint was soaked up by the grey, fibrous, 45-degree edges, but that it couldn't permeate the wood-effect surfaces. While rubbing over the floor I noticed how the moisture from the mop "varnished" the tiles so that they shone and mirrored the light from surrounding windows and doors, which led me to wonder what I might be able to do to improve the floor's appearance. I would prefer not to coat the floor with a polyurethane or similar coating because past experience has suggested that the coating gets worn away where usage is high, requiring the coating to be removed and replaced. So beside further occasional rub-overs with a damp mop, is there anything I can do to improve the tiles' appearance?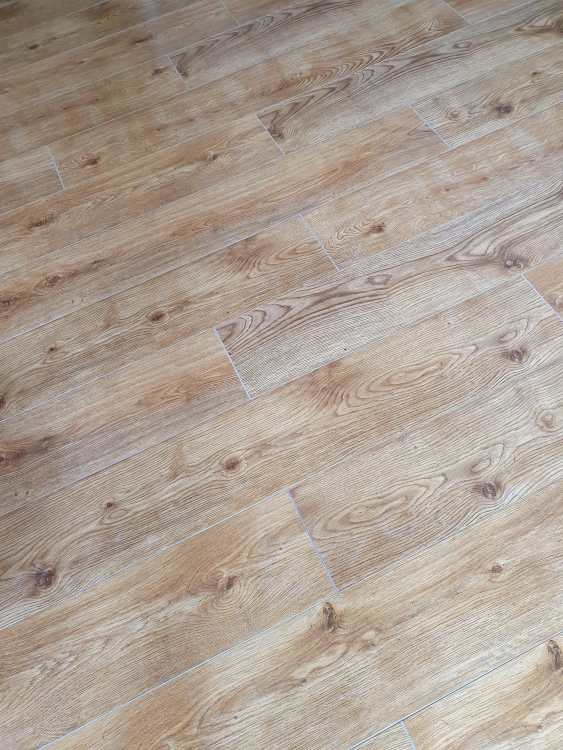
-
How to fix this leak from a hot-water tank?
David001 replied to David001's topic in Boilers & Hot Water Tanks
@Iceverge, thanks for all your advice. The brass unit was thoroughly cleaned, and then it's thread was coated with plumber's mate, and then carefully repositioned, and now all is well. 👍 -
How to fix this leak from a hot-water tank?
David001 replied to David001's topic in Boilers & Hot Water Tanks
@Iceverge, thanks for the advice above which I have only just found - after four hours (mainly spent working out how to empty the tank of all its water!), and managing to unscrew the horizontal brass piece entering the grey plastic collar. Please see the photo below. The thread of this horizontal brass piece is deeply encrusted with calcium or some other white deposit, perhaps including some degraded plumber's mate. The stiff grey plastic collar has a thread on its inside! By pushing my finger as far as I could extend it into the plastic collar, I found that the thread eventually ends and the plastic becomes smooth and continues inwards beyond the end of my finger. So the horizontal brass section, which I unscrewed from the inside of the grey plastic section, is male, and the grey plastic collar is female. I had expected the brass section to be female, and had expected to find that it was attached to a male piece inside the grey plastic collar. Anyway, presumably the long thin sensor attached to the brass fitting sits constantly within water, explaining the leak which has been occurring between the grey collar and the brass piece. I don't dare to extract the grey plastic collar, as it seems to me that it must be bonded to the inner skin of the tank. I suppose that it is possible that being plastic the collar may nevertheless have cracked, so that water has escaped under the collar rather than inside the collar. Although perhaps it's been passing out through both routes. I am cleaning the horizontal brass piece and the interior of the grey plastic collar using vinegar and occasional gentle rubbing with a toothbrush. This may take a number of days. Then I will try screwing the brass piece back in position, using some plumber's mate and then wait to see if the leak has been stopped. What is the purpose of the brass piece with the sensor attached? How does it work? And is there anything else that I ought to be doing - or which I not to be doing? 😱 I have no experience of plumbing, so all of this has been a little "terrifying". 😁 Thank you.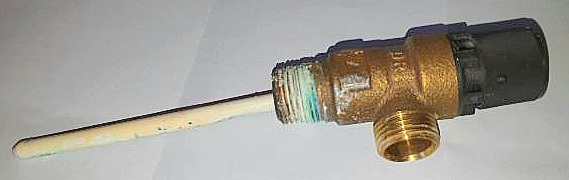
-
How to fix this leak from a hot-water tank?
David001 replied to David001's topic in Boilers & Hot Water Tanks
@Iceverge, thank you so much for your helpfulness. With that grey plastic disc in position it's difficult for me to see whether the leak has come from behind it or whether water dropped onto the face of it from the brass fitting above. But you have given me enough reason to have a go, hopefully today, at, firstly, trying to drain the tank, and then seeing if I can unscrew the brass fitting in order to clean up the threads and apply a little Plumber's Mate. -
How to fix a leak from these shower fittings?
David001 replied to David001's topic in Bathrooms, Ensuites & Wetrooms
@Nickfromwales, thank you. With your advice in mind, I've looked beneath the barrel of the mixer unit. Below is a photo of the situation there. The gap between the white ceramic tile and the barrel is just under a centimetre. I actually have a tiny camera (with LED light) on the end of a 2 metre "snake". The camera at the end of the "snake" is just under a centimetre in diameter. While I might be able to force the head through the gap it wouldn't be able to turn to peer around in the space. It could only look straight ahead. As the photo shows, there is a "wall" of pink plaster under the barrel. And it's dry, with no sign of having been damp. Would it be of any worth if I used a screwdriver & hammer to chisel it away so as to peer in further? Would removal of the pink plaster destabilise the position of the barrel to cause problems in the future? Thanks.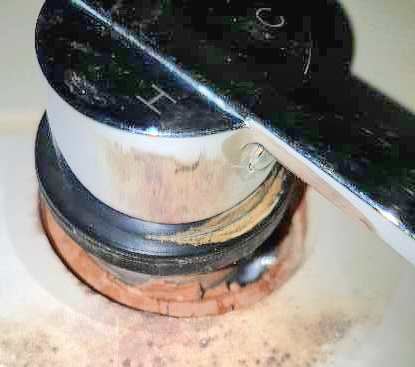
-
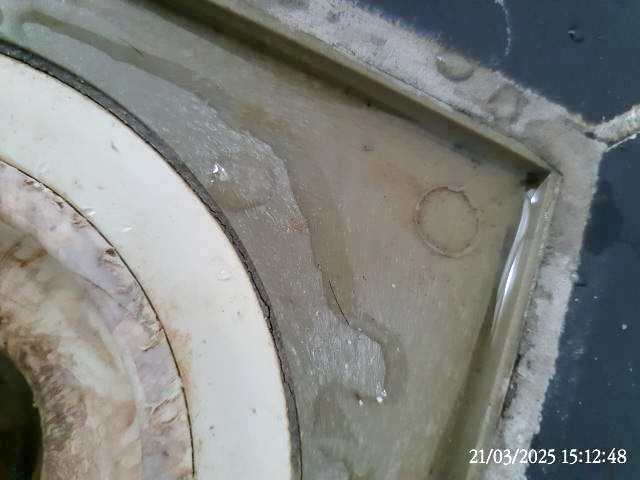
@ProDave, thanks, yes, I agree, "if it was done properly"! 🙂 But unfortunately since moving into this house which was built 12 years ago we have been challenged by quite a few things which definitely were not done properly. So I can't have faith that a proper tanking membrance was laid and that it lapped part way up the walls before the tiles were put down. 😞 I was hoping someone might be able to tell by examining the plastic or fibreglass fitting around the drainage hole.
-
How to fix this leak from a hot-water tank?
David001 replied to David001's topic in Boilers & Hot Water Tanks
@Iceverge, many thanks for the video, and for the pic of a tank. Please could you have a look at the further close-up below, which shows my tank's leak point? It seems that the thin grey plastic disc, which I thought was more aesthetic than anything else, is the outer part of a grey circular plastic pipe which enters the opening in the metal skin of the tank. Do you think that that grey plastic is "hiding" a metal thread protruding from the skin of the tank, as in the photo of the tank which you have just posted?
-
How to fix this leak from a hot-water tank?
David001 replied to David001's topic in Boilers & Hot Water Tanks
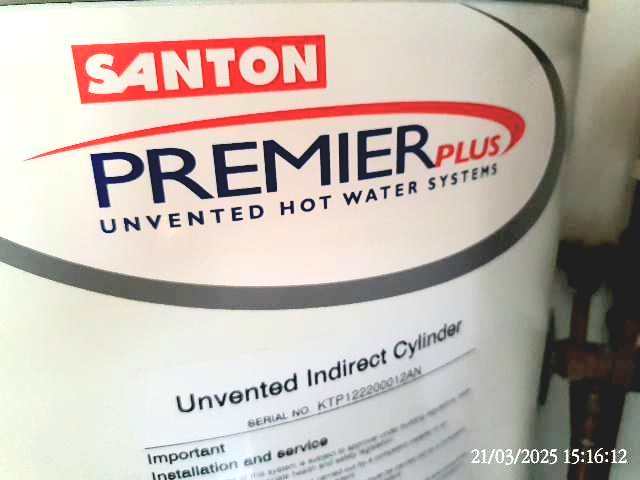
@JohnMo and @Iceverge, I've now cleaned away a lot of the encrustation on the side of the tank and can now more clearly observe what's going on. I've made sure that any water that escapes through the hole near the top of the tank will dribble directly onto a plastic lid I've placed under the tank. I put the lid in position 30 minutes ago, and already an oval of water has formed on the plastic lid, showing how much water is seeping from the tank during a 30 minute period. It's more than I was hoping for, suggesting I need to get this leak fixed sooner rather than later. If at the leak point I remove the plastic disc around the brass fitting that passes through the outer metal skin of the tank, and if then I were somehow able to unscrew the brass fitting from the inner metal skin, I believe the hole in the outer skin will be too narrow to allow any work to take place through it. What is the likely distance between the inner and the outer skin? In other words, how thick is the insulation foam between the two skins? Do you have experience of, or thoughts about, the "Santon Premier Plus Unvented Indirect Cylinder"? Thank you from a 70-year-old who has no experience of plumbing! 🙂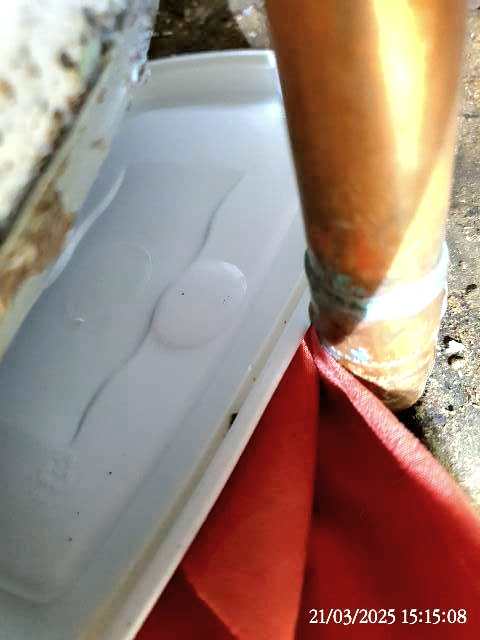
-
How to fix a leak from these shower fittings?
David001 replied to David001's topic in Bathrooms, Ensuites & Wetrooms
@Bonner and @Nickfromwales Well, to my surprise, I have managed to remove the circular plate around the mixer-unit and the small circular plate around the hose-fitting! In both cases the interior of the wall is completely dry, with no sign of having been wet in the past. I suppose this means that the leak must be from a pipe connection inside the wall cavity? If so, does that mean that in the adjacent room a rectangle of plaster-board will have to be cut from the wall in the area behind the mixer-unit and the hose-fitting? At least I may be able to guide a plumber as to where to do the repair. @Nickfromwales, are you a plumber by any chance? (I'm halfway between Llandrindod and Knighton.) Mixer-unit hole: Hose-fitting hole: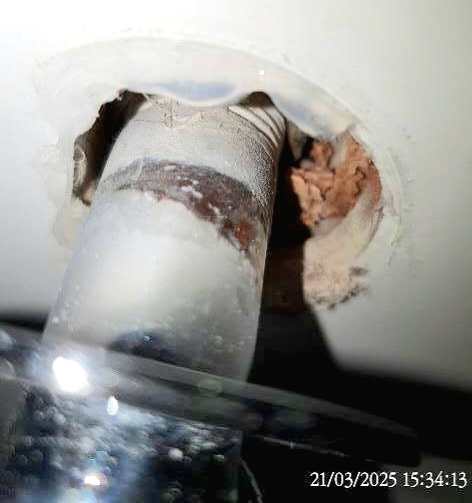

-
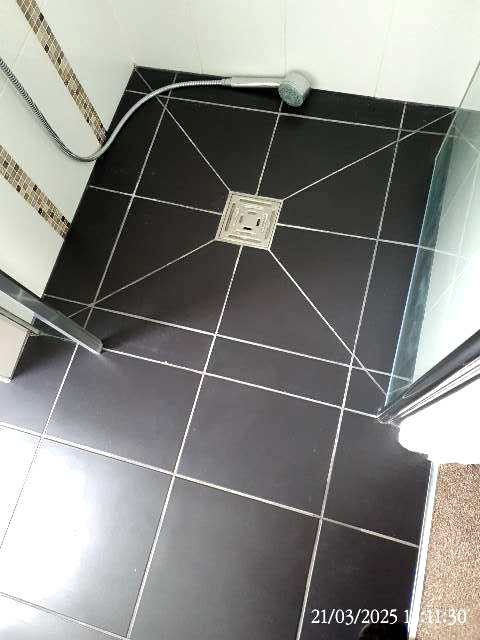
There may have been leaks from the floor of a shower cubicle, because of a water stain showing on the ceiling of the room below. Can I rule out water (when the shower is being used) seeping through cracks in the grouting between the floor tiles? Is there a water-proof membrane under the tiles, or could the tiles just have been glued to plywood boards (which form the surfaces of all our upstairs floors, covered by carpet or tiles)? Does the plastic, or plastic-like, square fitting around the circular drain hole extend under the tiles? The dimensions of the cubicle floor are 86cms by 94cms, so does that approximate to the size of a continuous water-proof membrane (which I suppose could have been cut down to fit the dimensions of the floor)? Here are photos of the cubicle floor, continuous with the floor of the bathroom, and close-ups of the fitting around the drain. Thank you.

-
How to fix a leak from these shower fittings?
David001 replied to David001's topic in Bathrooms, Ensuites & Wetrooms
@Bonner, so far with regard to the mixer-unit I have managed to move its large outer ring or plate a little in the anti-clockwise direction, but that didn't cause the plate to come away, so I am not sure what I should do next? How far should it turn anti-clockwise before it comes away? (Roughly how many centimetres?) And once the plate is moved sufficiently anti-clockwise, does it then need some kind of encouragement or special action to make it come away? Regarding the ring around the hose-fitting, I haven't yet been able to make it move. I think I may need to use a fine clamp, so as to get a purchase on the outer edge of the ring. What would you suggest? -
How to fix this leak from a hot-water tank?
David001 replied to David001's topic in Boilers & Hot Water Tanks
@JohnMo, for the moment, I am gently cleaning up the outside of the tank so that I will be able to place a tray under the tank and monitor just how much water is dripping out. I put a tray under the tank last night and this morning found it still dry. But until the encrustation is removed I can't be sure that droplets of water aren't still coming out but are then settling within the encrustation. I'm beginning to think that we don't have an urgent problem, but unless a plumber can get inside the tank to stop the leak through the inner skin, a new tank will eventually have to be fitted, which will no doubt be a costly and tricky operation. -
How to fix this leak from a hot-water tank?
David001 replied to David001's topic in Boilers & Hot Water Tanks
@Iceverge, thanks for your ideas. It's water that is leaking and I believe it must be initially coming from the inner tank. When I look closely at the visible source of the leak I see that the brass fitting appears to have passed through a thickness of yellow insulation foam/wool. The brass fitting is not sealed to the outer (visible) "skin" of the tank. The large plastic disc appears to be as aesthetic as much it is meant to cover up the tiny amount of open space around the brass fitting as it passes through the outer skin. So I imagine that the brass fitting is meant to be securely attached to the inner skin, but it isn't tight and so water is leaking into the space between the two metal skins. Perhaps the insulation between the two metal skins is not dense enough, or waterproof, to resist the incoming water, in which case the layer of insulation all around the tank may be saturated with water. I can't see that I can clean the threads attaching the brass fitting to the inner skin without taking off the top of the tank somehow, as well as draining the tank, so as to access the fitting from inside the tank. I have no idea how to check "the pressure and temp relief valves", but take your point that the leak could be due to an over-pressurising tank - although if water can pass through, as it clearly is, I believe it would still seep through no matter what the pressure is. But I have little idea about these things. -
We have a leak from either a shower mixer-unit or from the pipe which supplies the hose to the shower-head. The shower (in an upstairs cubicle) hasn't been used for three years. We know we don't have a long-standing or a continual leak because a stain has only just appeared on the ceiling of the room beneath the shower cubicle. If the drain-tray in the floor of the cubicle is not filled with a cup of water every six months or so a foul smell comes up from a soil pipe. There was a nasty smell a few days ago, so the shower was turned on for just 30 seconds to fill the drain-tray. The next day we noticed a water-stain had appeared on the ceiling of the room beneath. The stain is directly beneath the wall on which the mixer-unit and hose-pipe are attached. What's the easiest way to find out whether it's the mixer-unit or the hose connection which is leaking? The wall behind the mixer-unit & hose connection is accessible, but can the leak only be fixed by cutting into the surface of that wall and examining the mixer-unit and hose-connection from the rear? The photo shows the type of mixer-unit and hose-connection. Thank you for your help.

-
We've just discovered there's a long-established leak from a pipe attached to the side of our hot-water tank. It seems the leak is only slight because there's no pooling of water, although the surface of the board beneath the tank feels wet. The encrustation down the side of the tank suggests the leak has existed for many months. The nearest plumbers are situated about 25 minutes' drive away, so before we consider asking one of them to come and help, we'd like to know: what's involved in fixing this leak, and whether I might fix it myself (I'm handy with spanners etc., but have no plumbing skills). I can see that I could unscrew the vertical pipe from the short horizontal one which enters the tank, but what would have to be done after that? The short horizontal pipe at the site of the leak has a plastic adjustment knob on the end of it. The first photo shows the front of the tank, and the second is a close-up of the position of the leak. Thank you for your advice.


-
For the benefit of anyone who comes to this forum with the same question as I posted, I have now successfully used metal rawl plugs (aka metal "worms") to attach the board of a coat-rack to the back of a modern hollow-wood door. I discovered that the veneer of the moulded door, being made of hard-pressed "dust", responds in much the same way as plasterboard does when it is drilled by a metal rawl plug. Before screwing in the rawl-plugs I used a gauge to measure the thickness of the veneer and was surprised to find that it was 10mm, which is thick enough to accommodate a complete circle, or even two, of the rawl-plug's thread, thus ensuring a firm fitting. 1. mark where the rawl plugs need to be inserted. 2. drill holes to allow the end of the rawl-plug to be comfortably inserted into the holes. 3. coat the rawl plugs with a little bit of lubricating jelly. 4. screw the rawl plugs into the veneer of the door, making sure you press against the rawl plug with your full body-weight while you are turning the screw (to make sure the veneer is not pulled outwards). 5. attach felt-pads with adhesive stickers on them to the top rear and bottom rear of the coat-rack (to make up for the head of the rawl-plug which will otherwise cause the coat-rack board to "rock") 6. screw the coat-rack securely to the rawl-plugs. 7. ensure that the board of the rack is firm and unmoving (otherwise increase the thickness or number of the felt-pads on the rear surface). 8. treat the coat-rack with care, and don't lumber it with very heavy things clothes or other items.


