Night Owl
-
Posts
43 -
Joined
-
Last visited


Night Owl's Achievements
Member (3/5)
1
Reputation
-
No experience in building floors but am currently researching it for my project. I would presume that the RFG has a higher compressive strength and would be less affected by moisture/damp. Whether it would make much difference in the grand scheme of things, I've no idea. EPS would indeed be much cheaper if suitable. Looking at the instructions for RFG they seem to refer to a 100mm screed (presumably for structural strength) which some say isn't ideal for UFH.
-
This thread is exactly why Buildhub is such a good source of information. I'm in a very similar situation with my refurb of a late 50's dormer bungalow. Have been digging out floors to solve damp issues and also to prepare for insulation and U/F heating in part. Have been scratching my head for ages as to how the new floors should be built up. Also been struggling to even get builders to come and quote for the work. Then along pops this thread describing a material I have never heard of before with the added bonus of being a lot more self build friendly. Will be watching this thread with interest to see how you progress as it could well influence how I move forward. Please keep us updated if you are able to. Thanks.
-
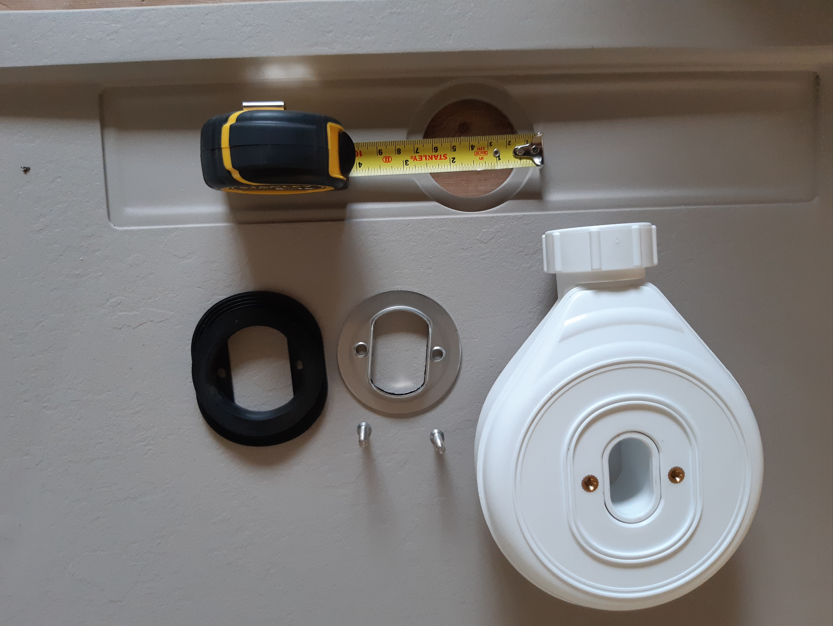
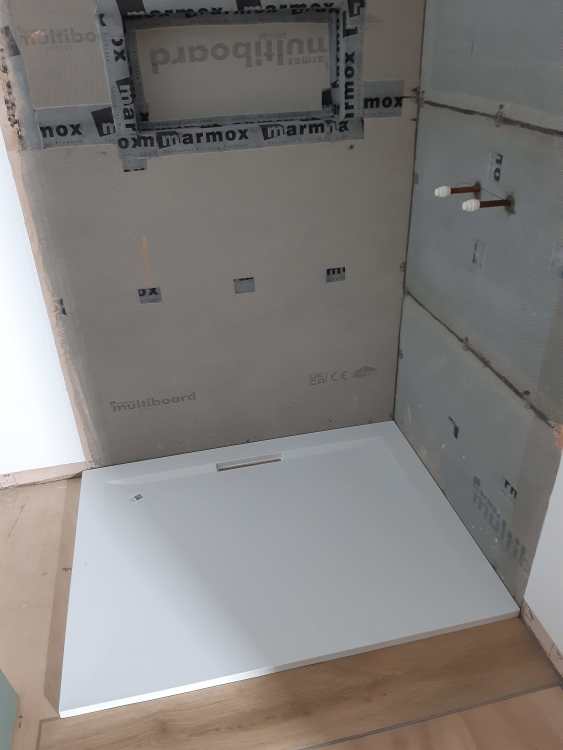
Bit of an update on this shower tray installation. Long story short but the original Mira tray I had was warped so ended up sending it back and picked up a nice Stone Resin Duplach tray which I believe are made in Spain. This tray is perfectly flat and straight so will be getting put in shortly. I have a question though about the waste trap that is suppled with it, not seen one like this and is quite shallow. No idea who makes it or what flow rate it has. No markings on it and nothing in the manufacturers literature about it. The hole for the waste is 55mm and the recess for the cover is about 72mm. I understand that European pipe sizes are different to UK ones so an adaptor is supplied to join the trap to pipe (not shown). I like the supplied rubber seal as it seals to the trap and passes through the tray flange then is bolted down with the metal disc shown. Would people be happy installing this trap or going for a more UK recognisable one, Mcalpine for example? A bit limited by the 55mm waste hole, my waste pipe is 50mm and will be solvent welded. Joist depth is 200mm and tray is sat on 18mm ply. Any recs for a suitable trap for this situation?
-
I had BC out today looking at some other work that's been carried out on my property. Took the opportunity to get him to look at the drainage proposal as above. Basically we are looking to connect the vertical (white) soil pipe with a horizontal one to a branch connection where the current clay pipe goes under the foundation. The bathroom W.C can then connect straight onto the branch as well. A rest bend below the branch can then direct the waste down and out under the foundation. BC suggested using a sleeve under the foundation and back filling with concrete as the easiest way of doing this. Makes things simple enough regarding getting the new plastic outside however I'm not sure how the new horizontal pipe (which will be buried in the new bathroom floor slab) can be made rodable with this set up. Any thoughts?
-
Air tightness (gues)stimation
Night Owl replied to timhowes's topic in Mechanical Ventilation with Heat Recovery (MVHR)
Plus 1 for the Greenwood fan. I'm pretty sure they can be installed in either a wall or ceiling. Fitted mine in a bathroom ceiling and vented it out through the roof tiles. A reasonably easy job even with the addition of a condensate type drain as the ducting was vertical. Only issue I had with the fan and I'm probably being over cautious was that there are 3 or 4 very thin sensor wires that are taped to the body of the fan that's inserted into your ducting. I found this fit to be quite tight and was concerned these wires would potentially get damaged during fitment / removal despite the insulating tape on them. In the end, I cut a small channel in the ducting where these wires would sit and sealed the channel up. No risk now of wire damage. Fan looks nice on the ceiling too. Not powered it up yet so can't comment on it's performance but will hopefully save me all of the hassle and expense of a MVHR install. -
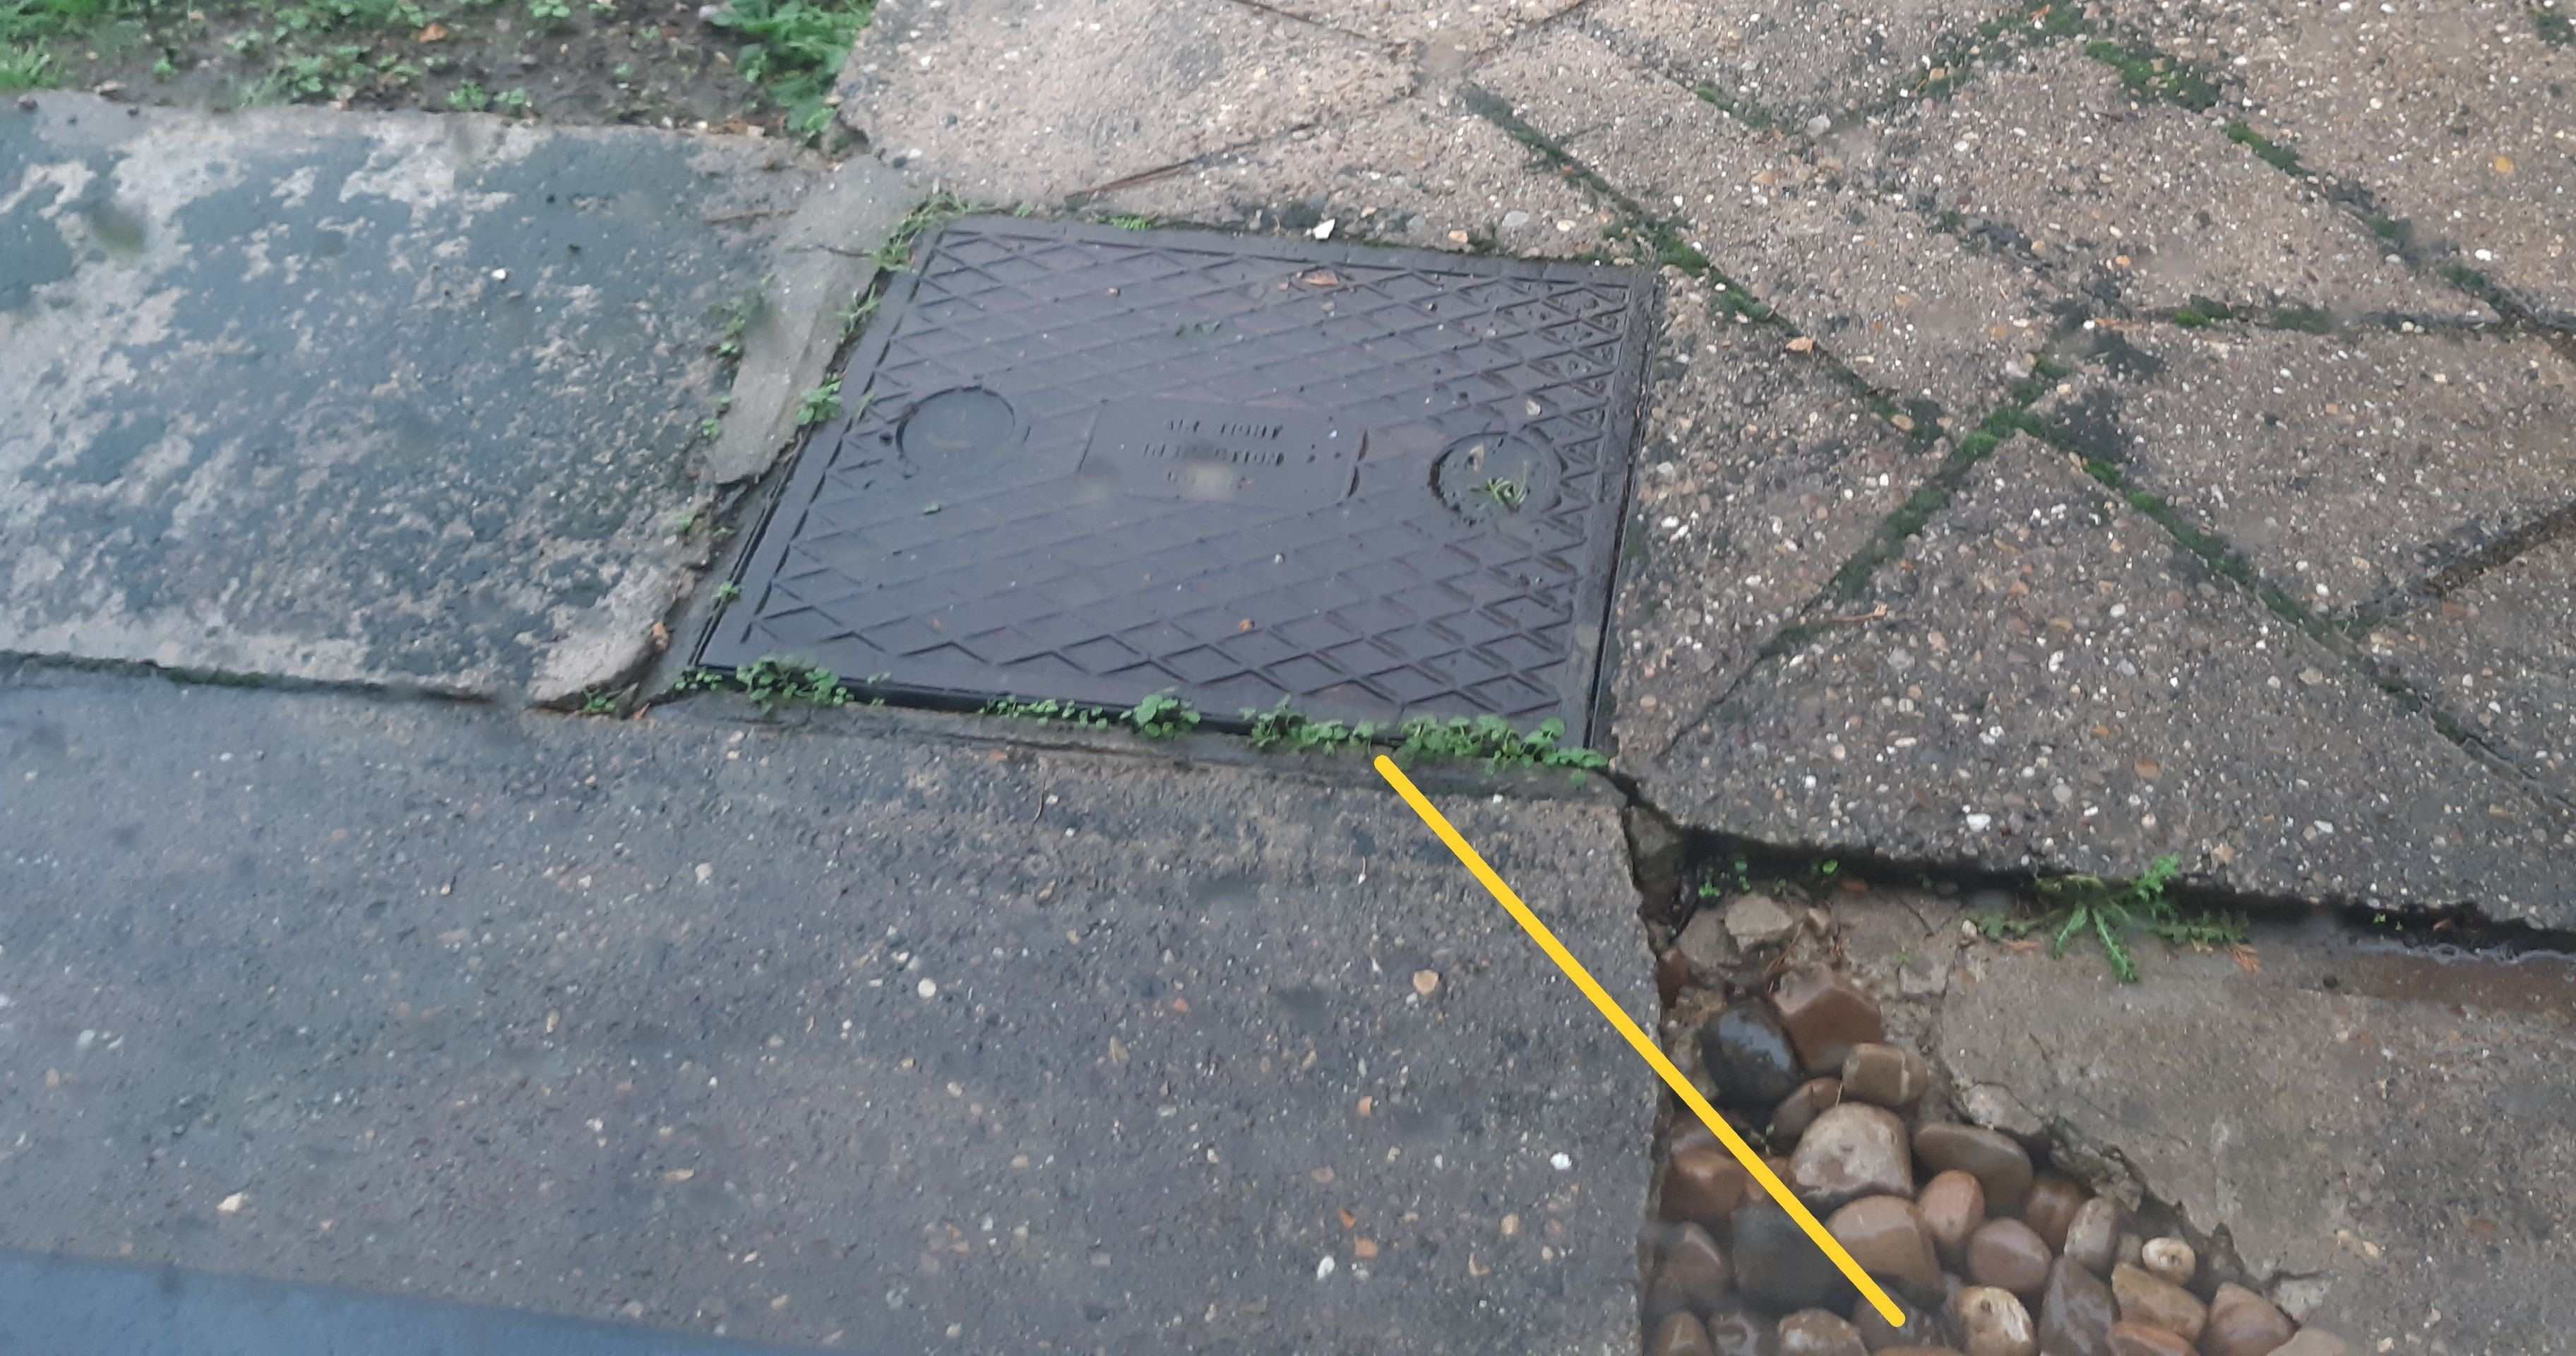
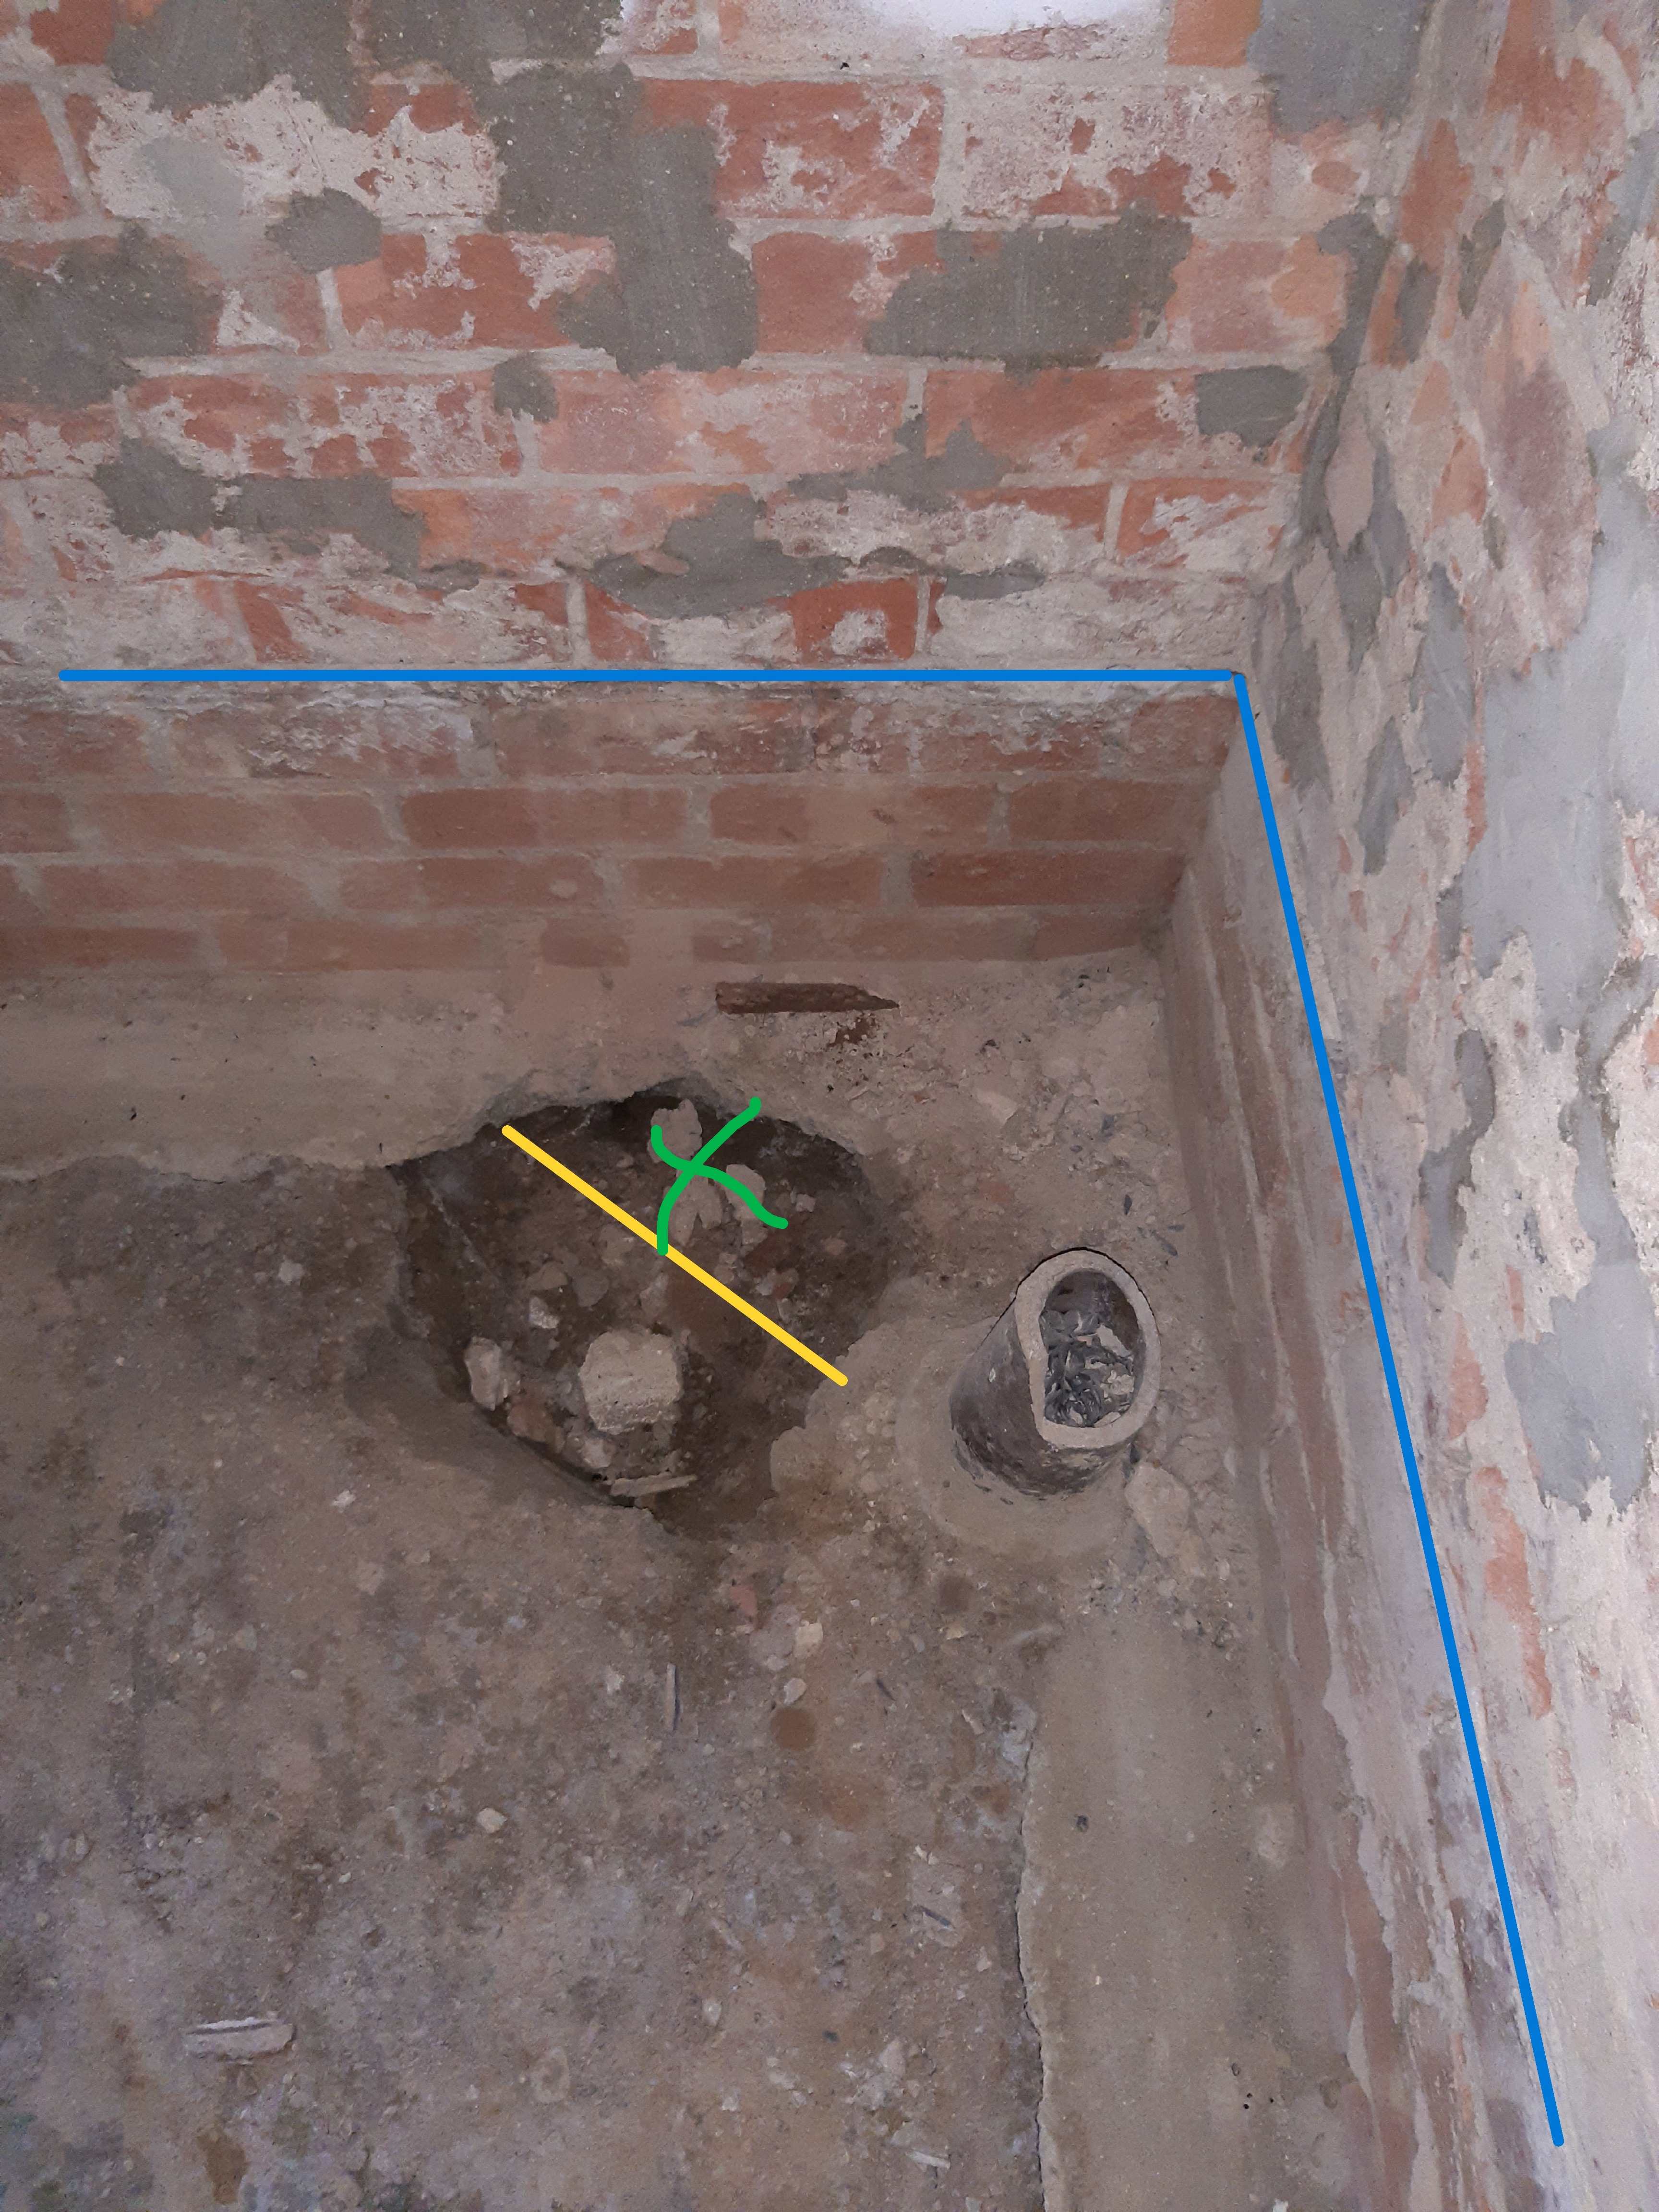
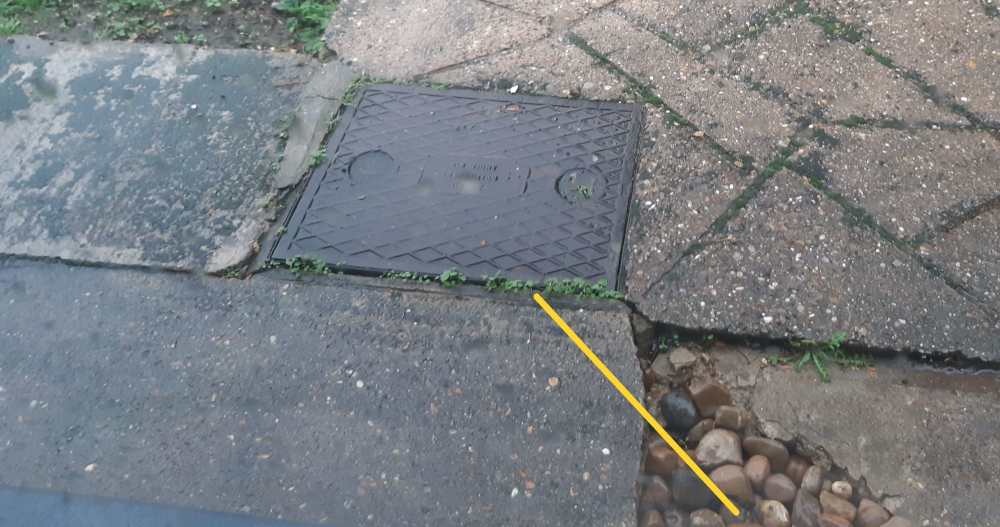
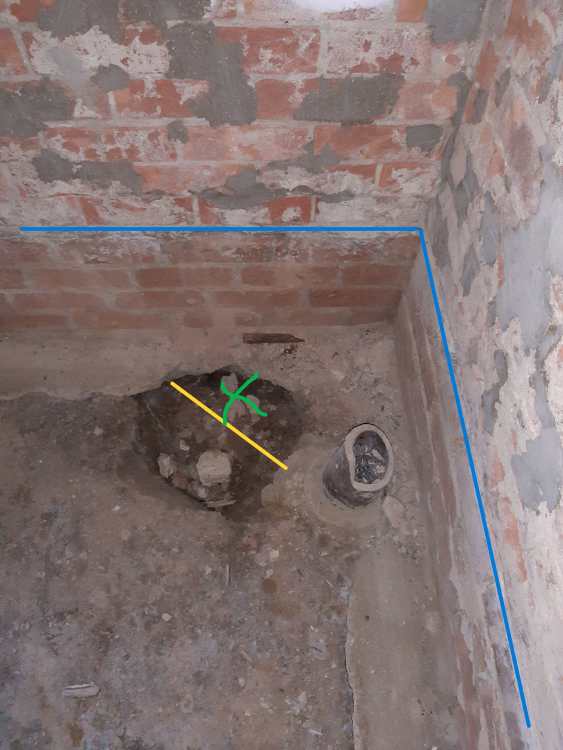
I recently posted a thread about my shower tray installation which is unfortunately work stop at the moment as I'm now waiting for a 4th tray to be delivered, not sure if they are leaving the factory warped or the courier is causing the issues. So in the hope of ever getting the en-suite finished I've moved on. Could any drainage gurus out there give me some advice on the best way to route and connect a new internal soil pipe to an outside inspection chamber? I have recently created an en-suite shower room in my loft space (dormer bungalow). For the W.C I have installed a new soil pipe (white in the picture) which runs vertically down into the ground floor bathroom. The bathroom is in the process of being dug out in preparation for some insulation and possibly UFH. Whilst it's dug out I want to now get this new soil pipe routed outside to the inspection chamber which serves the bathroom. Currently in the corner of the bathroom (which is a bit dark in the picture above) is an old broken clay connection for the W.C which is routed down and under the outside wall foundation (Blue line is the slate DPC). The clay pipe runs under the foundation to the outside inspection chamber (yellow line), probably about 2-3m run. Which would be the best way to do this - 1. Connect new soil pipe (white) into a rest bend on top of the internal wall foundation and run it to a bend / branch connection where the broken clay pipe currently is, following the yellow line hopefully achieving the correct fall. Replace the clay pipework with plastic and take it under the foundation using the existing hole. 2. Connect new soil pipe and run it as above but take it through the external wall below the DPC. I also want to install a new W.C in the ground floor bathroom but with the waste outlet for it being roughly where the hole is currently dug in the picture (green cross). Is there a clever way to join the two wastes together and exit through one hole to outside or would they need separate outlets? The outside ground level is currently about 1 brick below the DPC blue line (I know ideally it should be two bricks and is on my ever increasing list). I'm struggling to get anyone to come out and quote for this so will probably end up having to tackle it myself but need to make sure I don't introduce any issues. Not sure about rodding access but was hoping it could all be achieved from the inspection chamber. Thanks.

-
Thanks again Nick, that's perfect. Crystal clear now! Will hopefully be able to get onto this job now at the weekend once the new tray has arrived.
-
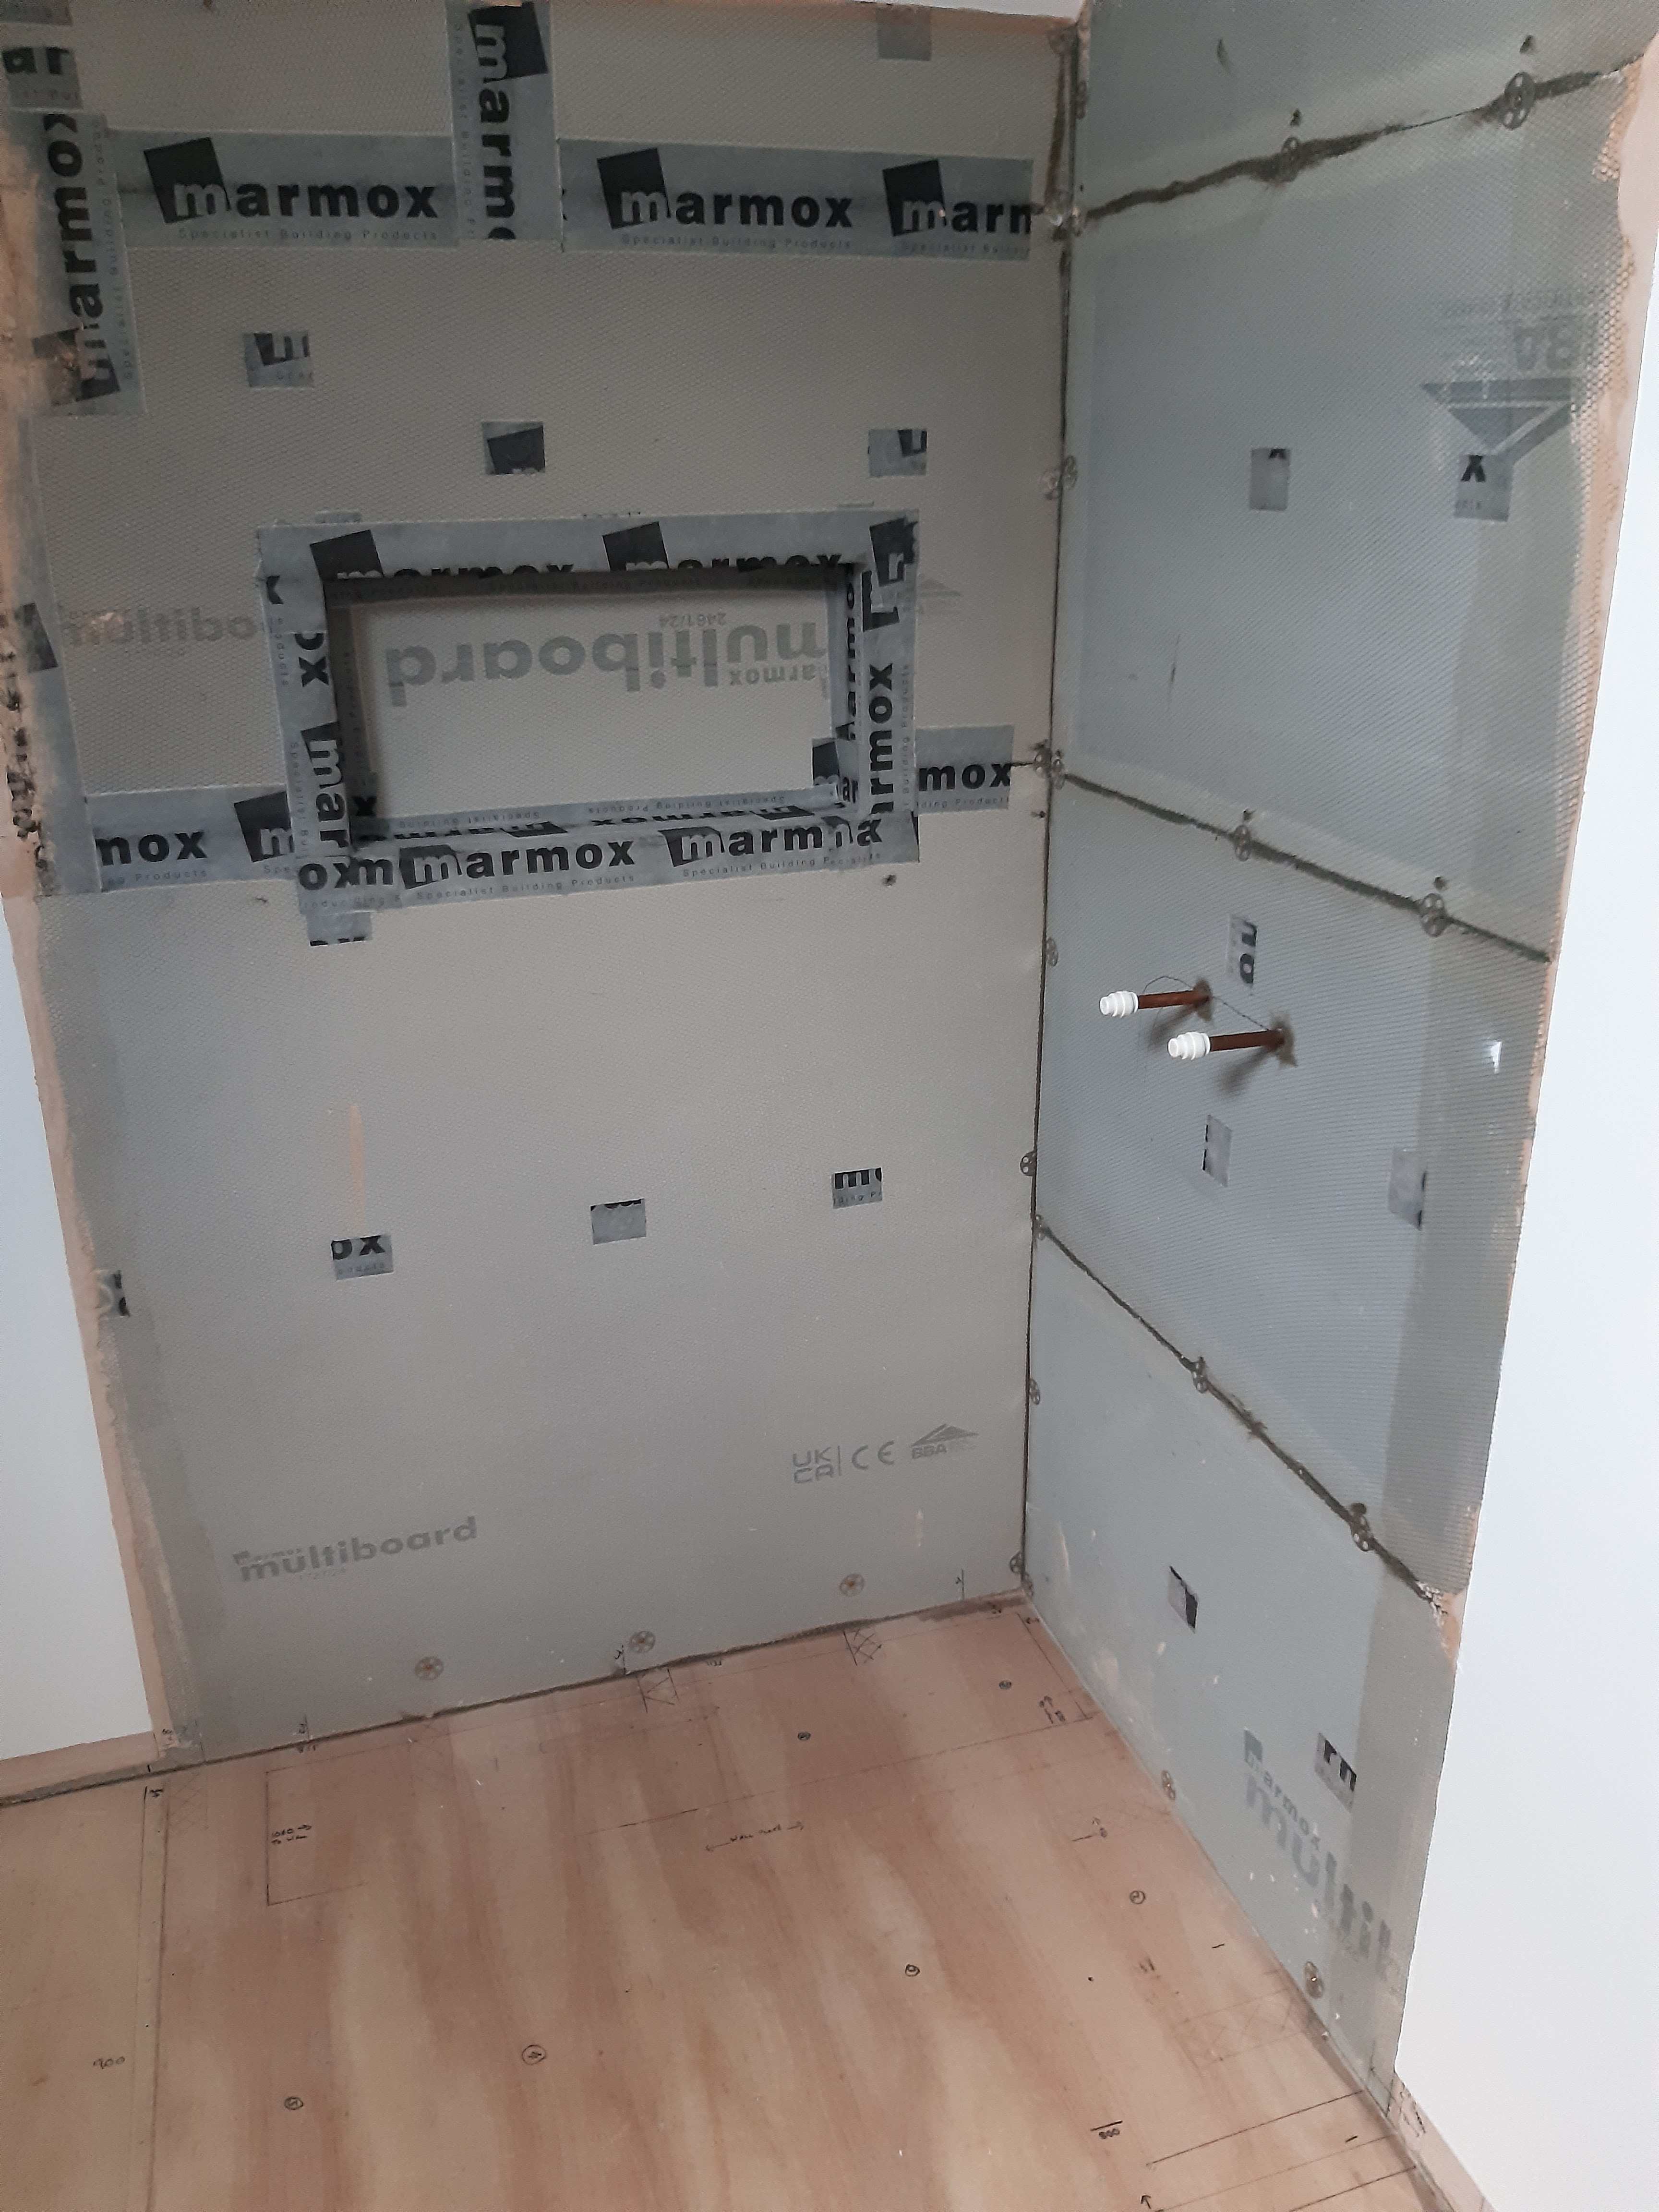
Reading my reply from Nick again I now realise he was referring to both walls for letting the tray into. Im probably over thinking this but at the moment I have the multi board which is 100% waterproof installed from ceiling to the plywood floor where it is sealed. If I cut into the board to let the tray in I will be losing the waterproof seal that is currently there. The walls are of stud construction so will then be open where the cutout is made for the tray. How do I then form a good barrier with CT1 within the cutout? The boards are 12mm thick and insulated with a foam type material, xps? Partially cutting into the board wouldn't be easy due to the insulation with respect to getting a neat cutout.
-
Thanks Beau/Nick for your replies today, Some good info in there for me to refer to, especially priming the plywood - completely slipped my mind. Thanks also for confirming not to lay the tray on top of the LVT. I'm not going to be able to do this job now until towards the end of next week as after inspecting the tray today I've noticed it is delaminating slightly in one corner, only a small amount but not worth the risk. Annoying as this is the second tray I've had, first one was warped. Manufacturer (Mira) says to bed the tray on a 5/1 sand cement mix or silicone. I'll go for OB1 to bed it down and CT1 to seal it to the walls. Nick, could I just confirm with you when you say to set the tray into the return wall with CT1, do you mean to cut a channel into the wall then push the tray into the recess made after packing it out with CT1? If you do mean this, how deep should the recess be and apologies if I'm being a bit thick here but which is the return wall - the 1200 or the 900 length of my tray? Thanks again for the replies.
-
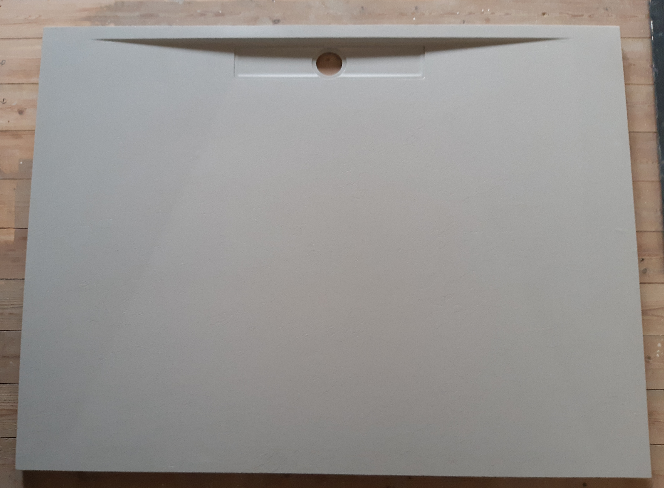
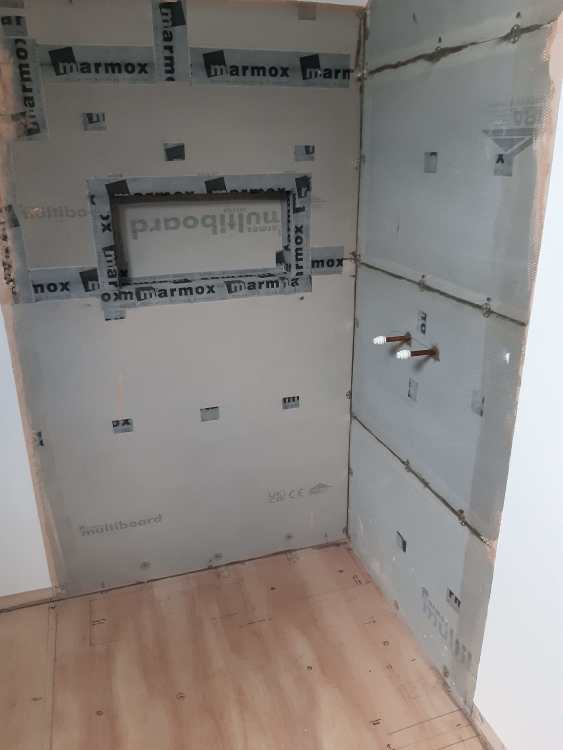
Hi, I'm looking for some advice on the best practice to prepare my new shower area for tiling. It's situated in a first floor room that I have created in my loft space. The marine plywood floor is sat on 8x2 joists and is solid. The floor covering will be done in Luxury Vinyl flooring which claims to be 100% waterproof. Shower area will be tiled and a glass screen fitted. The cut out in the wall will have a metal preformed niche installed. Finally, the shower itself is a hansgrohe bar type, no rain shower head though. I have boarded out the stud walls with Marmox Multi board and sealed all of the joints with Marmox MSP360 adhesive/sealant. Fixing screws and washers have been covered in Marmox waterproof tape. The remaining walls have been skimmed and decorated. I'm now at the stage where I want to add some tanking material prior to installing the shower tray (Mira Flight 25 Low Level 1200x900). Planning to use something like CT1 for bedding the tray onto the floor. I have a Dukkaboard Aqua 77 5kg tanking kit ready to go and am looking for the best way to go about this. I've been thinking about the various ways to go about this but am undecided on which method would work best. 1. Should you lay the vinyl flooring first then place shower tray down on top of it or should the tray go straight onto the plywood? I'm guessing the answer will be no, but my thinking is it will at least provide another layer of waterproofing. 2. Should the plywood be tanked using the kit before fitting the tray? Thinking about using the fabric along the wall/floor joint and up the corner join with a good covering of the tanking material. Also thinking of coating the plywood with it where the tray will sit. I then ask myself the question that if water reached the tanked plywood, where is it going to go then so probably a waste of time! 3. Bed tray onto plywood with CT1 and along the back of the tray where it will join the wall board - will try to create an upstand with the CT1 as I've seen mentioned here. Then use the tanking kit to make the join between walls and tray plus up the corner joint approx 1.8m. I have also got a good bit of the waterproof tape left which could do this job if considered just as good? The walls will then be tiled with 600x300 porcelain wall tiles. Will probably get a professional in for this but wondered if it's worth requesting him to use the resin type grouts I've been reading about? I realise there will be more than one way to go about this but am looking for advice from those who have done this type of job before. Thanks.
-
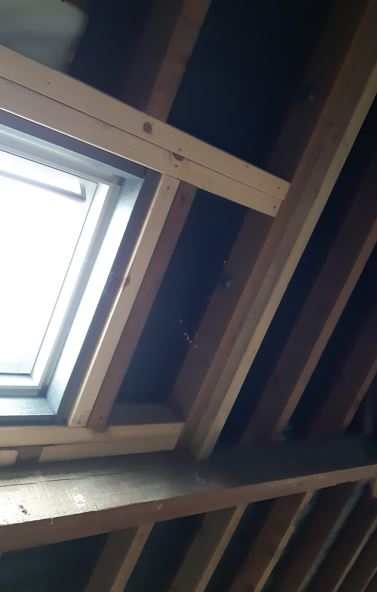
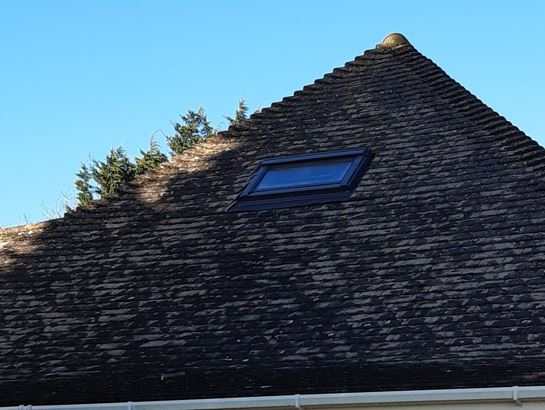
Thank you Nick, i wouldn't have thought about it that way as I've been more focussed on maintaining the structural integrity of the installation. From the way you describe it, sounds like it's pretty common practice to 'chop' timbers before installation to address this type of issue? I'm surprised Velux don't pass this onto their approved installers as my window was actually fitted by one. Building control never mentioned it either when they looked at it.
-
Thanks for the replies. Personally I can't see what effect drilling a couple of small holes would have on the overall structure of the roof. For info, it is approx. 70 years old, made up of concrete tiles, 1x1 lats, bitumen felt, 4x2 rafters plus the 2x2 batons I've recently added to increase depth for insulation.
-
Thanks Wil, hopefully someone will be along soon to enlighten us. In the meantime, if I do find something I will post it here.
-
Anyone have any thoughts on the above?
-
Hello, I recently had a Velux window installed in my roofspace which will be used as an en-suite for the upstairs bedroom. I will be insulating between the rafters leaving a 50mm gap for ventilation between the roof felt and insulation. There are two areas (to the left and rightof the window) that will be effectively sealed off (due to double trimmers being fitted) from the ventilation path once plasterboard has been fitted. Would it be acceptable to drill these trimmers top and bottom to allow some airflow through the void? If it is, what would be the best quantity / size / location for these holes? Thanks.