peekay
-
Posts
65 -
Joined
-
Last visited
Everything posted by peekay
-
WundrWall - Battery Subscription. Looks good, but what am I missing?
peekay replied to peekay's topic in Energy Storage
I've just come across this site, which seems suspiciously cheap for very large batteries https://www.itstechnologies.uk/collections/sunsynk-installed-packages/products/installed-solis-8-10kw-hybrid-plus-fogstar-energy-48-3-64-4kwh?variant=57830302187901 48kWh Fogstar battery with 8kW Solis inverter for £7130 fitted. 64kWh battery with 8kW inverter for £8315 Also options for 10kW inverters and larger quantities of batteries. These batteries are probably bigger then we need, but I'm now considering these, and sacking off the solar altogether. -
WundrWall - Battery Subscription. Looks good, but what am I missing?
peekay replied to peekay's topic in Energy Storage
I've found a Reddit thread with a bit more info -
WundrWall - Battery Subscription. Looks good, but what am I missing?
peekay replied to peekay's topic in Energy Storage
The total cost seems slightly cheaper than I have been able to find independently. Money is tight at the moment, so the cost of financing a battery install makes it even more expensive. Absolutely. Which I why I'm sceptical of this scheme, surely there must be a con somewhere. -
A friend was telling me that they had signed up to a WundrWall battery subscription. £35pcm for 10 years for a 12.8kWh battery. Including install, maintenance and DNO notification. The user can choose the energy traffic, control the charge/discharge cycle, pay annually rather than monthly and also buy themselves out after 5 years. Other options are 19.2kWh battery at £45pcm and 25.8kWh at £55pcm. I am considering the £55pcm option (having been in the house for a year now, we use over 30kWh every day including the summer). Given there is no upfront capital outlay from the user, we should immediately save £90ish pcm on our electricity bill at £0.13/kWh off-peak and £0.25kWh peak (£35 once the battery cost is taken away), and potentially even more if we switch to an EV tariff with a £0.07/kWh off-peak. It almost seems too good to be true, which makes me think that it is, and I am missing something obvious. Is it the next 'scam' like having non-owned solar panels fitted to your roof that prevent you selling your house? Inflationary price rises make it £500pcm for the batteries, they stop working and nobody else is able to work on them yet I still have to pay, Wondrwall go bust and they stop working etc. Any thoughts would be appreciated, or if anyone has signed up then I'd love to know how you are getting on. Here is the link to the scheme https://wondrwall.com/battery-powrplan/
-
Thanks We've looked in various carpet shops at the low Tog rated underlays and carpets. Have seen the 'keep beneath 2.0 tog total combined for carpets and underlay' repeated in many places. I understand the need to use an underlay and carpet that will not be damaged by the heat from the UFH (degrading any adhesives or foam etc). But my more general question of why does Tog rating matter in a sealed, insulated and consistently heated house with underfloor heating still stands. I can understand the 'keep below 2.0' logic for a more traditional older style house heated generally by radiators at 60 degrees against the wall for 3 hours in the morning and afternoon, and only a small part of the heating system by UFH. Lower tog carpets and underlays are generally thinner, less soft, more expensive and have a smaller range. Is there any benefit in using a low tog system in my situation?
-
Guidance seems to suggest that specifically designed low tog rating underlay and carpets should be used to allow for efficient heat transmission, but is it really necessary in my situation? Bit of background.... We have a wet UFH system throughout the whole house. Ground floor loops are laid on 150mmish insulation above the slab and set within a 100mm screed. First floor set within those cement board sheets with pre-routed loops then under 5-10mm of latex screed/self levelling compound. The house is very well insulated. Pretty much airtight with an MVHR system. We have an ASHP and the flow temperature to the UFH loops is about 35degrees. The whole house is heated to a constant 21 degrees 24/7. Each room is its own zone controlled by a thermostat and manifold. We want carpets in the 4no upstairs bedrooms, a ground floor bedroom and ground floor sitting room. Surely even if using cheaper standard thickness carpets and underlay the heat energy being transmitted to the room is the same, as there is nowhere else for it to go to. It still makes it's way though the carpet materials and in to the rooms, but may just take a bit longer for the room side surface to react and heat up/cool down, which I think as we keep everything at a constant temperature shouldn't really matter. I would welcome any thoughts. Thanks
-
Thanks everyone. We've looked in to cheap vinyl/lino, but as we have a large area to do, (140m², of which ~100m² is mostly a single continuous but oddly shaped space), we will need 4 joins with 4m wide rolls which as an amateur will be difficult to do tidily. Plus the cheapest I can find is about £9/m², so we are looking at at least £1000 for something temporary that we have a good chance of cocking up. Thanks for the recommendation of paints. That Teamac stuff looks like a good price and the reviews look good. If the paint is adhered well enough to the concrete not to flake or peel, would it really need removing before using an adhesive to affix whatever flooring we finally settle on? We've actually already used cheap recycled office style carpet tiles in the bedrooms upstairs. That worked out at about £1.50/m². We did consider doing that in the ground floor hallway/kitchen/diner/sitting area, but would prefer a hard floor.
-
Hi I'm looking for a bit of advice about painting internal concrete floors. We moved in to our self build 12 months ago. It is habitable but still not quite finished, and as always, money is tight. The ground floor is about 140m². 90mm drymix screed over UFH. The plasterers made a bit of a mess of the screed with splashes of plaster. Most of it has been scraped off but there are still lots of pink stains. When decorating, we didn't bother protecting the floor, as we expected to be able to hide the splashes under flooring. When we first moved in, we realised that we wouldn't be able to afford flooring for a few more months, so sealed some areas of the paint and plaster splattered floor with this https://floorseal.co.uk/product/concrete-floor-sealer/ some with this https://www.toolstation.com/bostik-concrete-sealer And some we never actually got round to sealing. It is all looking a bit grotty now, but for financial reasons, and practical reasons it will probably still be a few more years until we put a proper floor finish down. We don't know what that floor finish will be yet. Currently siding on a mix of cork, and marmoleum. But we may use LVT, or microcement. We want to paint the concrete floors for the short to medium term, but are worried that doing so might limit the effectiveness of any adhesives or other materials that might be needed in the future once we have decided what final floor finish we will apply. There seems to be a lot of different varieties of floor paint, that require different preparation but reading through the tech details, I can't figure out whether I can just apply directly over my sealed floors and unsealed areas, and what impact the paint may have on future floor finishes. Light domestic traffic, I don't think we need epoxy. This is what I'm thinking of using, in a jazzy colour https://www.crowndecoratingcentres.co.uk/paints/interior/floor-coatings-and-protection/crown-trade-fast-drying-concrete-floor-paint It is possible I may be overthinking it, and should just get on with painting whatever I want on there. Any thoughts or advice? Thanks
-
Not really. By the time I was seriously considering knocking the whole thing down, my builders had already started on site with the partial demolition. Pausing mid way through this partial demolition to allow time for submission of a full knock down/new build was not feasible given how tight we were on cost, and spending £2k+ per month on rent, double bills and double council tax. I'll send you a message.
-
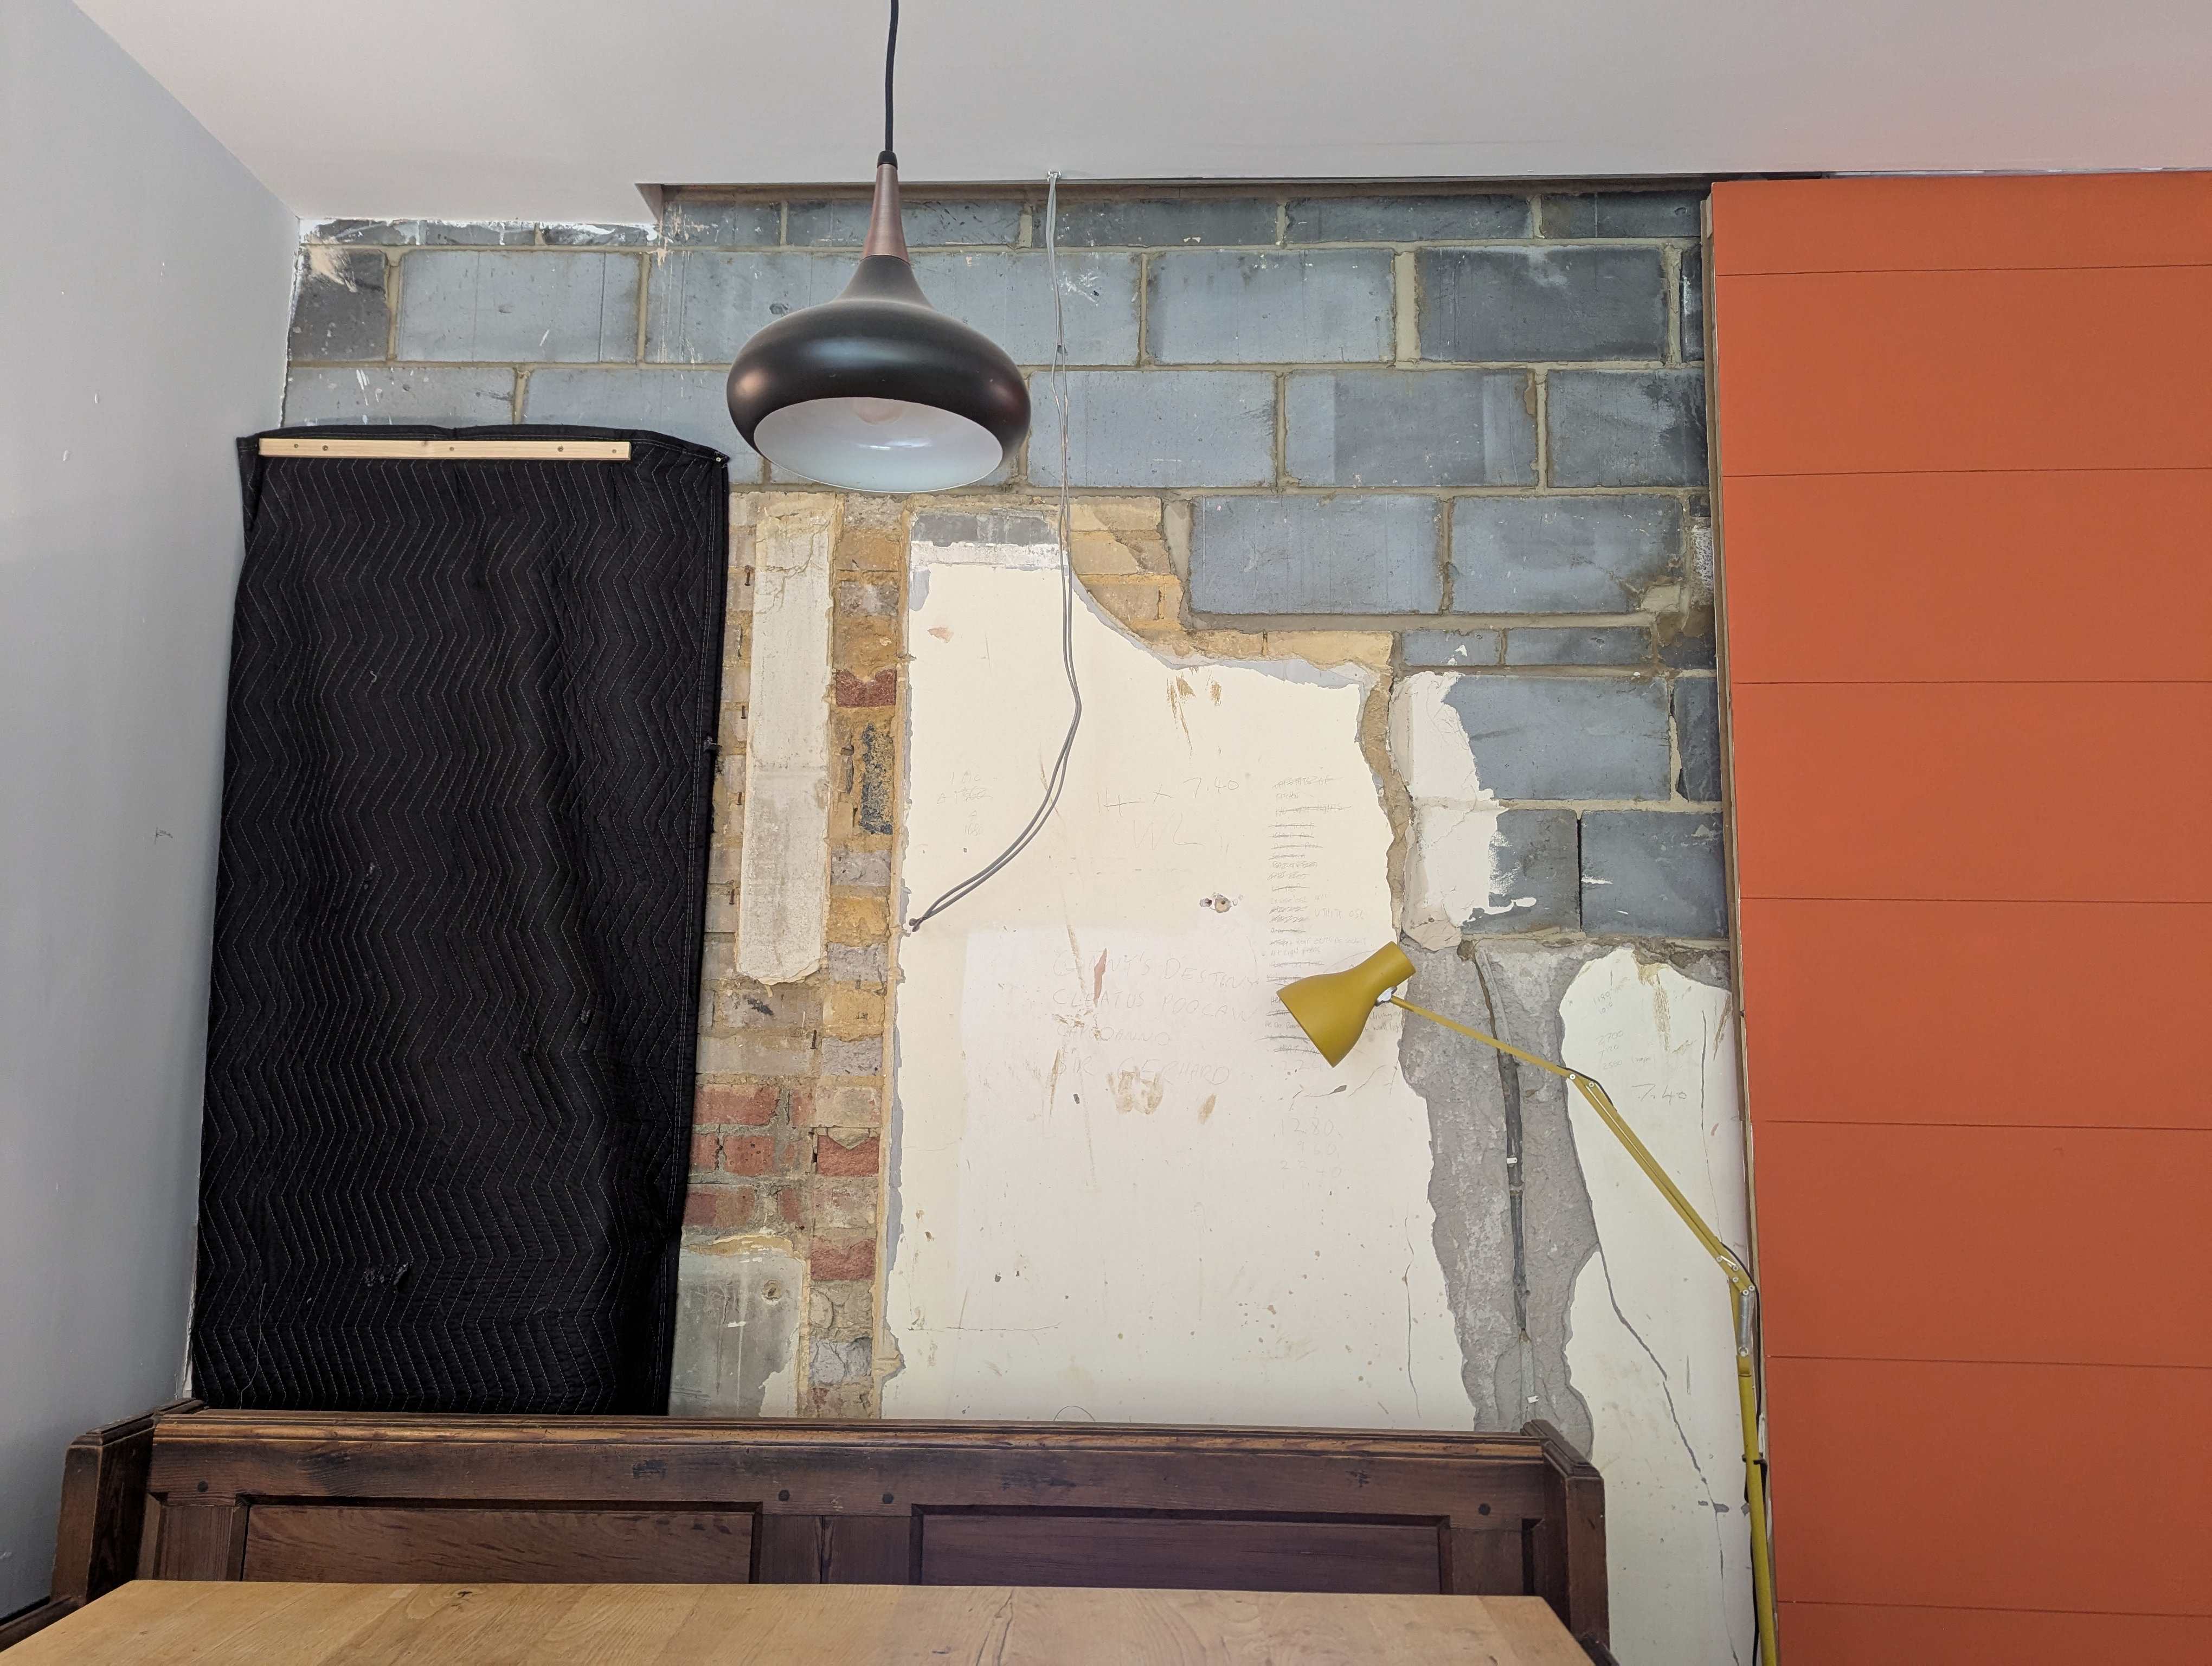
We kept a few of the original walls rather than doing a complete knock down and rebuild. The advice (and to some extent sowing of FUD) was enough for us to make the risk based decision that we would not fully demolish. We would not have been able to afford any time delays for resubmitting planning as we were paying for a rental house whilst doing the works. In hindsight, I am pretty sure that we would have gotten away with it, but we are happy enough with our decision. We were already doing it in quite a risky way with finances and mortgage. There is very little of the original house remaining as part of the completed structure, and almost all of it is hidden behind newly plastered walls (except a small portion behind a rarely used large sliding wall panel, complete with various pencil notes from the builders with to-do lists, shopping and horse racing tips. We are actually keeping this as a reminder of the works) As the house had been vacant for 2+years, the majority of the materials and labour were changed at 5% VAT at the point of purchase (VAT note 708), whereas if we had knocked down and been caught needing to to a full new build application the VAT would be paid at 20% then reclaimed at the end, so would have severely impacted cashflow for only a relatively small saving.
-
We used this company for our Juliet Balustrade. https://www.ironoctopus.co.uk/ Was very impressed with the price and service. They did basic style galvanised steel one, bespoke to our dimensions and fixing method, and powder coated it RAL matched to our window frames. From memory is was only about £150 delivered.
-
Using an existing ASHP hot water supply to heat a pool
peekay replied to peekay's topic in Air Source Heat Pumps (ASHP)
I've got lots of PIR board offcuts from the build, so might try and fix it together in to a pool sized panel to create a 'lid' for the pool to use in addition to the thin tarpaulin type one. Will keep it out of the water though, as I'm not sure what effect the pool chemicals will have on the PIR board. Thanks. Still no thoughts on whether using my domestic ASHP hot water supply to do the initial pool fill is a good idea or not though. The pool and small ASHP pool heater have now arrived, so will be starting the fill over the weekend. -
Using an existing ASHP hot water supply to heat a pool
peekay replied to peekay's topic in Air Source Heat Pumps (ASHP)
Thanks, I've already ordered various pool chemicals. -
Hi all. We have an 12kW air source heat pump with a 400l tank for our domestic hot water. Temperature set to 55°C. We have just bought a 3.5m diameter, by 1m deep above ground swimming pool that we will put up for the kids to play in over the next few weeks once the warmer weather returns. This will likely stay up until autumn. We are looking at buying a small either 3.5kW or 5kW pool heat pump to warm keep the water warm to around 25-28deg (example: https://www.tradeinn.com/swiminn/en/poolex-nano-action-a5r-2020-5kw-2.5-m--h-inverter-heat-pump/139816348 ) My question: Rather than filling the pool with the cold water supply, and having the small pool heater work to bring the water up to temperature over a few weeks, would there be any benefit in filling the pool with water from our hot water tank 400l at a time until the pool is at the required temperature and then letting the small pool heater take over? I've read that I should expect it to cost about £10 a week to maintain the pool temperature, does anyone in the South East have any thoughts on whether this is a realistic budget? And is there any benefit in trying to insulate the pool in addition to the standard thin polythene pool cover? We have some old foam garage floor tiles that we were planning on putting under the pool for protection/insulation but would welcome any other tips about setting up or running a similar pool. Thanks
-
For our almost complete knock down and rebuild, our BCO said that we would be fine with lower sockets. We chose to put them in at the higher position. At some point we may appreciate not needing to get on our knees to plug things in. I've also not once looked at them and thought that they look high, or considered the plugs to be at an inconvenient height on walls. My general view on most things is that Building Regs are there for a good reason, and should be a guide rather than something to rely and get around.
-
German kitchen brands - Nobilia, Bauformat or Leicht?
peekay replied to Indy's topic in Kitchen Units & Worktops
For a large hand built using good quality birch ply (mix of oak veneered and Fenix veneer), good quality hinges, feet and drawer runners, worktops a mix of Fenix NTM and Valchromat, we paid about £8.5k in materials (cabinet maker built the materials orders with his supplier, who then invoiced me directly for VAT savings), and about £7k in labour for the time in his workshop to build the units, deliver and fit. I sorted sink, tap and appliances myself, but they came to about £6.5k I am doing some of the finishing work to save cost, such as sanding and oiling the cabinets, putting in back splashes. My electrician and plumber did their own bits. Total cost of about £22-25k. The cost for the equivalent from wren was about £15-20k, the Germans were about £35-45k -
German kitchen brands - Nobilia, Bauformat or Leicht?
peekay replied to Indy's topic in Kitchen Units & Worktops
We are only a few miles away from you and used a cabinet maker based in Brighton. Happy to share details if interested. Have you looked at Schmidt kitchens? They have a branch near you in Dorking. -
German kitchen brands - Nobilia, Bauformat or Leicht?
peekay replied to Indy's topic in Kitchen Units & Worktops
If you want handle less, with solid doors, have you thought about getting a local cabinet maker who specialises in kitchens to help? Most decent kitchens use high quality hardware such as Blum or Haeffle for the drawers, hinges etc, so a good cabinet maker should be able to use the same bits and hit the same quality as a German manufacturer for a lesser price whilst being bespoke to your layout/design. There are loads of really interesting materials that you can use, ply, valchromat, Fenix NTM, and an almost endless list of different veneers that you can have applied to ply such Formica, various wood veneer, Fenix etc. Not sure where you are in the country, but take a look at the sort of thing this company do, there will be similar companies nationwide https://www.instagram.com/woodworksbrighton/ -
Removing house from Council Tax list
peekay replied to srowe's topic in General Self Build & DIY Discussion
Yes, or at the point when it is added back on by the Valuation Office if you get it removed from the Register to avoid paying Council Tax during the work. -
Removing house from Council Tax list
peekay replied to srowe's topic in General Self Build & DIY Discussion
Have you considered that if you do remove it from the register, then it might be re rated at a higher council tax rate once completed? We chose to keep paying council tax for the 18 months of our large renovation/build, as looking at similar size properties in a similar location we could have expected to go up by two council tax bands when it is re rated and added back on the the register by the Valuation Office. Our break even point for paying 18 months of unnecessary council tax is 6 years of living in the house of paying the lower rate tax band. We expect the house will be re-rated to the higher tax band when we sell it. -
Do I Need Even more Insulation? Decision needed within next 24hrs
peekay replied to peekay's topic in Heat Insulation
Thanks Will have a read about the BC Condo Crisis. I've just checked with the builders, and the breather membrane definitely overlaps the external masonry wall on the ground floor. Their plan was to fix a concrete board to the external studwork, and then fix the EPS/EWI on top of this. Going right up to the soffit and sealing at the top. I'll discuss your proposal with them, thanks for the detailed knowledgeable responses. -
Do I Need Even more Insulation? Decision needed within next 24hrs
peekay replied to peekay's topic in Heat Insulation
If the top of the EWI is under the soffit (regardless of whether there is an attempt to close the cavity behind it or not), where could water come from? Are you thinking of just condensation? Thanks -
Do I Need Even more Insulation? Decision needed within next 24hrs
peekay replied to peekay's topic in Heat Insulation
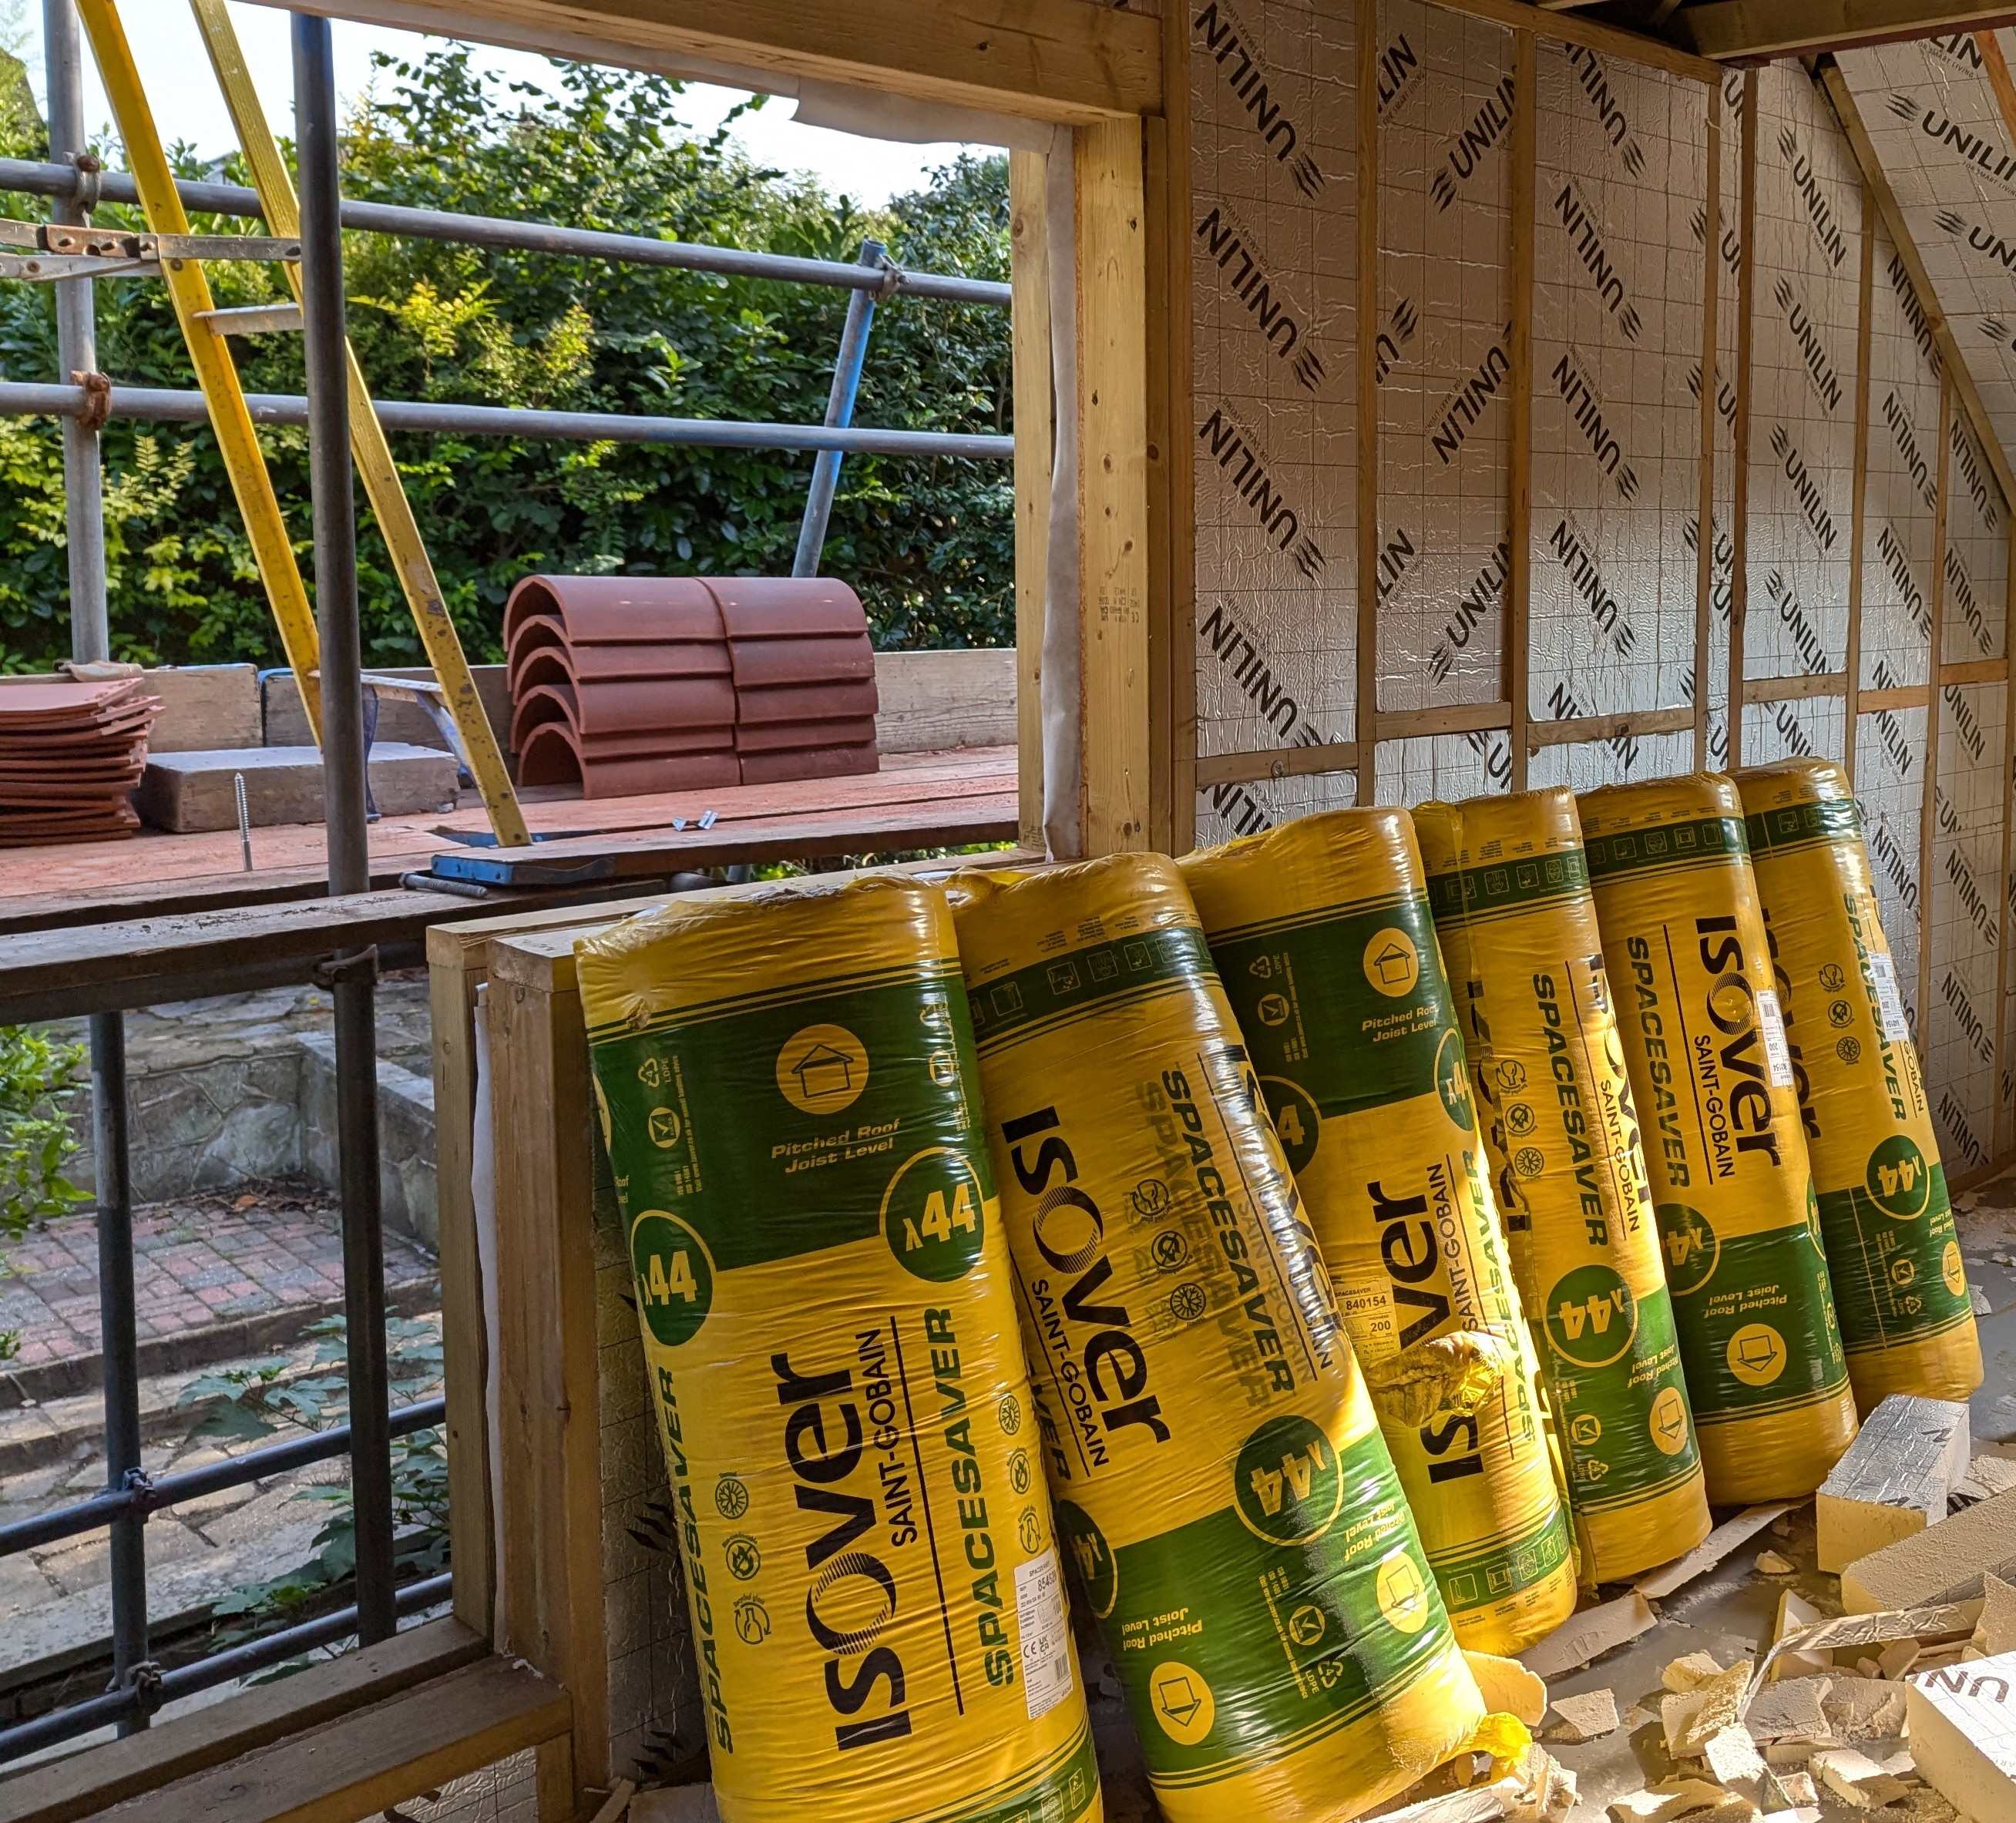
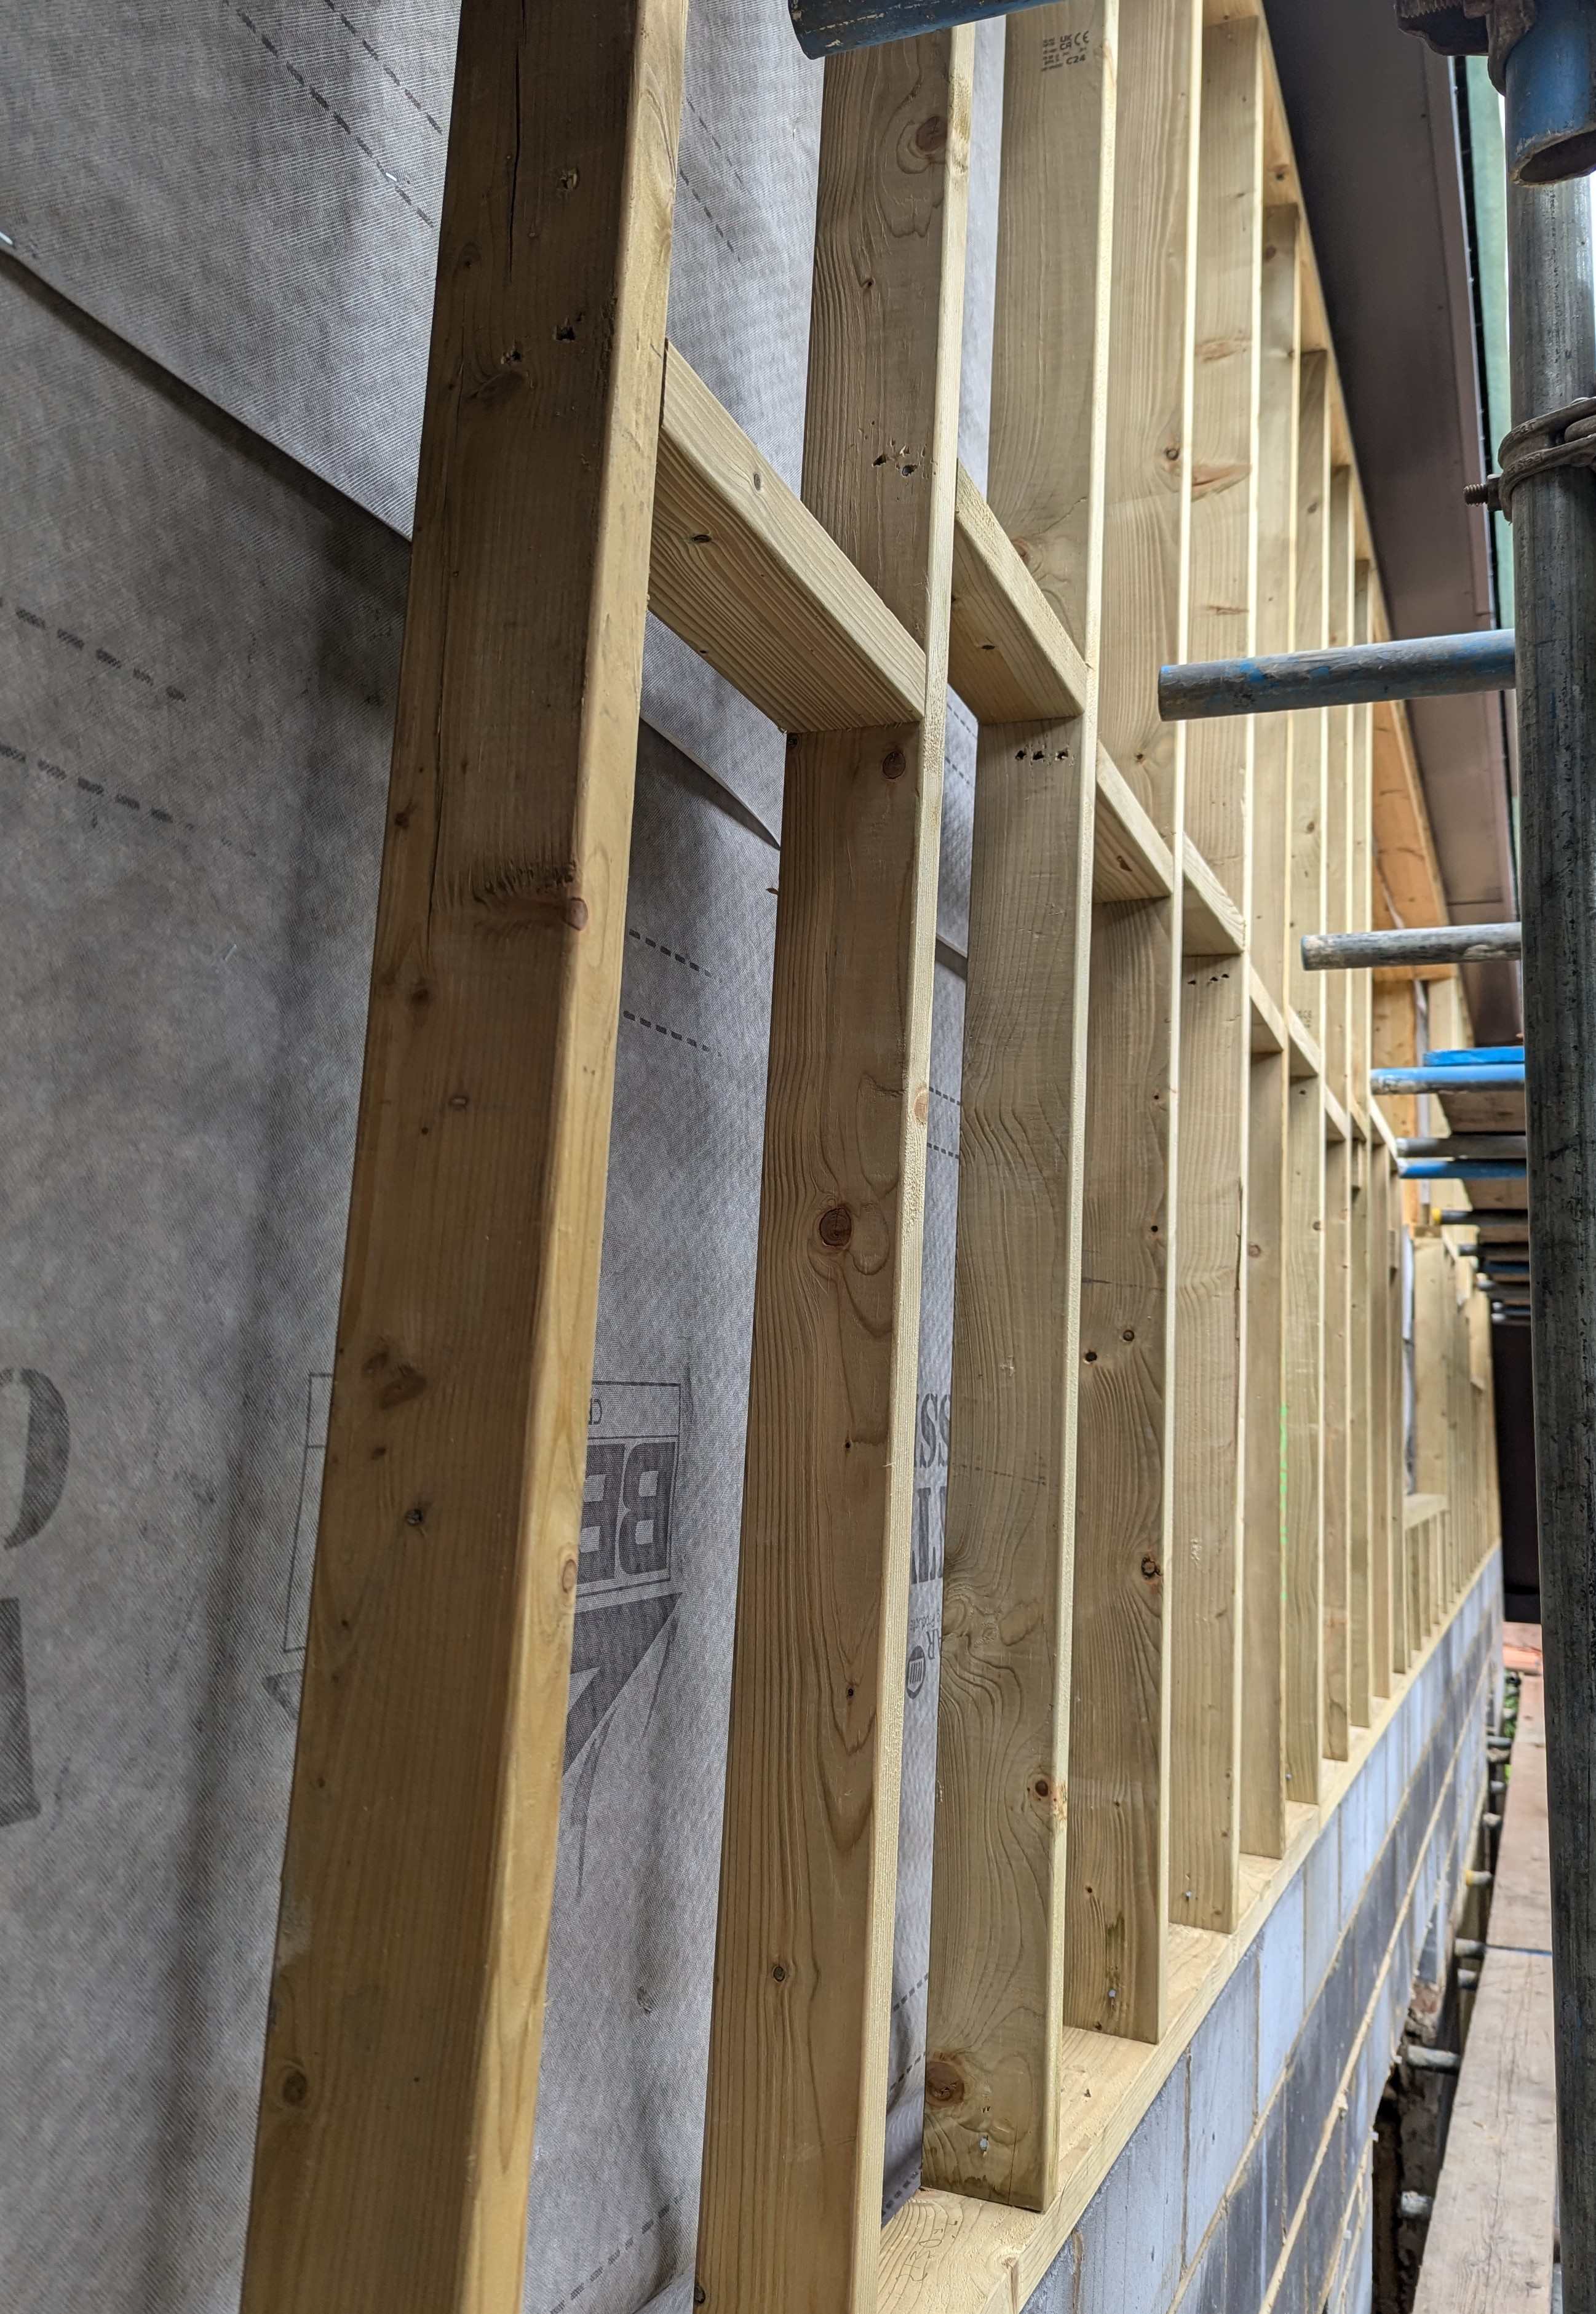
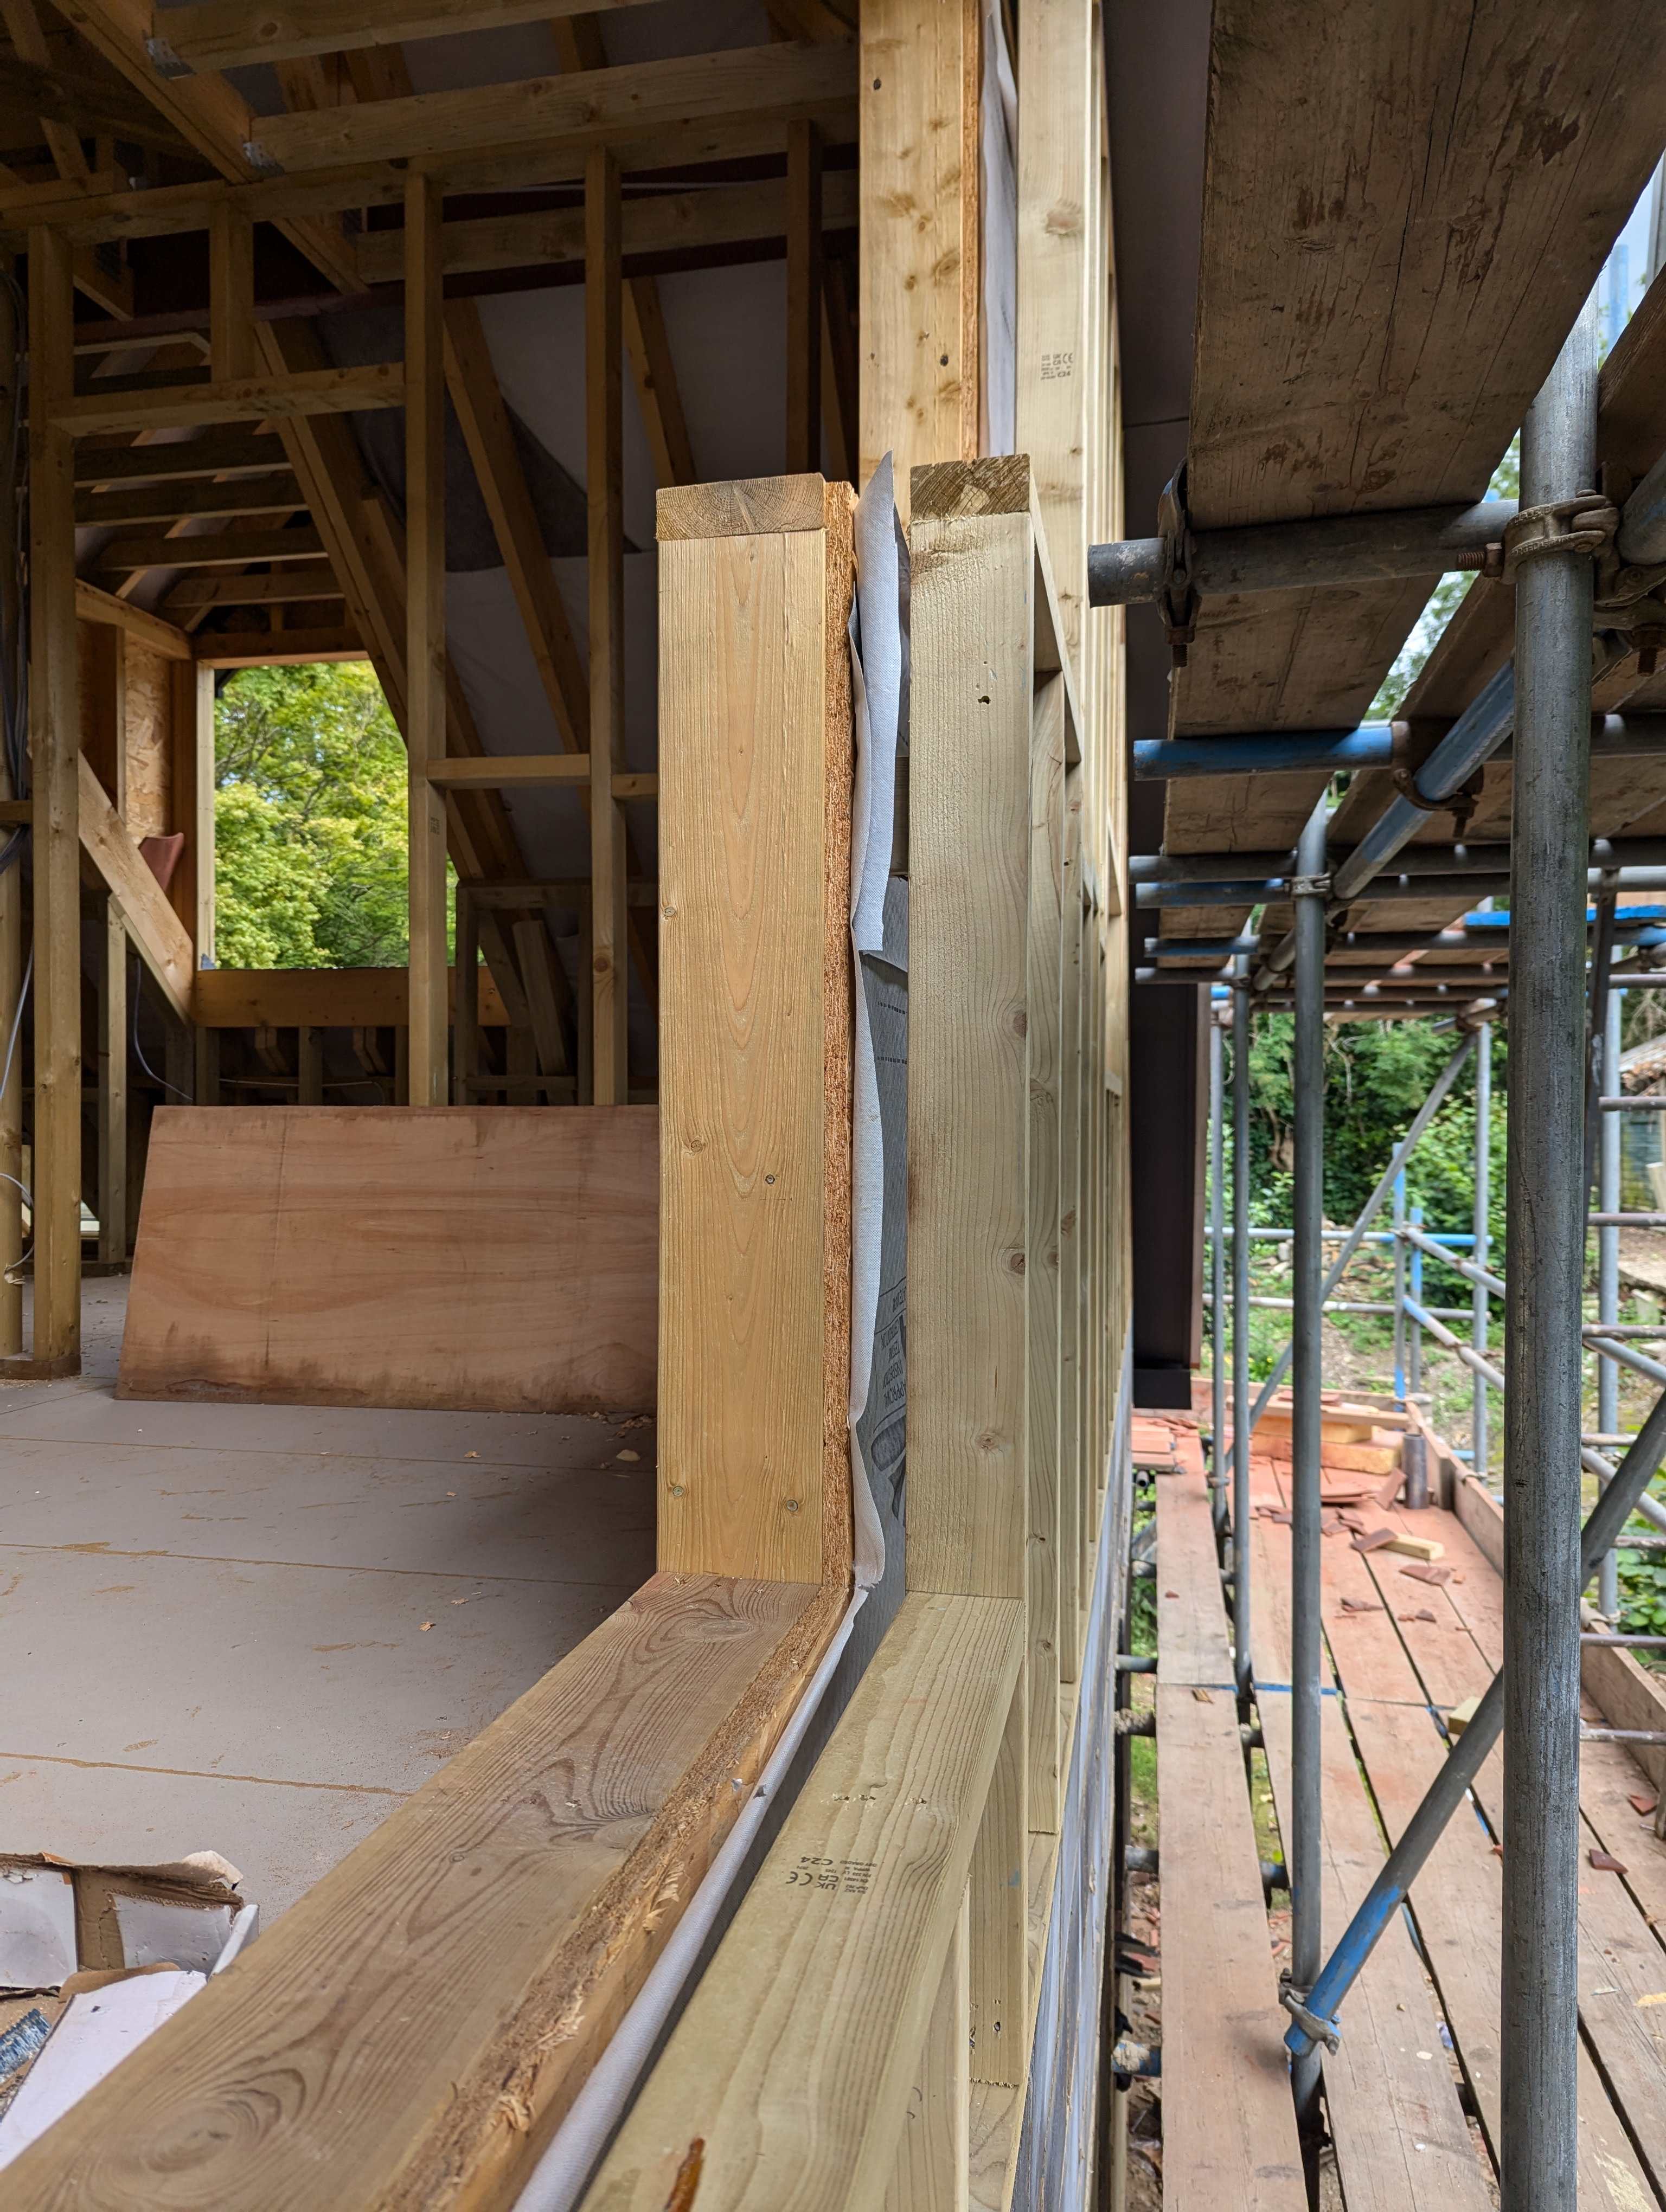
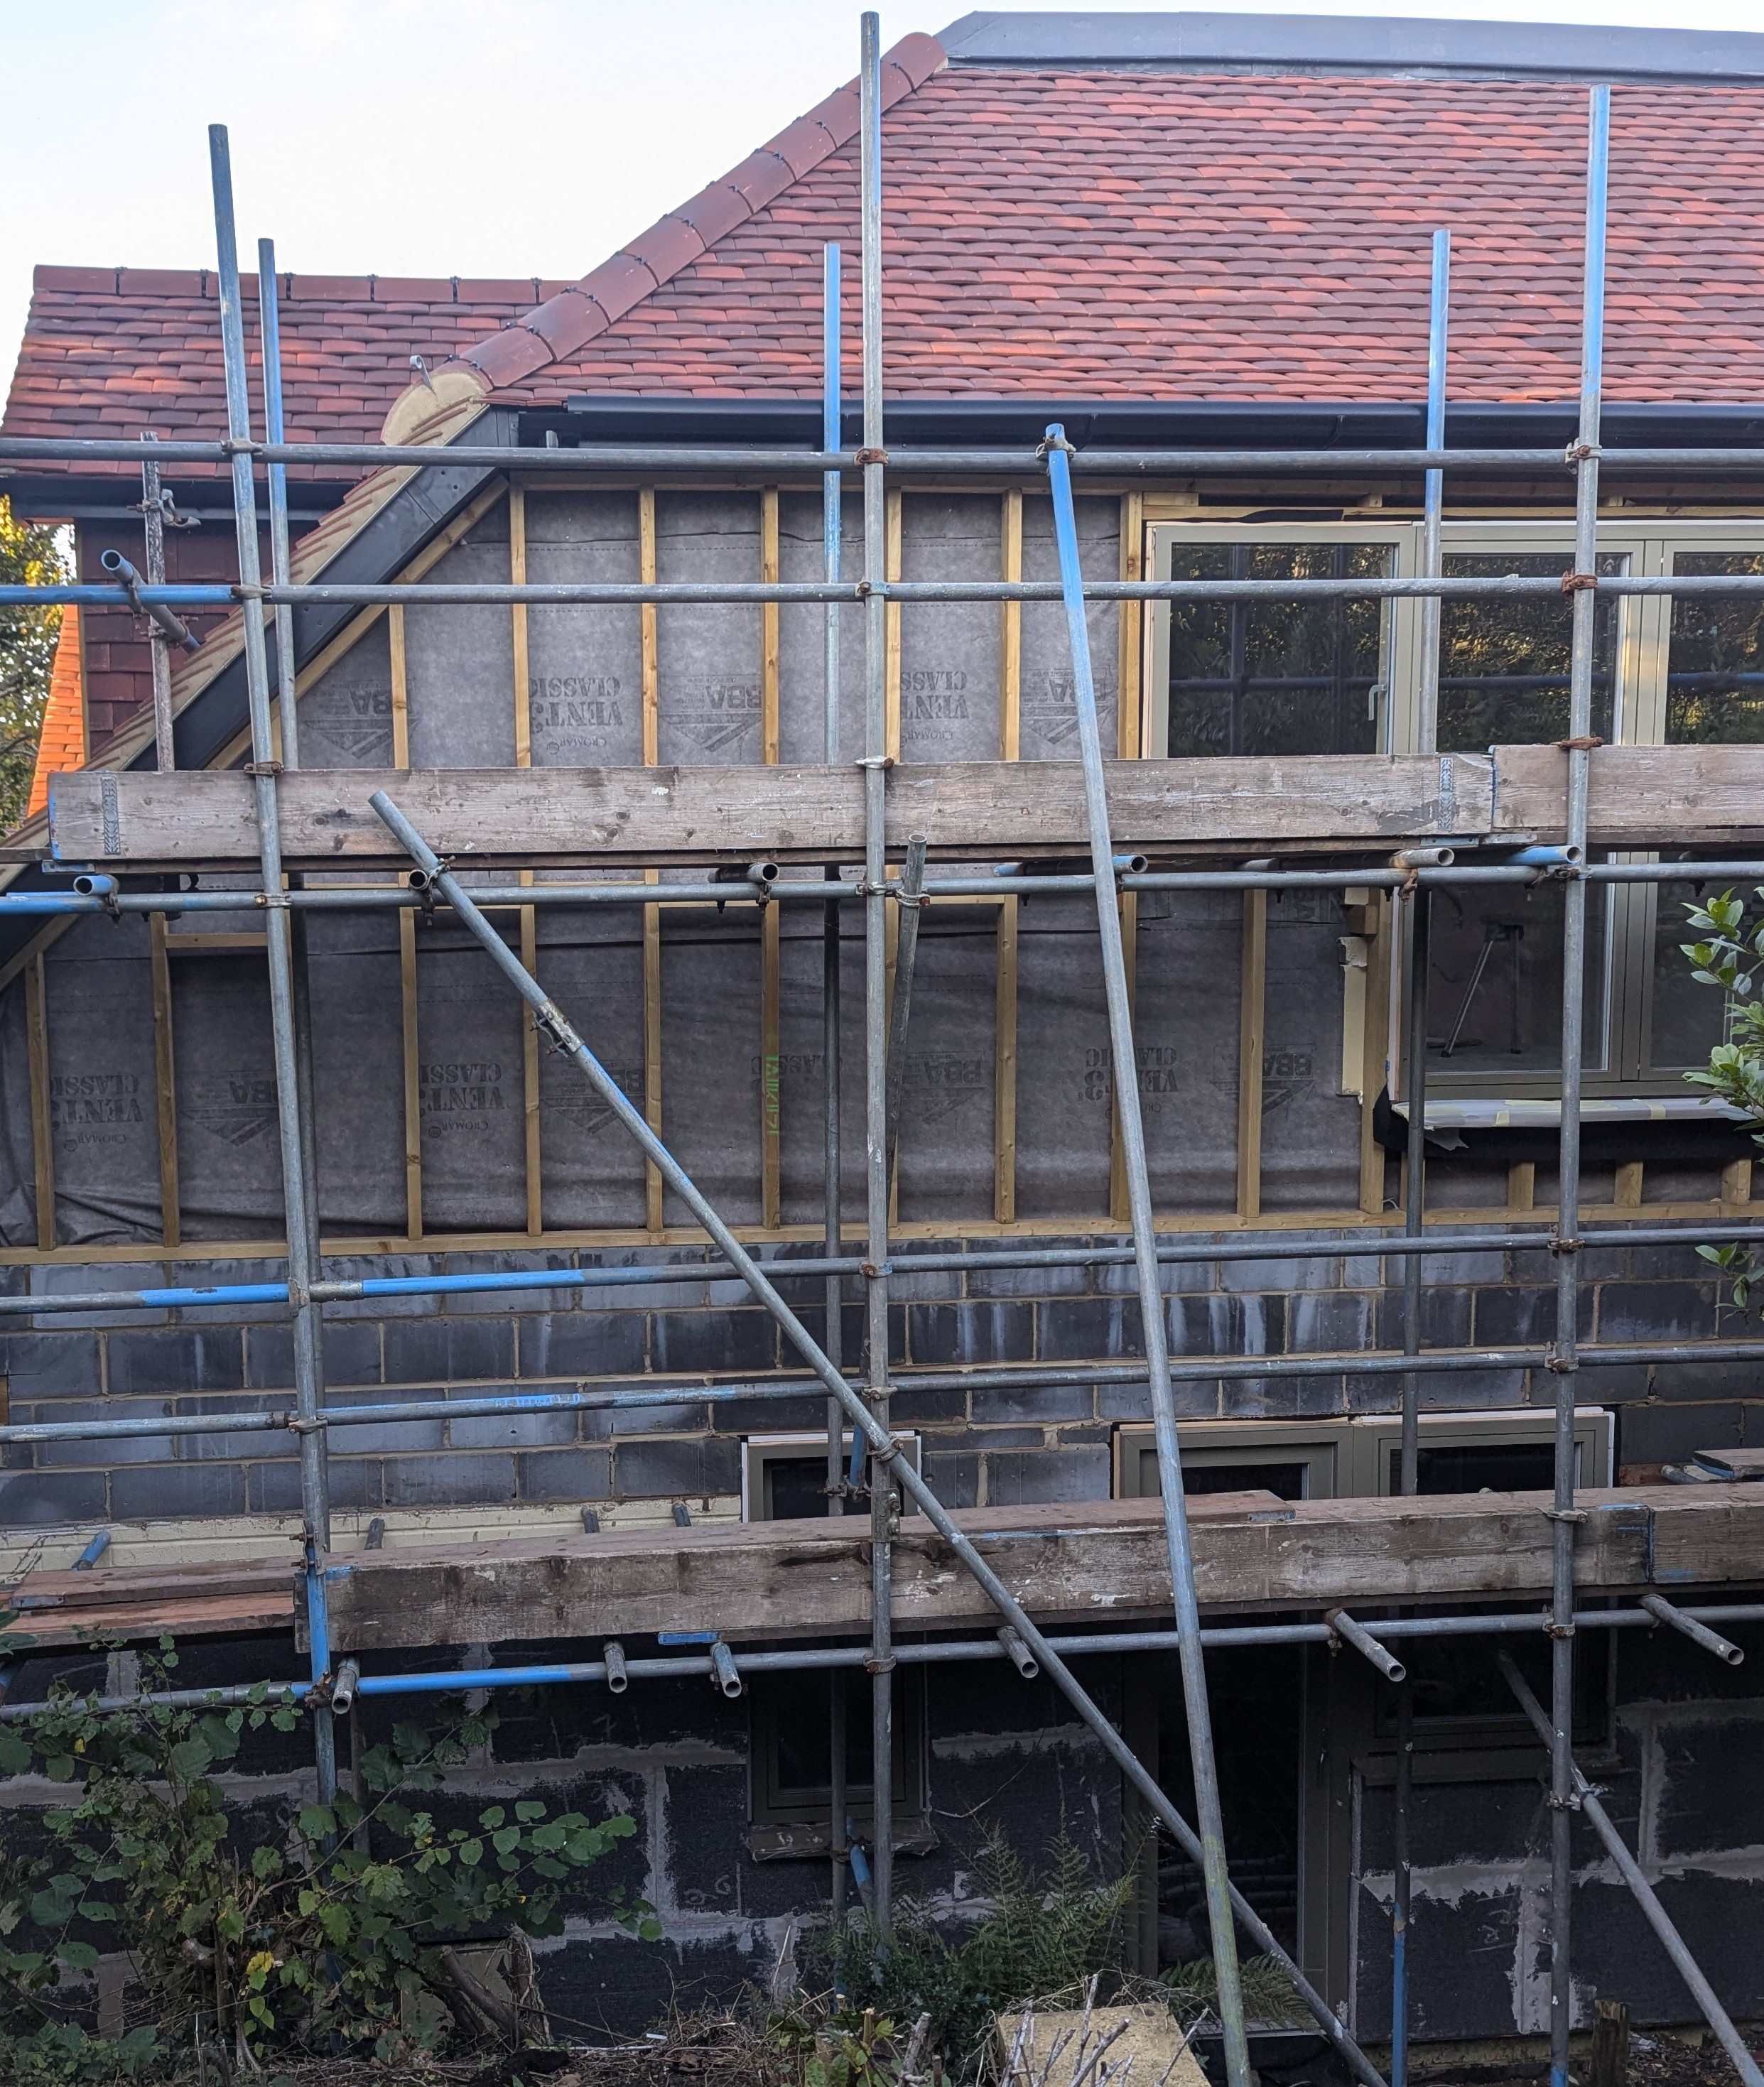
Here are some photos of the gables taken at various stages over the last few months. I'm not around until tomorrow morning to take new photos of specific details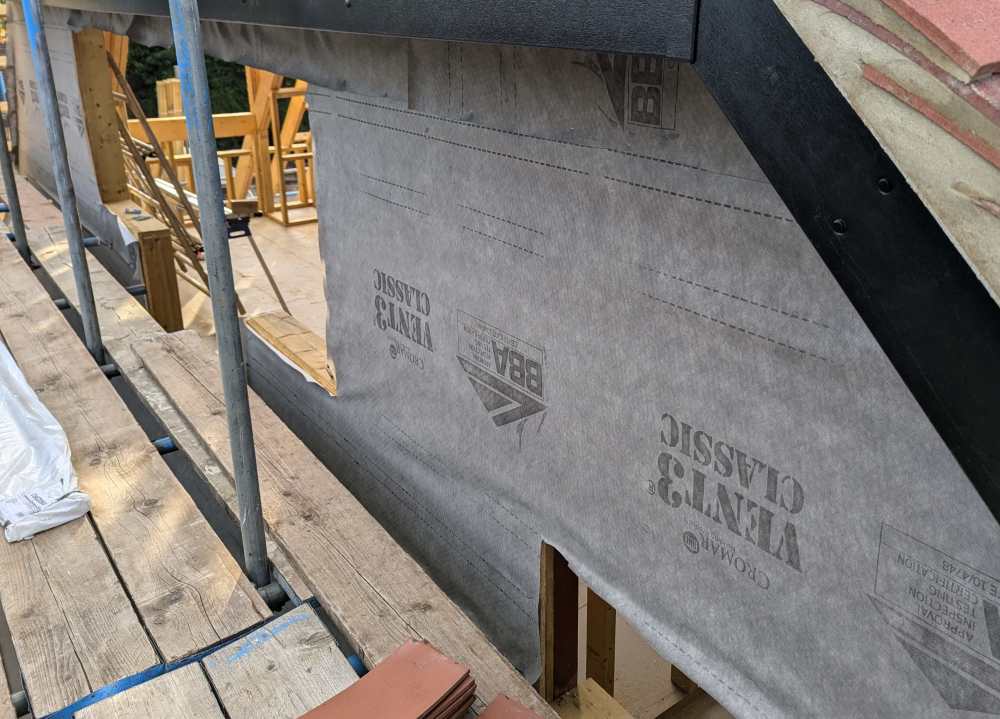


-
Do I Need Even more Insulation? Decision needed within next 24hrs
peekay replied to peekay's topic in Heat Insulation
@Iceverge (and others)thanks for the replies. I'll upload some photos and annotate your sketch over the next couple of hours The membrane that can be seen from my photo is fixed underneath the studwork that can also be seen in the photo. Unless there are any tears that I haven't seen, whist it has been exposed any rain water hitting it has not entered the cavity below. More info to follow.... -
Do I Need Even more Insulation? Decision needed within next 24hrs
peekay replied to peekay's topic in Heat Insulation
Here is a photo of the gable. You can see the external line of studwork. VCL laid over 22mm OSB set behind this. Behind that is the 150mm PIR set within the internal stud wall, and faced with 50mm insulated plaster board. The cheeks of the dormers are tile hung. You can just make one out in the photo. The external insulation has already begun being fitted to the ground floor and can be seen in the photo. The plan was for a silicone render over all of this.