Jump to content
  • entries
    24
  • comments
    246
  • views
    11735

Fun Surveying Site Levels


TerryE

1676 views

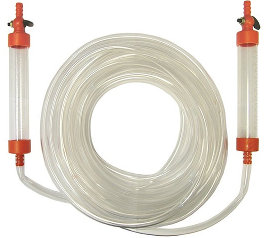
One of my preconditions it to provide an accurate survey of site levels across my site. The last time that I did anything like this was just under 40 years ago as a young Lt. in the Royal Engineers when I was surveying for a road, but that was using a decent theodolite to do cut and full calcs. Nowadays you typically lasers and GPS, but I didn't want to pay a fortune for something that I could do myself, so I reverted to a variant of a technique that the Romans used and that is to use a water level. You can buy them off-the-shelf (e.g. this Handyman Faithfull Water Level 10m/33ft which looks like the first image). However, I decided to hack together my own using a couple of 18" lengths of transparent tube, a garden hose and a couple of steel rulers and black masking tape as per the second.


faithfull-water-level-10m-33ft-handyman.    terry-water-level.jpg


Basically the technique is to leave the chair at a reference datum level and move the ladder around the site. The bottle of water on the chair is to top up the water if any is slopped out. Occasionally, I had to shift the position of the readout tube up/down on the moveable measure (to keep the water column in the transparent section). I just entered both readings in a spreadsheet with reading 1 being the moveable readout at the datum. (This is in row 2, because the headings are in row 1.) So the height formula is just (and copied from row 2 to the rest of the rows):

=(C$2-B$2)-(C2-B2)

Since my garden hose is about 40m long, I was able to cover my entire site from a single datum, and even where I didn't have line-of-sight. As you can see from the inserts, it is really easy to read out the levels to 1mm accuracy, so even if I was sloppy the entries in this spreadsheet are at most a couple of mm out for the entire site.

The one thing that you do have to be careful about is to flush the full length of the hose through before you start to remove any bubbles / airlocks and more importantly to ensure that you don't have one end of the hose at (overnight) air temperature and the other at mains water temperature, as this density gradient can cause a systematic error of a few mm.

  • Like 1

1 Comment


Recommended Comments

Here are the original eBuild comments:


Crofter, 09 Mar 2015 12:04 AM
That is so brilliantly simple that I may have to copy it!

ProDave, 09 Mar 2015 09:44 AM
I used a laser line level for mine. Best done on a dull day or at dusk.   It can be surprising just how much what looks like a fairly flat piece of land actually slopes by.

TerryE, 09 Mar 2015 10:36 AM
I have an indoor laser level but it would be a bit of a dog using it outside: I would need to do it late dusk to get any range and doing this on a 5m survey grid is a lot of points.  I have a decent professional Bosch laser measure which I use for distance work, ridge heights, etc.

Using a laser level is also a two man job, really.  At least with the water level technique you can easily do it on your own if you don't mind a lot of walking to-and-fro. In my case, I had a strong preference for the one-man option, because this sort of job is a tedious "grit your teeth and get on with it" one, and doing the whole site took a long time.  Taking twice as long on my own involved a lot less ear ache than enlisting my helper who doesn't suffer this sort of chore gladly :(

Crofter, 09 Mar 2015 12:38 PM
That sounds rather familiar! I do have a dumpy level and staff, which we have used for the basic initial site survey, but I'm hard pressed to get SWMBO to cooperate much beyond that. So off to make up a water level...

wmacleod, 09 Mar 2015 03:55 PM
The water level is ideal for transferring levels round corners, through doorways etc.  The laser level everywhere else for sheer speed and ease of use - although a receiver and a staff are essential for getting heights transferred quickly and easily.  No messing around waiting for dusk, struggling to see lines. Use it during concrete found pours, slab pours, wall heads etc.

recoveringacademic, 09 Mar 2015 05:00 PM
My dad taught me exactly the same skill when I was about 10 (1963).  He was also an ex-RE (RSM).  I suspect he just needed a theodolite carrier, and knew that I needed a bit of push to see the relevance of maths.  He made me do masses of level calculations, all by steam, and gradually allowed me to use logarithms.  Since then, and to this day, I've never ever used a set of log tables again.

The most fun, though, was sorting out levels the way the Egyptians did.  And since he was the bridging engineer for the M5 (Strensham to Bromsgrove) there were miles and miles of spare hose lying around. Imagine the fun of picking some random spot on the empty motorway carriageway and seeing if I could work out how much higher/lower another equally random spot was.

Wish I had thought of using an expansion/ inspection chamber and a ruler to get a really accurate measure.

For our build, it's the link between GPS, Google Earth Projections and CAD design drawings which made me decide that the topographical survey was worth it (£540 inc VAT). And avoiding the horrors that basic errors on my part would cause.  Density gradients for example - hadn't heard of that in this context until I read your blog entry.

How did you establish a datum from which other professionals can measure?

oz07, 09 Mar 2015 08:27 PM
Self levelling Optical pentax here.  No batteries to run out, no working in the dark, no need to understand science and water!

slidersx200, 09 Mar 2015 10:56 PM
Our topographical survey was about £250 I think and luckily, not only did the guy record the whole field we have built in, which saved the cost of a second survey when we moved the site to the other end, but he also surveyed the land we have at the other side of the road in case there is ever an opportunity for development there too in the future.

The Roads Service could make the existing survey obsolete though if the planned improvement scheme gets a green light as they will be changing levels and moving boundaries along the road.

TerryE, 10 Mar 2015 05:44 PM
Thanks for the feedback guys.  I agree that my method is a bit of a hack but it had three advantages:

  • I could to it myself on my own
  • It cost nothing
  • It was accurate to a few mm.

The alternatives used by others were:

  • To commission a topo survey £250-530 (probably nearer the lower end since my plot is smaller than Ian's).
  •  To use a dumpy level @£200 ish or £65 to hire (or equivalent).

I think that I'll live with my solution, but to Ian's point about a datum from which other professionals can measure, well, I can paint an X on my patio outside the kitchen door on my existing farmhouse.  It's set in mortar on 10cm of compacted sub base; it's been there for 15 years and won't be going anywhere whilst we still own the house.

Crofter, 13 Mar 2015 11:54 PM
Thanks to a lovely still day here, I was able to do some surveying singlehanded.  I was setting up profiles so simply replaced SWMBO with a bungee, and bungeed the staff to the profile post. Wouldn't work on a windy day...

SWMBO seemed surprisingly happy with this arrangement.

TerryE, 14 Mar 2015 01:51 AM
Hi, glad to see that this is working for you.

Rereading my last comment, it came across as too negative to everyone else's input.  Sorry for this guys.  There's a trade-off to be made here on speed / flexibility / cost, etc. I am retired so my time is free -- so long as I enjoy or at least take satisfaction in what I am doing.  If I was working and my time was a constrained commodity then I'd have either gone the subcontract to specialist route or bought myself a dumpy level.  But the reason for this post was that the water level method works and is amazingly accurate.  It can just be a bit time consuming.

The model that I described here was my V2 approach. Using the two transparent read-out tubes each against a long rule with a decent mm scale makes things a lot easier.  As does having a stable reference base (my heavy wooden chair with the readout clamped to it).  Black masking tape and clamps are an alternative to bungees.

The design for my stand for the moveable post could be improved -- the light aluminium ladder fell over a couple of times.  However, making up a couple of wooden bung pegs to close the tube ends when repositioning stops unnecessary water slop -- albeit at the cost of an extra to-and-fro walk to take them out and let the levels settle before taking the reading.

I also had a couple of peg sets with 5m of string between them so that I could quickly walk a grid to take level and transcribe them onto my plan.

Yes, it's a bit clunky but I don't think that a dumpy would be accurate to 1-2mm over 30-40m and this approach is.

TerryE, 04 Apr 2015 12:05 PM
OK, OK, I have given in and just bought a CST Berger 24X Dumpy level on eBay "as new" for £174 inc free delivery.  Why? I've just had to check something for the 3rd time.  The water level method is accurate but setting it up and taking measurements just takes too long.  It struck me that getting the levels just right is a potential issue on our build, so the investment in a Dumpy was a sound one.  Hopefully I will be able to sell it "very good condition; used on one project; one owner for ~£100" in a year's time.

The time savings and extra mm accuracy of going to an equivalent laser system didn't seem worth the significant extra costs. Still doing the water levels was fun. :P

TerryE, 14 Apr 2015 12:55 PM
We had got our AT to double check my water level readings for the key measurements that we put on our application to clear preconditions, and tweaked them accordingly so that he could put his name to them.  We used his Dumpy to do this, and seeing how easy was this to do was what tipped the decision for me.

I've had a play with our Dumpy and it's brilliant even though it is a two man operation.  You can get readings to a few mm with a 24x Dumpy if it has been correctly levelled.  In our case when I rechecked a few of our TAs readings across the site, making sure my level bubble was spot on, I realised that his Dumpy baseplate must have been off level very slightly, and this caused about a 2-3cm gradient error across the 50m of the site in our submitted plan.  Not enough to worry about.

Link to comment

Create an account or sign in to comment

You need to be a member in order to leave a comment

Create an account

Sign up for a new account in our community. It's easy!

Register a new account

Sign in

Already have an account? Sign in here.

Sign In Now
×
×
  • Create New...