jamesmonk83
-
Posts
15 -
Joined
-
Last visited
jamesmonk83's Achievements
Member (3/5)
0
Reputation
-
Professionally Built Fitted Wardrobes Issues
jamesmonk83 replied to jamesmonk83's topic in General Joinery
But we did, that's the point and why we're so disappointed. We specifically told him how we wanted them to look, I can't find any examples of fitted wardrobes that don't wrap around the chimney breast. -
Professionally Built Fitted Wardrobes Issues
jamesmonk83 replied to jamesmonk83's topic in General Joinery
My original post was a bit confusing, he's friends with my sister in law, we went to school with him and are all from the same town so everyone knows everyone if you know what I mean, but he's not someone we're close to. -
Professionally Built Fitted Wardrobes Issues
jamesmonk83 replied to jamesmonk83's topic in General Joinery
The print out contained designs of other fitted wardrobes which we'd added annotated notes along the lines of "doors should look like this", "internal compartments should look like this" etc. We were with him when he measured everything up and went over the design/style that we wanted and we did specify they should be as per the alcove cupboards downstairs. All of which he agreed with. -
Professionally Built Fitted Wardrobes Issues
jamesmonk83 replied to jamesmonk83's topic in General Joinery
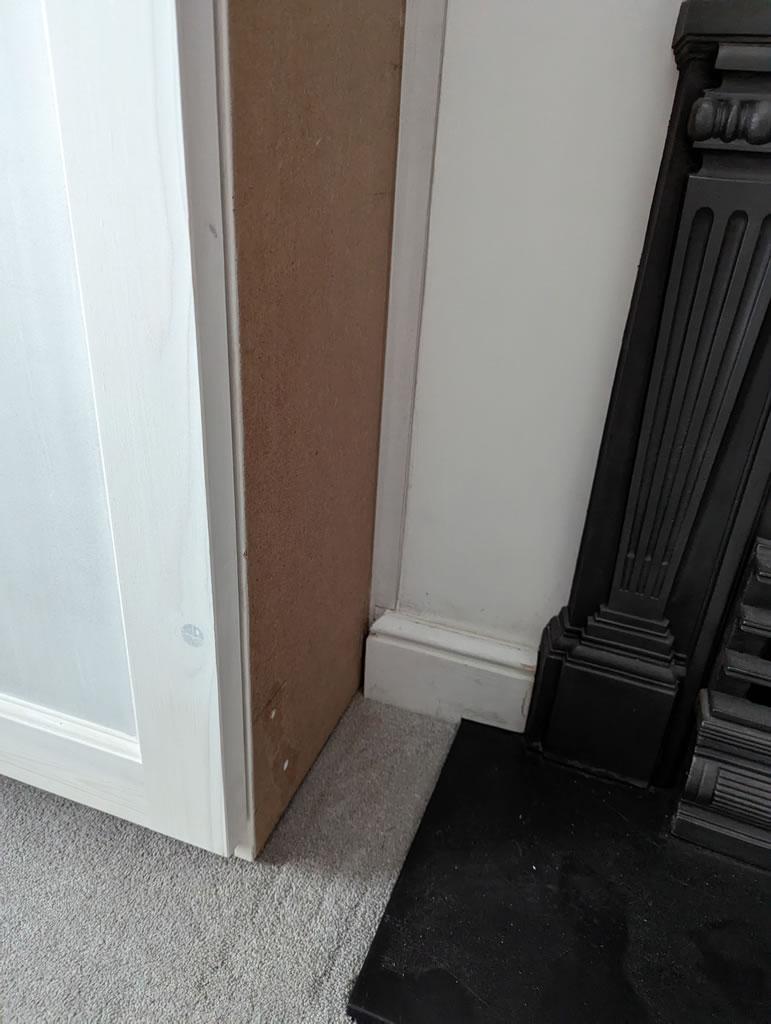
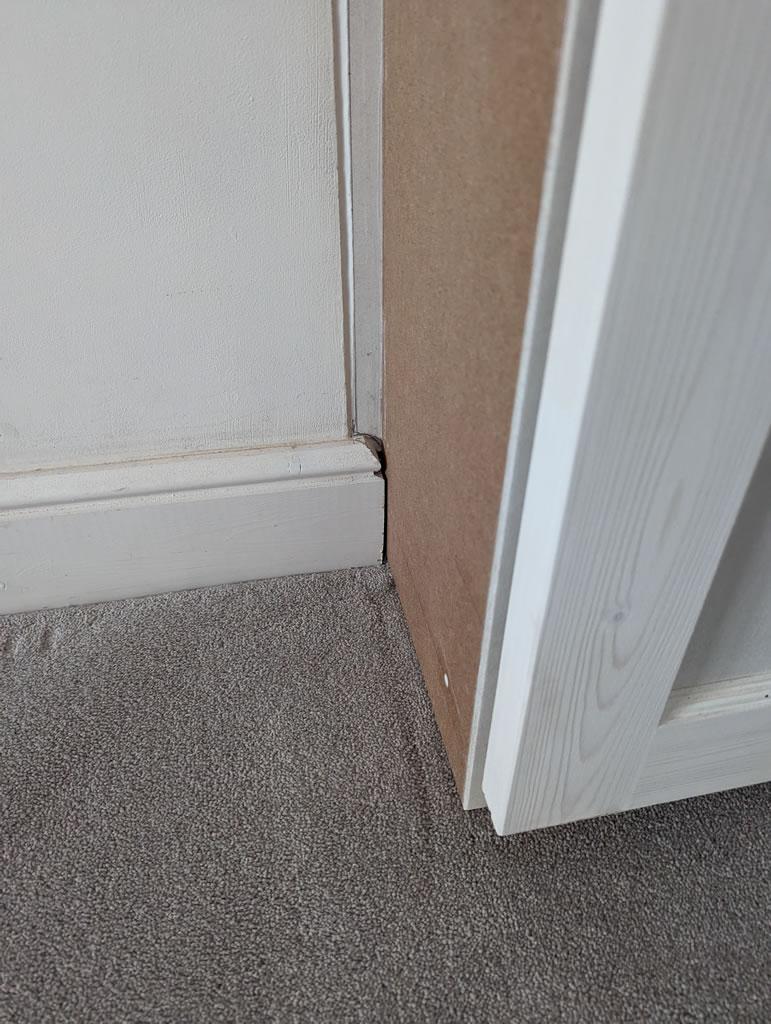
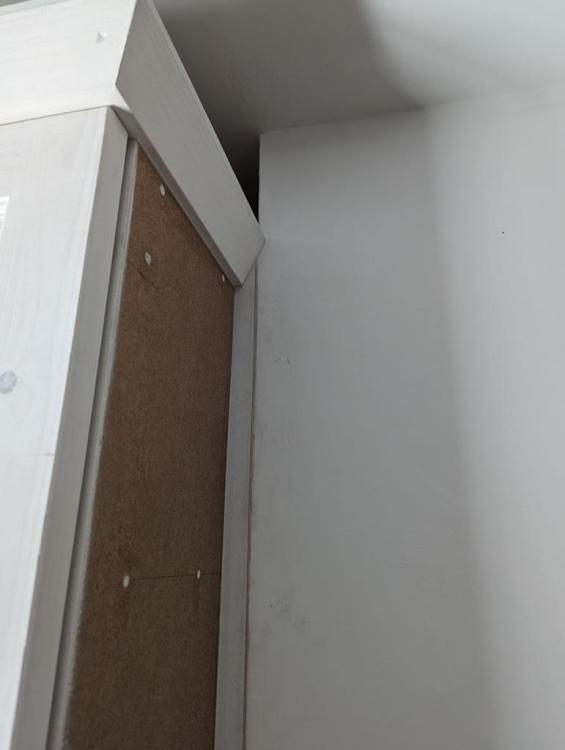
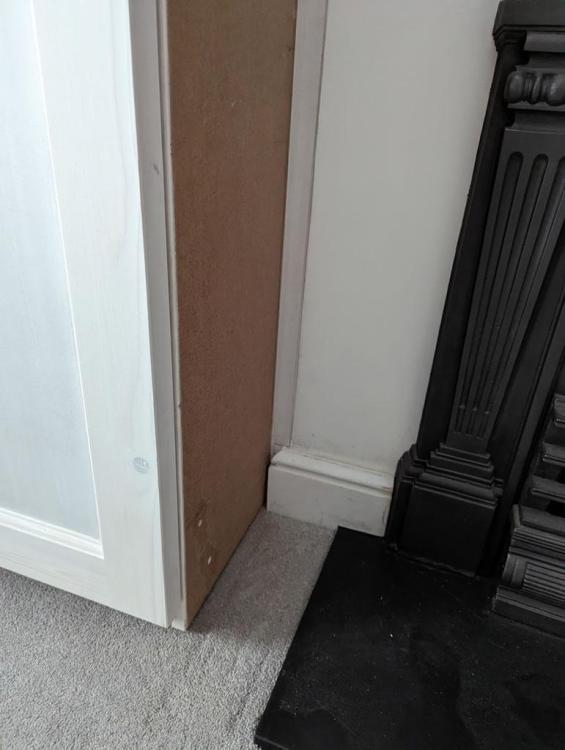
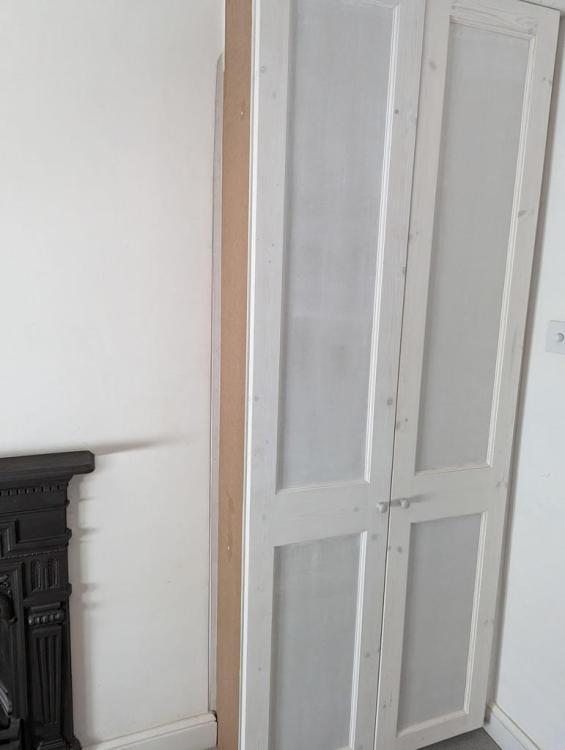
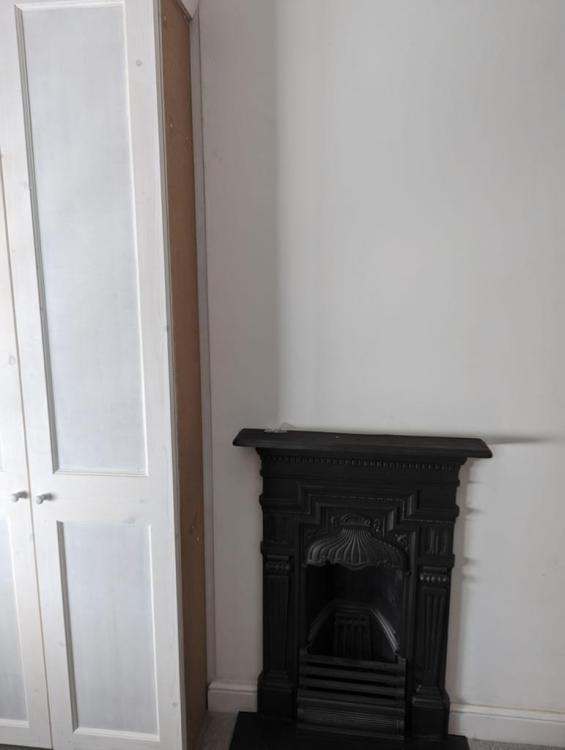
Unfortunately I didn't save the handout that we gave him but we asked him to essentially make them like a set of alcove cupboards he'd previously built for us which wrap around the chimney breast. Whilst filler might hide the join between the wall and filler panel (for now) it's not going to cover up how it meets the skirtiing which looks pretty ugly.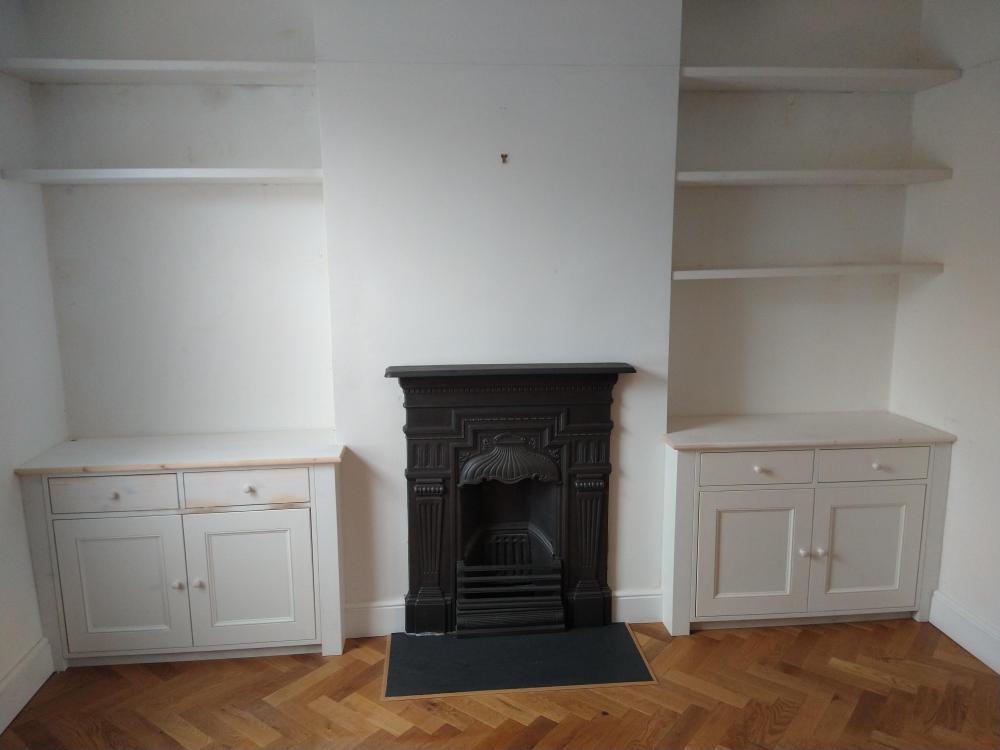
-
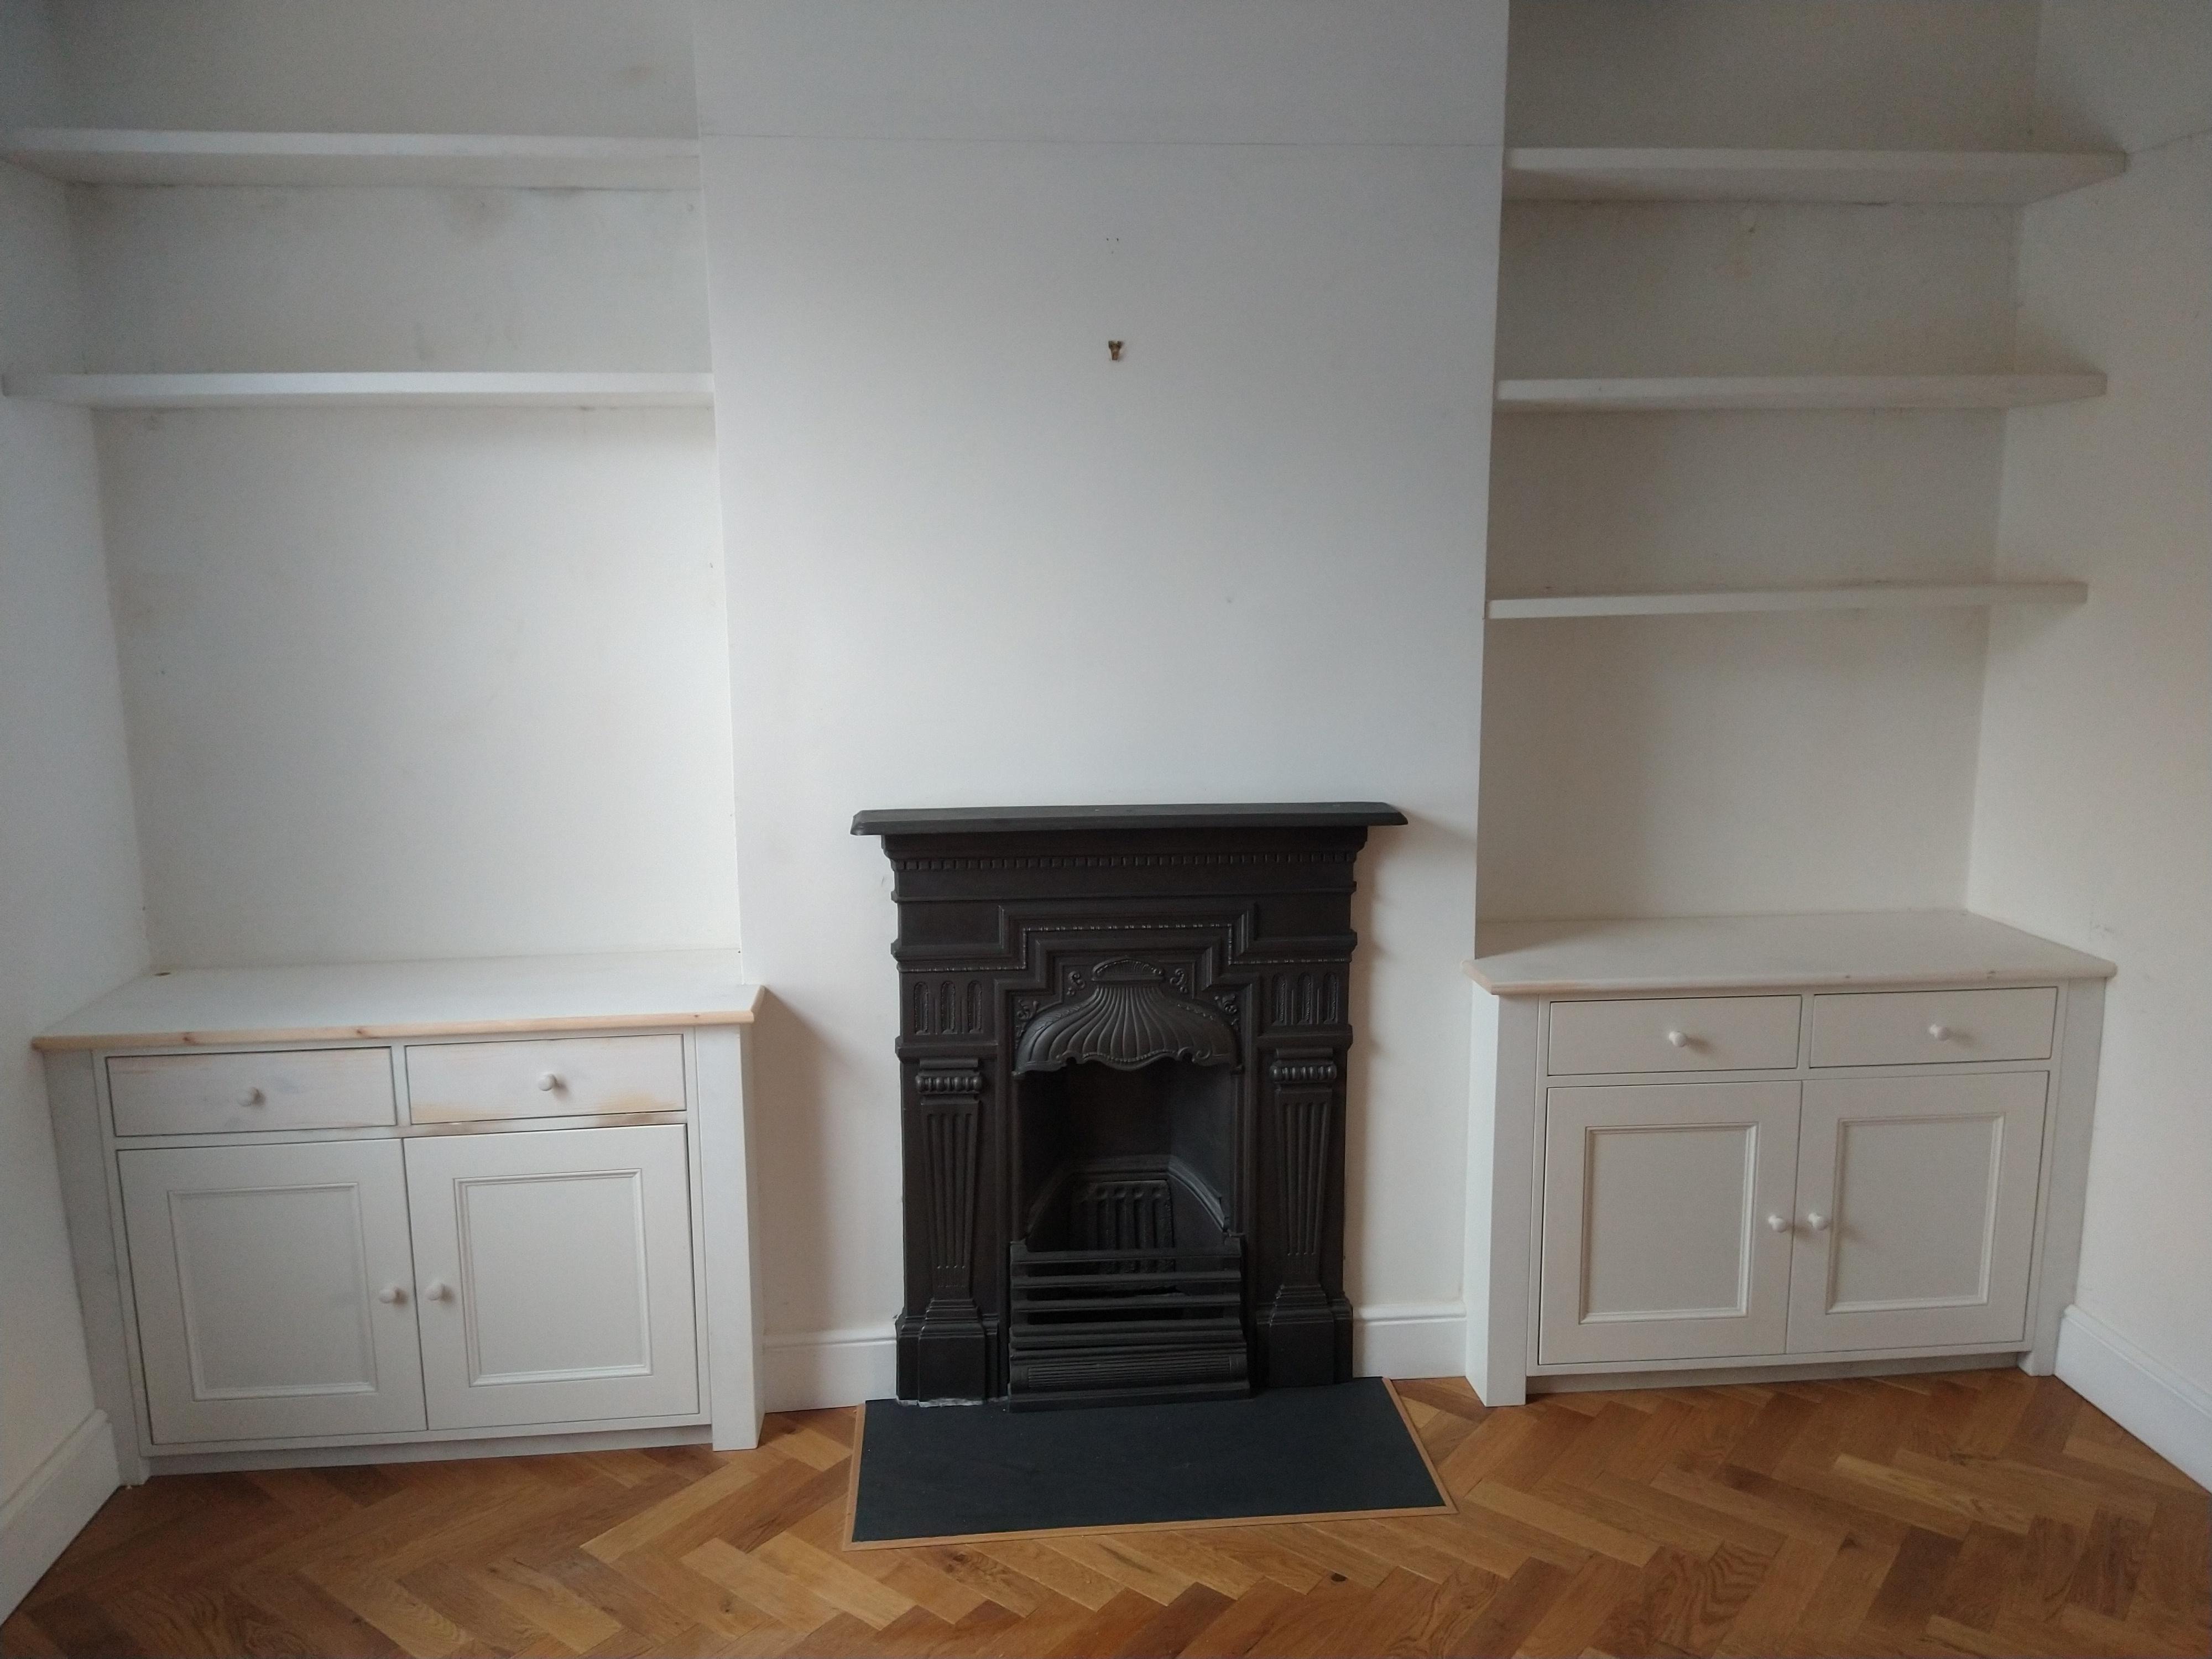
Hi All, I could do with a second opinon on some fitted wardrobes we've just had built and fitted by a local joiner. He's a family friend and a nice guy so it's a bit of an awkward situation. When we commissioned him to take on the job we supplied him with a 3 page print out showing photos/examples of other fitted wardrobes that we liiked, our preferred style for the doors and layout for the internal part of the wardrobes so there could be no confusion about how we wanted them to look as admittely we are quite picky about things and from experience a lot of trades seem to better understand our requirements if we use pictures! Everything has been going fine with them until yesterday when he finished them off, we're really not happy with how they've been fitted around our chimney breast. Instead of wrapping them around which is how we were expecting them to look (and how it looks like most are built from looking online) he's scribed them into the chimney breast with filler panels which look messy and really quite odd. We supplied him with examples of other fitted wardrobes that we liked the look of none of which had filler panels so we're a bit confused as to why he's decided to build them like this. We know it's not because of the doors hitting anything as we paid extra for hinges that allow the doors to open more freely than 90 degrees so they would easily clear any sort of side panel.. We've asked him to come back and correct this for us and he's said it's fine but to change them so they wrap around the chimney breast he's going to charge us an extra days work on top of his original quote which was a slight surprise. Are we being unreasonable and is that a normal way of finishing a set of wardrobes of? Many thanks, James

-
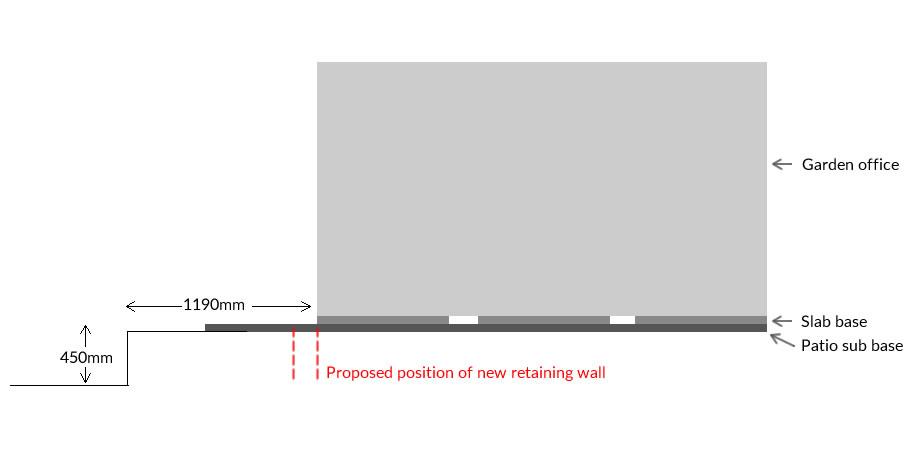
Hi All, I'm after some advice on how close I could realistically dig back to my garden office. My garden office is built on an (old) raised patio at the back of our garden (rough sketch attached). At the moment the old patio extends out from the front of the building by about 1m but doesn't have a wall in front of it as we've already taken it back by a slab so I had to remove the old small retaining wall. In an ideal world what I would like to do is completely remove all the soli in front of the building and put in a new block retaininng wall and foundations and then build a stepped decked area. What I'm unsure about is how close I can dig to the front of the office building where it sits on it's slab base. Am I okay to dig back right up to the front of the building (marked in red) or should I only dig back a certain way and leave some of the current level in front of the building? Thanks in advance! James
-
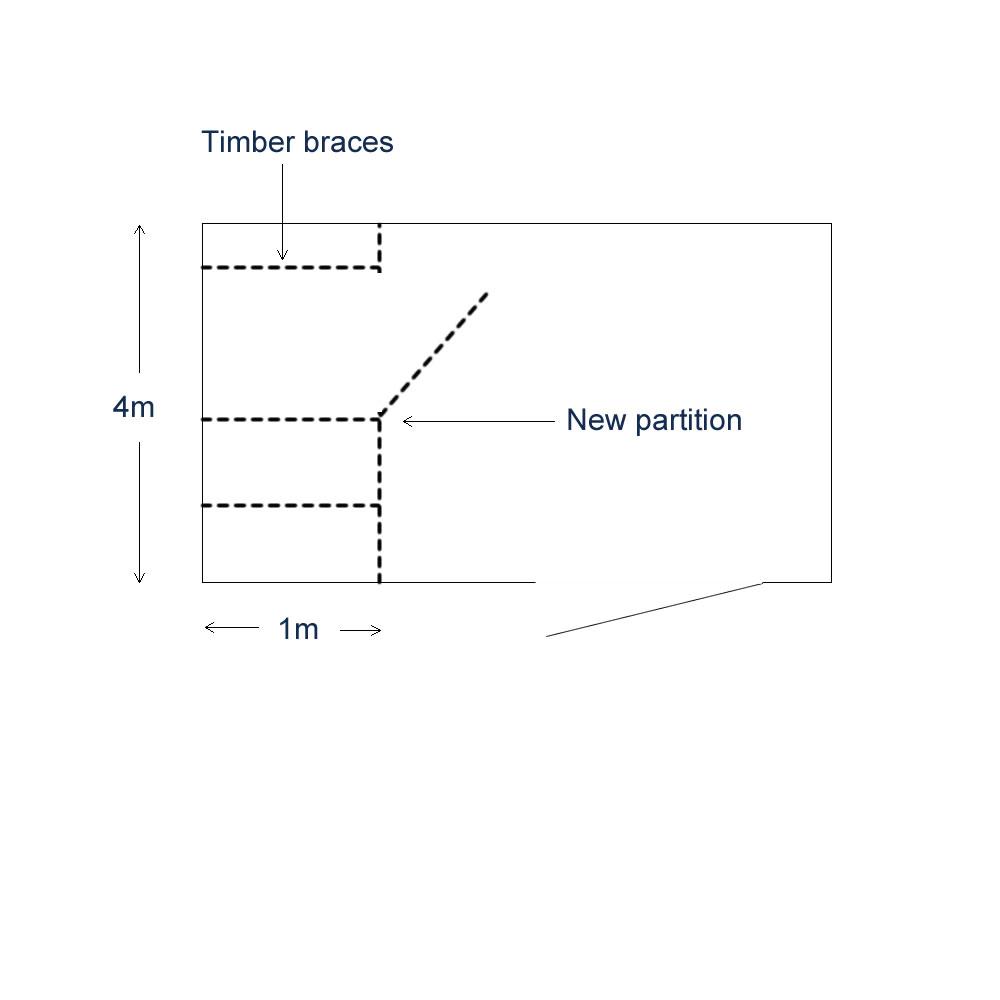
So you think it should hold if I bury some posts into the ground to support the partition from behind?
-
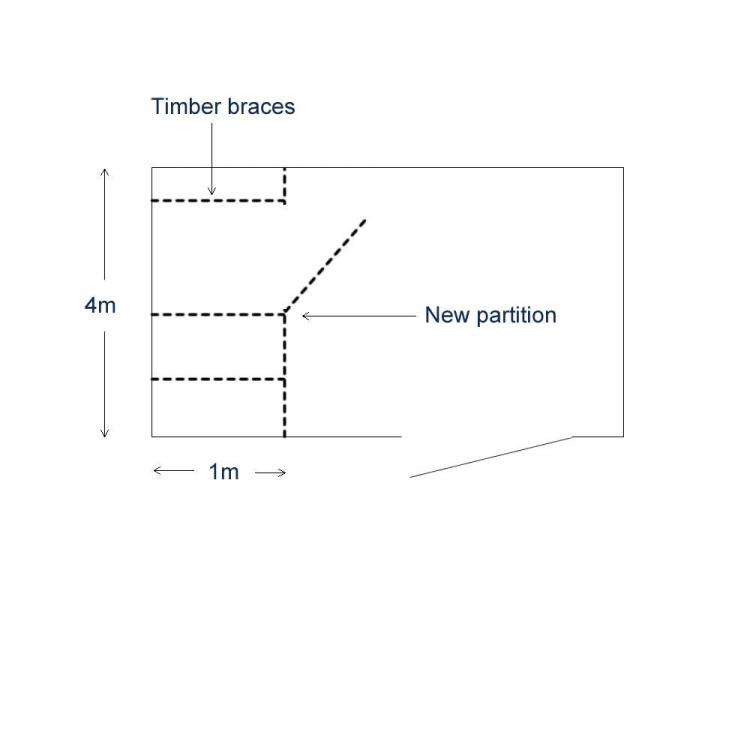
Hi All, I'm not entirely sure if this is the right forum for this post as I couldn't see anywhere obvious to post it in. I've been asked by my wife to build a partition in her timber stables, it will divide an existing stable room up, roughly two thirds will have a 4 legged friend living in it and a smaller section (approx 4m x1m) will be a rug store. I have plenty of OSB and 5x2 timber left over from other projects but I'm not entirely sure the best of bracing it. It will need to cope with a small pony potenitally rubbing/puttiing weight on it. I've built a simple few stud walls but this is a little more tricky. There are obvious fixing points for each end of the partition to the existing studs of the building but my concern is that there's no obvious way to attacah it to the floor (it's just dirt and we're not allowed to use cement/concrete on the site) or the ceiling/roof as the partition only needs to be about chest high. We were thinking of having a small hinged door in it but I can't see how this could be added without negiatvely impacting the strength of the partition as it would mean cutting into the timbers that would be running the length of it. The only thing I can think of is having some bracing timbers going from the partition to the back wall at the top and bottom of the partition which you'd have to duck under when fetching the rugs which isn't ideal! Crude sketch attached. Does anyone have any experience or ideas as to how to get around this? Many thanks, James
-
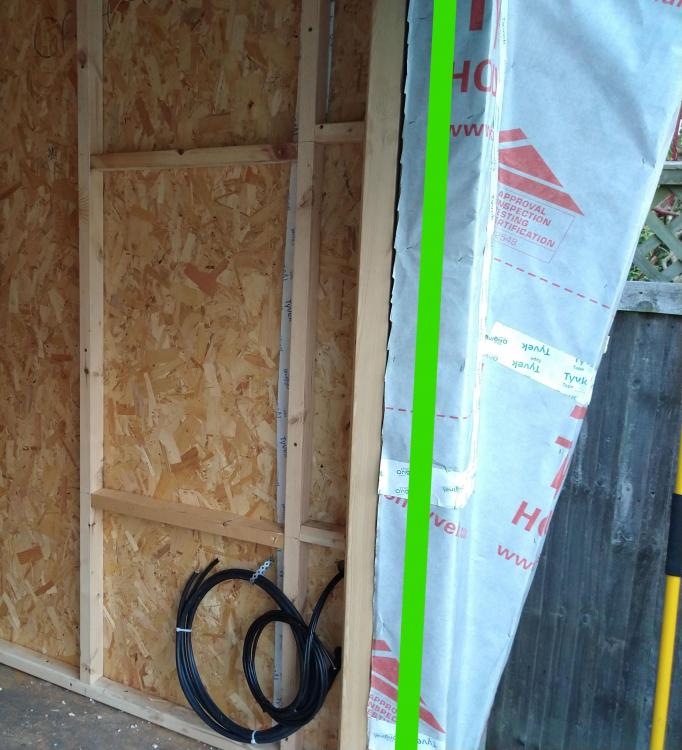
Hi All, I have a (probably stupid) question, I've wrapped my SIPS garden office with a breahable membrane. The front is essentially a single large opening where a sliding door wil be installed in the new year. My question is where should the breahable membrane finish here? At the moment I have the membrane coming into the recess where the door will be installed (so it's just inside the room). I'm wondering whether I just wait until the door is installed and then cut back anything that is showing on the inside or whether there's a "proper" way of finishing it. I'm just worried about the membrane providing a route for water/moisture getting into the room but I also want to provide maximum protection to the external walls as well. The attached pic (taken on an angle!) shows a side on view of the opening with a crude green line drawn showing the rough position of the installed door. Thanks, James
-
Wall Cladding Build-up Query - Flat Roof Detail
jamesmonk83 replied to jamesmonk83's topic in Flat Roofs
Okay great, yes I was planning on having a gap top and bottom to help with air flow. Thanks for the help. -
Wall Cladding Build-up Query - Flat Roof Detail
jamesmonk83 replied to jamesmonk83's topic in Flat Roofs
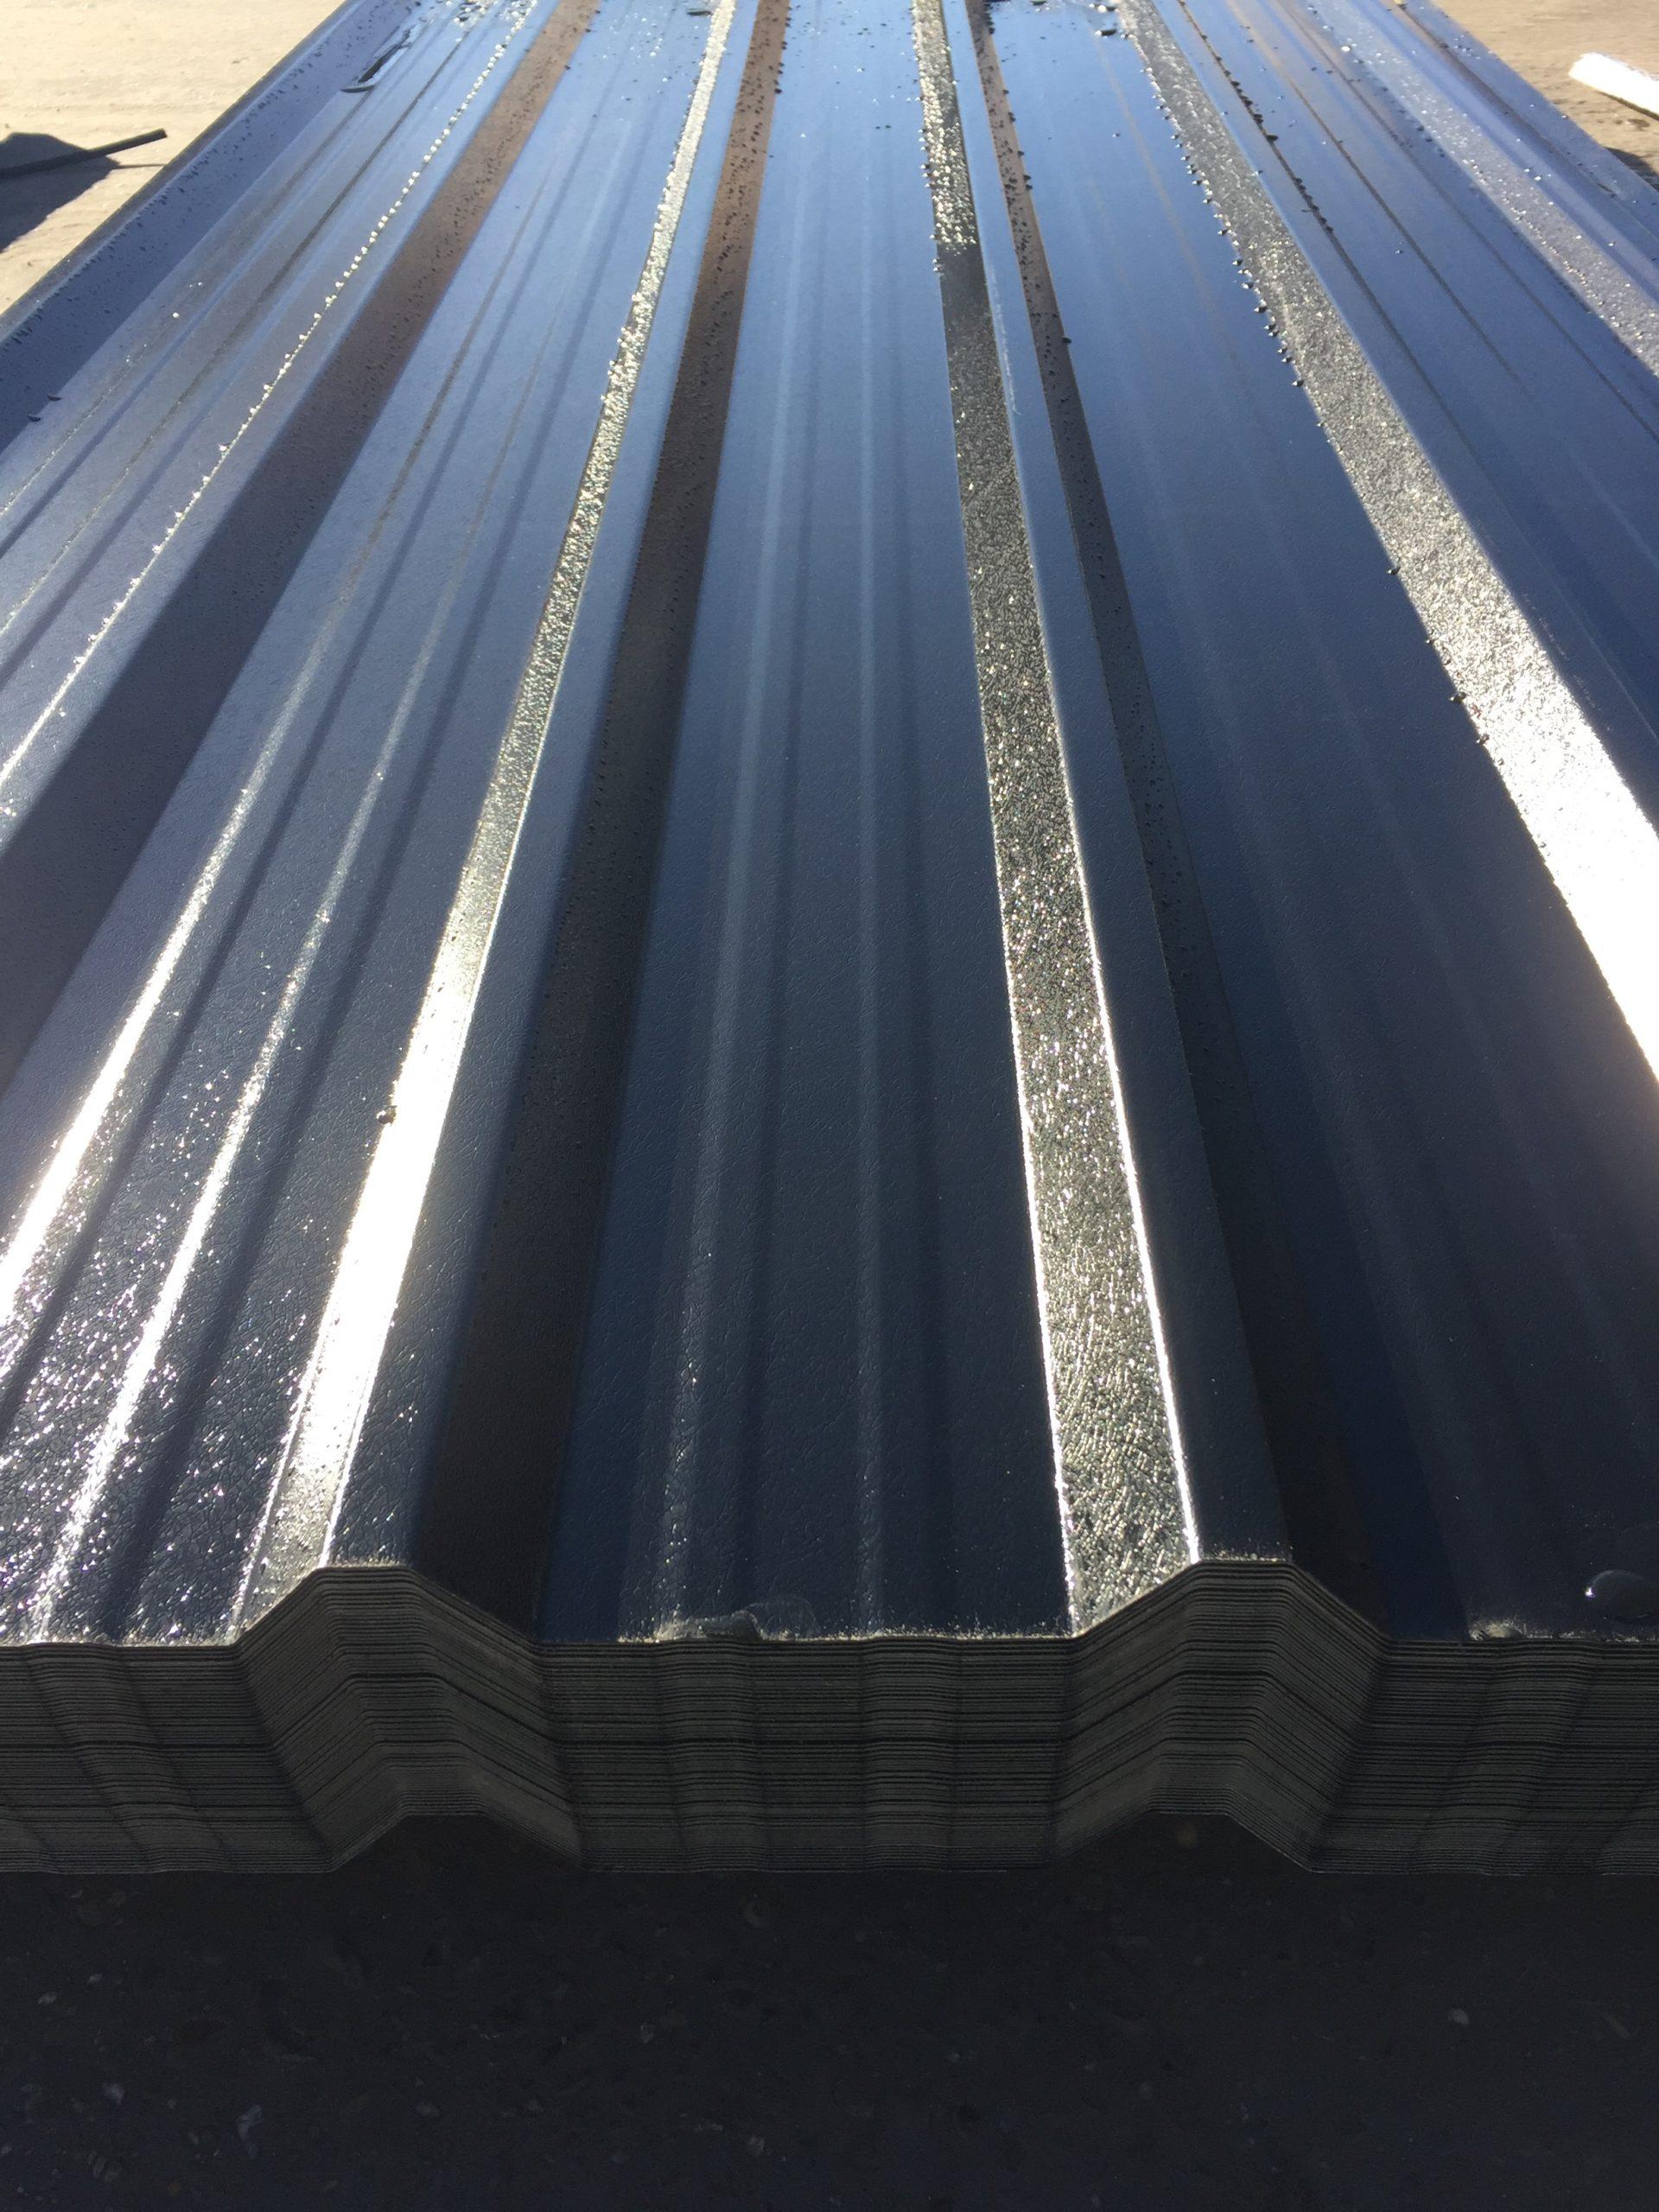
I was planning on using a box profile style sheet like the attached pic (standing seam I guess?). So are you saying that I should be replacing the battens with a board or including a board as well as the battens? I'm very new to the concept of metal sheet cladding, I was just going for a timber cladding look originally then changed my mind and assumed the same principles of using battens applied but from what you're saying I guess this isn't the case or I have I misunderstood?!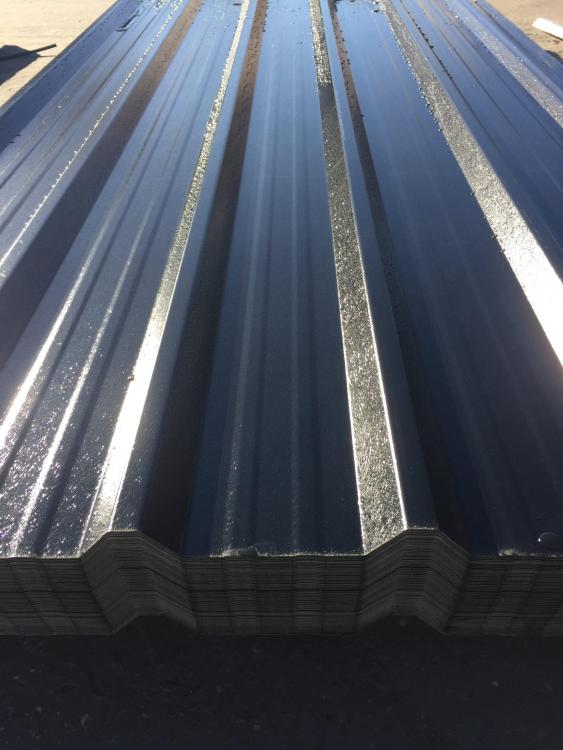
-
Wall Cladding Build-up Query - Flat Roof Detail
jamesmonk83 replied to jamesmonk83's topic in Flat Roofs
Thanks for all the replies, that all makes sense. -
Wall Cladding Build-up Query - Flat Roof Detail
jamesmonk83 replied to jamesmonk83's topic in Flat Roofs
Thanks for the reply, I wasn't sure whether that was an option. Wouldn't the Epdm need to be fixed to the metal cladding or would the room trim hold it all together? -
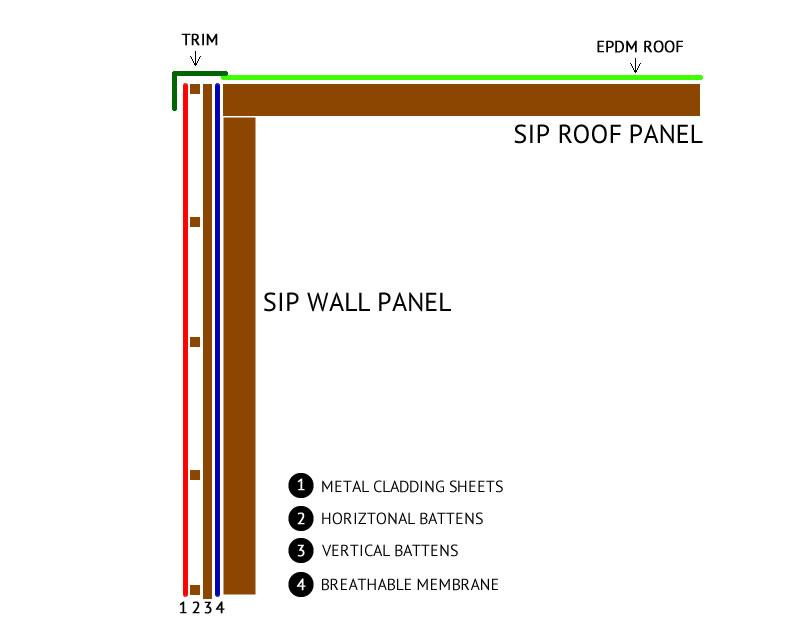
Hi All, I'm currently bulding a home office using a SIPs kit, the structure is up and wrapped in a breathable membrane but I'm strugglng to get my head around how the cladding and EPDM roof are to be finsihed. There's no overhang so just straight walls, my plan is to batten vertically, then horizontally and then attach some metal roof cladding sheets vertically. My query concerns where the wall build-up of battnes/cladding sheets meets the roof/roof trim. I've attached a crude diagram of how I would expect it to finsh but I can't seem to find anything online actually stating the correct way of finishing it. Am I on the right track? Thanks in advance! James
-
Hi All, My wife and I our renovating our first house together and have become a little stuck installing our wet underfloor heating system. Before we end up phoning around local plumbers I thought I'd post on here to see if anyone has any bright ideas.... We've laid the pipes (2 zones), attached the manifold to the wall with the ball and drain/fill valves and run water around the system from the mains (one circuit at a time) as per the manufacturers instructions. We've carefully gone around checking the pipes and there are no signs of any leaks so we started pressure testing the system. At first there were obvious leaks around all the valves so we re-fitted them and tightened them up which has stopped that however the pressure isn't holding for very long. According to the manufacturers instructions the system needs to be at 6 bar for 2 hours. Our system does appear to hold the pressure for this long however whenever we've left it overnight it always drops by around 1.5 bar. We're not sure whether this is normal or something to worry about? We've doubled checked all the connections on the manifold and there are definitely no signs of any water/leaks and the pipes aren't leaking so we're a bit mystified as to the pressure would drop like this. Any help/advice would be greatly appreciated. James