


YodhrinForge
-
Posts
60 -
Joined
-
Last visited
Everything posted by YodhrinForge
-
Okay, useful feedback thanks, but I'm not quite ready to give up on it yet it seems refinable. To address your points: Firstly sorry, I wasn't clear - the roof buildup currently has a mortar fillet, I was trying to say that was different to the example image. My intention when replacing would be to ask for something much more like the example with leading and a formed gutter edge under the edge of the slates. Regarding the internal battens - wood fibre batts are flexible, you need to set them between something, so I can't just fix the plasterboard directly atop them. I could use rigid boards instead, but those are a big enough faff using lime adhesive and hammer fixings on a wall, getting them in place and fixing them with thermally broken screws against a pitched roof would be a proper pain. The bridging issue also isn't a problem if the external insulating sarking is used since it will place all of the roof timbers within the insulation envelope. On the membrane: the Intello is functionally impermeable unless it's beneficial for it not to be. It's air-tight if properly taped and under most conditions it's as impermeable to vapour as regular plastic barrier sheets, but if temperature and relative humidity levels between interior and exterior are right and there is sufficient vapour pressure from the building assembly on its exterior face(ie, if there were ever any water penetration which soaked into the structure and did not dry to the outside), its pores open and allow the assembly to dry to the interior as well. The air gap isn't necessary in this proposal since the assembly is not air-open(I specced an air-open membrane on the exterior only so the surface of the woodfibre sarking would dry even faster if there were ever any minor rain penetration), instead it relies on the three layered waterproofing(slate, membrane, woodfibre sarking which is rated as waterproof at my roof's pitch) and vapour diffusion to manage moisture levels. Historic Environment Scotland have done multi-year test installations where they compared vapour open materials when installed with and without an air gap in traditional roofs and the data from the probes they buried inside showed both approaches resulted in humidity levels within the roof materials that were almost identical, well within the margin of error for the test. And IIRC that was done with no VCL at all, fully vapour-open to both interior and exterior, so with an Intello type membrane it should be improved significantly since no humid interior air(not that it'll be *that* humid, I'll be using a whole house MVHR) will be absorbed. My understanding is air gaps are recommended practice on the assumption that any insulation being used will be completely vapour-impermeable like PIR, or will have less ability to diffuse vapour through its entire mass like rockwool, in either case meaning the timbers would struggle to stay dry without constant airflow, while woodfibre is both permeable and very effective at evenly distributing vapour through its mass until conditions allow it to leave the structure. Regarding the edges, in terms of the gable the plan would have a continuous layer of wood fibre insulation rising up the outside of the exterior wall(a lime harl protective coat would be applied), over the top by replacing the existing skew(which wouldn't be wide enough for the insulation anyway) with faux-stone coping(basically blocks of insulation wrapped in fibreglass then covered with resin-based material that superficially resembles cut stone, they can colour match it to your existing stonework) and then a thin layer of something like a PIR down the inside cheek to meet the woodfibre sarking(all of which would be covered over by the membrane and then the lead). At the rear of the property there won't be any weak spots as that will also be insulated externally and the rear eaves will be ammended accordingly, resulting in continuous insulation. The only remaining weak point will be at the front wall which must be insulated internally because of the conservation area(and because I like it), however only the very ends of the bottom of the rafters where they meet the wall plate won't be completely enveloped in insulation so thermal bridging will be extremely minimal and that part of the roof will be just as capable of dispersing and then releasing moisture vapour as the rest. On the marine ply you're right I didn't account for its impermeability, it would impair the vapour openness of the assembly. For the purposes of the nails biting properly regular ply or lengths of regular wood board should be fine though. I'm not sure why I would have issue with fixing span? The rafters are 600 on centres and 50mm wide so a 25mm surface is all you'd get on a normal butt joint between two pieces, and since they're inset the fixings would be more like 530mm apart with a 550m span, plus each would be getting nailed both right down into the runner and diagonal into the rafter - it seems like it would be solid enough? If not, I wonder if you have any suggestions on how I might refine it, would pushing up to 40x40mm for the runners do the job? On the slates, you'd know best how it's done, I recalled reading about the two nail offset method but now I think back it might have been on an American's blog and I just muddled that with the youtube videos I watched from Scottish roofers. I know it must seem mad to be so intent on making this nonsense work, but for me this is probably my "forever home" and my one opportunity cost-wise to have it seriously renovated, so I'm really keen on a "buy once cry once" approach and it really is amazing the difference in comfort and ongoing cost between insulating inside vs outside(as much as possible) - for the walls you can't put anywhere near as much insulation on or you can cause problems with moisture condensing inside and degrading your stone walls, my rough calcs would put it almost a full point down with a u-value of barely 0.3 vs 0.2 or even 0.18 if done outside. And the difference in a mass-y roof of wood fibre compared to PIR is huge; it's a bit worse for thermal performance(though not as much as you'd think given you can't fully fill the rafter voids with the PIR approach), but the wood fibre roof has *amazing* decrement delay so should never overheat in summer, and it's like stepping into a soundproof box. I'm really keen to figure something out if I can.
-
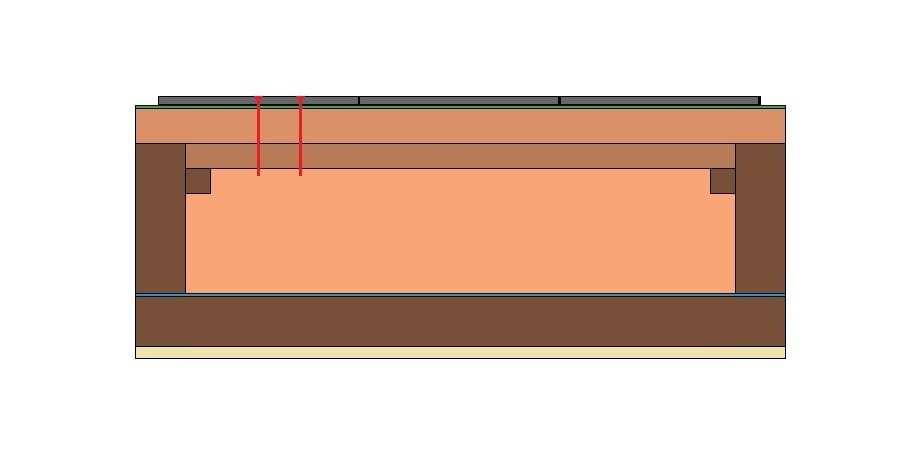
Quick recap of the type of roof I'm talking about: With two addendums; it uses a mortar fillet in place of the lead skew flashing, and it has already had a velux conversion done to it by a previous owner so the rafter assembly is different. As you can see there are no battens, slates are nailed directly to the sarking through the felt. Also my specific situation(conservation area, semi-detached) means changing the exterior dimensions of the roof significantly is not an option so no insulating sarking with counter-batten setup on top. So the previous time I asked about my roof you guys helpfully established that unfortunately nailing into modern wood fibre insulating sarking boards is a non starter, but I've been loathe to give up the idea of externally insulating it's just so much more efficient and so much better for the building fabric in the long term, and it's also looking more and more like this roof will be at end of life within a few years anyway so if I need to go for a full reslating anyway that opens up some options. What I'm wondering from people with experience is firstly, how reasonable do you find BCOs to be in terms of a-typical buildups? Can they be persuaded if you demonstrate your solution will be safe and functional, or are they generally Computer Says No types when it comes to roofs? And secondly, whether the a-typical design I had the notion to build would even work in your better informed opinion. My thinking is this: if the problems are that insulating sarking won't reliably hold a nail and that I can't make the roof assembly significantly thicker as seen from the street, can I add a substrate to securely hold the nails within the existing depth? Illustrated badly in the attachment, you'll have to forgive my terrible "plans" but MSPaint is about the limit of my artistic ability on computers. I'll list out what it shows inside(bottom) to outside(top): Plasterboard 50x50mm horizontal battens with 50mm wood fibre insulation batts between Intello VCL membrane existing 150x50mm rafters, fully filled with more wood fibre batts wood runners fixed to the inside of each rafter along its whole length 25mm marine ply fixed to runners and joists sitting flush with outer surface of existing rafters 35mm Steico tongue & groove woodfibre sarking vapour and air open waterproof membrane ~8mm "heavy" slates with 75mm+ stainless or copper annular ring nails, two per slate centre & off-centre to prevent rotation Result is essentially a solid assembly, thermally broken, three layers of water protection, breathable to the exterior at all times and to the interior in conditions that would benefit the roof but otherwise prevents transfer of moisture from interior. The slates are on top of insulated sarking, but the actual grip for the nails is provided by the marine ply sheets fixed between the rafters and supported by the runners. It would be a few millimetres thicker than the existing assembly, but so little that the slight ridge created by the necessary hidden splitting gutter would disguise it relative to my neighbour's slates. In addition to bringing the whole roof structure within the thermal envelope of the building, it would also allow continuous insulation over the whole structure with the exception of the front wall: you can't see on the image above but the stone wall is actually twice the thickness of the skew/coping and the whole area which in the illustration is a lead valley is underneath that sarking sitting on top of the bare stone of the rest of the wall, which would be a huge honking thermal bridge but with this approach needn't be. Anyway enough blathering: am I on to something or should I just resign myself to insulating the whole property internally despite it being much less effective?
-
Maths for working out door thickness vs clearance etc?
YodhrinForge replied to YodhrinForge's topic in Doors & Door Frames
Hi thanks for the replies but as I said I'm not really interested in the standard sizes, which I know are inadequate for what I want to do, but in the actual method of how the sizes/clearances are worked out so I can figure out something custom. I should probably have described the general plans to illustrate why: externally the garage will be clad in rigid insulation(probably high density rockwool or rigid wood fibre) then rendered, internally I will be building a "room-within-room" stud wall arrangement with a small air gap between it and the existing single block skin with a vapour control membrane on the back wall-facing side and flexible medium density rockwool between the studs on which will be fixed a double layer of 18mm ply for the interior face; the existing flat roof will be replaced with a timber framed pitched roof(primarily to carry solar panels) clad externally with PIR/aluminium composite panels and partially filled internally with more medium rockwool and lined with acoustic plasterboard with dampened washers. It will have a mini MVHR system with maze vents and I also intend to damp seal and insulate the concrete floor. There will be no glazing anywhere. I want to have a workshop for wood and metal work I can use year-round in comfort, all day and into the evening if I want, and without disturbing my neighbours(one elderly lady, one family with a young girl, and two doors down a nursery) hence all the effort to reduce noise - ignoring the door with my planned buildup you could stand a couple of metres away from a box with someone inside using a metal saw to cut steel and struggle to hear anything at all. A standard door whether just steel skinned or composite foam panel would make most of that effort pointless, I need to be aiming for something more like 100mm thick with significant mass and layers of different materials to improve its ability to absorb different frequencies of sound plus a frame that allows for a double or triple seal. If the maths of it isn't widely known I guess I'll just have to make little mockups and experiment. -
The modern enshittified search engines are worthless and just keep spitting out the same endless "hurr durr normal interior doors are between blah blah blah" nonsense no matter how I phrase this question so hopefully someone here has actual experience. I want to build(or modify) a side-hinged 1/3-2/3 garage door because it seems like the choices on offer either don't meet the specs I want(all "insulated" garage doors seem to be the exact same set of ~40mm foam/aluminium composite panels no matter which company is selling them, which is woefully insufficient for a year-round-use workshop conversion) or are wildly expensive premium custom jobs, but what I don't have the knowledge to work out is exactly how thick I can make the final doors so they aren't colliding when I try to open them, or what potential relief angles I might have to incorporate. I'm aware the hinges have some impact on it but there must be a rule of thumb I can at least begin planning the project around.
-
I've got a "swirl" pattern artex ceiling in my living room that I want rid of. It's been tested professionally and came back negative for asbestos thankfully, so I could just paint over it, but honestly I hate the stuff. Local plasterers were giving me comedy quotes, clearly can't be bothered to do a fiddly job on a high ceiling which is their right I suppose, but that leaves it up to me and having investigated the options(learn to plaster properly, use roll-on filler, overboarding) I'm pretty sure my skill level is more on the "taped and jointed overboarding" end of the scale. The one question I had though is this; some of the swirls have some pretty aggressive looking pointy peaks, do I need to bother going around and knocking all of those back manually before I start putting boards up, or will the boards just deform a bit to accommodate the bumps if I shove them up against those spots?
-
What I want to add to my plans isn't actually a conservatory per se, more of a glass porch, but the prices I've seen both by doing research online and in a couple of cases from local companies are, to my eye, lunacy. Assuming an aluminium frame, triple glazing, and the groundworks already being done the small lean-to design I have(which isn't even a full lean-to, it's a pitched roof 1.6mx3m and a 2.5m front elevation, plus a triangle on one side of the pitch - it slots between two existing extensions to the building) I'm getting back numbers in the 9-14 grand range. For something that - even buying stuff at pleb non-tradie prices and building a frame from scratch - can't have more than 5 grand's worth of materials involved, and that's using the worst pricing I could find, I could get it down to 3.5 if I went dealhunting and compromised here & there. It's a job that would take two or three days, max, for two guys(you'd need four guys for about an hour to do one heavy lift). Are they paying their lads like FTSE100 CEOs? Are the frames alloyed with gold? I get that you pay a premium to have professionals do a job, but almost doubling the cost of labour & materials seems like simple banditry.
-
Decent "middle of the road" brand for plugin tools?
YodhrinForge posted a topic in Tools & Equipment
Not too pricey, not too crappy is basically what I'm after. I've got a decent set of battery tools already(Milwaukee for important/frequently used ones, Parkside cheapies for anything I only use occasionally), but when I finally get the chance to start work on my reno project I'm going to need stuff for bigger jobs that won't require me to faff with batteries; plunge-tracksaw for sheet goods, mitre saw for framing, mains SDS for taking out the old fireplace and various bits of outdoor work to rid myself of crappy concrete things, a punchy shop vac(ideally with power passthrough and tool-start) etc. There's loads of decent reviews out there for battery brands but all the stuff I find searching for mains tools is AIslop listicles. EDIT: Oh and none of this "jobsite power" guff please - mains 230vAC, I don't want to have to faff with transformers. -
M'Lord, I present to the court Exhibit A. First of all, I am unfailingly polite in person. That's why I like pseudononymous internet forums. Secondly, I'm not demanding access to trade shows, or that I be given the same priority as a volume housebuilder, I'm literally just saying if you're bothering to put together a website and you're bothering to claim you sell to the public, there is *no reason* not to put up a per-unit price unless you want to retain the flexibility to fiddle individual people based on your estimation of how clued in they are. If you're still running a business in this day and age on the basis of "okay he wants this much, what can we fleece 'em for" rather than "this is the volume I need to move at these prices, and so each unit must be sold at X - if you make a really big order I might consider a volume discount" then that's a perfect example of the kind of Victorianism I'm talking about. The fact you make so many assumptions - oh he must just be doing some silly wee thing, a bit of wonky sopping-wet CLS from B&Q would do him, what's he moanin' abaht etc - is absolutely typical of the attitude I'm talking about. I'm conducting an eco deep-retrofit of a 19th century stone cottage with a late 20th century masonry extension that will be receiving an additional wooden extension - not using whatever CLS is shunted through DIY stores once the good stuff has been sold through proper BMs, using specialist engineered timber products because long-term dimensional stability is important for maintaining airtightness - and so far as a complete layperson I have discovered exactly two things I'm not comfortable doing DIY - electrics and traditional slate roofing - because frankly it's not exactly rocket surgery, and I have the free time. But that's not what the industry wants. The industry wants you to hire an architect, who instructs their pals who're QEs and SEs, and then call up their buddy who's a builder, who then goes and chats to his pal who runs a BM and gives him a lovely jubbly little deal, and if the plebs try to butt in to any step of that inefficient, incestuous little process we're given as much of a runaround as possible to try and discourage us.
-
So I've been in my new-old place for a few months now and I've noticed that over the past few weeks there's a really bright mint green colour that seems to be bleeding through the cream wall paint at various spots, and increasingly so(primarily at edges like the wall/skirting line or next to trim and doorframes). Pretty sure it's not mould or anything like that. Redecorating was something I wasn't going to be doing for ages yet, but I am planning to do renovation work that will involve fiddling with one of the greening walls, is it anything to worry about do you think?
-
Not really how it works in this case, I'll have sufficient access to create a seamless airtight layer even though it's a retrofit. Attic & floor membranes and doors & windows will be taped off against the masonry, then lime parge applied to the masonry will seal the walls over those joints. The handful of tight corners where getting tapes in would be a faff will get a liquid application membrane product applied and that can be taped off to. I shouldn't have any appreciable gaps, and all those products have been through enough testing that I can be assured I'll be long dead before they risk losing any performance.
-
Oh here's another bugbear - if your timber is 45mmx45mm, then don't bloody well advertise "47mmx50mm joists" and then put "lol jk that's the size before we regularise it" in smallprint at the bottom of the page. I was aware of that pitfall in advance but it still boils ma pish every time I see it, plus even if you're aware of the problem it still makes finding actual 50mm(or whatever size) material a gigantic pain in the bum when the dimensions actually matter. All the joists and rafters in my old house come from a time when the stated dimensions were the *actual* dimensions so trying to find stuff that will match them when I need to deepen, reinforce, or sister one is rage inducing.
-
Honestly starting to think you're right. I went back and ran the rough calcs for just deepening the joists to 200 or 250mm and using ecologicalbuildingsystem's retro-ecofloor technique and it's coming back somewhere between 0.13 and 0.15 which is in the same range as the thermally broken approach and would be easy as widdlin' up a wall by comparison - grab some joist stock, tack them on underneath with the nailgun on an angle, a few screws up from below, then it's all vanilla. I don't anticipate there being any missed bits, I'll actually have pretty good access to everywhere I'll need to do comprehensive airtightness and I'll be handling that aspect of the project personally to ensure no bodging, but tbh that aeroseal thing looks nas-tee to me. "Non-toxic water based" but requires full-face breather with VOC cartridge during application hmm yuh-huh. Looks to be an aerosolised acrylic caulk, no info on longevity testing, no info on whether it is or how long it stays flexible to deal with wood movement etc, can't see vapour permeabilty numbers in any of the docs on their site. Seems like it would be a useful tool in the context of the volume housebuilding sector to save them time and effort, if they were building near-passive homes(and assuming engineered timber rather than sopping wet CLS that will look like a plate of spaghetti by the time the house dries out), but in a back-to-masonry deep retrofit I don't see the value really.
-
I have to say that so far in life, I've enountered few experiences more mindlessly, needlessly frustrating than trying to give the building industry my money. It always seems that you need to put on the fez hat and give the special secret handshake to prove you're One Of Us before any sod will even tell you how much something costs. Something as basic as a webstore with a simple per-unit pricetag is apparently beyond ~95% of suppliers, even the ones who ostensibly sell to the public - like, why even bother pretending? Just say "trade only, DIYers bog off", don't waste my time submitting requests to perhaps maybe be considered for the possibility of buying something, only to turn around and refuse to even give a price unless I provide complete structural plans for the project - I want to know the rough price *before* I get to that point or how else am I supposed to sodding well cost the different options against each other. Computer building, car and bike mechanics, even other trade-esque areas like furniture carpentry and small boatbuilding are at least *somewhat* open to laypersons who want to do things themselves and just need access to buy materials - hell I've never had better customer service than from a local-ish sawmill where I get hardwood and the first time I went there I was completely clueless - but heaven bloody forefend I try and find out how much anything that isn't bog-standard DIY store CLS from a construction materials supplier is going to set me back. Everyone in this crappy country seems to want to pretend they live in the Victorian era for some reason.
-
If the sarking boards are wind-tight, which they are as they're rated for roofing, I don't see how it would make much difference, as it will all be fully outside the thermal and airtight envelope as is the wall the chimney sits in. We're still talking about 3 pretty small vents feeding one small duct, it's not like it's going to generate a howling gale; back of a napkin prelim calcs suggested it would only be a bit more than double the present airflow which is with only two functional vents, and still below what modern regs spec for with air bricks every couple of metres around the house perimeter. I was also under the impression that a closed up chimney has to be ventilated somewhere regardless and since it won't be from the heated interior I don't see how the solum air is going to be colder than air direct from the exterior. It's not either-or man, I'll be investing the time and money on airtightness anyway. All exterior and adjoining walls are being stripped back to bare masonry and will have a lime-based parge/levelling/airtight layer applied before lime adhesive & hammer fixing woodfibre insulation boards. Appropriate tapes, membranes, and where needed liquid-application barriers will tie the lime parge into new passive rated windows & doors and a complete rework of the current room-in-roof attic conversion which will have contiguous insulation and airtightness on the interior of the pitches from apex to eaves(ventilation gaps will be maintained to regs "outside" the insulation), as well as to the ground floor with the airtight layer under the insulation - which in the concept being discussed would be the airtight T&G sarking boards, or in the "normal" method a vapour-open roofing membrane stapled to form "slings" between the joists for the batts. I'm already committed to going whole-hog on this, that's why I'm trying to figure out how to maximise every aspect as much as I can without going *too* mad on costs. Insulation boards over the top of the joists kind of negates the object, which is to place as much of them as possible *inside* the insulation envelope, which should ensure only the very tips embedded in the walls on the coldest days get close to hitting dew point and even then should quickly recover to a temperature that encourages evapouration and allows them to expell any moisture through the vapour-open buildup. All that said, this notion seems much easier to work with than my plan and should work fine with the "membrane sling" airtight concept with only a little bit of faffing. Rough calcs suggest I could hit aroundabout 0.15 with that - could be more, but factoring in the depth of the flange hanging down I think I'd only be able to fit 60mm insulation under the joists with the requirement to maintain a 150mm cavity.
-
Aye it's this stuff: Seems to be granite from what I've read online? Thinking about it, I could somewhat over-order my concrete ballast and mix that in, end result should be fairly type 1-esque just lacking the few bigger ~40mm chunks.
-
Just wondering if it's allowed/sensible. I have a garden absolutely rammed with that heinous red gravel that was big in the 80's and early 90's and want to replace it, but paying to have it lifted or just posting on FB inviting randoms to come and shlep about my garden with shovels doesn't hugely appeal, so given I'm going to need a bunch of hardcore for the foundations of my new extension, my planned garden room, and as a subbase for a couple of new concrete floors putting it to productive use and saving myself the costs would gladden my tightfisted little heart. Maybe by mixing some sand into it to make up for the lack of fines?
-
Almost: 35mm WF(no need for a membrane with the T&G sarking boards), flexi WF, VCL, subfloor(the floorboards evidently went away sometime in the 20th as its particleboard at the moment), LVT or somesuch top layer. Ventilation is definitely a concern as there are presently two vents, one at the narrow front and one diagonally across from it at the wide rear(the best way to envision the property is a wide cottage divided internally into two properties shaped like interlocking Ls - mine is the small front wide back one). I suspect there was a third directly back from the front vent at one point but it was covered by the old kitchen & covered porch extensions, since the porch is getting ripped out and replaced with a new utility room I'll be restoring that one via a duct. Preliminary discussions with architect came up with the notion of using the pipe-converted chimney flue that will be left after I have the gas fire ripped out and carrying the pipe down into the subfloor, changing from cross ventilation to constant draw on all ground vents via stack effect on the chimney pipe(with anti-backdraught cap). That has to be modelled though, to make sure it'll work. I have been thinking over torre's notion a bit more and trying to figure out if I could make the install easier by deepening the joists with 50x50mm rigid wood fibre board "battens" ripped from insulation(ordering a bunch of that anyway for the stone walls) and screwed in diagonally from above, just need to figure out a way to do the membrane underneath - maybe instead of trying to keep it whole and stretch it across crosswise to the joists I could cut it into strips sized to cover the gap between just a few joists and tape them(apply the first one "properly" by nailing off a runner to the wall plate, then secure it to the first joist with tape, then just move across taping each strip off against an extended joist, and then the next strip over that). Lots of expensive tape but easier to manage, and would still break the thermal bridge.
-
I'm going basically-EnerPHit - "wasting time and money for only microscopic improvements" is essentially the job description lol I appreciate for most people it's not worth the bother, but as I'm DIYing a lot of this project and it's a "generational" retrofit of the building which will almost certainly be my home until I shuffle off, I'd rather do as much as I physically can and get the best possible end result, even if it wouldn't make sense for a commercial project. Adding 35mm sarking to the underside of the floor assembly bumps the u-value from over 0.2 to under 0.18 on the rough calcs which both hits regs(and I'm trying to show willing there whenever I can because there are a few things I want to do that will require the BCO to sign off exceptions, so better to not push my luck) and will actually make a bit of difference in the long run in the context of a highly airtight(MVHR) heatpump-heated home up here in Scotland. If I break any of the tongues eh, I'll just slap some Tescon Vana tape on the join. Lifting the floor unfortunately isn't an option as the doorways are already only just big enough for me to walk through without ducking and I'm avoiding structural work if I possibly can so going around and remaking all the lintels to be a course higher doesn't appeal. @torre I considered something similar to your suggestion about the backer board, but I'm having to be very mindful of maximising the ability of the floor assembly to dry out into the cavity as these old stone cottages only have a small amount of ventilation and being in a conservation area means I can't just go around punching more holes into the wall, so I'd be hesitant to introduce even small elements that aren't as vapour open as possible. That's why the sarking is such an appealing product, being wind-proof and resistant to moisture but still basically transparent to vapour.
-
Pretty close to deciding I CBA with slabs and UFH and just insulating the existing perfectly good suspended timber floor as flooring has to come up for other work anyway. Easy option would be membrane slung between joists filled with wood fibre, but that leaves the joists as cold bridges, so I'd prefer to use the approach of adding tongue & groove 35mm wood fibre sarking underneath the joists(which doubles as the vapour-open windproof layer) - trouble is my solum cavity isn't gigantic, about 270mm below the joists, and even with a right angle drill attachment etc I can see getting under there with the thermally broken fixings is going to be a pain in the bum. I'll do it if I have to like, but if there were a ready made easier solution I'd be interested to hear about it - some kind of heavy duty plastic L or T bracket that could be hung from the joists maybe? I could screw in diagonally from above but I'm not sure if that's going to be secure enough long-term.
-
Alas I'd already tried that and my original issue stands - any inclusion of the phrase "party wall" almost exclusively returns results concerned with the Party Wall Act and the fact it doesn't apply here, and even using quotes just sprinkles in a few links mentioning the fact the scottish building regs exist. As far as I can tell from checking them directly, having done so previously, the regs only mention the concept specifically in relation to not undermining the structural integrity of the building, and in terms of requirements for fire resistance. There are mentions of *boundary* walls, but those explicitly refer to walls external to the house constructed along property lines eg garden walls, not part of the structure. I can't find any info on what processes, if any, actually govern situations like "I want to attach something to an external wall that is also a party wall wot do?".
-
I know the Party Wall Act does not apply in Scotland and that things are done differently here because that's what every single online search result I get tells me immediately before not saying what those differences are or linking to them and immediately going on to discuss the E&W Party Wall Act in detail. Whether my google-fu is weak or search is just enshittified nonsense now I can't wrestle any more than that out of it. Does anyone happen to know what if any legislation *does* apply here? I have a useless little part of my garden that sits between me and my neighbour's extensions that I'd like to make into an enclosed porch with a mini lean-to conservatory, but that will require at minimum a few bits of silicone sealant on their extension wall(based on both deeds and my own comparative measurements their extension wall is built running *on* the property line, not merely facing up against it) and sticking some butyl tape to their guttering, so while I fully intend to take the idea to them for discussion and come to a reasonable accord rather than just spring it on them as a fait accompli, it'd still be useful to know if I have any legal rights or legs to stand on.
-
I have this odd little space on my property around the back between my neighbour's existing extension(built up to the property line, so is a party wall) and my own house's existing extension. It serves no real purpose, it's north facing and the ground level is shaded by the extensions so nothing useful will grow there, it's inconvenient to use as a bin store, and it features the downstairs bedroom's only window so regs won't permit a "proper" extension there, it's just generally dead space. My only initial idea was to stick a couple of sheffield stands around there in case any visitors come by bike, but sitting in my little back porch the other evening which unfortunately will be getting demolished to make way for a utility room(and moving that isn't an option since it needs to be in that spot for various reasons) I found I actually quite enjoyed having a sheltered wee space to read and listen to the rain hitting the roof looking out to the garden. The space is about 2.5m wide x 3.6m deep and apart from having to faff with the drainage and guttering(which all needs to be addressed as part of the broader renovation work anyway) it *seems* like it would be a fairly simple extra project since it would only need the roof and frontage, but from attempts to research it I'm finding the "conservatory industry" seems pretty thoroughly geared around a few standard designs all of which are intended to project outwards from a wall rather than be fitted between two existing ones, so I take it I'd be looking at a custom design? Does anyone have experience with rough costs for that sort of thing? Would it be easier to go to a specialist company or could I be better off just getting my existing architect and structural engineer to specify it and order individual components myself? Given I'm in the central belt of scotland and it's north facing it'll have to be triple glazing so that narrows my options.
-
Yeah I probably will have to drill it in the end, bloody inconvenient though due to the way the extension was done(hipped roof into middle of existing pitched roof so no easy access from the attic, walls inside are tiled and the roof has that really tough popcorn plaster, probably have to go in from outside and then just jam the hole with silicone for the short term). On the plus side your comment made me double check and I was just being dim with the garage - it's single skin on three sides with solid double on the front with the doors in, they just put some lines into the render on the front side so it would resemble the wall of the extension hah.
-
I'm starting to get into the weeds of detailing with my architect about my renovation and was just wondering if there's a way to determine cavity size without having someone digging into the walls? I suspect I know the answer but might as well check. There's an extension on the back of the house that definitely has some kind of cavity as there are exterior wall vents, exterior leaf is blockwork(it's just painted so is obvious), inner leaf could be brick? Can only barely see it through a tiny hole in the back of the cabinets at floor level - you'd think it would be block as well if the outside was, but there's also a masonry built detached garage that seems to have been put up around the same time as the extension and that's brick inner block outer(although the block outer might just be a facade? there's a layer of engineering brick visible just above the paving slabs and the block layer protrudes out from the top of that by ~30mm or so) so who knows. The approximate thickness of the extension wall is 320mm, the garage wall is 230mm. Trying to decide on relative merits of different insulation systems & materials but it's all so dependent on if there's a cavity and how thick it is.
-
Re flue liners; the issue there is *air* tight is not necessarily *radon* tight. Radon is capable of diffusing through a lot of materials that can stop air molecules no bother, it's why you're supposed to use a specially rated DPM in known radon areas. It would also - assuming the standard metal option - be putting a huge condensation generator in the middle of a stone wall outside the insulation envelope which doesn't seem great for the health of the wall long-term, as you'd have an air cavity around the pipe where moisture in the wall assembly could evaporate and then a metal tube drawing cool air from the solum space - completely coating the interior of the flue would firstly seal the flue from the wall assembly so water vapour couldn't pass into it from the wall itself, would make condensate less likely in the first place as nothing in there would be cold enough to let significant moisture form out of the air before it was expelled through the chimney, and any that did form could drain back down into the solum rather than being trapped in the air cavity. The Visqueen(or other brands) stuff is designed for exactly this sort of issue it's just normally applied to seal floors or walls rather than the inside of unused flues. At the three access points the measure depth of the cavity between the bottom of the joists and the earthen solum is ~270mm. Re soil gasses; other than maybe radon in a former mining area there's also potentially methane, though that's more common on former waste dumping sites that have been built over, and also just water vapour - you have to be really careful with moisture when renovating these old stone buildings because they were designed to be draughty as hell and have active or residually-hot fireplaces pushing air out through the chimneys pretty much 24/7, so even using the proper vapour-open materials as I will be you have to watch the solum space with so few vents compared to modern structures, soil moisture can elevate the humidity of the space and then you get water condensing around joist-ends and other inconvenient places. Re radon maps & measuring - the maps only report testing that's already been done and most people don't even know radon is a thing they should be testing for. The map data is also not particularly refined - your neighbour a dozen doors down could submit an all-clear result and if that's the only result your whole area could be marked as lowest possible risk, but *your* house could still be sitting on top of a plume of the stuff. You also really have to wait for winter to get proper results, and on top of that results before & after a renovation can be totally different. For my money testing is more something you do to confirm that there isn't an issue *after* you've already done all the mitigations you can within your budget and project scope. And the issue with the recommended methods Mike are they all pretty much assume either old and draughty or modern and airtight, whereas I'll be making an old property airtight(or as close as I can manage) but using vapour-open(and so radon-open) materials to control moisture buildup, so they won't really work in this context because if it stops radon it'll also stop water vapour. Everything about these kinds of renovations is non-standard really.
