David001
-
Posts
82 -
Joined
-
Last visited
David001's Achievements
Member (3/5)
12
Reputation
-
Bad roofing job: how should I proceed?
David001 replied to David001's topic in Roofing, Tiling & Slating
@Spinny, 20260529_195248.mp4 20260529_195153.mp4 Thanks for nudging me towards collecting more useful evidence. -
Bad roofing job: how should I proceed?
David001 replied to David001's topic in Roofing, Tiling & Slating
@Spinny, thank you. Why did I not think of doing such a valuable thing and with the camera close at hand! Another thing I did not think of doing is actually shaking the triangular added on "wings" at the lowest points of the two fascia boards! That was done last night by the professional carpenter who came to look at the work. He found that those triangles could easily be moved back and forth! Why? Because they've been stuck on with something like the rubber sealant which was used elsewhere! UNBELIEVABLE. It's as if the philosophy of the two workers is: build something that LOOKS LIKE what the customer wants, then squeeze payment out of them as quickly as possible. -
Bad roofing job: how should I proceed?
David001 replied to David001's topic in Roofing, Tiling & Slating
@Mr Punter, thanks. That is exactly how I felt when I discovered what they had done. I simply could not trust them to truly remedy all their faults. I think the work proves that they are unable to judge the quality of their own work. Locating and arranging the new company, documenting all the faults, continuing to have to deal with the project: it has all eaten up further time and energy. Does this warrant refusing to pay the outstanding ⅔? What would you do in these circumstances? -
Bad roofing job: how should I proceed?
David001 replied to David001's topic in Roofing, Tiling & Slating
@BotusBuild, thanks. I paid ⅓ at end of first day's work. Am awaiting the quote of a recommended builder to make good all the flaws (but probably as you say too redo everything except they basic structure). Should I refuse to pay the outstanding ⅔, or should I only pay whatever is left over once the making good has been completed? What would you suggest? -
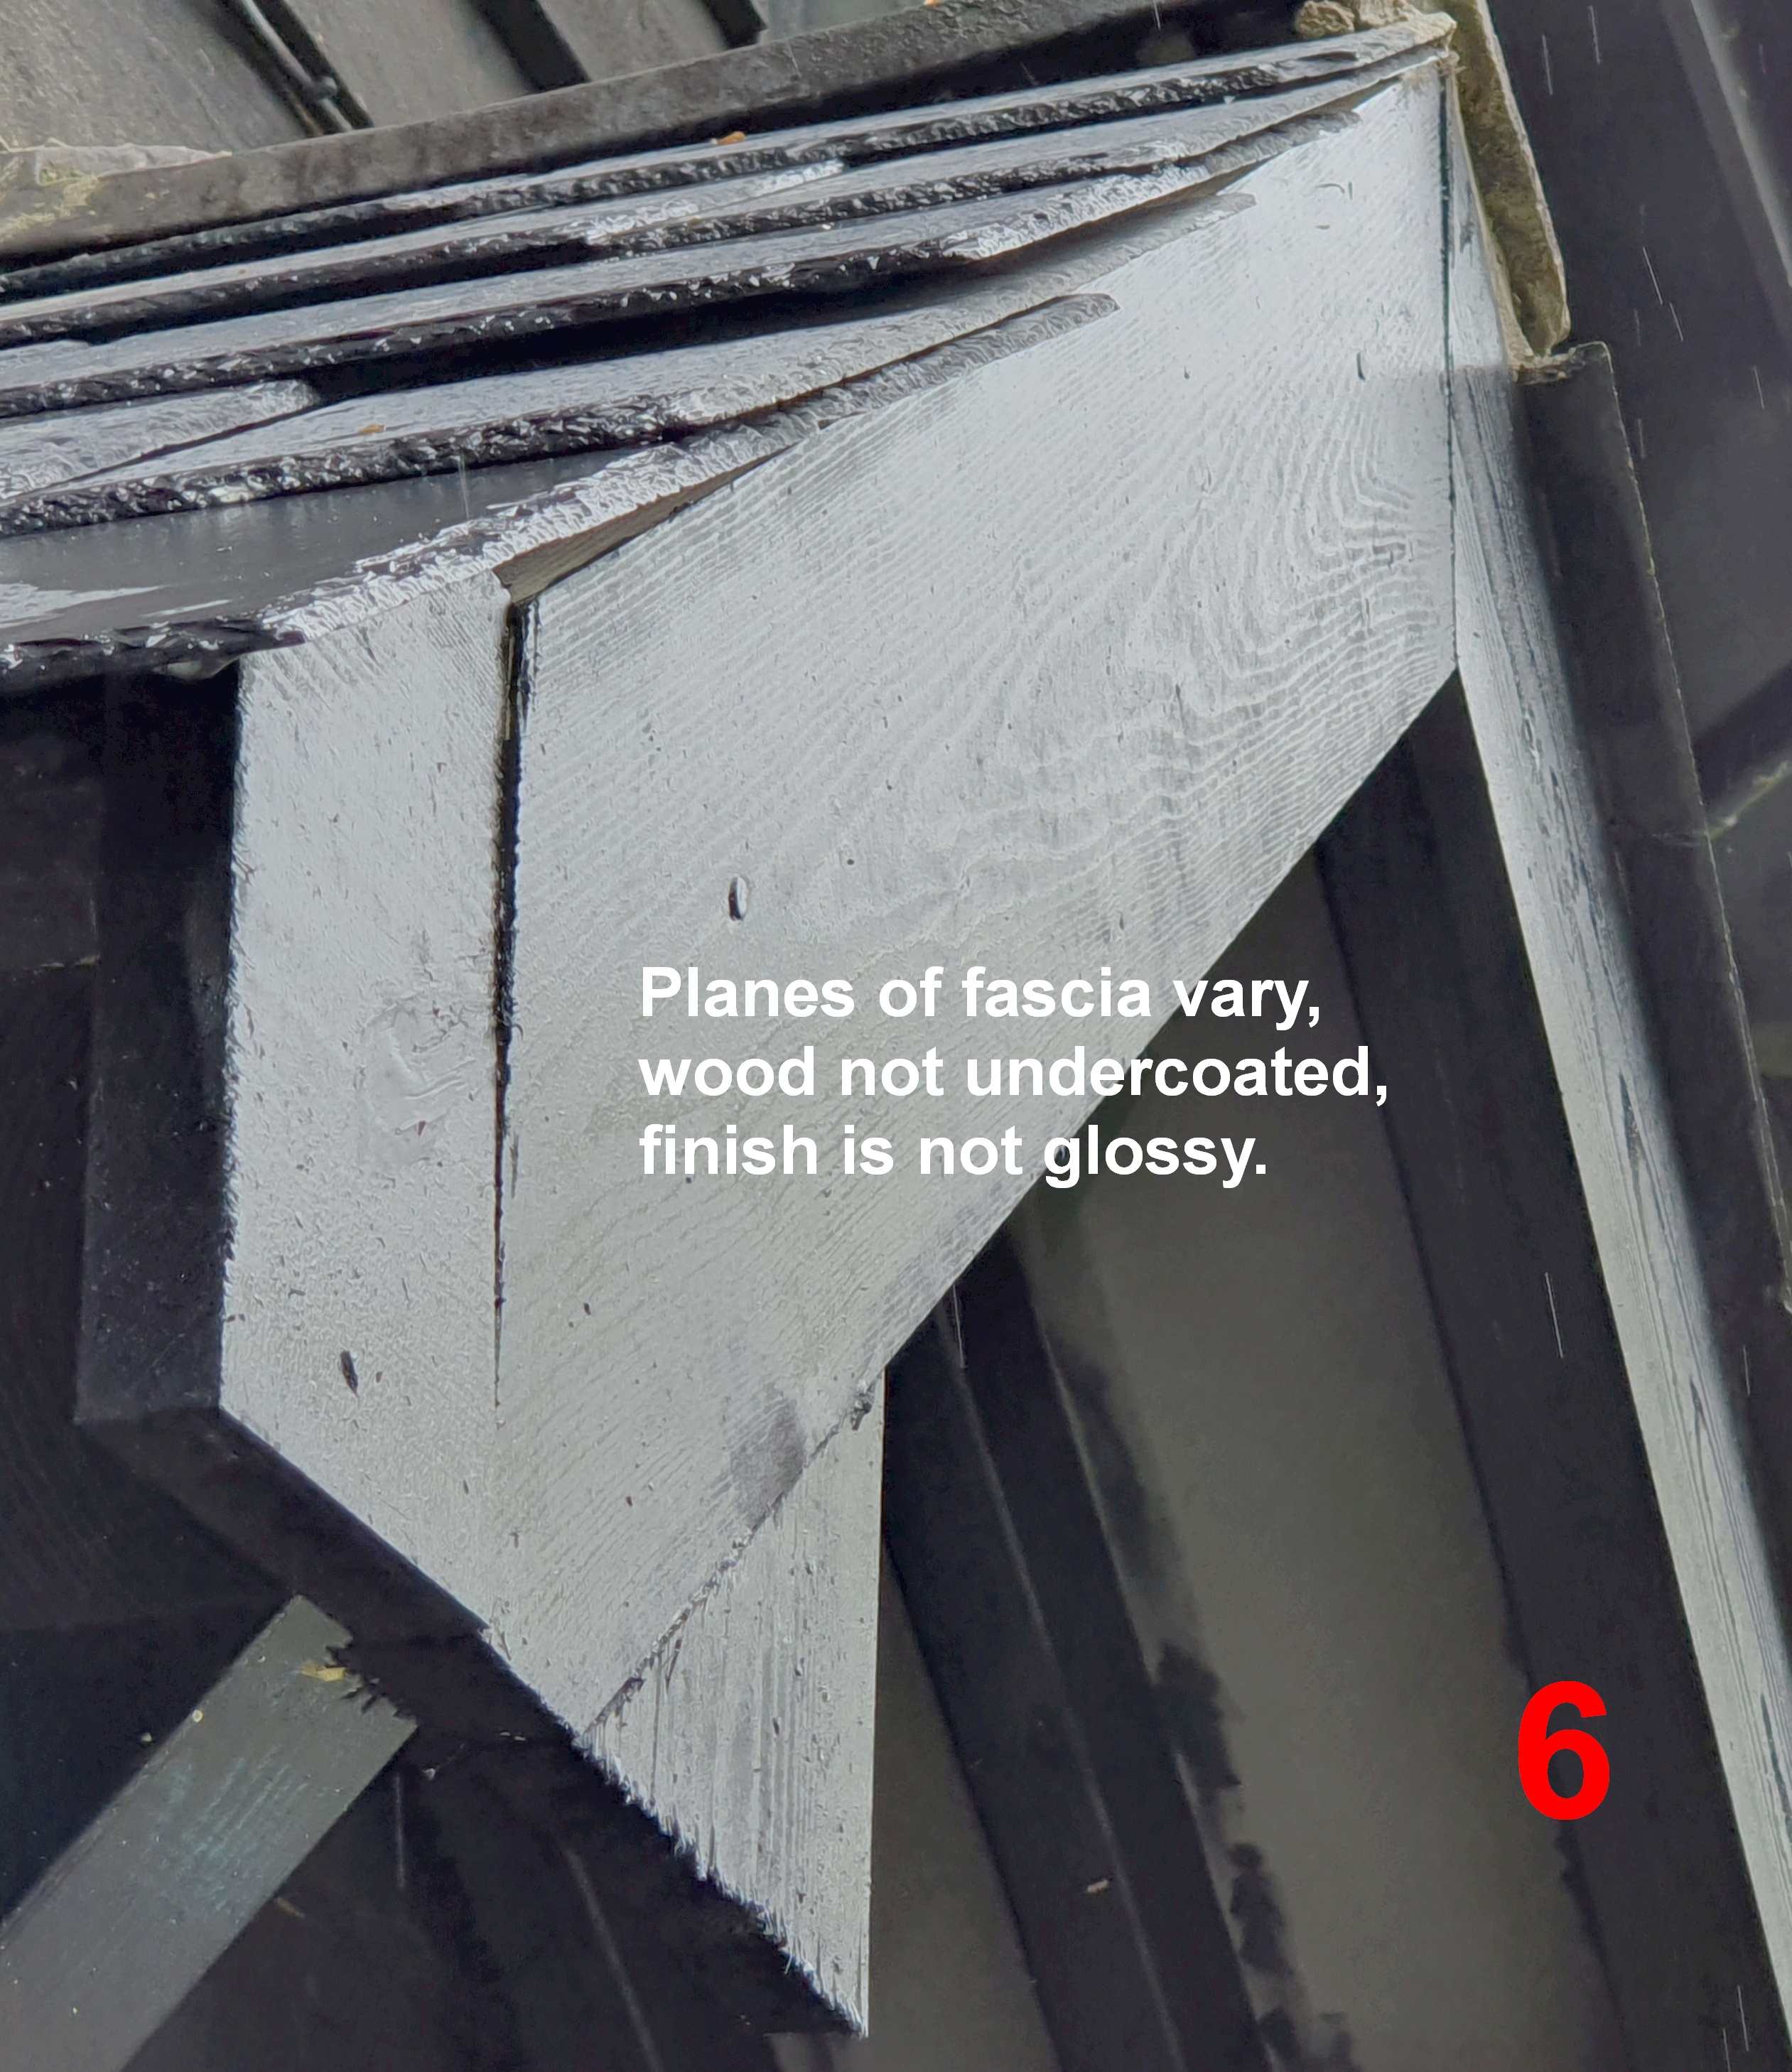
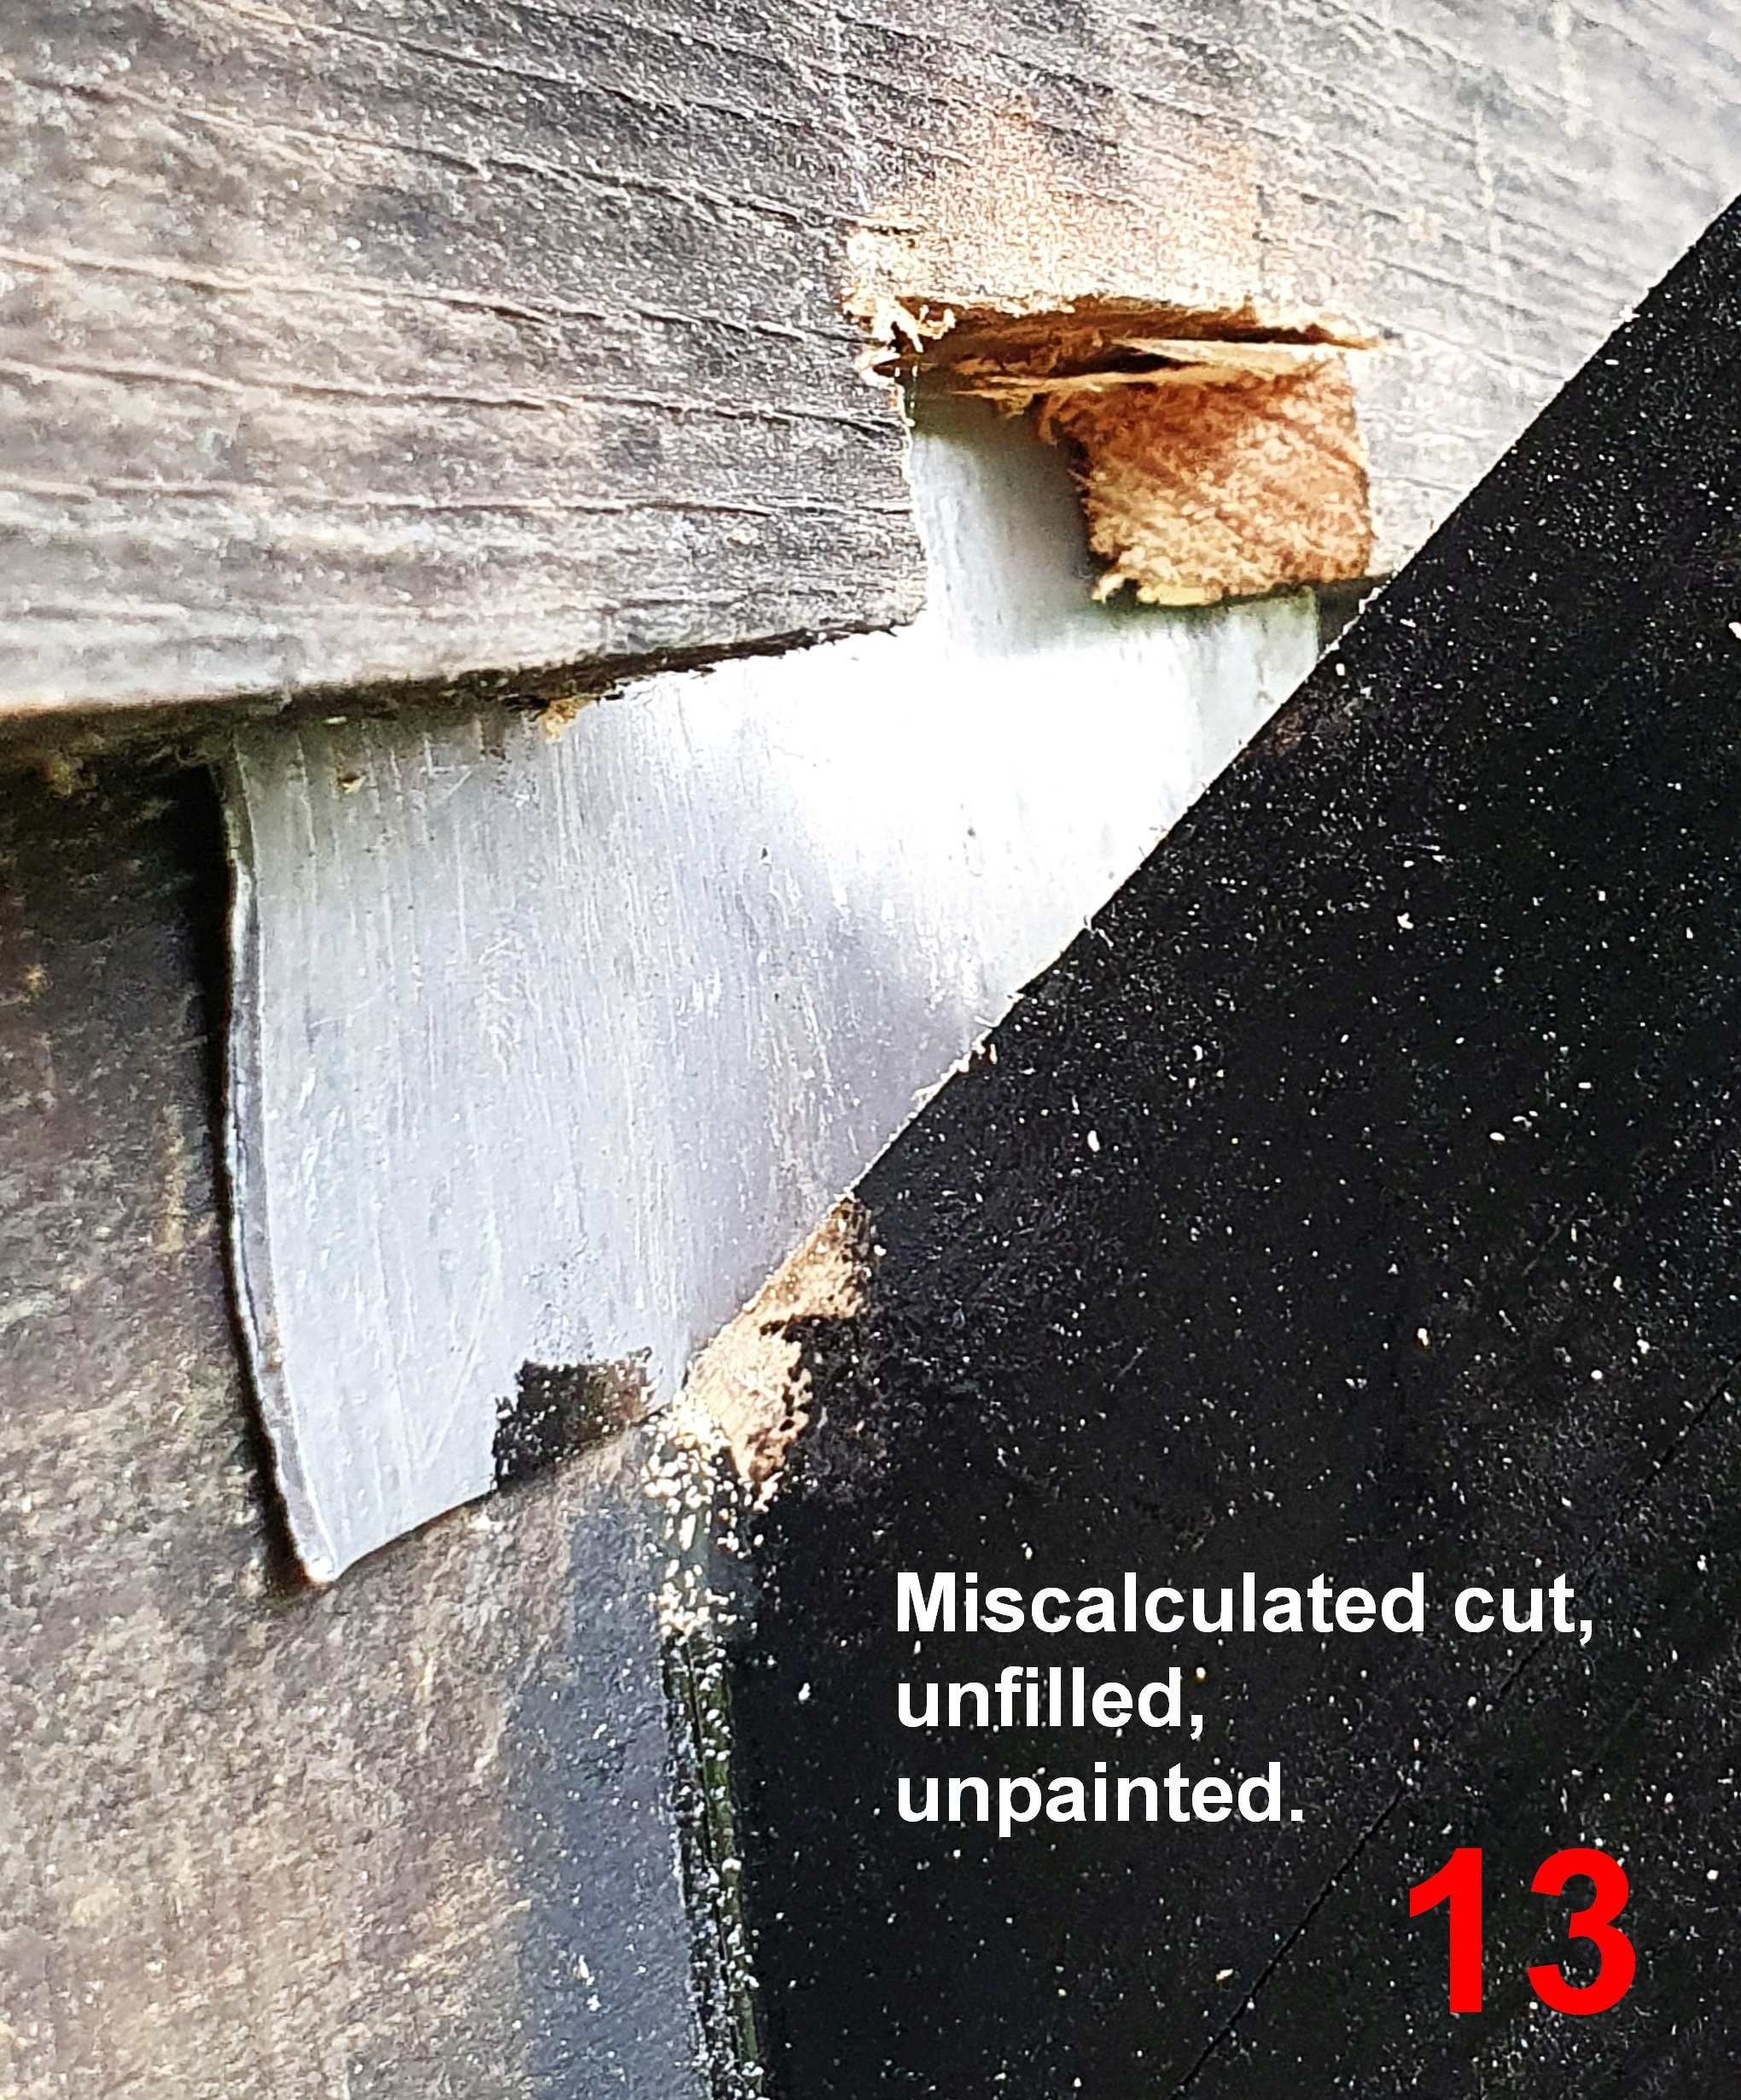
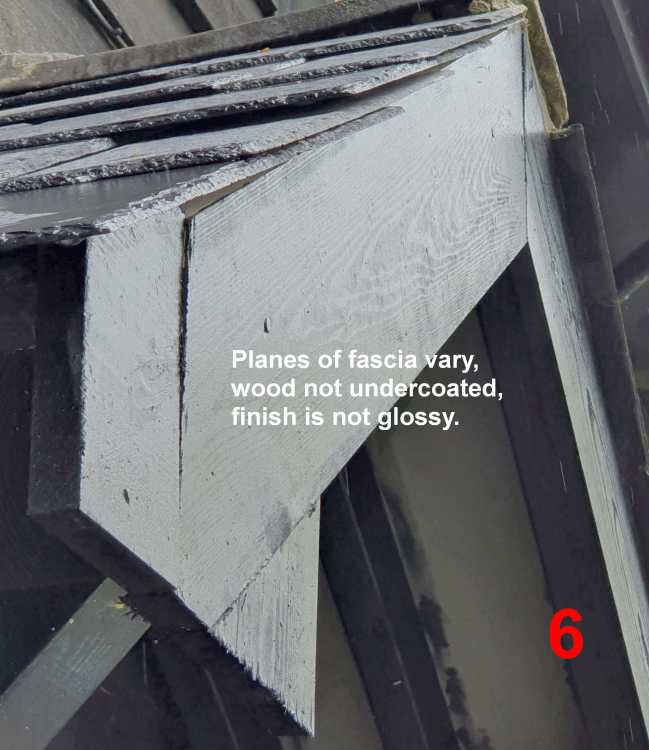
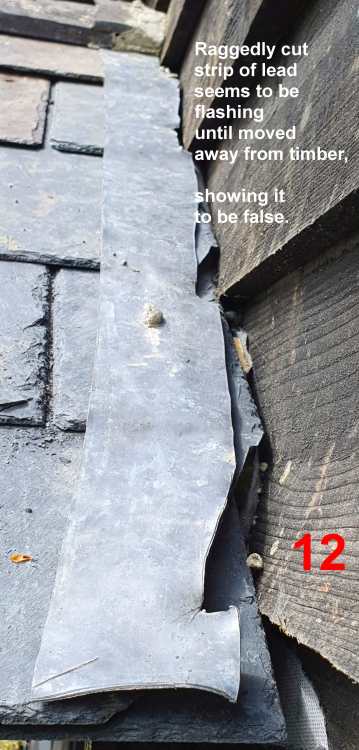
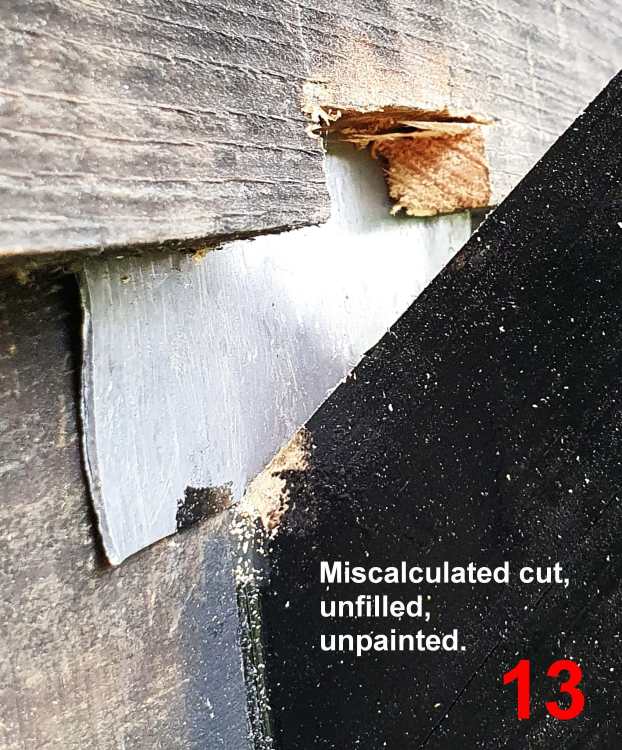
A certain building company, which claims to be professional, has left me with a shoddy porch hood. I paid them one third at the end of the first day of work. I have not paid them the remaining two thirds. Please have a look at the worst examples of their work. (There are a total of 32 similarly serious flaws. I have asked another roofer to look at the porch, and a carpenter is soon to look at the woodwork. PLEASE could I have people's opinions as to how to proceed?

-
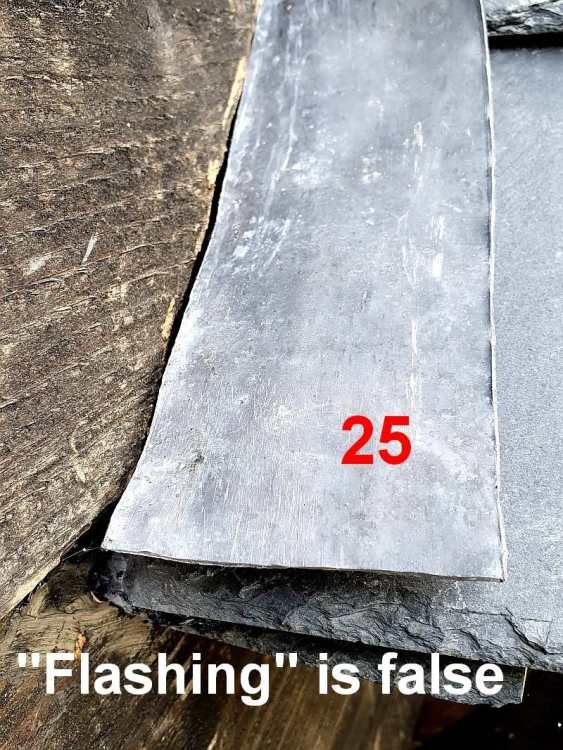
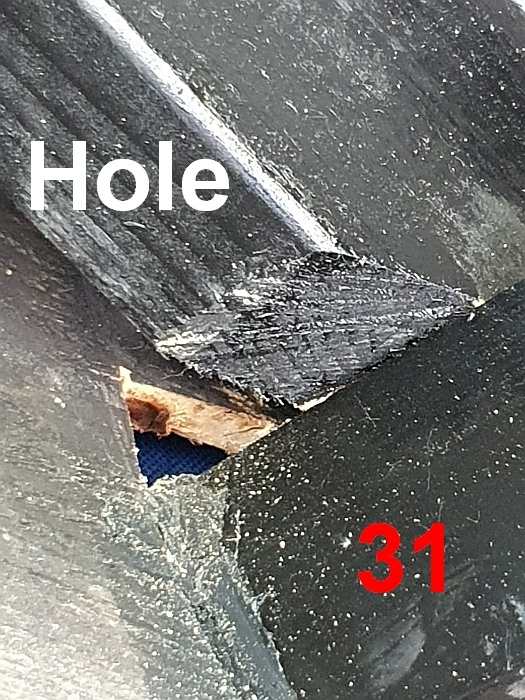
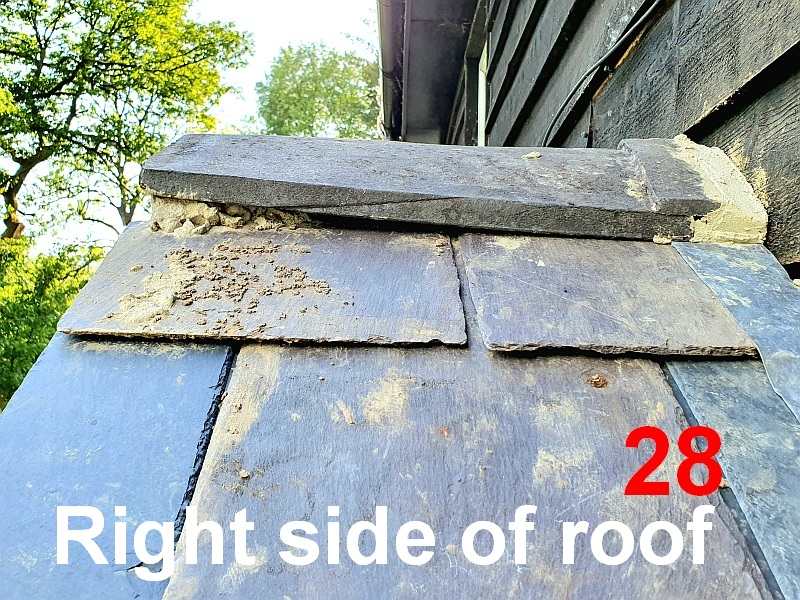
Unfortunately I have just had a porch hood added over an external door and there are unbelievable flaws in the construction. I'm not certain which side of the roofing membrane should be facing up and which side should be facing down. The photos below show that the two pieces have been laid differently. Which side is correct? As the porch-hood is open to the atmosphere, how important is it that both pieces are correctly laid? (Another flaw is that there is a visible hole in a tile on the right side of the porch. It may not be the only hole.)
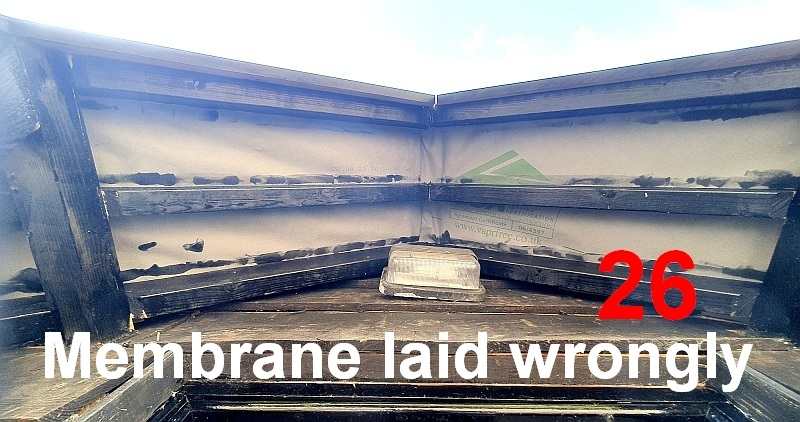


-
Sorry. I meant, thanks for pointing me to the gap which there seems to be under the ridge!
-
Many thanks @Gus Potter @SteamyTea @saveasteading for pointing me to the gap which there seems to beneath the ridge.
-
@Gus Potter& @Nickfromwales Thanks for asking for a photo. I hope this one will do.
-
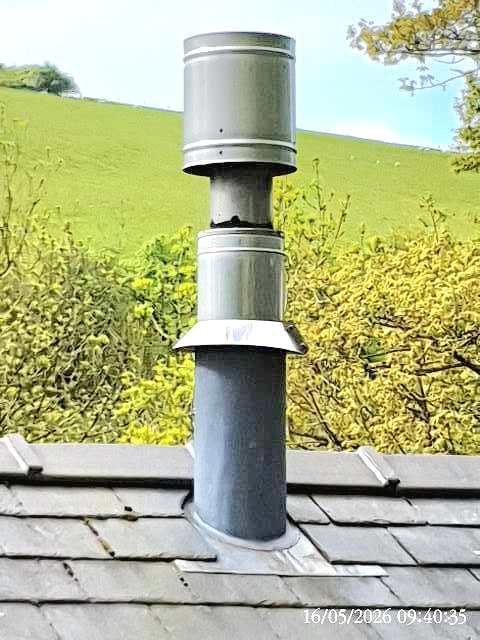
Once during the recent winter, when the wind and rain were vicious and rather horizontal, I noticed some drips of water trickle down the outside of the stainless-steel wood-burner vent inside a bedroom. So this summer I intend to get up on the almost flat dormer roof which is close to the stainless-steel chimney and fill any small holes I can find around the vent. I imagine it needs to be something flexible, but also something that won't react badly when the metal is warm (when the fire below is burning). What product should I use, please?
-
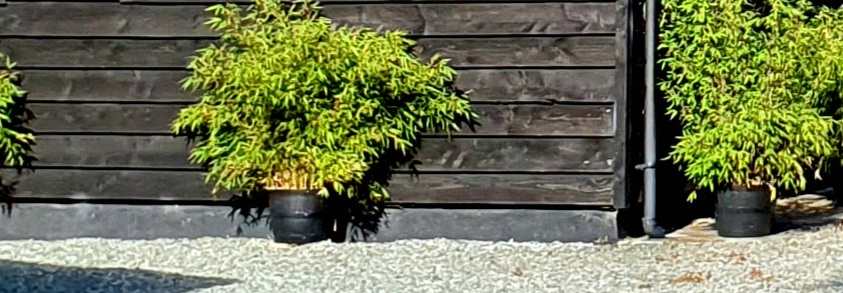
Mice, shrews, voles! Somehow they all get into our house and make their way up into the walls and attic. A couple of years ago one of them nibbled a plastic pipe in an upstairs wall and caused a leak which saturated the plaster of an upstairs wall and the downstairs wall directly beneath, as well the carpets of both adjacent rooms! So it's time to close the "front door"! The trouble is: where IS their "front door"? Somewhere around the perimeter of the house, the little devils are clearly able to make their way up the 8 inches of plaster between the shingle and the first board of timber-cladding, as in the photo. Where they go after that we'll never know, but behind the cladding there must be one or more holes allowing them into the house. So what's needed is a guard of some kind. It must be attached between the top of the grey plaster and the bottom of the first board. It must be firmly and permanently attached. It shouldn't have holes or gaps in it greater than 6 mm. It must allow air to ventilate the cavity behind the boards. It must stop determined rodents from making it onto the outer surface of the boards, so that they can't climb until they find a gap between the boards. It should come in long strips, so that there will be as few joins as possible. It should be black (or be painted black), so that no part of it will be visible. And: It mustn't be chewable. It mustn't rust. It mustn't be an eye-sore. Are there any other requirements? Any recommendations, please?
-
How to make a shower-cubicle floor waterproof?
David001 replied to David001's topic in Bathrooms, Ensuites & Wetrooms
@Nickfromwales, I took the plunge five days ago, nervously monitoring the state of the ceiling below the shower afterwards. So far, there's no sign of water, but if there's a leak from the shower and it's only a slight leak then it may take several weeks to penetrate the plasterboard ceiling of the room below. But so far so good, and I'm inclined to think the problem was the leaking tank in the cupboard directly beside the shower. I've checked the point of the leak on the tank and it's still dry. So I'm hoping that in a couple of weeks' time it will be safe to paint some stain-block over the brown stains on the ceiling of the room below, and then paint over that. Thanks for nudging me into summoning up the courage to test the shower! 😅 -
Hello. The house we bought four years ago has 10 Velux skylights. We never open them, but in the summer we open the narrow flap along the top of the odd one, to enable some ventilation. The problem is that for the past three or four months tiny moths and the odd mosquito have been spotted inside the house when there should not be any - other than the odd quick one that might dart in while an external door is briefly open. We live in an area which still has a considerable insect population, so after being assailed by moths and mosquitoes in bed at night during our first months in this house, we spent quite a bit on insect-proof screens on key windows (windows which we need to open for ventilation). So there should be no insects anywhere in the house. Yet some have recently started getting in. The question is how? The only thing we can think is that some of the insect filters in the Velux skylights may be letting them in. The previous owners installed the skylights in 2012 and Velux states on its website that the insect-proof strip and the padded tape along the top of the skylights need to be replaced every four or five years. Did the previous owners ever maintain the skylights in this way? I very much doubt it. So the moths and mosquitoes may be getting by way of this route. Q. 1. Each Velux maintenance kit costs £37, probably with an extra amount for postage. Each kit includes filters and padded tape 2.5m long. So as each window here is 70cms wide, one pack will do 3 windows. So I will need to buy 4 packs, totalling £148. Can the materials be bought at a lower cost somewhere else? Q. 2. Why does the insect gauze need to be replaced? It seems to be made from strong, honeycombed plastic. So why can't it just be rinsed under the tap and put back? Does the honeycombed plastic deteriorate in some way over time? The Velux service kit is available from Velux at the following link: Service kit (ZZZ 220) for VELUX roof windows produced before 2014 I've not owned skylights before, but I think the time has come to get to grips with the ones we now have. Thanks for any help with this situation.

-
How to make a shower-cubicle floor waterproof?
David001 replied to David001's topic in Bathrooms, Ensuites & Wetrooms
@marshian, same here: the leak from near the top of the water-tank had saturated the chip board forming the floor of the water-tank cupboard, so the owner had evidently pulled away the sodden board directly beneath the tank and then lain over it some thin plank-like strips of floor covering . . . which hid the hole and fooled our us and our surveyor! Thankfully the board directly beneath the feet of the tank was dry so the tank was still well-supported, nevertheless the leak from the tank must have been considerable . . . and it was still leaking when we moved in. With all that Nick has contributed, I'm now inclined to think that the dripping from the ceiling below may have been coming from the leaking water-tank and not from the floor of the adjacent shower cubicle. The big test will come soon when I switch on the shower for the first time in ages. Fingers crossed! 😀 -
How to make a shower-cubicle floor waterproof?
David001 replied to David001's topic in Bathrooms, Ensuites & Wetrooms
I reckon the leak occurred just before completion. The previous owner cut a sizeable square out of the ceiling below. Whether he was able to find the point from which the water came, I don't know. But he wedged a small pot-plant dish beneath the L-shaped waste-pipe, presumably to catch drops of water. Then using map-pins, he pinned a sheet of white foam-board over the hole in the ceiling to sort of cover it up! I then came along, peered inside, saw no water in the tray, no dripping, so I asked a contractor who fitted new cupboards in that room to cover and plaster over the hole as well. So, no, I can't now examine the underside of "the tiles". After drilling holes through the grouting, here and there but equally spaced, and then inserting lots of Fixafloor, I placed three big heavy buckets of water on the tiles and left them there for two weeks! But I haven't had the nerve to use that shower since! 😅 https://fixafloor.co.uk/products/fix-a-floor-pro-repair-pack Thanks very much, Nick, for your photo of a former inset into the floor. That probably explains why the cubicle tiles slope a little to the central drain while the tiles outside the bathroom appear to have been stuck to the same stretch of chipboards as are under the carpet of the adjacent room. So if the leak is from the shower cubicle, it's probably from the drain or drainpipe. BUT adjacent to the shower cubicle is the hot-water tank cupboard, and from the side of it I found a leak about nine months ago. That leak looked like it was "ancient" because of encrustation all the way down the path of the dripping water. But where did the water end up? It must have ended up somewhere. Maybe it was that water which appeared in the ceiling area beneath the shower cubicle? I fixed the leak from the hot water tank and there's been no further water dripping from the ceiling below, but of course I haven't had the courage to use the shower! I guess that shower is going to have to be tested sometime soon! 😱