MaxEmery
-
Posts
6 -
Joined
-
Last visited
MaxEmery's Achievements
New Member (2/5)
2
Reputation
-
Insulting block and beam flooring in preparation for ASHP run UFH
MaxEmery replied to MaxEmery's topic in Heat Insulation
Sorry for the lack of reply and double sorry for bringing back to life a dead thread but I thought it would be worth updating this thread with how things went. I did indeed use bricks under the PIR to keep them in place and once each sub sub floor was installed they were quite secure. I was looking at getting EPS beads to fill the void between the beams but in the end decided against it due to cost and the fact that the huge beams would amazing thermal bridges. As I said in an earlier post I got this insulation as seconds which made this very very cheap to fit. As I progressed across the house I found that there were areas where the subsoil was very very close to the floor and probably should have had more excavation when the house was built. In these areas I wasn't able to add insulation these being the hall and a utility room. Above the block and beam went 40mm of kooltherm. I haven't been able to do anything about thermal bridging from the walls so this is far from new passivhouse standards. Was it worth it? I think so. Installing the panels was a royal pain and I then had to replace a fair few broken blocks but the difference is remarkable between the utility which just received 40mm kooltherm and the other rooms which got these panels as well. Over the top of all this went ufh at 100mm centres and 40mm of screed to keep the stack height as low as possible. I've found heating costs to be very low running off a heat pump. Total electricity use is 2000kwh for the first year of install. (Home is 75m² 1982 built) Obviously I can't attribute all of the low cost to the extra insulation under the floor but it does seem to have made a decent difference. So far as I can tell I haven't had any issues with dampness or humidity over last winter so I'm fairly confident that the void left is sufficient. Oh and thanks for the advice on the foam gun. It was indeed much better. -
Insulting block and beam flooring in preparation for ASHP run UFH
MaxEmery replied to MaxEmery's topic in Heat Insulation
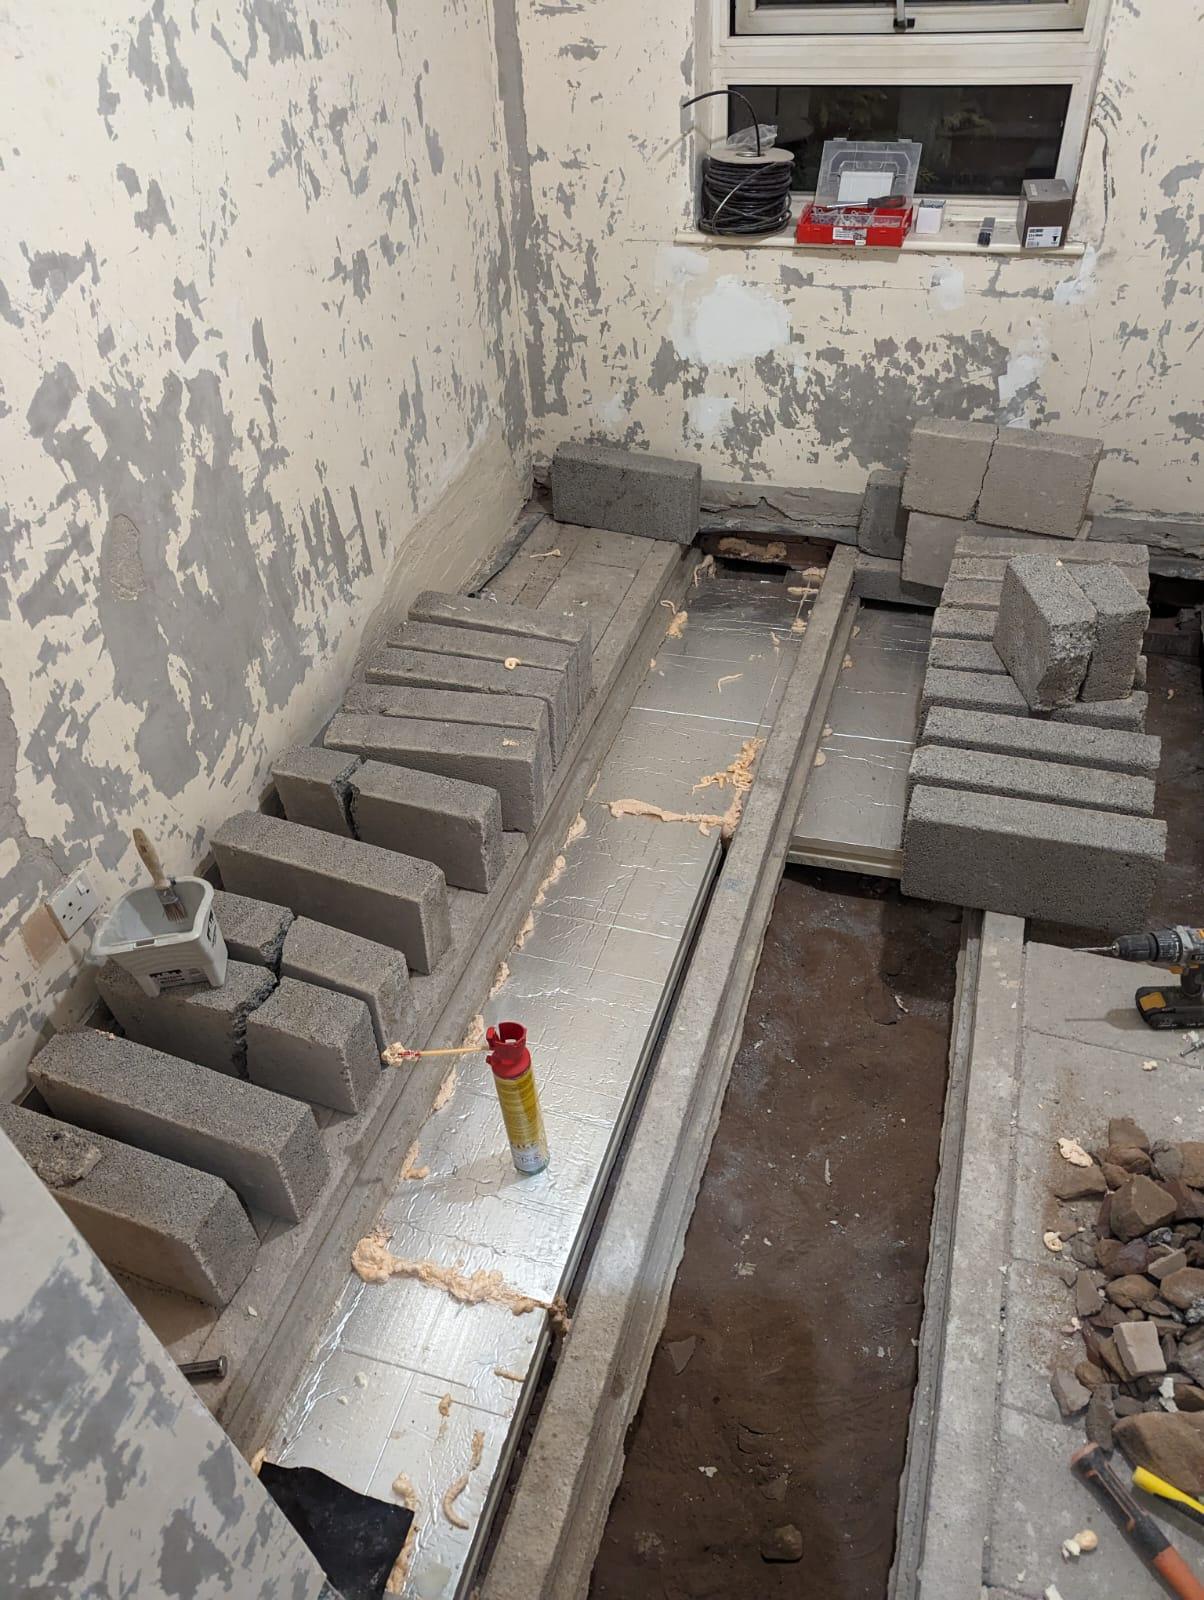
As promised... It's a slight pain to do but it does seem to be working so far. The current process I'm using is: Lift a section of blocks. Measure and mark the boards so I know where they will touch the beams. Spray a little water on the areas that need foam to help it adhere. Apply the foam and wait the 4 odd minutes for it to go sticky. Wrangle the board into position and support it with a brick to keep it in contact with the beam above. About 30 minutes later the foam seems fairly well set but I've left the bricks in place lightly touching the insulation just to be safe. Issues I don't yet have a satisfactory way to mechanically fix the boards to the blocks so any ideas would be very welcome. There really isn't the clearance to get a fixing in from below and the insulation wall plugs I bought aren't really up to the job of holding the boards if the adhesive gave up unless I commit to 6 or so per board which adds a fair bit of time faff and expense. At the moment I'm tempted to leave the bricks I used to prop them up temporarily in place permanently it'll take 1 per board centrally on each which I can't see causing an air circulation issue. A cheaper option would be a cut up scrap section of insulation but not totally sure Its sensible to leave the PIR in contact with the sand subfloor. Speed wise it isn't the worst. Working solo I can do about 5 boards an hour each board being .52m². cost for me is likely to be as follows: £3 per m² for the insulation (defective cavity wall boards from seconds and co 1.50 each 100mm depth) £1.50 per m² for the sticky foam £1 per m² for the bricks assuming I run out of the ones kicking around in the garden £2 per m² for EPS beads to fill in the void left above the insulation and below the blocks I feel like this is well worth it for less than £10m² and could be a viable option for many retrofits. Other notes are that far more of the blocks (maybe one in 10) than it initially appeared are cracked so this is a bit of added expense. I fully appreciate that I'm going to be reducing my floor void to levels that are not recommended. However the vent bricks will remain open and accessable and the floor will still have ventilation. I've bought 4 humidity sensor probes which I'll install that I can check on occasion to make sure things aren't getting out of hand humidity wise and if they are I figure I can install some ventilation fans to replace the vent bricks but I really don't see this being necessary. If people do think of anything I might be missing please do let me know.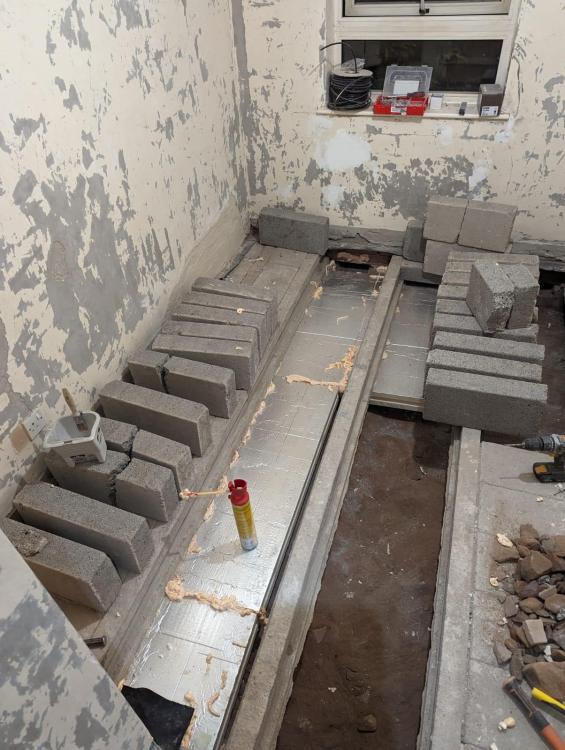
-
An idea for insulation under an old uninsulated block and beam floor
MaxEmery replied to Carol W's topic in Floor Structures
What did you end up doing here in the end? I'm looking at doing the same thing but with sticky foam and screws through the blocks into insulation wallplugs. -
Insulting block and beam flooring in preparation for ASHP run UFH
MaxEmery replied to MaxEmery's topic in Heat Insulation
I really like this idea and it would save much of the need to cement and screed which was likely to a be a pretty big time sink to get right and EPS would be easy to carve away in areas where the floor was massively out. Thanks for the help. I do have some cavity boards arriving which are currently destined for the garage but I'm going to give my plan a go and see how things are. I'll be sure to report back on the findings. Like you say I suspect its going to be impractical but given I have access now and probably never will again I'm keen to work through all options before committing to just 50mm of kooltherm. -
Insulting block and beam flooring in preparation for ASHP run UFH
MaxEmery replied to MaxEmery's topic in Heat Insulation
The idea with fixing the PIR under the floor is lift sets of blocks. Glue the PIR to beams with sticky foam, screw insulation wallplugs to the PIR boards, then drill through some of the blocks, countersink and put a screw through the block and into the insulation wallplug. Does that make any more sense? The alternative would be to do similar but from below. Glue the PIR in place, drill through it and into the blocks above then use plastic insulation screws (link below) to secure the PIR to the blocks to stop them falling back down should the foam glue fail. Are you saying that if the PIR was to crush in those locations that would be acceptable? RAWLPLUG INSULATION FIXINGS 160MM X 10MM https://www.screwfix.com/p/rawlplug-insulation-fixings-160mm-x-10mm-250-pack/140KF?kpid=140KF&cm_mmc=Google-_-Datafeed-_-Screws%2C Nails and Fixings?kpid=KINASEKPID&cm_mmc=Google-_-TOKEN1-_-TOKEN2&gad_source=1&gclid=CjwKCAiA0PuuBhBsEiwAS7fsNRKI8RiltXHWW7uWQUCltczqTyv04E_uUTRjh__rMEZEp5MQpEUOyhoC3IoQAvD_BwE&gclsrc=aw.ds -
Good morning all, I've read what I think is every forum post about insulating suspended floors and in particular insulating block and beam floors but I still have some questions. Our house is a 1982 built B&B floor semi on a split level due to the slope of the site. Naturally the floor is not insulated. As the heating was very restrictive microbore and getting a bit old we decided underfloor heating would be the solution to allow efficient heat pump install and reduce the clutter of large rads in what is quite a modest home 75sqm. The house is pretty airtight and I plan to make this even better. We are replacing blown glass with new low U value units and installing triple glazed bifolds in place of the thin double glazed sliders, the cavity wall insulation has been inspected and is dry and clean with no cold spots and the loft has 300mm or 400mm of glass wool depending on area so heat loss should be fairly low (predicted 50w/m2 at -4C) We have so far taken the floor back to the block and beam. The blocks are undulating by a fair bit but a laser level set to the highest points tells me I have about 100mm to play with at a minimum before I have to start replacing front and side doors. Option #1 is to smooth the floor with sand and cement lay 50mm of Kooltherm which I was able to get quite cheap (already bought) and then lay 100mm centres UFH followed by 9mm of floor coverings. Heating tables suggest that at around 30-35c flow temps our estimated heat loss of 50w/m2 will be covered. My initial hope was that low flow temps would lead to less heat loss down and negate the need for more insulation alas I think others experience here says otherwise. Which brought me to devise Option #2A same as above but with EPS beads filling the subfloor which varies from about 250mm below beams to 500mm. At the moment this is sand covering the earth with no apparent DPM but it is very dry and the site means the risk of flooding is 0 and runoff should also be very low risk. With new EPS beads installed DIY cost is around £1000 waterproofed ones from a cavity wall installer closer to £2k. Option #2B same as #1 but with 100mm of PIR glued or attached in some way to the underneath of the beams. At the moment I have been toying with plastic insulation nails fixed from below (issue with access once insulation is in place) or insulation wall plugs from above with screws inserted through the blocks holding the PIR up and then EPS beads poured into the remaining space. With seconds insulation and new EPS beads cost is around £500. Option #2C I'm very much open to ideas!