Gaf
-
Posts
228 -
Joined
-
Last visited
Everything posted by Gaf
-
OK to cut excess window fixing straps to help airtightness taping?
Gaf replied to Gaf's topic in Ventilation
Yes, plan is insulated plasterboard on the reveals. It’s not visible but there is a solid piece of approx 50mm PIR used as a cavity closer between the inner and outer leaf at the reveals. We have the insulated plasterboard for the reveals ready to go, but that board might be useful for the head and sill. Between the builder / window installer / block layers, there wasn’t enough space left for insulated boards in the heads or sill of the windows. Those thin marmox boards might be the trick. You can plaster directly onto them? -
OK to cut excess window fixing straps to help airtightness taping?
Gaf replied to Gaf's topic in Ventilation
Better to use screws on the last hole to both pin it flat and add extra strength to the strap? Throughout the house there’s at least one strap that has come loose. -
OK to cut excess window fixing straps to help airtightness taping?
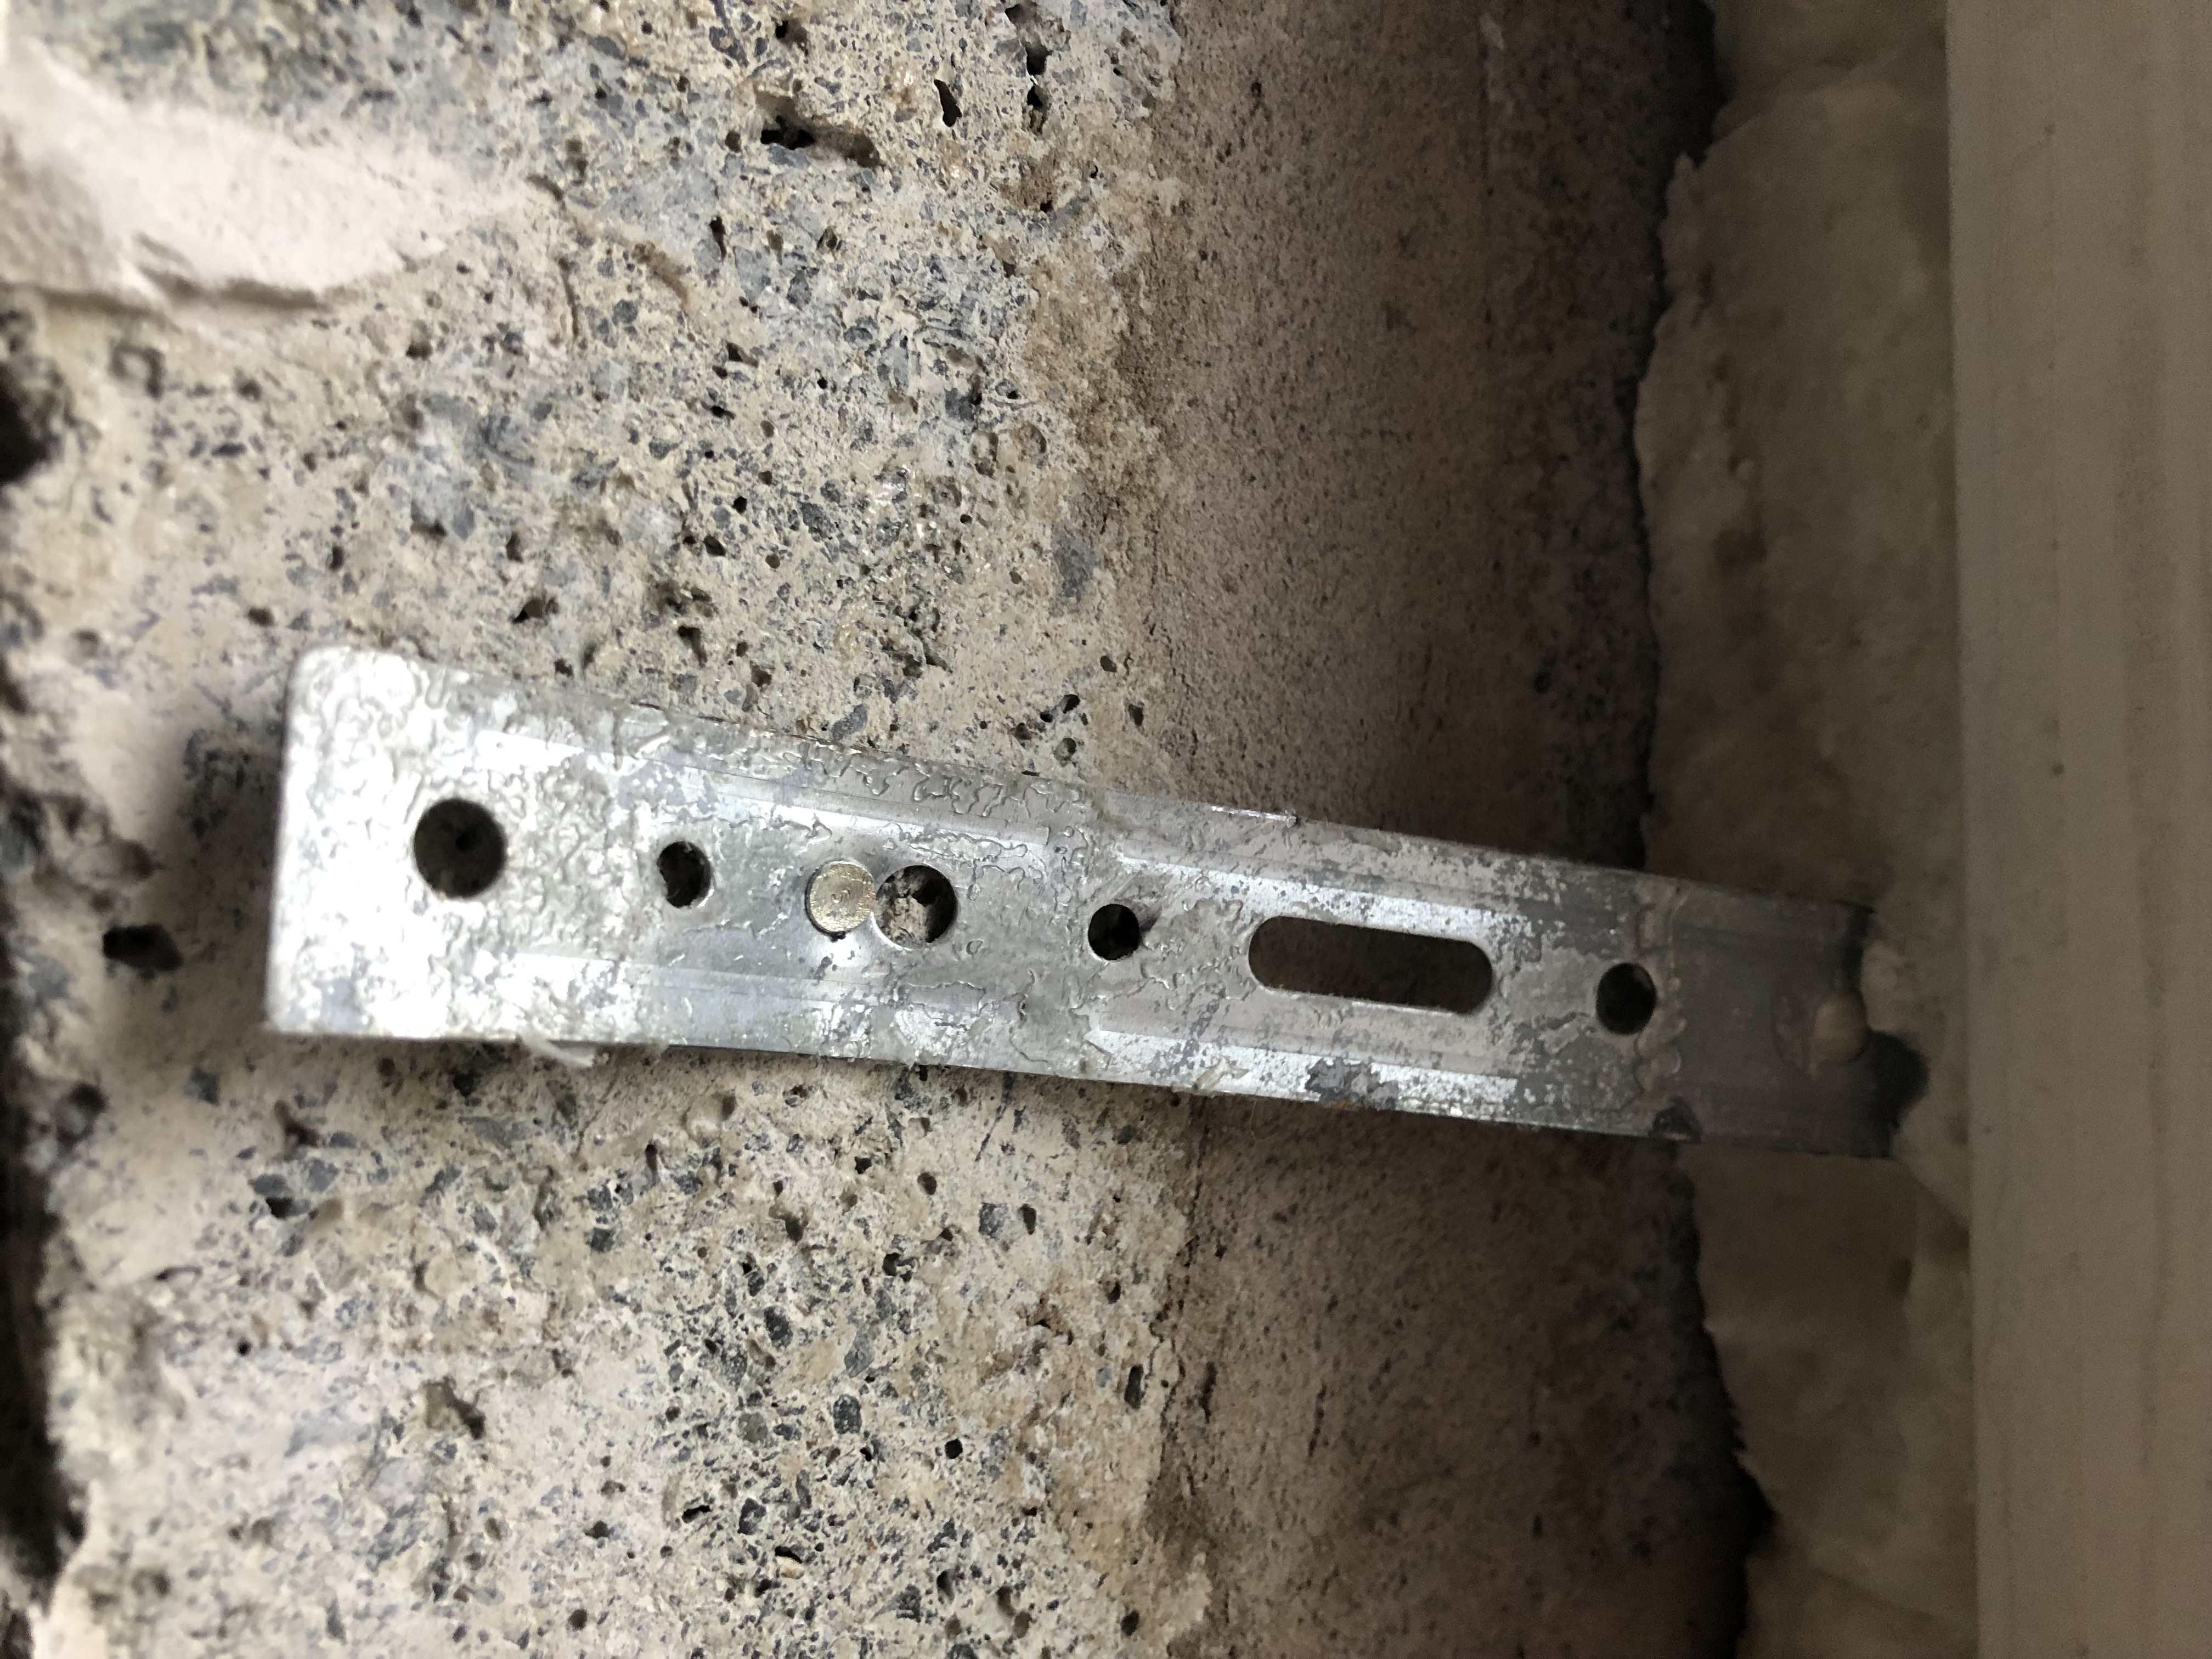
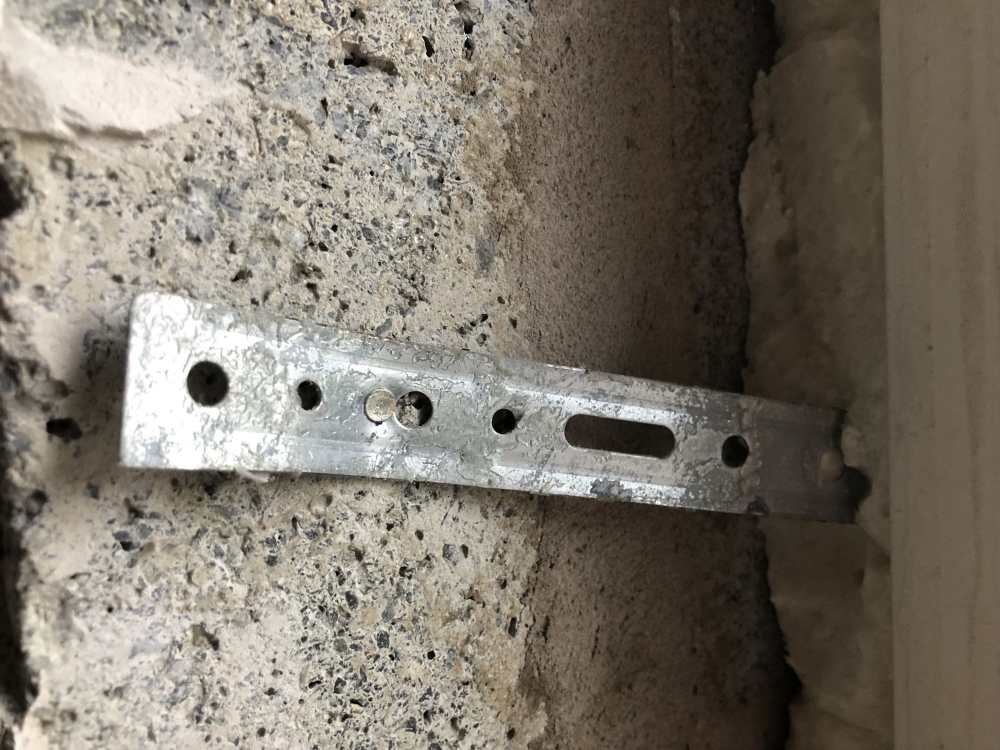
Gaf posted a topic in Ventilation
Have seen these fixing straps referenced as often being a source of air leakage and reduced airtightness. Is there any reason I shouldn’t cut the strap after the affixing nails (red line) so there is less chance of them pulling up the airtight tape?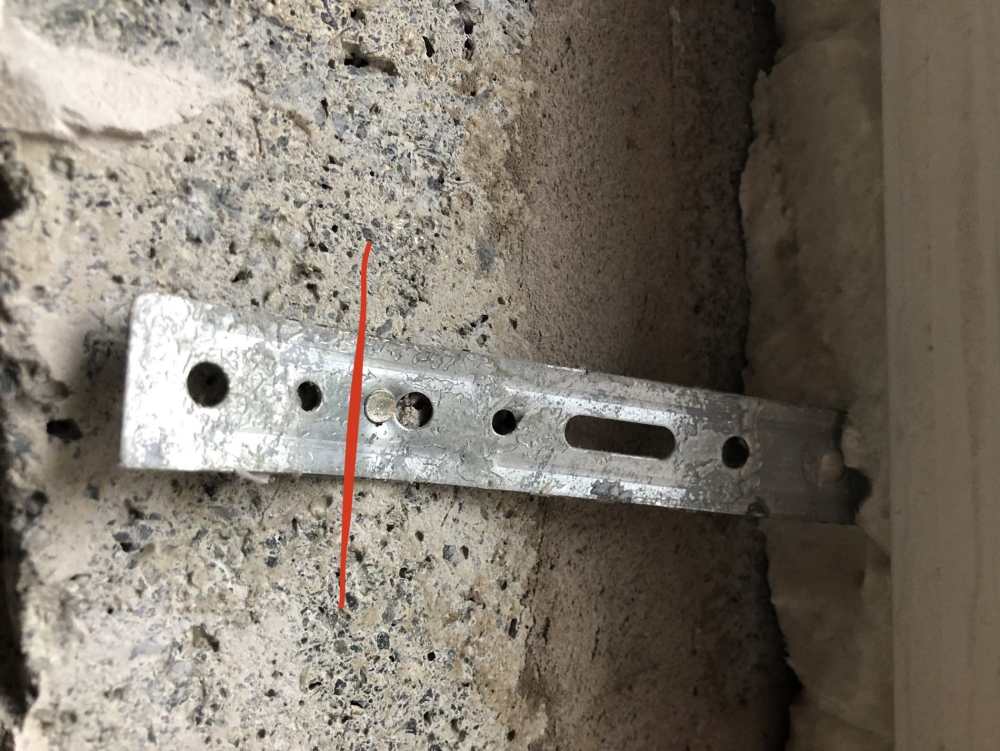
-
I'm just a civilian but have done a build and run into trouble between the various professionals involved. I am currently going through some structural issues requiring remediation and, based on my experience, I would trust your SE above all others. I've had the 'ridiculous' comments and the 'overengineering' comments thrown at me when communicating the SE's evaluations - but everyone went quiet when the SE produced the data. Your SE will be the one who can provide the most robust rationale via calculations cross referenced to building regulations. Everyone else, in my experience, will provide unbelievably confident opinions but if things hit the fan, opinions will count for naught. Based on my conversations with an SE, base foundation depth of 600mm is a minimum best standard to ensure your deep enough for suitable soil stability and frost protection, so (although just a civilian) this doesn't look ridiculous.
-
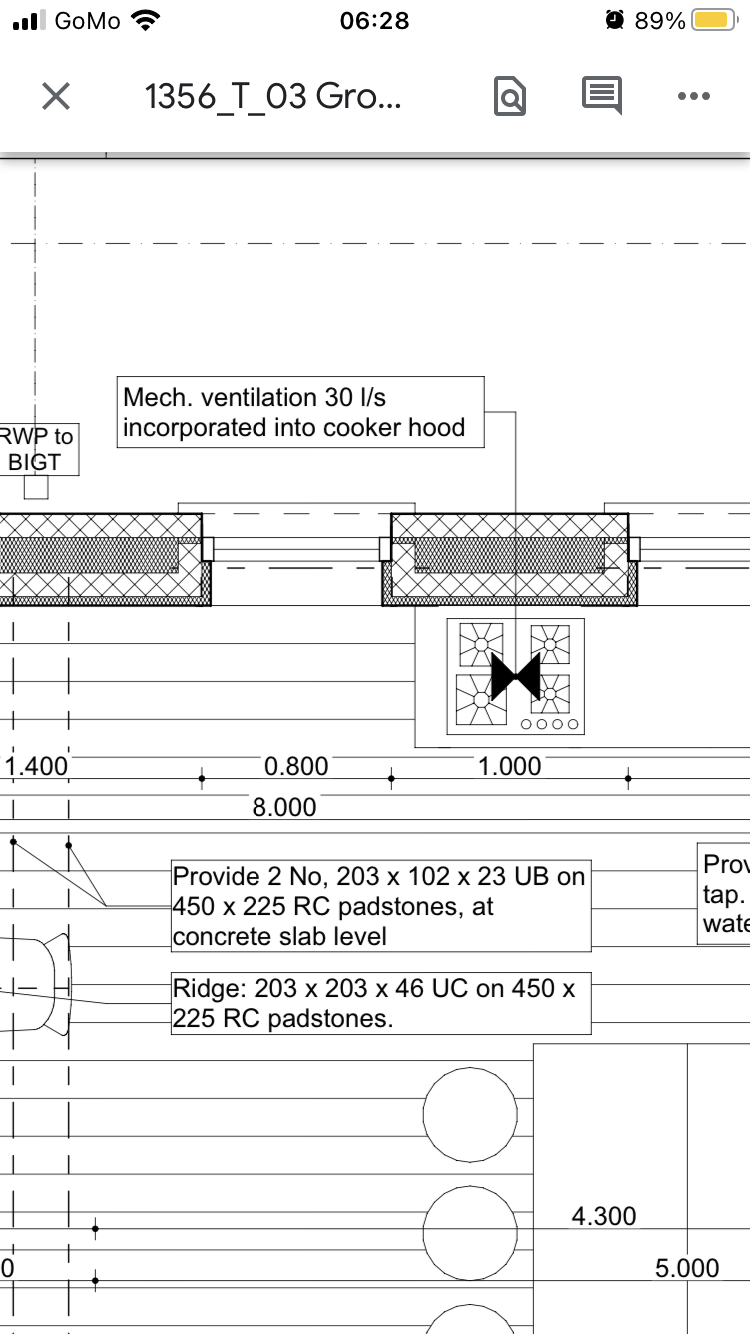
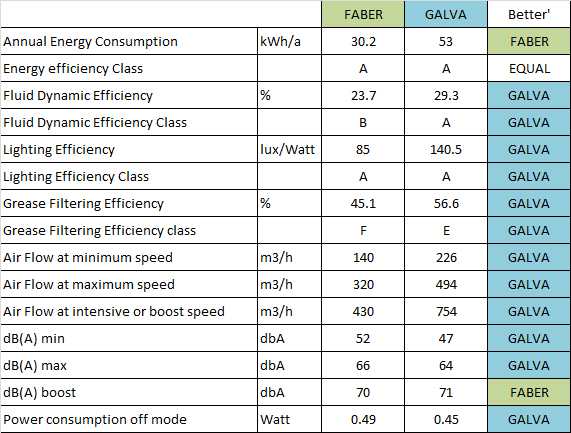
Induction Hob Extractor Hood Comparison: Faber vs Galvamet
Gaf replied to Gaf's topic in Kitchen & Household Appliances
Contacted one of the MVHR installers locally and he had an interesting take. Said a potential reason the cheaper Galvament unit might be causing the condensation issues is actually, paradoxically, because it's more powerful than the more expensive Faber unit. With airtightness levels in houses, he said a more powerful unit will suck out so much air that the MVHR can't compensate to get enough air into the house, so the fan in the extractor might just start spinning but not actually extracting, leaving the humidity in the air above the hob resulting in the condensation. He also wasn't a fan of the recirculating ones and advised venting externally to remove grease that isn't properly filtered out so that it's not getting up into the MVHR. Said just to crack a window whilst the extractor is on and that's sufficient. -
Induction Hob Extractor Hood Comparison: Faber vs Galvamet
Gaf replied to Gaf's topic in Kitchen & Household Appliances
Id be for this but herself wants the cooker hood as a feature in the kitchen. Getting it custom made and ordered already… 😬 -
Induction Hob Extractor Hood Comparison: Faber vs Galvamet
Gaf replied to Gaf's topic in Kitchen & Household Appliances
So not how our architect spec’d it? 😂
-
Induction Hob Extractor Hood Comparison: Faber vs Galvamet
Gaf replied to Gaf's topic in Kitchen & Household Appliances
Did not know that! Just searched here and online. If I've understood it, recirculating is for grease filtering while the MVHR generally takes care of the rest? Can I ask what make/model you have? And I can't seem to locate Miele discount outlet - is that in the UK? Meant to mention the extractor has to be a built-in / integrate one as we're getting a timber hood made for it. -
Will have an 80-90 cm, likely 5 zone, induction hob with hood extractor. Extraction will be to the outside via the wall the extractor is mounted on. We also have MVHR. Kitchen crew are recommending a specific induction extractor. The 'standard' extractor they do is a Galvamet, but they're recommending a Faber. I compared the specs against each other and almost across the board the 'standard' Galvamet wins out against the 'induction' Faber (attached image comparison of specs). I mentioned this to kitchen crew who said it's the Faber 'Steam Off System' that makes them still recommend the Faber. Said they switched to recommending the Faber because they were getting feedback from customers who had the Galvamet, but when these customers later upgraded to an induction hob, they were getting loads of condensation dripping off the Galvamet. Faber is 500 bucks more than the Galvamet. We're at the last stages of a new build, over budget, so don't want to be unnecessarily spending but also prefer to get this right if it needs it. The Faber has that steam system and is 10cm winder than the Galvamet, but the Galvamet has better fluid dynamics, stronger air flow, and is quieter. Any ideas why the Faber, with poorer specs, may be the better option?
-
External wall makeup (outside to inside): - Parex Monorex Render - 100mm block - 150mm cavity bead insulation - 100mm block - ~5mm Parge coat (sand cement) - 37.5mm IWI (25mm PIR) with integrated “vapour control layer” - Skim finish IWI was being installed dot dab but they weren’t sealing the perimeters or fixings. Builder said they could pin them all with mushroom fixings instead for tight to wall sealing. I spoke with Kingspan and Siniat technical departments on this - named the boards being used as having VCL and both said no issues at all pinning the boards tight with mushroom fixings. Thought came to mind about vapour control on this wall buildup with multiple mushroom fixings piercing the VCL in the plasterboard. All fixings are metal - I understand these can create thermal bridges but we’re preferring over plastic for fire safety (all caps being coated to avoid rust). Given the 150mm CWI, that effectively places the parge coat and IWI on the warm side, so regardless of piercings in IWI VCL, I’m hoping this isn’t a recipe for condensation and mould down the line.
-
Perfect, so it’s all about prevention 👍
-
We plan to get the water treated, however a neighbour with a well likely running off the same water table has had two DHW tanks go kaput in the past 10 years. Supposedly no particular issue can be identified as to the cause of the two going kaput. Both were under warranty so replaced without issue but we still want to consider what our DHW might need to be. We're in a hard water area (you'd want to see the limescale on another neighbours kettle 🤣). Neighbour said theirs was 'marine grade', but searching here I've seen this is a bit of a marketing term. It seems it's about the grade of steel that is the most important aspect? DHW will be connected to A2W heat pump and my understanding is it will be unvented. No solar. I've seen Joule and Dejong mentioned, not sure if these are well regarded makes?
-
Cheers lads. @MikeGrahamT21 Insulated plasterboard was specified by the architect but we're at a stage this can be changed. @JohnMo The stove crew did say to make sure there's no timber battens anywhere near the area. The planned plasterboard is 37.5mm (12.5 PB and 25 PIR. The 50 metal battens with plasterboard would bring us to 62.5, only 3cm more so might be worth it.
-
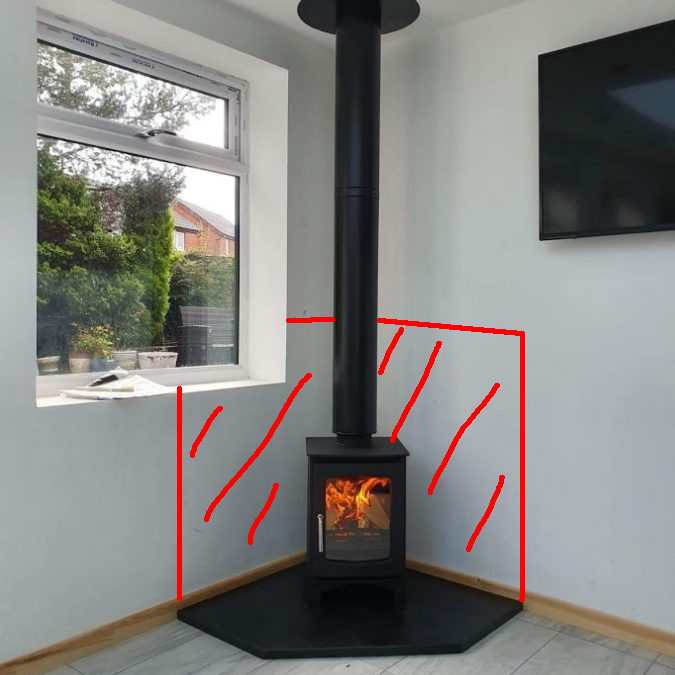
Getting conflicting advice on this. We will have a free standing corner stove (as in it will be sitting in the room) just like the attached image - we just won't have that window. There won't be any wall cladding added around the stove, at least that's our preference. Outside to inside our wall build-up is: Block, Cavity Bead, Block, 25mm IWI PIR, (yes not the way many would go) 12.5mm Plasterboard with skim finish. On one side we're told we need to replace the PIR IWI around the red wall area on the attached image with something like an "isoboard" for fire safety, on the other side we're told the PIR IWI (unilin, mannok, or kingspan) is perfectly safe in this position. I've tried searching here and wasn't just finding a clear answer. Is it safe enough to go with the 'standard' PIR IWI for a 5kw multi-fuel stove here? I posted here rather than the stoves forum as I thought this query focused more on the insulation than the stove.
-
Hi folks. New build in Ireland but was advised that this forum is the place to go for advice and questions. We have planning permission and are getting construction drawings completed at the moment. One particular area I'm hoping to get some advice around is the choice of insulation as we're getting different advice from everyone we talk to!