Gaf
-
Posts
234 -
Joined
-
Last visited
Gaf's Achievements
Regular Member (4/5)
17
Reputation
-
Any newly installed blocks can be left to fully set. I had thought this would be a reasonable enough solution to replace the block but blocklayer seems adamant that no matter how good a job he does there will be additional settlement with the floors above and an overall weaker section.
-
You can say that again. "Oh I didn't know they were load bearing walls" when the precast floors were already installed above them... Engineer said they must have had something wrong with their necks and couldn't just look up.
-
Thanks for this. Useful to hear from someone who has been through a bit of repairing. This is a new build (but this was noticed only when it was close to final completion. What you're saying had crossed my mind... since there have been plenty of renovations going on where walls are knocked and lintels/rsjs inserted, can it be that difficult to get a tight enough fitting of new blocks at the top. I hadn't considered your idea of the lintel. I'll run that by him and see. We're considering a hybrid approach but will need engineer approval. A crew who specialises in heritage building repairs suggested we use helibars and resin across the cahses, as well as the repairing of the chases.
-
Yeah the engineer past it on visual inspection. The repair method at that stage was simple (fill chase with repair mortar) and the chases were exposed so we reckoned why not just get confirmation and do the repair now. Then the repair approach became difficult. Those chases are there now 1.5 years with partial loading above (bathrooms all tiled). No cracking was visible. No floors, sanitaryware, or furniture installed. Spoke to second manufacturer who said same as other one. Repair mortars have too high N value and risk cracking/debonding. Recommends the repair advised by engineer just not with that high an N.
-
Standard 100 x 215 x 440 concrete blocks.
-
Have two different issues with chases done to blocks. #1: Single leaf internal wall (100mm) holds one edge of a precast concrete floor. Chased to within an inch of its life. One 1.5m section has seven vertical chases plus a 100cm x 10cm horizontal chase at mid height. Chases are 30mm deep. One chase was done back side also so they left only 4cm of block in that section. #2: Inner leaf of external walls got some funky chases (walls are 100mm block, 150mm cavity, 100mm block). By funky I mean a 10cm wide x 3cm deep chase floor to ceiling on a 40cm end of wall pillar to accommodate for just a single cable, a really messy handheld kango chase at a 30 degree angle that’s 4cm deep in places and 20cm wide, and a more normal looking neat but curved chase floor to ceiling. Main issue is repair versus replace versus leave them. One structural engineer said he’d pass them based on his visual inspection but he was there for a different reason and it was a 10 second look at them. Second structural engineer initially said the same, but he did calculations and said they don’t pass so need to be repaired. He provided a repair method using a certain repair mortar but the manufacturer said they don’t recommend the use of their repair mortar for chase repair because the 30-40 N/mm3 is too high compared to the blocks so risk of debonding and cracking. There doesn’t appear to be a low N/mm3 repair mortar, just general M4/M6/M12 general purpose mortars that I believe aren’t suitable because they can shrink too much. Engineer wanted a low shrink repair mortar to ensure no debonding. Engineer now agrees with the manufacturer and said best just replace all chased blocks since other repair mortars are even higher N/mm3. Blocklayer who has been doing it since he was in the womb said he doesn’t recommend replacing the blocks as all of the sections are load bearing. He said toothing in new blocks will never be as strong as original blocks, one reason was there will be no compression on newly toothed blocks so they don’t form as strong a bond. Also said he’ll never get the blocks up as tightly under the precast floors as the original install and he’ll be hammering in steel shims that will never be a good enough job and may lead to settling / cracks when the acrows are removed. Blocklayer saying repair surely is better method. Engineer was somewhat differing to the blocklayer on how to get the job done, so we’re a bit stuck on how to proceed. Wondering if anyone has been in a similar position and how they repaired chases or replaced blocks in load bearing walls. The house is fully built at this stage.
-
OK to cut excess window fixing straps to help airtightness taping?
Gaf replied to Gaf's topic in Ventilation
Yes, plan is insulated plasterboard on the reveals. It’s not visible but there is a solid piece of approx 50mm PIR used as a cavity closer between the inner and outer leaf at the reveals. We have the insulated plasterboard for the reveals ready to go, but that board might be useful for the head and sill. Between the builder / window installer / block layers, there wasn’t enough space left for insulated boards in the heads or sill of the windows. Those thin marmox boards might be the trick. You can plaster directly onto them? -
OK to cut excess window fixing straps to help airtightness taping?
Gaf replied to Gaf's topic in Ventilation
Better to use screws on the last hole to both pin it flat and add extra strength to the strap? Throughout the house there’s at least one strap that has come loose. -
OK to cut excess window fixing straps to help airtightness taping?
Gaf posted a topic in Ventilation
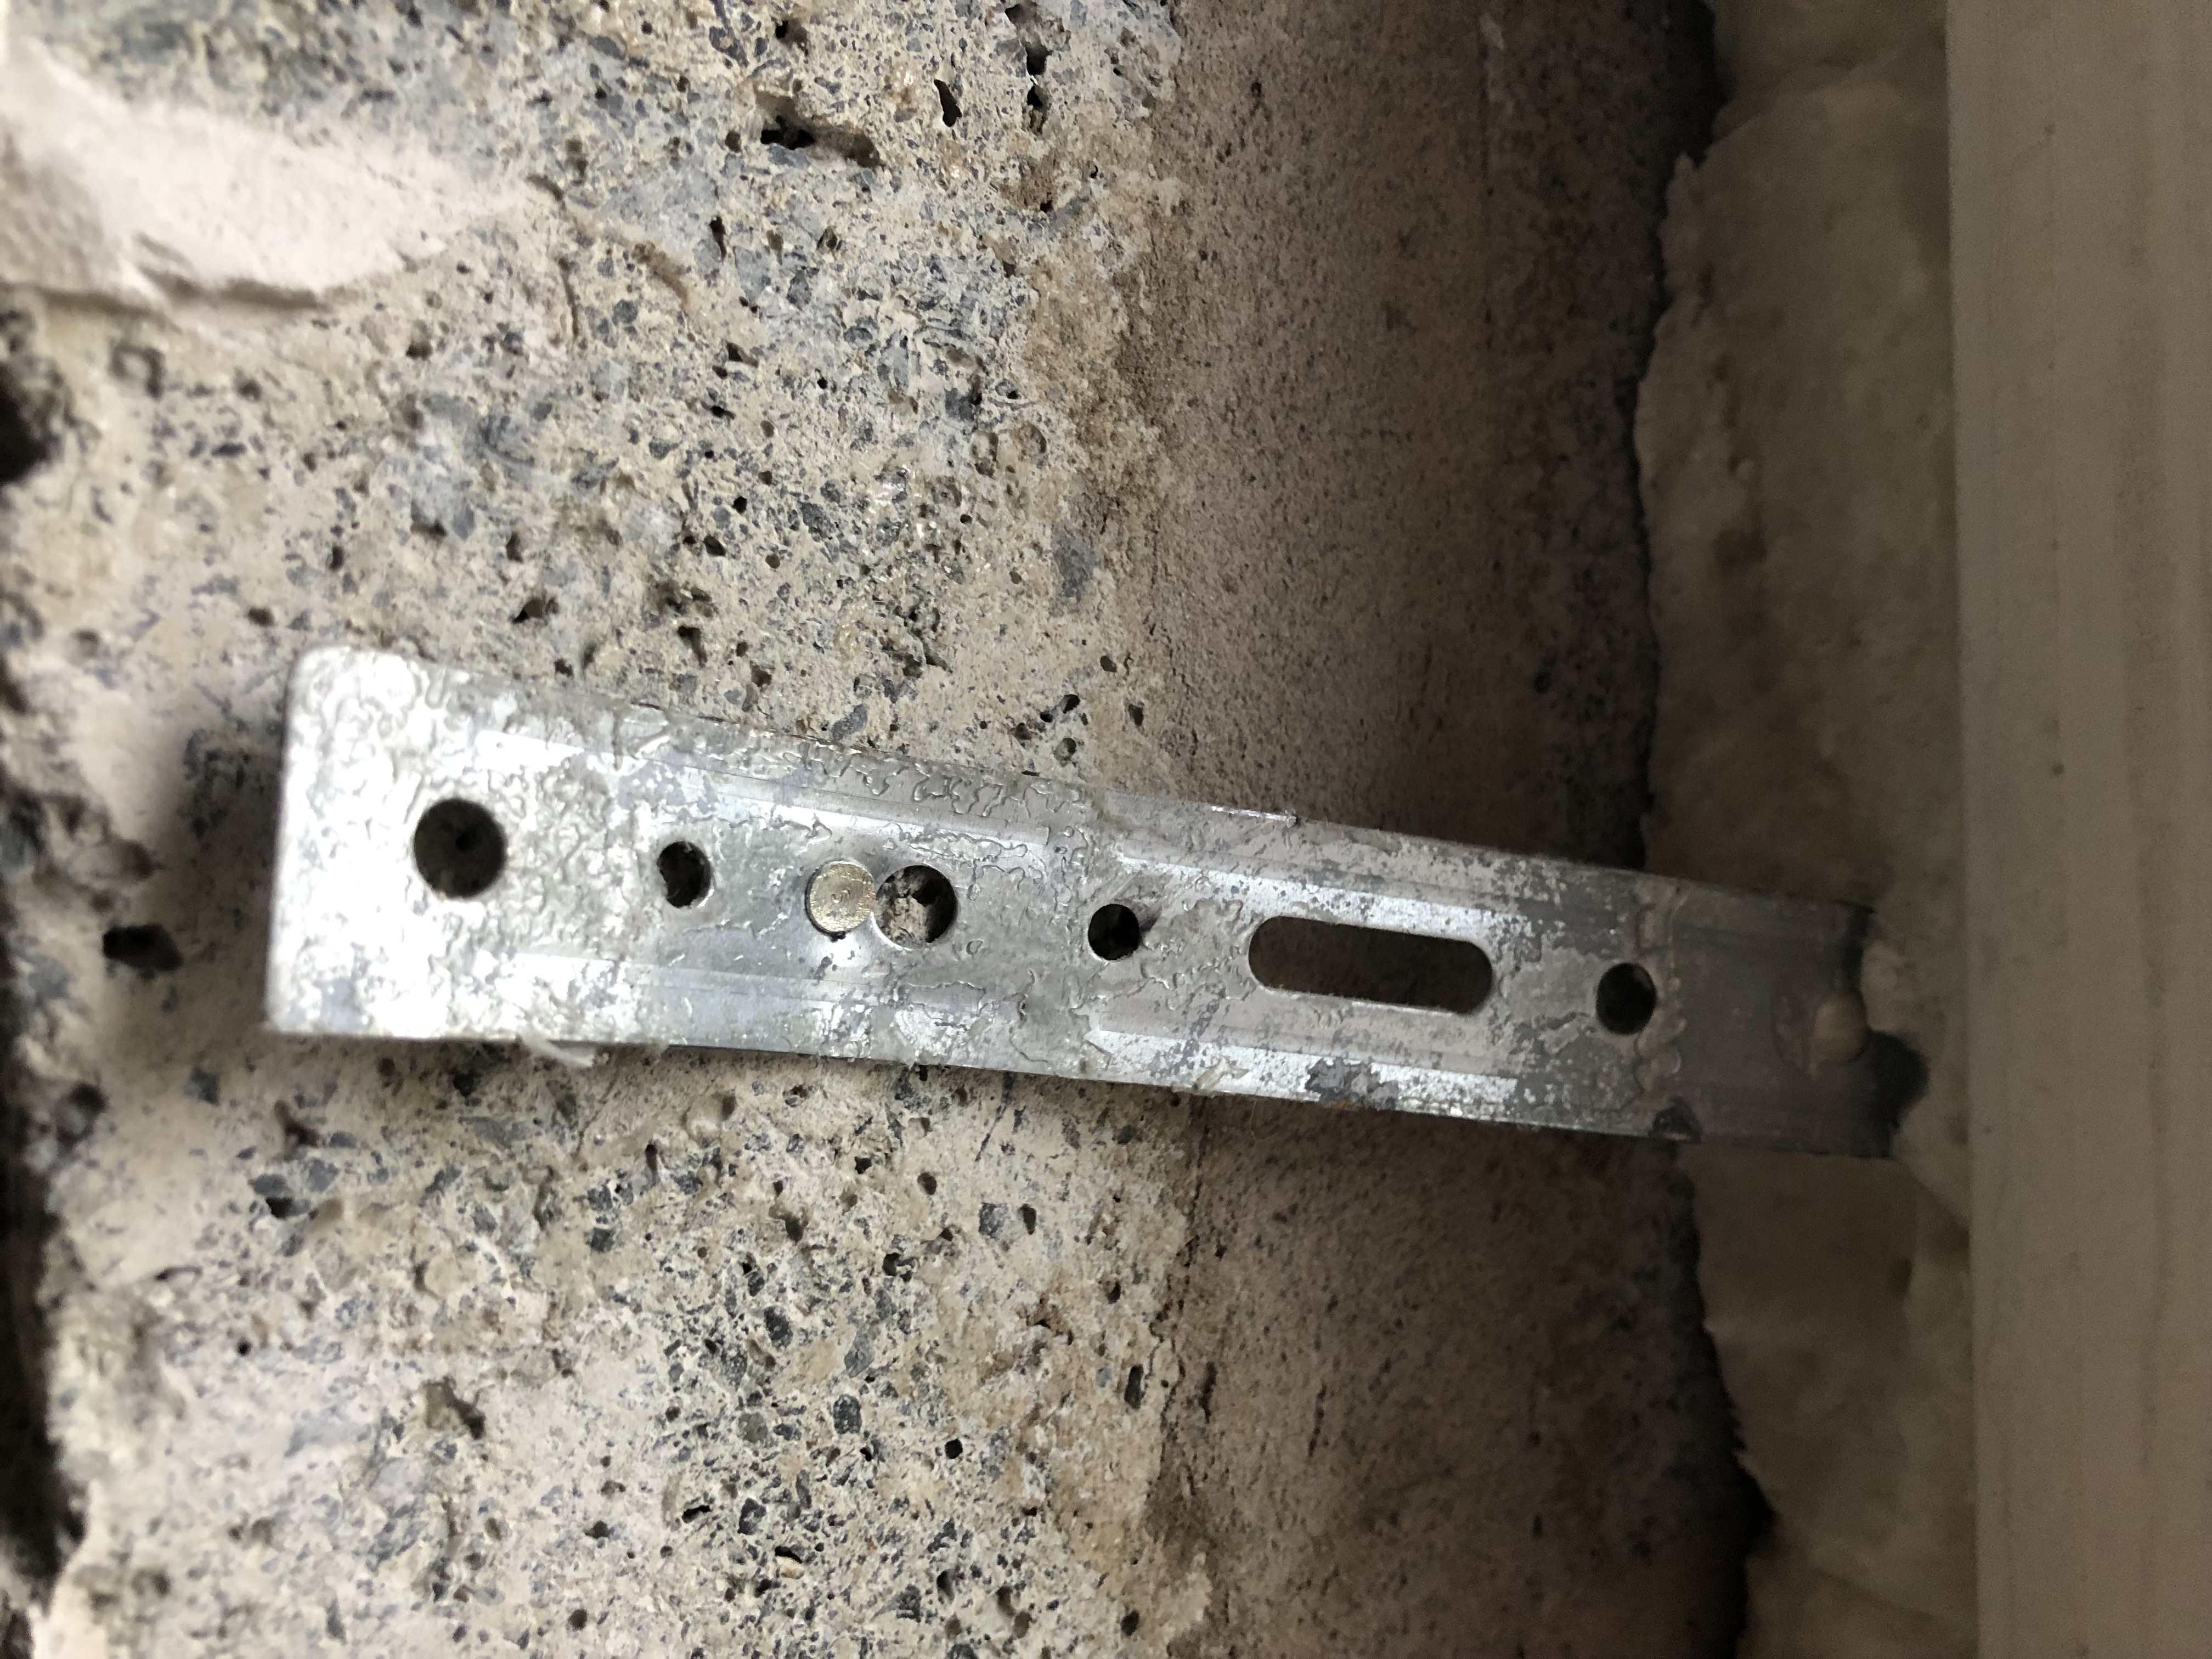
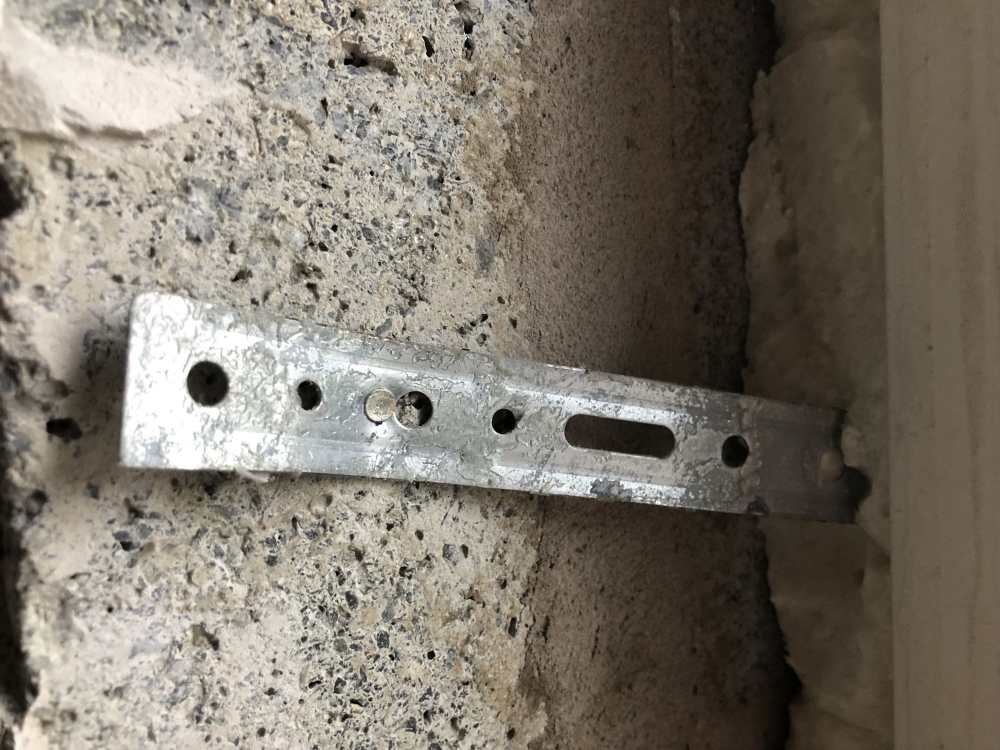
Have seen these fixing straps referenced as often being a source of air leakage and reduced airtightness. Is there any reason I shouldn’t cut the strap after the affixing nails (red line) so there is less chance of them pulling up the airtight tape?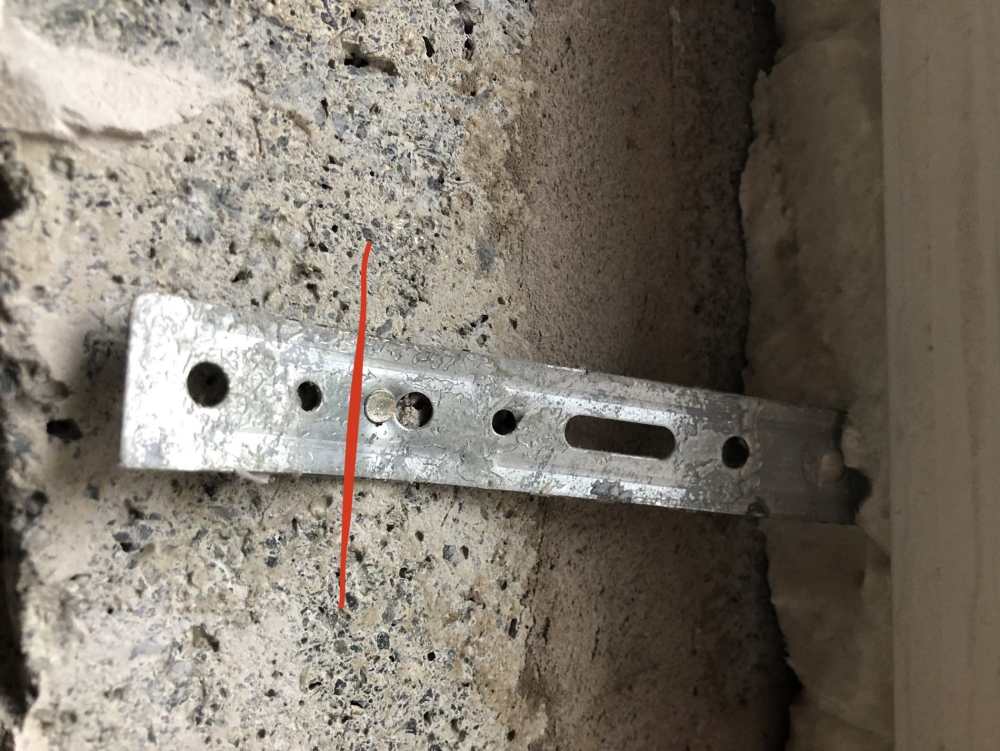
-
I'm just a civilian but have done a build and run into trouble between the various professionals involved. I am currently going through some structural issues requiring remediation and, based on my experience, I would trust your SE above all others. I've had the 'ridiculous' comments and the 'overengineering' comments thrown at me when communicating the SE's evaluations - but everyone went quiet when the SE produced the data. Your SE will be the one who can provide the most robust rationale via calculations cross referenced to building regulations. Everyone else, in my experience, will provide unbelievably confident opinions but if things hit the fan, opinions will count for naught. Based on my conversations with an SE, base foundation depth of 600mm is a minimum best standard to ensure your deep enough for suitable soil stability and frost protection, so (although just a civilian) this doesn't look ridiculous.
-
Induction Hob Extractor Hood Comparison: Faber vs Galvamet
Gaf replied to Gaf's topic in Kitchen & Household Appliances
Contacted one of the MVHR installers locally and he had an interesting take. Said a potential reason the cheaper Galvament unit might be causing the condensation issues is actually, paradoxically, because it's more powerful than the more expensive Faber unit. With airtightness levels in houses, he said a more powerful unit will suck out so much air that the MVHR can't compensate to get enough air into the house, so the fan in the extractor might just start spinning but not actually extracting, leaving the humidity in the air above the hob resulting in the condensation. He also wasn't a fan of the recirculating ones and advised venting externally to remove grease that isn't properly filtered out so that it's not getting up into the MVHR. Said just to crack a window whilst the extractor is on and that's sufficient. -
Induction Hob Extractor Hood Comparison: Faber vs Galvamet
Gaf replied to Gaf's topic in Kitchen & Household Appliances
Id be for this but herself wants the cooker hood as a feature in the kitchen. Getting it custom made and ordered already… 😬 -
Induction Hob Extractor Hood Comparison: Faber vs Galvamet
Gaf replied to Gaf's topic in Kitchen & Household Appliances
So not how our architect spec’d it? 😂
-
Induction Hob Extractor Hood Comparison: Faber vs Galvamet
Gaf replied to Gaf's topic in Kitchen & Household Appliances
Did not know that! Just searched here and online. If I've understood it, recirculating is for grease filtering while the MVHR generally takes care of the rest? Can I ask what make/model you have? And I can't seem to locate Miele discount outlet - is that in the UK? Meant to mention the extractor has to be a built-in / integrate one as we're getting a timber hood made for it. -
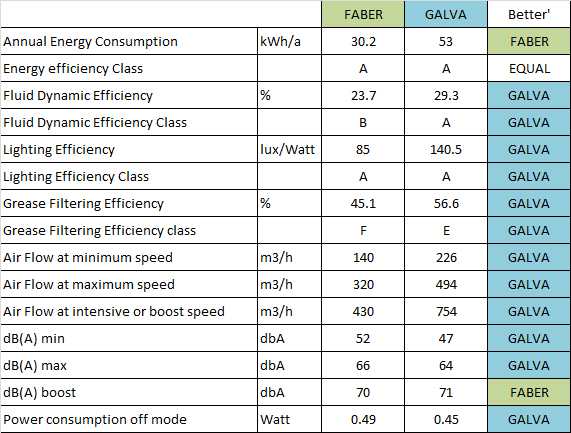
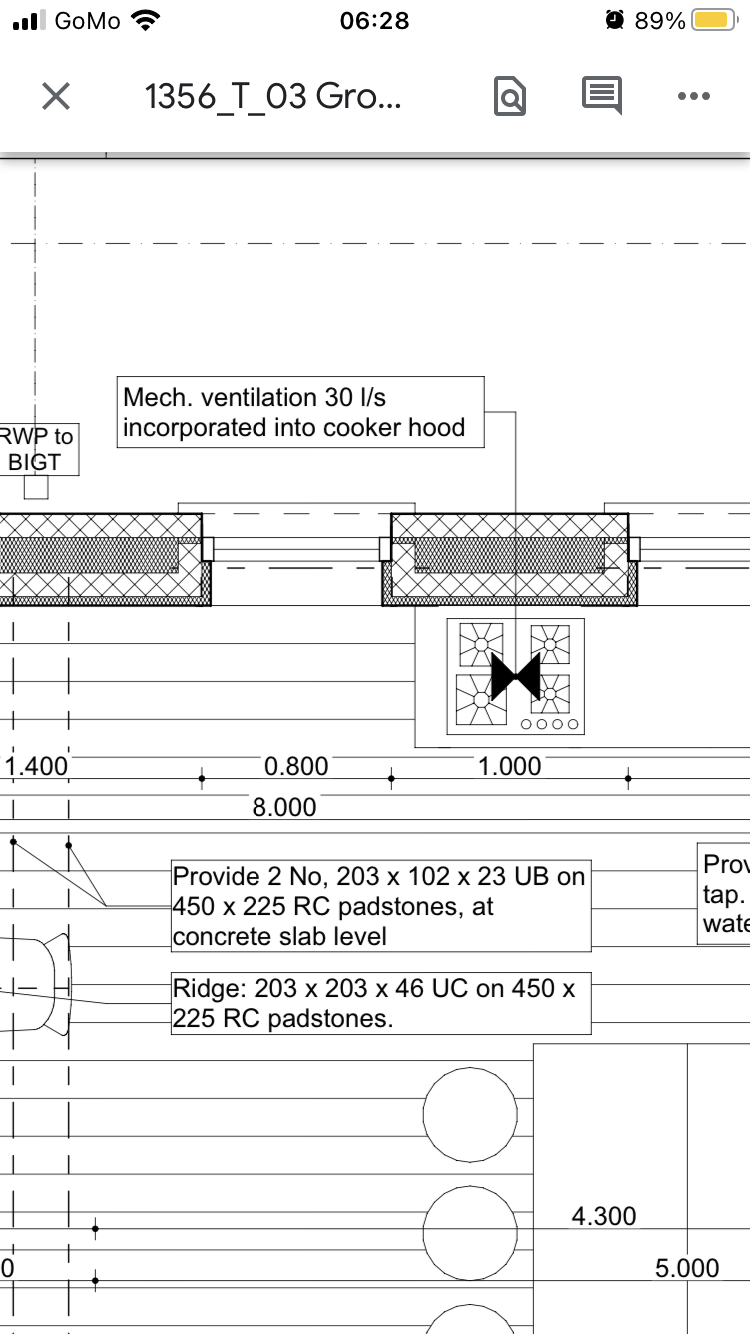
Will have an 80-90 cm, likely 5 zone, induction hob with hood extractor. Extraction will be to the outside via the wall the extractor is mounted on. We also have MVHR. Kitchen crew are recommending a specific induction extractor. The 'standard' extractor they do is a Galvamet, but they're recommending a Faber. I compared the specs against each other and almost across the board the 'standard' Galvamet wins out against the 'induction' Faber (attached image comparison of specs). I mentioned this to kitchen crew who said it's the Faber 'Steam Off System' that makes them still recommend the Faber. Said they switched to recommending the Faber because they were getting feedback from customers who had the Galvamet, but when these customers later upgraded to an induction hob, they were getting loads of condensation dripping off the Galvamet. Faber is 500 bucks more than the Galvamet. We're at the last stages of a new build, over budget, so don't want to be unnecessarily spending but also prefer to get this right if it needs it. The Faber has that steam system and is 10cm winder than the Galvamet, but the Galvamet has better fluid dynamics, stronger air flow, and is quieter. Any ideas why the Faber, with poorer specs, may be the better option?