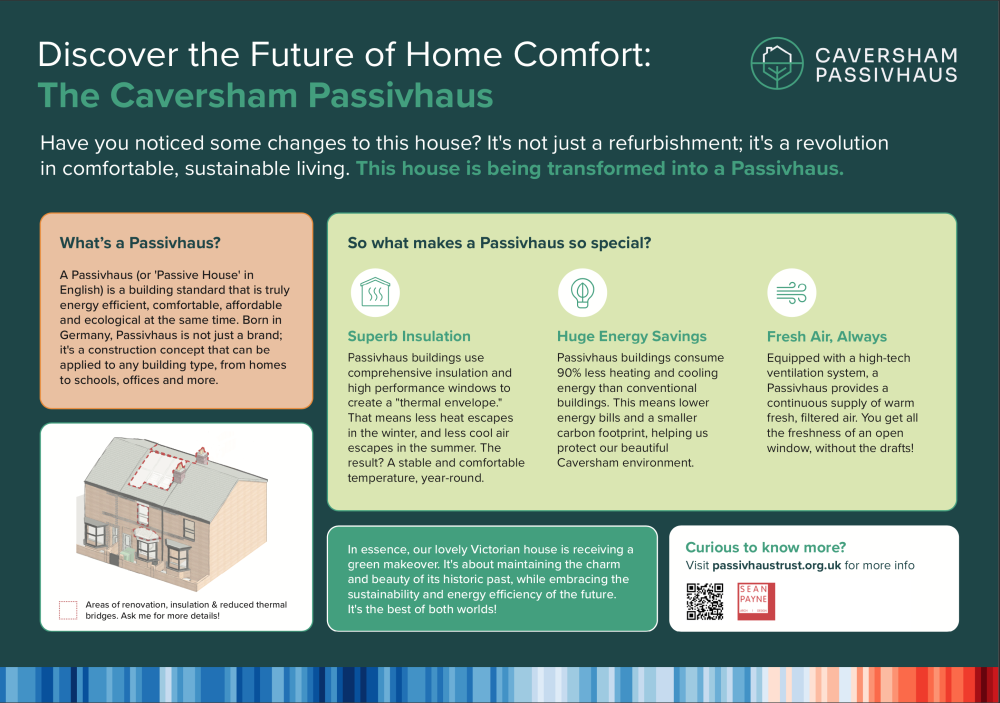
Caversham Passivhaus
-
Posts
15 -
Joined
-
Last visited
2 Followers

Caversham Passivhaus's Achievements
Member (3/5)
12
Reputation
-
 mainly cause it’s a restoration to the original design of a stone bay. The windows will be installed on the internal half of the cill on the compacfoam forming the insulation layer. I agree lots of work. But as we are going for passive house certification, this was a weak area and our assessment was just reaching the target. The additional work in this small space gives us flexibility on choices elsewhere. But probably more importantly has help with the design elsewhere for example the structural insulation around windows is something we will be applying to all the windows. also learnt so much given I have little expertise.
 -
Interesting, what were you making? I had used Autoclaved Aerated Concrete (AAC) blocks for the wall. That was a task finding them in small quantities. I had come across the various attempts to make these via the foam mixes. Before trying glass bubbles, I had tried inserting PIR foam, but could quickly see that wasn't working for me, I wanted it in the centre but couldn't find a way to keep it in place.
-
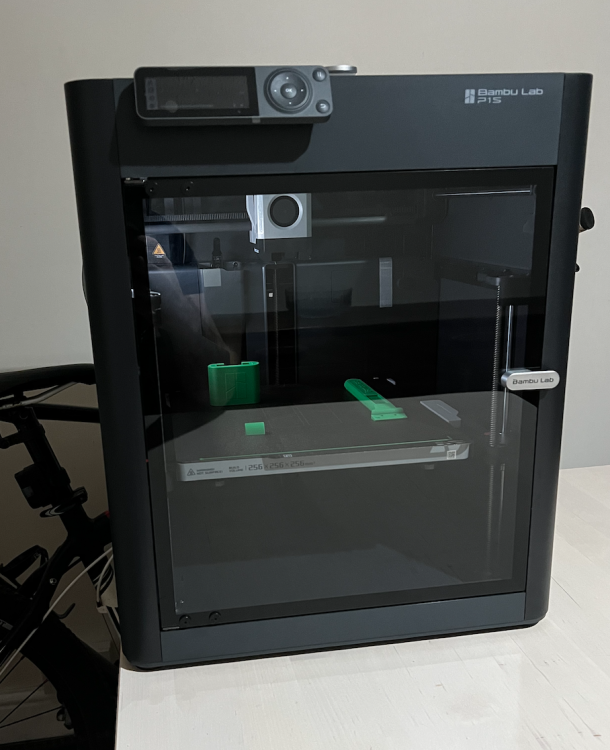
@saveasteading Its a Bambu Lab P1S.
-
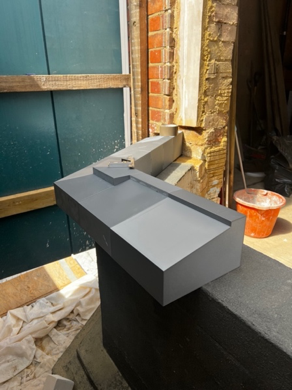
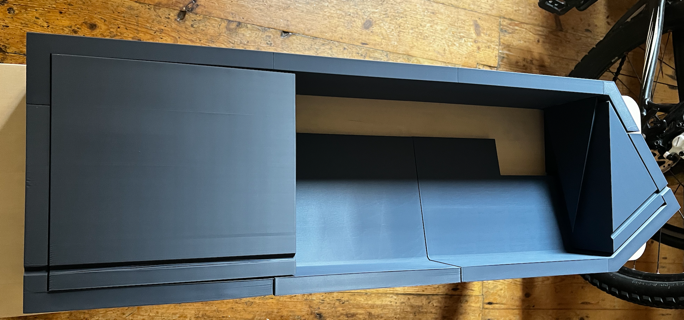
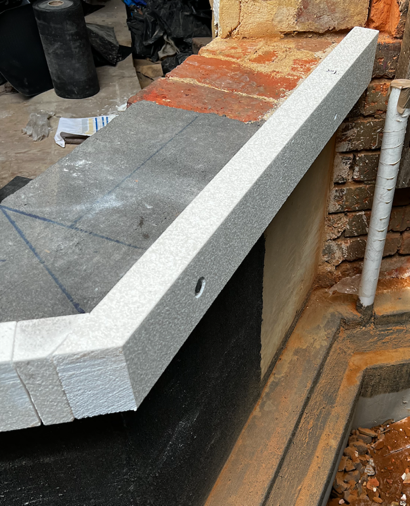
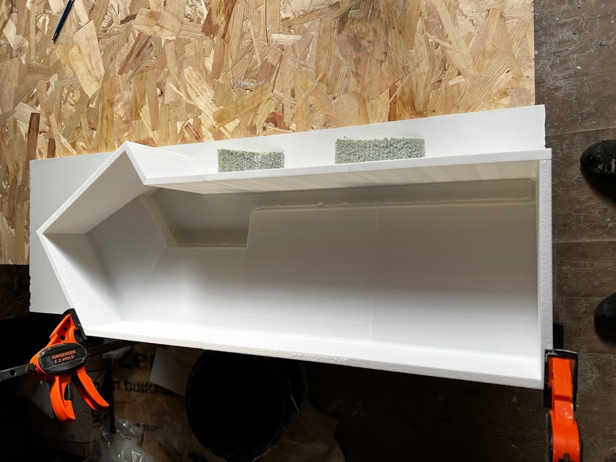
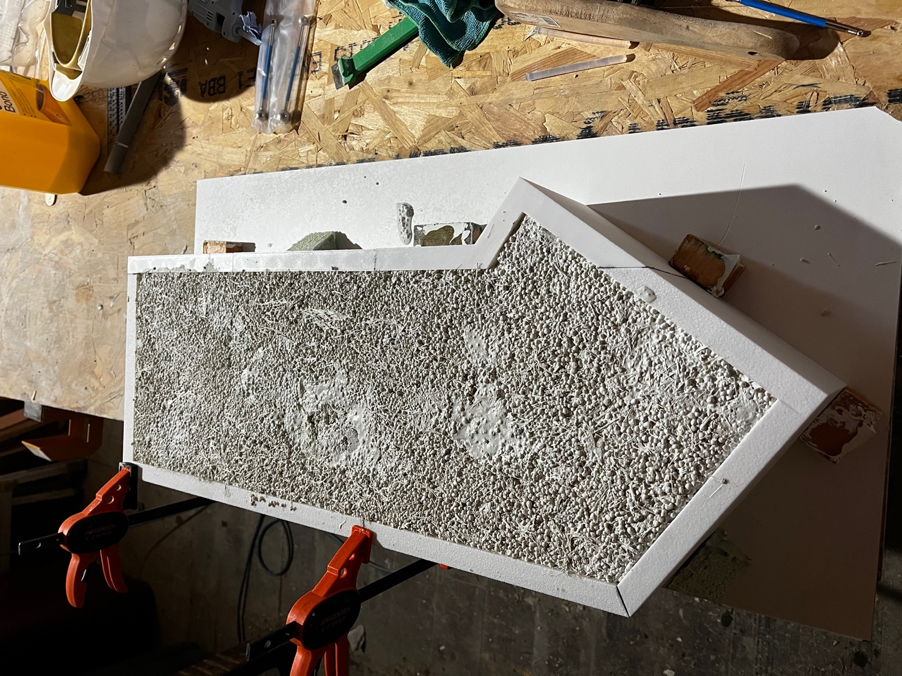
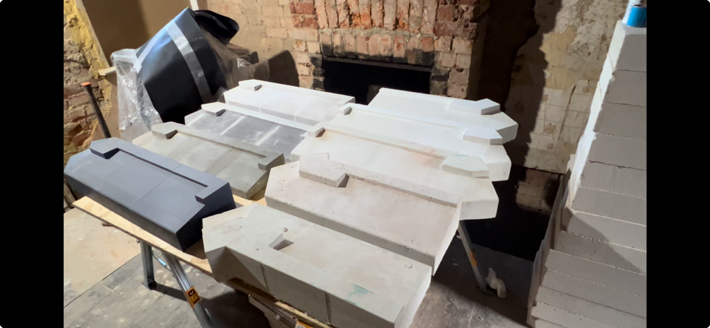
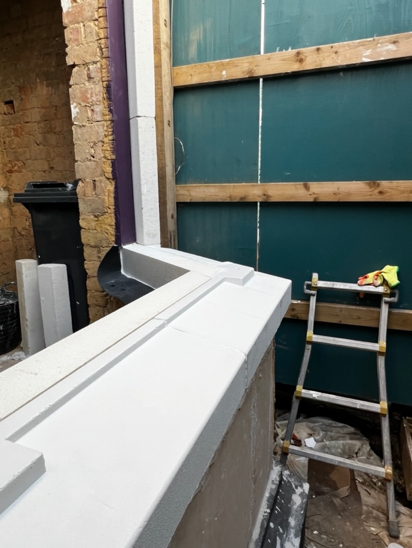
We’re rebuilding a Victorian bay window with a focus on thermal efficiency and restoring some period detail. To achieve this, we designed and cast our own bespoke window cills using GFRC, 3D printing, and innovative materials like glass bubbles to reduce weight and improve insulation. This post shares our design process, casting experiments, lessons learned, and the final results. Design I used SketchUp to produce the design for the side and centre cills. The bay has external wall insulation so the cill was designed deep to accommodate 10mm aerogel, 50mm PIR, render and the offset from wall. The 10mm aerogel was something I wanted to try out, and doesn’t add much compared to just using 60mm PIR. For some reason the grey versions of aerogel with a 0.015 thermal conductivity are not easy to find, so settled with the 0.019 grey blankets. We are targeting below 0.15 U value. The EWI gets us to 0.16 with additional internal insulation needed to be below target. The cills themselves are a thermal bridge 210mm deep then 100mm of structural insulation for a 0.34 U value, I haven’t yet decided on the further internal insulation to get below 0.15. I am trying new things out with this and will try VIPs. I have a budget for trying out new insulation. 3D printing The first concept of the design was printed out in a 3D model, including a wall return, stools for the jambs and mullion and underside drip. And later its mold to test the casting process. Structural insulation The plan was to install the cills on the exterior half of the wall, then given the deep cills a section of structural insulation was fixed into the wall to provide some support for the cill in case they were used as a step. Here this is fixed to the top of the wall and replaces the 50mm of PIR which otherwise would have been used. Casting Once the cill designs were done, I made a mold of the cills for casting with concrete and sand. The mold was 3d printed and via some experimentation manage to find a way to get a stone effect for the face coat. The idea of casting my own cills started while looking at GRFC concrete countertops, so my mix included glass fibres. The hope is that they prevent cracking, but the cills are already substantial so they probably don’t need them, but I kept with my original mix design. I don’t think the glass fibres added much to the process, except additional complication. If its reduces cracking then that’s helpful. Glass Bubbles I later tried an experiment using glass bubbles. Half the sand was substituted for glass bubbles to improve the thermal efficiency of the cills, (only a little) but its main advantage was in reducing the weight so it was possible to move the cills around with some ease. It also helped reduce deliveries of the sand. I was using a white sand which was an annoying bulky delivery. The glass bubbles tended to rise to the top of the mix, here the top is the bottom of the cill which was problematic for creating a flat surface. I later experimented with covering this to produce a flat surface but I manage to instead amend the mold design to be fill from its back. The advantage of this was that the slightly uneven surface was in an area where it didn’t matter and also the glass bubbles would be situated more evenly towards the back of the cills thus helping with the thermal efficiency of the cills on their internal side. Test casts I had about eight different cills cast before being totally happy with the design and the casting process. I experimented with using cast stone dust, but with a bad result (probably from my poor face coat application) so I moved away from a “bath stone” look to a white to be further finished. Completed Cills Once the cills were done, I was able to see how to progress upwards for the rest of the bay window. At the start we were happy to accept the bay would be a thermal bridge requiring lots of internal insulation. The benefit with this design is that much of the insulation is now external saving on the floor space. It took some time, which I have and I am happy with the result. Since I installed the jambs and mullions and making the header/lintels copying the original design in the area. Plus the cost is much reduced. The original plan was to spend 30k on the bay window build, as a standard build, that cost without windows relying upon insulation being done separately afterwards. Instead we have managed to spend 5k on tools and materials, including £500 for a 3d printer but lots of my time.

- 9 replies
-
- 8
-

-
- window cills
- bay window
- (and 4 more)
-
Party Wall needed?
Caversham Passivhaus replied to Farah Jones's topic in House Extensions & Conservatories
You are correct if the excavations do not go deeper than your neighbours foundations. However the work has already started, so the party wall act would not apply now. Just crack on. But note as the work isn’t covered by the act you can’t benefit from it’s protections from claims of trespass or nuisance. If your neighbour does something like appoint a surveyor at your cost, that will be an expensive mistake for them. -
Caversham Passivhaus
Caversham Passivhaus replied to Caversham Passivhaus's topic in Introduce Yourself
I thought I would update on what I actually did! I eventually managed to find YTong, aircrete thermal blocks that would be suitable with thin layer mortar. The thin layer mortar was additionally difficult to source. Along the way I had settled on the Rawlplug Polyurethane Thin Bed Mortar Foam but I couldn't work with it personally and abandoned the thin layer mortar option. I liked the idea for building the rear extension with that method but it's not going to be the approach I am going to take. For the tanking I decided on Remmers MB 2K Plus to encapsulate the blocks. Additionally I added 200mm of below ground XPS insulation and set out the electric supply alternation. For the backfill I decided to use glass foam aggregate. Partly because the area will be dug up a few times for further utility changes and I am considering using glass foam for the ground floor, so was also trying out the material. It's lightweight but dusty.
-
Hi, I have plans for a roof replacement including dormer. The current design is a cold roof and skylight with upstand and roof level no higher than the ridge. The skylight upstand results in the entire roof being lower, and given the head-heights is the advantage of having a cold roof. However, I would prefer to have a warm roof, and can see this would be possible if the skylight upstand could be removed. Are there any options that could allow this? Do skylights come without up stands. Is a walk on roof light an option?
-
Caversham Passivhaus
Caversham Passivhaus replied to Caversham Passivhaus's topic in Introduce Yourself
for drainage, planning a backed fill trench with LECA. Realistically I would expect much worse than 0.12W/mK below ground, around 0.20+. Considering tanking but not sure of that solution at the moment. -
It was the initial SE recommendation, after questioning the SE stated we can reduce.
-
Also doing a single storey, SE recommended 7.9N/mm2 "a standard strength" - but as we are looking at a single storey section of wall we can reduce, looking at Part A: Structure pg. 24, 2.9N/mm2 blocks are allowed with the best thermal u-values.
-
Does anyone know a supplier of thin joint mortar for use with aircrete blocks (thin joint system)? So far I have determined: Thomas Armstrong, Airtec Aerated Concrete Blocks are best for thermal conductivity but don't have a supply of the thin joint mortar. Celcon can provide the mortar if you use their blocks. There is the product in Poland, and I am investigating this option. I only need one 25kg bag for now. Does anyone have any stock?
-
Caversham Passivhaus
Caversham Passivhaus replied to Caversham Passivhaus's topic in Introduce Yourself
The current work is a restoration to a bath stone bay window. The existing bay window is a UPVC frame with flat roof replacing many years ago the original stonework which was demolished. We are excavating around the existing solid brick base to the corbel foundations and along the way picking out the old stonework which was demolished. The plan is to build aircrete blocks off the existing foundations, using 2.9N/mm2 blocks that have a thermal conductivity of between 0.09 to 0.12W/mK. I am keen on using thin joint mortar as this slightly helps with U-values, but there appears to be a shortage, for example Mannok have an aircrete thin joint system but don't supply the thin joint mortar. Celcon have the block and mortar if you use their blocks. Investigating getting a source from Poland! -
Caversham Passivhaus
Caversham Passivhaus replied to Caversham Passivhaus's topic in Introduce Yourself
thanks. I will take a good look! -
Caversham Passivhaus
Caversham Passivhaus replied to Caversham Passivhaus's topic in Introduce Yourself
Hi, It's towards the end of design, close to completing a PHPP assessment that confirms EnerPHit is possible, some enabling works are underway and a restoration of a bay window is now starting. No builder at the moment. I am quite hands on but with no construction background but enjoying the project. -
Caversham Passivhaus changed their profile photo
-
We've taken on the challenge of transforming a charming yet crumbling Victorian terrace house in Caversham into an energy-efficient gem. Our goal is to reach the EnerPHit standard with a Passivhaus retrofit. The house's unmodernised condition offers us the perfect chance to not only perform a comprehensive retrofit, but also rework the layout and expand the property.