Timmyk
-
Posts
34 -
Joined
-
Last visited
Everything posted by Timmyk
-
Hybrid inverter for small in roof 2kw array - help please!
Timmyk replied to Timmyk's topic in Photovoltaics (PV)
Did it! Managed to get a login for SetApp. Half an hour of setup or so and I'm up and running! Only making a measly 150w right now but hopefully that's just because it's 7pm. Thanks again everyone! Very grateful for all the help to get it going. -
Hybrid inverter for small in roof 2kw array - help please!
Timmyk replied to Timmyk's topic in Photovoltaics (PV)
Exactly. Which sadly I can’t get on without registering as an installer. I can’t fathom why they’d be so obtuse about giving access to the app. It even says in the manual that you can sign up for instant access to SetApp from within the app - a feature they must have subsequently removed -
Hybrid inverter for small in roof 2kw array - help please!
Timmyk replied to Timmyk's topic in Photovoltaics (PV)
That female MC4 with the red multimeter tip inserted inserts into the +ve labelled connector on the inverter. And seems from the multimeter reading that the polarity is therefore correct. thanks for all your consistent help with this by the way - really very much appreciated! -
Hybrid inverter for small in roof 2kw array - help please!
Timmyk replied to Timmyk's topic in Photovoltaics (PV)
I believe so yes. I’ve checked it a bunch of times with a multimeter and pretty sure I’ve got it right. difficult to explain in words so hopefully this photo makes sense!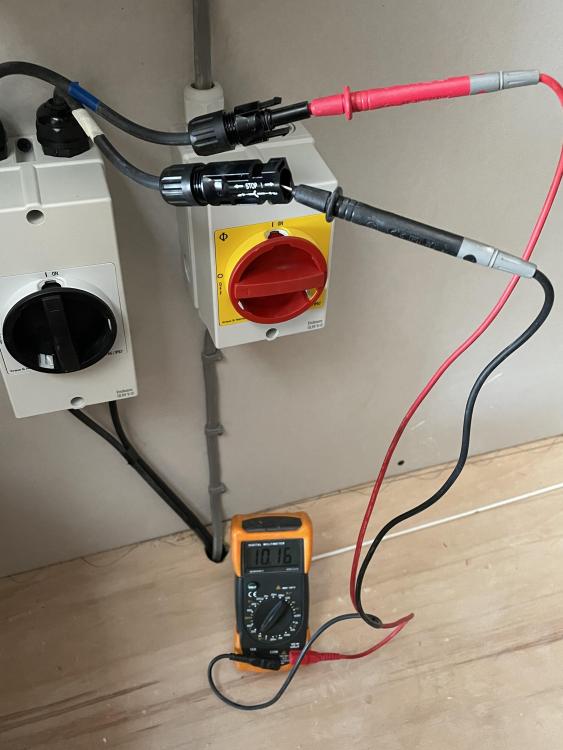
-
Hybrid inverter for small in roof 2kw array - help please!
Timmyk replied to Timmyk's topic in Photovoltaics (PV)
Apologies. By failing pairing I mean it does not want to pair with the optimiser when I try to do it manually using the toggle switch. Additionally whilst I can get connected using my phone, I can’t actually use Solaredge’s setup app ‘SetApp’ because you need an installer login, which I don’t have. Any advice appreciated. Was very much looking forward to getting this running today! -
Hybrid inverter for small in roof 2kw array - help please!
Timmyk replied to Timmyk's topic in Photovoltaics (PV)
I can yes. But I can’t get into SetApp without an installer login. -
Hybrid inverter for small in roof 2kw array - help please!
Timmyk replied to Timmyk's topic in Photovoltaics (PV)
Thanks. Seems there is a toggle sequence to try to pair (just hold on ‘P’ for 10 secs) but mine just keeps failing pairing and throws an error light. The optimiser is making 10V as it’s supposed to. Bit lost on this one now. -
Hybrid inverter for small in roof 2kw array - help please!
Timmyk replied to Timmyk's topic in Photovoltaics (PV)
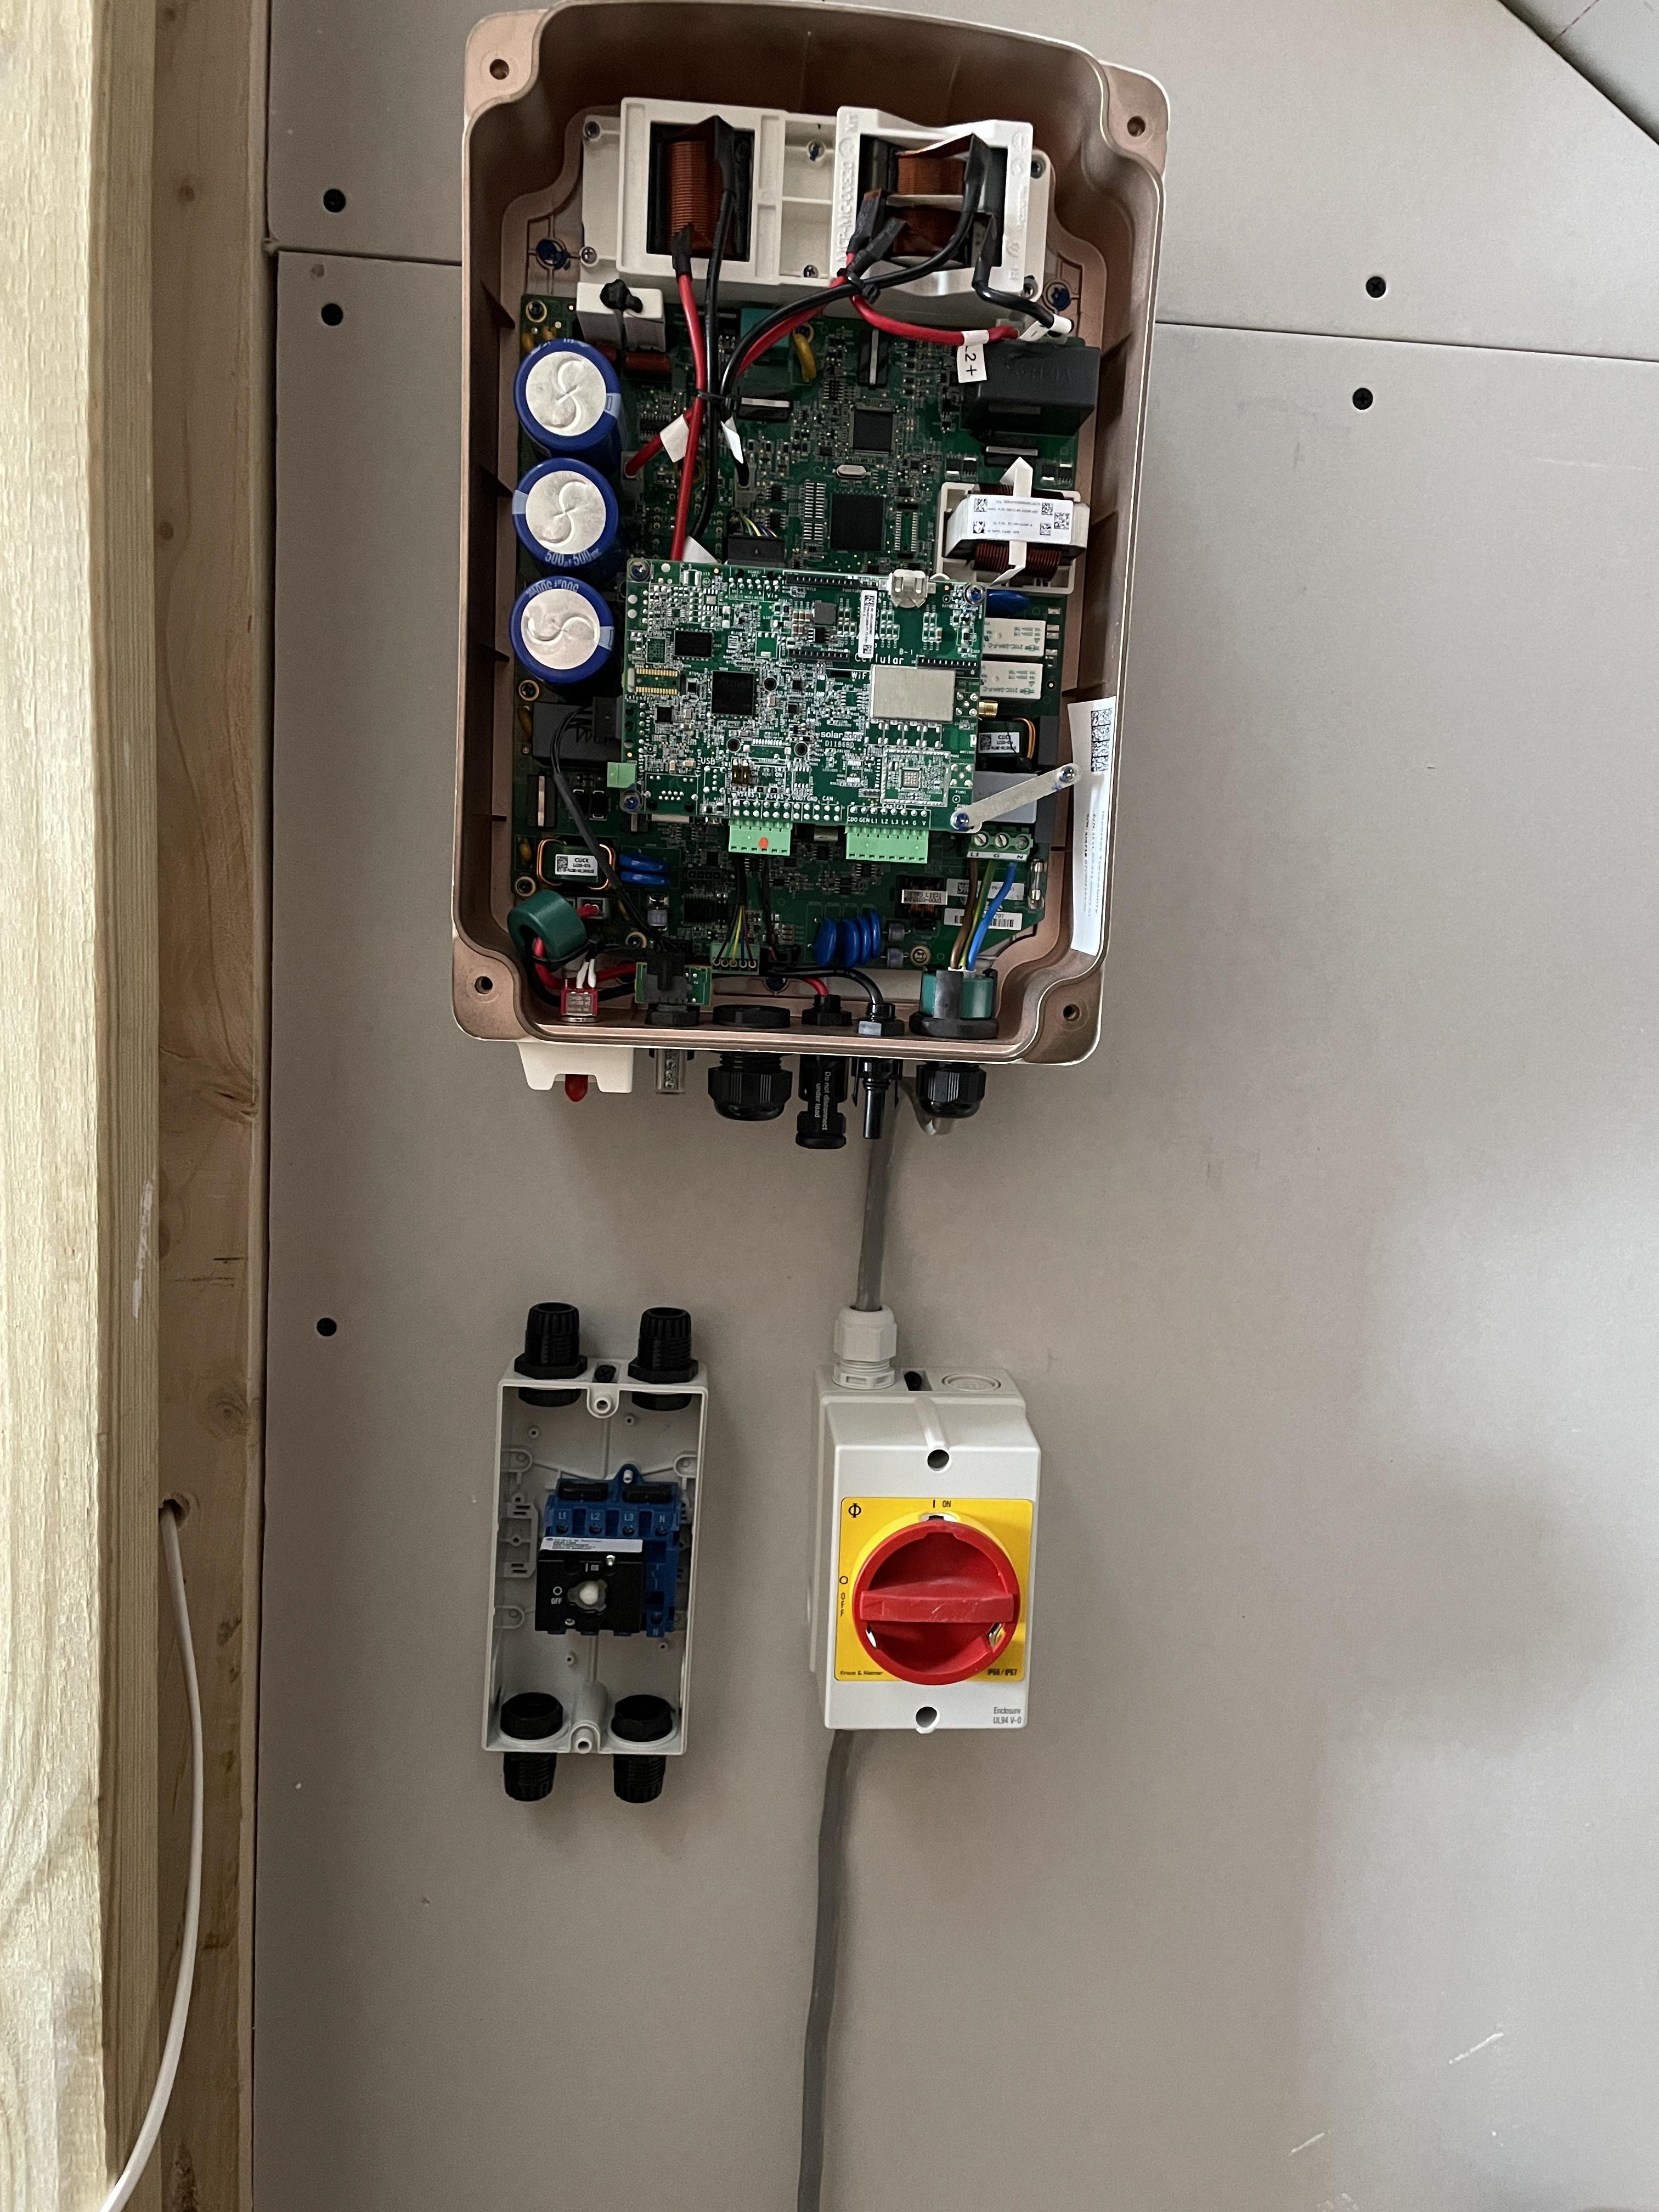
Okay so FINALLY all plugged in to the consumer unit. But I've hit another barrier. To commission the inverter I need to use SolarEdge's 'SetApp' on my iPhone. All their FAQs say you can instantly register to access settings on the inverter. But there is nowhere to register an account to be able to do this. So without a username and login I can't get into the app to commission the inverter. So incredibly frustrating! Is there anyone here who knows how to get a SetApp login immediately, or who could lend me their login details? Big ask I know but I only need it to be able to set up the inverter. Thanks if you can help T -
Hybrid inverter for small in roof 2kw array - help please!
Timmyk replied to Timmyk's topic in Photovoltaics (PV)
So I had to get back out there on the roof and re-wire the panels 🙄 But now at least the optimiser is outputting 10V as it's supposed to and all seems to be fine. Haven't quite worked up the courage yet to attach a plug and plug it in to a socket 😬 Got a day off tomorrow so might give it a go but there seems to be pretty mixed feelings about it on here! I have manage to get a (non-solar) electrician to agree to come and attach it to the consumer unit in the near future. Any chance you know what amp MCB I should get for him? Output is max 2kW and 9.5A. 10A or 16A? Thanks! -
Hybrid inverter for small in roof 2kw array - help please!
Timmyk replied to Timmyk's topic in Photovoltaics (PV)
No. Way. I did not know this was possible! That would be fantastic! There's a socket directly next to the fusebox so can I just plug it in there and get it going temporarily?! It's been driving me nuts waiting for someone to come and get it wired in! One interesting problem has arisen this evening - I got everything wired into the optimiser and measured the voltage it was producing. My setup is total 6 panels with 2 panels per input to the optimiser. As the optimiser does 4-8 panels (4 inputs, max 2 panels per input) I am only using 3 of the available inputs. I kept the final one free for if/when I can add 2 more panels to the flat roof. The manual says that when the optimiser is disconnected from the inverter or the inverter is off, the optimiser will only output 10V total. Any less than that and there is a polarity/some other issue elsewhere. I am getting 7.5V. I tried with just 2 panels connected to a single input and it produced 2.5V. My interpretation of that is that I've 'lost' 2.5V by leaving one of the inputs to the optimiser empty with no PV input. I have no idea if this matters or not and appreciate it's probably quite a niche problem, if it even is a problem. I suppose the only ways of know are 1) emailing SolarEdge tech support or 2) plugging the inverter in as you've suggested and seeing what it produces Any suggestions on that? By the way - I am very very grateful for your help on this. Couldn't have got this far without it! Thank you!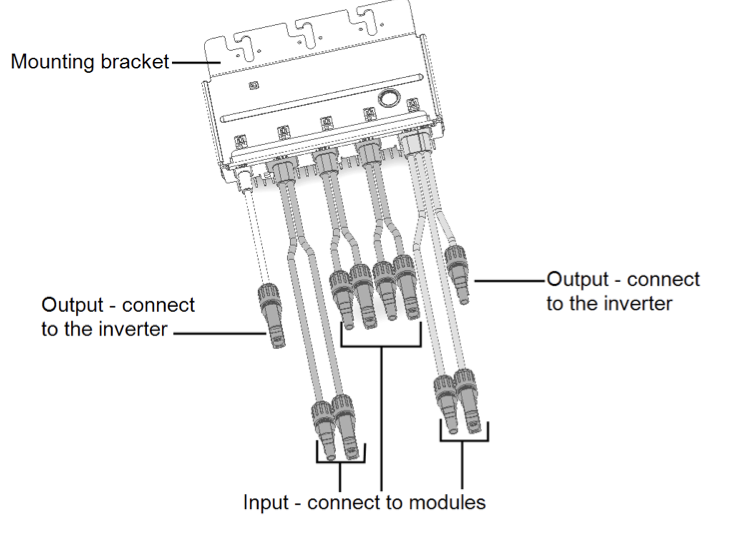
-
Hybrid inverter for small in roof 2kw array - help please!
Timmyk replied to Timmyk's topic in Photovoltaics (PV)
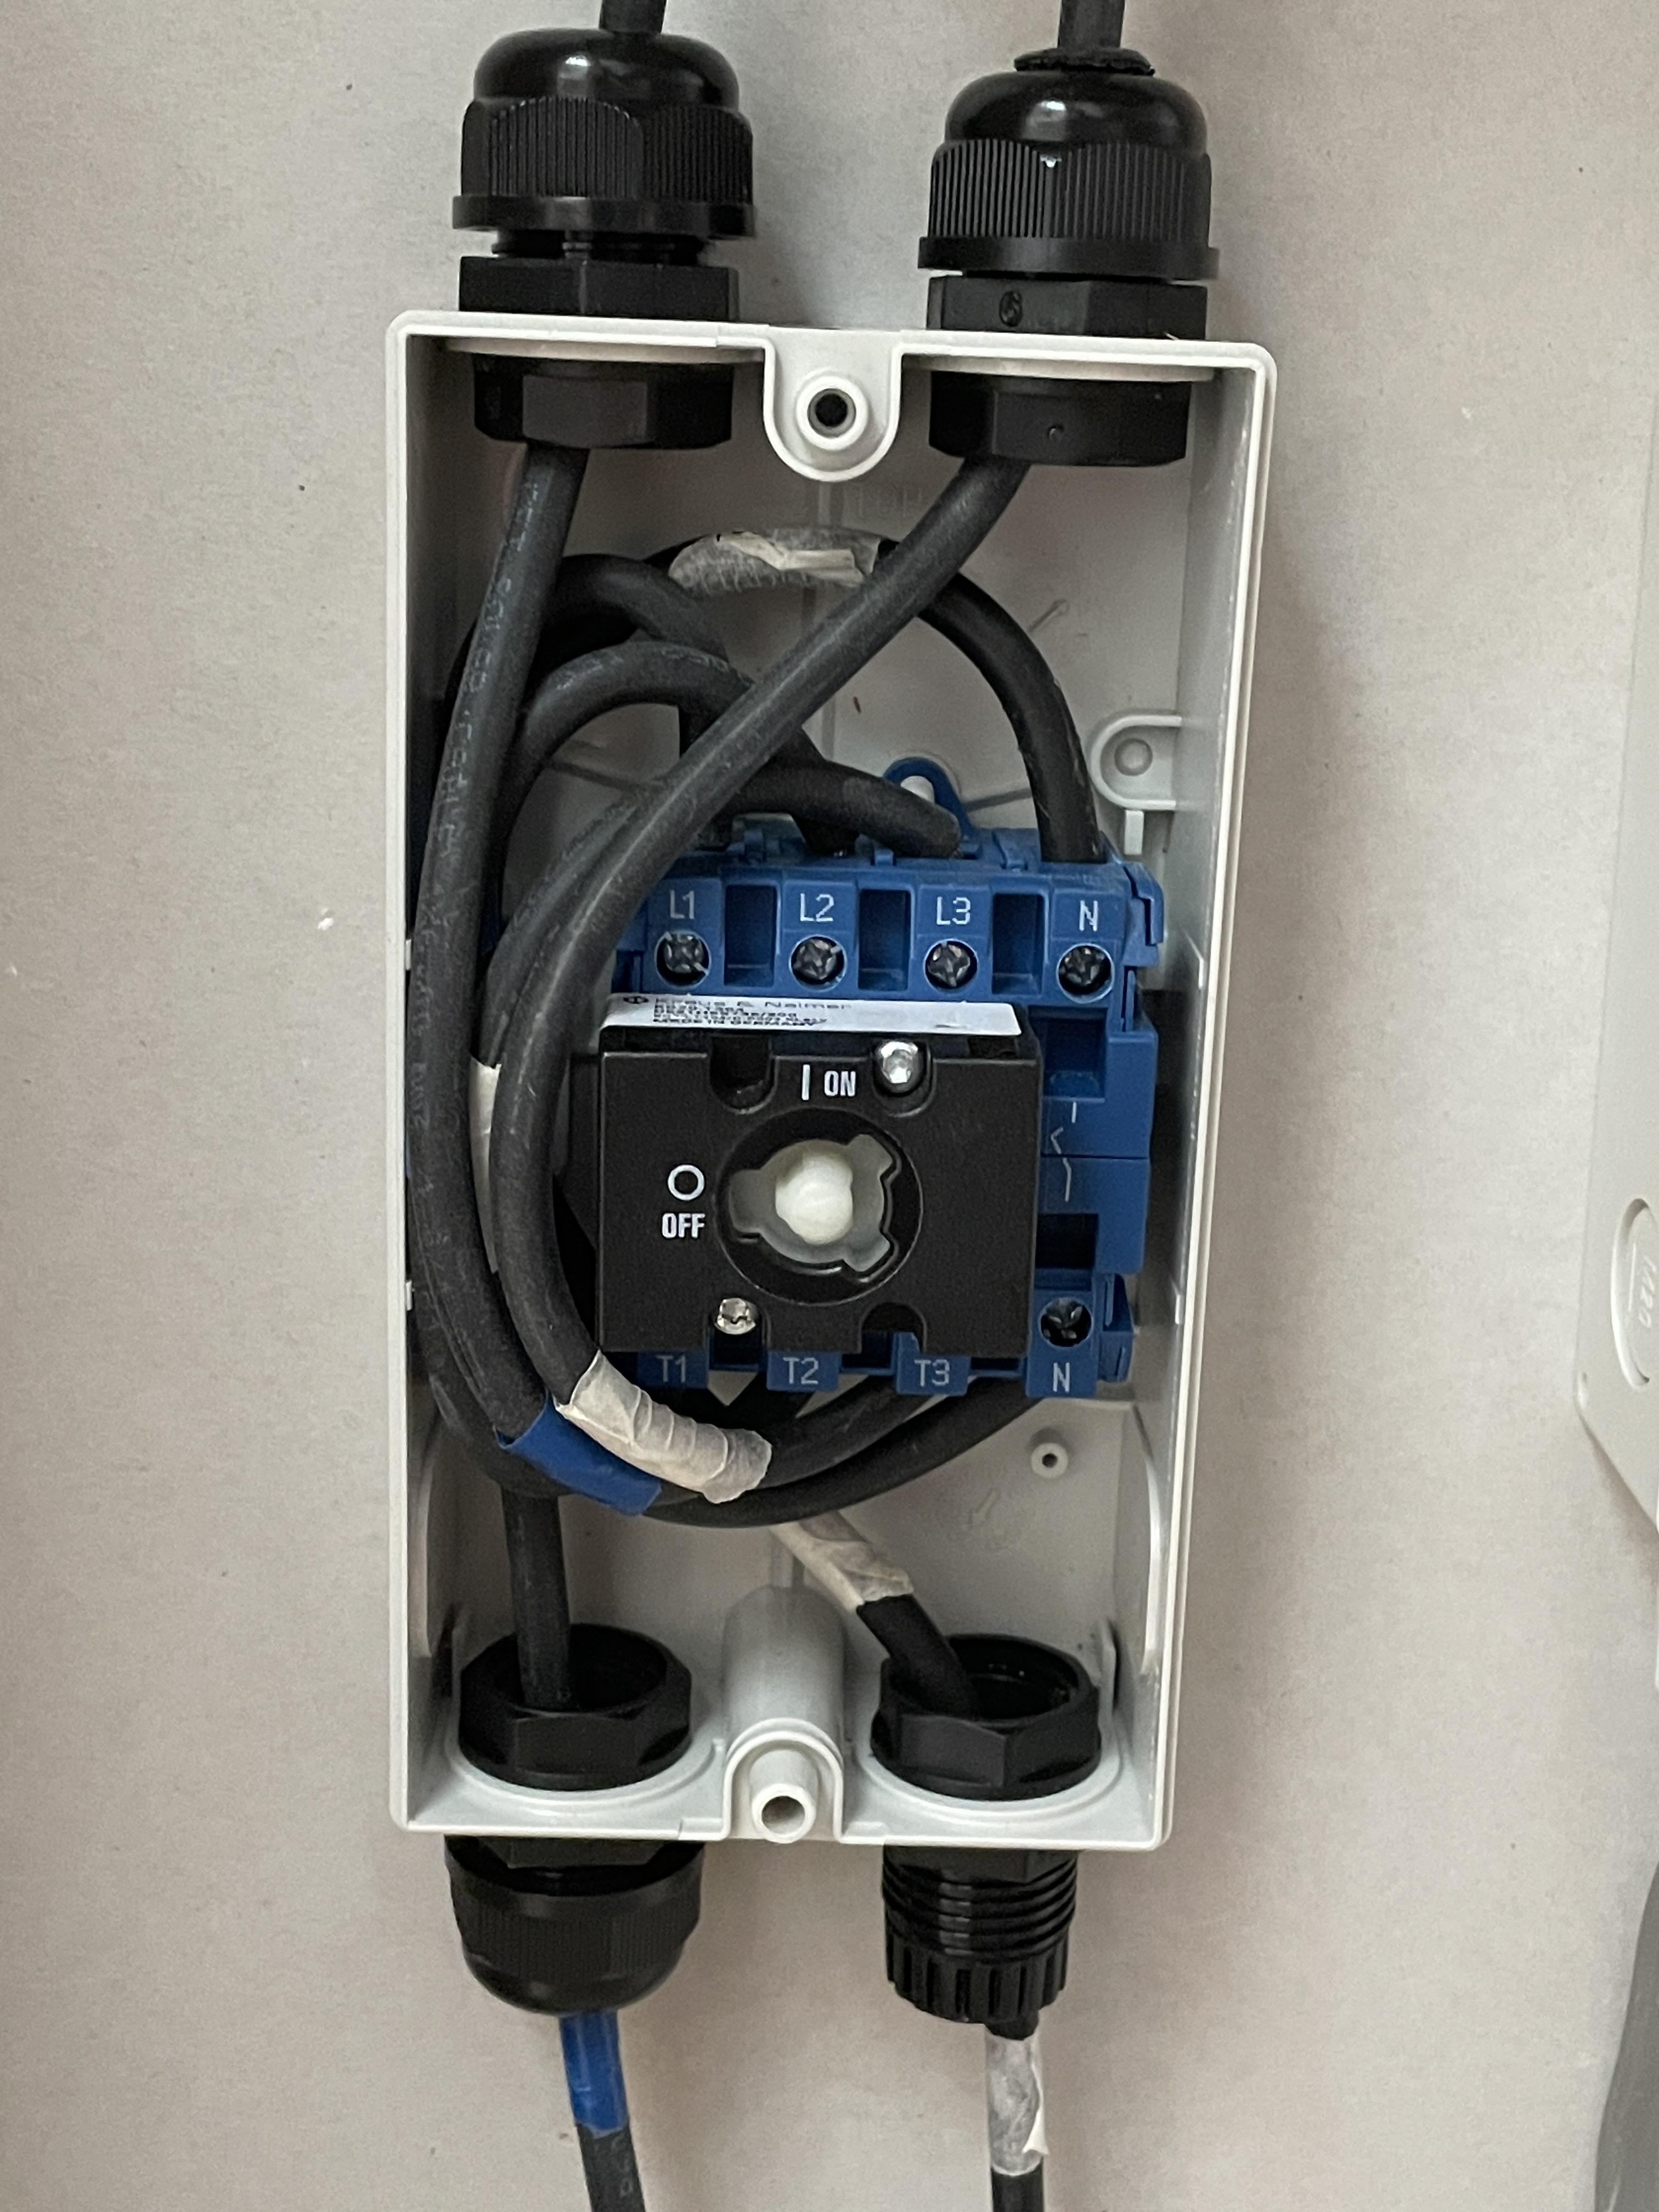
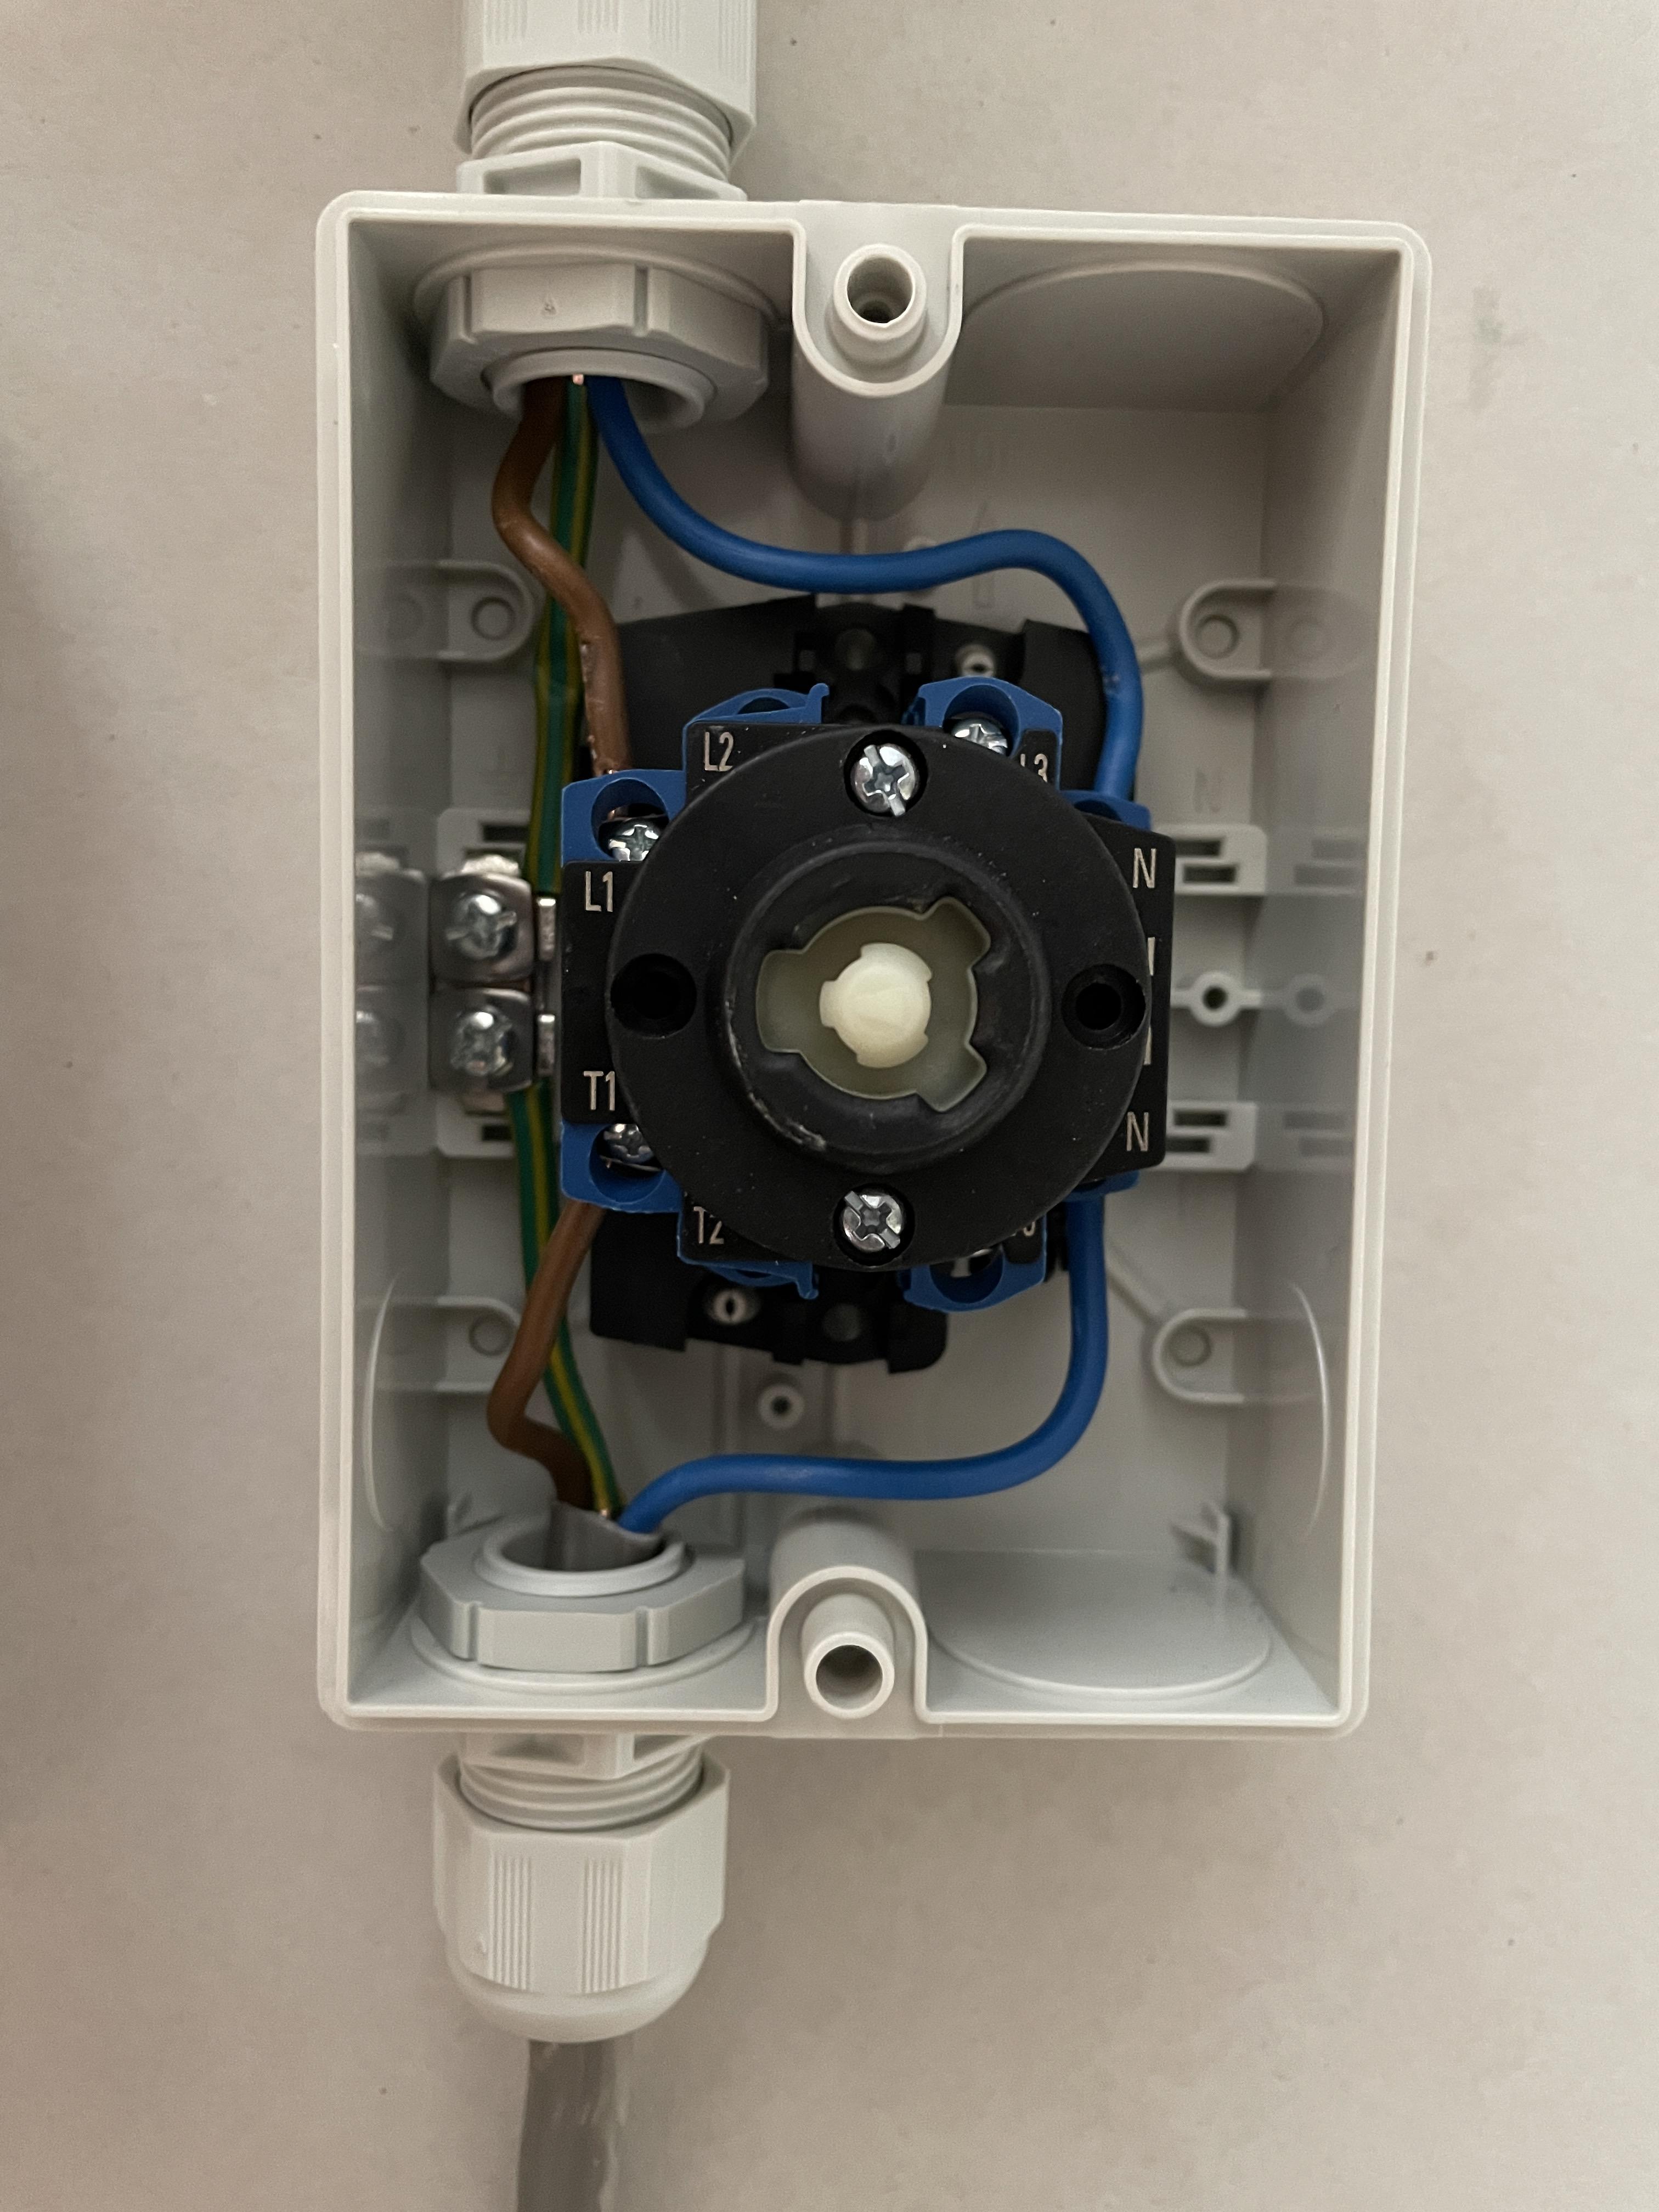
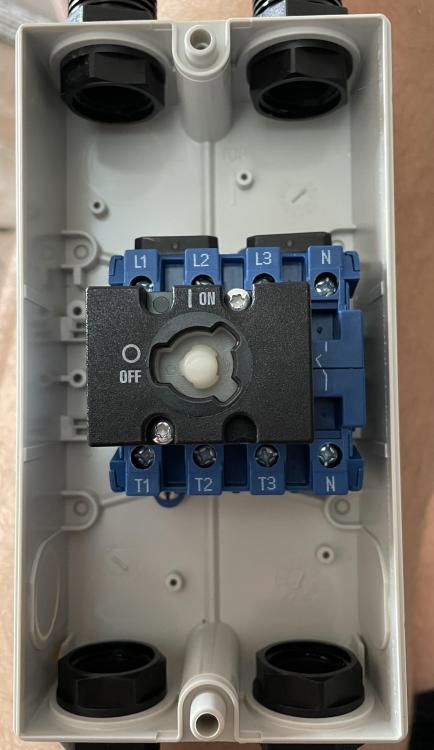
Okay so this now runs: 1. Optimiser(+ve)-> L1 -> T1 -> L2 -> T2 -> inverter +ve 2. Optimiser (-ve) -> N -> N -> L3 -> T3 -> inverter -ve Lots of wiring inside the isolator as you can see but I’ve taken your advice and gone for best practice so hopefully you approve of it! AC I’ve left as it was. Not ideal I appreciate but as you said it’ll work. Now I just need to test the panels and inverter are working and then get someone willing to wire it into the fuse box. Anything I’ve missed/words of warning? thanks again for all the assistance Tim
-
Hybrid inverter for small in roof 2kw array - help please!
Timmyk replied to Timmyk's topic in Photovoltaics (PV)
Thanks again. I can probably wire the DC isolator as you've suggested without much of an issue to be fair. Interesting they've shown it like they have though - everything coming in and out of the T side. There's also pre-fitted connectors between L1 & L2 then L3 & N which I'll have to remove to do it properly. Weird -
Hybrid inverter for small in roof 2kw array - help please!
Timmyk replied to Timmyk's topic in Photovoltaics (PV)
The terminals to the consumer unit. I’ve currently got T1 going to the consumer unit. So I’m upside down, correct? Interestingly this is the wiring guide for the DC isolator, which shows input from the PV array and output to the inverter all in T1-3. Not the best quality photo but the lower side of this is T1-3.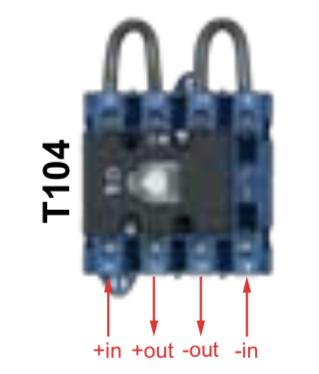
-
Hybrid inverter for small in roof 2kw array - help please!
Timmyk replied to Timmyk's topic in Photovoltaics (PV)
Thanks. I think I’ve got the AC isolator the right way round. The live coming from the inverter is connected to L1, and T1 outputs to the consumer unit. Technically though I guess both sides of this are live as one is an input from the inverter and the other is an output to and input from the consumer unit. Regarding the DC isolator - understand that the live side (from the panels) goes into the L side. I will put one into L1 and the other into N for the sake of neatness. T side will output to the inverter. Which is annoying as it’s basically upside down! Am I all correct there? thanks again -
Hybrid inverter for small in roof 2kw array - help please!
Timmyk replied to Timmyk's topic in Photovoltaics (PV)
Ac isolator:
-
Hybrid inverter for small in roof 2kw array - help please!
Timmyk replied to Timmyk's topic in Photovoltaics (PV)
Interesting discussion - thanks everyone. I think on balance I’ll just fill in the forms to be safe - regardless of it’s actually meaningful or not. Quick question about wiring. I’ve taken everyone’s advice that despite this Solaredge inverter having a built in DC isolator, I’m going to put an external one in as well. this is how it currently looks: Question is simply - does one dc cable from the optimiser pass through the neutral port in the dc isolator and the other through a live port? If so does it matter +ve vs -ve way round? Not both through separate live ports, correct? thanks! tim
-
Hybrid inverter for small in roof 2kw array - help please!
Timmyk replied to Timmyk's topic in Photovoltaics (PV)
Do I need to do that even if I don’t intend to sell the extra back to the grid? -
Hybrid inverter for small in roof 2kw array - help please!
Timmyk replied to Timmyk's topic in Photovoltaics (PV)
Great, thank you. So finishing it off is as straightforward as I’ve described and nothing else needed? -
Hybrid inverter for small in roof 2kw array - help please!
Timmyk replied to Timmyk's topic in Photovoltaics (PV)
Hi all, This project is (finally) nearly done. I just want to check one thing. AC wiring from the Inverter to the house simply goes: Inverter -> AC isolator -> free space on consumer unit/fuse box. There’s nothing more complex than that? Why does power come preferentially from the inverter rather than mains supply? thanks! tim -
Hybrid inverter for small in roof 2kw array - help please!
Timmyk replied to Timmyk's topic in Photovoltaics (PV)
😬 Okay! Added one to the order. When I looked at the order last night, there were 91 of the GSE frames available. This morning at 8am...22. Clearly popular right now! Ordered: 6 x Qcells G9 345w all black All the GSE kit needed to fit them + flashing 1 x DC isolator (2 pole 1 string) 1 x AC isolator (20A 4 pole) 25m 6mm2 DC wire Total about £1800. SolarEdge Compact 2kw Extended to be sorted later. Next to work out how to get the DC wire from the 2 east facing panels at the back of the house to the optimiser on the west facing opposite side of the house. Within the roof maybe? Does it need to go in conduit? Will only be around 80V at 10A going through there I think. -
Hybrid inverter for small in roof 2kw array - help please!
Timmyk replied to Timmyk's topic in Photovoltaics (PV)
Maybe I’ll avoid the DC isolator in that case! -
Hybrid inverter for small in roof 2kw array - help please!
Timmyk replied to Timmyk's topic in Photovoltaics (PV)
Managed to change/cancel my order for 5 panels and am now going for 4 x Qcells G9 345w to West, 2 x Qcells G9 345w to East, all in portrait with GSE frames. Inverter will be the SolarEdge Compact 2kW extended, with the optimiser placed indoors in an accessible place if I ever need/want to change it. This inverter looks perfect for my needs as it accommodates different azimuths and has a low startup voltage, built in wifi and (I think) a built in DC isolator. Whole thing should cost around £2400, which probably isn't terrible. How does this setup sound? Is there anything obvious I've missed in this? Thanks again! -
Hybrid inverter for small in roof 2kw array - help please!
Timmyk replied to Timmyk's topic in Photovoltaics (PV)
So with the current plan, it estimates 600kWh East and 1128kWh West / year. That SolarEdge compact 2.0kW takes up to 8 panels, so I've got the potential to pop 2 panels on the flat roof in the future...or change inverter! -
Hybrid inverter for small in roof 2kw array - help please!
Timmyk replied to Timmyk's topic in Photovoltaics (PV)
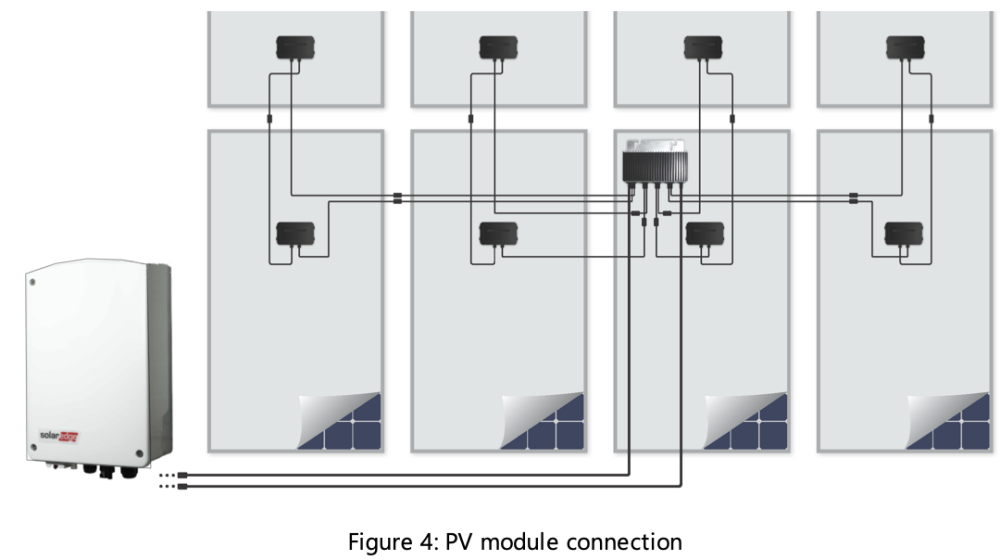
Thanks. The orientation thing was actually about making better use of the roof space and having 4 x 345w panels instead of 3 x 370w. Seems SolarEdge divides opinions! Because of the orientation of my arrays (one east, one west), it seems I need 2 small inverters to make it work. Just starting to wonder if it's even worth the bother having the 2 panels on the east side really. Only 690w created at the best of times 🤷♂️ And a reasonable cable run to get it to an inverter. Argh, this is more complicated than I thought it would be! Edit: Just looking again at SolarEdge compact. The (singe) 6-input optimiser that comes with this inverter seems perfect for my needs re: 2 azimuths - it even states this as a use example in the product brochure. I could locate the optimiser inside the loft so if I ever need to change inverter then it's easily removed. Then all the bases seem covered 👍 -
Hybrid inverter for small in roof 2kw array - help please!
Timmyk replied to Timmyk's topic in Photovoltaics (PV)
Does anyone know if it is acceptable to run a 6m or so length of DC cable under the floorboards without a conduit? I think max voltage will be only 70 (690w/10a). Going to need to get the cable run from the back to the front of the house.