EinTopaz
-
Posts
183 -
Joined
-
Last visited
Everything posted by EinTopaz
-
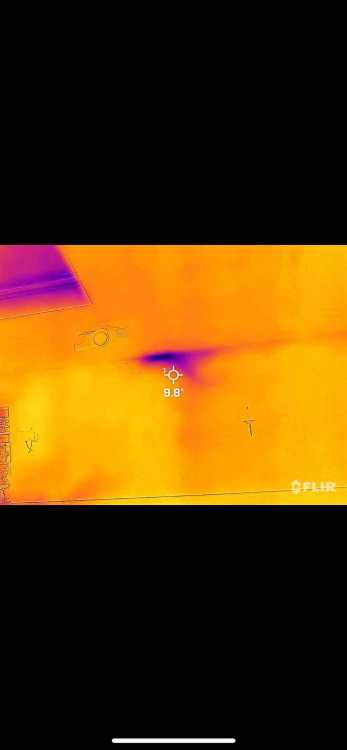
As far as I know there's no ABV. I cannot see one externally anyway. There is solely one radiator in the circuit (towel rad in bathroom) that has no TRV Running 73 degrees because thats how hot i like the radiators. It does modulate down to 44% eventually after maybe an hour or so. and I can see fluid coming out of the condense pipe. So it is condensing. return temp, not sure. i'll list the rads out properly in a future post. good shout. also good shout on the vertical rads, i do have a FLIR camera so i'll take a look. Out of interest should they or should they not have diverters in there? the place i bought them off told me the TRV should be diagonally opposite the bleed valve because of something. I imagine that's related to what you're saying?
-
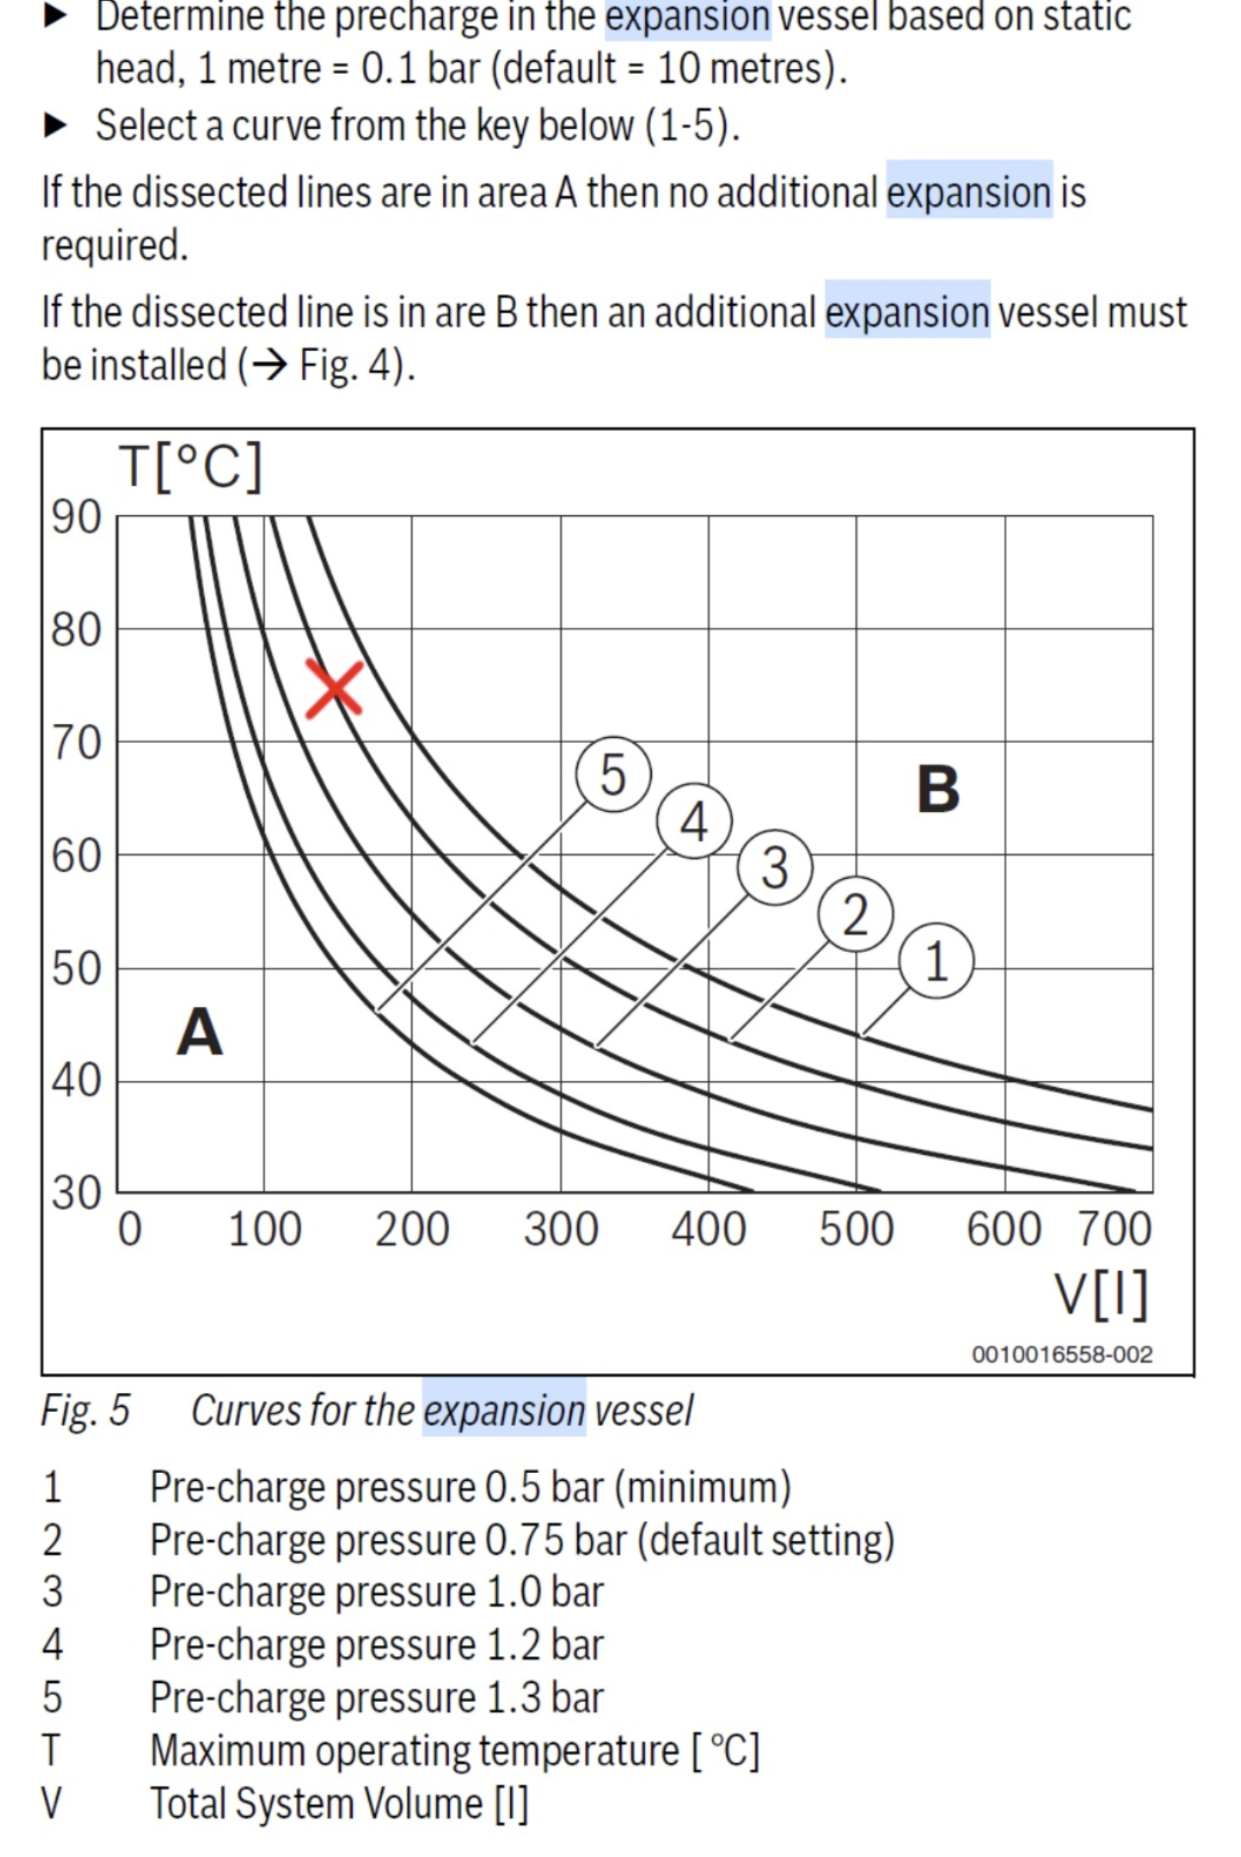
Always had the symptoms though i originally thought some of it was due to poor balance, but its been balanced over and over and over, still the same inconsistencies. 12 months old system, brand new boiler, all pipework, all rads. All went in at the same time. Have not checked the chare pressure yet as its a system boiler with everything inside. Wasn't really sure how to check it in this type of setup. I did check the manual for what they recommend and saw this graph however.... i plotted the red X on where we are. I calculated we're at 150L or so based on all the specs of my radiators. (the designer triple column ones take up so much water!) I can't see the size of the vessel inside referenced in the manual,. but looking on ebay for replacement parts, it would suggest the one i have inside is a 10L one.

-
Bumping this - anyone on here knowledgeable of the above? 🙂
-
Hey all, Investigating some ongoing weirdness with the CH on the ground floor and looking for some insight. On the ground floor we have a Worcester Bosch Greenstar life 8000 System boiler (35kw variant). It powers 15 radiators on the ground floor which are a mix of large type 22 double panels, and some triple column designer types too. Total wattage of those at T50 is around 29kw total, ish. Also worth mentioning this boiler does not power any hot water in the property, that's dealt with elsewhere. This boiler is CH only. I'm getting three annoying symptoms that I can't seem to eliminate no matter how many times I balance and bleed etc. They are:- When I turn on the boiler the LCD for flow temp goes up real quick though the radiators take a long time to get heat in them. Eventually the boiler ends up getting to 70degrees or so, then modulating itself down to 50% or so before some of the radiators are anything more than warm. Im seeing an inconsistency where sometimes some radiators will be fine temperature wise, and other times they wont get hot. I.e radiator 5 was piping hot when I ran the heating last time, this time it's cooler than some of the others (with no balancing between the tests). I seem to need to let air out of the towel radiator in the bathroom every couple weeks or so. (this is the radiator in the circuit that has no TRV). Could the above be caused by an insufficiently sized Expansion vessel? Or would it suggest something else? Thoughts and insights greatly appreciated. thanks! Ged
-
Yeah true, I suppose it's down to the installation than the material (this thread being a great example of that ha!) Im not sure what other options I have for the walls really. That PIR that's in there ain't coming out without serious re-work. So my only options are to go over the top of that. I assume other people must have been faced with a similar option. Already installed PIR but not a great installation... so what is one supposed to do?
-
Didn't even think that'd work. What is the air gap between the PIR and brick meant to be for? I assumed its to stop any wet/damp bridging. Wont beads allow for damp to transfer to the PIR from the brick? Read all sort of stories online of people having these put in their empty older cavities and having issues with damp, then having to have them removed!
-
yeah, i love stuff like this. Visual layers of how I can spend fewer £'s in the future ultimately. It is a game On that subject, I looked to add external wall insulation as a test (if I wanted to go that route and render etc) and realised quickly that this would be entirely pointless as I have the 50mm airgap between brick and PIR....so my assumption is EWI (external wall insulation) won't work on a cavity wall UNLESS the cavity is entirely filled. I remember a few posts ago perhaps you mentioned about infilling the cavity here with closed cell foam. I'm interested in doing this, just not sure how I prevent it from going up into the eaves. How do people seal the cavity to prevent this happening, do you know?
-
thanks, taking a look now - do you know how to add an air gap in the buildup for ubakus? I couldn't figure out how to add one.
-
Question for the insulation knowledgeable persons on this thread. Is there an app or perhaps an easy way to calculate how much % improvement i'd get if I add another 50-75mm PIR to the roof? Essentially taking it from 150mm to 200/225mm, assuming it's all airtight and performing appropriately. Just costing it up and it is a bit higher than id hoped, so trying to workout the value proposition of it before I go ahead and buy.
-
What has double-annoyed me about this one was, they were one of the more expensive quotes we had to do the job and we went with them because of how confidence building they were. I.e they continually said things like "we are more expensive but the attention to detail and overall quality will be reflected in the price".... Being a very quality-driven type person myself that really resonated with me. But in reality I could've likely gone with the other quotes, saved £20k and invested that into these types of snags! That said, we can sit here and moan about it and it still wouldn't fix the problem. So rather just get it right and let bygones be bygones. I only care about the comfort level of my family. Not so much about pounds and pennies.
-
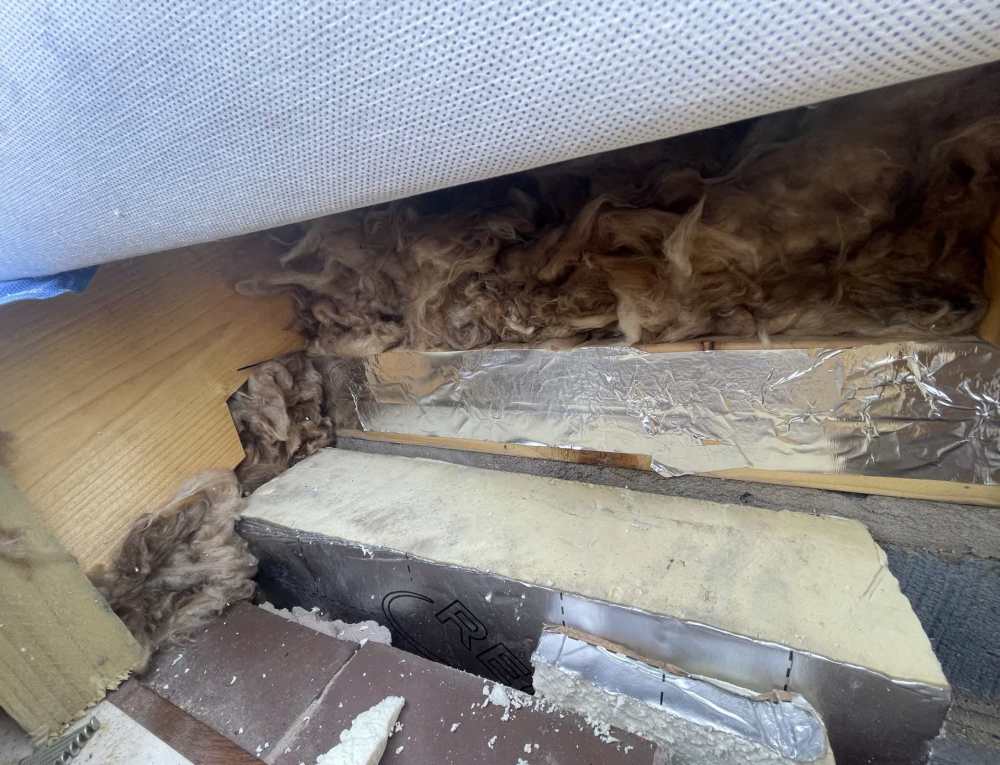
Brief update on this one just so the thread and any other troubled onlookers are aware. I've now gone through and inspected the eaves detail for everywhere I can for this extension. Found some horrifying things and insulated it the best I can. Those steps being:- :- Remove all poorly seated wool covering wall plates. :- Seal all gaps between ceiling PIR and wall plate with wool / foam/ tape. :- Reinstate PIR insulation where there was none :- Form Wedge to force wall PIR to be uptight against block :- Seal all gaps between Wall PIR and block with wool / foam / tape. :- Reseat wool covering wall plate and all sealed areas. I'm very pleased to report that this has made a huge difference. I have not had chance to put my thermal cam back on, but you can feel it in the room. It's actually retaining heat through the day now, heating on in the morning for a few hours and you could still feel the residual heat in there by midnight. Perhaps i'd got used to having essentially balls-all insulation in there so im hypersensitive, but very promising so far. and that's without any form of curtain / blinds etc. All the glazing (of which there's lots) is still entirely bare. Not to say im going to stop there, I will be still removing all the roof to fully seal it and add more insulation. But atleast now my horrifying suspicion that I may need to add interior insulation in an already finished room... has been quelled. I'd REALLY hoped I wouldn't have to do that and it looks now that i wont have to, so im very glad for that atleast. Id rather spend the time and money on further improving the roof, glazing and adding exterior wall insulation to the walls if I need to. Anyhow, some more images of fixes for future ref for anyone.
-
I don't disagree, it's just not something i'm familiar with and anxious about buggering it up. IF there was someone in the NW that could do this for me i'd be happy to look at costing it and proceeding. Just feels beyond my level of understanding and time availability to DIY on this one. But the U value numbers you've posted there have got me interested for sure.
-
They're being investigated for tax evasion. Even if they weren't; based on the evidence I wouldn't want to deal with them again after this, even monetarily. Rather wash my hands. Just keep telling my self the good old motto "if you want something done right... do it yourself!
-
I know, frustrating. Even more concerningly that corner explains why this bit on the thermal image was darkened. So imagine what im gonna find here as it's way colder!.. through frustratingly i think this bit is gonna require the valley to be removed to see it properly... as it's past where the roof turns on the 90degree angle. So can't access it from this side annoyingly. I estimate it to be around here.

-
Thanks for these @Iceverge the roof one may be a bridge too far for me and my skills. But the wall one i'm interested in so long as it wont cause damp. How do you limit the insulation from rising above the clay brick height when doing this? Will the installer just know what to do? Or will i need to block something off in the wall cavity to prevent it rising too high, if that makes sense?
-
I did wool down the gaps, foamed over the top, cut back, then taped over. Probably overkill. But gonna see the difference over night tonight.
-
Found a particularly horrendously poorly section on the front section. Found a really bad section on the front right corner earlier today, its now rectified (to the best i could given the access i have) but look how bad this is! eaves_pt3.mp4
-
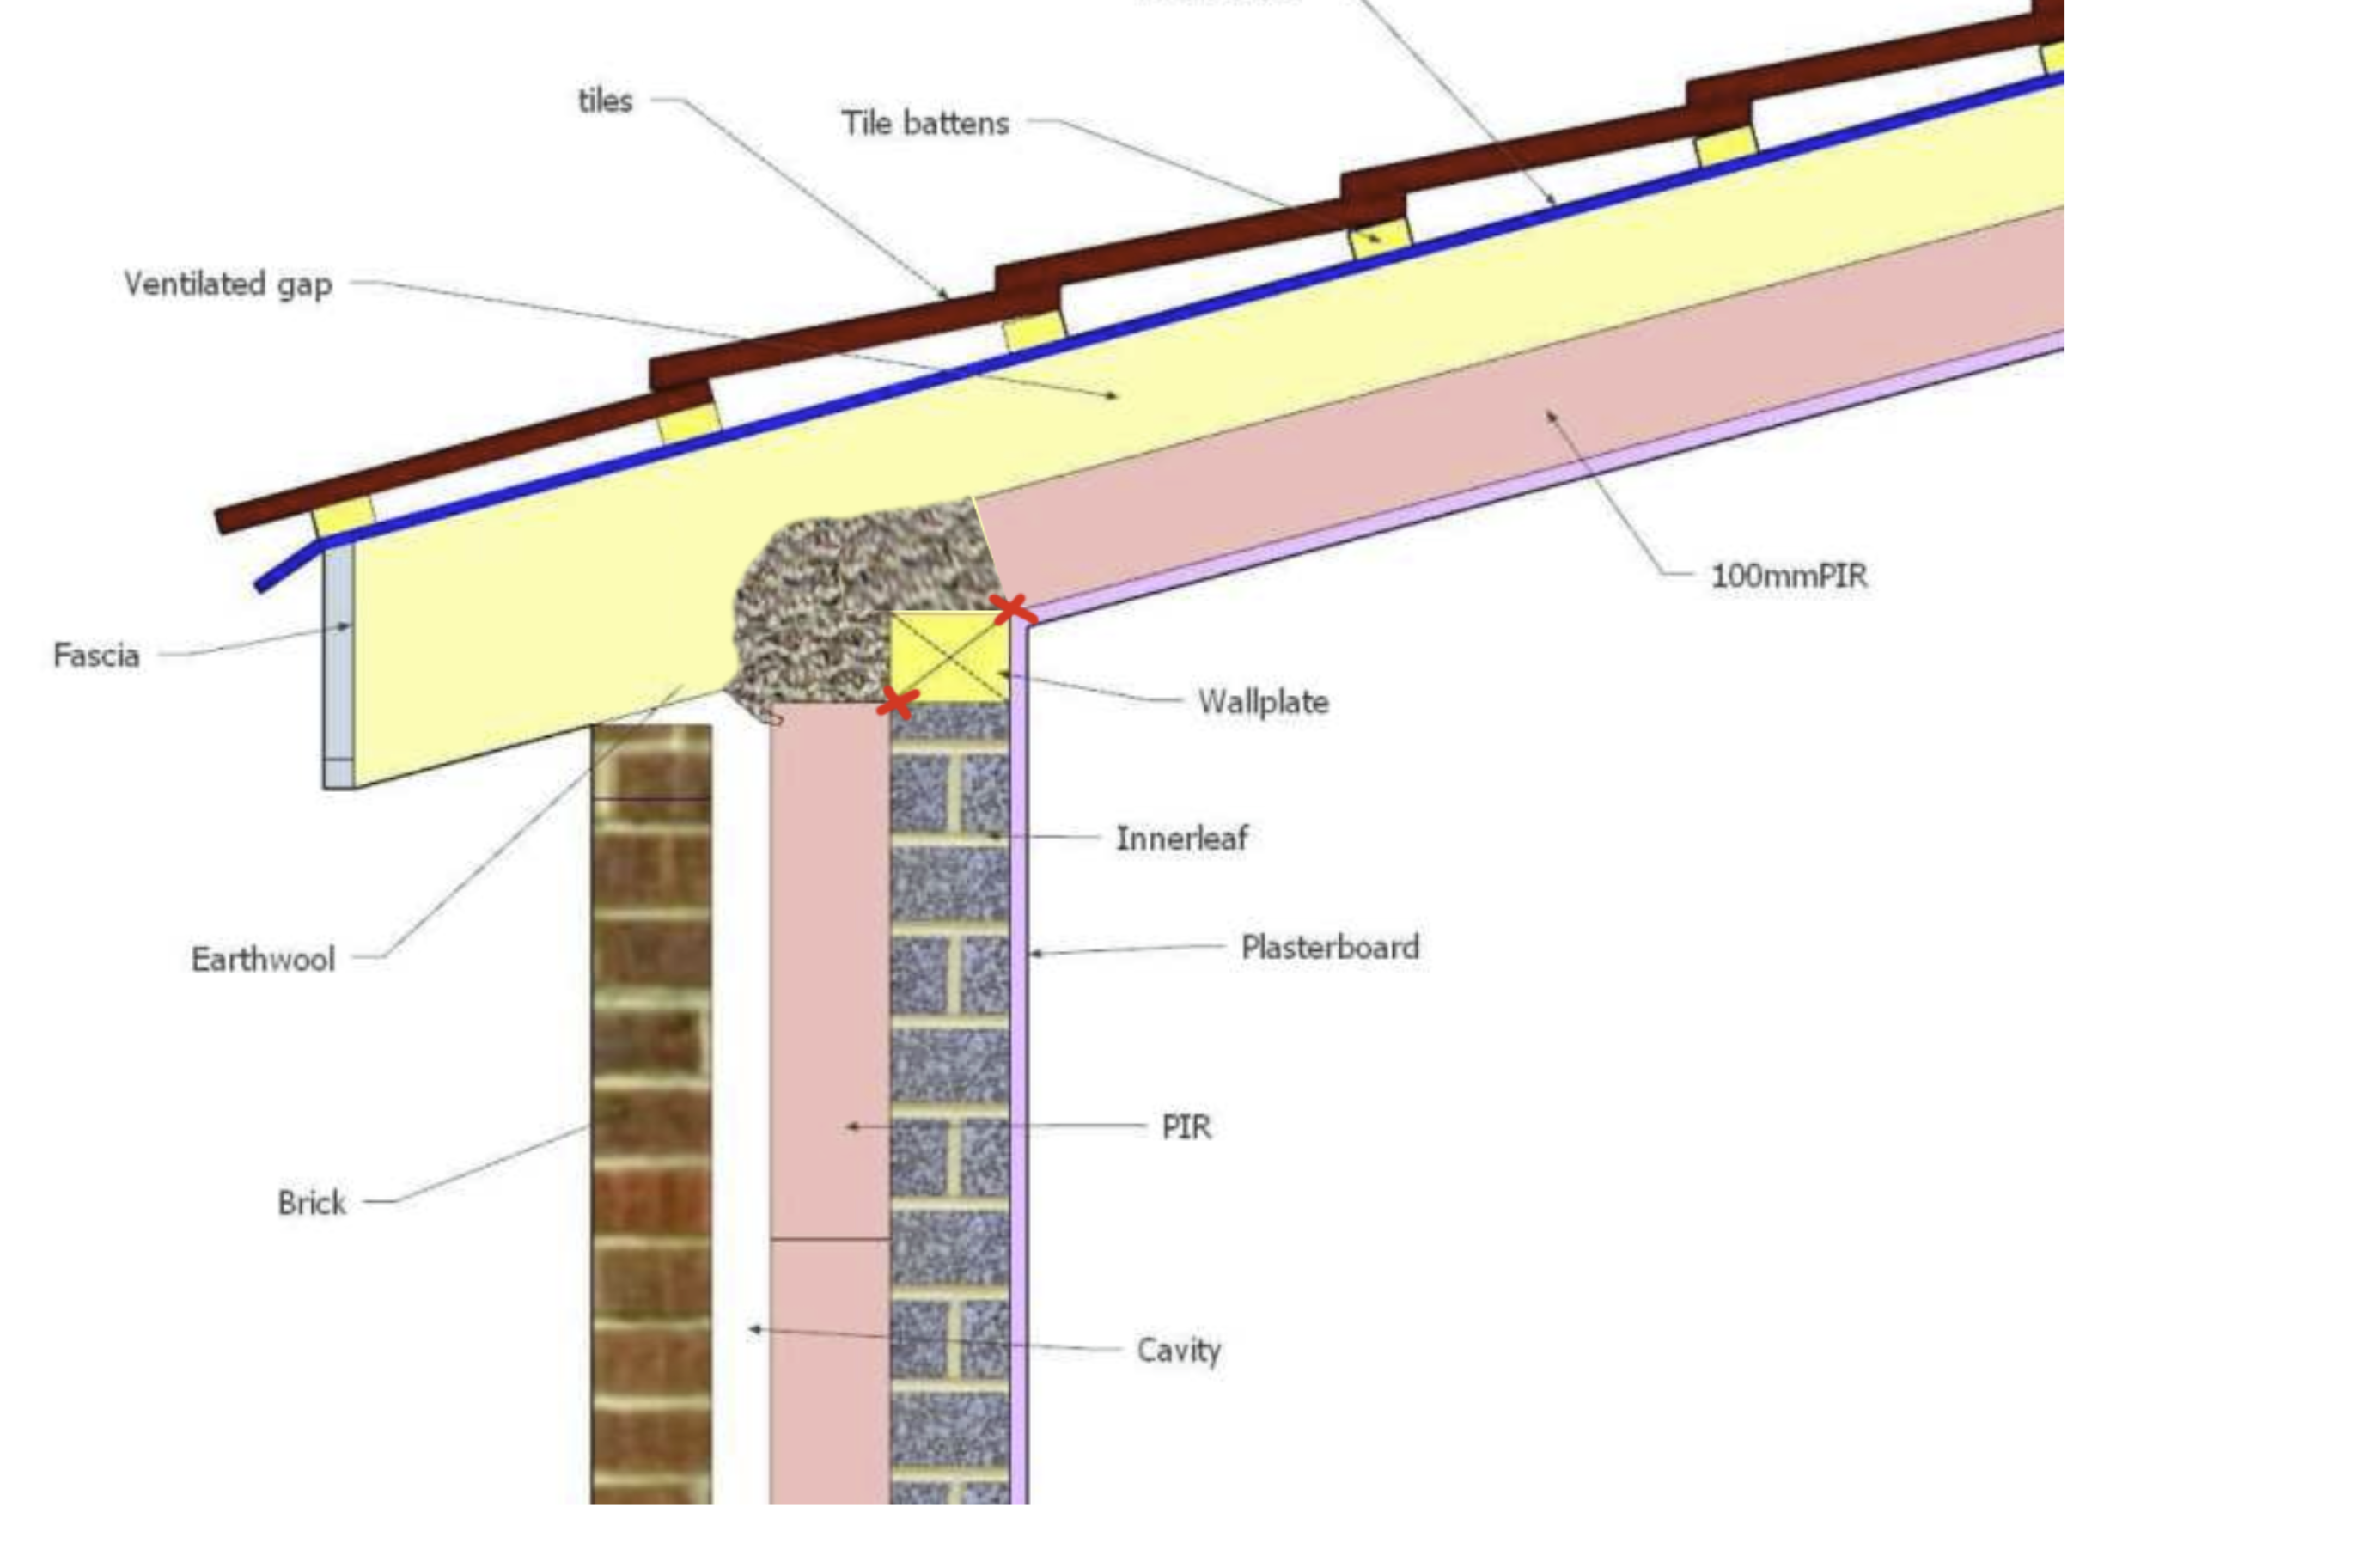
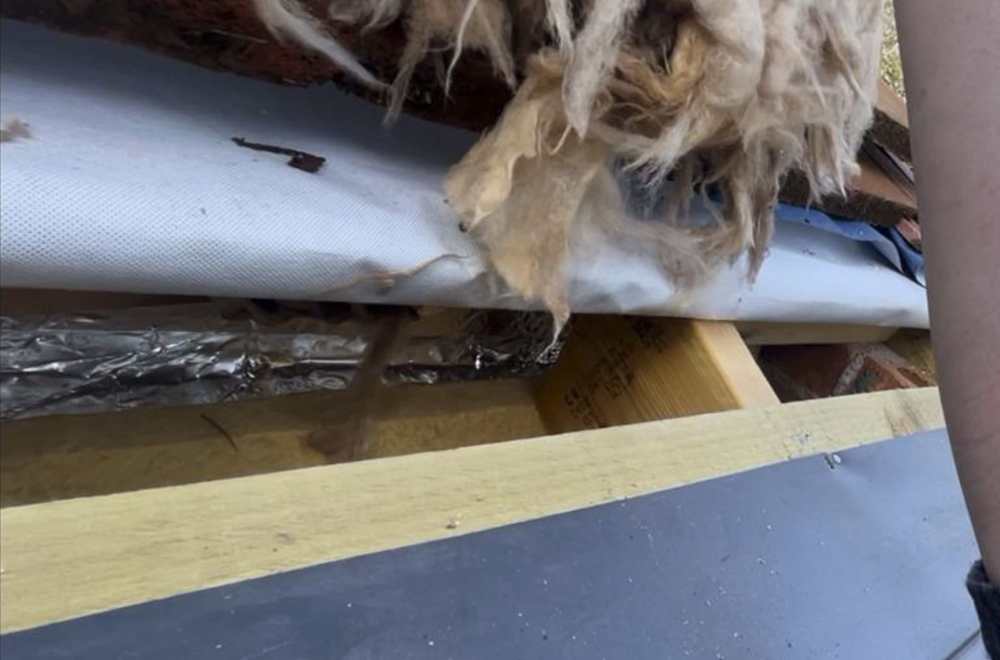
Yes, so again thanks for this. Ours (as im sure you've seen on the video) looks more like this - as the roof PIR does end pretty short of the wall plate. What i've done today is remove the wool that was sat atop the wall plate (they'd actually done a terrible job where they'd entirely blocked the cavity between pir and felt here so needed to come out anyway as it was wet!) then where the Red X's are, i've sort of packed the gaps with wool, foam sealed, cut the excess foam off, electric tape over the top, then reinstated the wool. I'm yet to see if it's made a difference, but in principal its following your guidance of the air flow getting into places it shouldn't being the biggest causer of issues. So i'm hoping it makes a difference, albeit less of a pucker fix than your suggestion. I plan to do the same methodology to the entire roof, as a bare minimum, if what i've done today helps. As simply taking the front 2 rows of tiles off all the way round didn't give me access to all the bits I needed. So Yeah i do wanna do a full pass with a roofer.


-
thanks for the detailed steps and the cross section in the other reply too. Sorry if a silly question - but if you're packing all that tight into the roof cavity, wont that stop any air travelling through it? Or is that why you've suggested open cell foam? will that still allow air to pass through? Same question for the walls. In eliminating the 50mm airgap between brick outer leaf and PIR, wont that become an issue with damp bridging? i thought thats what the airgap was there to prevent.
-
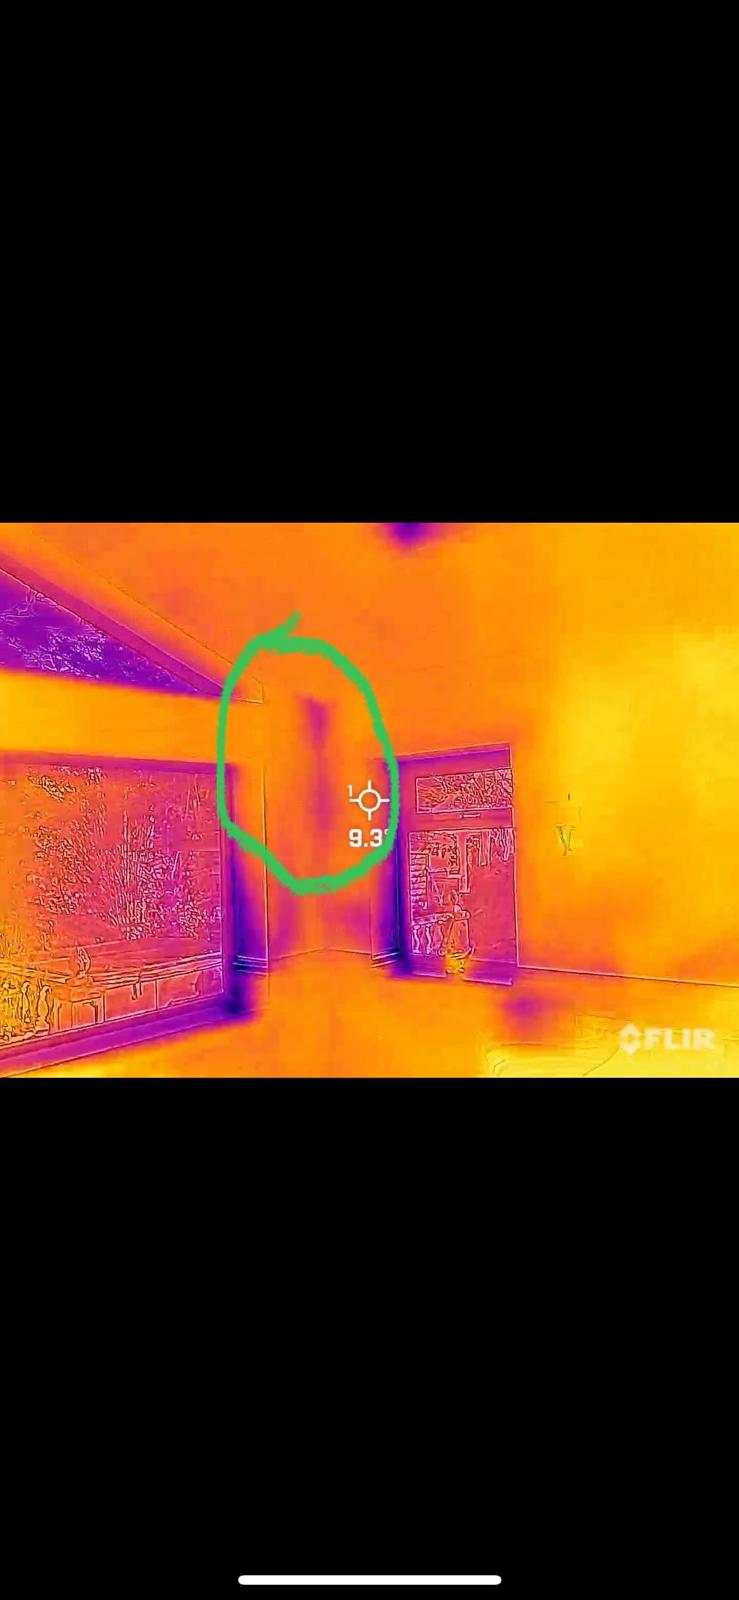
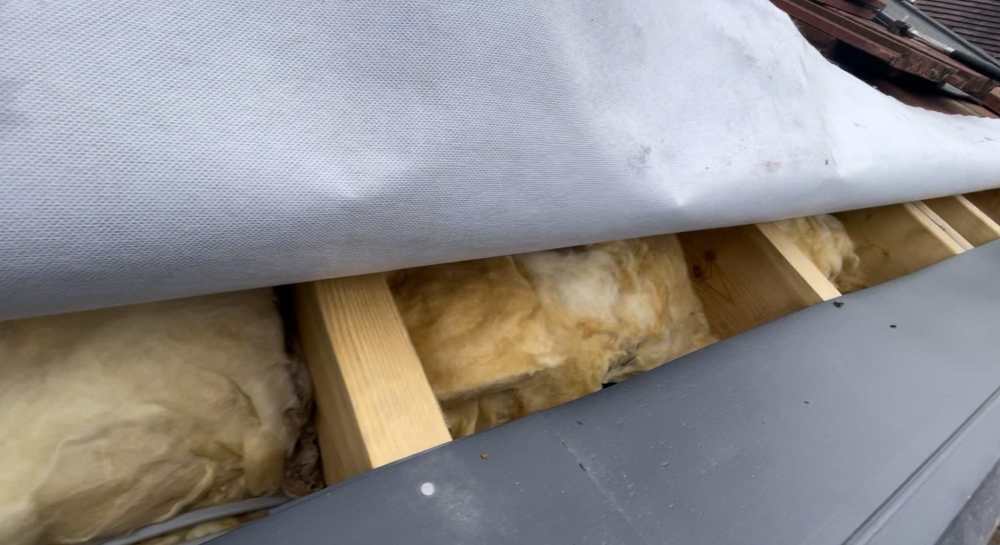
i'll be up in the eaves insulating today so did a quick video this morning with the thermal cam to form the before portion of a before / after. Figured I may as well share it should anyone else be struggling with the same issues and comes across this thread maybe it'll give some good insight, there are obvious very cold spots in the walls / roof still that i'll be continuing to address from the exterior. I'll do another one of those after i've done all my insulating / sealing today and (hopefully, dear lord) it makes a difference. Thermal imaging with air gaps rectified, insulation not yet rectified Thermal Interior-1.mp4
-
thanks for taking the time to comment. We've had a tightness test done and it wasn't as bad as I thought, main culprits were under skirts (now sealed) gaps between wall and window frames in the revels (now sealed)... sockets (now sealed)... and weirdly the door architrave leading back to the rest of the property (now sealed). I think i'll have a decent level of access for the cold spots from the exterior, that's what im hoping. Plan today is to get up there in the eaves and properly insulate / seal everything I have access to. Trying to minimize interior works where possible.
-
Cool, probably a silly question but does it have to be PIR type up there or could I use rockwool slabs / rockwool rolls? as it already has 150mm kingspan, this is just topping it up. Though wasnt sure if wool is the wrong material to use up there if it gets damp etc?
-
thanks both, Well then i'm hoping the PIR below the stepped dpc thing IS tighter to the inner leaf blockwork but i guess that's gonna be real tough to confirm. I've got a few roofer quotes to just de-tile/de-baton/de-felt the entire roof for me. I think im just gonna go ahead with that. and foam / tape all the gaps I find in the roof insulation Question though - If the roof rafters are 200mm thick and the roof kingspan between them is 100mm fitted towards the lower side. Will it be fine for me to add another 50mm insulation ontop so long as it doesn't block the cavity for air flow between rafters and felt? Just thinking while the roof is bare, can't hurt for me to throw some more insulation in there.
-
Is it fine that they've sat insulation atop of that then? Maybe that's the why the pieces are wobbly and not up tight against the inner leaf.
-
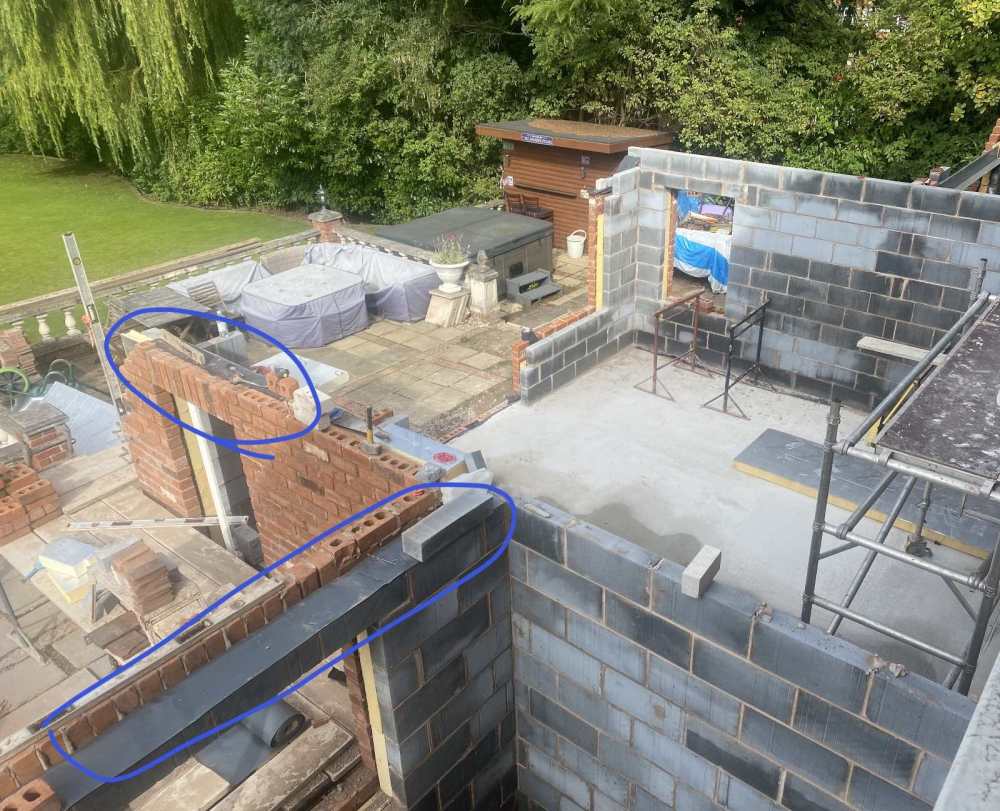
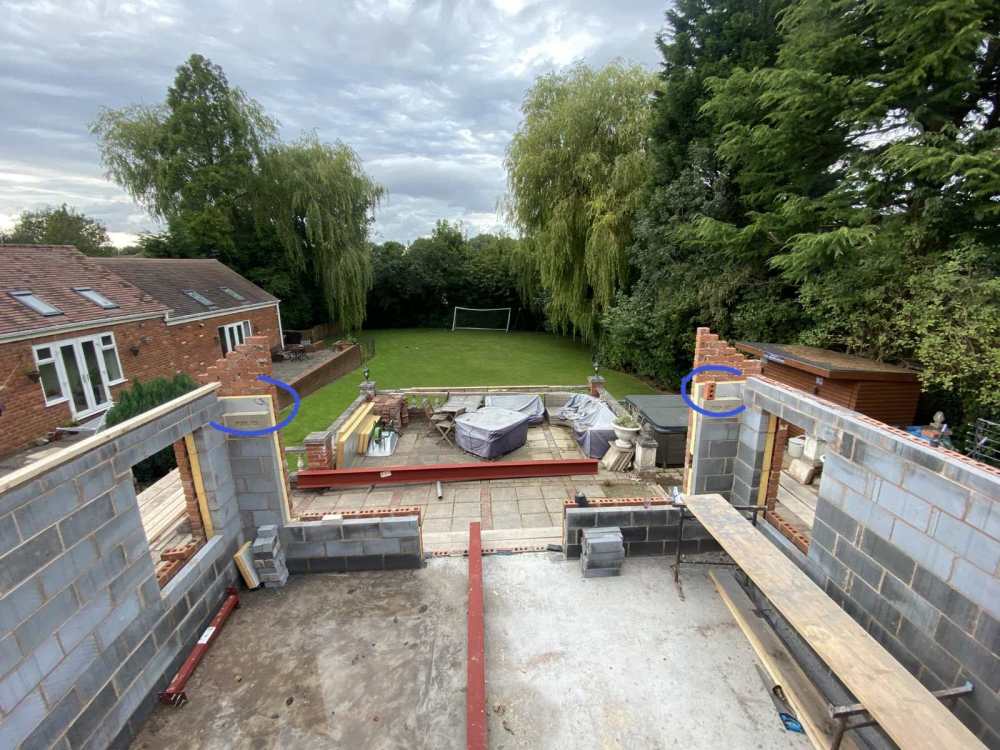
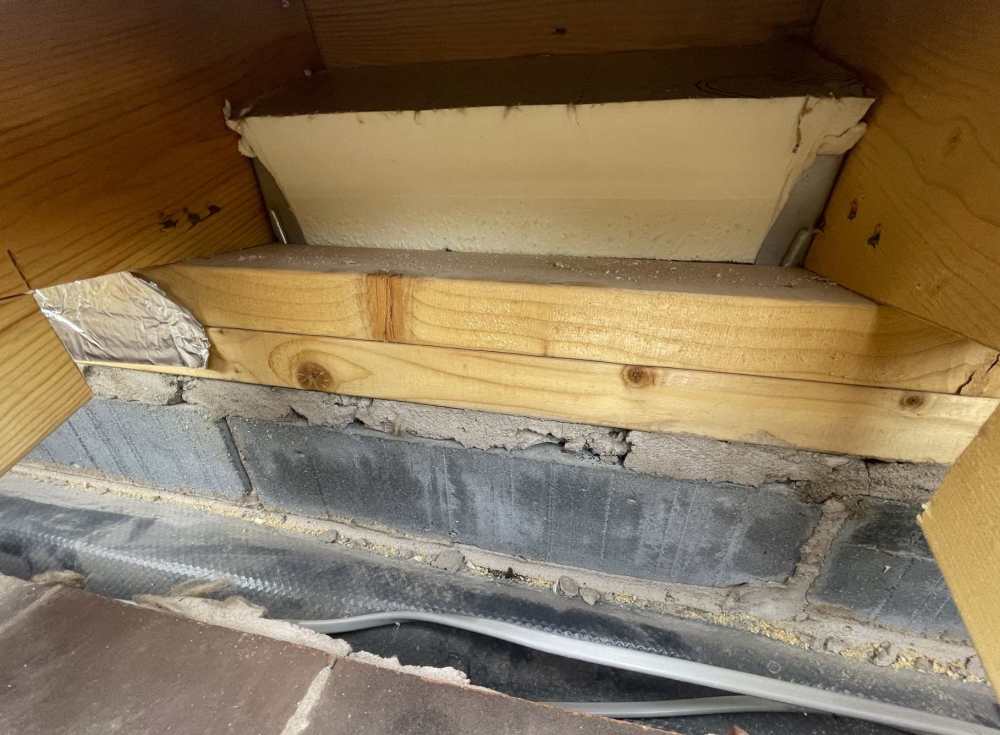
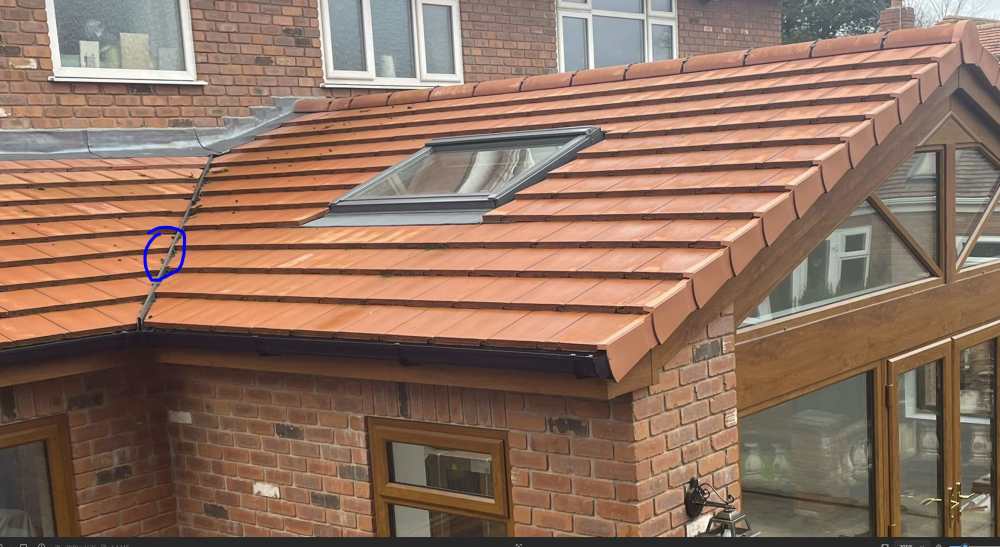
Another update on this one, So I took a look at another portion of the roof to compare. Had the same problem with gaps in the insulation and wall plate etc. But also noticed something interesting when I dug a little deeper. Beneath the wobbly pieces of wall PIR insulation, they looked to be sat atop of a black material that i'm wondering is a cavity closer? Video below. cav_closer_maybe.mp4 Looking back through the WIP videos of the building stages. Im guessing the blue circled stuff is what im seeing in that video? I assume that's a cavity closer? If it is , then based on these 2 images and difference in height between kingpan and inside leaf, it looks as if for whatever reason they've closed the wall cavity, then added another half a course of block, then added the wall plate, then sat another piece of PIR insulation atop the cavity closer. Is that weird? and is it an issue or fine?