


_Alex_
-
Posts
19 -
Joined
-
Last visited
Everything posted by _Alex_
-
Thanks a lot @Temp and @SteeVeeDee, Asking the manufacturer sounds like a great idea! The windows are not structural, they do not support any part of the house.
-
Thank you @JohnMo! I would prefer to remove some intermediaries and work with a proper builder (which is who in the end does all the work), providing proper windows. And for that I need to order them myself.
-
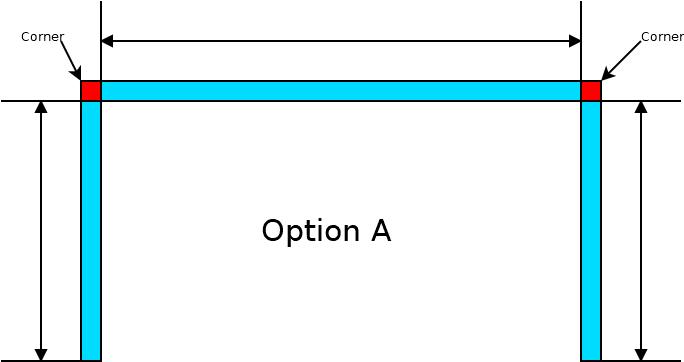
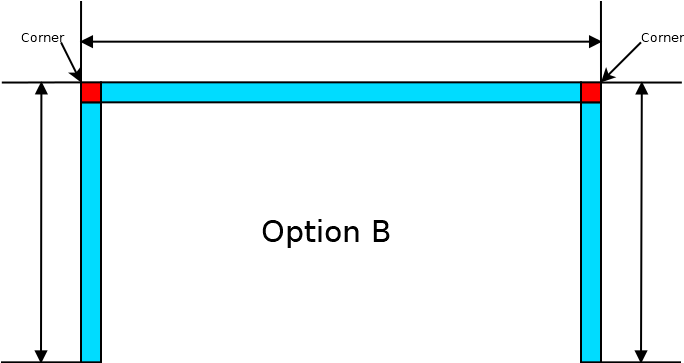
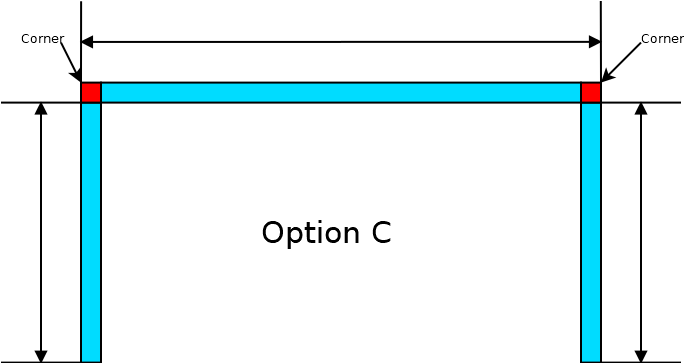
Hi, We have some 90 degree bay windows in our house which we bought last year (in UK). We want to replace them with new uPVC windows. I know this might look silly but my question is: How do you measure correctly bay windows? Is the correct way the "Option A" below, where you do not take into account the external corner part of the window: Is the external corner taken into account for all windows, like in the "Option B" below? Or is done in a different way, like measuring the main long window taking into account the external corners, then the smaller side windows are measured not taking into account the external corner, like in the "Option C" below? If someone with experience can please let me know what is correct way, I will be able to avoid ordering the wrong windows. Best regards and thanks in advance, Alex
-
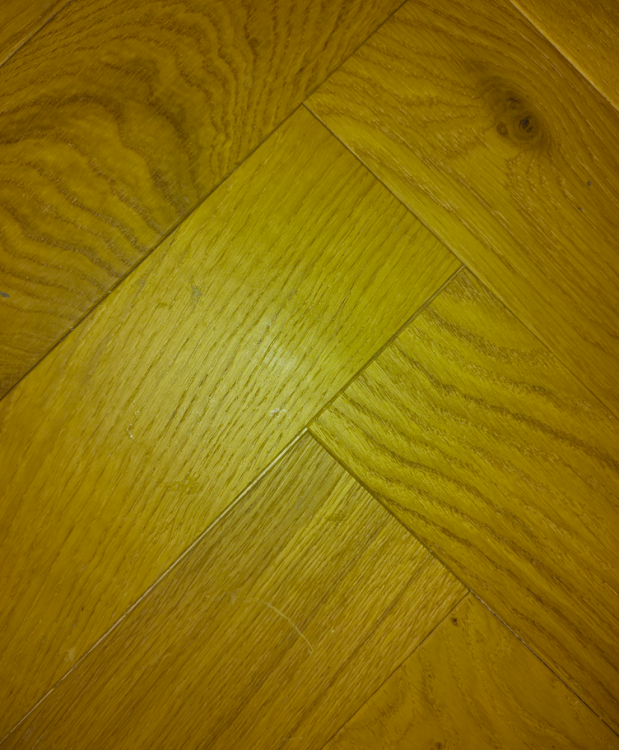
Hi, I am installing engineered Herringbone flooring (8cm width x 30cm height x 1cm thick). I watched a lot of videos on this topic. I also followed the advice from a professional builder, to first put a central line using a laser (like in the image below), and let it dry overnight before continuing to work on the sides. I can tell this method helps a lot, but I still have some small gaps and misaligns as a consequence of the central line not being 100% correct. These small imprecisions propagate into other rows later leading to small gaps. I would like to know possible advices for a DYI guy like me (even if they are overkill) to achieve a more precise installation of this central line. Some options I am thinking of: Together with the central line, and before it gets dry, add 2-3 rows (not glued) of flooring on each side, so I can see possible misaligns and "trace them back" to the central line, fixing while still not dry. Draw a template on the floor beforehand and make sure each piece of flooring is properly aligned. Any advice will be welcomed, thanks in advance! Alex

-
How to fill small gaps in Herringbone flooring
_Alex_ replied to _Alex_'s topic in Wood & Laminate Flooring
Thank you so much @Alan Ambrose and @markc! I think for the time being I will follow your advice and ignore the gaps. -
How to fill small gaps in Herringbone flooring
_Alex_ replied to _Alex_'s topic in Wood & Laminate Flooring
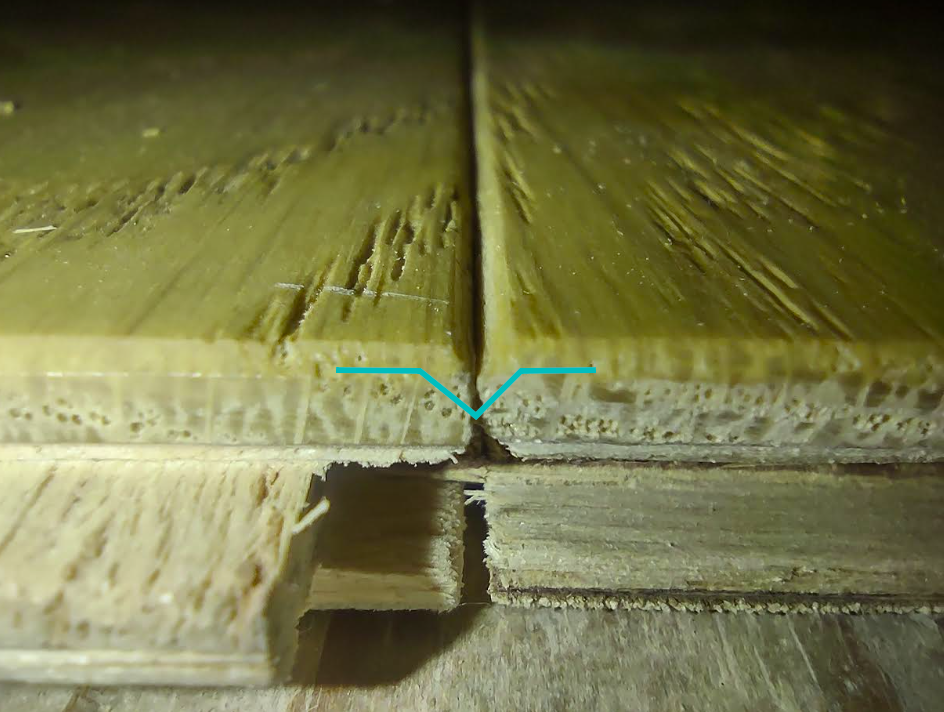
Thank you so much @Big Jimbo for your help! I am ignorant but agree adding the micro bevel back sounds like a nightmare. I wonder if there is a way to cover or fill those gaps one by one keeping (more or less) the micro bevel. What I can think of: Use masking tape around one gap. Fill the gap with the wood dust + wood filler mix (I would generate the wood dust by sanding the spare floor boards I have from the floor installation separately, so I do not touch the installed ones). Then use some "V" shaped tool which allows to cut a shape similar to the micro bevel? I would do some experiments on a few floorboards I would prepare separately with small gaps on purpose, to see how well it works (or if it works at all ). Alex -
How to fill small gaps in Herringbone flooring
_Alex_ replied to _Alex_'s topic in Wood & Laminate Flooring
P.S. The Herringbone flooring is engineered wood. -
Hi, I am installing glued Herringbone flooring. I followed advice from a professional builder who adviced to do the central row, let it dry overnight and continue the day after. I used a laser and watched a lot of decent videos on how to do it. However, as a DIY doing it for the first time I have some small gaps (see photo below). After some googling I can see there are several options to fill the gaps but I am not sure which one is better. All follow the approach below: Sand the floor with a 100 / 120 grit and keep the wood dust. Mix the wood dust (prepare a thick consistent mix) with either: Solvent-based wood filler (Berger Seidle Solvseal Pafuki Super). Water-based wood filler (Bona Mix & Fill, can fill gaps up to 2mm). Spread it with a trowel filling the gaps. Let it dry. Finally, sand again. Question 1: Are there any options to fill those gaps which preserve the wood colour? (I can see in some cases the wood loses a lot of colour, perhaps is a wrong understanding from my side). Question 2: Are there any approaches where I fill gap by gap (as I don't have many). Question 3: The floorboards I use have a small indent at the edge (see photo below). Would this be bad for any filling method? Thanks in advance for any advice! Alex
-
Correct way to install XPS insulation boards on top of plywood?
_Alex_ replied to _Alex_'s topic in Wood & Laminate Flooring
Thank you so much @marshian and no woreries, The reasons behind ruling the correct way of doing it are varied unfortunately: lack of experience on this specific topic, not very happy to cut open the downstairs floors during winter, and lack of time as this at least in my DIY opinion, would take much longer than laying down some XPS and plywood layers. Just in case, I finally opted to follow Option 1 but I used nails (ring-shank) on the plywood layer as the glue was not strong enough. Time will tell if it was an acceptable choice. Alex -
Correct way to install XPS insulation boards on top of plywood?
_Alex_ replied to _Alex_'s topic in Wood & Laminate Flooring
Thank you @Beau! this could be a great option. After reading some sections of the Jackboard installation guide, it seems the boards have to be either glued down or fastened. This makes me think the XPS panels should be installed in a similar way, instead of just laying them down. Best regards, Alex -
Hi, I will be installing Herringbone engineered wood floors (10mm thick) on top of timber subfloor on a first floor on a house. As the Herringbone wood floors are small, the manufacturer insisted on gluing them down. I would like to put as well some insulation between the engineered wood floors and the timber subfloor (unfortunately, the correct way to insulate, by putting a thick thermal insulation material below the timber subfloor between the joists is ruled out). I have an idea on how to install each layer, but the XPS. Option 1: The manufacturer mentions to just lay them: Underwood installations using a Fastwarm XPS insulation board are laid directly on to a clean, dry level subfloor in a brickbond pattern (boards are joined together using our heat resistant duct tape). (source https://www.fastwarm.com/fastwarm-10mm-xps-insulation-boards-11107-p.asp ). The different layers would be as below: --------------------------------------------- Herringbone floor (10mm) --------------------------------------------- Plywood (4mm) --------------------------------------------- XPS boards (Fastwarm) (10mm) --------------------------------------------- Timber subfloor (18mm) --------------------------------------------- Option 2: I read in several forums the best way to install such panels for wood floors is by gluing them down with a polystyrene adhesive (solvent-free). In that case I would avoid gluing them directly to the timber subfloor, adding another thin plywood layer, with the layout being: --------------------------------------------- Herringbone floor (10mm) --------------------------------------------- Plywood (4mm) --------------------------------------------- XPS boards (Fastwarm) (10mm) --------------------------------------------- Plywood (4mm) --------------------------------------------- Timber subfloor (18mm) --------------------------------------------- My questions are: Should option 1 or option 2 be avoided for some reason? Would option 1 lead to squeaky / raised floors as nothing is holding the XPS boards down? Would option 2 end up cracking the XPS panels as they adhere to wood which can warp with time? Any feedback / opinions will be welcomed. Thanks in advance, Alex
-
Insulation foil between timber sub-floor and plywood sheets?
_Alex_ replied to _Alex_'s topic in Wood & Laminate Flooring
I think this thread was extremely helpful and I want to thank everyone for all the help. I am sure other non-expert DIY people like me will come across it in the future and all the information will be of great help. Best regards, Alex -
Insulation foil between timber sub-floor and plywood sheets?
_Alex_ replied to _Alex_'s topic in Wood & Laminate Flooring
Thank you so much @Iceverge for your huge hep, this incredible message rounds all the other messages in this thread and makes this much easier to understand for me. -
Insulation foil between timber sub-floor and plywood sheets?
_Alex_ replied to _Alex_'s topic in Wood & Laminate Flooring
Thanks a lot @JohnMo, @saveasteading, @torre and @Redbeard! I understand the correct way of achieving proper insulation is through the subfloor void but unfortunately that will take time, effort and skill beyond what I have. I will reach as well two people I know who work in construction (although they are not specialized on flooring) for more feedback. I had one last question: In the case of the floor layout below --------------- Engineered wood (10mm) --------------- Plywood (around 10mm max) --------------- Professional Sonic Gold underlay (7mm) --------------- Timber sub-floor (18mm) --------------- Does anyone know of any material which could replace the plywood (meaning it is about 10mm thickness maximum, rigid, can be nailed down to the sub-floor and can stand large weight loads on top) which has also good thermal properties? Thanks everyone for the huge help! Alex -
Insulation foil between timber sub-floor and plywood sheets?
_Alex_ replied to _Alex_'s topic in Wood & Laminate Flooring
Thanks! For me to understand: I would use the same layout, but replace the insulation foil with PIR, is that correct? (timber sub-floor | PIR board | plywood sheet | engineered wood floors). Also (and pardon my ignorance), some PIR boards are made of foam which would make the floor unstable. Are there any boards offering thermal and acoustic insulation (and ideally not flammable) which are solid and rigid enough to put below the plywood sheets? Perhaps https://www.sruinsulation.co.uk/acoustic-floors/rockwool-rockfloor-acoustic-slab-25mm ? Thanks again, Alex -
Insulation foil between timber sub-floor and plywood sheets?
_Alex_ replied to _Alex_'s topic in Wood & Laminate Flooring
Hi, Yes, the layers would be: Timber sub-floor (18mm). Insulation foil on top of the timber sub-floor. Plywood sheet on top of the insulation foil, nailed down to the timber sub-floor (with the nails going through the insulation foil). Herringbone engineered wood floors on top of the plywood sheet, glued down to the plywood sheet. Thanks, Alex -
My bad, I meant DIY (this is even more meaningful of my skill level 😄). 100% agree some advice from talented people will allow me to achieve things I would never be able to do by myself.
-
Hi, I want to install Herringbone engineered wood floors (10mm thick) gluing them onto plywood sheets. I have timber sub-floors. I wanted to know: Is is possible to install insulation foil (like Sonic Gold) between the timber sub-floor and the plywood sheets? If that is possible, what would be a recommended maximum thickness for the insulation foil? Thanks to anyone giving advice, Alex
-
Hi, I am Alex and I am just a regular DYI guy. We recently got a house which we are refurbishing. I am trying to do as many things as possible that I think I have the chance to do at an acceptable level, which are not a lot

