Frazer G
-
Posts
23 -
Joined
-
Last visited
Frazer G's Achievements
Member (3/5)
1
Reputation
-
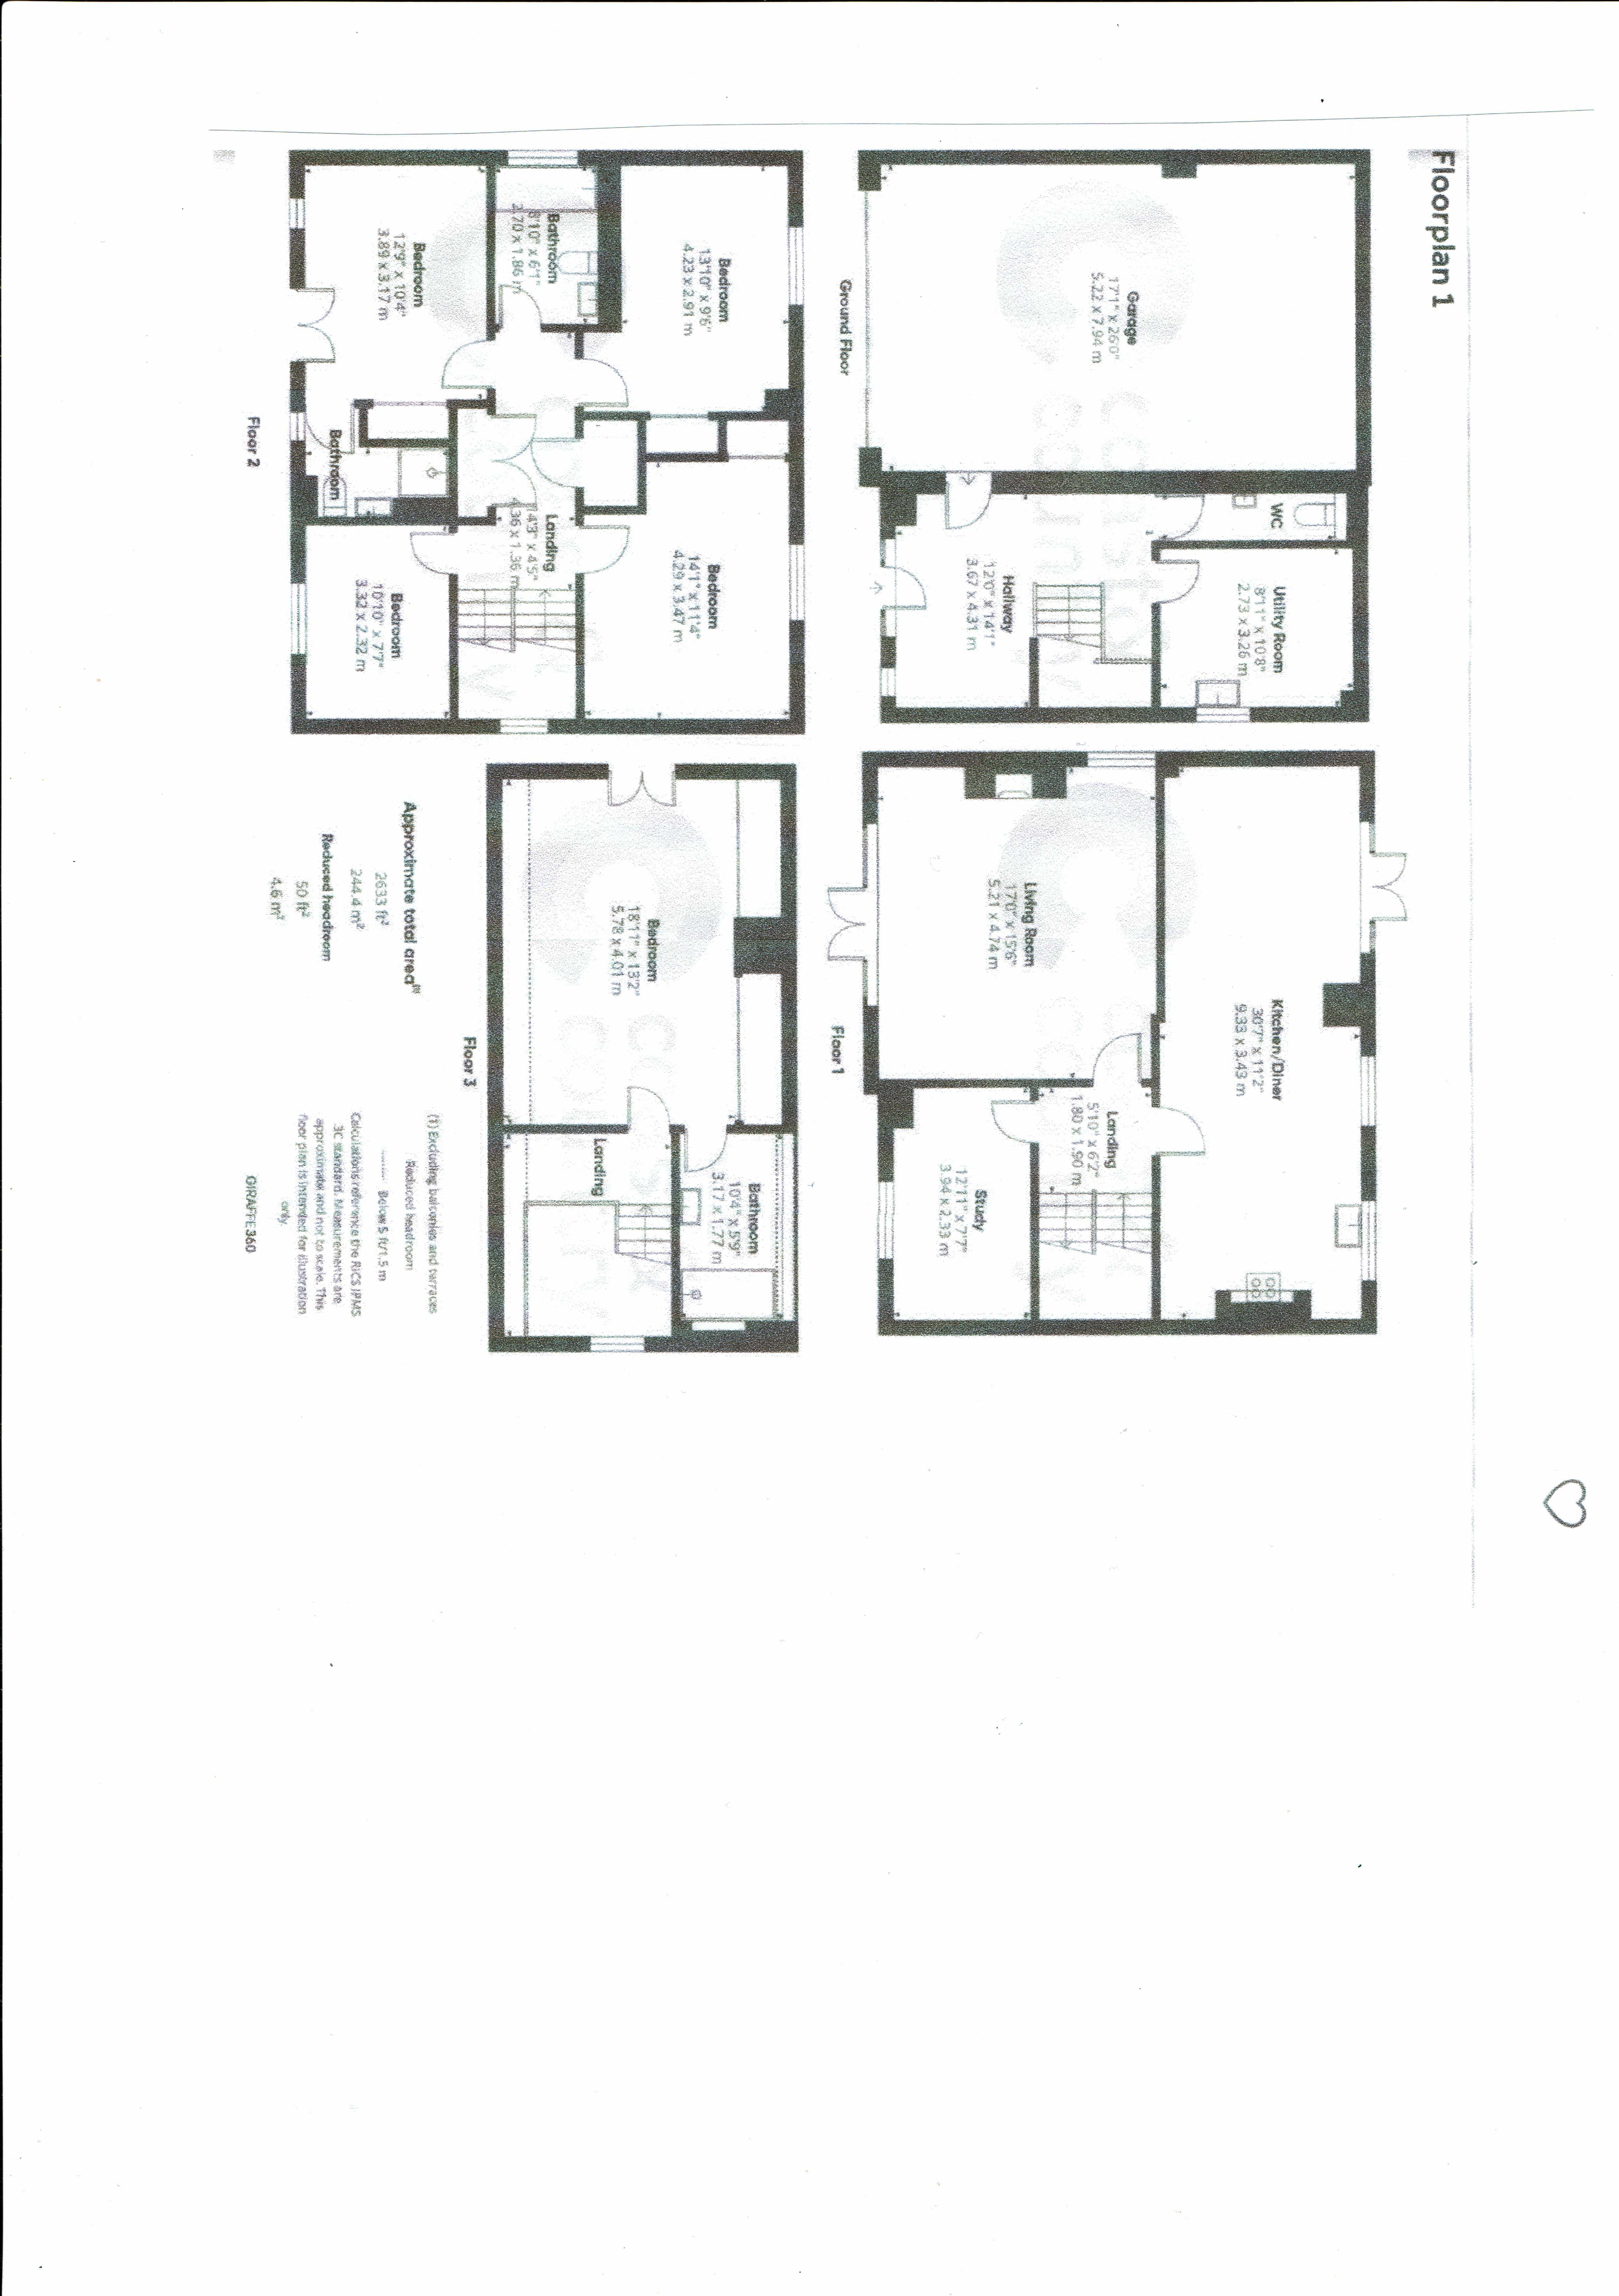
My daughter is considering a house purchase and one consideration is the possibility for a pool room in the integral garage. The garage is 17 x 26 ft. The proposal is to build a stud wall across the garage leaving plenty of room for two cars and have a decent sizer pool room for a pool table. The garage currently has the entrance for vehicles and a single door gaining access to the residential area of the house. In the proposal this door would be within the vehicle part of the garage and access to the pool room via a door in the stud wall. All the usual fire precautions are taken as read with certified electrics etc. The questions are, would the resultant room be classed as habitable space or non-habitable and would it need a second exit. There is no possibility of a second exit into the house area (existing layout drains etc) so it would need to be to the exterior of the property. There are currently no windows or door other than the two mentioned above. This is a simple job at the non-habitable level but becomes very complicated (and expensive) if classed as habitable - or so it seems. All comments and advice would be appreciated.
-
New vinyl plank flooring on old kitchen tiles
Frazer G replied to Frazer G's topic in Wood & Laminate Flooring
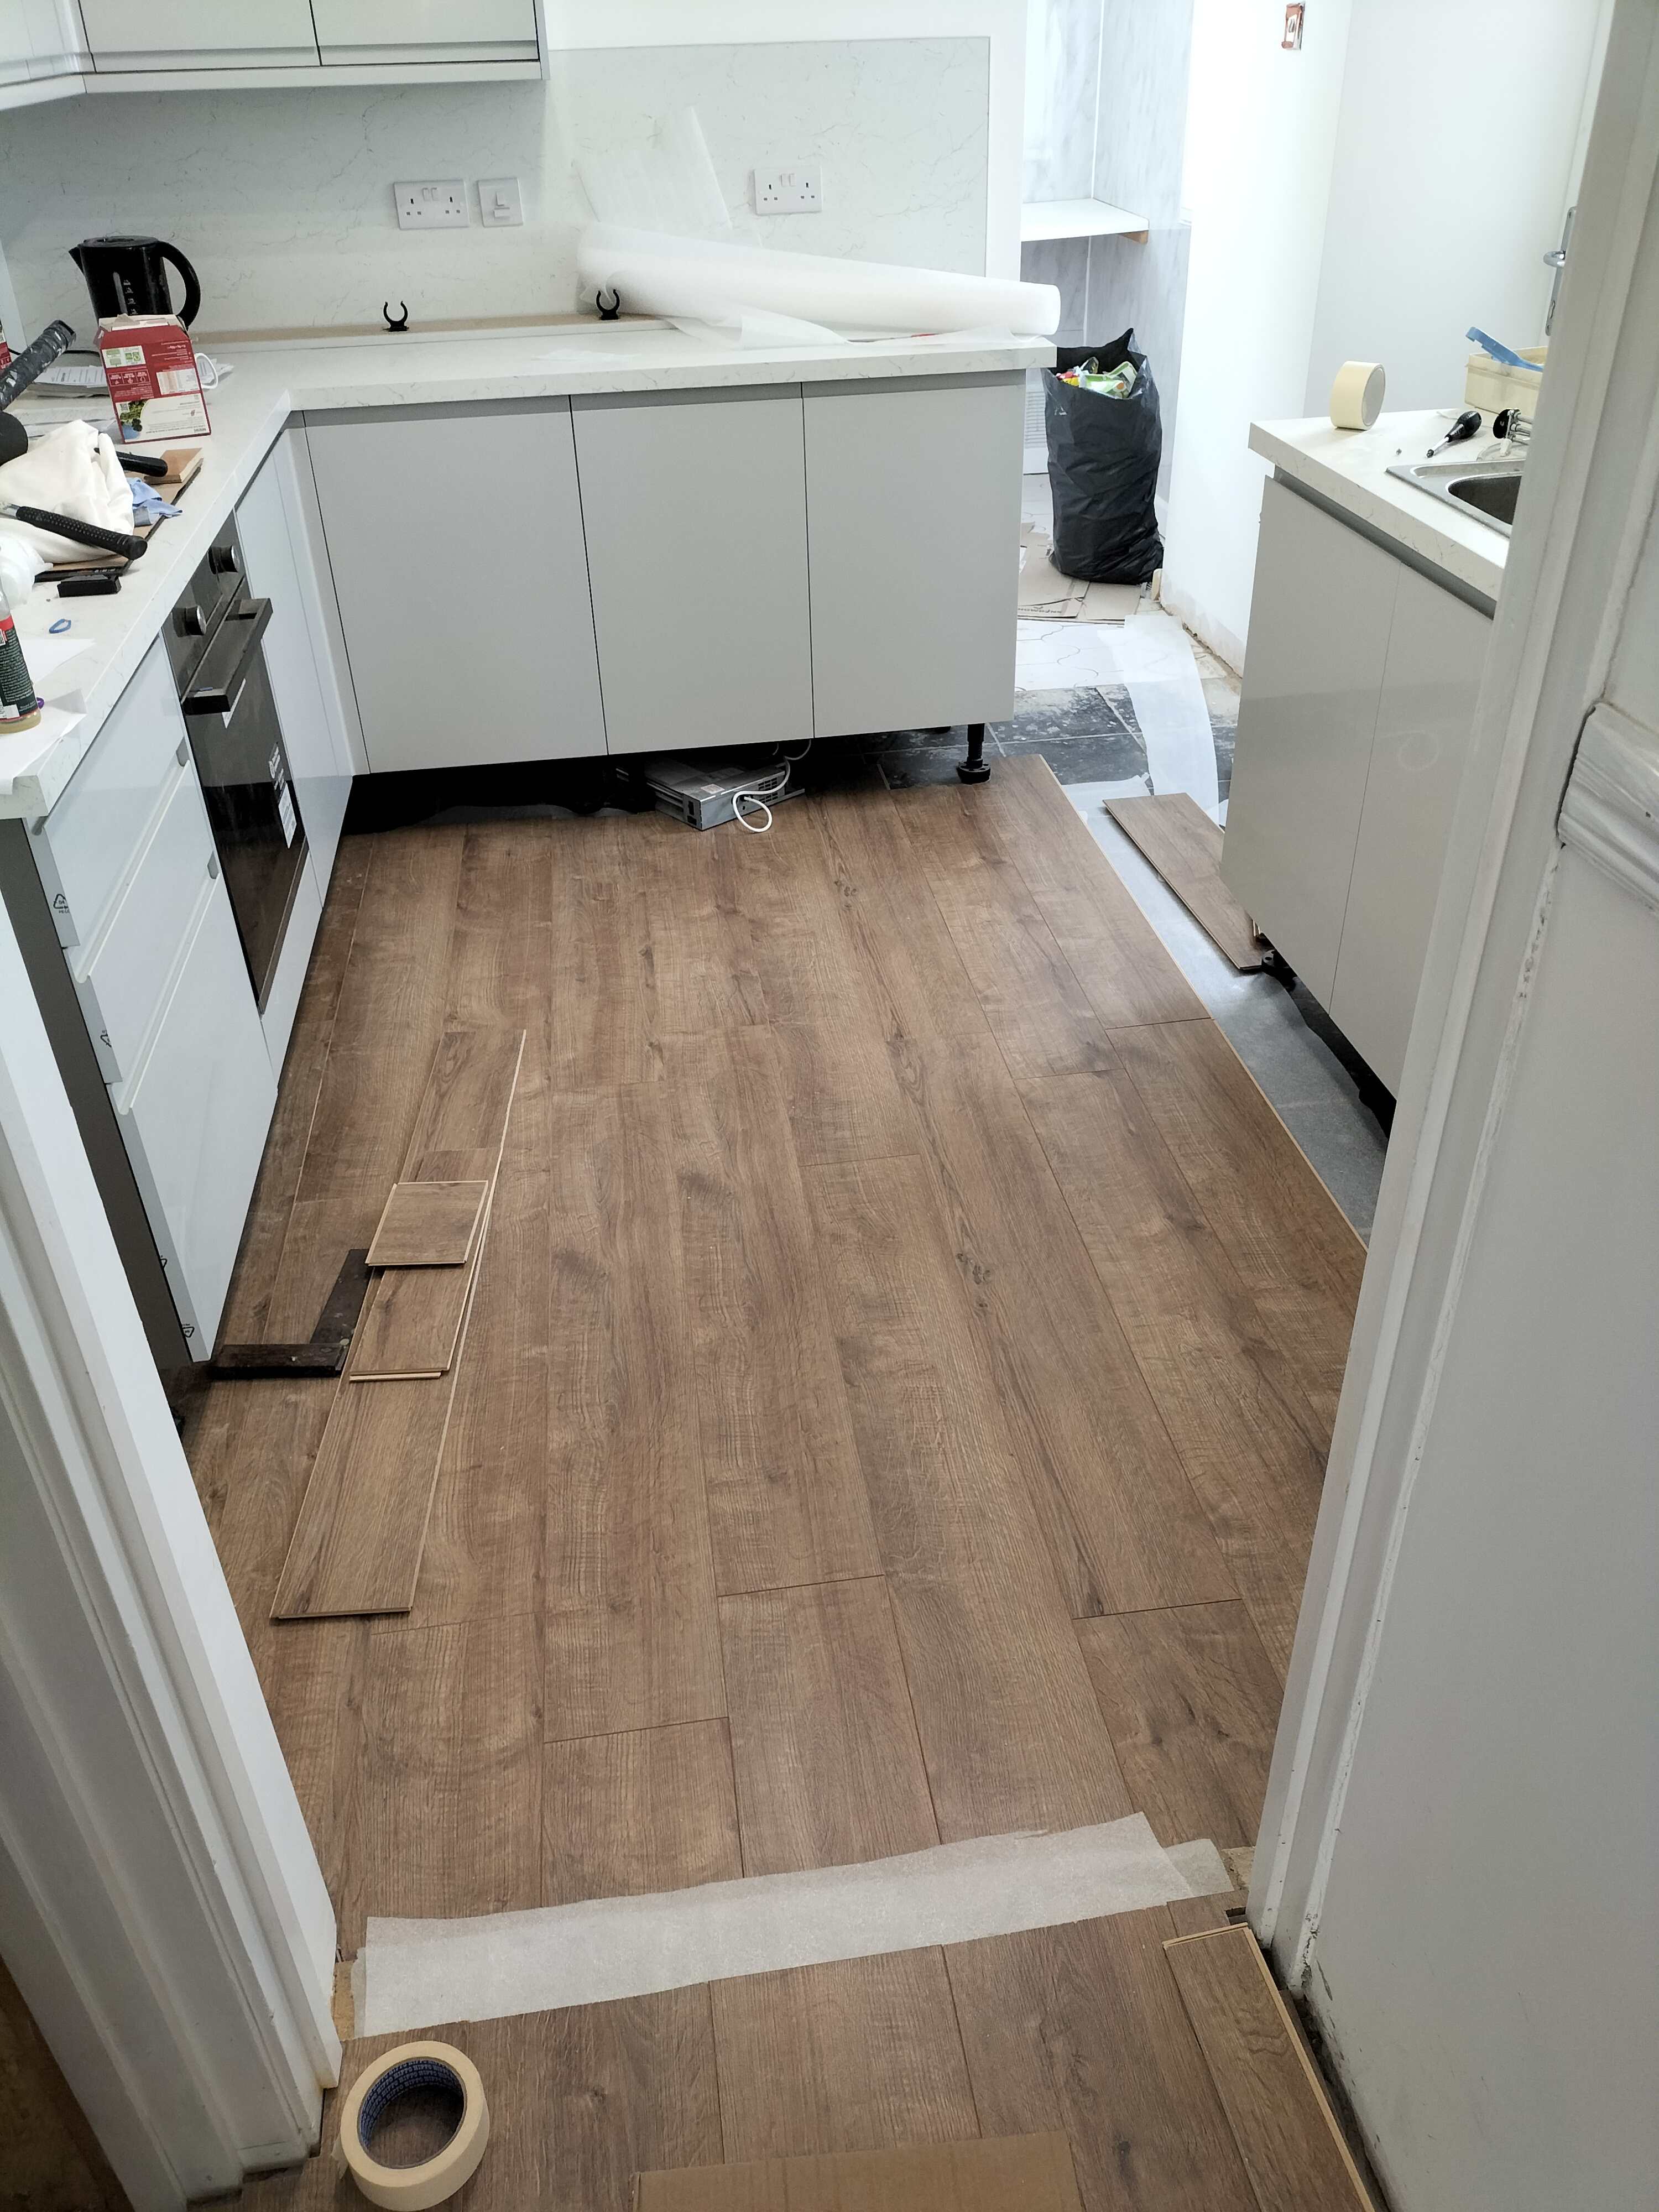
Thanks for all your inputs. I didn't "stand" the legs on the planks as I thought that would definitely stop any chance of expansion / shrinkage But I like the suggestion of putting a retainer on the left and right so that is now my plan. If there are reports of a kitchen floor making its way up the M5 you will know where it came from! Thanks -
New vinyl plank flooring on old kitchen tiles
Frazer G replied to Frazer G's topic in Wood & Laminate Flooring
The floor area is about 2 x 3m plus the "hidden" area under the units. The kitchen units are on 3 sides
-
I have laid a new floating vinyl floor (click planks) over old kitchen tiles which were flat but badly marked. I can't reach all the way to the back of the kitchen units so the new flooring ends just inside where the plinths fit. The only down side is I can't meet the usual expansion gap criteria ( the actual gap is probably about 300mm so obviously no worry about any minor thermal expansion!) but as it is a floating floor I am a bit worried it may move too much. I am thinking of gluing some pieces of wood around the edges of the floor where I can reach under the kitchen units and generating a "false" expansion gap between these pieces of wood and the new flooring. I would pack this gap with cork or foam. Would this solution work or is there a better way? For the record the kitchen units are in perfect condition so no reason the disturb the whole installation.
-
I want to lay vinyl plank flooring in a hallway which has a surface which is is quite rough, bumps and hollows up to 10mm locally. At one end of the hall it also has a slope across the width (about 1.2m) of about 10mm over a length of about 2 meters. I have purchased Everbuild universal levelling compound as I was advised this would be suitable but now I have doubts as it says on the bag "depths of up to 6mm". My questions are~: would this compound be acceptable to fill local 10mm deep hollows and if not what should I use to reduce the excessive depth of the deeper hollows so that I can finally use the compound I purchased as a normal self levelling coat. In relation to the "lateral slope", could I use a pre layer along the last 2 meters to raise the "downhill" side of the hallway where the slope is greatest to reduce the total slope to less than 6mm and then apply a second general coat of the self levelling compound to give an even level surface. The base material is concrete with some odd tiles partly buried from previous activities. Wholesale removal of the floor in the "start again" principle is not a viable option due to buried services and maybe the odd skeleton of a previous occupant (the property is very old!).
-
ETC that is exactly the objective with a major BUT if the rising damp is endemic in a random stone built wall about 18" thick short of total demolition it is impossible to stop, french drain (been there), external cladding (been there as well) so the key is to let the damp do what it will do anyway but protect the inner occupants from it's effect. Air circulation in the generated cavity will prevent unpleasant smells, mould etc. The key is to make the barrier as effective as possible hence my question as I have not used this material previously. Saveasteading I am trusting that the PIR which is foiled on both sides tightly packed between the studs and foam sealed will in effect be the inner layer of prevention as you suggest. The second barrier which will leave an air gap between the inner surface of the PIR and the PB will allow for the secondary air circulation. The only issue I have is the uncertainty if the PB fixed to the studs (effectively they are acting as battens) will be if the fixing will squash the foil at the fixing points (it obviously will not squash the portion between the studs) so that the PB is solid to the touch. I would prefer the 4mm thickness from a thermal perspective (either will give the same moisture resistance) but I am concerned the thickness will not squash sufficiently to give a "hard fix" to the PB. In regard to the floor it is suspended wood so there is no direct contact with the ground.
-
I have been working to "cure" damp in a house with random stone walls. The recommendation by a damp "consultant", who's suggestion was supported by local building control, has been to construct a stud wall withing the house leaving an air gap so there is no physical contact with the external wall.. The damp is thought to be a degree of rising damp with the added effect of condensation on the cold stone. The stud wall has been built (2 x 4" timbers floor to ceiling) and the spacings between the stud will be filled by 25mm PIR (I might use 30mm where space allows) which will be set back slightly within the stud frame to leave a gap between the internal surface of the PIR and the subsequent plasterboard . All the gaps etc will be taped or foam filled. My plasterer recommended that I also use a layer of aluminium foil insulation (the type with an internal bubble gap) before I fit the plaster board. I have researched the options which seem to condense into two types, one is around 4mm thick and the other about 1mm. My concern is if I use 4mm (the best for insulation) will the plasterboard squeeze the bubbles to ensure that the plasterboard does not "float" but is tight and rigid to the stud work. I would be using normal drywall screws. Given there is minimal price difference I want the solution which will not give me a problem later.
-
Some forum users may have seen my questions before but unfortunately I have had various suggestions which I am trying to distil into a positive action plan. At times recently I have felt like someone in a strange city who askes for directions from a local trader, only to be told "well I wouldn't start from here!". So, my current "here" is the wall of the old house I am renovating which is random undressed stone built in about 1890. I am renovating it principally to reduce damp issues. It has been stripped of all old plaster, patched where major cavities were found using a 3:1 cement mortar, and "painted" with a waterproofing slurry (Sika) as per their guidance, approximately 2 - 3 mm thick. So far so good. Now at this point all the "guidance is to fit a mesh membrane and plaster on top of that. There are endless "how to do it" guides but none cover walls as described below. It is virtually impossible to use mesh on such uneven walls due the difficulty of fixing it to random stone. I need to prepare for the final plastering (which I will not be doing as I am not a plasterer). The wall is, as stated, random stone and now, after application of the waterproofing slurry has a surface which is sound but has bumps and hollows, in some cases 20mm deep, peak to trough. The final surface render / plaster, after completion will be approximately 15mm - 35mm thick due to the undulations between stones. It seems to me that given the primary objective is to reduce / eliminate damp in the wall it could either be a) rendered with thick bonding plaster / render with a waterproofing additive prior to a final skim or b) a moisture barrier plasterboard be stuck to the wall, again to be ready for a final skim. If option a) what exact type of render should I use with what additive, how many coats for these thicknesses etc? If option b) how would the plasterboard be fixed. Dot & Dab can't be used with foil backed PB (as I have read) on its own. I have also read the it can be used with D&D if the foil is painted with SBR and allowed to partly dry. I have also read that a foam PB adhesive will work on foil backed PB but will that be OK with the bumps & hollows described. Finally will the PB need mechanical fixing for safety? Drilling into random stone is extremely difficult as many will know because the drill tends to slide away from stone surfaces which are angled and old lime based "mud" cements will not hold modern screws and plugs (drilling through the waterproof slurry would also defeat its purpose). Why use option b) with all the questions? IF the problems can be overcome it would be much quicker, need virtually no drying time and provide a perfectly flat surface for the plasterer to finish the job. Is a combination of a) & b) feasible. A thinner coating of plaster / render to flatten the surface (all questions about option a) are still valid), which would then be suitable to use foam adhesive without mechanical assistance??? Would this generate other questions about using foam adhesive on foil-backed PB which I have not thought about??? I can't be the first to face such a problem, there are thousands of similarly built houses, so how would forum experienced members address my problem without saying "well, I wouldn't start from here!.
-
Some time has elapsed since mid November but work has been progressing (even if slower than planned!) and most of the suggestions from scotishjohn and iceverge have been incorporated into the lounge / hall areas so I am happy that there is a good solution in those areas. But ... there is always a "But" , I have now been looking at the entrance hall. I have considered the same solutions as the lounge regarding floor covering but because the area will experience the heaviest foot traffic and highest level of "dirt" I am reluctant to use carpet. The old carpet which has been removed was pretty disgusting! My preference is either an engineered wood solution or a good quality vinyl tile. However the problem is much the same for both options. The floor, now exposed, has a multiple range of historic finishes from paint to odd "plastic" tiles etc and has evidence of damp (where in this house is damp not an issue?) so a solution needs to be found. The random tiles can be removed using a hot-air gun but will leave a "tar-like" residue. As a little extra at one end of the hallway (it is about 10m in total length, about 1m wide) it has an "interesting" sideways gradient of about 25mm for no obvious reason. The gradient is fixable of course but a measure (no pun intended) of the unexpected issues I have found! Are there any suggestions as to how I could treat this floor (bearing in mind what has been done to the walls) so that either wood or vinyl could be used without the damp being a problem. One option I have considered is to put in a false floor on 25mm battens to allow air to move under the floor but I am not sure if I do that whether the floo2 should be sealed first?? Just for the record ripping up the existing floor is not a practical option, either physically or economically.
-
Thanks for all the input. I am familiar with French drains as I did one for my daughter in Cardiff where the water was running down hill and meeting her property wall. It is a very successful method where the site allows it but in my current case the house is on a hill with the water running away so we are talking about residual ground moisture not a water table as such. I have chatted to my local building control team about this as contrary to many views in my experience if approached they are a mine of information based on local knowledge. They have suggested "off the record" that in the area of town all the houses circa 1890 were rough stone quarry waste and a type of coarse lime mortar and as such I and my children's children are unlikely to see it dry! A solution which they would approve but which does not need a formal application due to the size of the project would be to seal the existing wall with PVA if the surface is dusty / loose and then build an insulated stud wall with a gap between new and old to maintain air circulation. Strangely having previously costed the tanking etc I have found that the new option is actually cheaper although cost was not a factor as I want it right not cheap! Regarding the concrete floor they were less convincing so I will probably follow Iceverge suggestion and use a decent quality carpet instead of the wood intended
-
Hi Scottishjohn I am guilty of not finishing the story. After the stage of applying tanking slurry i will be fitting a mesh membrane (damp proof) which will then be plastered (not by me). My question only related to the tanking slurry part of the job. It was suggested to me that the tanking slurry would be easier to apply over a smoother surface than the random rock finish I am left with after removing all the old plaster.
-
Thanks Scottishjohn, I have removed all the very loose plaster but I could actually keep raking until the house falls down. The builders of the day were apparently using quarry waste stone so the wall has every size but given the walls are about 2 ft thick they could get away with that "technique" - one occasion where quantity outweighed quality. What I need to do having removed all the surface and immediate loose mortar is stabilise what remains and fill any areas where the smaller stones have fallen out. I have read that a 6:1:1 mix is better in a stone situation as it is slightly more breathable than a full strength 3:1 mix and the lime content helps it "stick" in the cervices. While the stones are hard and distinctly non-porous the mortar is the exact opposite and the source of the damp issue hence my desire to ask for the best options.
-
I have taken all the old plaster off an internal stone wall Which is now clean but uneven as the stone work is old with random sizes. I am proposing to carry out three elements of initial treatment. 1) apply a coating of dilute PVA to "seal" the mortar (hopefully will spray it on) 2) I will "flatten " the wall with a thin coat of 6:1:1 render (sand : cement : lime). 3) I will apply two coats (recommended) of tanking slurry 4) Apply a damp proofing membrane The finish will be battens with PIR insulation between and plasterboard with a final skim of normal finishing plaster. Can anyone confirm or otherwise that this is a reasonable approach to damp proofing an old stone wall? My second question is that in the same property there is a concrete floor of indeterminate age. Inspection seems to confirm that it is sound (no cracks) and visually "OK". However I am uncertain as to it's damp proofness although it seems dry. Should I apply a coating of some sort on the "better to be safe than sorry principle" and if so what coating would be recommended? I intend to lay a vinyl / wood effect floor but have not yet finalised exactly which (the boss needs to approve!).
-
Imperfect finish on ex chimney breast
Frazer G replied to Frazer G's topic in Plastering & Rendering
I have a "tool" for scouring wall paper - would that be good enough to prepare the painted surface as you suggest? To be fair to the previous owner, you can't scrape the paint off. As a painted surface it is perfectly OK - it is just the paint has been applied to a bodged plastering job. -
I have a wall, which is an ex-chimney breast, in a 1890's property which a previous owner has botched somewhat. From tapping the existing plaster seems well attached but has been painted with unknown emulsion paint. The last would probably have been recent so modern vinyl or similar. My options seem to be to skim the whole surface or apply plasterboard to the surface with dot & dab with mechanical backup and then skim. The reason for the two options is I am not sure how well plaster (dot & dab or skim) sticks to painted surfaces. I should say the paint is sound, no peeling, dusting etc - it just looks a mess! My preferred option would be to skim the existing but I do not want to find it lifting off in a couple of years. Experience of plaster sticking to paint is my missing knowledge!!