Stu84
-
Posts
29 -
Joined
-
Last visited
Stu84's Achievements
Member (3/5)
1
Reputation
-
To update on this. I sought a second opinion from another engineer. He confirmed that the surcharge load (soil + lorry etc) would result in a lateral pressure against the external wall. He designed a solution based on 10kN lateral pressure. This involved a line of vertical rebars with horizontals to be placed between the outer skin and the excavated face and also another line of verticals with horizontals placed centrally within the cavity. All rebar to be surrounded by 50mm of C25 concrete (75mm cover against the excavated face). He applied partial factors for safety. Building inspector notified and happy. Thanks
-
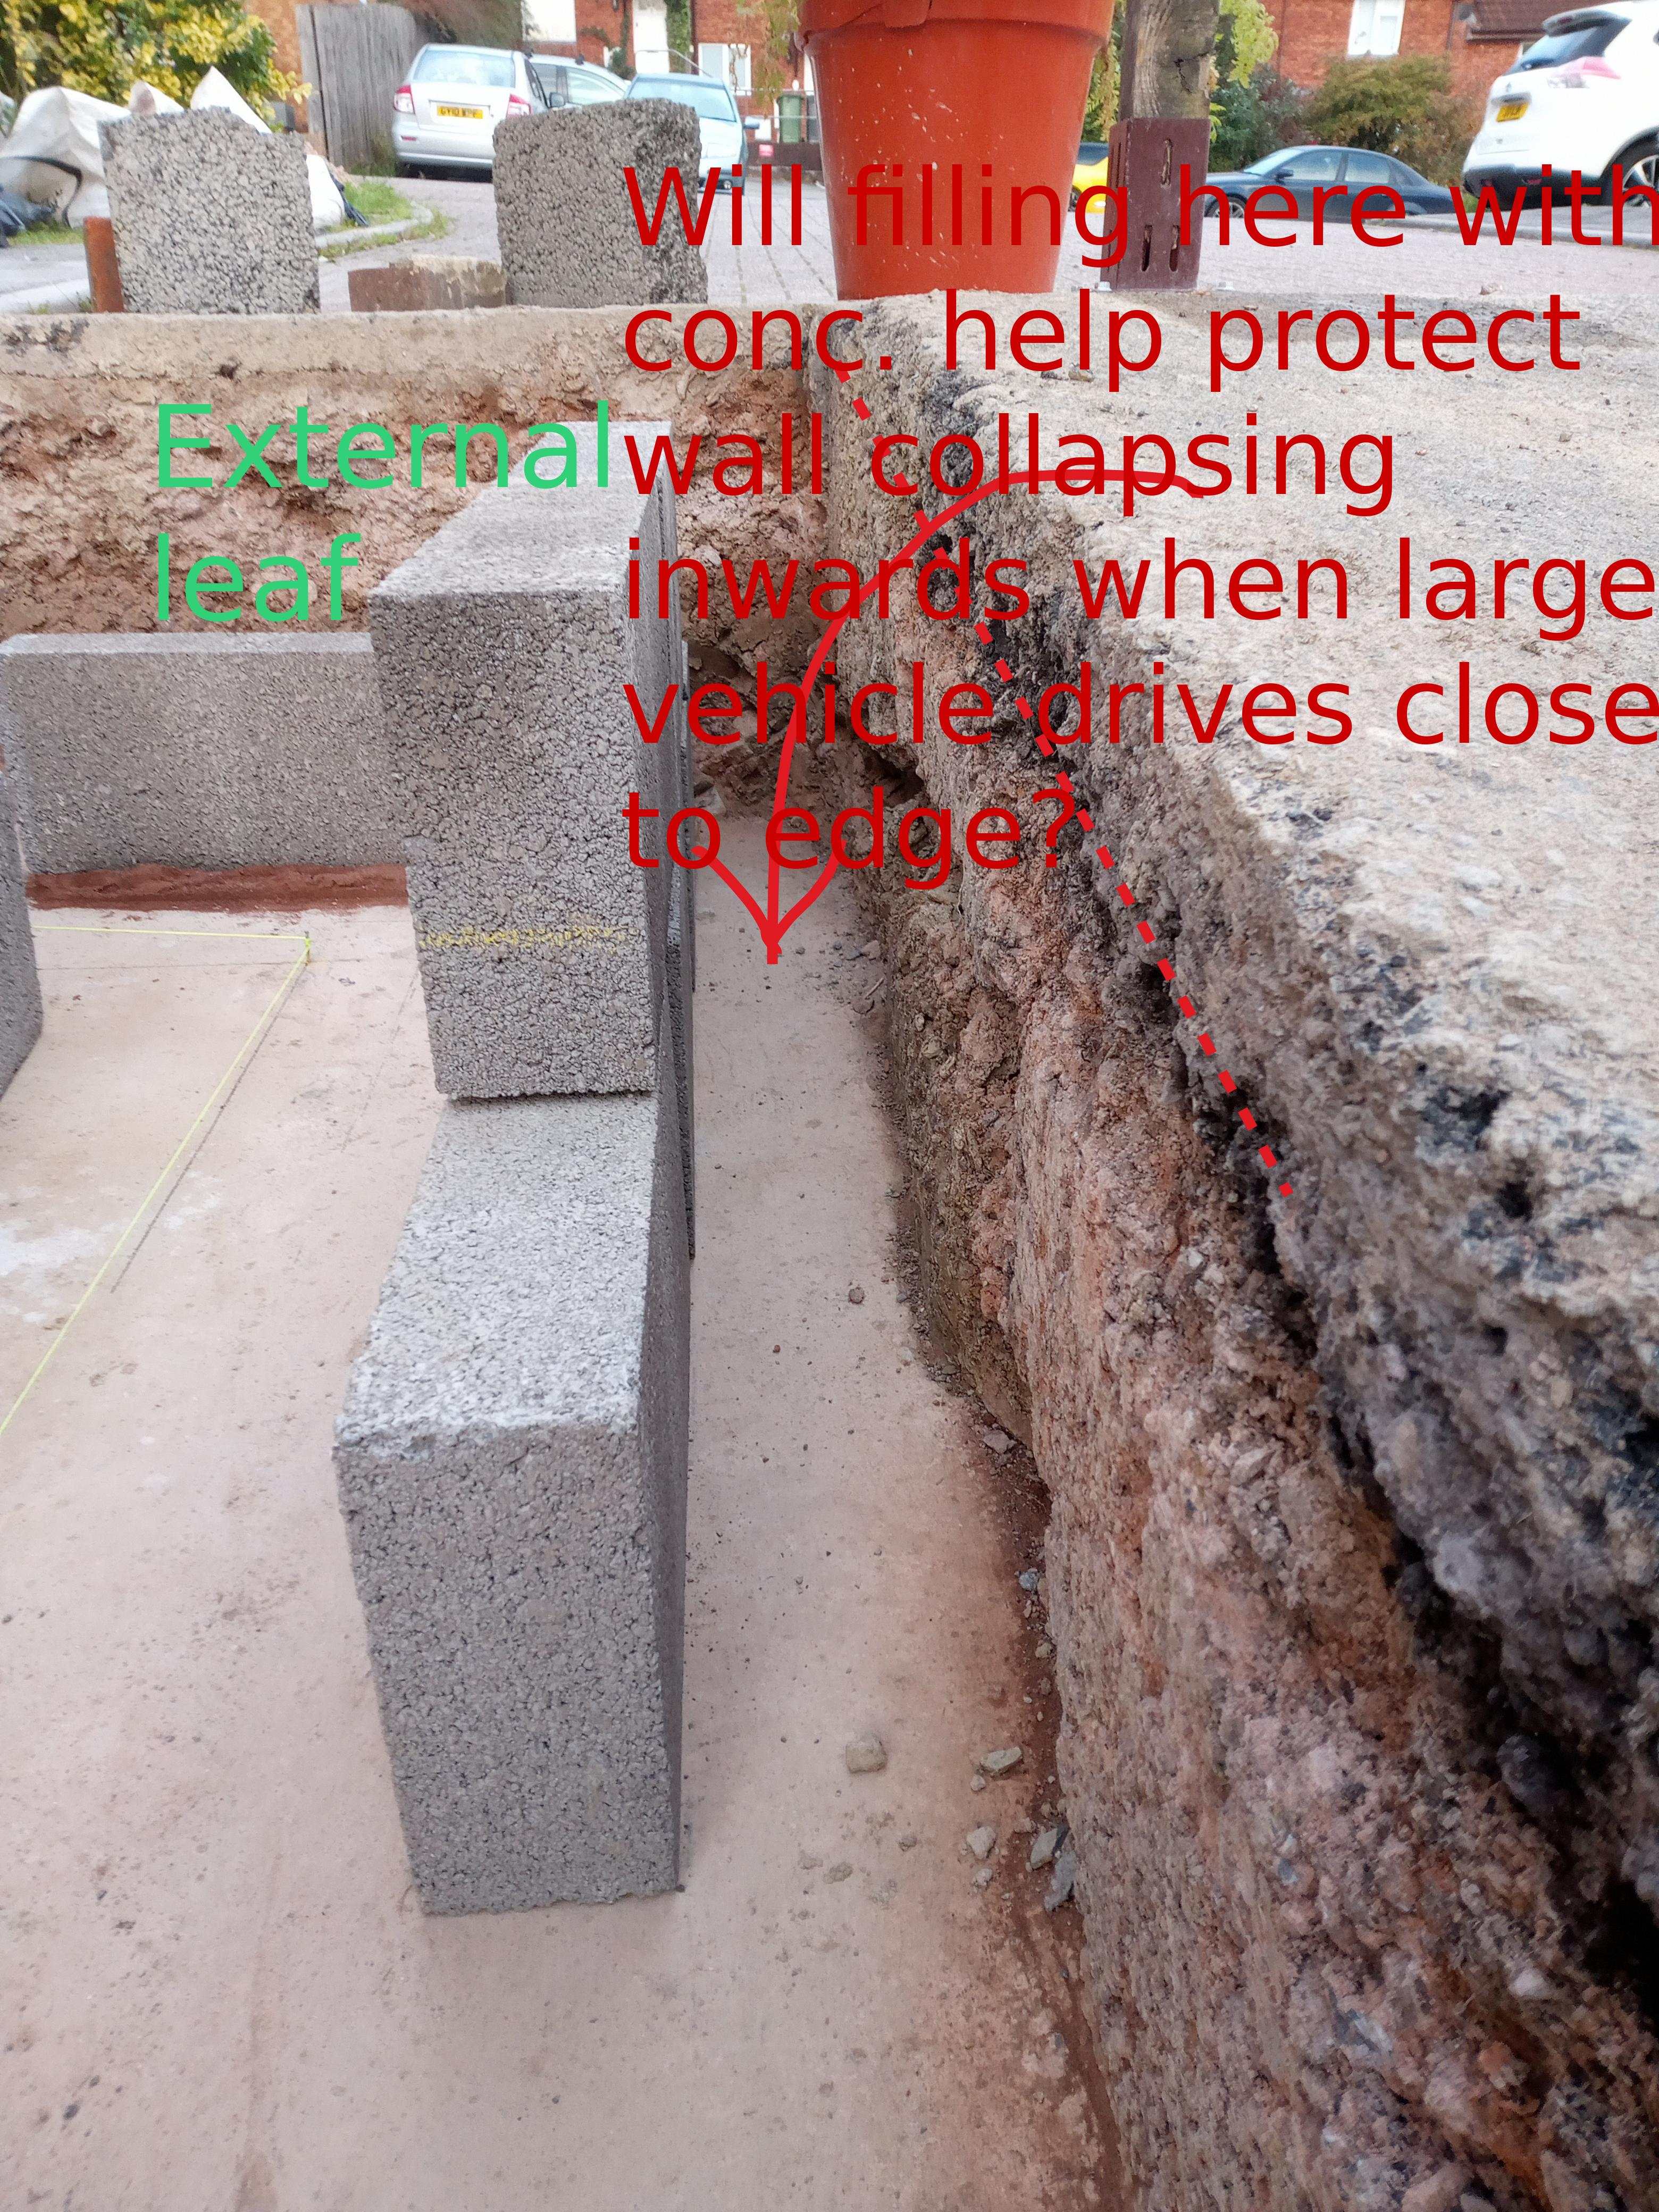
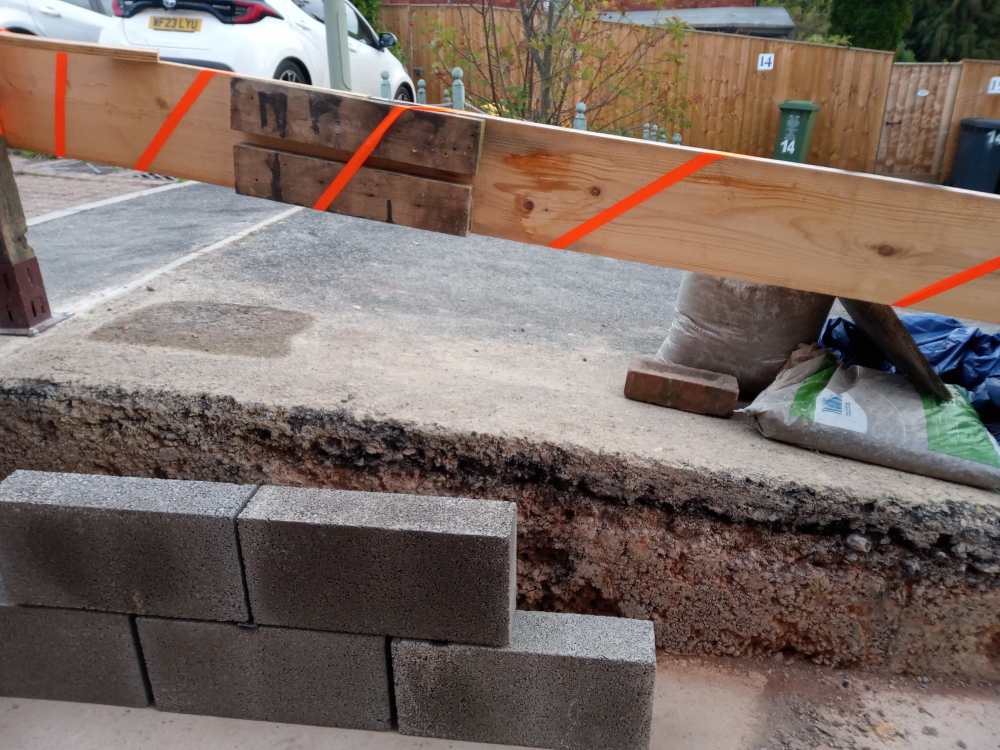
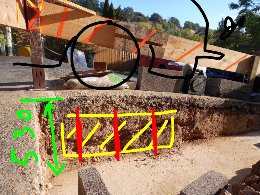
Morning all. Looking for some engineering consideration. Please see images. Here we go! The exposed face of the small car park is, at its tallest, 530mm measured from the foundation. It gradually slopes to less. The total wall thickness is 340mm: block-infill-block. It's standard practice to infill wall cavity with a weak concrete mix. However the maximum I can fill to is 320mm (above foundation). As otherwise I start to get close to internal skin DPC level. Occasional car traffic uses this small car park. And a few times a year you'll see a heavy lorry reversing down to drop something off. The foundation projects about 120mm from the outer skin. S.E. has suggested that filling this void between the outer skin and the excavated edge with concrete will protect the cavity wall from collapsing. This solution is not ideal as the external concrete will then be higher than the infill so would water in the cavity have trouble trying to escape? Secondly I struggle to understand how filling the external void with concrete will help prevent the cavity wall from collapsing inwards? Won't a vehicle parked on the tarmac close to the concrete cause a horizontal component of force which would be transmitted through to the block wall via the concrete? My suggestion was to epoxy a few vertical T12 rebar rods in a line, maybe 3 across a metre, and slide a metal stainless steel panel between the rebar and the edge as an additional retainer. I wouldn't need to do the entire length, just the highest point, so a metre should do. I'd then back fill with soil/MOT Type 1 and tarmac. Thanks all! Stu

-
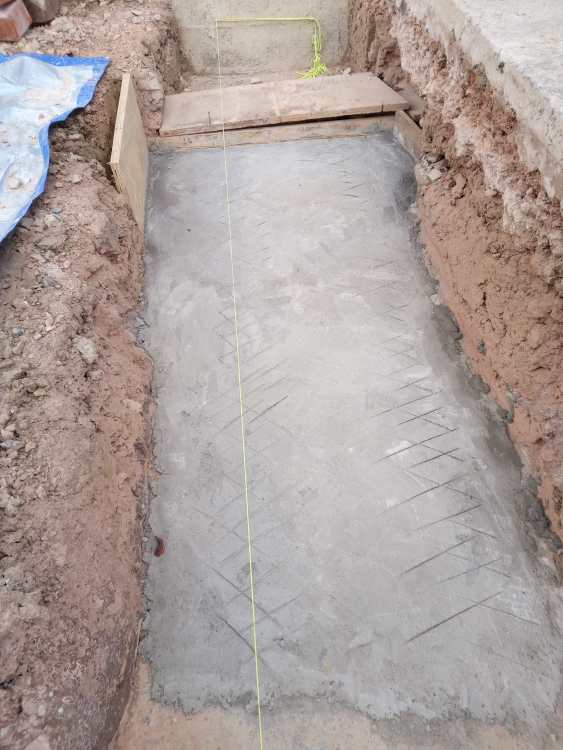
Hi everyone sorry to revive this just wanted to say thanks for all the input and update you on what happened. So the engineer had a very slight preference to scabbling and using something like a Sika repair mortar to level out. He did say that a thick mortar 25-30mm would be adequate. However I did a few experiments with some thick regular mortar and I found it pretty brittle stuff when it gets to that depth. So I got in touch with Sika and they suggested either Sika Monotop 630 Rapid or 4012. Both with the application of a primer (Sika 1010). I went for it. The preparation was difficult (trying to get a straight edge around the repair patch for it to key to, no dust, etc etc) and also application of the primer was very specific. It wasn't easy. The image looks like its keyed into soil, it's not, there's a step not far in from the edge(s) which has been covered with a bit of repair mortar which I will sand down so that it can't 'flake off'. Any way, I now have a level area to build off. Moving on to my next challenge. I can't be absolutely certain it's better that just throwing down some regular mortar but can' see it being worse. Lesson learned: Insist on builders pegging depth markers and be there during the pour! Thanks all.
-
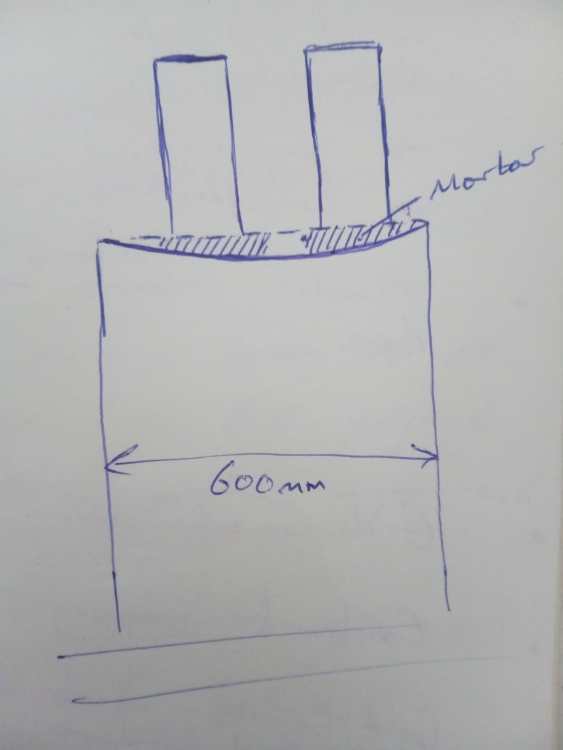
Hi Gus and thanks for your perspective. The builders wanted to lay a few trenchblocks down with very thick beds. But I can't do this all the way around as on one side they will be above ground and prone to freeze/thaw. Then I pondered using trench blocks for the immediate problem area only but Thermalite technical said not ideal abutting Aircrete products against aggregate blocks and it just raised more Qs. I suppose I could use a few extremely heavy 6" blocks for that small stretch? It was soft clay for the first 700mm then we hit good shillet. The boards came out just before the pour to reduce risk of side collapse which I was pleased about. To make level with the first corner block we'd need a 30mm bed (tapering to less). I've asked my SE whether he thinks that would be OK, and if so whether he prefers to see a 'levelling' bed of about 20mm go down first, followed by a another bed on top. I'm aware all of this is getting into crazy detail, but I can't help it. That's the way I am until I understand a subject well. My mind's eye just sees a concrete slope with ground water pooling around a thick mortar bed. The SE has come back and said that something like Sika MonoTop 630 repair mortar would do the job but may be overkill as would need to scabble the surface so I await his opinion on deep standard M12 mortar. Which must be pretty darn tough as I think 3:1 mix (M12) is what they bed some manhole covers with on major highways. But probably doesn't have much movement. It might not sound it, but I am comforted by all of the feedback above. I know rationally there most be thousands built on worse. But perhaps irrationally I don't seem able to move forward comfortably without very high confidence, not helped by things like Eurocodes 6 that quotes maximums of 15mm bed.
-
Thank you all for rallying and offering ideas and support. Yes I am prone to overthinking. I realise often much more happens below ground, but I wasn't quite happy with doubling Eurocode's 15mm max! This is probably what we will do. Throw down a 0-10/15 bed let it go off and treat that as the building surface. One alternative idea is to trowel a bag of Structural, non-shrink grout over the area. Could this be a forgotten panacea for low spots such as this? It's cement and sand based, can be poured to as little as 10mm, can take high loads and can be used externally. Just have to scabble the surface a few mm for a better key. I suppose this is basically the same as smearing mortar but perhaps a bit more substantial? Was looking at something like this. https://gbr.sika.com/en/construction/concrete-repair/grouts/cementitious-grouts/concrete-repair-andnewconstructiongrouts/hand-applied-grouts/sikagrout-111-gp.html Thanks every one. Starting to feel better about it.🤗
-
Thanks guys, am struggling with this one. Dreaming of a footing with 3mm tolerance 😂 Here goes.... So I've taken more measurements and its one return (the rest is levelish) that slopes 20 or 15 mm (depending on whether you pick internal or external leaf) from the corner to the house over only 1.8m. On top of that it's all about 15mm below where is should be. All considered to bring it back on track over 2 courses the beds are going to be massive (30mm). Even using dolly blocks the first course is going to have to be about 30mm, dictated by the slope (granted its 30mm at worst tapering to about 10 Builder came around and couldn't really see the issue. Said they'd level out the slope with some mortar, let it stiffen before laying another bed of mortar over that. Starting to think best thing is to have the concrete breaker in to take 150mm of concrete out up to the corner. Hand mix and re-pour this length. 😑

-
Thanks for thought Redbeard. No, I'm doing the brick and block work and they knew that. That's why I'm a bit irked. Will be a challenge for me to sort. I'll do it, but I put a lot of detail into the design to ensure I got off to the best. That's been thrown away with their careless pour and I'm gong to have to play around with coursing/dolly blocks now to make it work, when before it would have been standard blocks all the way (that I'd already bought). No point me ranting. If it's normal for people to build off bad pours like this then that's some comfort. Cheers
-
Thanks nod, that does help. On one stretch they managed to lose 15mm+ over 2m, impressive! This is my first self-build so steep learning curve. I know bed courses can be increased a bit but in the real world what is roughly deemed acceptable below ground for a standard 3:1 mix? 20mm? Think if I had to go more I'd start looking to cut a few blocks. There's an inverse camber across the surface so the mortar will be deeper on the inside than the outside otherwise blocks will want to tip in. This is common?? At least the weak concrete mix that will go in the cavity will help blocks wanting to cave in. Thanks!
-
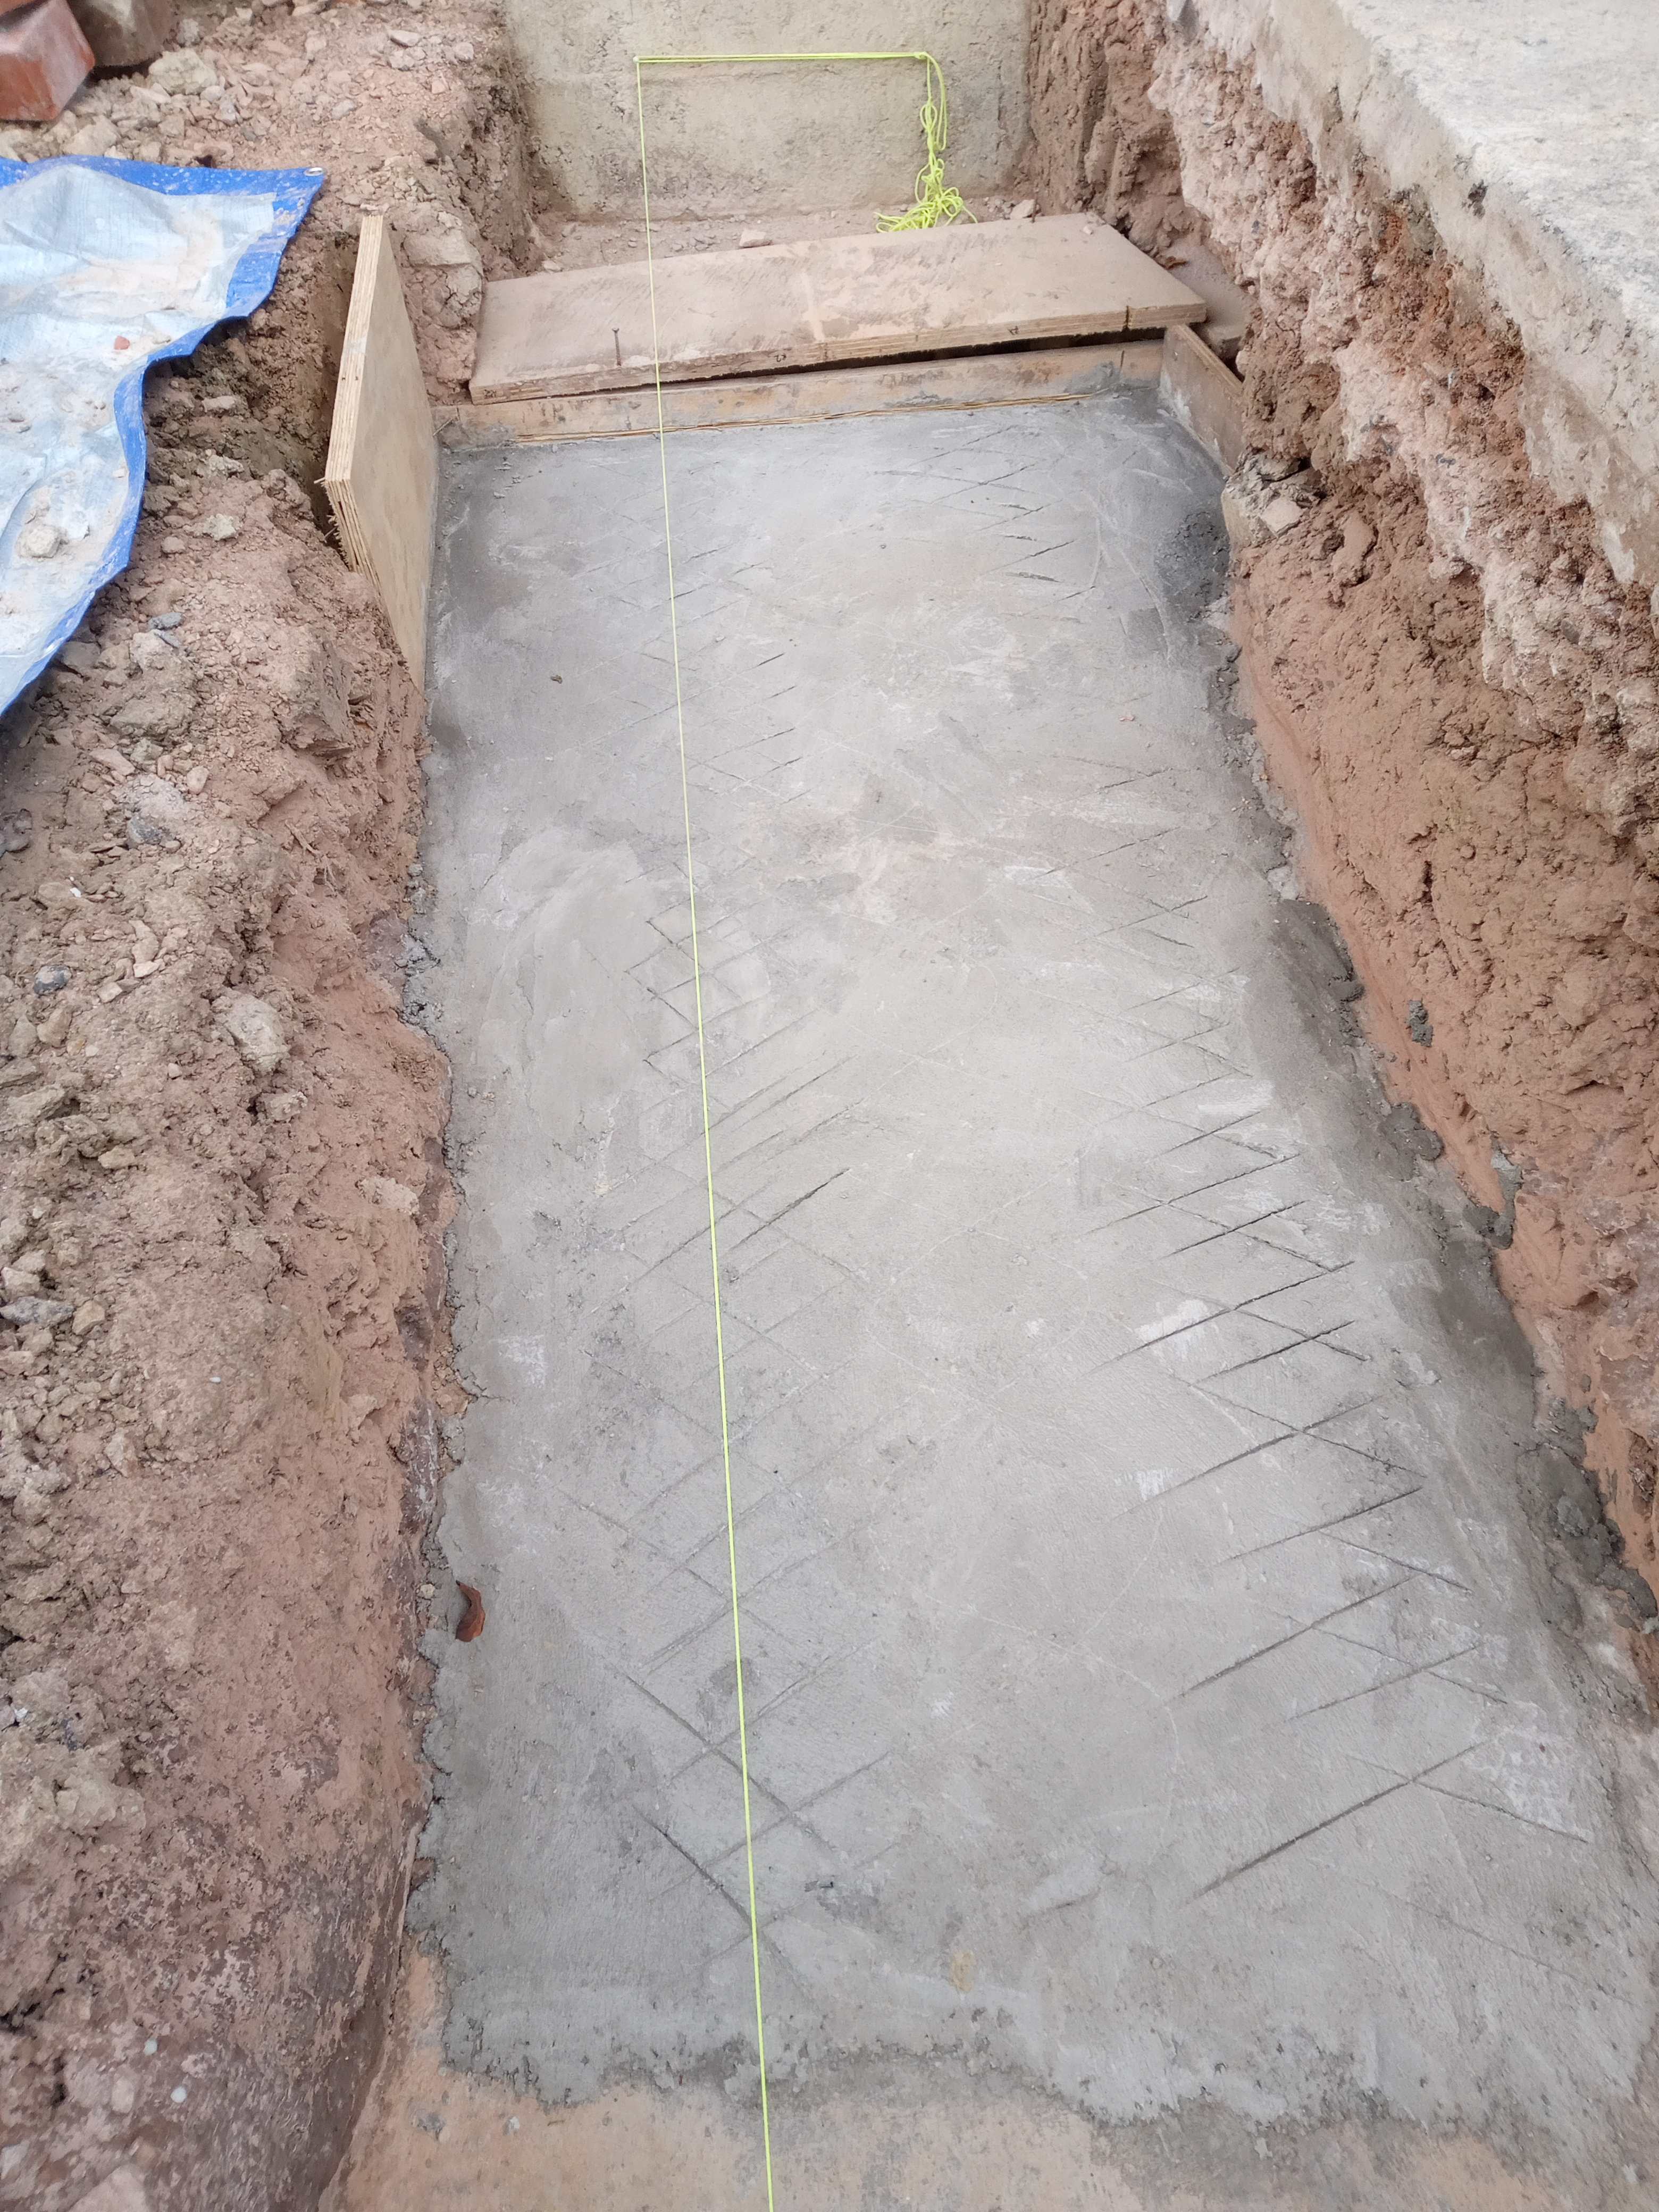
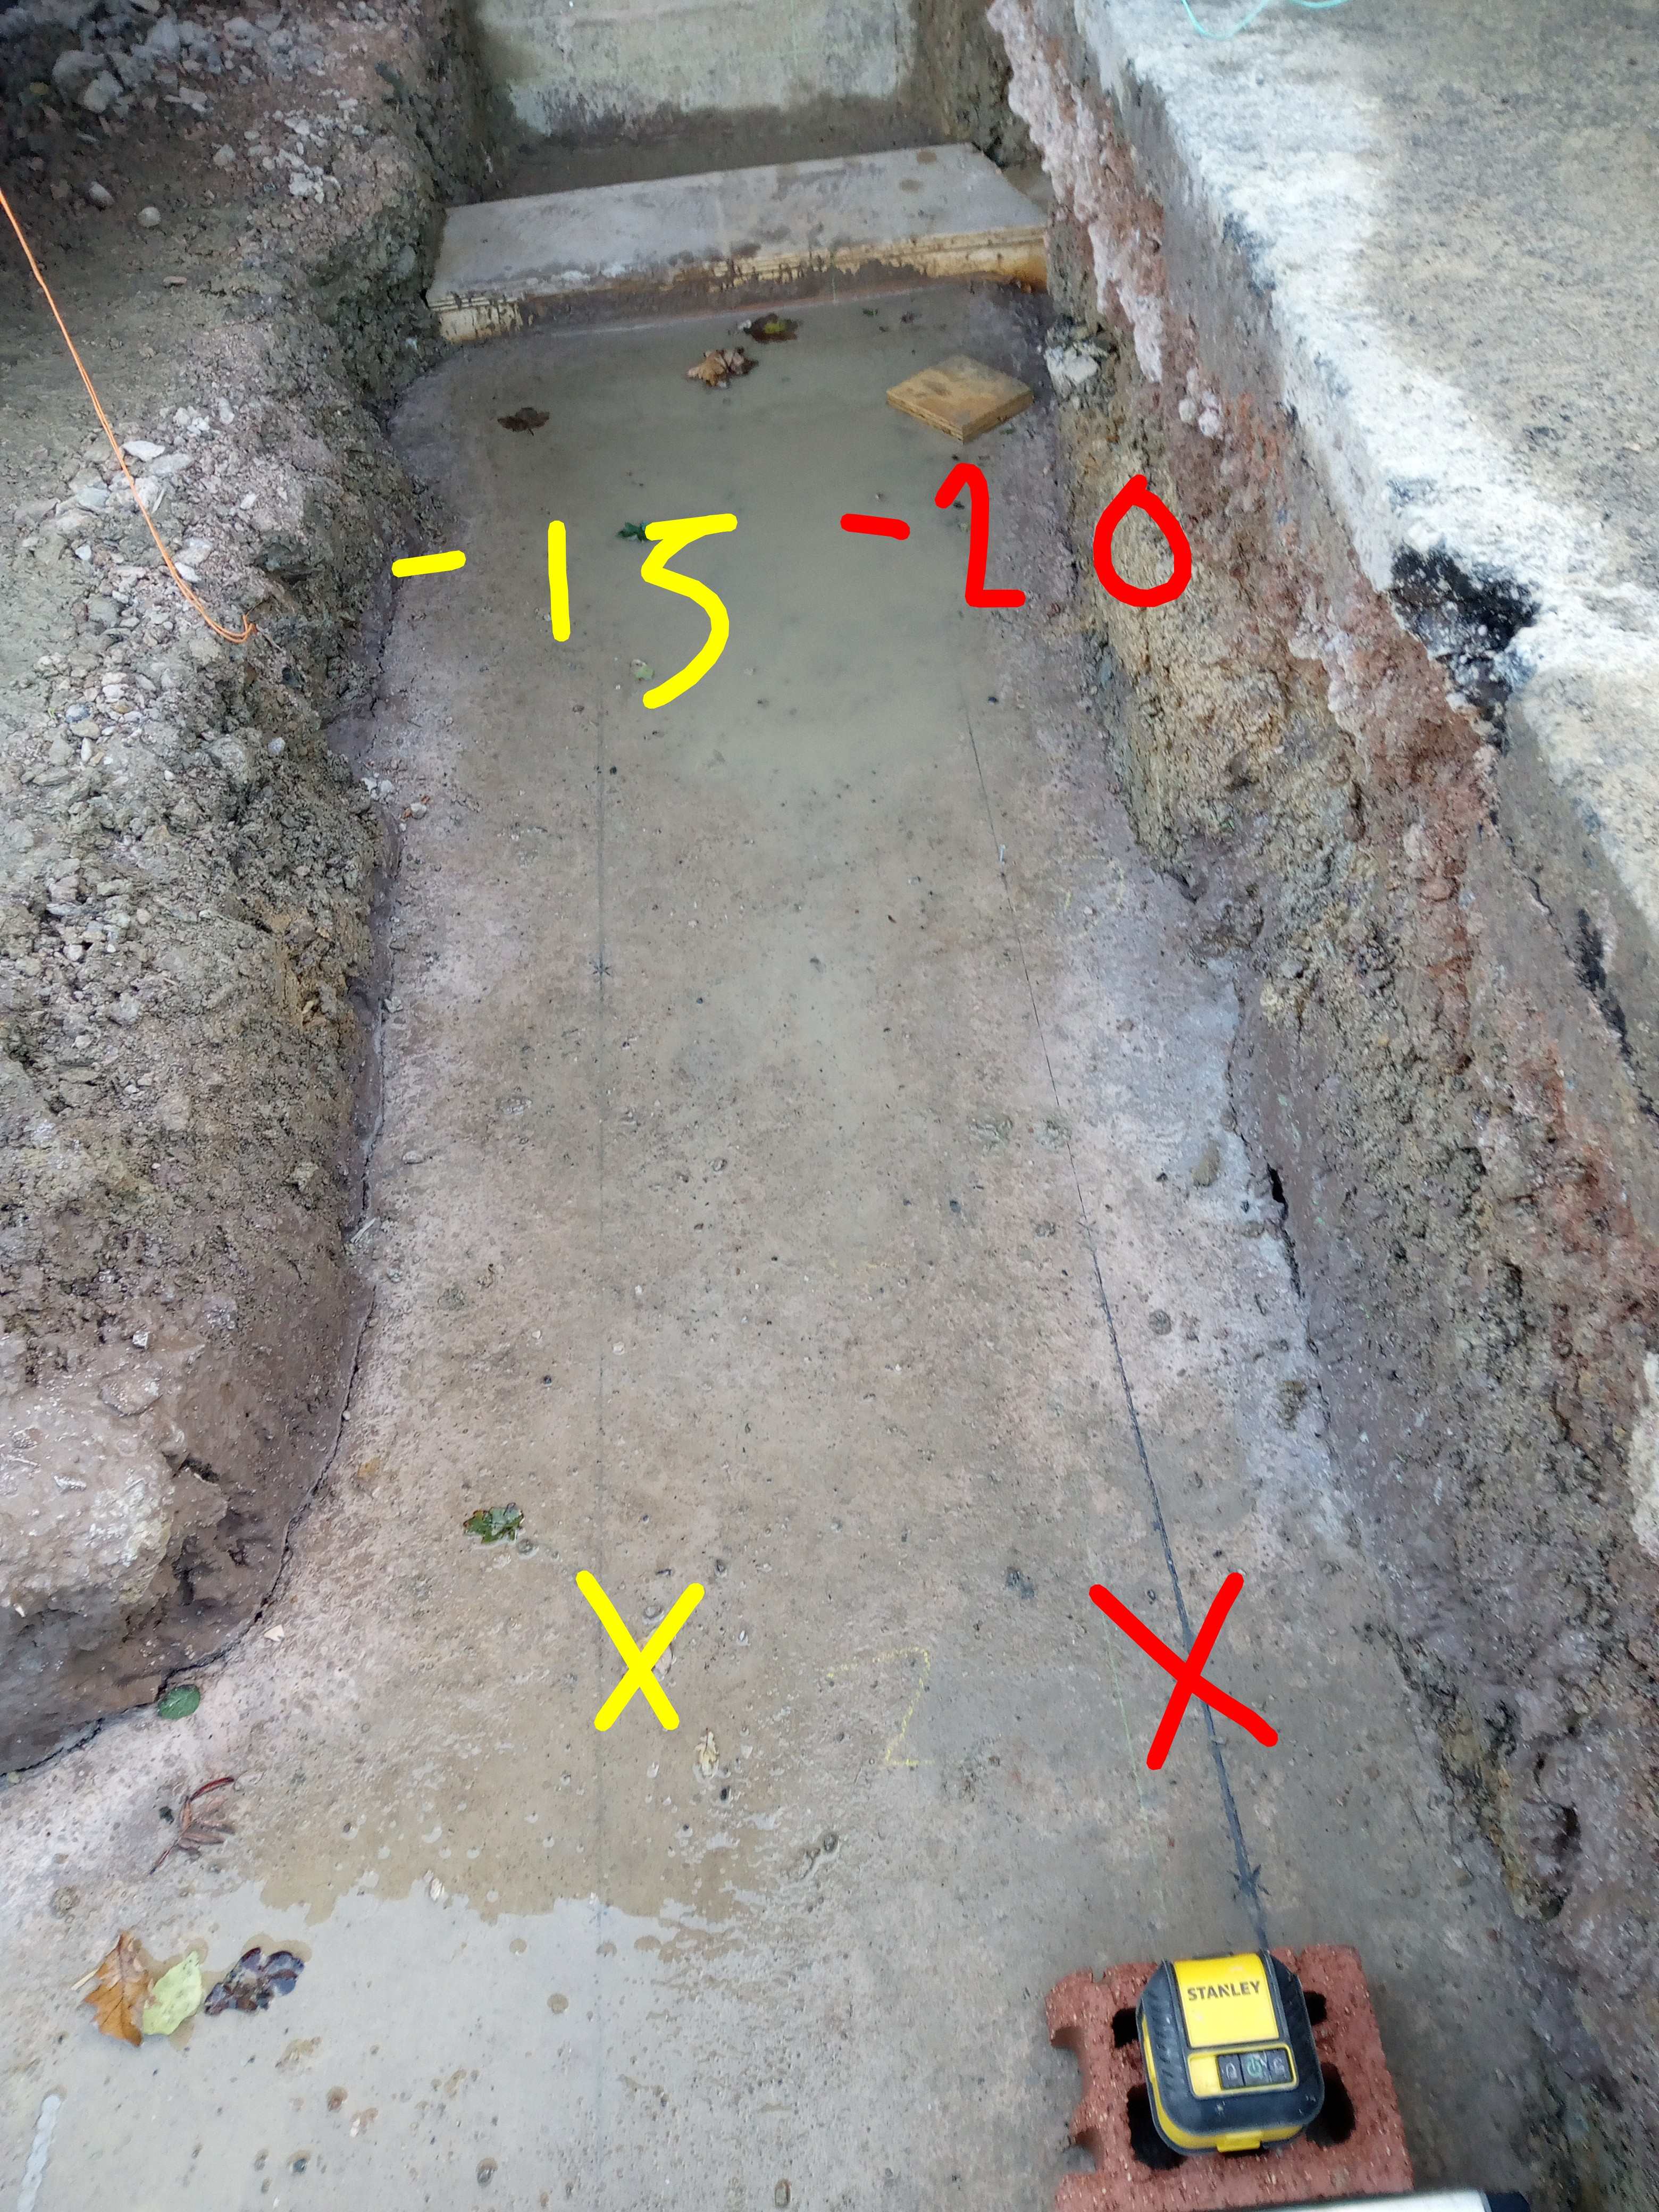
Greetings all Trench fill happened yesterday for small side extension (3x4m footprint). Footings are about 600mm thick and 600mm wide. Checked levels today and there's up to 25mm deviation in height and if viewed in section there's a slight dish (up to a 10mm dip across the width of the foundations). Also the pour is 10-35mm below the finished depth we agreed. To be truthful I am upset as builders quoted to dig,rebar, box-in pipes and pour. The digging was hard going so of course I helped dig. I boxed in the pipes and even resin-fixed all the rebar. We've had some down pours so I've painstakingly kept the site as dry as possible with tarpaulins / pump etc. I asked them to drive stakes in to ensure level all around which they argued against. They said they'd use a laser and would get it to within 10mm and that I should trust them. When the concrete arrived I thought best to leave them to it so they can focus. 4.5T of concrete was poured in about 10 min and I returned after about an hour to find they were packed up and about to leave. I asked if they used the laser, they said they had. There was a bit of floating water but not much and I covered with a tarp. I'll get over the disappointment. Just hoping it can be worked with. Does the 'dip' across the width of the foundation matter? Can this be leveled off with mortar before laying the first course of regular block? It is definitely there (the water pools along the centre). Should I be grinding down the sides a bit to better level? Excuse long message. Part of the healing process! 🥴 Thanks all.
-
Step in foundations, flatness of bottom of foundation, sleeving
Stu84 replied to Stu84's topic in Foundations
Thank you so much for your reply. Yes we shuttered pipe in the end and will now lintel over. Was very difficult shuttering, as all the pea gravel starts to pour out when trying to key the boards into the side. We didn't step in the end. But probably should have to save on concrete as inspector said he would have been happy. Thanks again. -
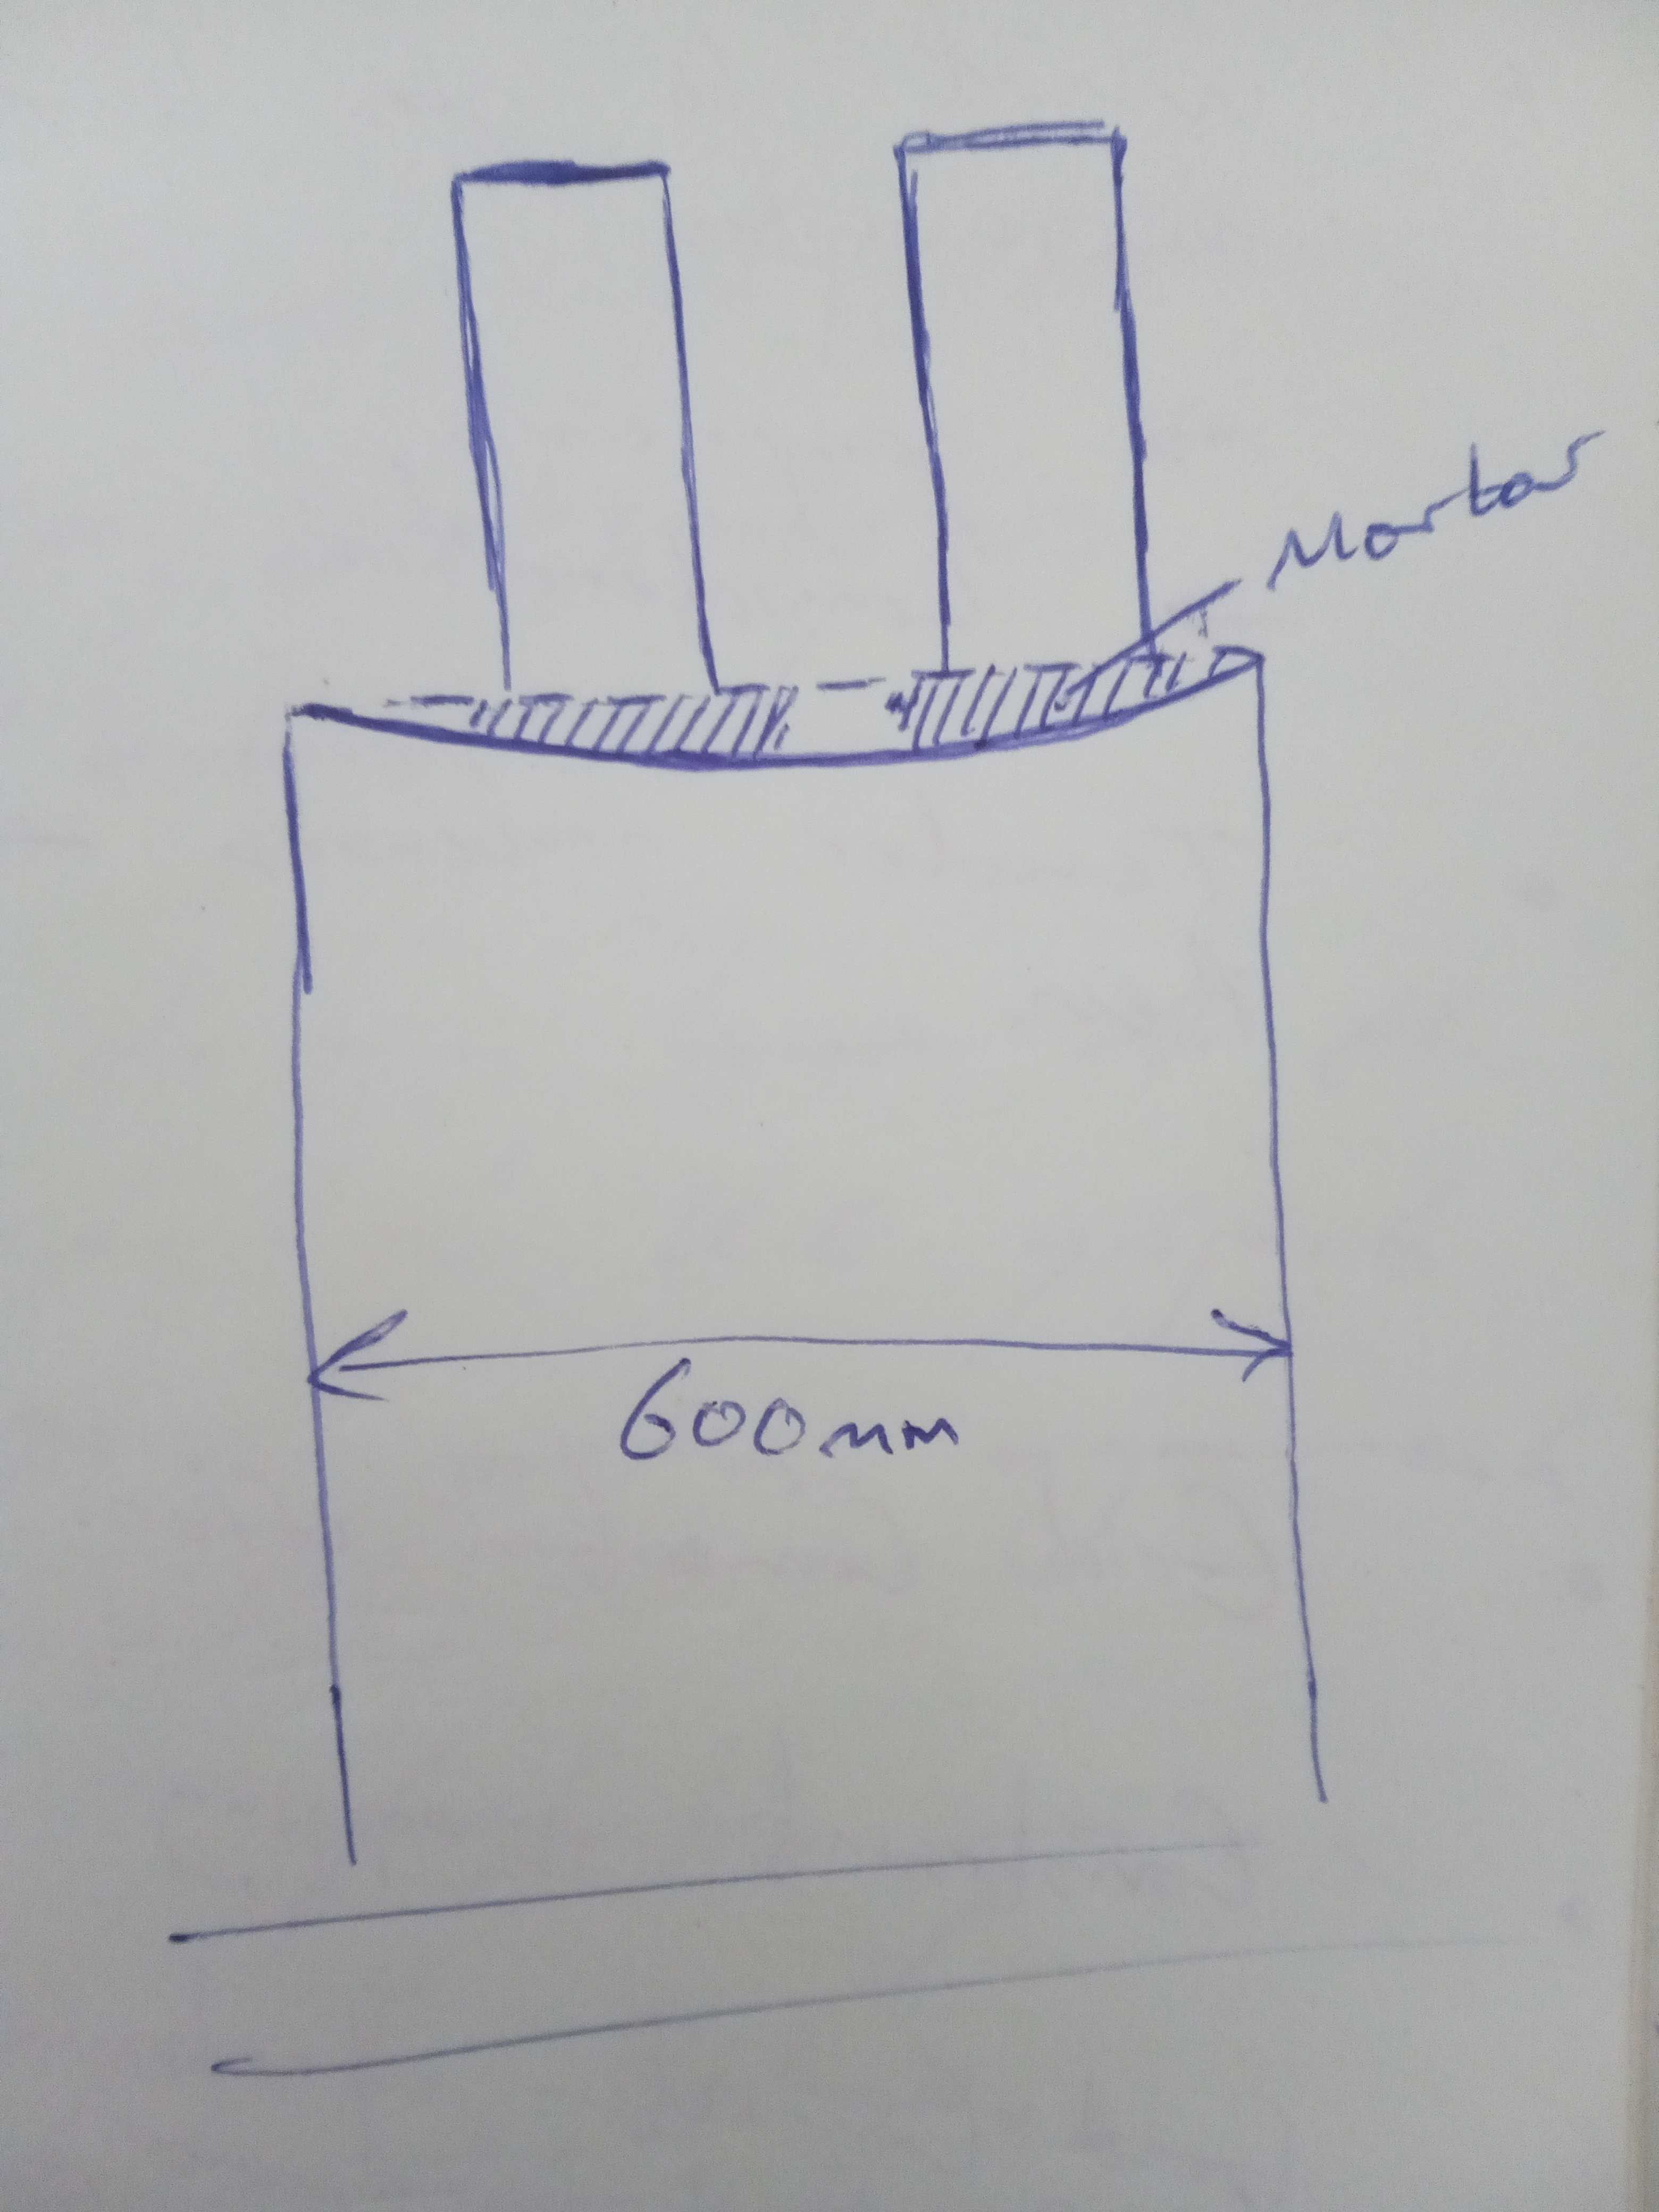
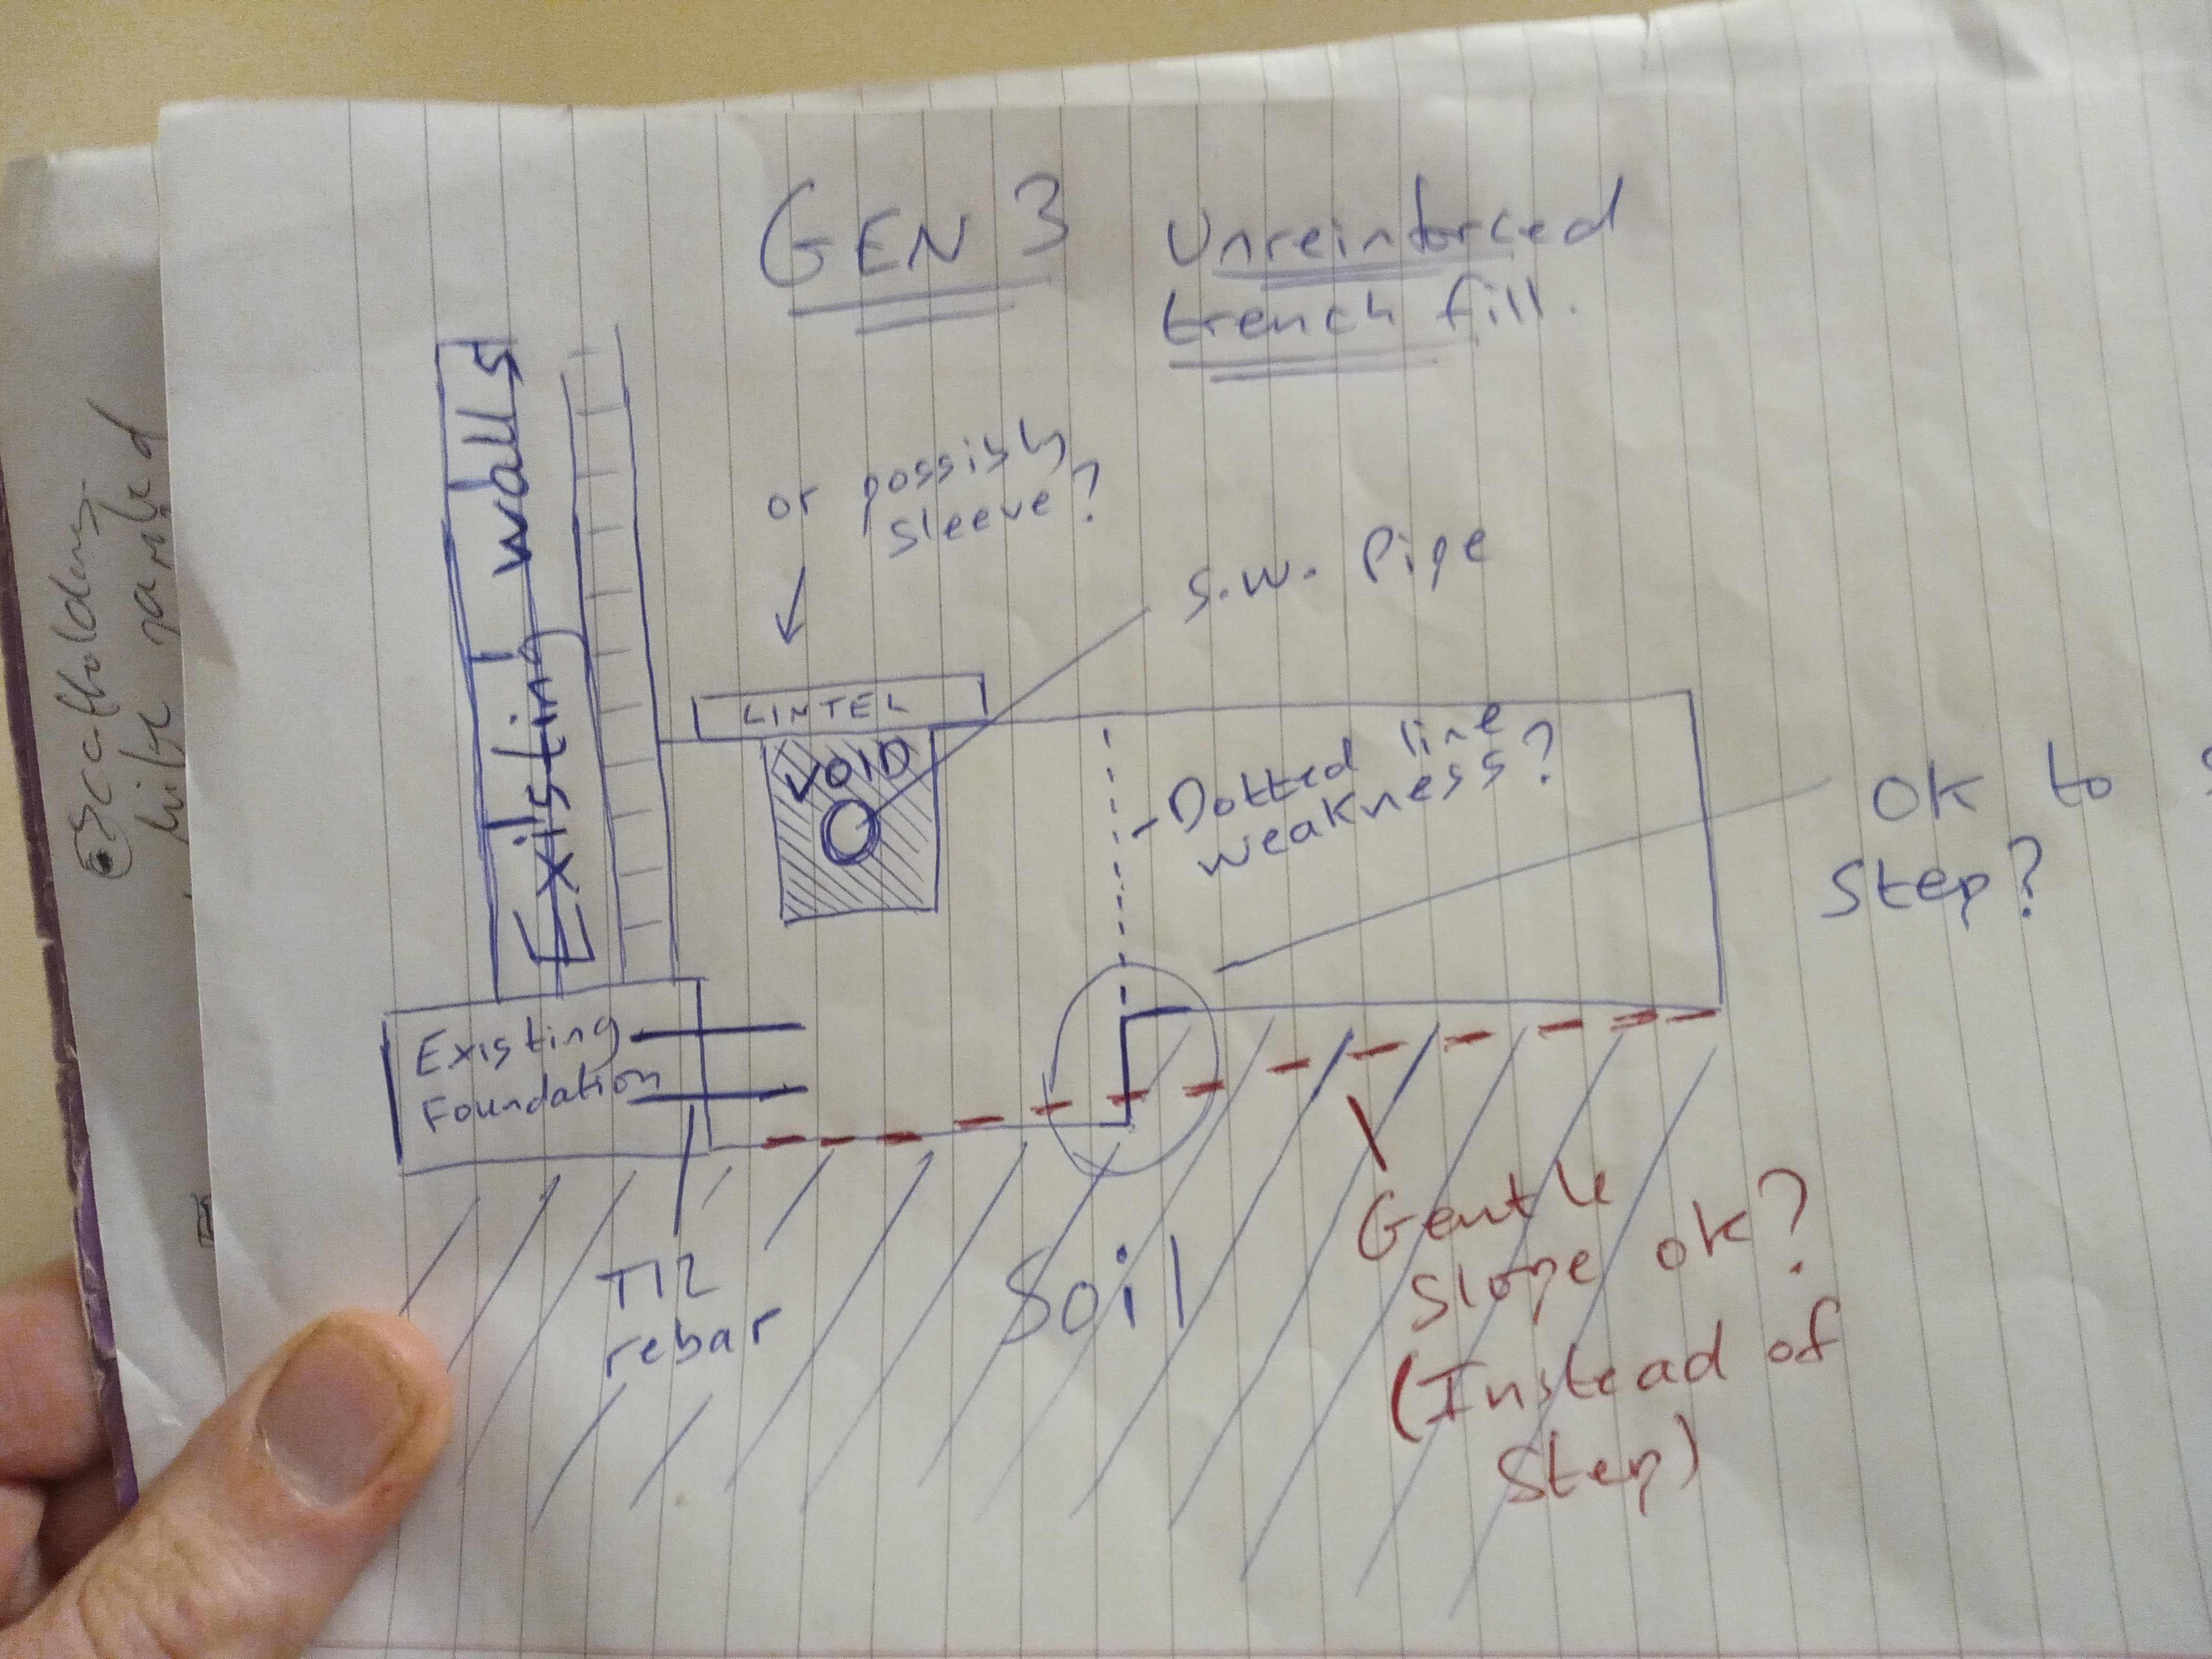
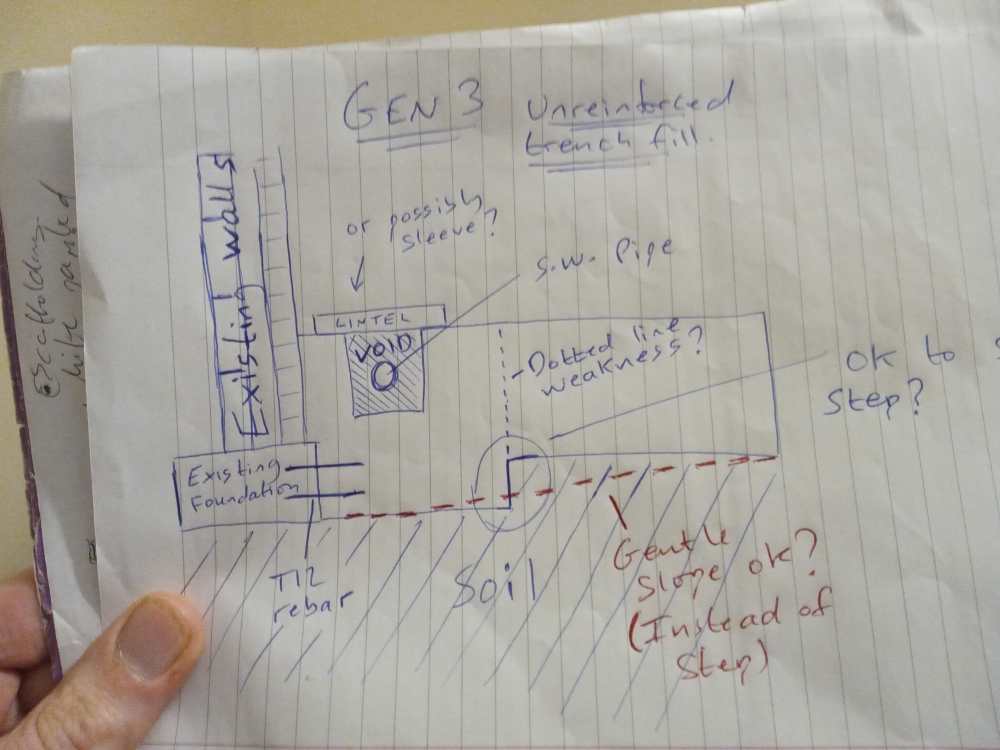
Hi everyone. Few Foundation-related Qs. Thanks all for their help, new to this so steep learning curve! Excuse long post and numbering. 1) Mid-way through digging foundations for a small side extension. Wondered if OK to step the foundations like drawn in the picture attached? Alternatively would a gentle slope be OK as shown by dotted line (gut instinct says no but builders having hard time matching depth at far). 2) How level should the bottom(s) of the trench be before the pour? Is a variation/bumps of 2-3 inches acceptable, checking depth every few foot measuring relative to a datum? Or should we be more accurate across the entire length e.g. talking spirit levels laying flat along the bottom. I guess latter would be preferred, but I’m talking real world. 3) Have a 110mm surface water pipe that runs perpendicular right through the two return foundation trenches (which are 600-650mm wide). Building inspector seems happy for us to wrap a bit of insulation around pipe, then sleeve with a split larger diameter pipe, with a few jubilee clips to close the split. Then support the pipe on a concrete block or two and pour right over it. It’s great that the BI is open to this but wondered what the community thought? There will be about 100mm concrete above the pipe. I could place (float) a few off-cut lengths of approx 400mm rebar into the concrete immediately above the pipe if that would help? Thanks you!
-
If there's an expectation of DPCs failing then fair enough! Is there any need to consider slip of the structure on multiple DPCs positioned only a block or two apart? Suppose provided its sits on a thin bed all is fine? Thanks
-
Thank you for comment. I can see how how this works for the sides, but how does this work for the butt ends of the beams?
-
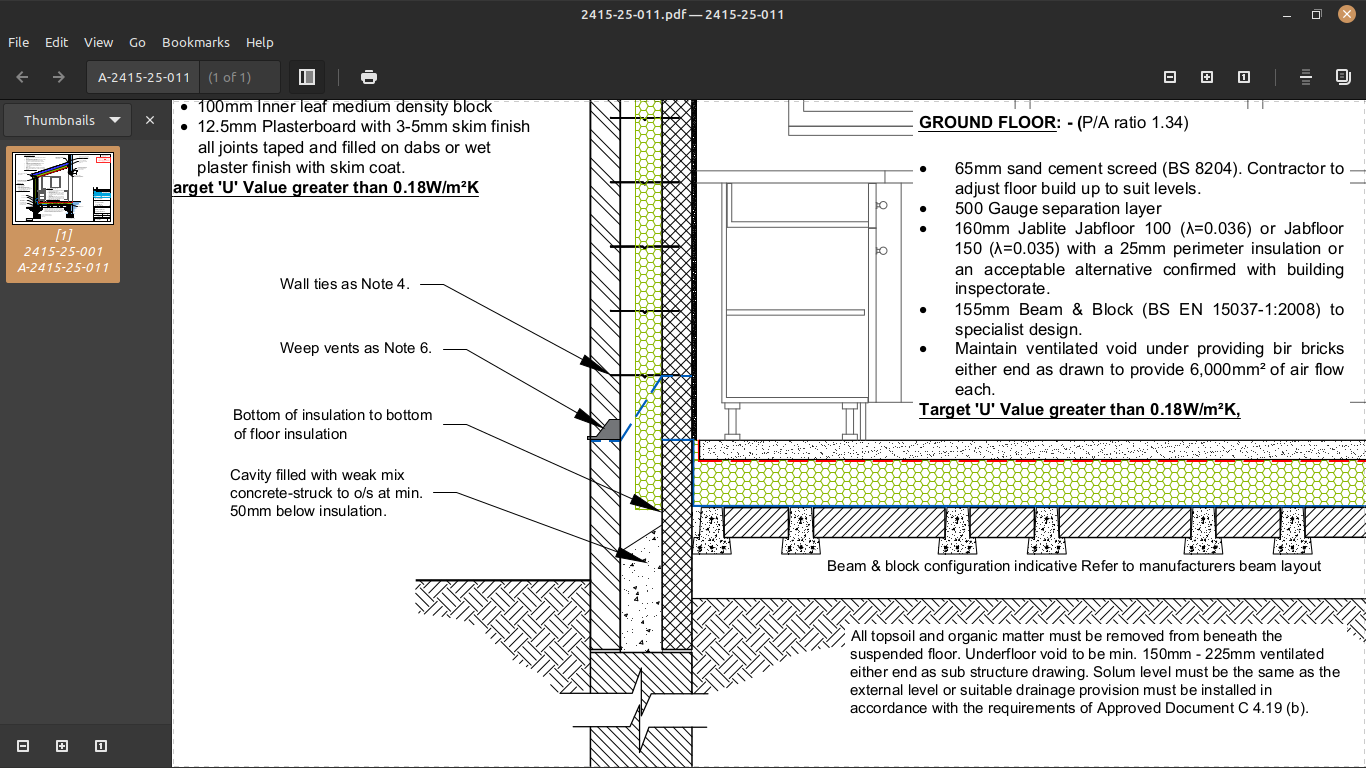
Hi all Working alongside a designer to submit full plans to building control. Really stuck on where DPCs should go. Designer has specified a DPC (blue line) immediately above the beams which continues up the wall a little before turning into the bed joint where it meets a DPM (red line). I would have thought it better to place the beams directly on a DPC? Which leads to my next question.... If you place the beams directly on a DPC rolled out over the supporting inner block work then why would you need a second DPC further up the inner skin as so many seem to suggest? Doesn't the DPC which the beams rest on stop any rising damp entirely? Is there a risk of the DPC tearing and so another is put further up just in case? Thank you for thoughts Stuart

-
HI all Sorry for the hiatus. Have been taking into consideration points and wracking my brain as to the direction to go. Ultimately I've decided its best to have a AVCL of some sorts. Perhaps not a complete barrier to vapour, but certainly airtight. As to the insulation. I'm looking at two options: Option one. a) Rockwool Nyrock bats 200mm in between 200mm deep rafters b) Rockwool Hardrock 60mm immediately above this c) 50mm of battens (2 x 25mm) with a LR breather draping over the counter battens d) concrete tiles According to Rockwool blurb this should achieve U=0.15. Is very breathable so any moisture that does get in (because of an imperfect VCL) has a chance to evaporate and escape. Hoping the Hardrock boards at 70KPa compressive strength can take the tiles. Rockwool does provide detail suggesting this is OK. Possibly incorporate an over fascia vent and ridge vents. Option two: I was looking at some EPS boards. Some of the boards by Styrene and Unilin have thermal resistances of 0.31 or even 0.3. Not has good as PIR, but not bad. They are more vapour permeable than PIR (the foil-facing of PIR has a 'mu' value of about 7000!). And so have some breathability. EPS boards come in at higher compressive strengths. Using EPS would enable me to reduce thickness of roof by a 20-30mm compared with mineral wool. Of course, the BIG consideration is how fireproof EPS is..., it isn't. But for a single story side extension with Fireline pink plasterboard at rafter level is this overly important? Occupants should have time to escape before the pink PB has given in and you'd hope fire service would be there within 30min... Phoning a few stockists I was surprised that none of them think its normal to put EPS in a roof. In fact, presumably because of Grenfell, it was a bit of a 'hush hush' topic. Almost felt like trying to buy illicit material! Anybody else used EPS in the roof? Some 'Green' builders seem to like it. And several boards are BBA certified. Thanks again! Stuart