Search the Community
Showing results for tags 'structural'.
Found 13 results
-
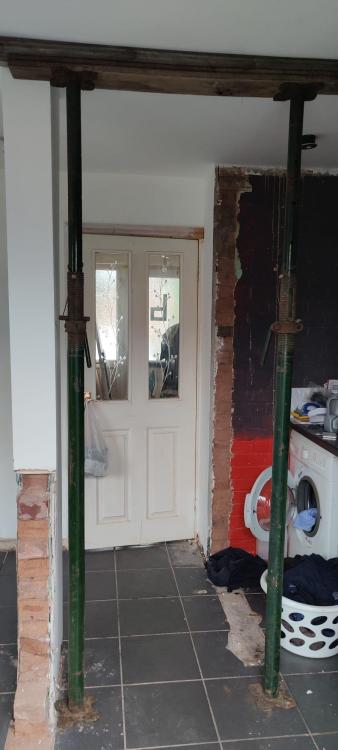
Good afternoon everyone, I hope you are enjoying the bank holiday weekend! I'm new here, I've had a look around and I can't see a topic on the issue I have (which I guess is a good thing!). There is a bit of a backstory here so please do bear with me. I moved into my house coming up to 4 years ago, there was a wall in the kitchen that didn't make much sense in being there so I spoke with a (former) friend who I knew as a builder, he came round and had a look and noticed that above one of the walls I wanted to remove, there had been 3 (partly) replaced joists that were held together with a few wood screws, he advised me that I needed to put 2 x 12mm coach bolts through each them and then I'll be ok to remove the wall below. So that's what me and my old man did one weekend, there was a pillar which was part of an old wall which I left in as I liked it as a feature, (this was 3 years ago) the wall got removed bit by bit with no issues. Fast forward to last week (W/B 25/04/22), I want to remove the pillar now to fully open up the kitchen and the remaining wall that formed a breakfast bar. I wanted to get a builder in to confirm that I was able to remove the pillar with no issues and that's when everything seemed to snowball! I spoke to one builder (Monday, last week) and he asked me to send over some pictures and he'll let me know when he would be able to get out to have a look. Tuesday afternoon rolls around and I get a phone call saying he thinks I'll need a structural engineer, he gave me the number of a mate of his, I then spoke with him, he thinks I'll need an RSJ, I want to avoid this where possible as it'll have to be a 7m to reach side to side of my kitchen. I've been Googling (as you do to try and learn about the issue) and found that I might be able to replace the joists as the span is 3200mm (ish) using C24 47x175mm timber, I spoke to the structural engineer and he seems adamant that I'll need an RSJ (he hasn't been around to look yet) I looked at the average price of a 5m RSJ supplied and fitted and it seems to be just over £1k, not something I was expecting and not something I can “just pay for” either. So, after all that, my question is, can I not just replace the joists so that they sit wall to wall? I understand it’s a floor boards up, wiring out and ceiling down etc but I’d prefer to do that than have a 7m RSJ in my kitchen. I put the acro's in as a "just in case" it's been fine for the last 3 years. Any advice is much appreciated
.thumb.jpeg.0c0f18d34c098c73dfc014980f3136b4.jpeg)
.thumb.jpeg.0f0cd171af675a71e80ef0b59a03dd29.jpeg)
-
Have these blocks been used in the UK? Anyone know more about this? The Irish Times.. "Muscovite mica has led to apparent defects in building blocks used in at least 5,000 homes in the northwest, causing cracks to open up in thousands of buildings. Videos posted online show load-bearing blocks crumbling in homeowners’ hands." https://www.irishtimes.com/news/ireland/irish-news/q-a-what-is-mica-and-why-are-people-protesting-over-it-1.4593301 and https://www.bbc.co.uk/news/world-europe-49109158 What a nighmare for the home owner.
-
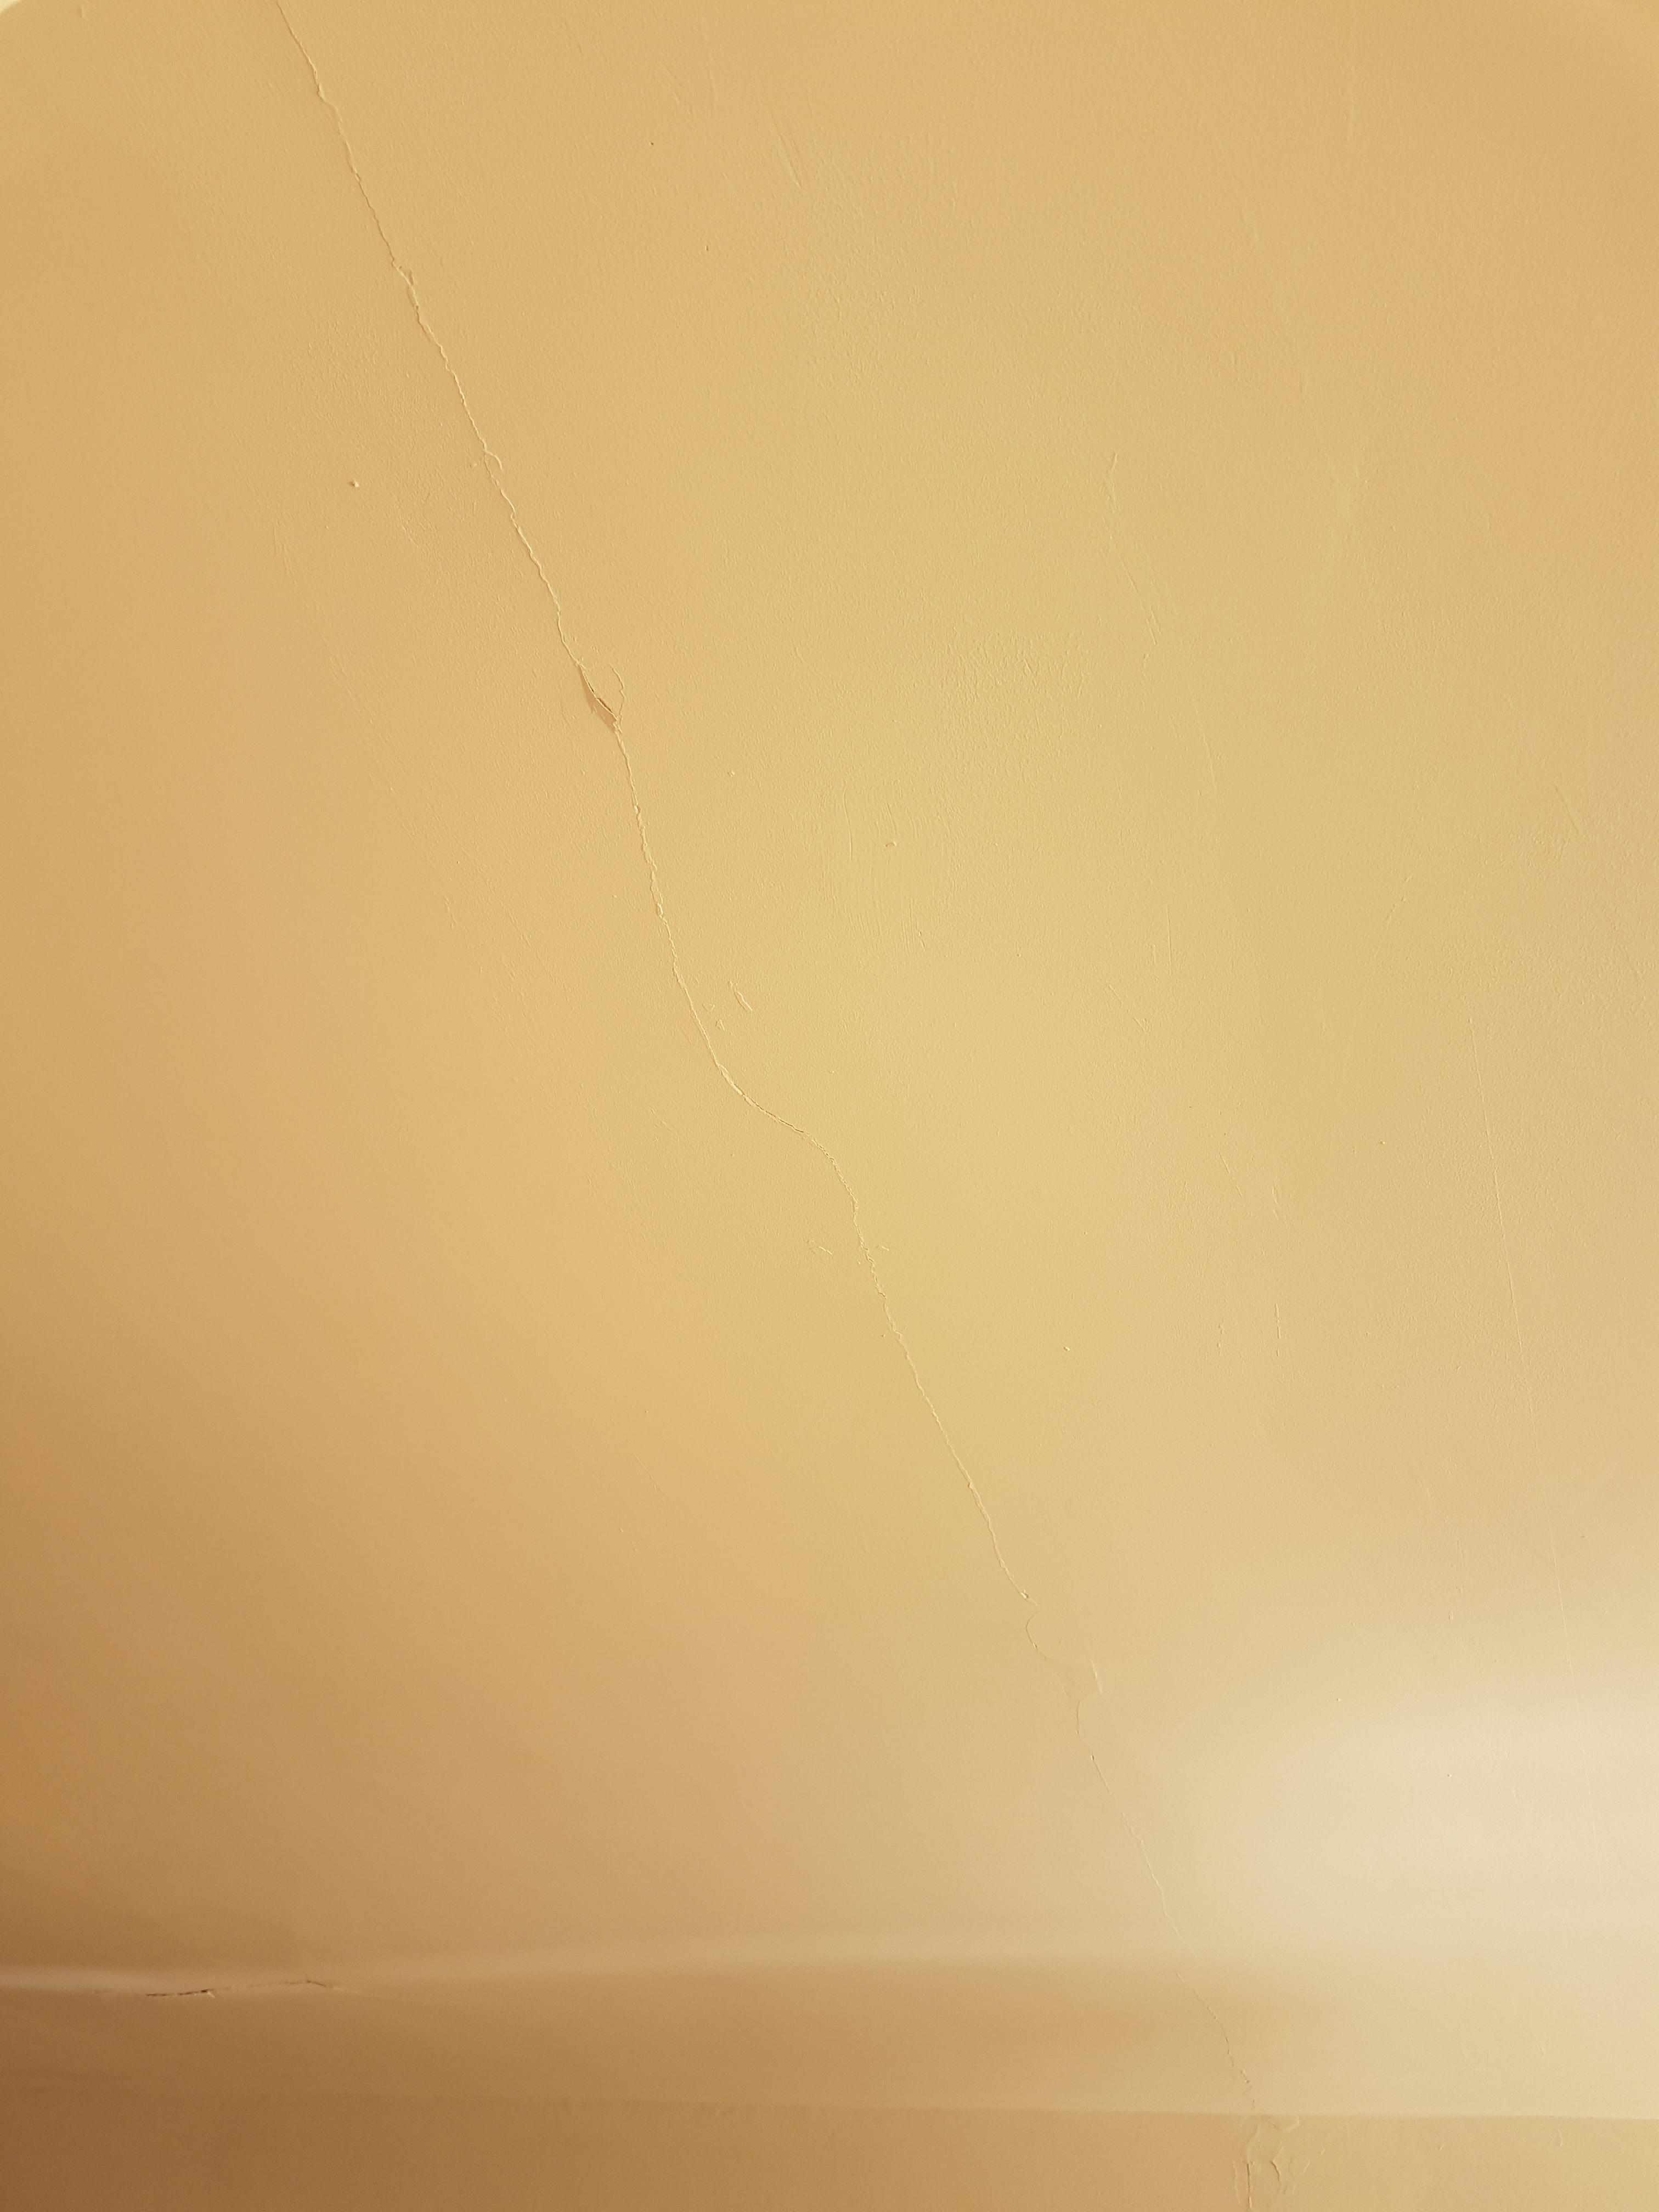
Hello, We've had an offer accepted on an early 1970s era timber framed house. On our second viewing we noticed a crack running across the ground floor ceiling and into the top of the wall (photo attached). The same part of the ceiling also has a much larger but more localised crack which is sagging slightly (photo in next post) The ceiling has been recently painted but very faint waterstains are visible. The room above the ceiling is the WC, with no visible issues. The room next to that is the bathroom, again with no visible issues. One of the windows in the room with the damaged ceiling sticks - the one next to it doesn't and neither do any of the doors. Other issues - We also spotted a bit of damp where the plumbing for the washing machine is located, and some grey stuff sticking of out a hole which makes me think there's mineral wool insulation. I have photos of these and can post if helpful. Should we be worried about the ceiling cracks and other issues? What might be causing them? Would it be so difficult to fix that we should look for something else? We haven't commissioned a survey yet but will be doing a level 3, but first want to make sure that these issues don't scream "avoid"! Thanks very much for any advice!

-
 I am not a structural engineer, so please bear with me I have a cottage wall with a small window that has three (3) wooden lintels supporting the top of it. The wall is approx 2400mm tall and 800mm thick with random stones and a lime mortar mix. It was constructed in the early 20th century. As you can see the wood has dry rot and needs to be replaced with concrete lintels. I have measured and found concrete lintels to replace. My question is getting the lintels in safely. I have looked at various techniques (spikes, demolishing the top part of the wall and rebuild) However they all seem to use brick walls as examples I have come across Strongboys used with Acrow Props, however they might make it hard to manoeuvre the concrete lintels in perhaps. Any advice on how I tackle this? This is a rough idea 1. Double check any loose stones on the surface 2. Put lime mortar on loose parts of wall (if there are any) 3. Insert 2mm piece of sheet steel between wooden lintel and stone wall to prevent any loose bits moving or falling out 4. Try and push two strongboys between wood and steel sheet 5. With a cordless circular saw, cut out the wooden lintels 6. Clean out old mortar 7. Re-mortar 8. Insert concrete lintels 9. Finish with more mortar
-
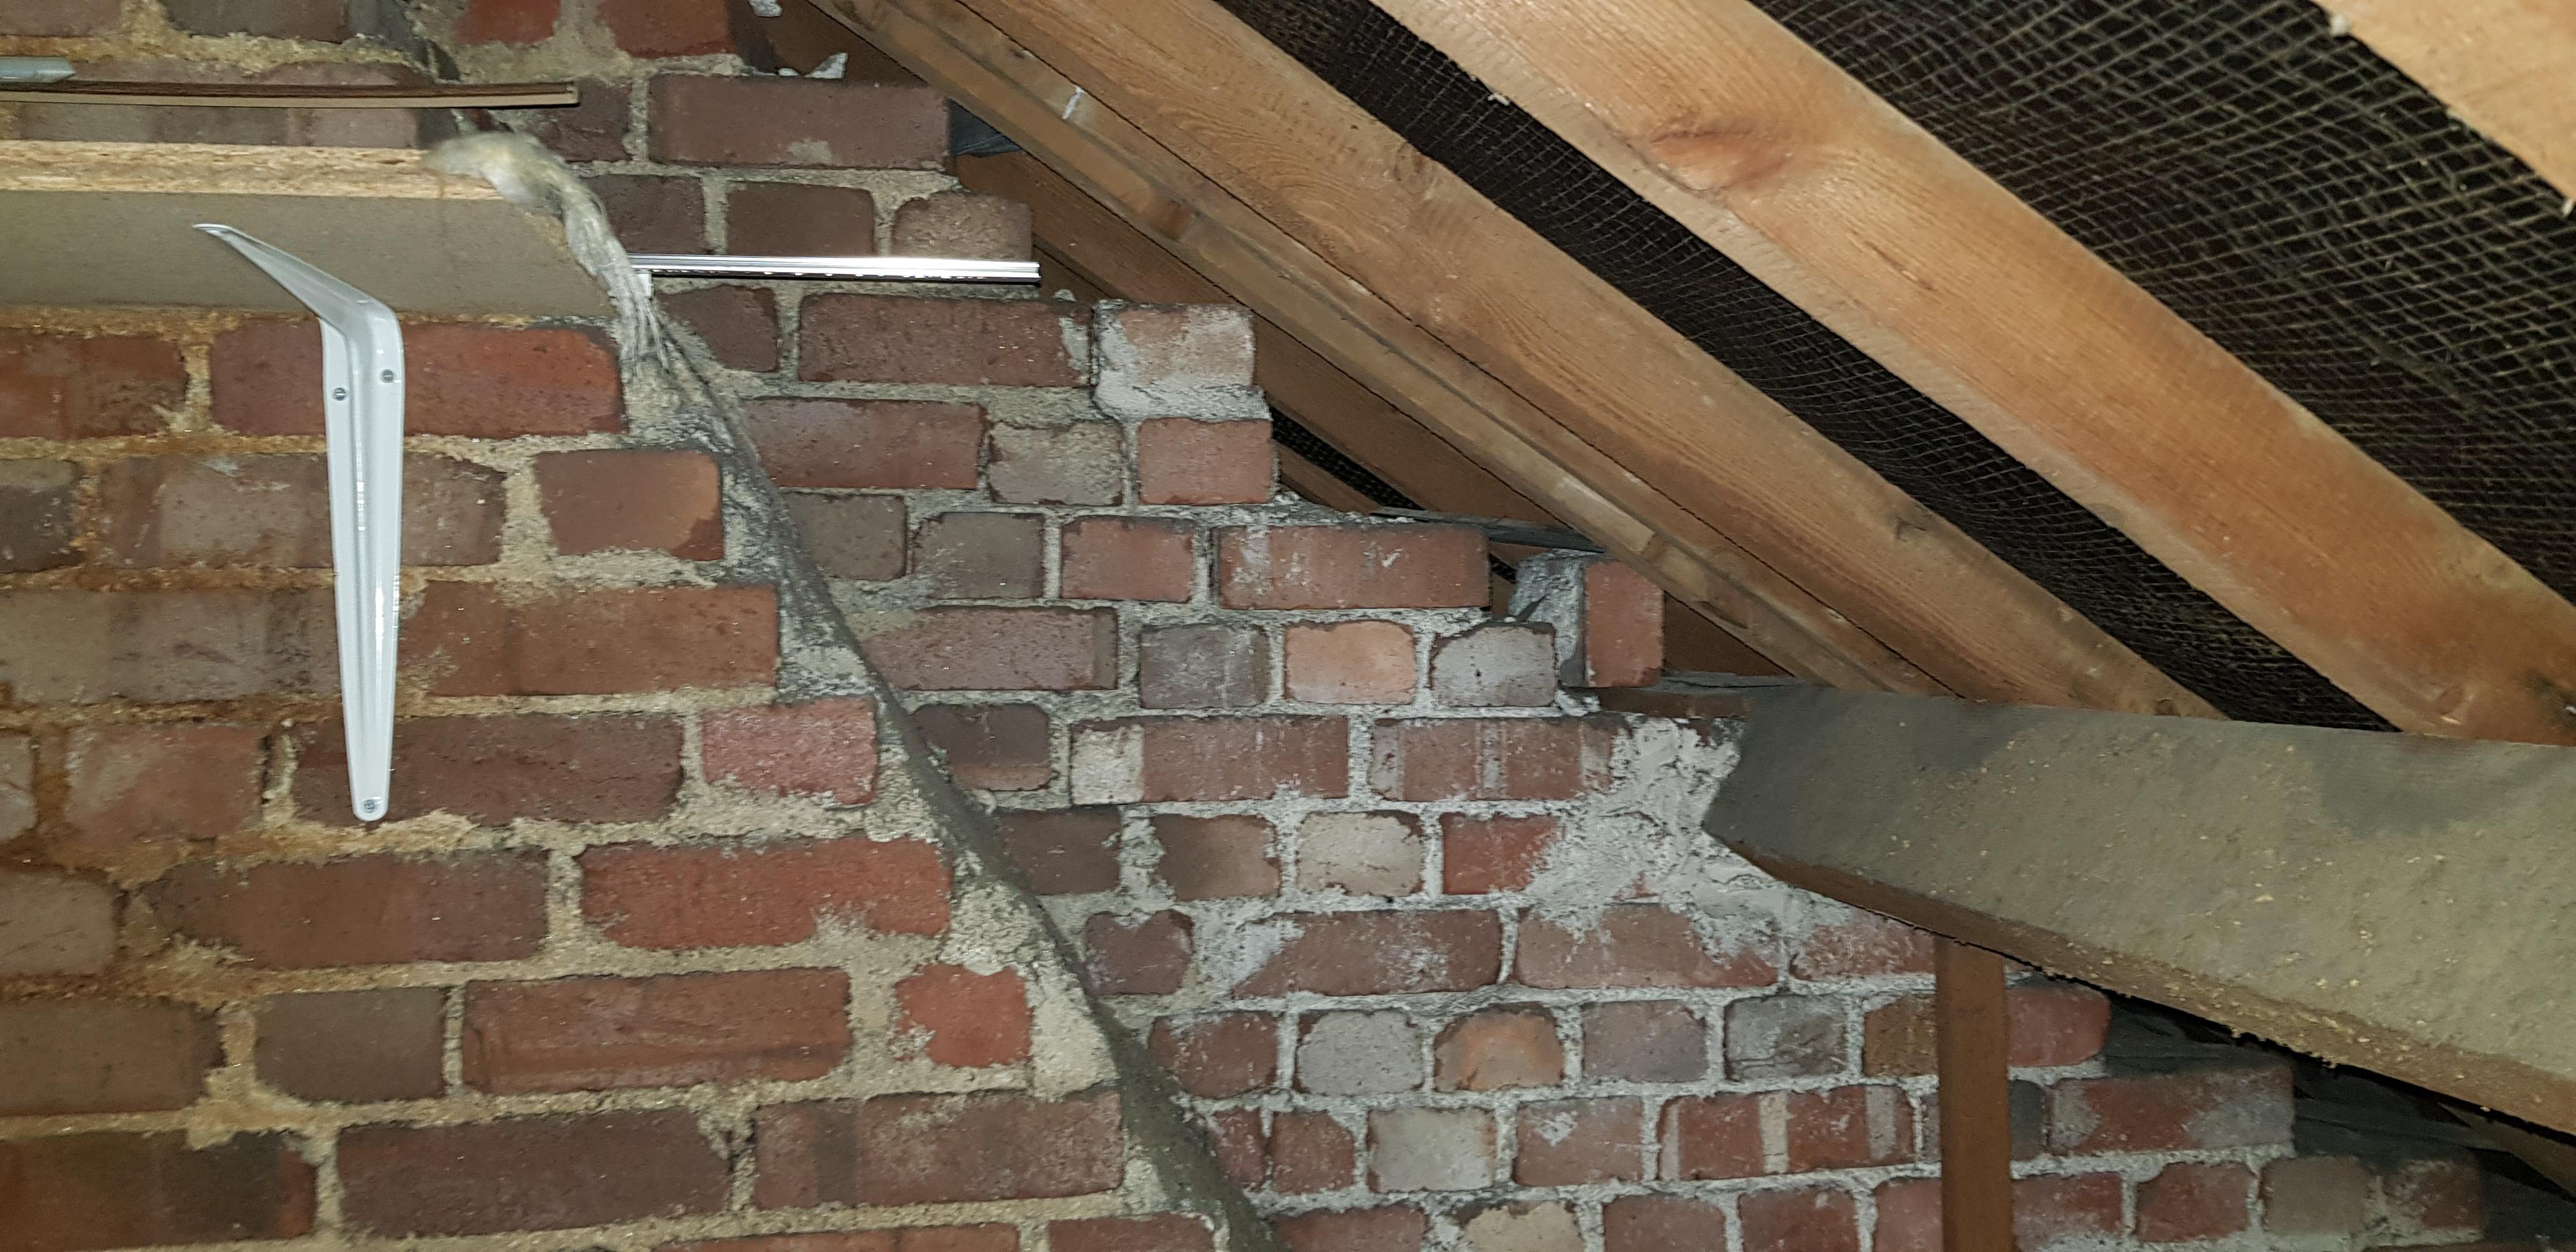
 Hello everyone, I have recently moved into a 1960's mid-terraced property. I had a full survey done at time of purchase and nothing came back of any concern. I went into the loft for the first time and spotted that some brickwork is loose and missing on the party wall on one side of the property - as identified in the attached pictures. I was wondering if anyone can tell me if this is something to be concerned about and could pontentially become an issue over time? Everything else in the loft looks to be in good order, such as the timber supports and i cannot identify any cracking along chimney breasts or other walls. Any help would be greatly appreciated, unfortunatley I do not have a great deal of knowlege in this area. many thanks,
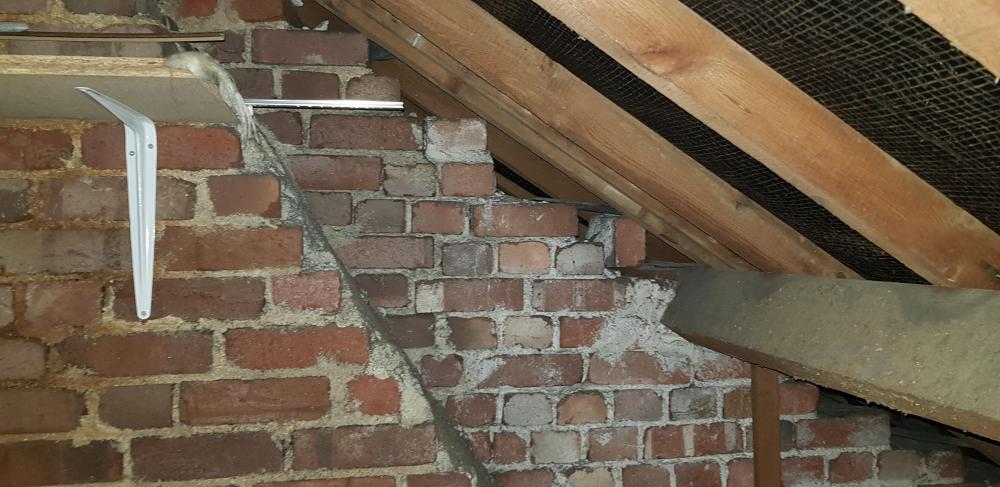
-
 Hi all... so i couldn't see this question/answer in any searches on here... my scenario 600mm plastic inspection chamber (IC) with plastic risers vs brick built manhole both with metal lids. (650mm deep) I've had contradicting advice that plastic IC's break when vehicles are driven over them and brick manholes are the the best way to go. The position of drain will be in the front driveway (hardscaped) for a residential dwelling which is a self build. There is an option to place the new drain further down the existing foul line which will be positioned in proposed soft landscape (non parking area) but that means due to the gravity fall existing drain, i will have to excavated down to a possible 1.1m deep. Look forward to hearing of your experiences and thoughts on longevity and cost solution for this scenario. Andee
 -
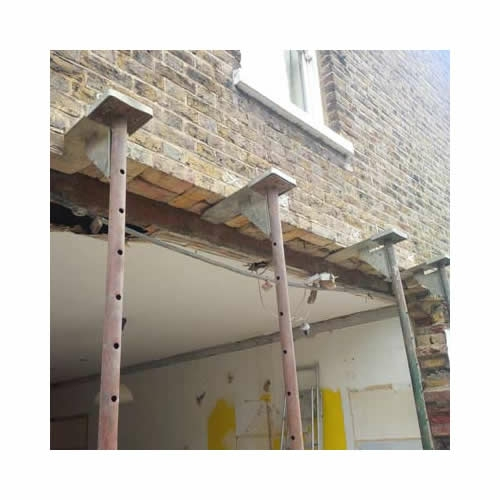
Acrow props – is there an alternative that won’t fall down? Yes there is in some cases. Much depends on your programme, whether you wish to give it a go yourself and how much time you have on your hands. Please feel free to comment / question. I’ll answer if I can (if not, I hope some other BH members will be able to) and provide more detail. Photo 07 showing holes for the needles and the first few temporary works studs going in. The base of the studs are sitting on a sole plate fixed down to a temporary strip foundation. Part of the sub floor has been built up and concreted to provide a working platform. Photo 04 (copied from previous post) In my case I have been dipping in and out of our project. I reckoned that I would need some 25 – 30 Acrow props for the temporary works which would take me about 4- 6 months as I was also mucking about with other bits of the build. To hire 25 props at £ 5.00 per week = £ 125 per week! I could have bought the props but I would have needed to get rid of them after in my case, just gave up on that. I have two or three old props that were used to help tighten up (pre load / stress) the timber propping. The timbers 145 x 45 (grade C24) to form the needles studs, top and bottom sole cost ~ £350.00 ex vat plus a few screws (about 250 number 5 x 80 gold screws I think) to fix things together. I knew that I could recycle the temporary studs to form a new floor we needed and that if I cut back the needles I could also use these to prevent the top steels from moving sideways. This is called simplistically “ lateral restraint”. Also, I used same needles to provide additional what is called “torsional” restraint to the top beam , a slightly different effect, but is it to do with the fact that I used one beam with a top plate to support both the inner and out leaf of masonry which can be loaded in different ways at different times. These different loading patterns cause an uneven loading on the top of a single beam.. resulting in a twisting (torsional) effect. You can see more photos in post 01. Fig A 01 showing proposed rear elevation. How does it work / stay up? The starting point here is to calculate the amount of load. With this house the roof spans front to rear, the attic is full of stuff, the walls are rendered brick cavity walls and you have part of the weight of the new extension roof that is now attached / built into the outer leaf of the house. Once you calculate this you end up with a working load you need to hold up of round about 25 kN/m run of wall. Approximately 1.0 kN (kilo Newton) is ~ 100kg so 25kN/m is about 2.5 tonnes per metre run of wall. Thus if you put your needles at 600mm centres then each cluster of needles has to carry 0.6 x 25 = 15 kN (1.5 tonnes) and the studs supporting the needles at each end need to carry a vertical load of roughly 0.5 x 15 = 7.5 kN (0.75 tonnes). These types of loadings are as about as much as you can “do” for this type of system. There are other ways but you need more height for timber needles. To make life a bit more difficult the window lintels on the first floor cause the load from the roof to be unevenly distributed so some needles need to carry more load than others. You can see from the photos that some needles are in pairs, some are a cluster of three. In terms of the studs these needed doubling up in places and the whole lot horizontally braced at mid height with some diagonal bracing just to stiffen the whole lot up. While this sounds like a lot of work once you get going it’s actually quite quick. This approach is a little different from using Acrow props. With Acrows you wind up the prop to preload the system so that the upwards force is approximately equal to load the wall you are taking away is carrying. Aside, If you are Acrow propping things then be careful not to over tighten the props as you can easily start to lift parts of the house accidentally! Here, what I did was to use a combination of the spare props I had combined with timber wedges to pre stress the system, one set of needles at a time. The other thing is that over time the timber can shrink / creep a bit so I was careful to get the timber dry first and then monitor the system as I went along. All sounds complicated but once you grasp the principles a lot of it is common sense and this is not a reinvention of the wheel. I know a few old joiners and brickies that still remember doing this when they were serving their time. Some extra information that may help. As always, comments welcome. Options for beams- In terms of material vs labour cost it can sometimes be beneficial to design the steel beam as a single beam with top plate. The one you see here forms part of a double flat portal frame. You will also see designs that use a separate frame for the inner and outer leaf, a question of balance, each project is different. You can introduce a problematic thermal bridge at times if you deploy these single portal principles to an external wall, but in my case the steels are now internal.. the thermal bridging is resolved in the main. Propping considerations. Below is a screen shot of part of a temporary propping design for a set of 4.0m bifold doors etc. There was another big chunk of the rear wall to come away at the same time which is not shown. The contractor here was stopped from working until remedial action was implemented. Screenshot propping.docx Fig 02: The purple lines are the props and what is called the lacing / bracing system to stop sideways movement. Work was stopped when this was discovered. Part of the contractor’s defence was that “he was insured” Photo 08 Photo 09 A few points. The Contractor had not investigated the ground under the slab and the base of props can slide about. The site investigation had revealed this ground was very soft. Use of Strong Boy type supports at the head of the props.. these have a reduced load capacity and not suitable for the loads to be carried in this case. Props well out of plumb, no bracing.. further comments welcome. On a finishing note the timber propping scheme may look a bit rough but it was designed and executed with no unexpected movement. If this approach may suit you then as always check with or be a competent person. Thanks for reading.
-
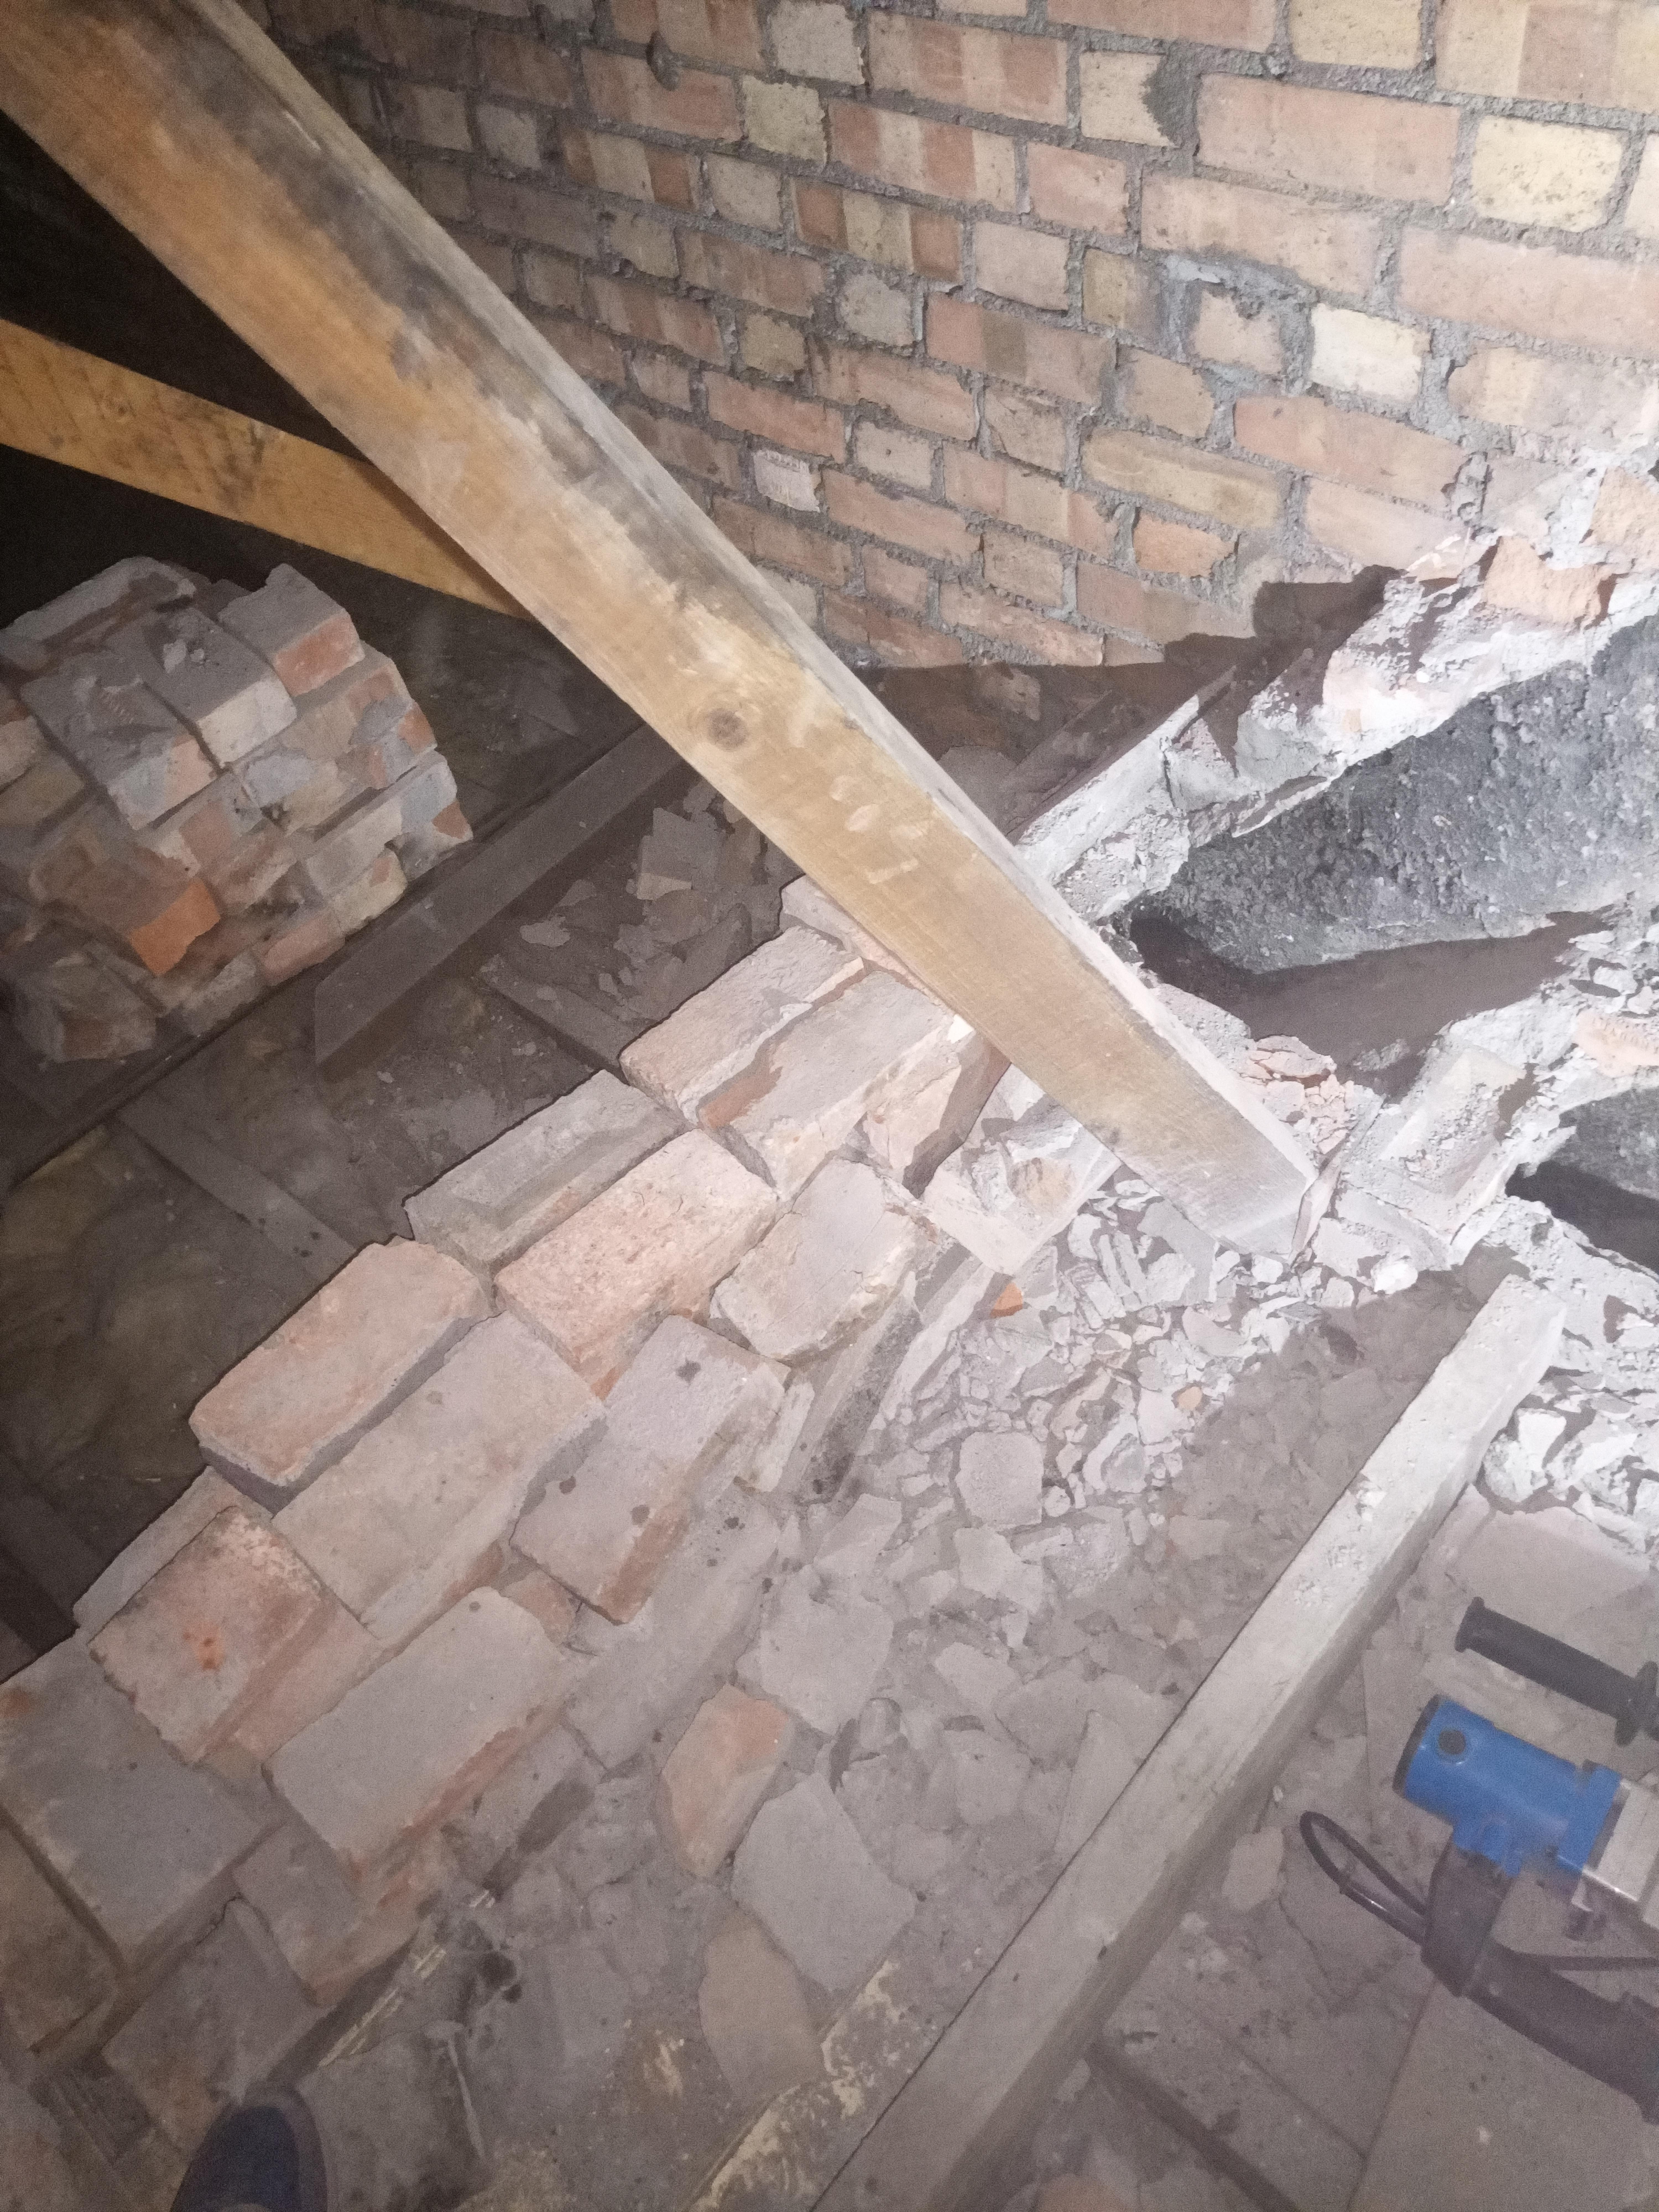
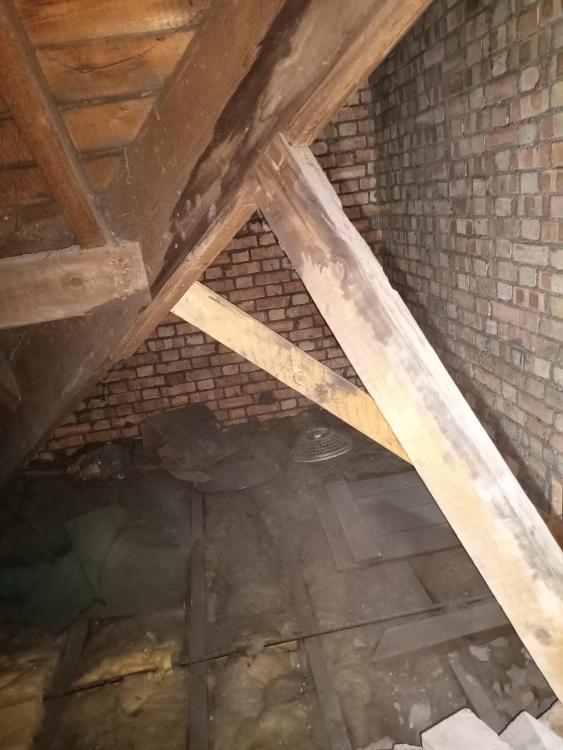
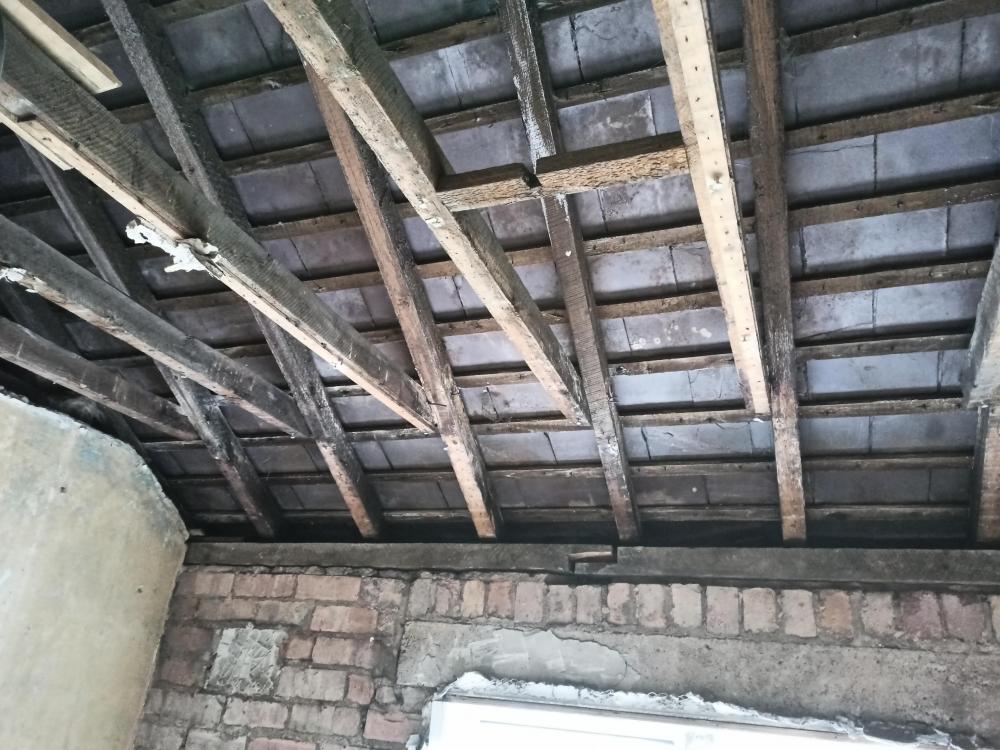
Hi All, Me and my girlfriend bought our first house recently and got straight to work with the improvements. There's lots of jobs to tackle but the first one we wanted to do was remove two first floor chimney breasts. We've had a builder in to fit gallows brackets and a steel across the span but as Ive started the removal of bricks I noticed that one of the roof supports is tied into the chimney itself below where the brackets were fitted and will likely need supporting somehow. See pictures for what I'm up against. We're hoping to get the removal sorted in the next week ready to move in a couple of weeks and clearly don't want to remove more until I'm confident the roof is supported. Any advice welcome!!

-
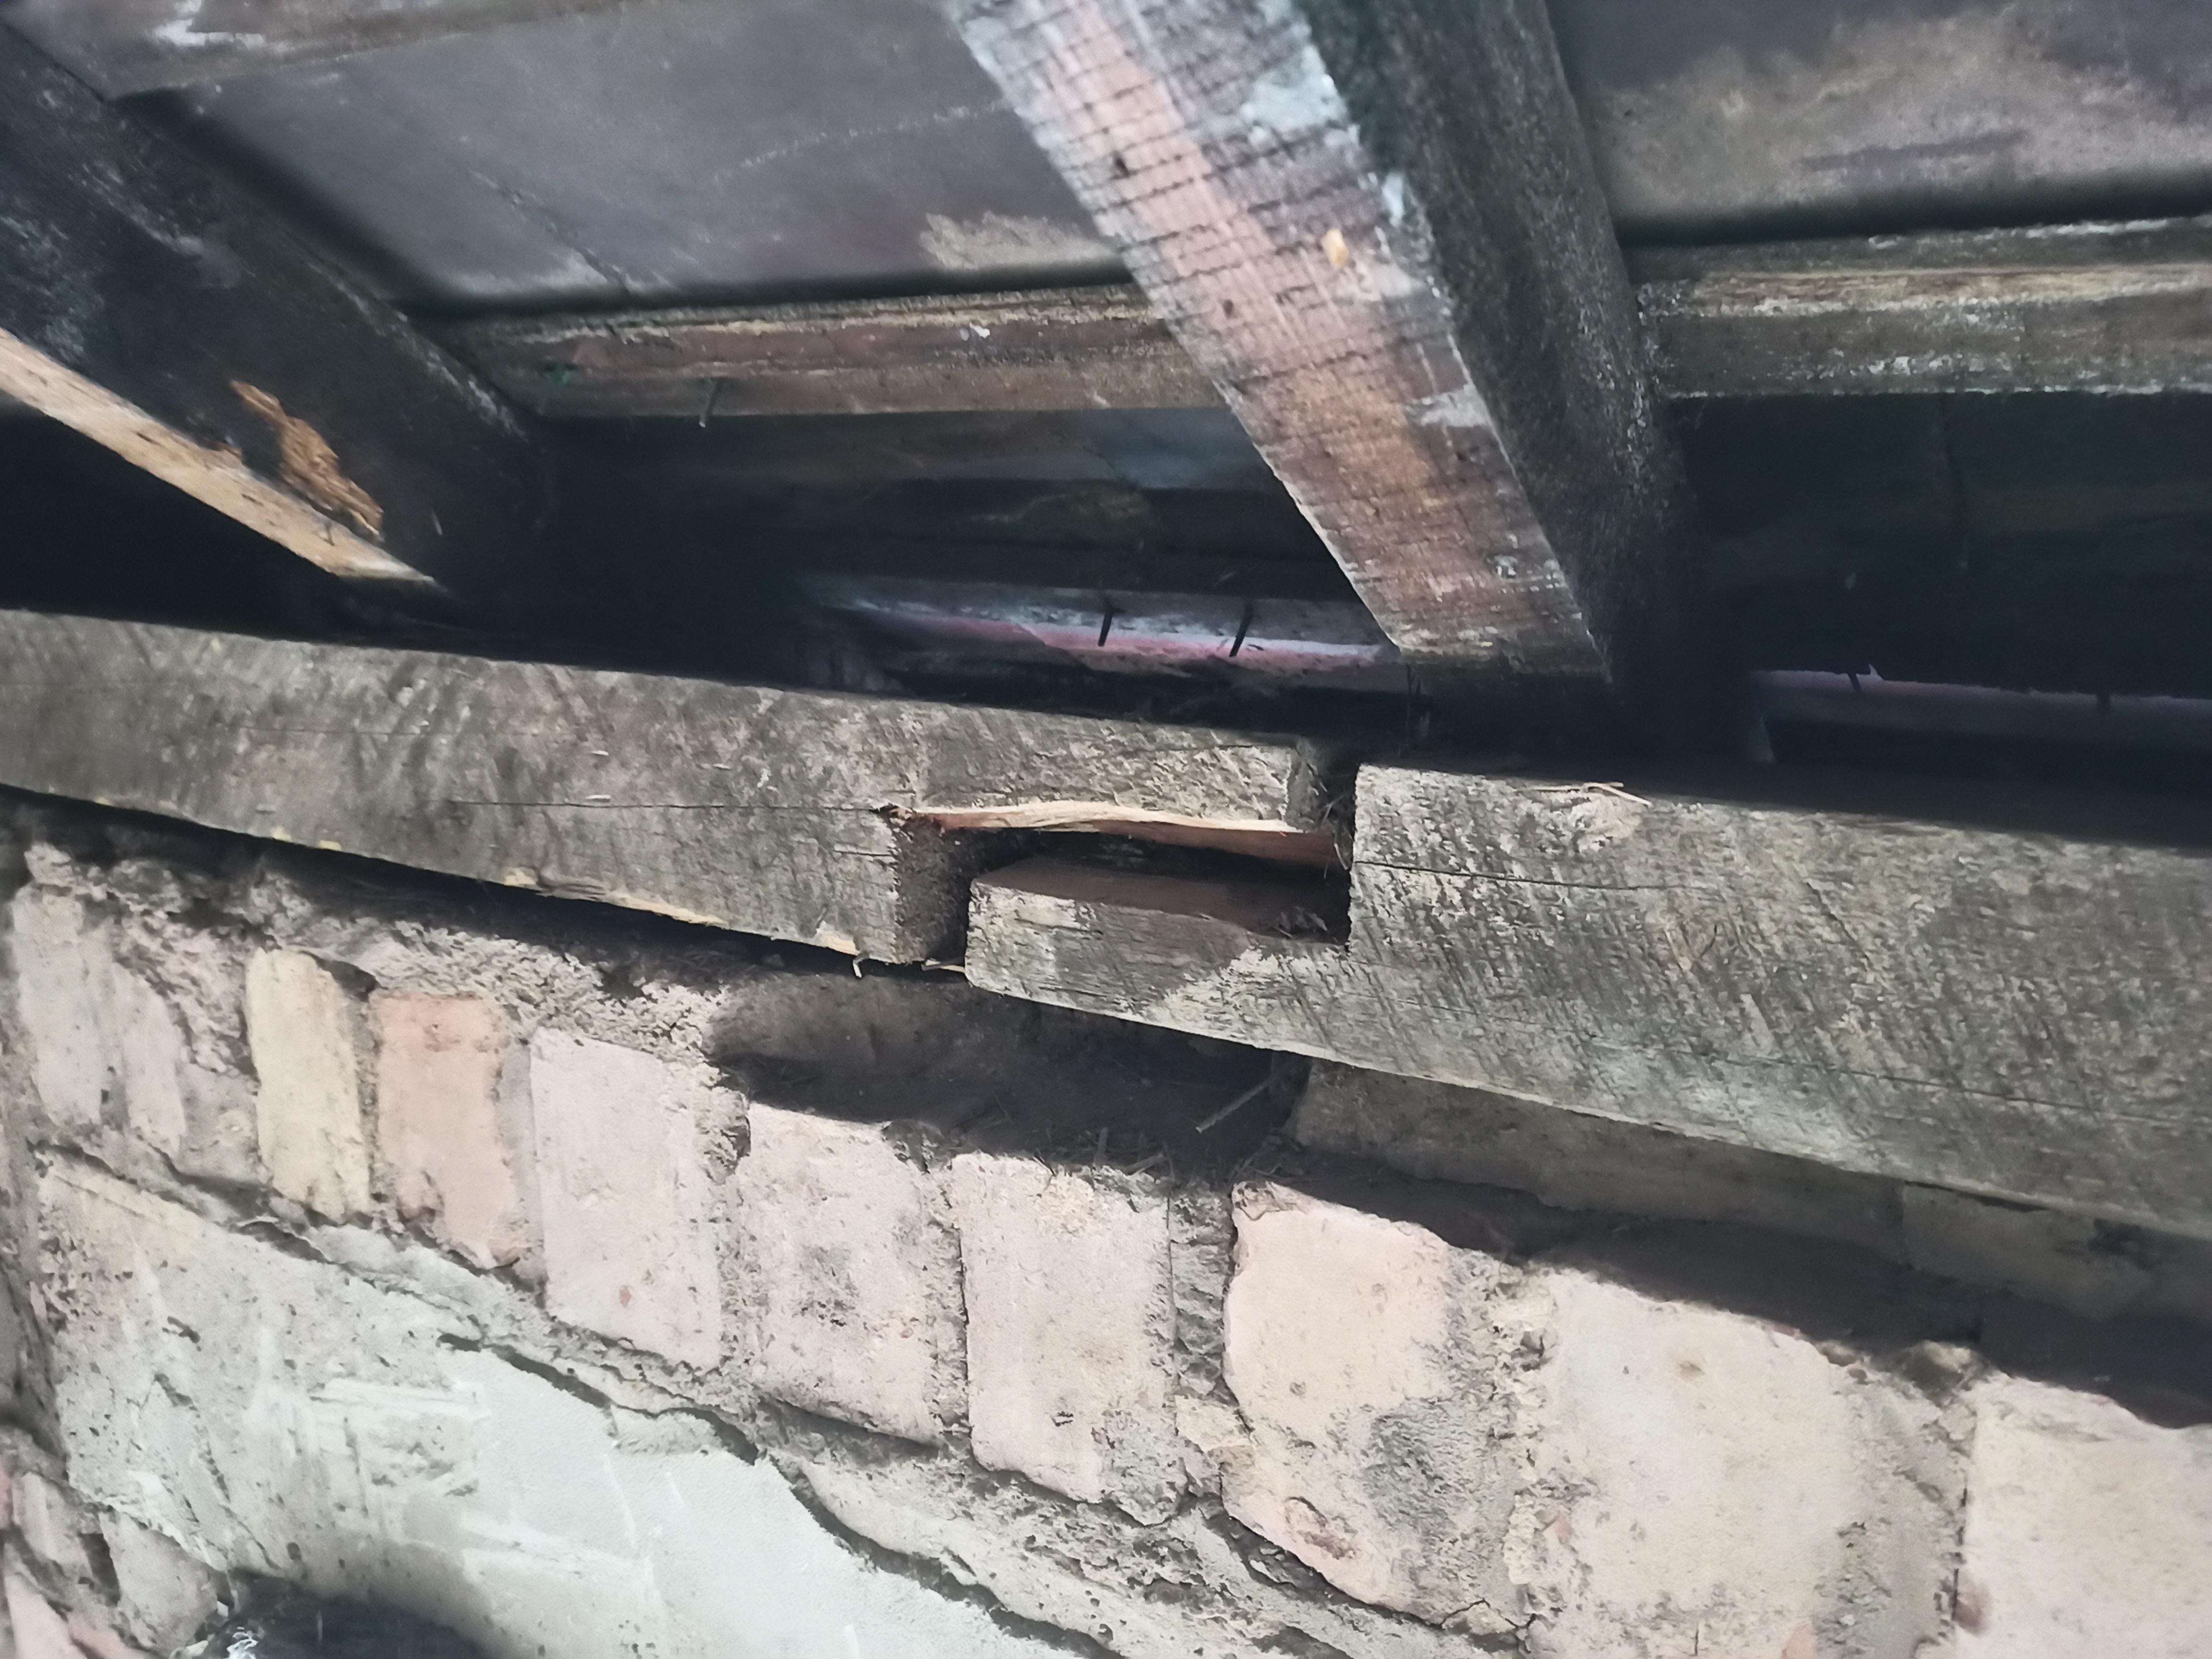
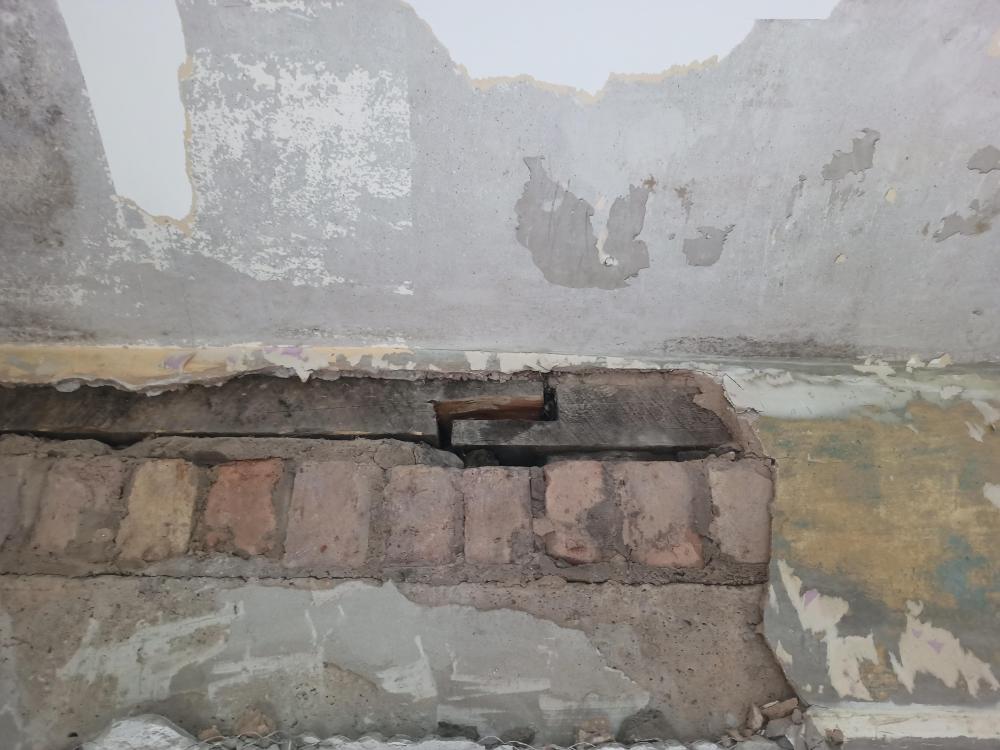
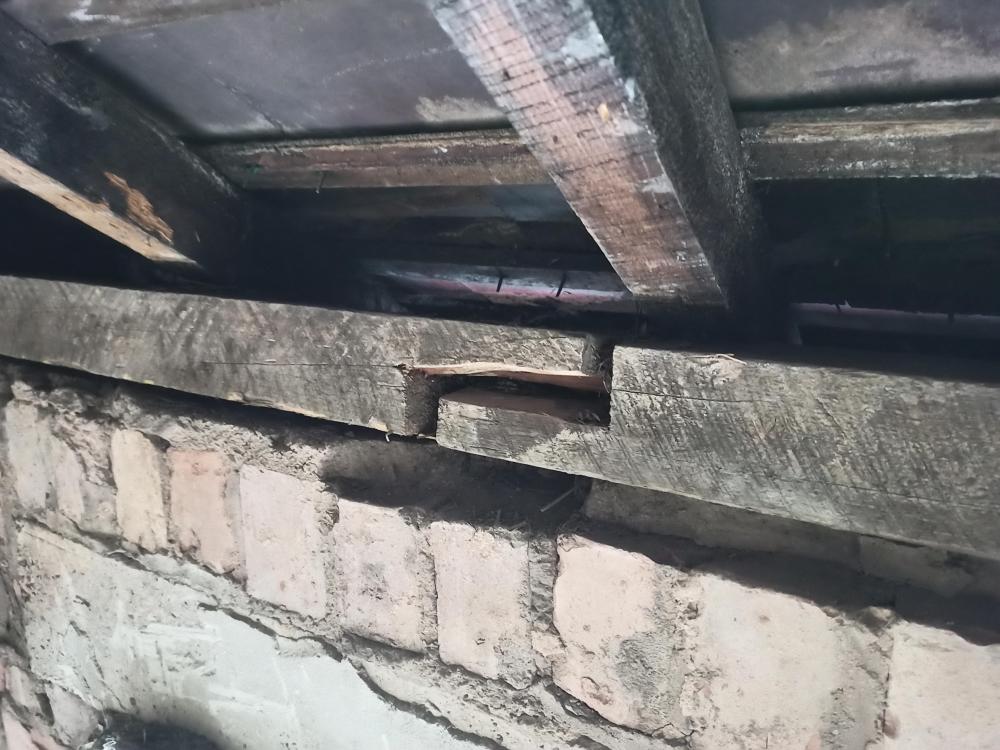
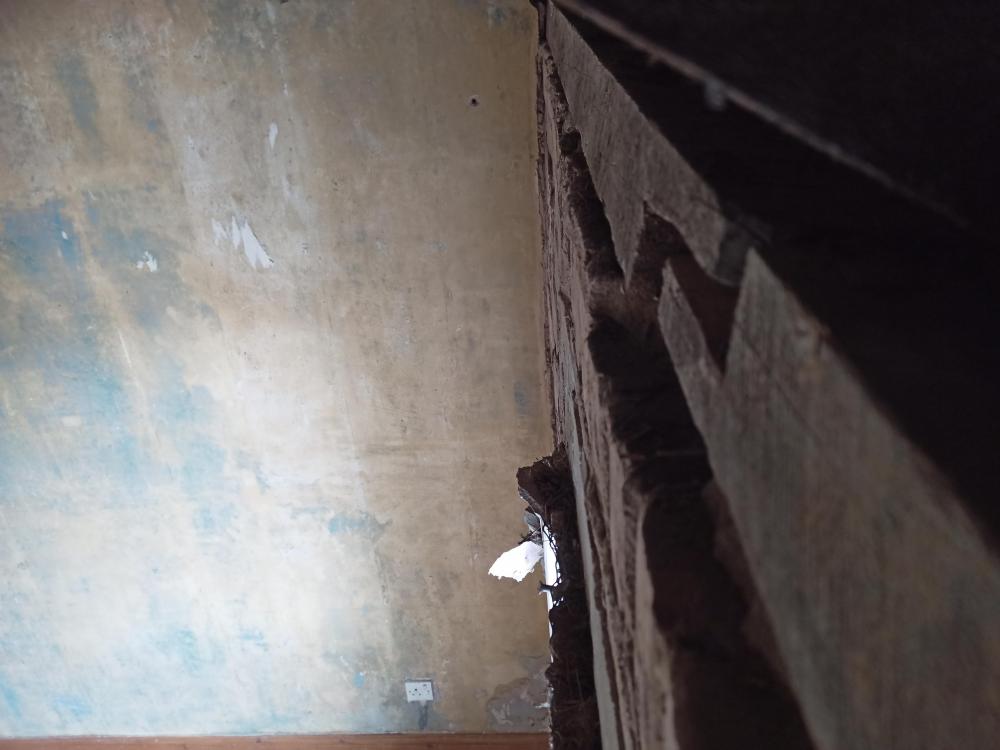
Hello everybody, I have been striping plaster in the 1st floor of my house and I have found out possible quite serious problem which I am not sure how to treat. The wall plate overlap connection is broken and the beam itself has been pushed few cm outwards. The beams ends aren't aligned. Whole thing seems to have happened in the past and seems stable at the moment but I want to make new ceilings hanging on rafter ties and I am worried about future stability of the roof. The idea I came up so far is to add some new rafter ties sitting slighly higher than the current ones to prevent roof from spreading further and add some heavy duty L-bend steel straps fixed to the wall and the beam. Still not sure how to reconnect two beams. Do you thinks this is feasible or have any other ideas? Should I get structural engineer to look at it? Thank you very much for any inputs Vaclav
-
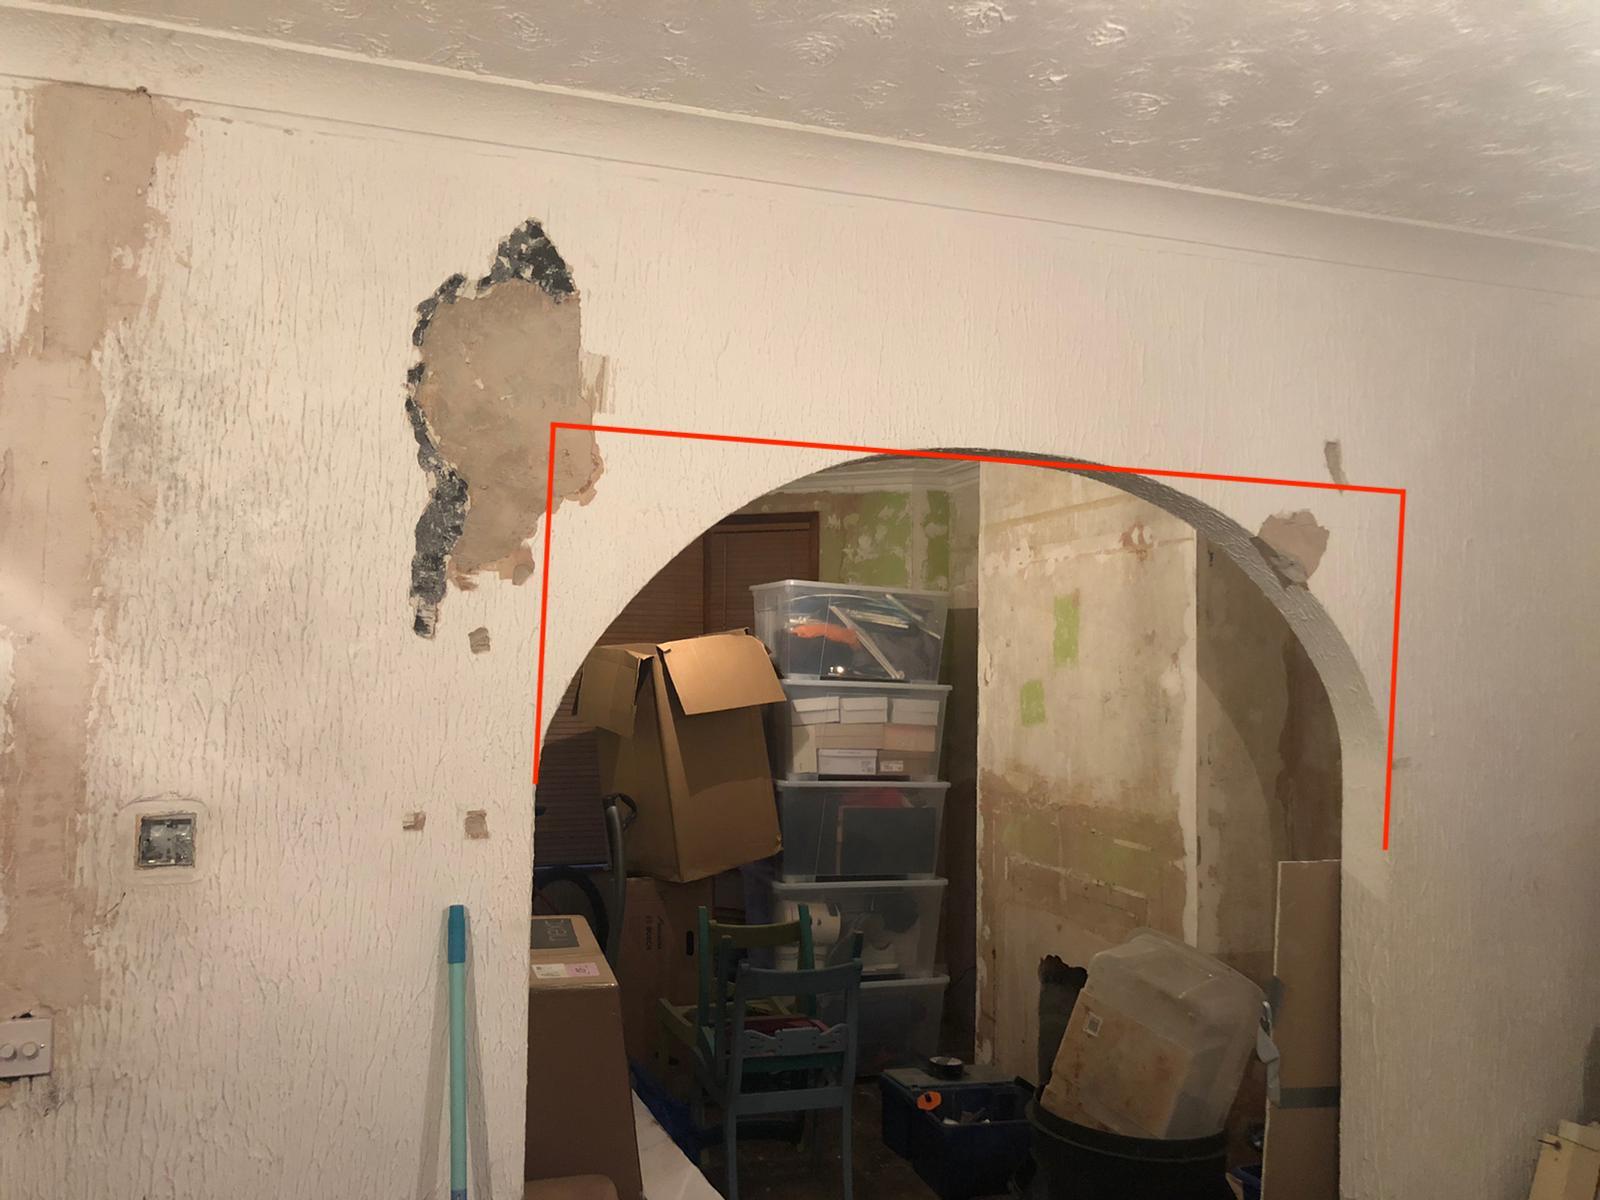
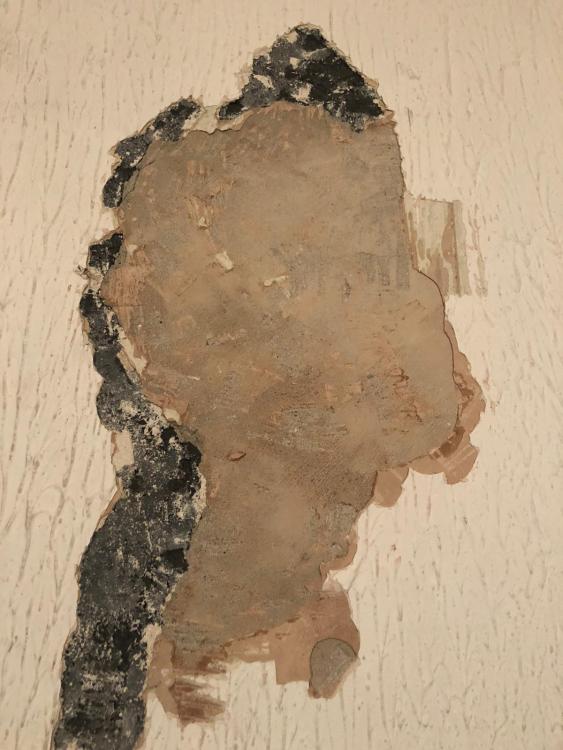
Hello! I want to square-off the archway as shown in the picture below, marked-up in red. I've chopped away some of the artex to reveal some concrete which has the original black plaster around it I believe. By looking at the photos, do you think there is a lintel or some sort of support to hold up the walls above? Can I go ahead and square the arch off? Is there a way I can find out if there is a lintel in there? - The wall with the arch is a supporting wall I believe as has foundations below it, solid walls above it and has joists resting on it in the attic. Any help would be massively appreciated. Many thanks - Charley

-
Trying to be diplomatic here. Our architect has drawn up our living room to have floor to ceiling glazing on two walls meeting at a corner. This is to make the most of a nice view. We understood that there would have to be a vertical steel of some kind to support the floor above (a room-in-roof constructed from timber attic trusses with slate cover @ 50' pitch) but the SE drawings have come back with a massive 200 x 200 I beam rammed right up to the glazing frames. That's before boxing around and finishing in the impossibly tight gap to the glass. On asking if this could be switched for a slimmer alternative, we're simply being told 'no'. Similar constructions I've seen elsewhere utilise 100mm square posts although these may have been single storey. Anyway, a wide variety of sections and wall thicknesses are available out there but the SE won't budge. He's been paid already and TBH we've only just picked this up while studying the drawings. I can't see a way out of this as hiring a different SE we may be back in the same situation only £££'s worse off. It doesn't seem to be any real fault of the architect although they might have warned us. We haven't got the engineering knowledge to call out the SE on the decision and the plans already got building approval for the giant steel. Any thoughts on how to handle this? I mentioned diplomacy at the start of this post because IME these kind of professional can get a bit cagey when their decisions are brought into question. If not done right, all flexibility can go out of the window.
-
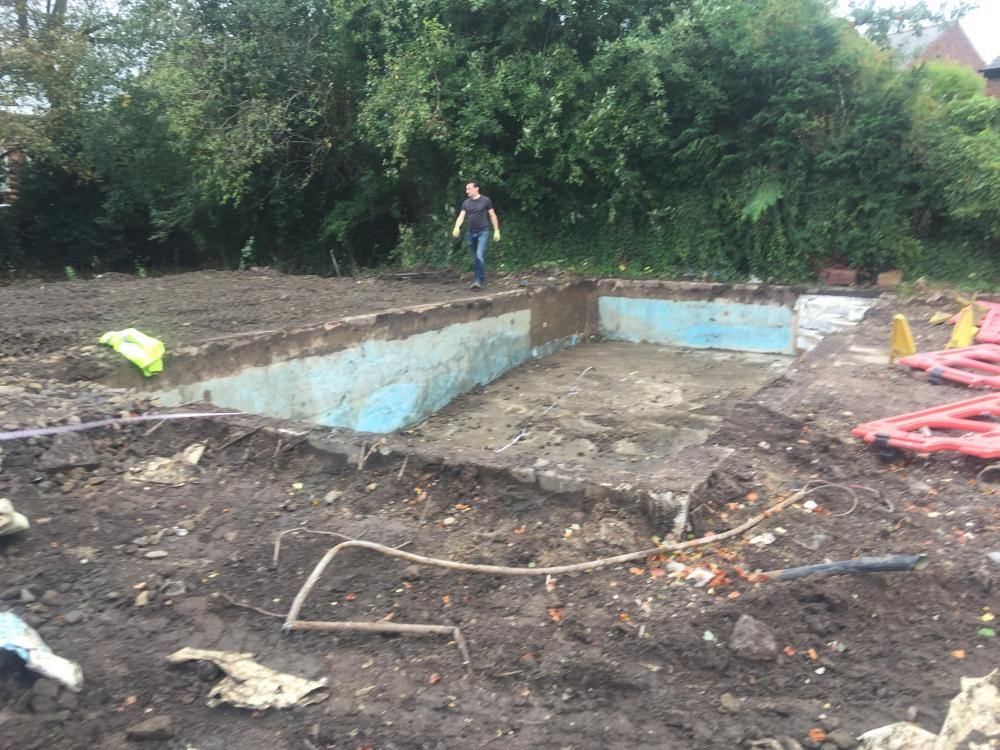
So here's something we found in the ground when levelling our site ... an old swimming pool. I said "under the house" in the title, but it's only under the ground surface level by inches and therefore a basement leisure area is not an option. As it falls half under and half outside our new house's footprint we have a problem. What do we do with it? Remove it all and pay for the concrete to be taken away say. 4 loaders + 1 or 2 days labour Put a metal deck on top and moth ball it. c. £2k materials + 2 days labour. Expensive and doesn't achieve a great deal Fill it in with hardcore and pretend it's not there. Cheap; we have loads of hardcore. Raft foundations will go on top. But will this be safe? We could create a 3m x 2m x 1.25m high wine cellar beneath the kitchen, but I'm trying to guestimate costs and I think it will be thousands of pounds. The glass hatch alone is £2k and that's assuming MBC can work their foundations around this. Has anyone experienced anything like this before? and / or, can anyone offer any other solutions? (nice answers only please ?)
-
Hi My questions/advice needed relate to an extension that I am finishing off. I have 2 RSJ's spanning about 3m and the edge of them is exposed to the external elements. The whole extension will be rendered with a monocouche render to match the rest of the house. You may question why there is a mixture of brick and block ... well unfortunately the first bricklayer let me down significantly, so I had to ask another guy I knew from a while before (but was not available when I originally started the project) to complete the work (hence the change from facebrick to render). My question/concern is that although the RSJ's are painted in a red primer, I am concerned that they will rust over time causing the external render and brickwork to crack. There are no fitted cavity trays, but there is a damp membrane a little further up the cavity that directs water from the internal brickwork skin to the external brickwork. There even appears to be some early discolouration that may be some surface rust. So before I cover everything ... am I being overly paranoid and if not then what should I use to protect? Also, even if I paint/cover the edges exposed, will the weather/rain penetrate the first skin of bricks/blocks and cause rust to continue? I was thinking of putting cement board up across the whole frontage and then rendering? But I am not even sure if the render itself will prevent the water ingressing to the RSJ's? (I will be having some bifold doors under these RSJ's) Thanking you all in advance!


.jpeg.901ea493a89e8cfcf2a49fc8dd5a0a7d.jpeg)
.jpeg.df034b549f51a4d2abfa72a49d816b25.jpeg)