Search the Community
Showing results for tags 'roof'.
-
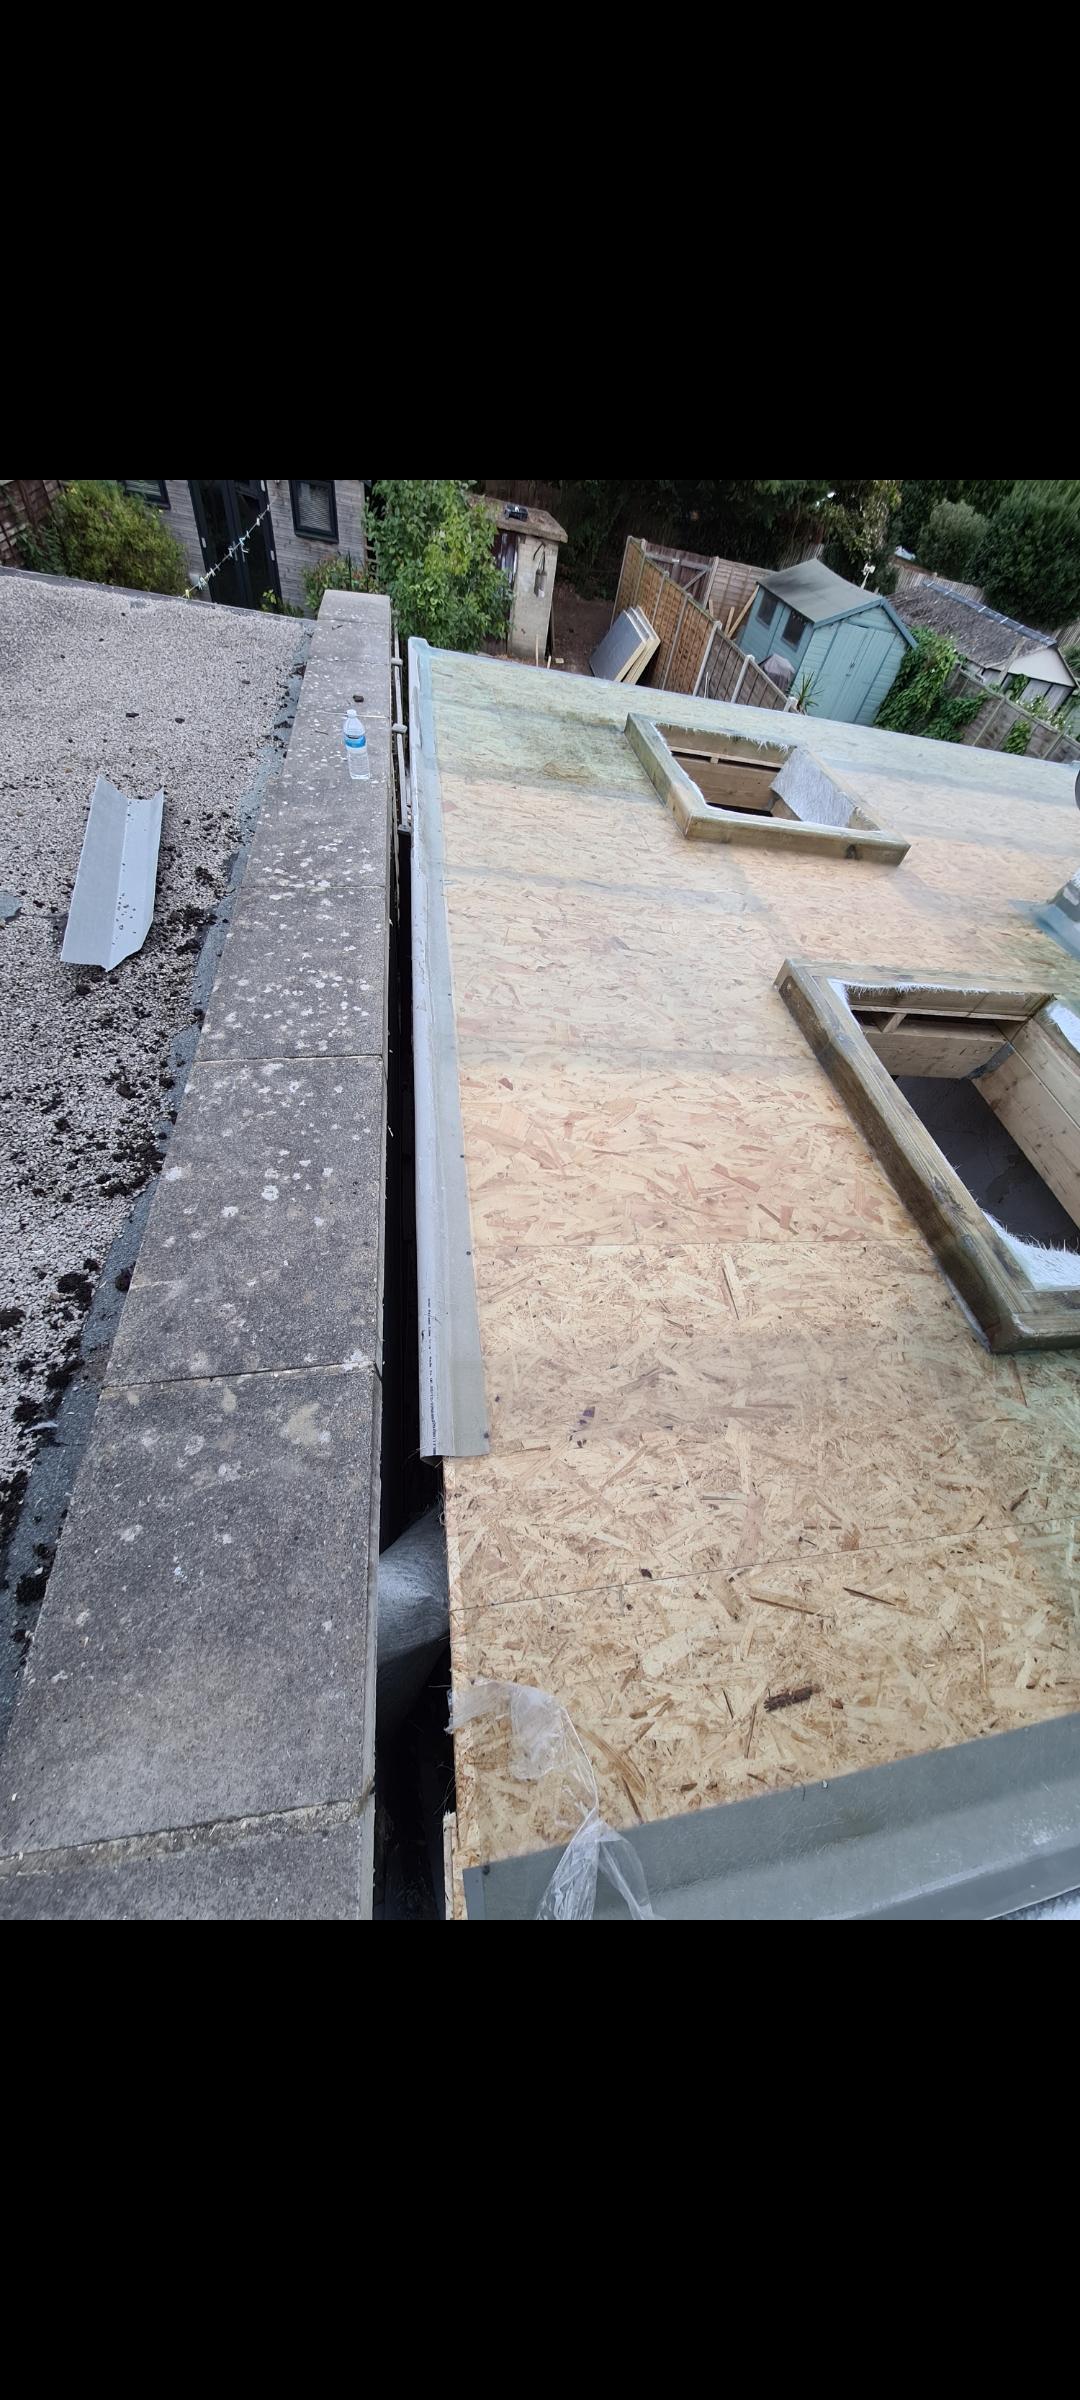
This week the roof was cut in. Can see the spaces for the Velux rooflights and get a different picture of the inside - the vaulted ceilings in the rear living area in particular. The builder recommended a ceiling in the upstairs bedrooms at around the 3 meter / 9 foot mark which is high enough even if you're bouncing on the bed! Still leave a bit of space for storage so may leave a small hatch and floor this area after setting it up. It's a warm roof so this is all conditioned space. Next week they'll add OSB and Solitex WA, then baton and counter baton and that's them finished! The roofer is due in after Easter to install the tiles and the Velux will go in sometime then also. There is also an AEV for venting the soil pipe to install. There's a ventilated ridge, and other details that will be interesting to see installed. Should stop ice dams forming! Big decision point is around the rear picture window - it's to be metal clad. There is the option of adding additional insulation on the outside and then stud work for the ventilation behind the steel cladding or just insulate internally only. Also the roof of this feature needs to be worked out. Some drain to the back of the house but that needs a gutter. Most drain towards the house which I didn't realise and the water channels to either side. This junction has to be perfect or it ensures rain ingress. There's a good local team recommended by the builder so I've left word and hope they'll get in touch next week so they can build out the 7 degree backward slope needed for the roof of this area. There is a lot of metal posts in the house which worry me but I had a few hours onsite today to take my time and see if it's something to worry about or not. The contact area with the foundation or wall are very small so there may be cold spots but I feel for a first attempt, the detailing is sufficient. I just didn't realize how decisions about moving walls etc impacted structural changes until I saw them onsite. Decisions made years ago haunting me a bit, but I can live it! It's still a wonderful house. The next two will be better!! The air tightness will be a challenge but I got some samples of Tapes, Gutex and Phonotherm I plan to use by driving to the company I'm buying them off and seeing their warehouse up front. I hope to entice one of their technical guys onsite for an hour to get their advice on a few things. I expect a detailed post at a future date to address this. Lots to think about. I plan on using Moy Metac in the timber frame wall - 220mm worth. The frames are mostly at 600mm centers. I'd calculated I'd need 43 rolls off the plans but now looking like 53 when I did a quic calc onsite. They do a roll that is exactly 220mm deep and 1200mm wide so plan to cut in 1/2 and it should press fit in the space nicely. I could do this before the windows and doors arrive, just need to find a good price! And hope it isn't swiped! Windows to be measured either next week or 2 weeks later due to builders holidays. Delivery 9-10 weeks after that. Bricklayer, still chasing quotes! Hope to get that done Late April / Early May. Waiting on council to approve brick style as the plain red in the estate isn't to my taste, I've gone for a blend of brown, red and beige. As a project there's a LOT to think about, decisions to be made and money to be managed! Spending is SO easy, tracking it and keeping in budget not so much!!
-
Hi, hoping for some advice reassurance please. We are adding an extension to the back and side of our solid wall 1920s house. After much deliberation we have decided on a pitch roof, I prefer the look of this and also we won't need planning consent. The architect has designed a 15 degree pitch, but we do not have room fot the recommended 150mm upstand due to 2 upstairs windows, however the architect has reassured us that the reduced upstand is still with the guidelines. We have had a couple of builders take a look at the whole of our plans so we have some reassurance that what we are doing is ok before the architect completes the building reg drawings. One has suggested that we may encounter problems with a reduced upstand, albeit within guidelines and is suggesting that we incorporate a gully tray. Not sure what this is but tried to Google. Can this be done on solid walls? What are people's thoughts? Thanks in advance.
-
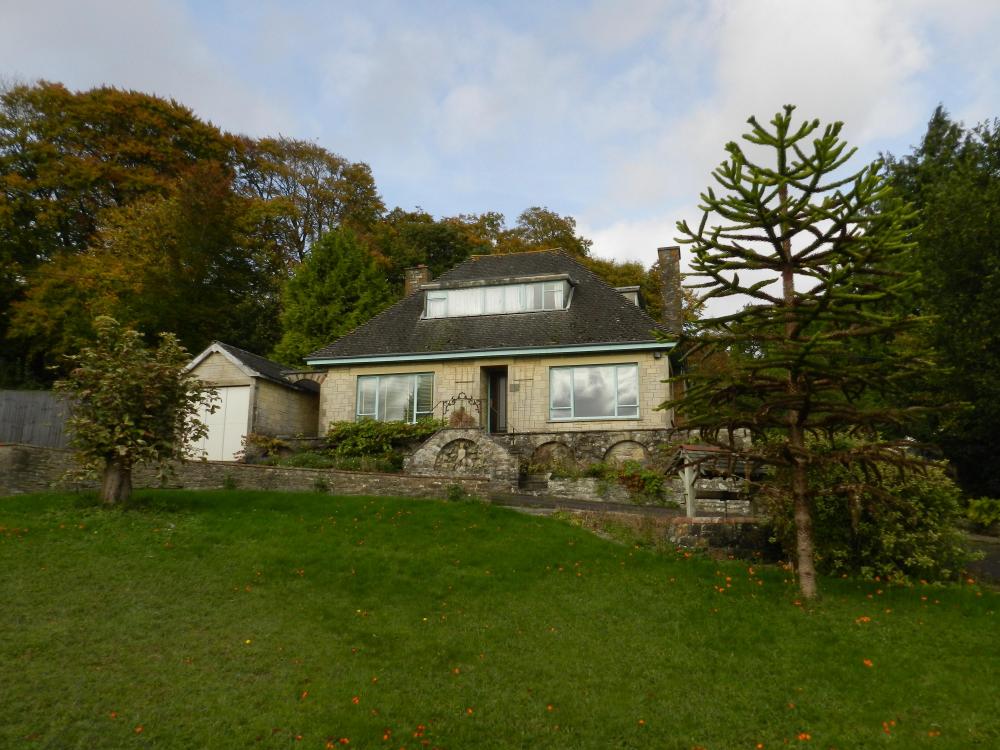
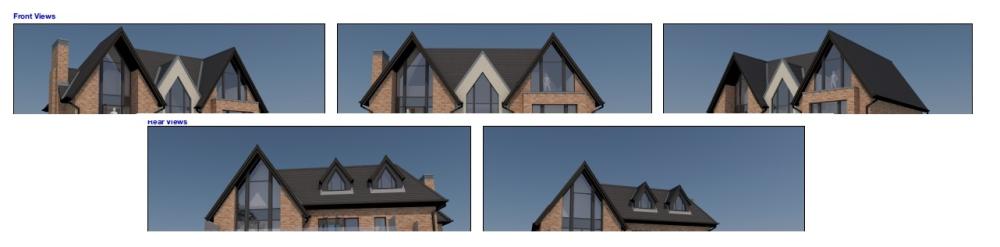
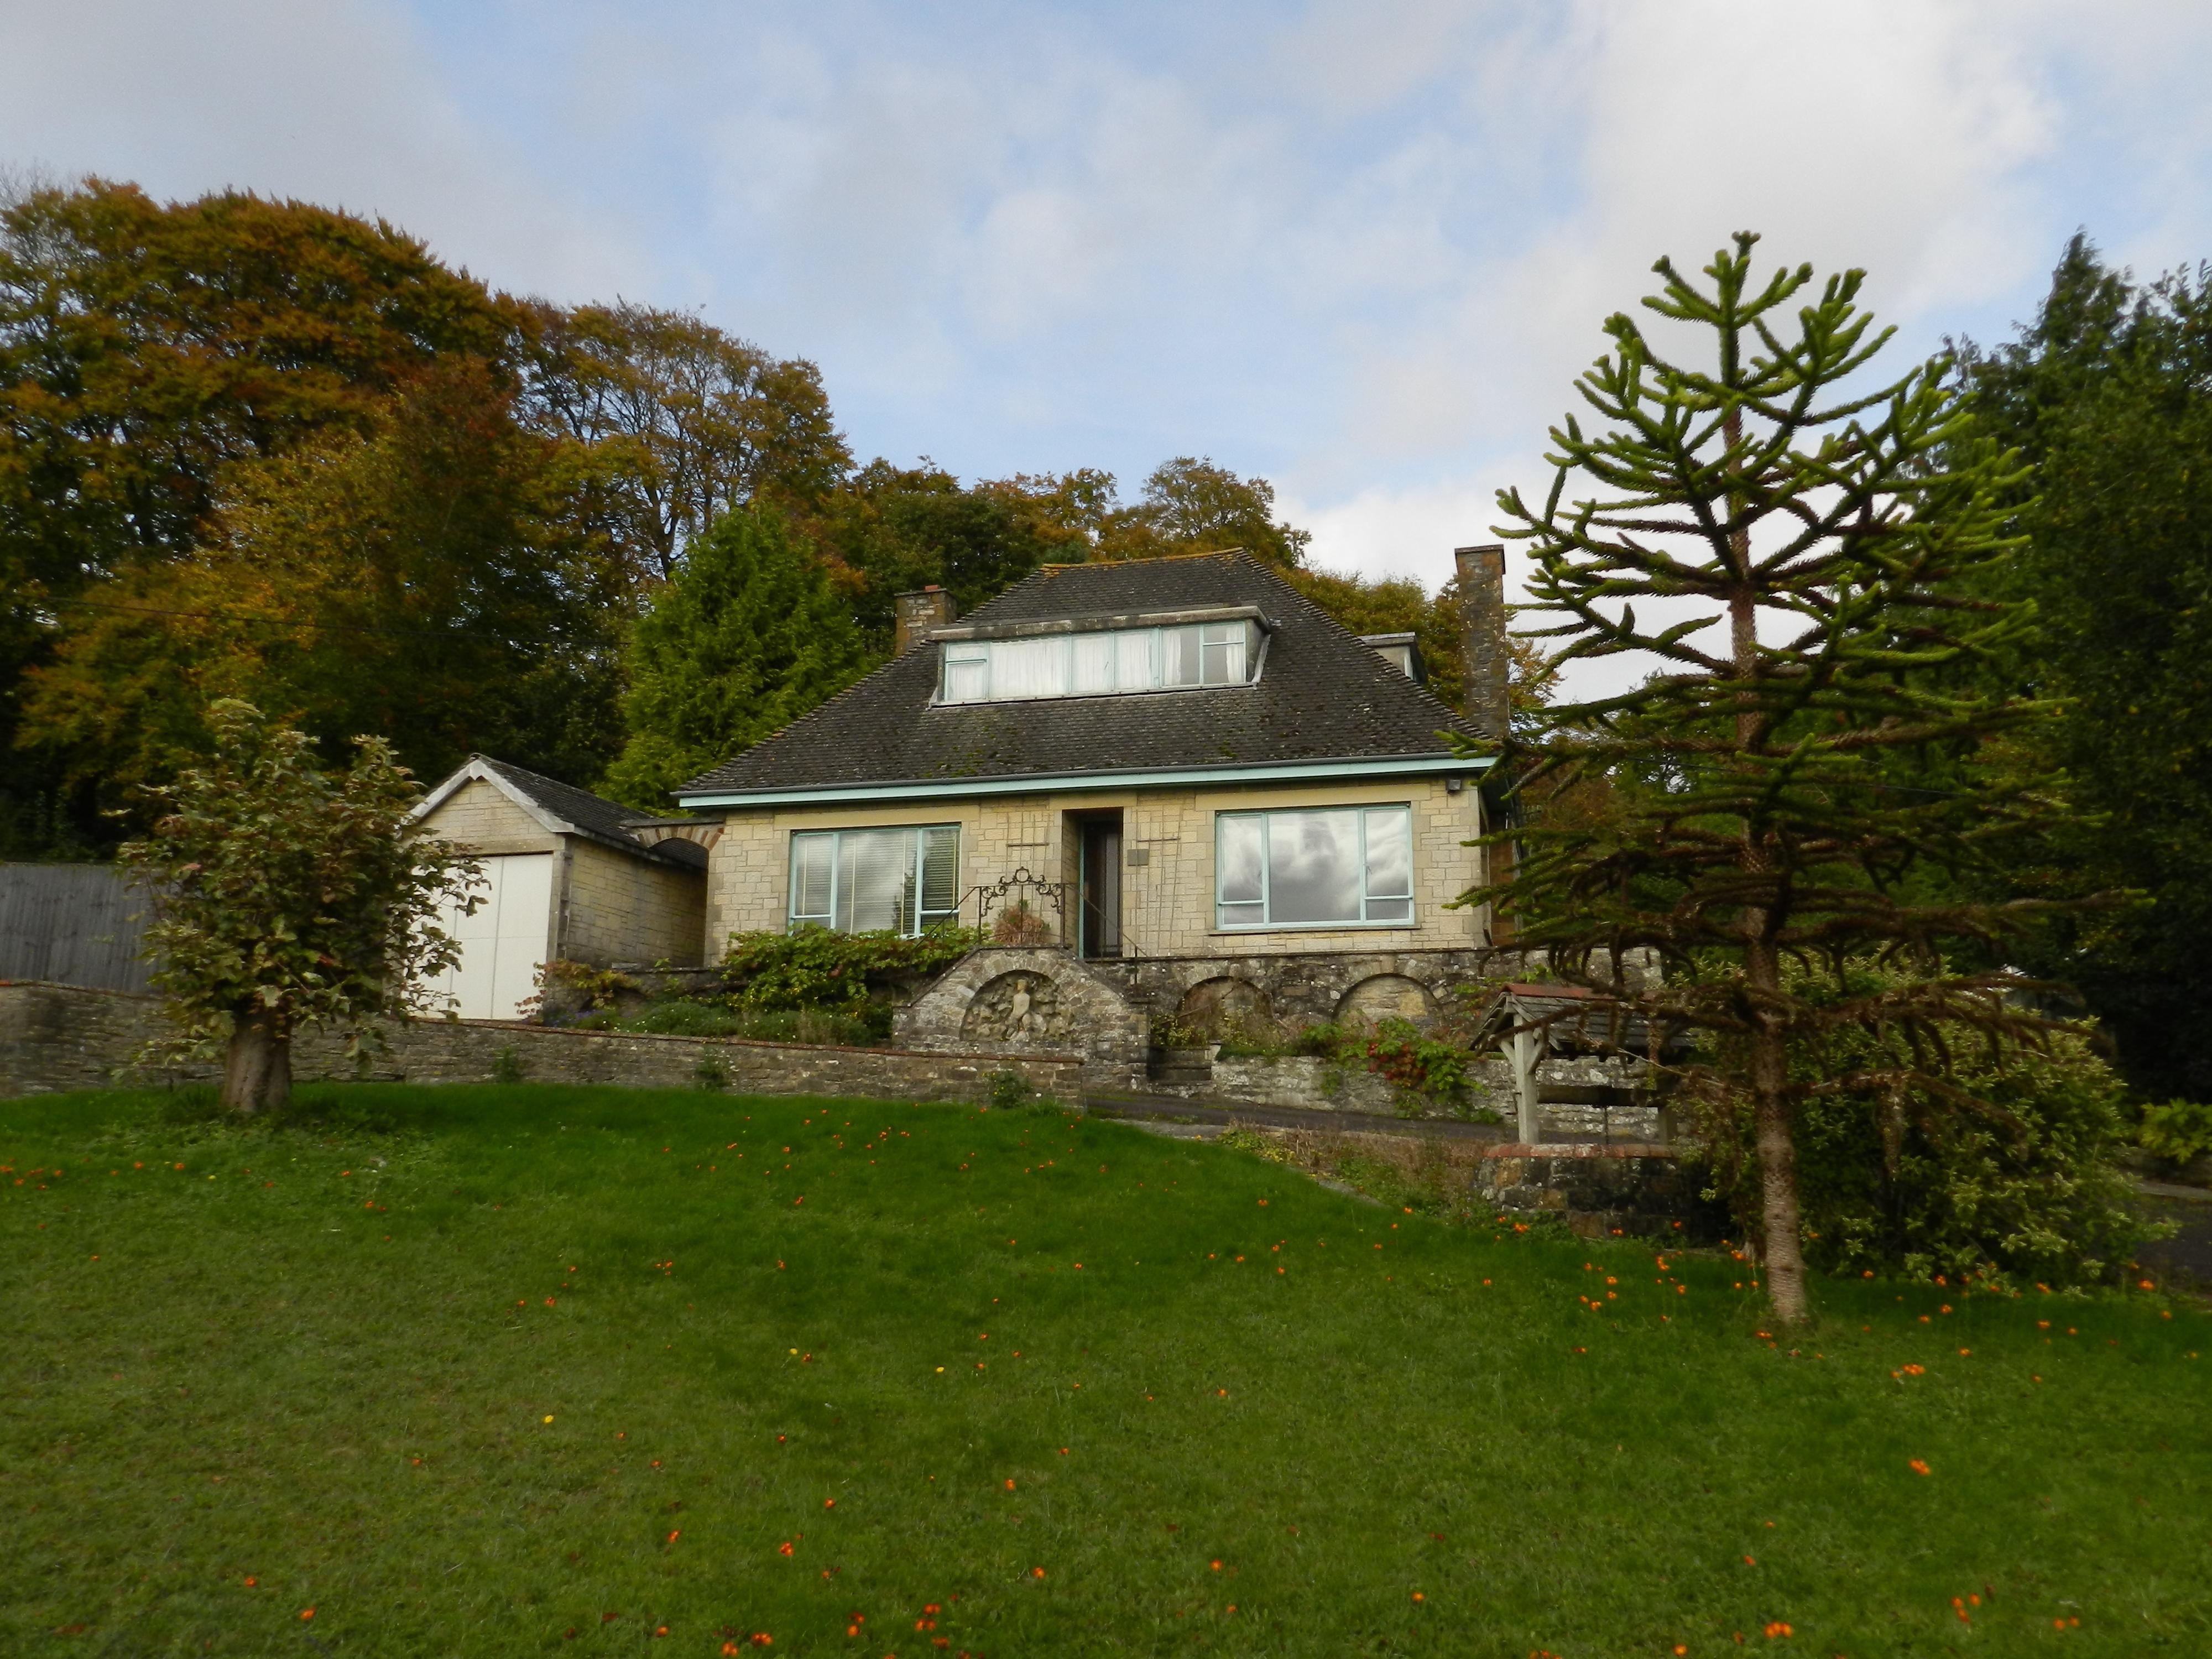
We are planning to renovate our 1960s chalet bungalow (cavity walls, reconstituted stone). Photo attached. Footprint is 11m x 7m; ridge is 3m long. Building is structurally sound and existing foundations are good enough to build a new two storey, timber-framed house on them. Before we get carried away with ideas, we would like an indication of the relative costs of three options: (i) Re-roof and re-do the existing dormers and probably remove both chimneys (this is base level option); (ii) Remove chimneys, convert hips to gable ends (with hipped or gabled dormers for better kerb appeal) to provide a bit more interior space; (iii) remove roof and chimneys, replace with timber-framed, flat-roofed timber-clad, first floor extension giving a lot more upstairs space (+ cosmetic alterations to give a contemporary look). I can work out demolition, flooring, walls, bathrooms, electrics and so on but have no idea about the roof and exterior wall elements. Just wondered if there was anyone on the forum who could give ball park range of figures for each option as a starting point for us?
-
Hi all, I’m budgeting for a new build but trying to trim some costs. The design guide requires Staffordshire blue clay tiles but there are numerous local buildings have slate. I’m told the clay tiles are expensive so I’m looking at changing to slate if I can persuade the LPA. Has anyone conducted a similar comparison that they’d be willing to share ?
-
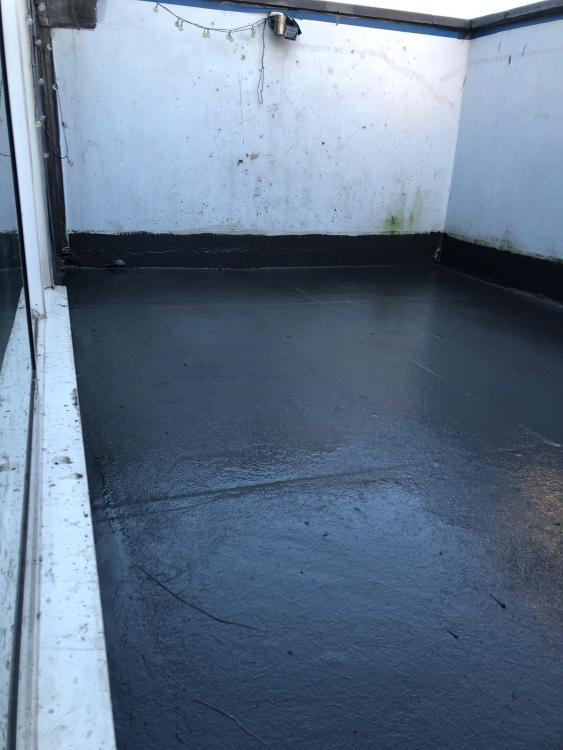
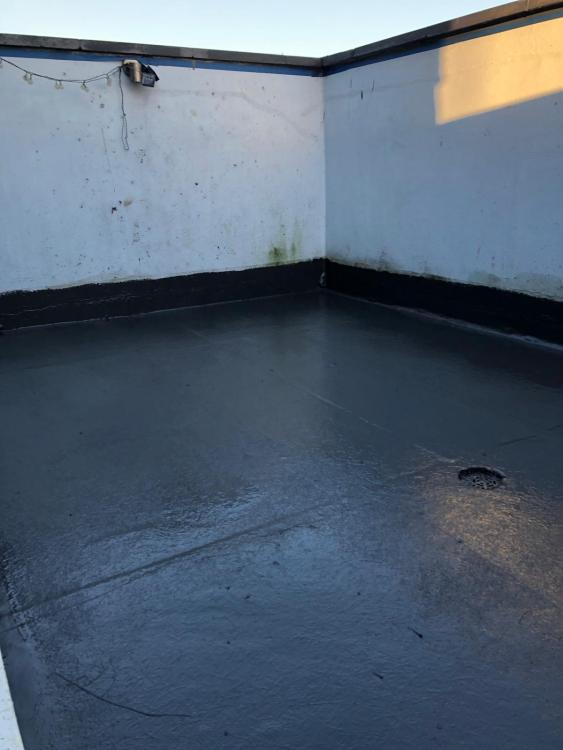
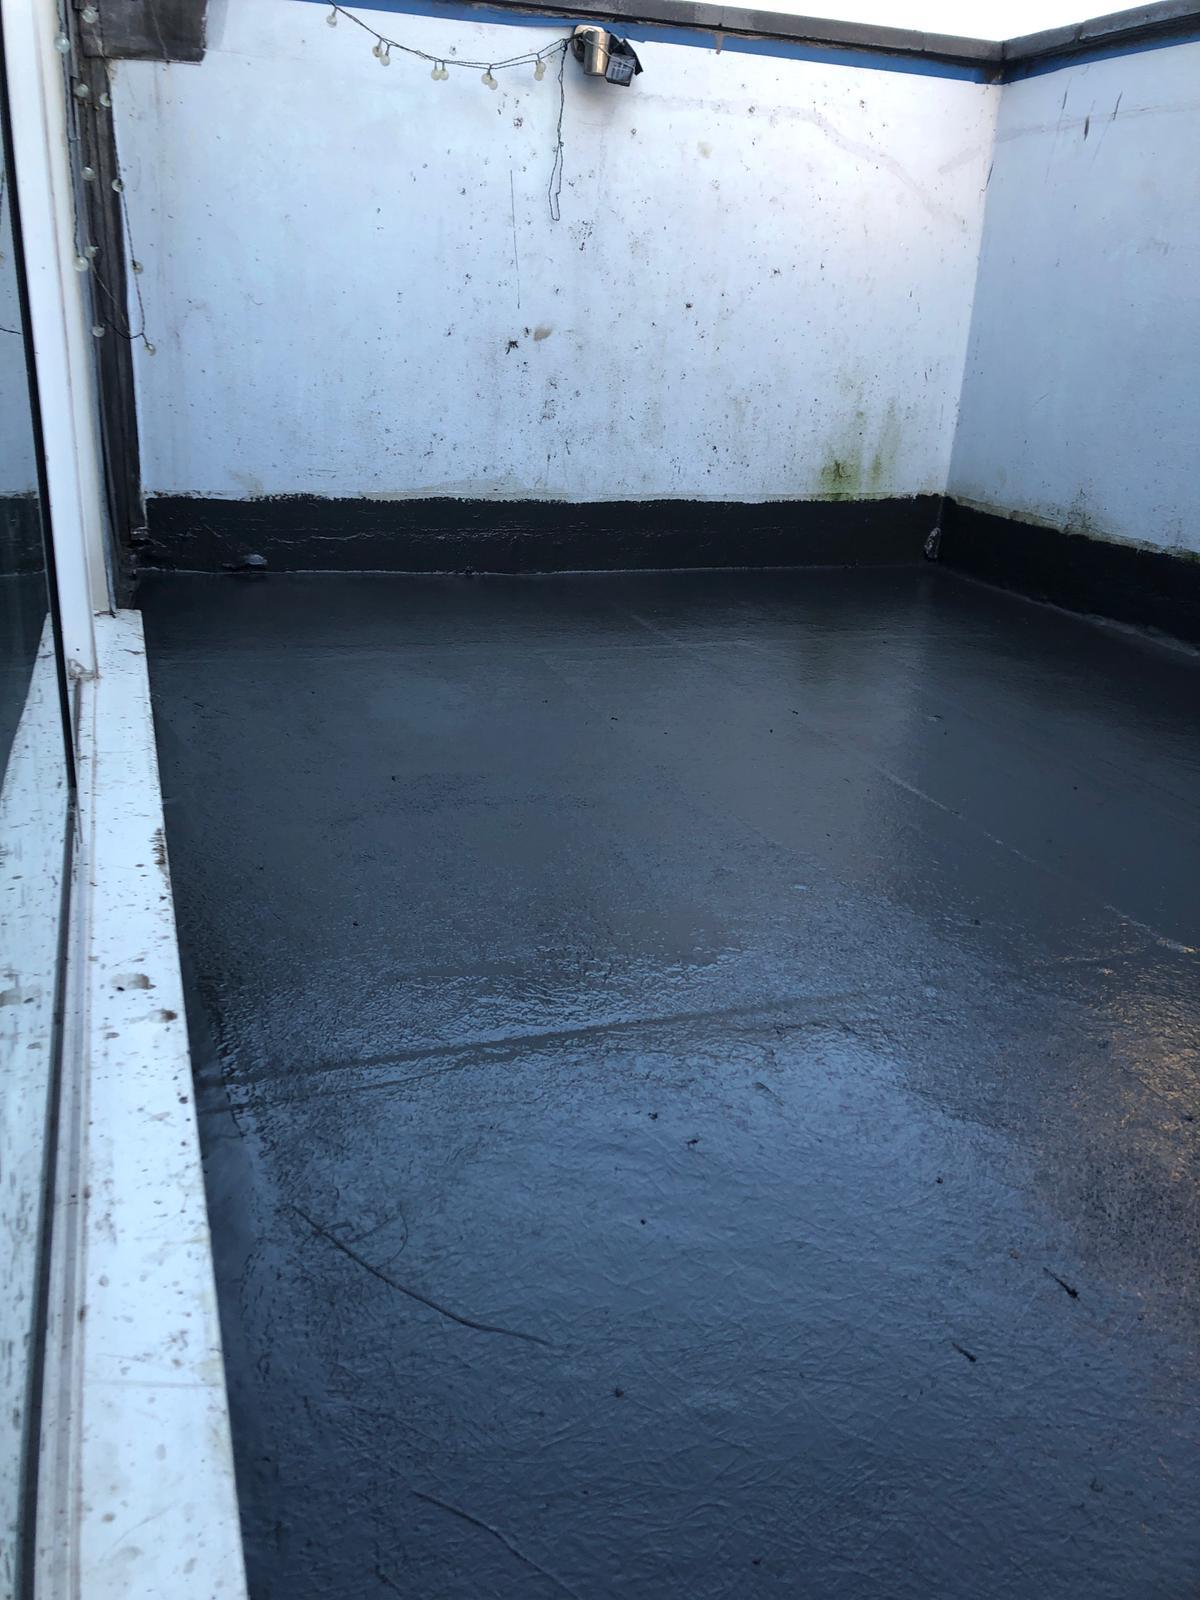
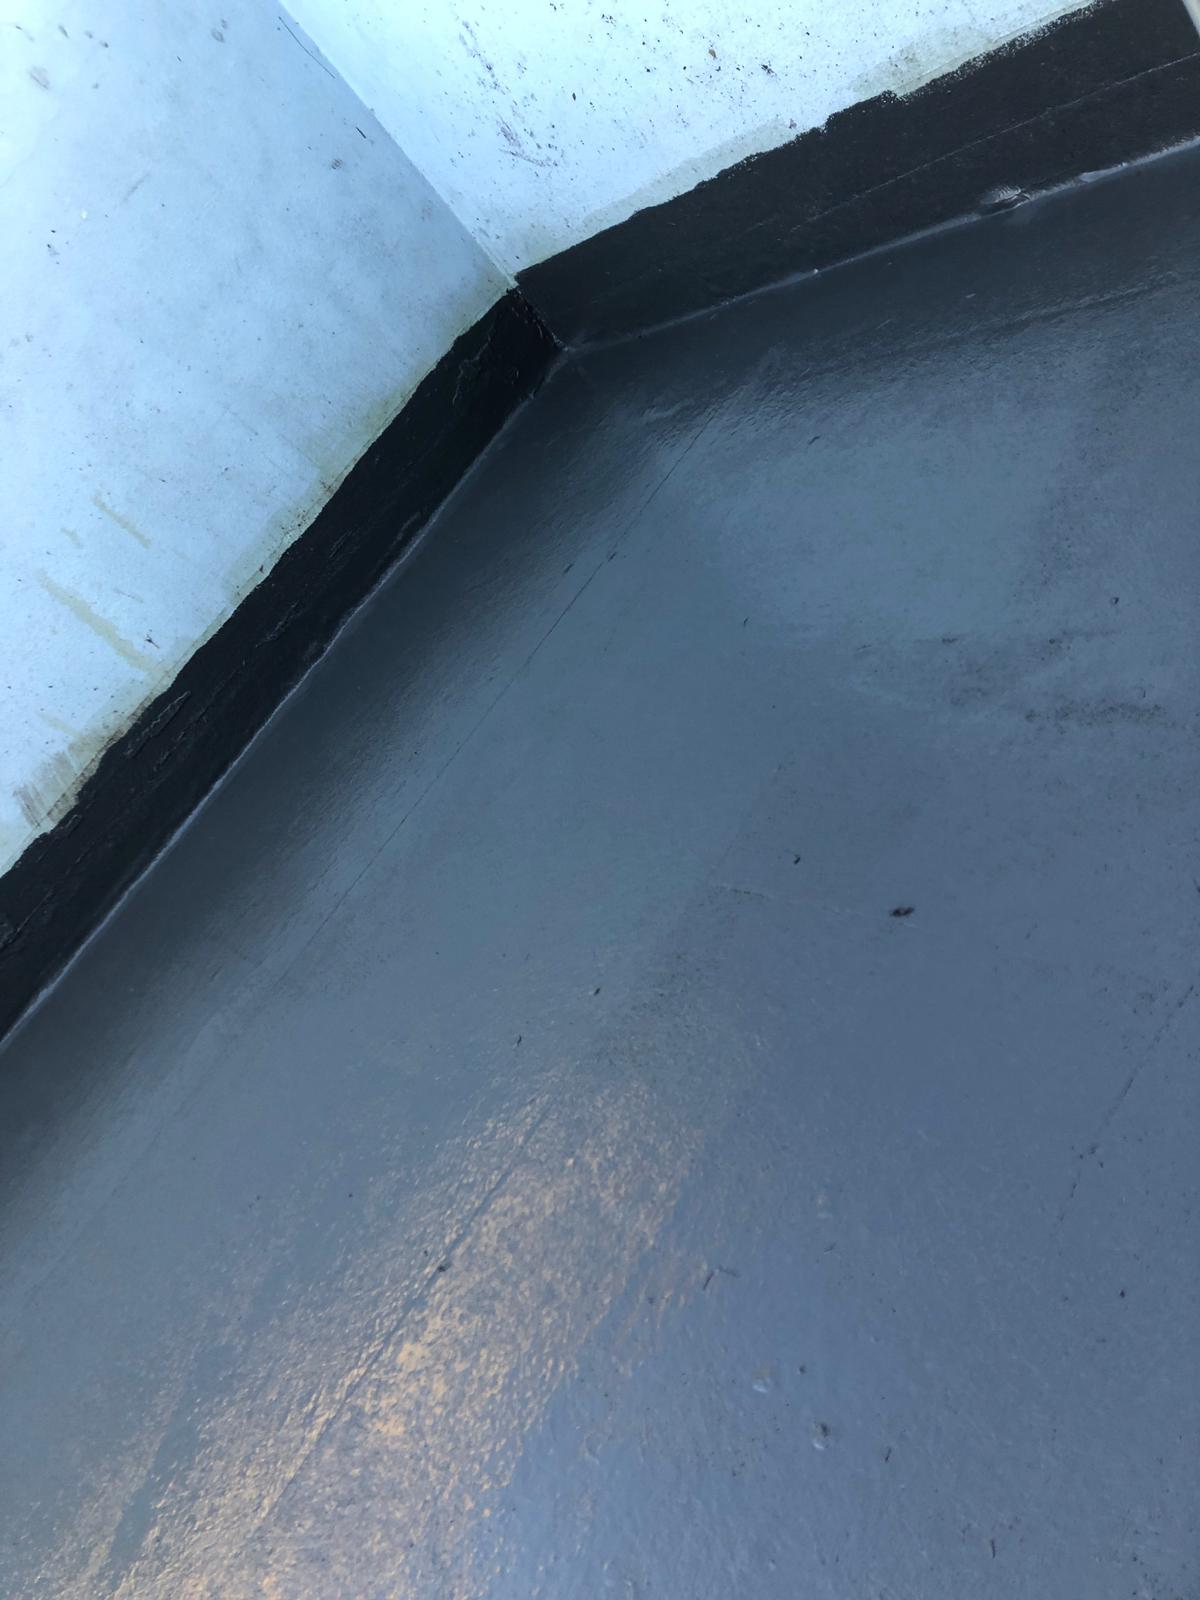
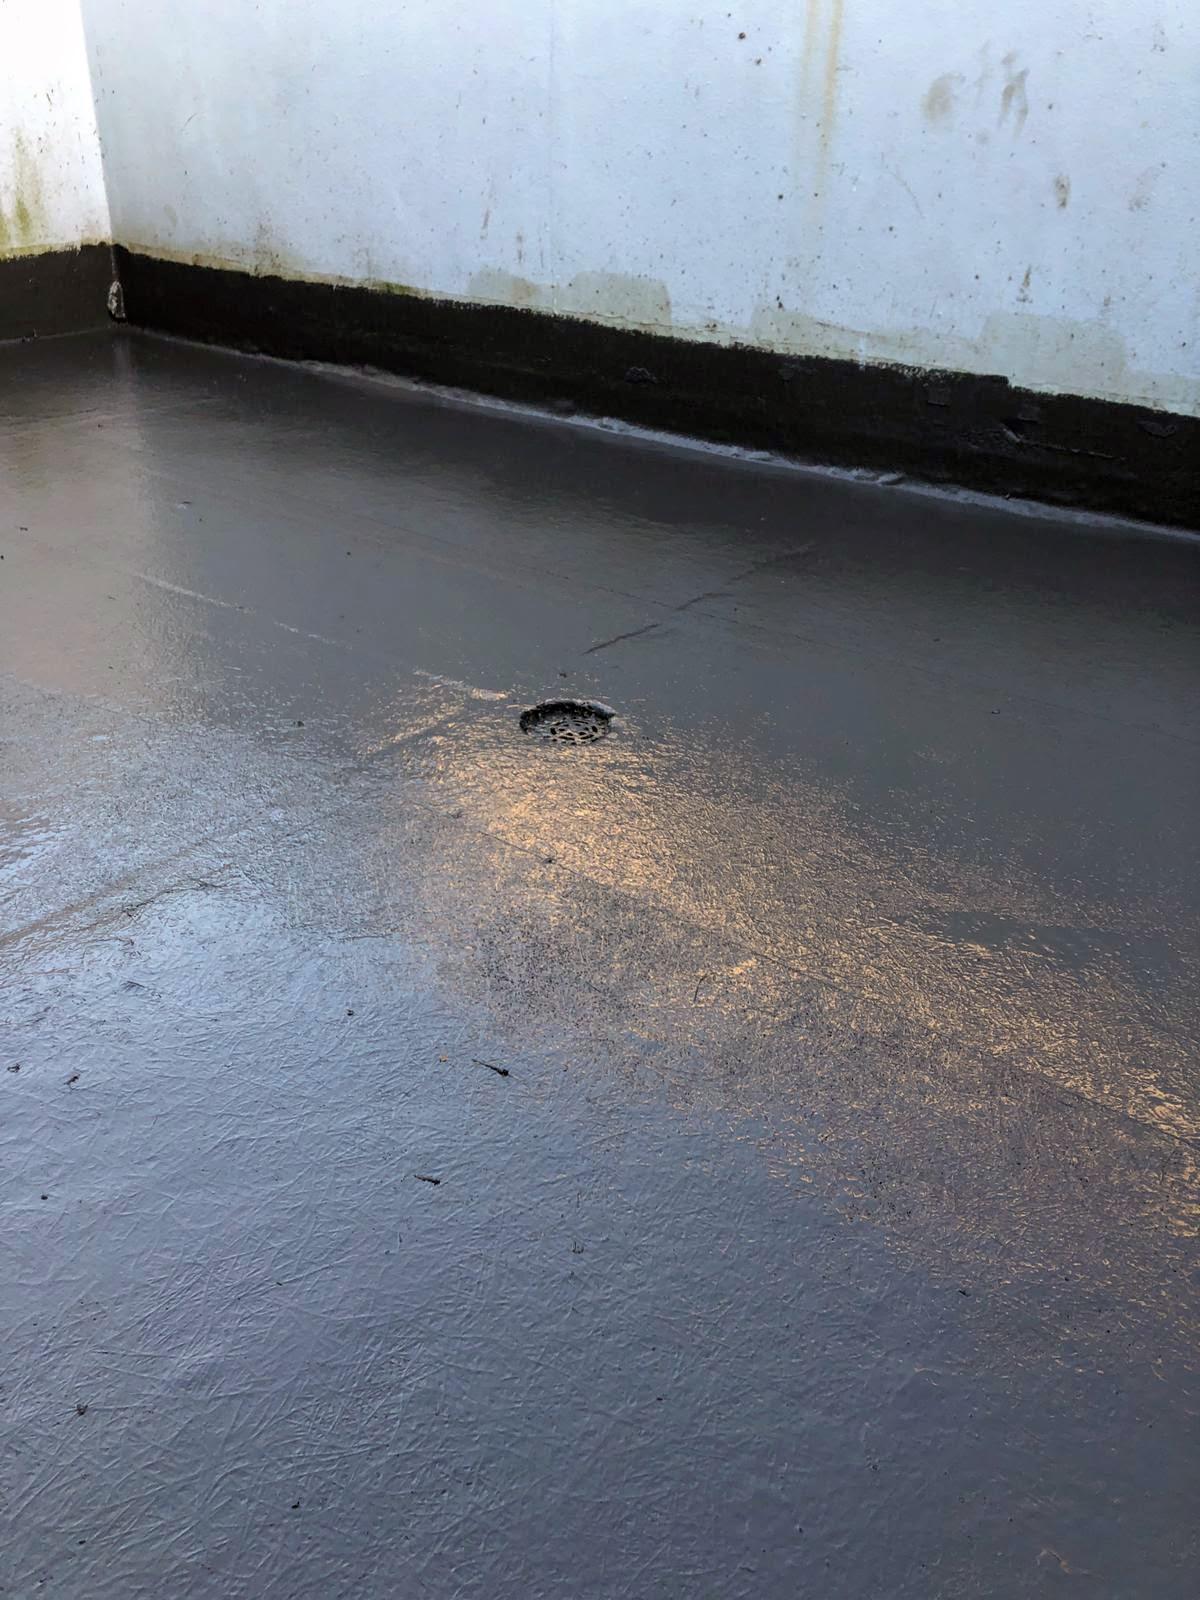
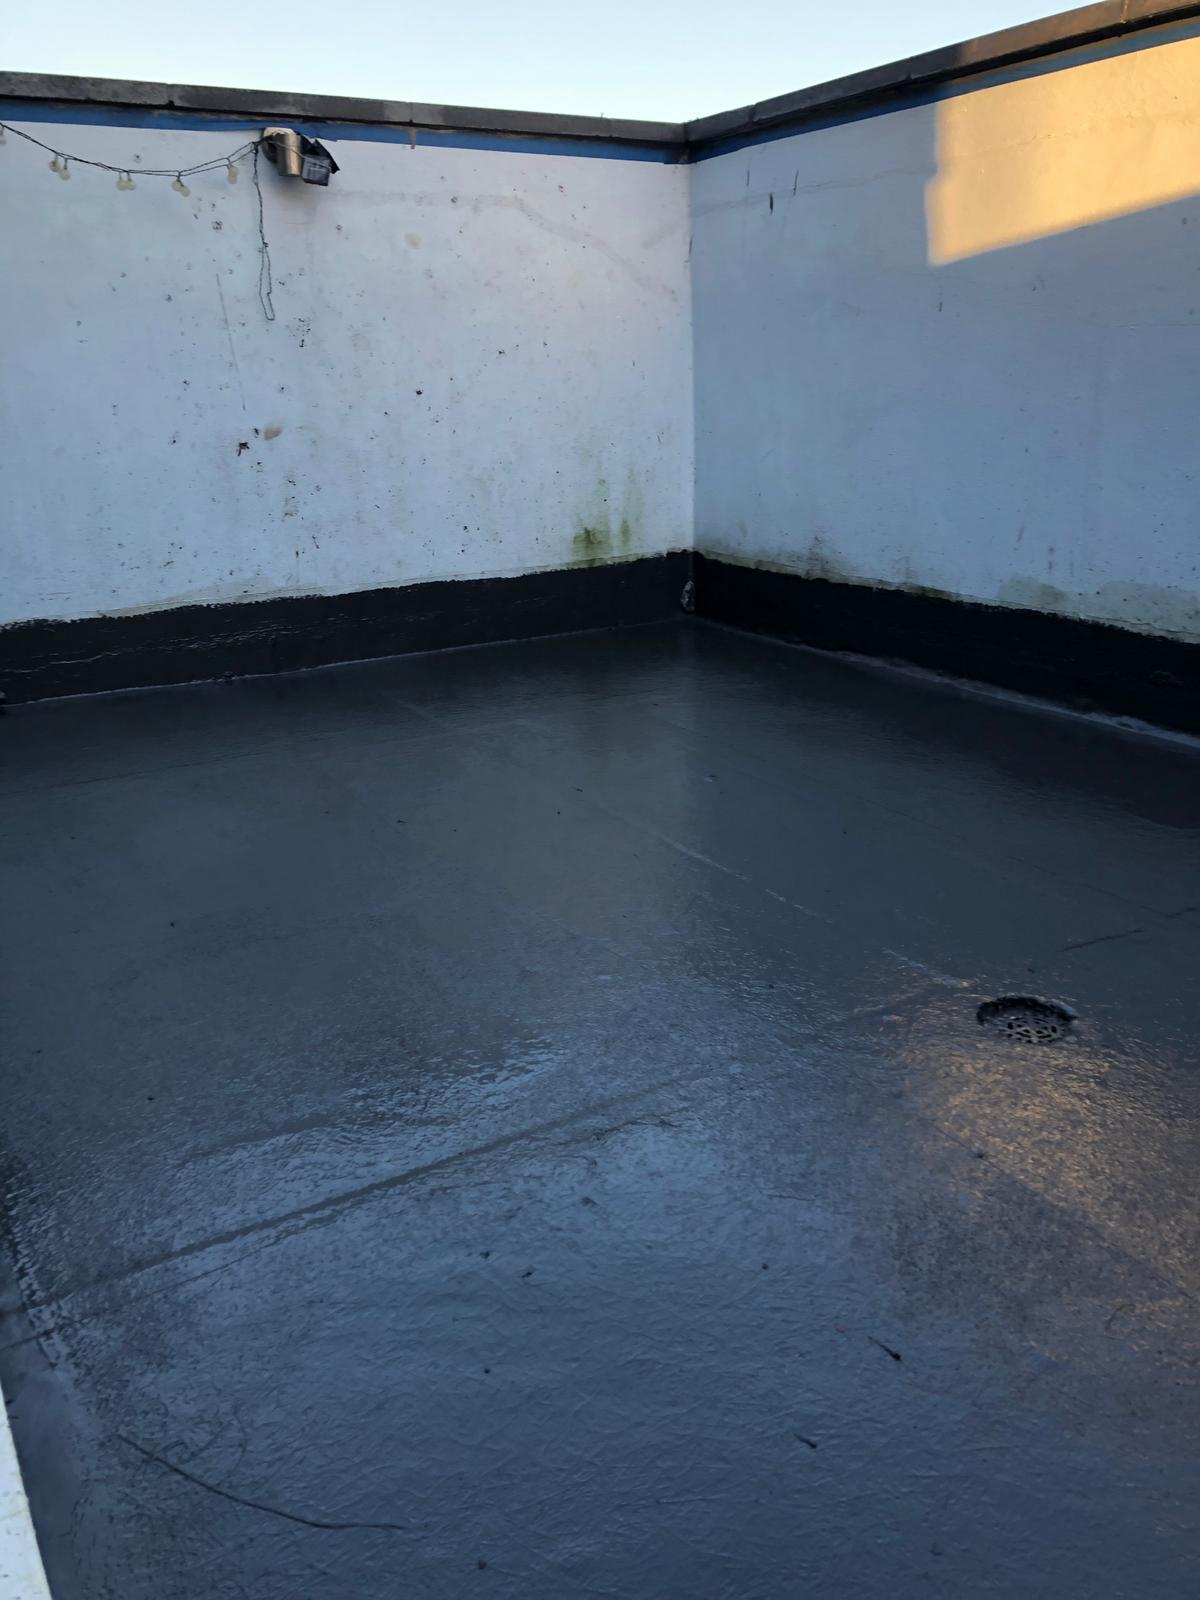
Which waterproofing system would be best for a terrace floor above two bedrooms. The terrace floor is chipboard I believe sitting across the underlying beams. There is a drain to the centre of the terrace so any system needs to be sloped to the centre. There will be people walking around on this terrace so the system needs to be flexible and strong and withstand a few knocks. Currently the floor is a failing fibreglass floor. It would be great if I could get some decent advice on this as I've been ripped off a couple of times now for a liquid rubber roof and a fibreglass roof. Both of which have failed. If there is a DIY solution then I will consider that too as it's broken the bank and the cowboys are not refunding the money. Thanks for any advice and replies. Also is there anything I can do to recover my money or is it not worth pursuing?


-
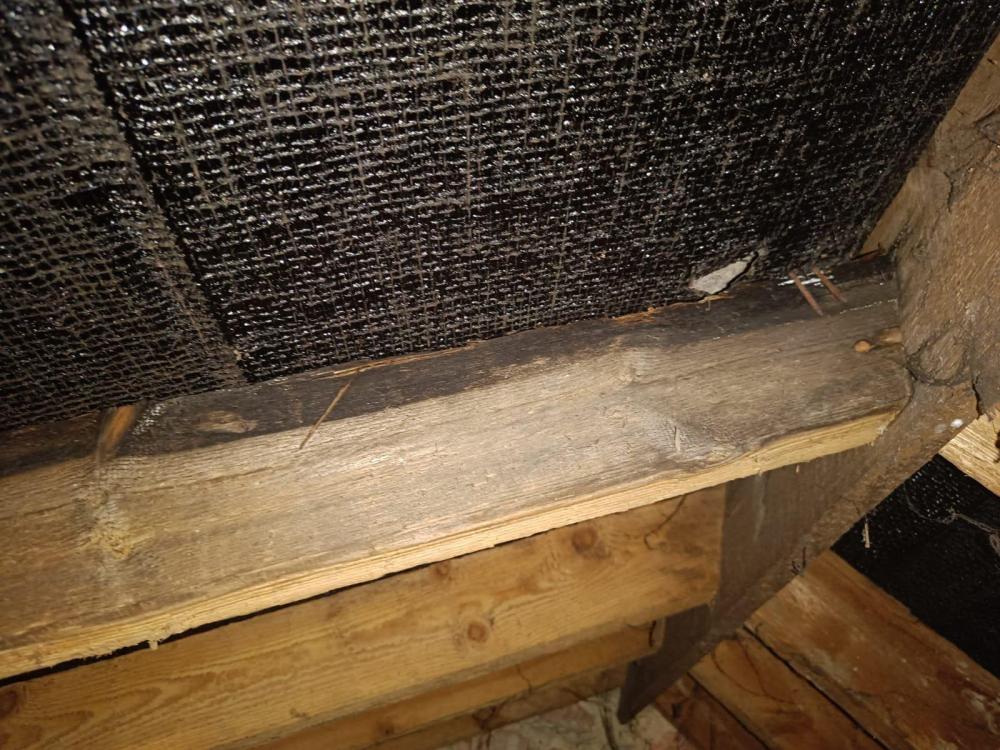
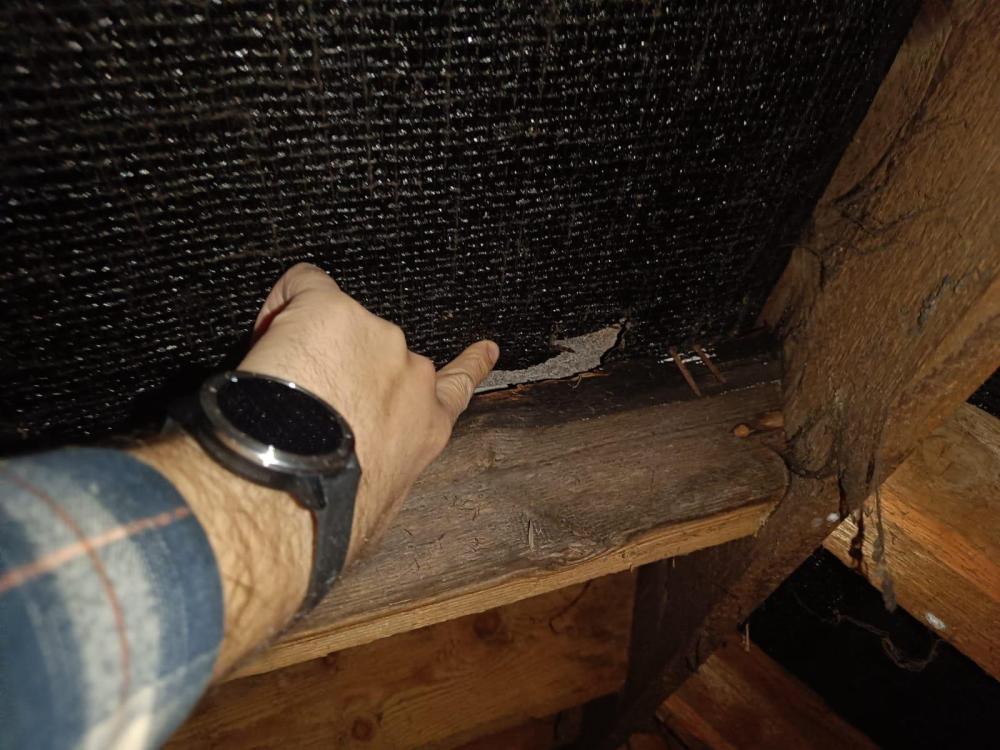
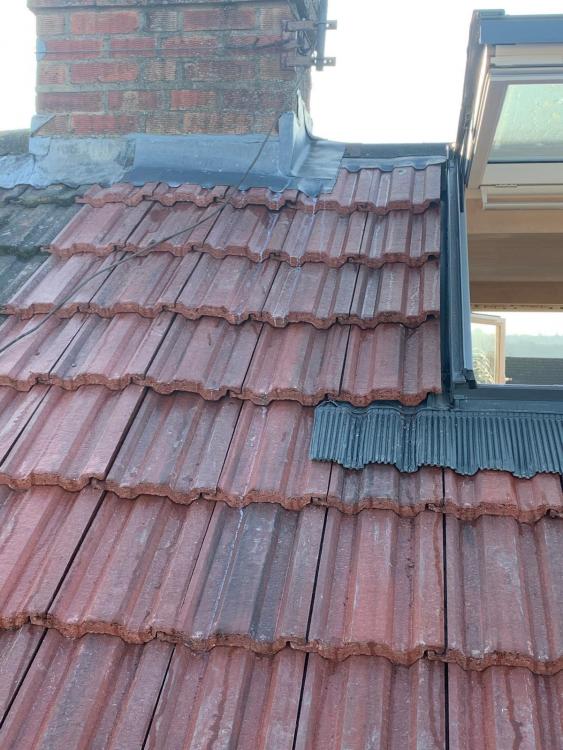
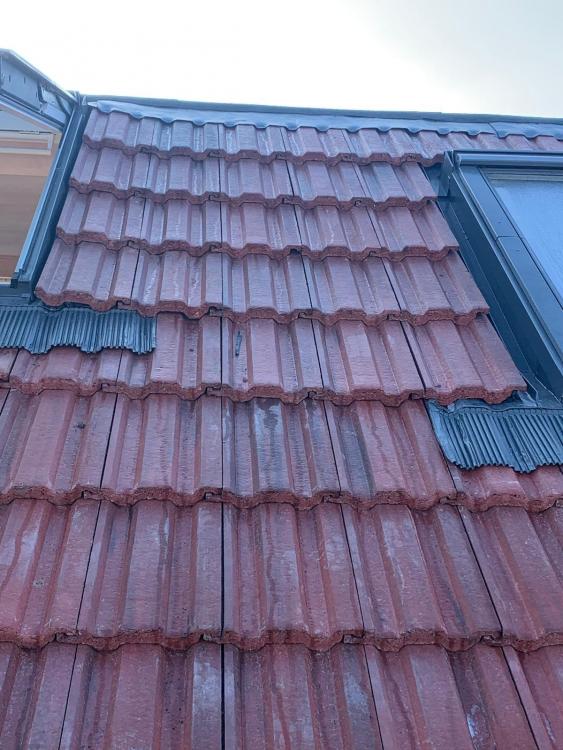
Hi, 1. Roof beams wet, damp, mouldy at the top of the roof. 2. 2 beams in a terrace house of around 20 beams, so isolated to those beams. Two separate areas. One much worse than the other. 3. There is a small hole in the felt. The water is absorbing into the beam, see photo. 4. Had a roofer round, he said could be the ridges. He filled the ridges with a mastik or some kind of sealant. He said there should not be any ingress of water now. 5. The beams is still damp, mouldy when raining. He said the only way to fix it is to remove the ridges, refelt that area, then put ridges back on. 6. Problem is that the ridges are cemented firm against the tiles and if we remove them it will more than likely break the tiles and cause more damage to the tiles that will then need replacing. 7. He said another reason could be that there is condensation between the felt and the tiles when wet. I dont think this is the case as in my separate image where the chimney flue is, there is a big gap in the felt but no water issue. 8. My conclusion, water is ingressing in this area, damaging the beam. Is my only option to rip all the ridges off, refelt the area. Quote is circa £500 +materials. Please see images attached. Appreciate if any builders/roofers could advise on their opinion on this, where is the water coming from, it's not dripping wet but wet enough that it's causing the wood to crumble at the very top in the image. Roof Area with issue- Wet beam with hole in felt. Note tiles are dry here, as there has been no rain. Seperate part of the roof, no damp so i dont think it can be condensation

-
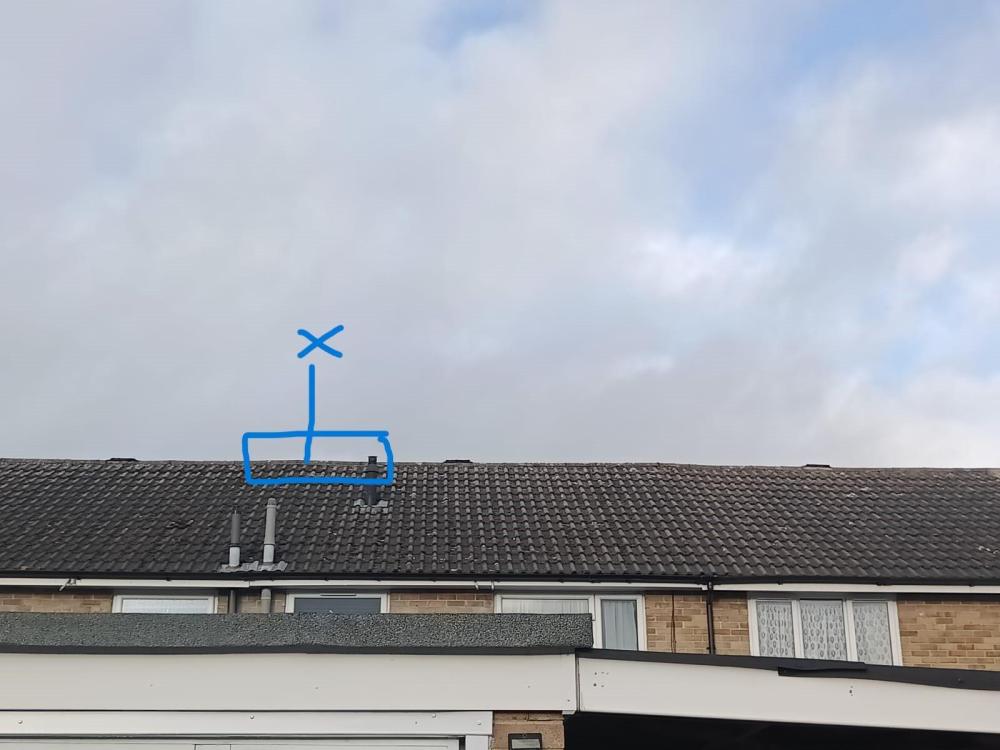
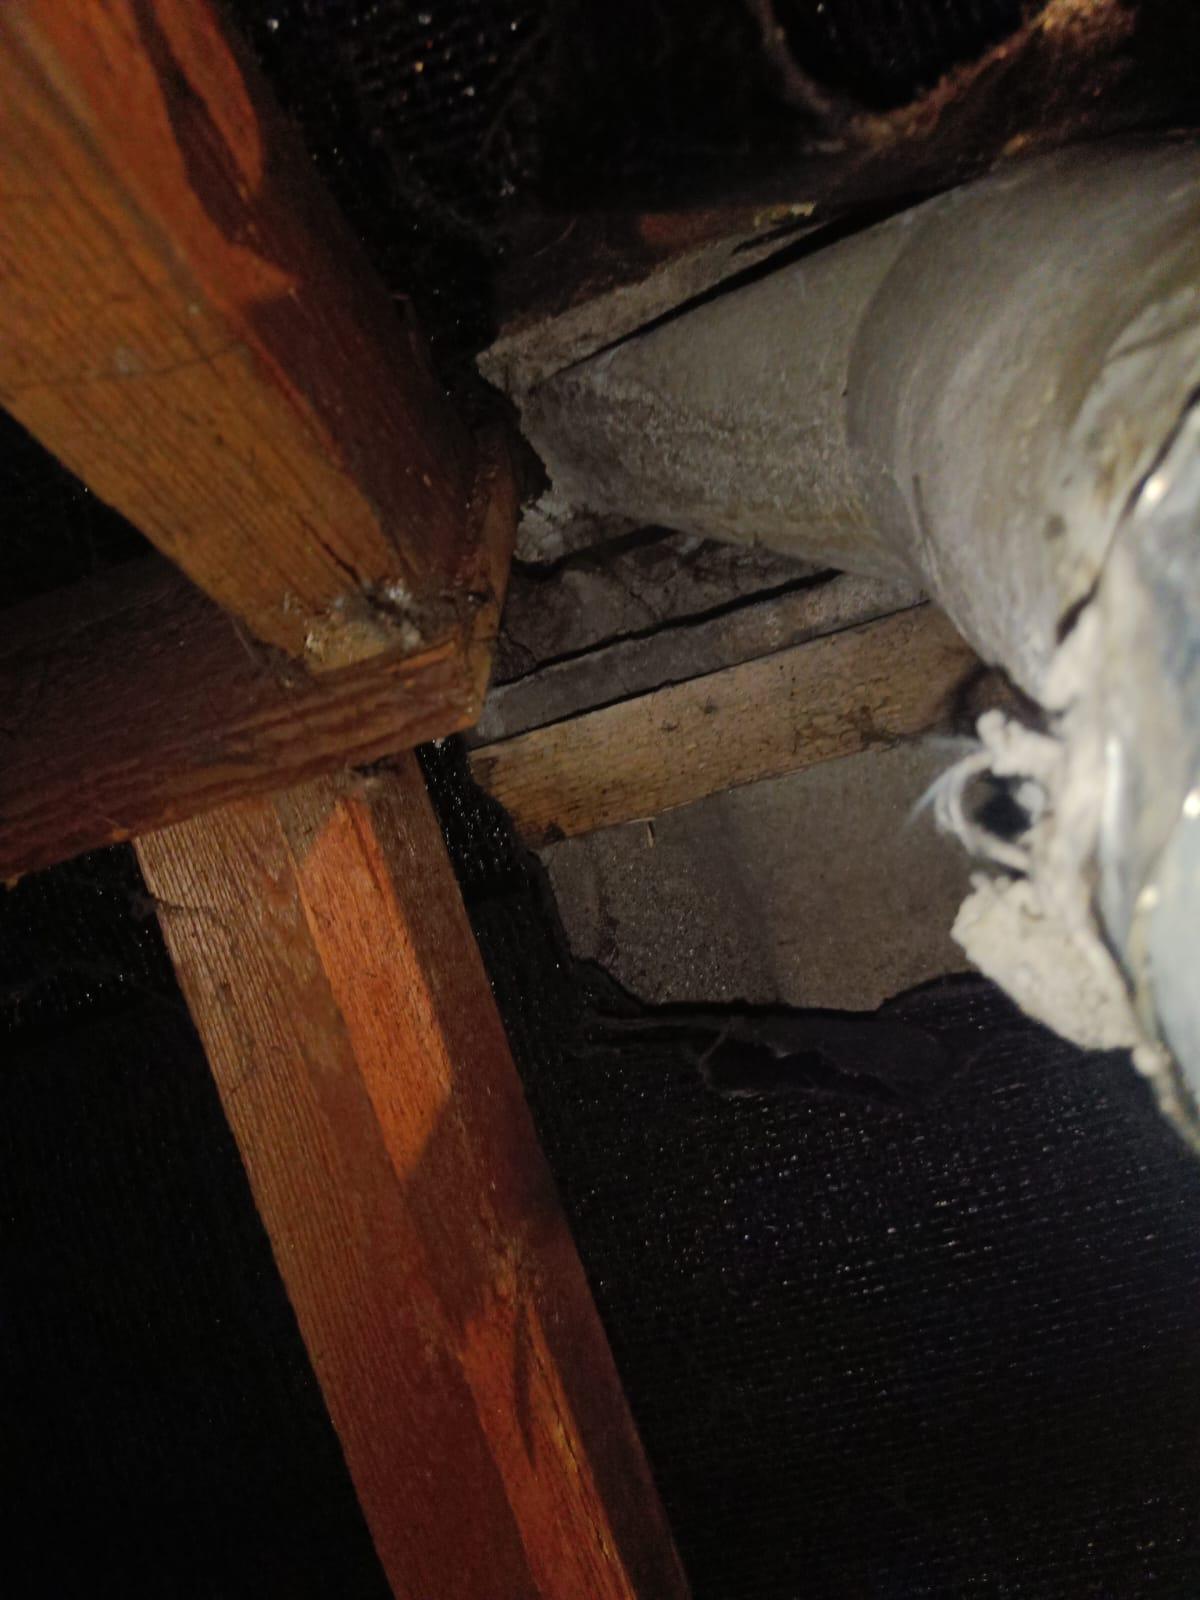
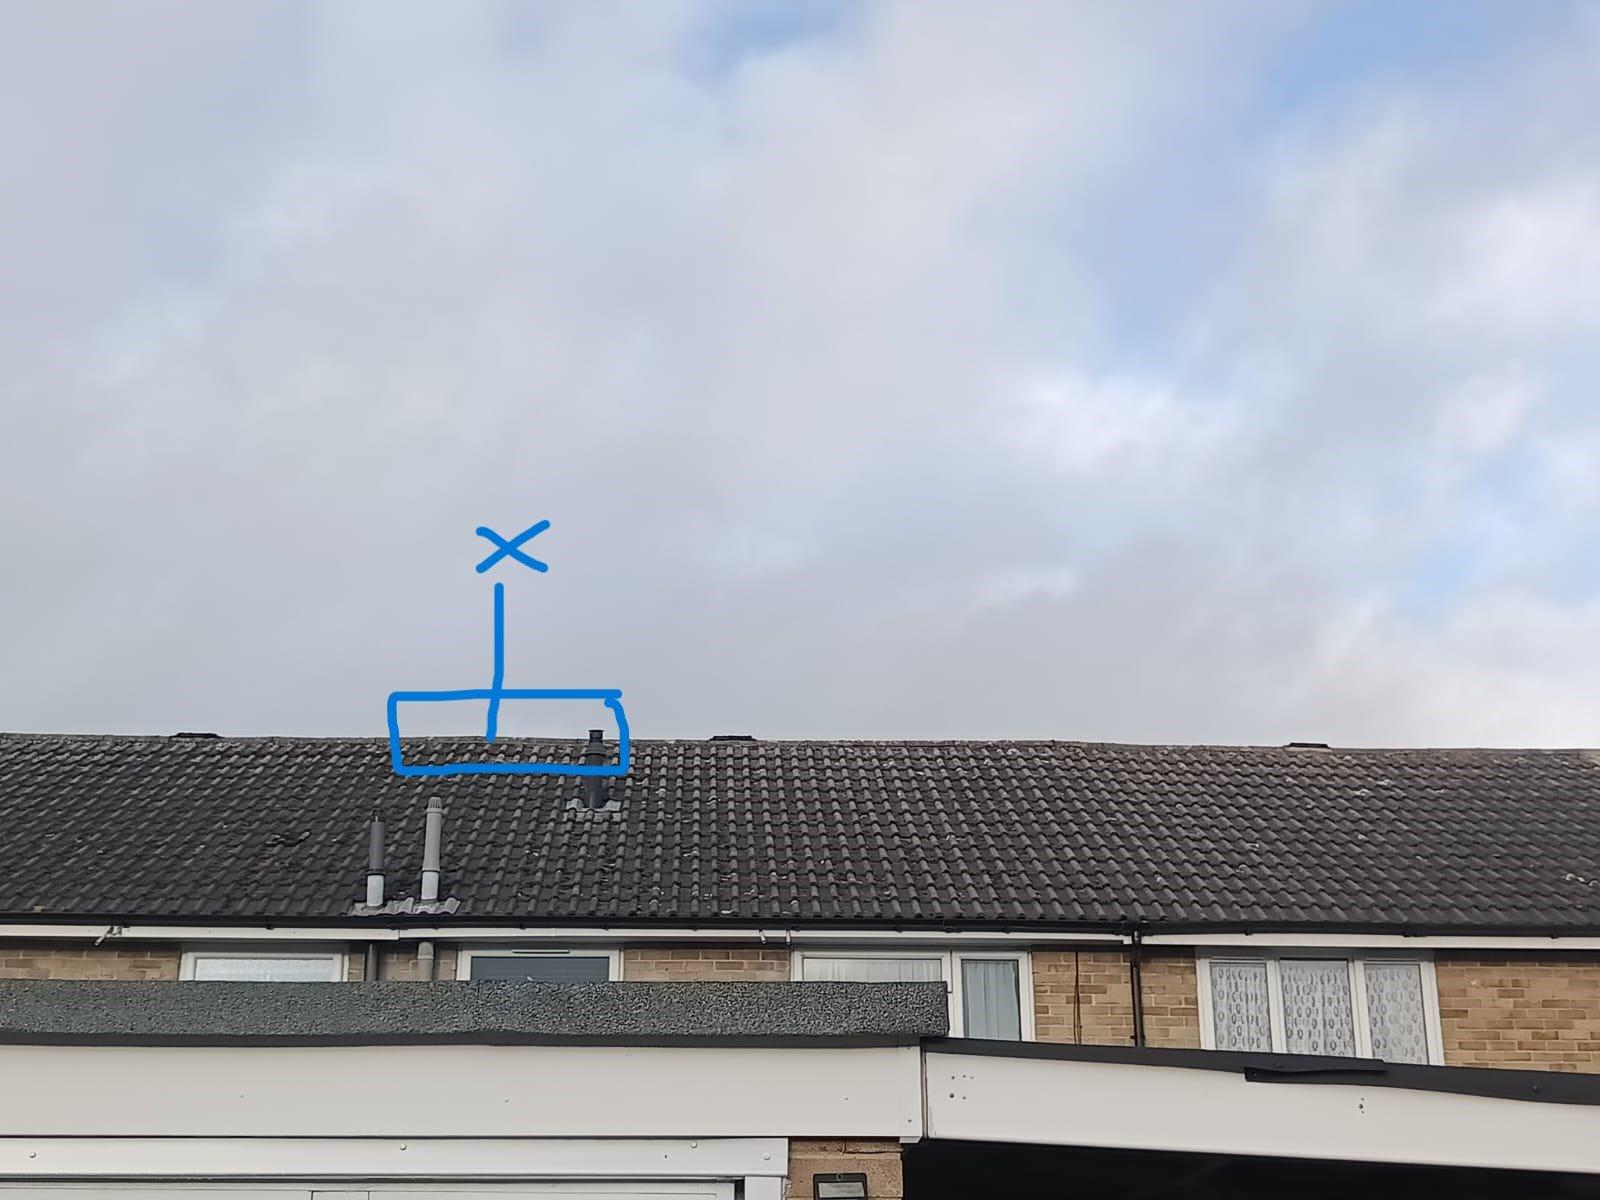
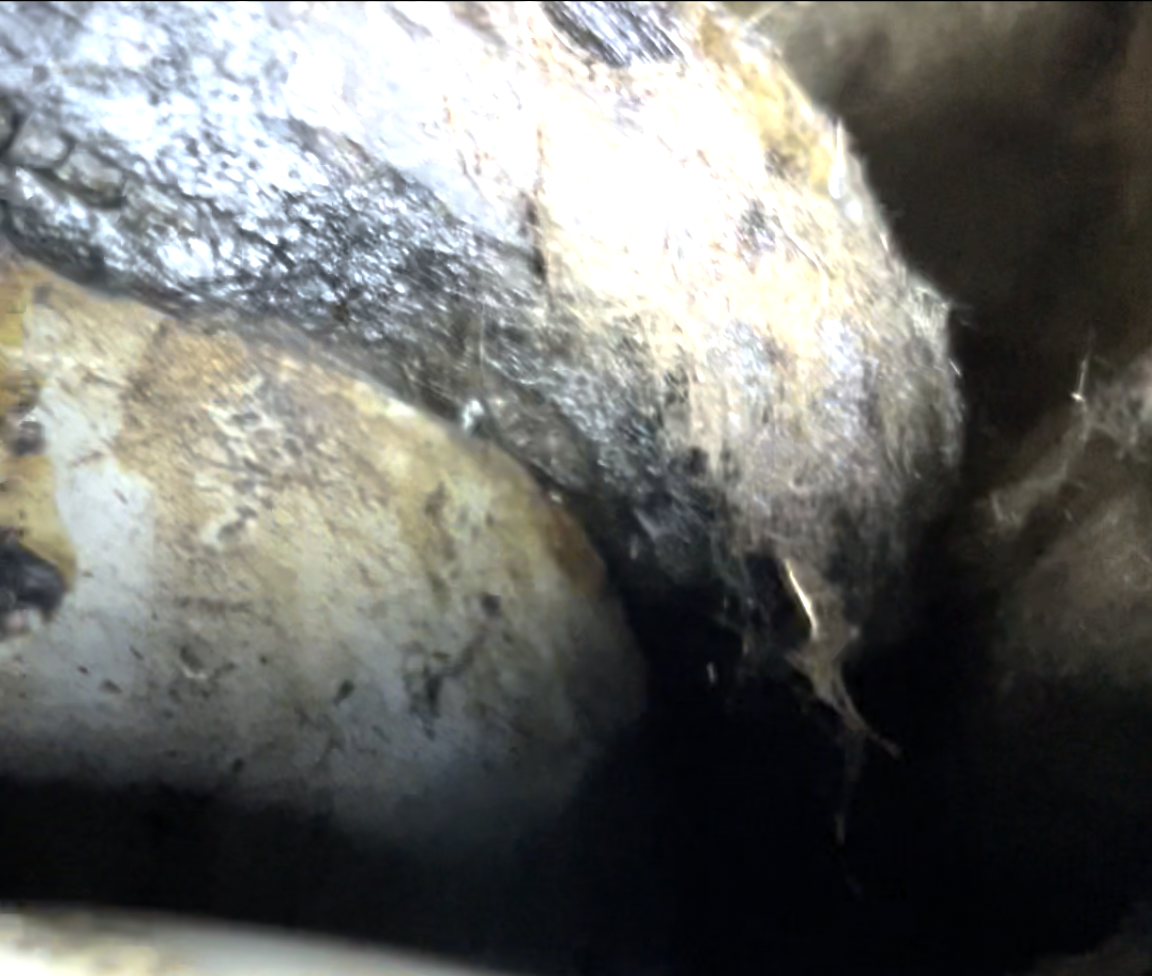
Hi folks, I've been having issues with a leak in my kitchen for some time. Reached out to insurance who were not useful, and several trades have either not resolved the problem or didn't want to get involved. Currently it looks like this: Leak site after insurance investigation Insurance broke through the plasterboard to try and find what's behind, a soil pipe. Have attached an image and video of the exposed soil pipe. This is in a flat roof extension to my kitchen. On the right of the beam is the original house, and directly above is the toilet. Above this, on the roof you can see that the vent pipe leads into a box. The box is directly behind the toilet. The box is sealed, originally with felt, and then the insurance guys covered it with some strange sealant that's now started peeling: The "box" Inside the box: Soil pipe coming out of the toilet, covered in bitumen Inside the box is the soil pipe. It's a strange angle, and it's been suggested that it might be ceramic. It's also covered with something horrible, bitumen perhaps. Close inspection of the pipe showed that it seems to have slipped, there might be as much as an inch gap between the pipes, but the bitumen is hiding it: Signs of slippage What I suspect is happening is the box itself is sealed and weather tight. However, within the box, underneath the pipe, is not sealed. The pipe is leaking straight into the house. I've so far had difficulty getting this fixed because it needs the roofer and the plumber to work together. Given this, I'm thinking that I should crack the box, remove the pipe, and seal the roof underneath the pipe so that I can remove the box. That gives me free access to the plumbing and a plumber can fix it without the pressure of getting a roof weathertight. I have a number of questions I hope people can help with: Is there a reason that the pipes would have been covered in bitumen? Is there a good reason for building the box around the pipe, rather than sealing the roof underneath it? I presume it might be because replacing the roof is going to be difficult with the pipe in the way. Should it be possible to erect a tarp to keep the area dry, or am I going to have to time this around weather? Is felting this sensible given I have no experience with a torch etc? The box is less than 0.5m2, is there another option that would be easier given my lack of experience? I'm considering just cracking the box then sealing the edges with epoxy as that seems to have worked for the insurance roofers... Do I need to give any consideration to the state of things within the box eg sodden wood? Can you make any sense of the soil pipe exposed in the kitchen? There's a strange mass around it and I'm not sure if I should be opening this up further as a possible second leak Thanks all IMG_1170_trim.mp4

-
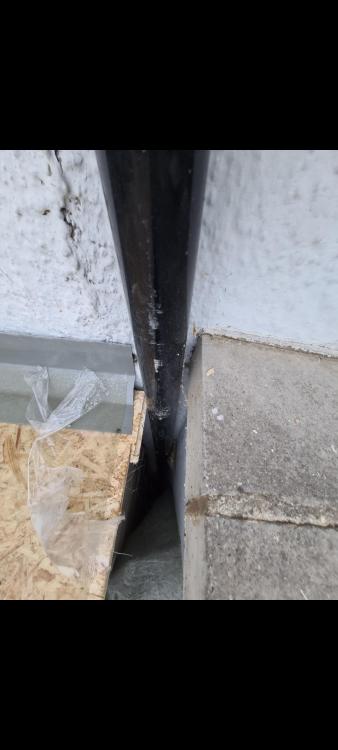
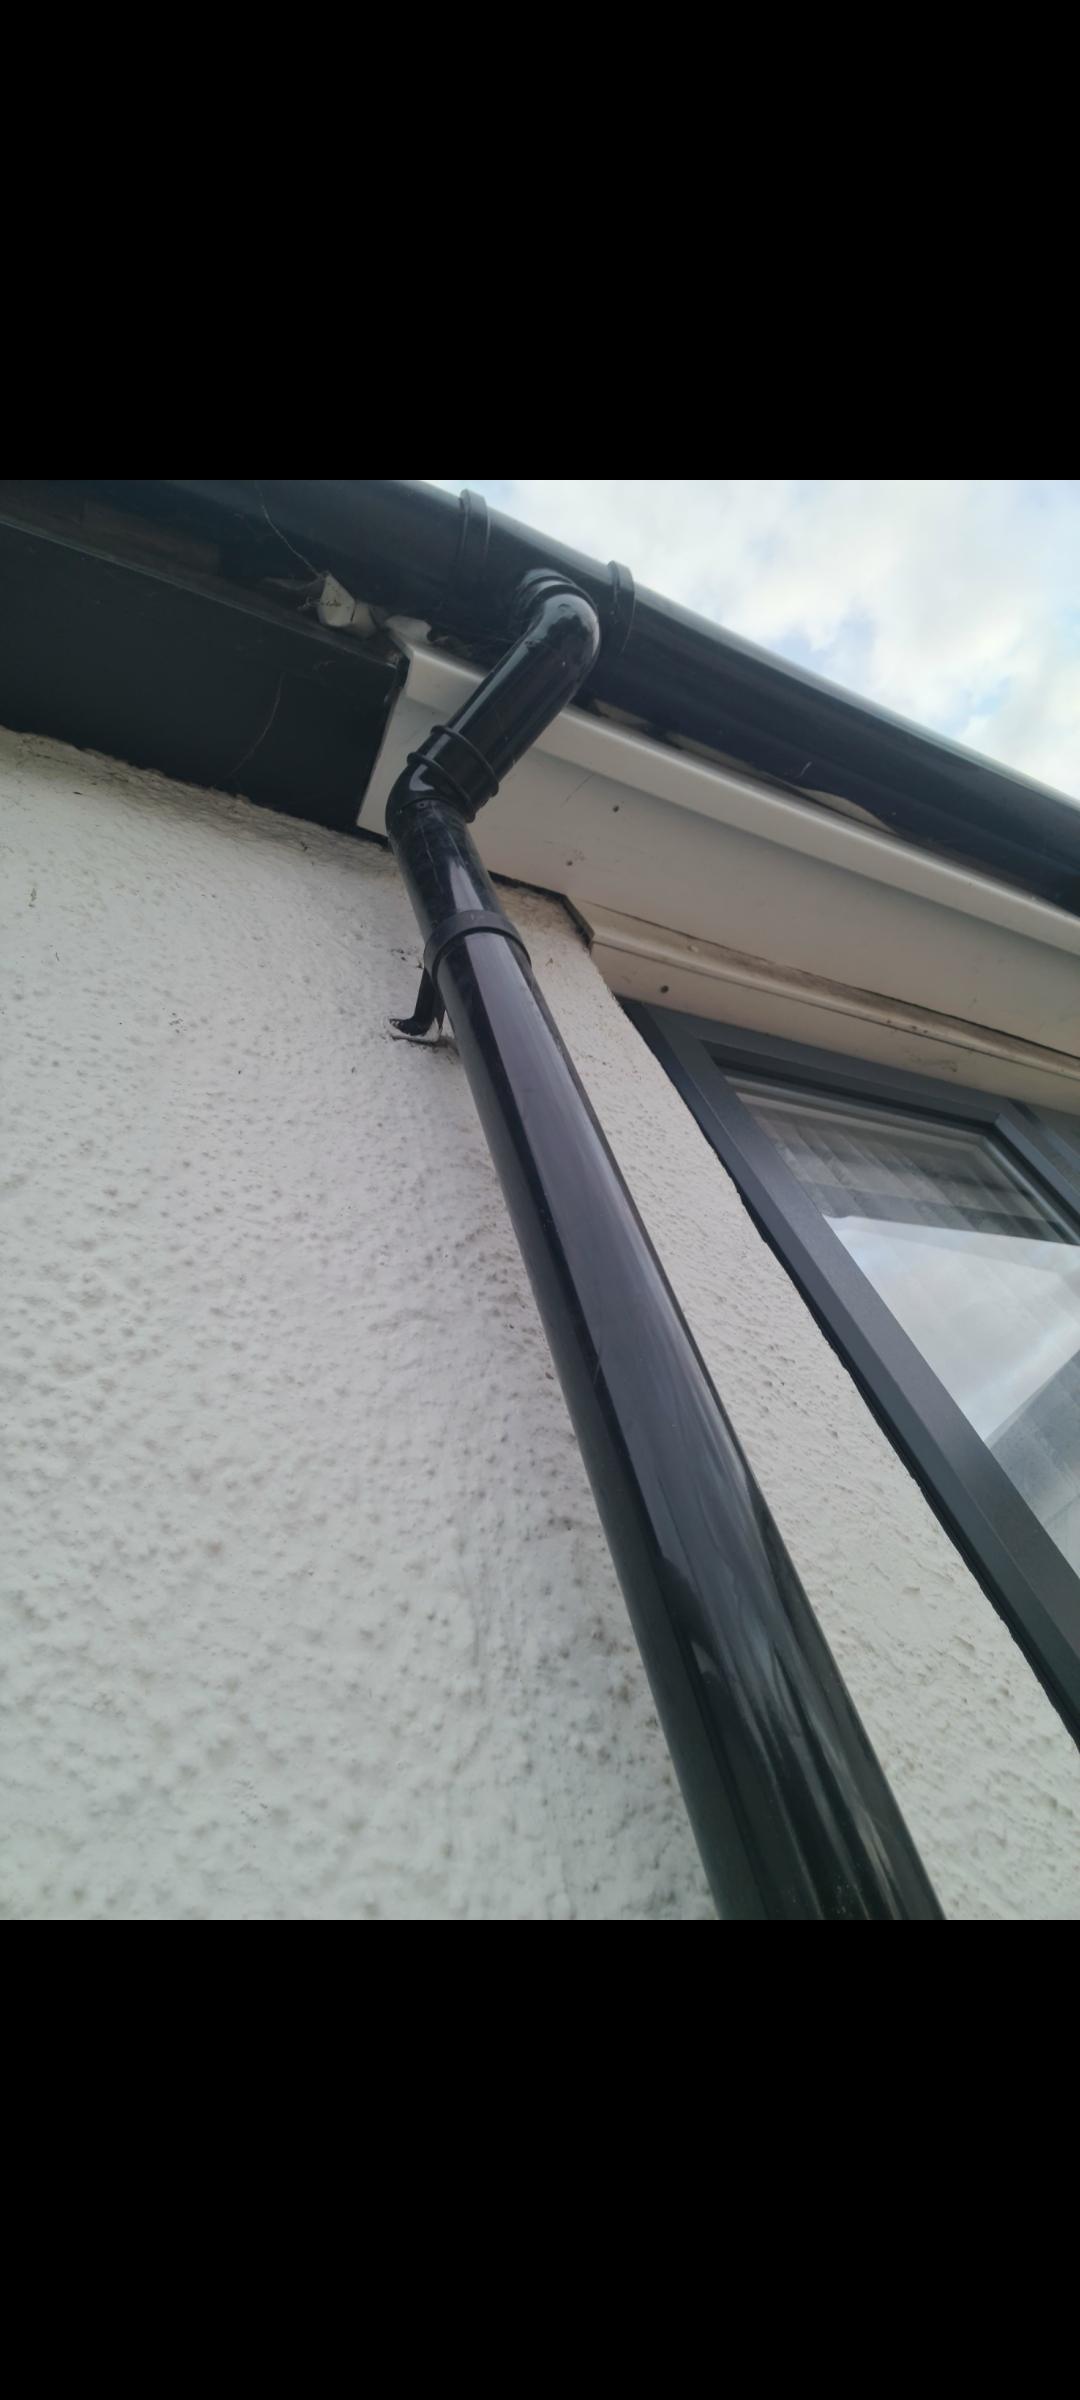
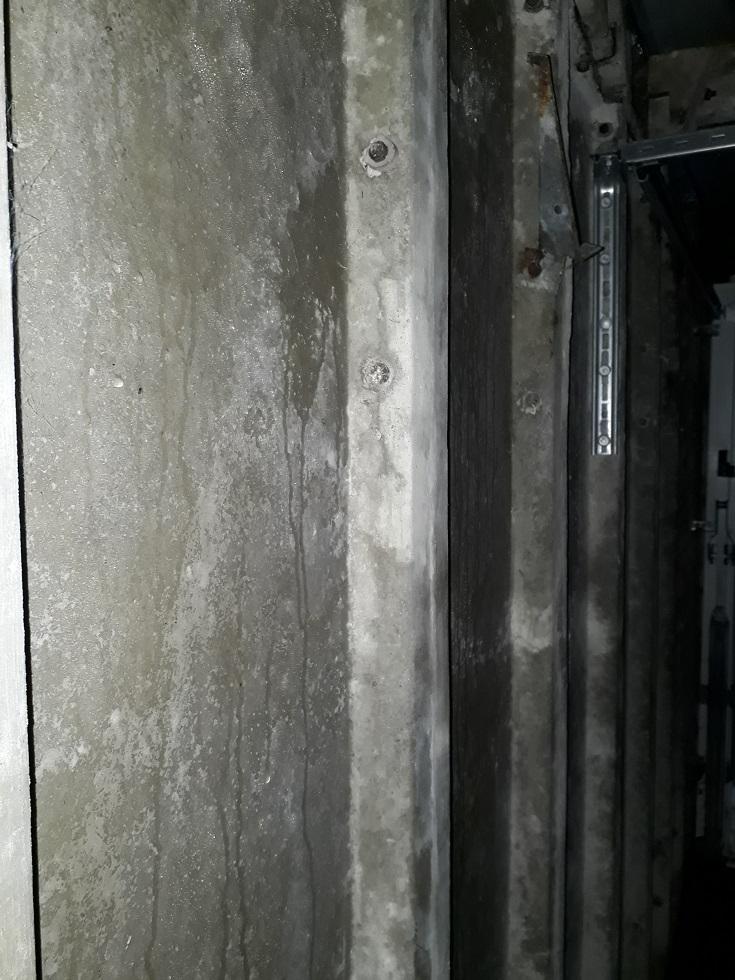
 Hi Just wanted a few opinions on next doors building works. Our neighbours are having a ground floor rear extension built on their property. It is the same length and height as our existing extension. Their builders have built the walls and put the roof on quite quickly. They erected a wall 6 inches from our party wall but left the roof guttering down pipe in its original position, running down between the 2 walls, presumably into the original drain. See photos. This drain is now totally inaccessible so if it were to get blocked we couldn't get to it to unblock it. I'm hoping that they have thought of this and have a solution. I have asked them but they claim not to understand English. Can any experienced builders or roofers suggest what next doors plans for this trapped drainpipe and inaccessible drain might be? Many thanks David Field
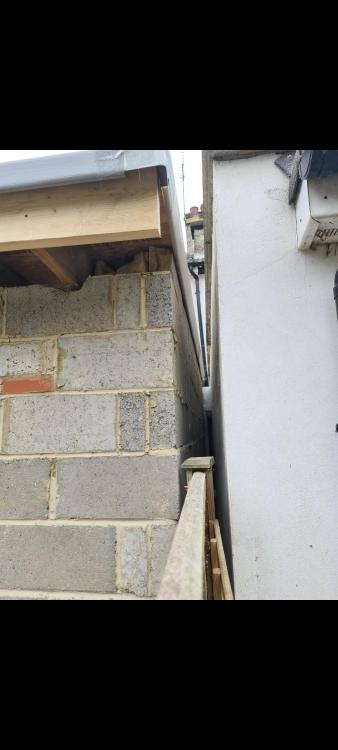


-
Looking for some advice on roofing if I may: I’m building a cabin with cold roof in SW UK and concerned about the air gap between insulation and OSB deck. The roof comprises (inside to outside): 12mm Q mark plywood Thick vapour barrier (black DPM) that is fitted best I could but without butyl tape to seal screw holes and stapler holes. 170mm deep rafter filled with 150mm PIR insulation which only gives me a 20mm air gap (50mm is recommended building regs). I messed up the materials order. That’s where I’ve paused building. Roof is 10 degrees single pitch roof Spans 4.2 meters I’ve already ordered 32/1000mm box profile metal roofing sheets High usage holiday cabin I can see 3 options going forward: A) No OSB on top of rafters - just membrane, counter battens then metal roofing Q) is this weather proof enough? Warm enough? Too much airflow? B) OSB fixed to rafters (20mm air gap), breather membrane, cross batten then metal box profile roofing. Gaps on front fascia and eaves for airflow. Q) enough airflow? 50mm is most people's recommendation. C) option B but with battens on top of rafters to lift OSB and increase air flow (cross and through ventilation) Q) is this too much airflow?) Any advice or thoughts much appreciated. I know cold roofs are prone to moisture build up so I want to get this right. Cheers, Jake
-
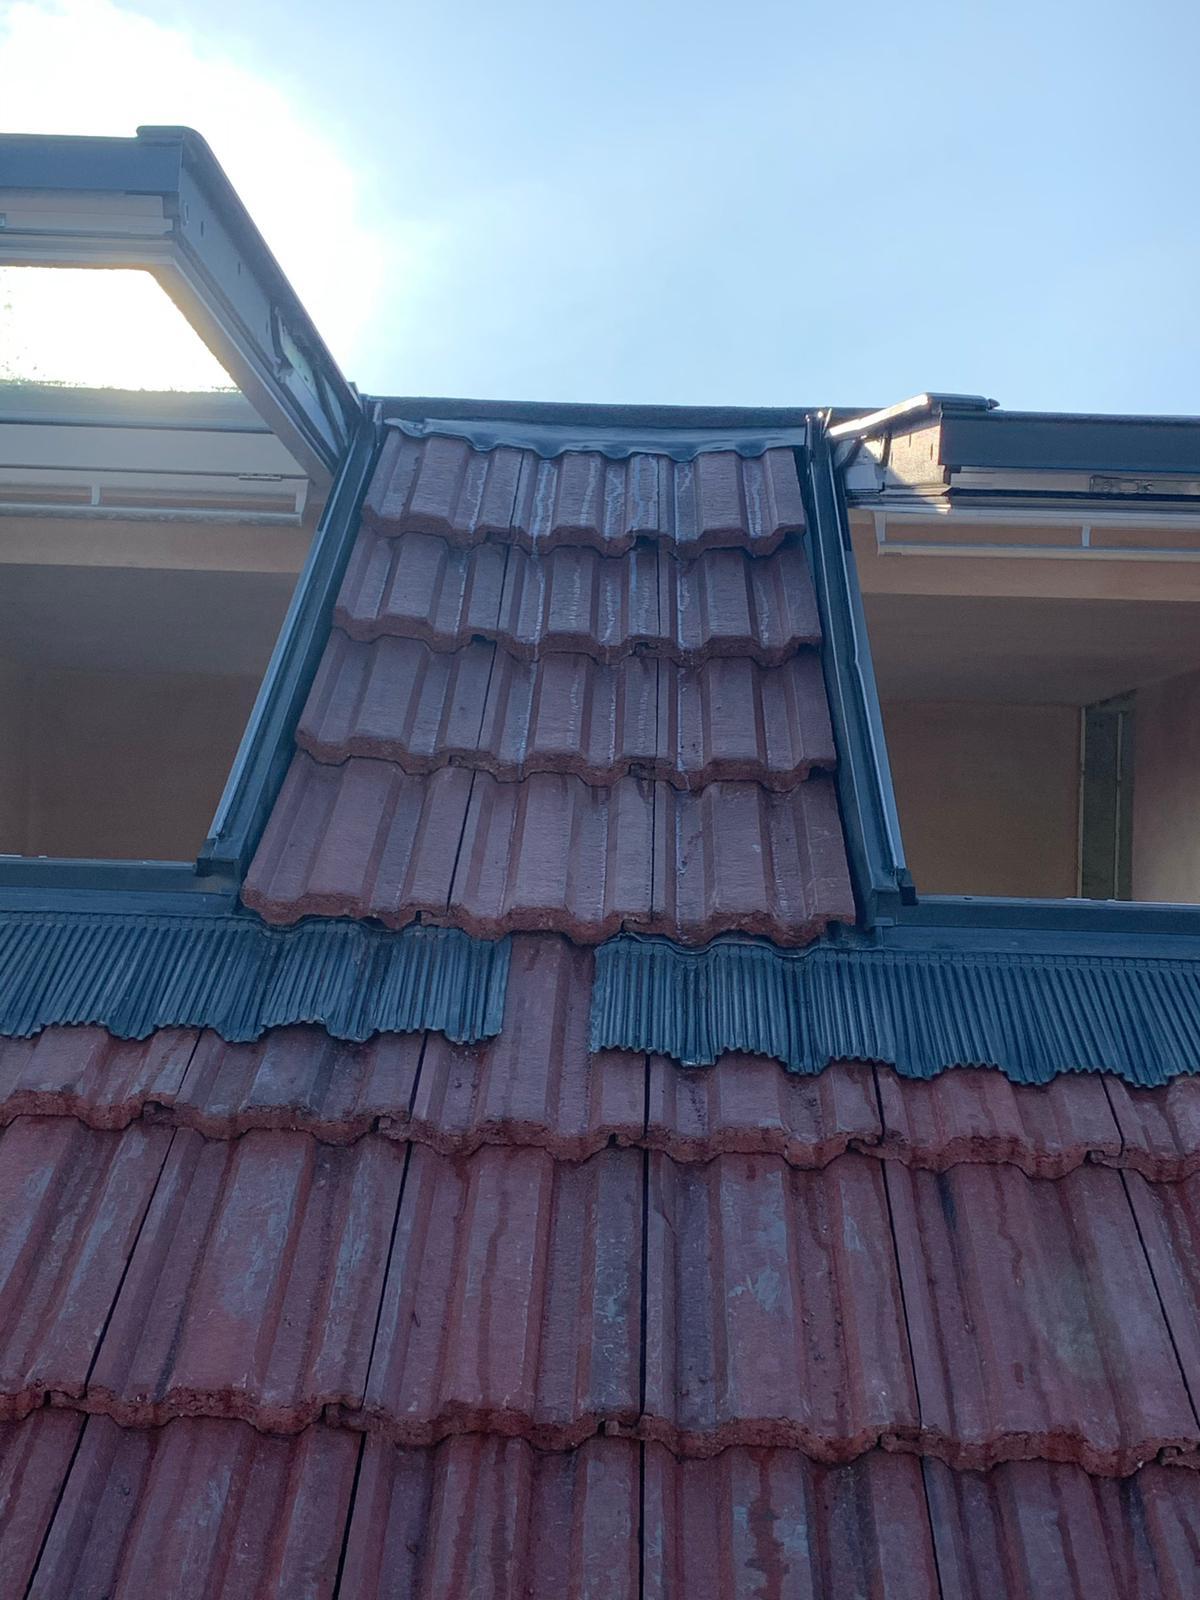
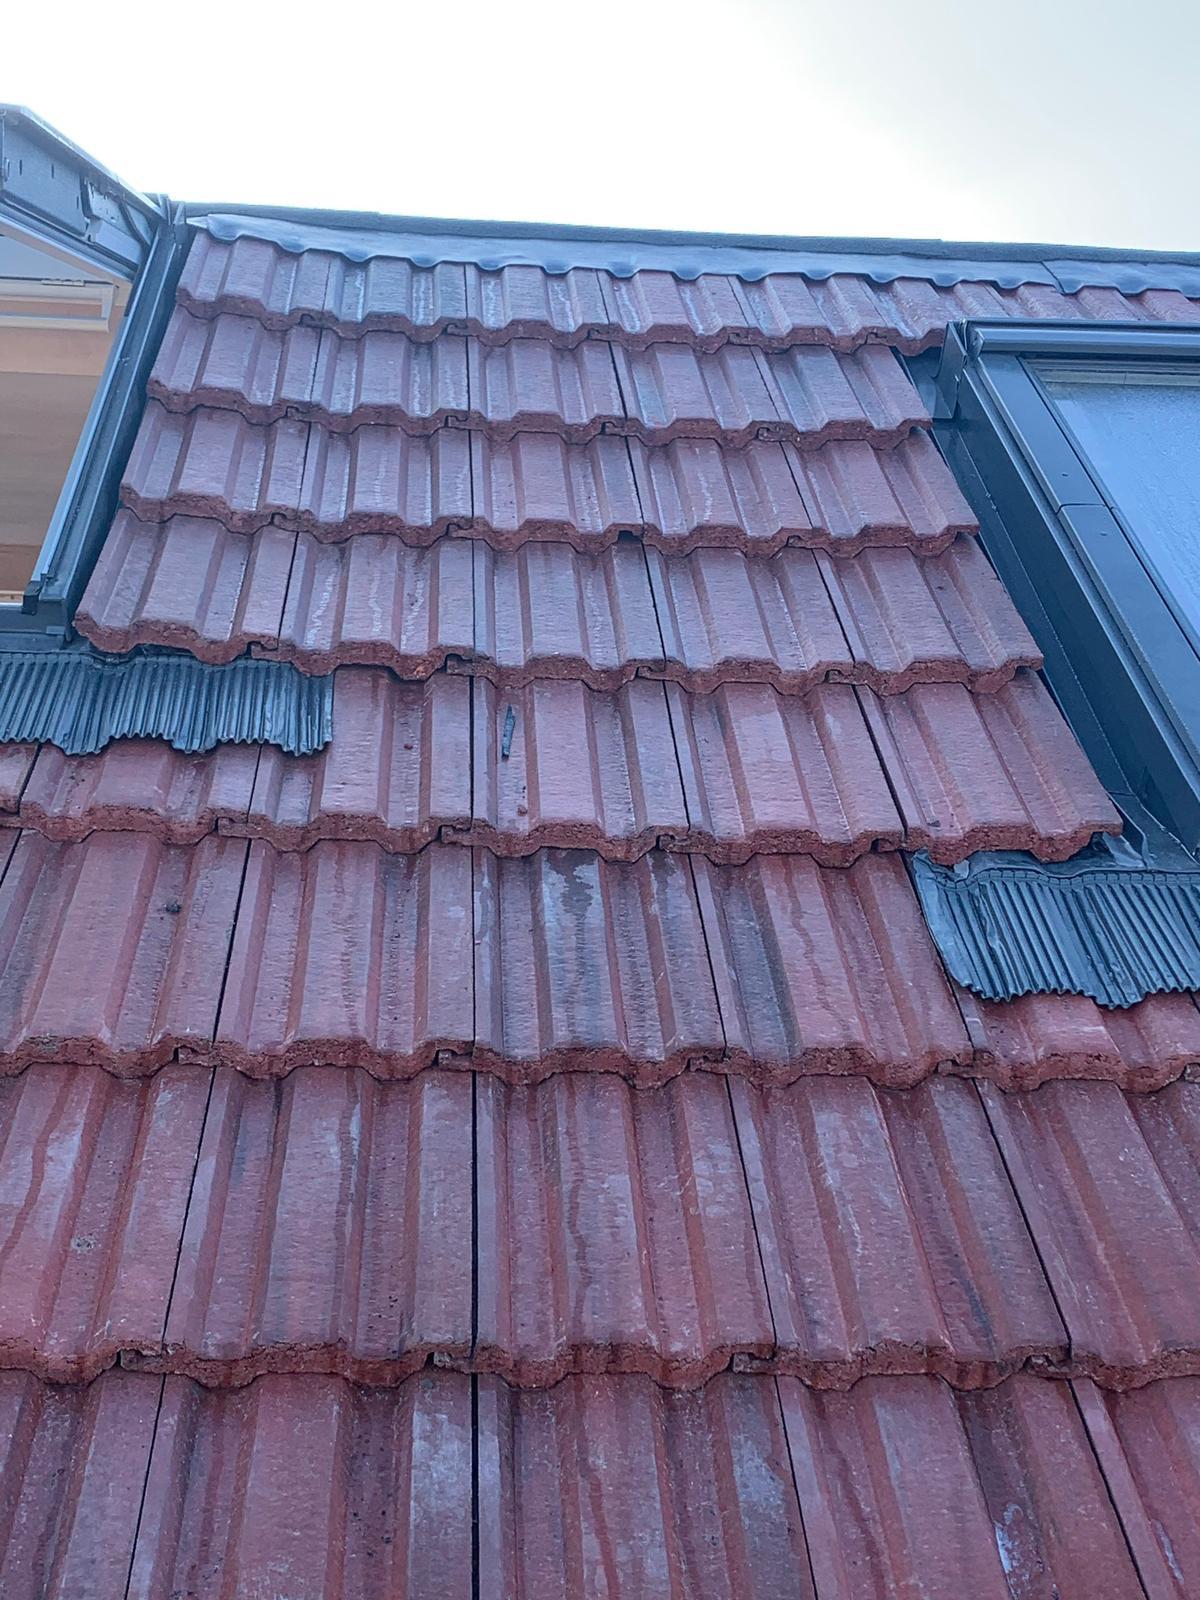
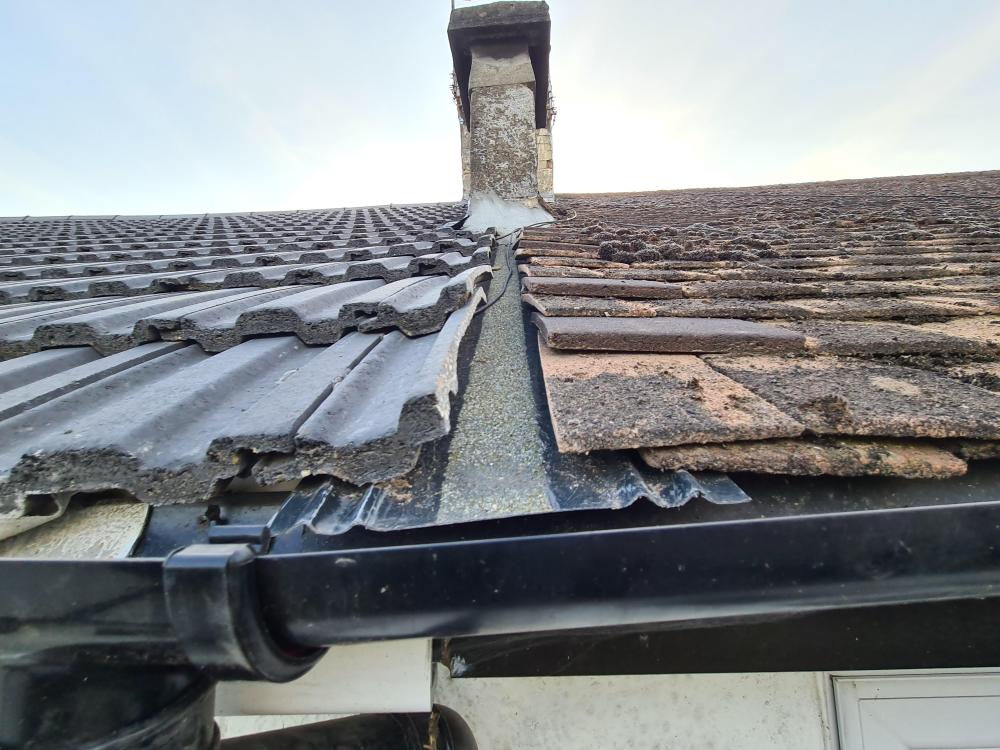
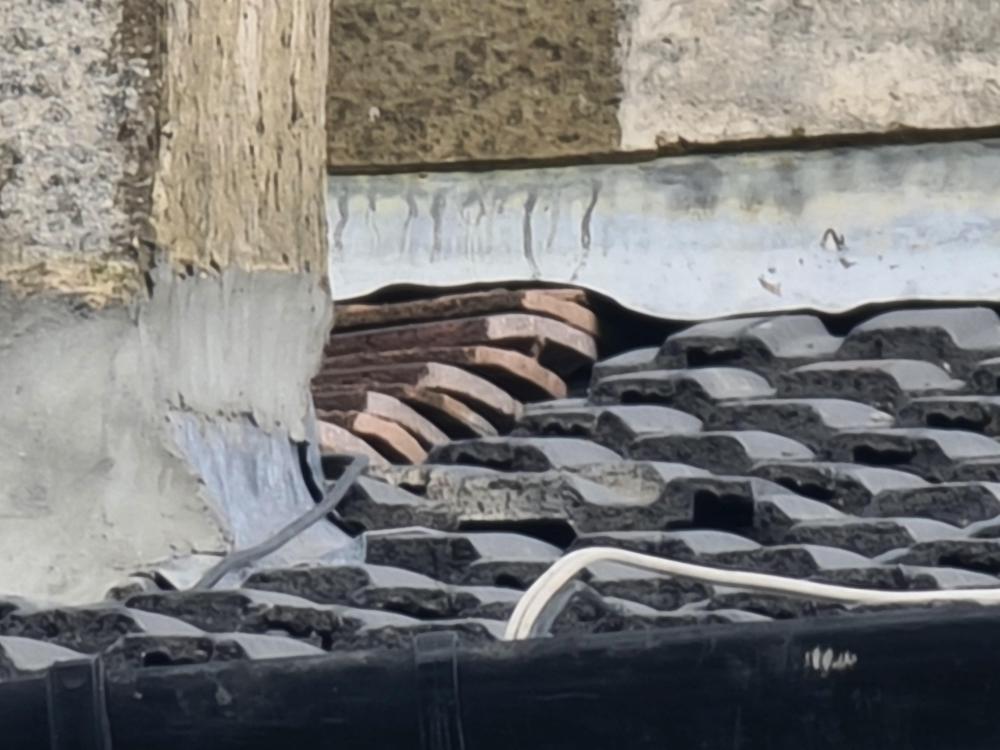
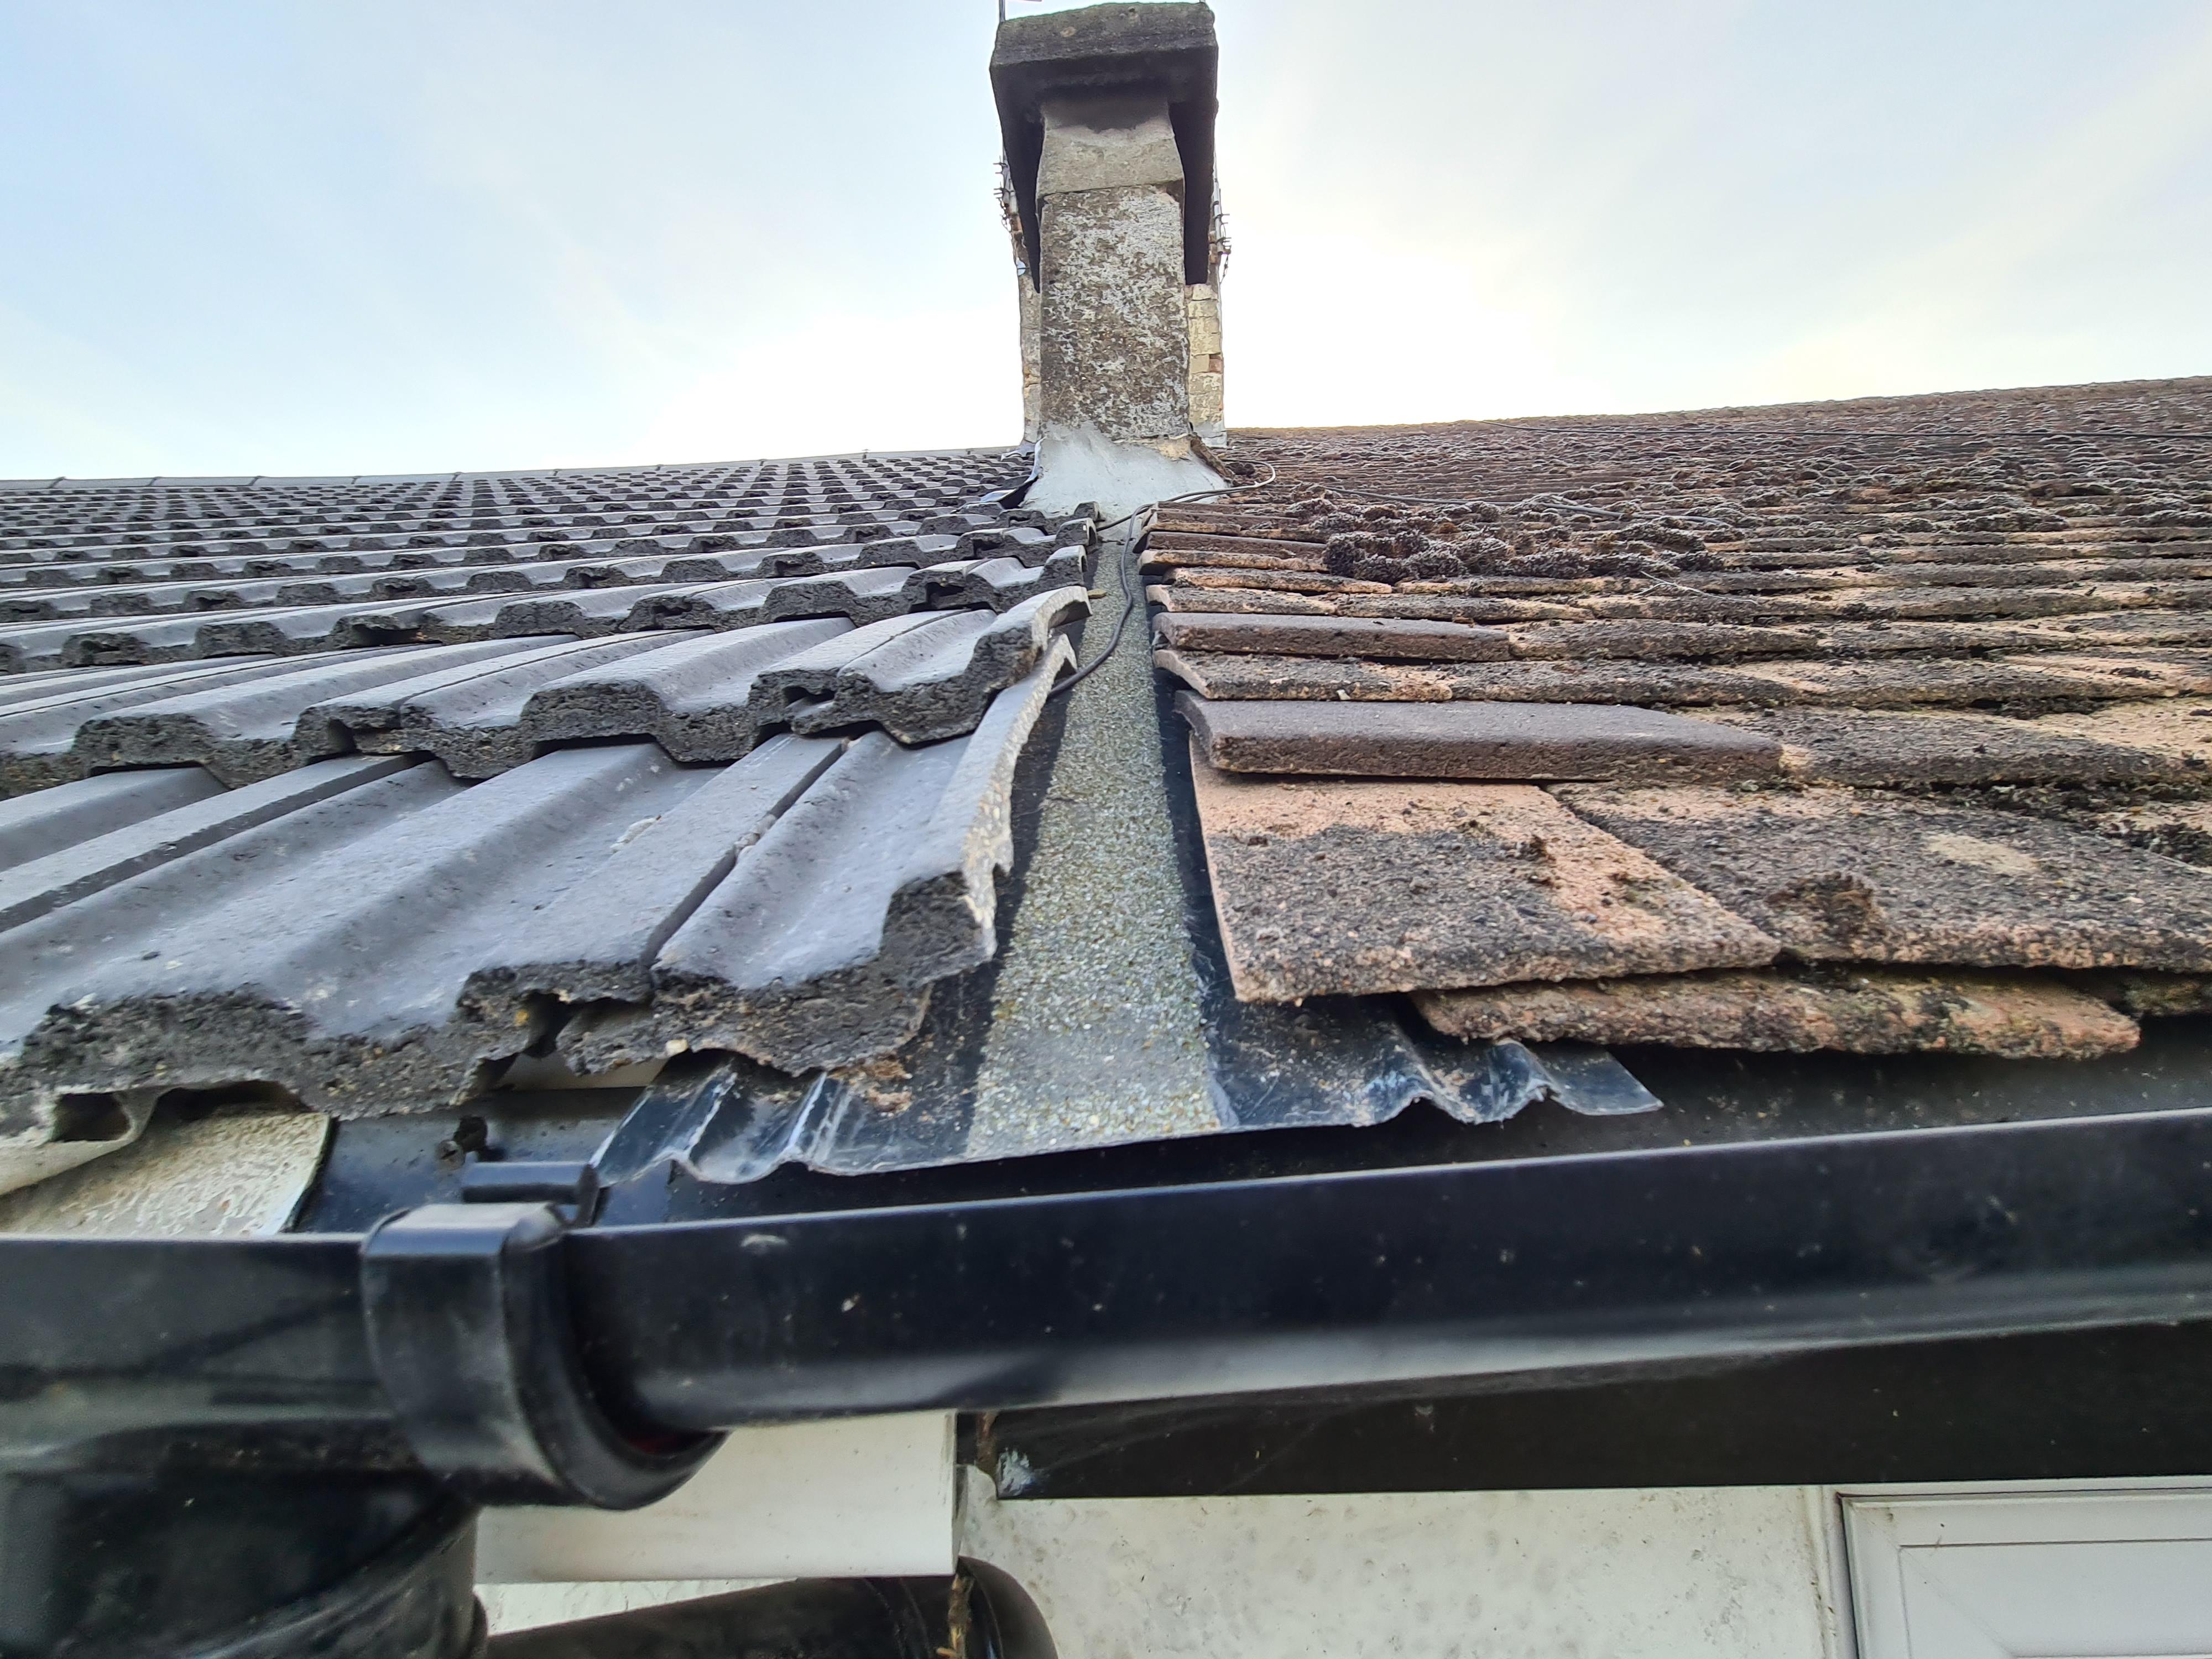
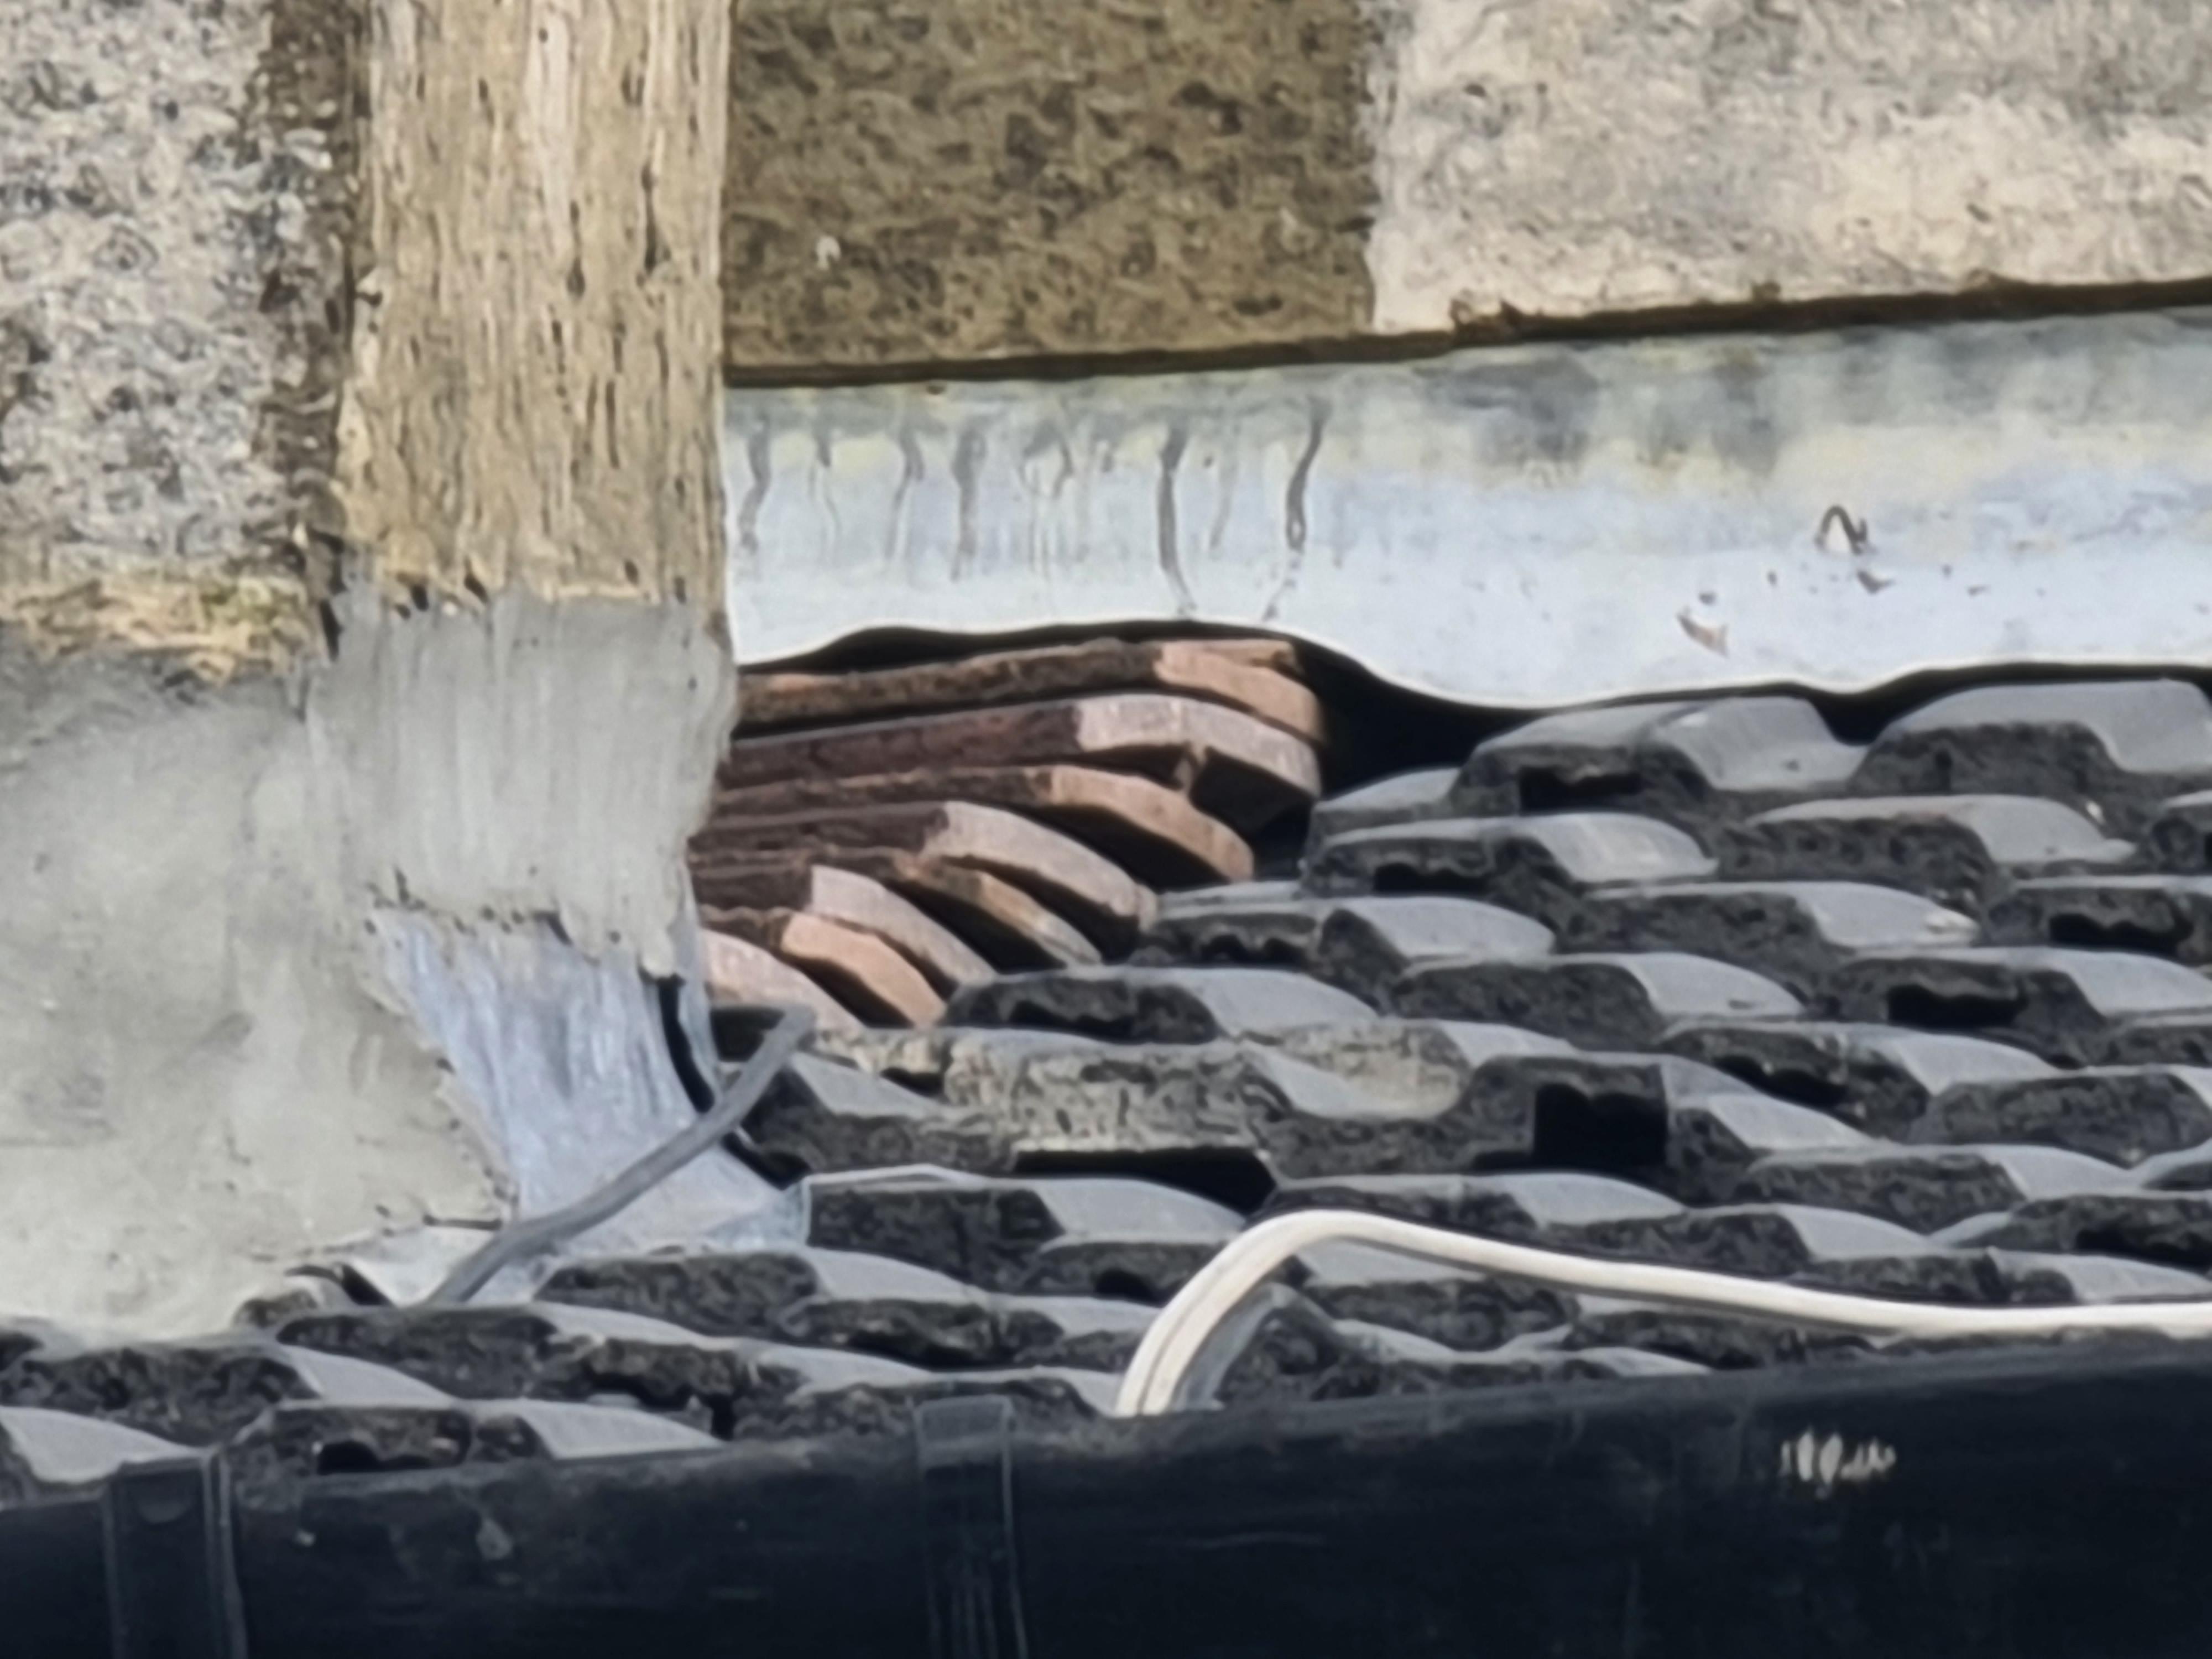
Hello We live in a 1930s terraced house. Our new neighbours just retiled their roof and the roofers used a bonding gutter where the roofs tiles meet. They have left a 3 inch space between the 2 roofs and tiles on both roofs are kicking up where they sit on the bonding gutter. I'm concerned about water getting under the raised up tile edges on our side because we do not have felt under our tiles and the roofers haven't bedded our edge tiles in mortar. See the 2 attached pictures. Our roof is the orange tile. Do I have anything to worry about? All thoughts welcome. Regards David
-
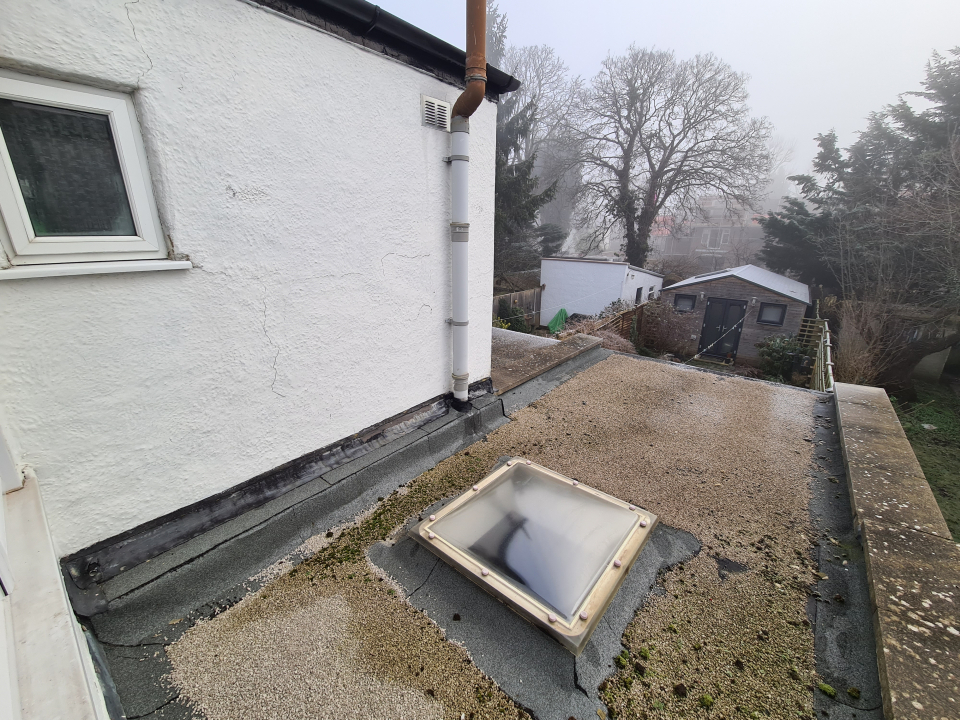
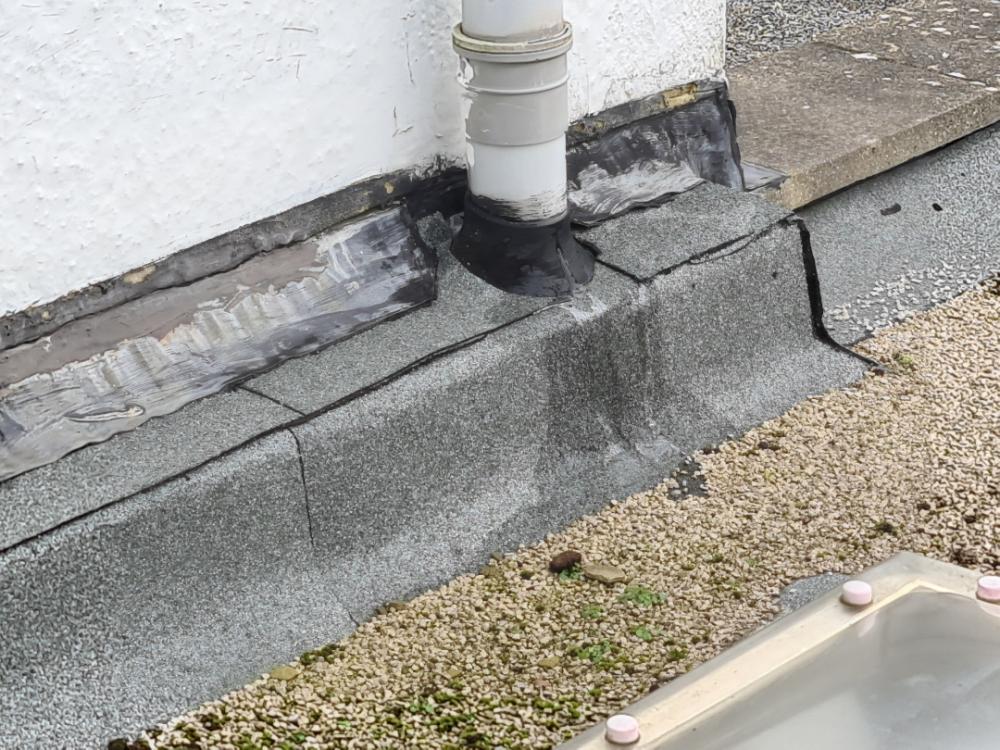
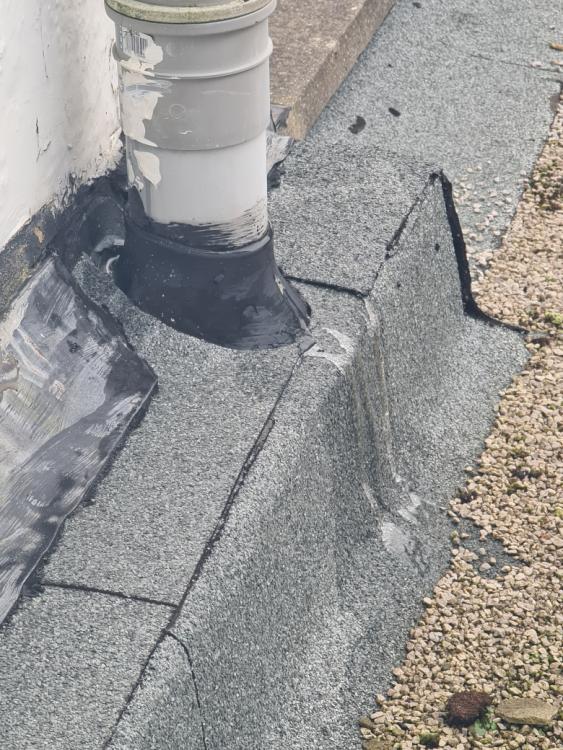
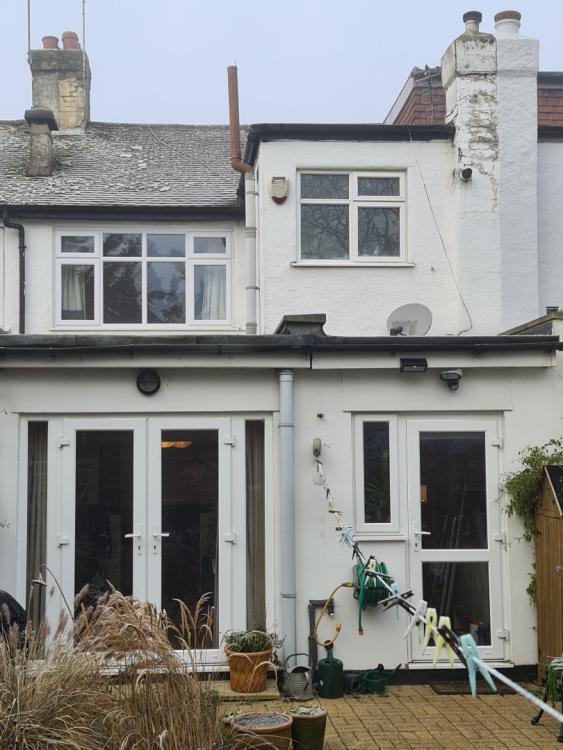
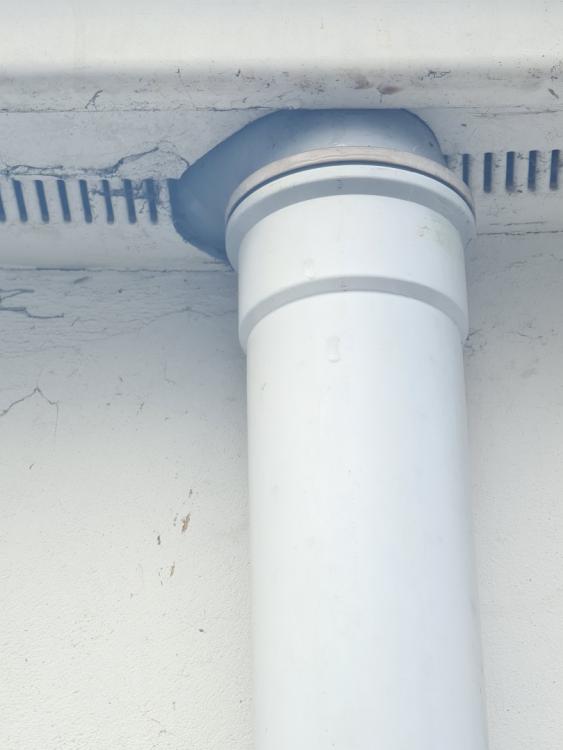
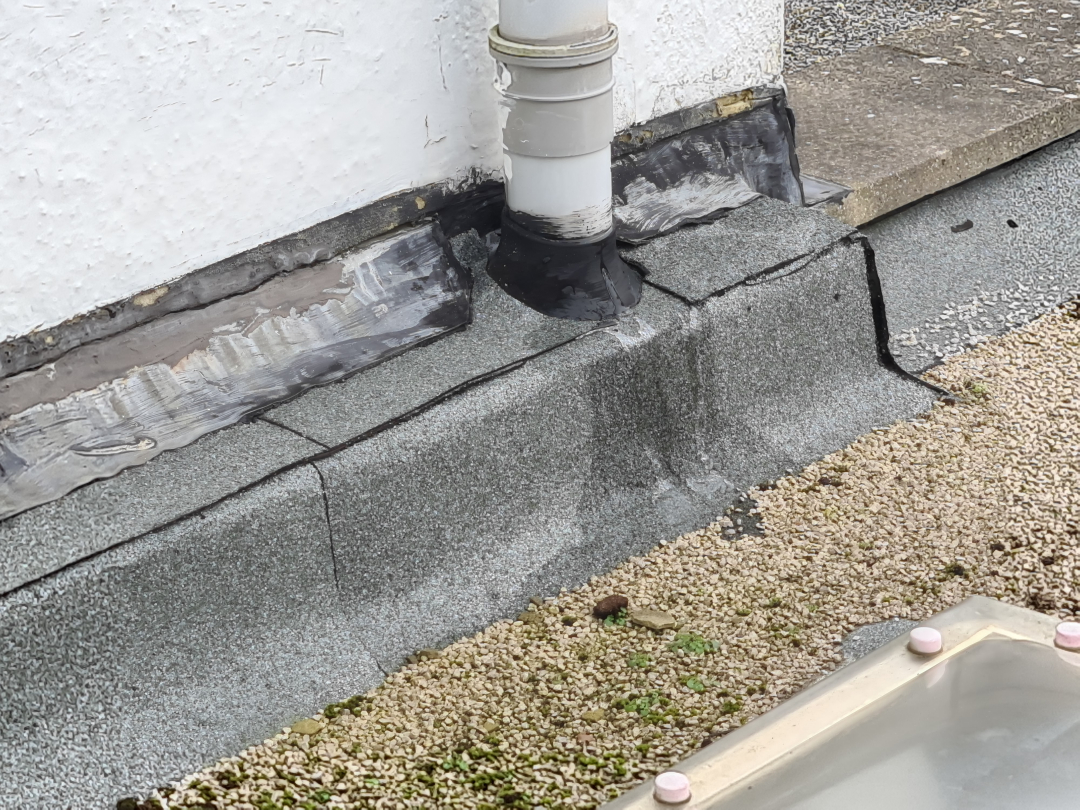
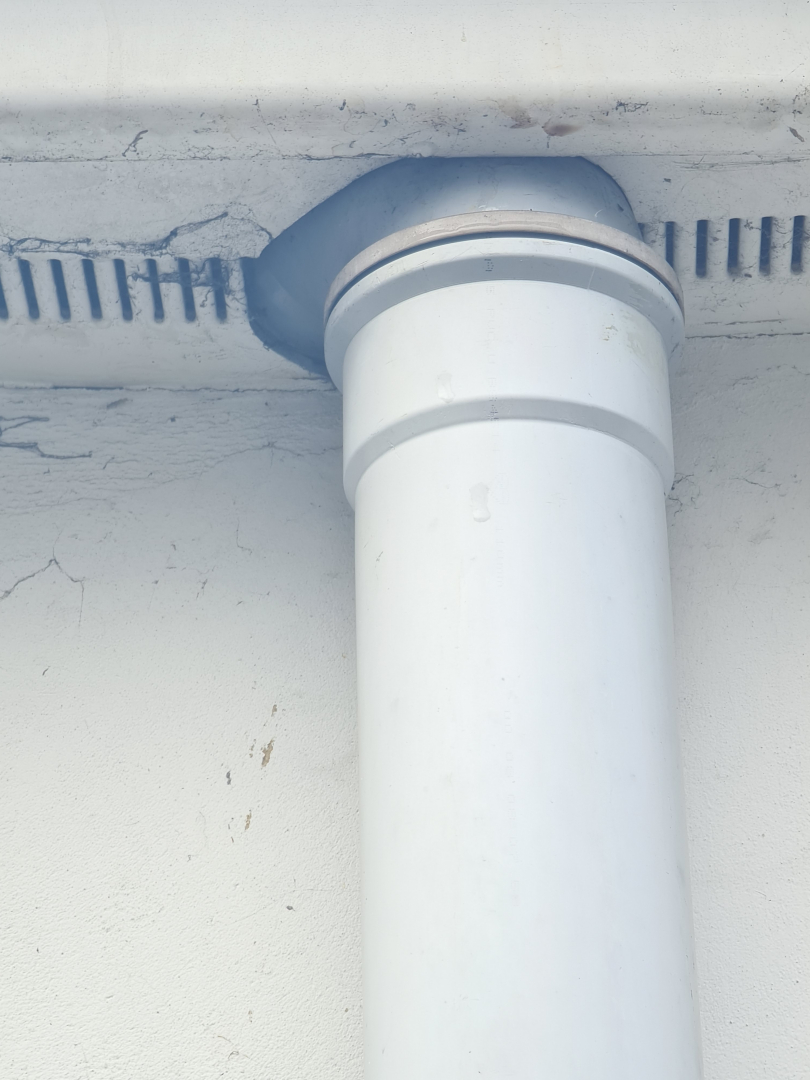
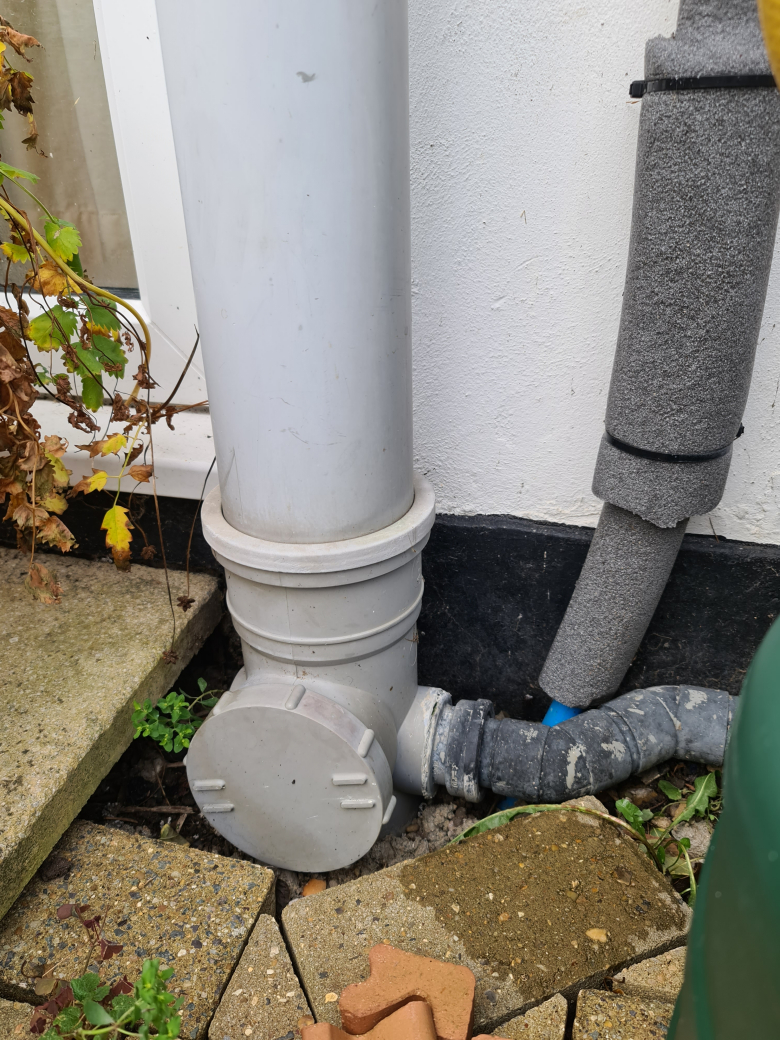
Hello. We had an extension built 14 years ago and the soil pipe from the loo and bathroom was re-routed through the extension roof. The loo is behind the window in the first photo. The bath/shower is to its right. I've noticed we often have water seepage from where the air pipe joins the boxed in soil pipe. At the moment there is a frozen stream of ice in that area. See photos. We have no history of loo blockages or slow drainage of the bath. Is the drained water backing up in the soil pipe? If we needed to get someone to investigate would the pipe have to be unboxed? Any thoughts appreciated.

-
Hey all, Wondering what slate size I should go for on this build and how many slate and half should I be estimating. I had in mind 200 slate and half 235sqm roof area for slating 500 x 250 4845 600 x 300 3135 Thanks C
-
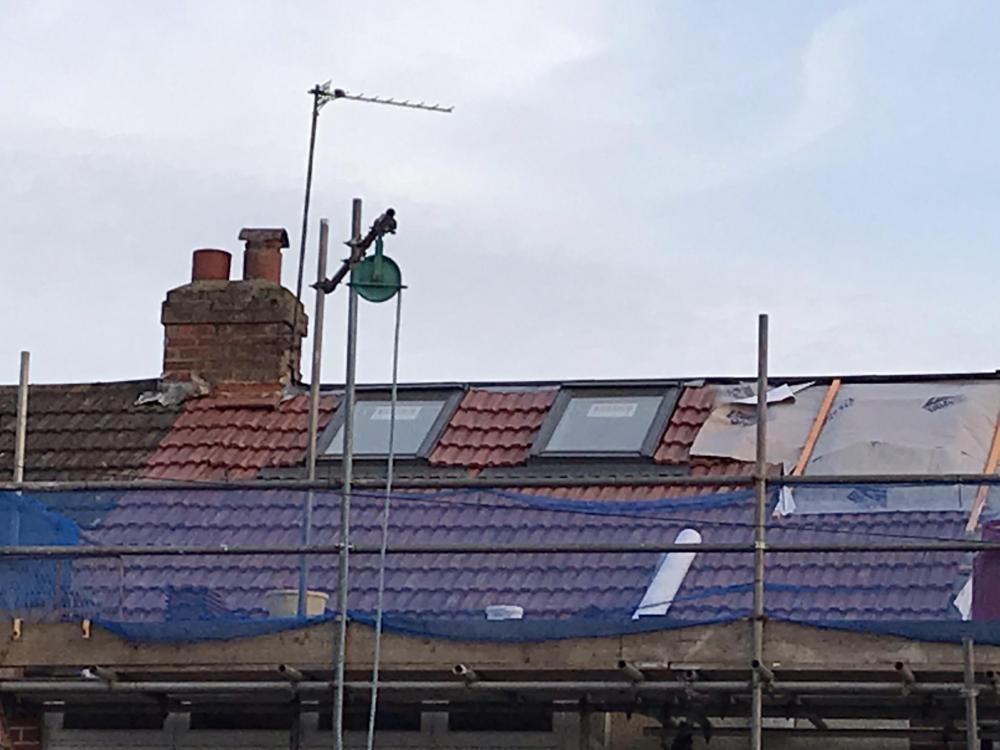
 I replaced the roof on my two-story house with concrete interlocking tiles and the dry ridge roofing system. I paid the local authority building control department to inspect the work and provide an approval certificate. The roofer left the scaffolding up, so the inspector could go up and check the work. The roofer was not on site when the inspector arrived. The inspector said he could not go up the scaffolding to inspect the work as the roofer had not left him a ladder. My next-door neighbor is a builder and I offered to collect one from him. The inspector declined to state it was not needed and he would inspect the work from ground level. Part of his view is blocked by the scaffolding boards. He went across the road and checked the front and side roof without using binoculars and said it was all ok. He told me he did not need to check the rear of the property as he had viewed it from the adjacent road where he had parked his car. He opened the loft hatch, briefly looked in the loft without turning on the light, and said it was ok. He walked under the scaffolding and said he could see from the gaps in the scaffolding that the new gutters, fascias, and soffits were all ok. He spent a maximum of l0 minutes, said he has completed the inspection, and passed the work. I repeatedly told him that I was concerned that he had not gone up on the scaffolding to inspect the roof closer, nor had he used binoculars for close-up checks. He told me not to worry and everything is ok. My friend involved the local authority inspectors who passed her roof last week. She tells me her inspector visited twice and each time, he went up the scaffolding and did a close-up inspection of the work. I am concerned that there may be snagging work or problems with the work that the inspector did not pick up. Is this the right way to inspect roof work? My son suggested I pay an Independent inspector to get a thorough report. Is that ok and will the roofer comply with that if additional work is necessary? The roofer left the scaffolding up from Thursday 14.4.2022 for the inspection and will take it down on Tuesday 19.4.2022 (due to the Easter Bank Holiday Weekend). As it is Easter Weekend I cannot contact the Local Authority till Tuesday. I paid the Local Authority £250 to inspect the roof which was costly to replace and I am very concerned.
 -
 I am working with a structural engineer specialising in Traditional Timber frames to design a new build Wealden Hall House. Could anyone point me towards a person / company with a good degree of experience in efficient building design for traditional timber frames? Pursuing a truly historically-accurate frame design results in some specific cold-bridging issues (use of continuous timber posts / plates / joists through cross sections), that we are seeking mitigation strategies for. Thank you.
 -
 There's a longer backgound story to this to do with embodied carbon - but keeping it simple.... We are contemplating alternative roofing materials for our new build and need to know if/what the impact on the design of the construction of footings and structure will be if we have to use tiles over our choice of seamed metal. The metal roof covering weighs about 2 tons the tiled roof more like 22 tons. We are planning to use a timberframe construction too. Do we need beefier footings = more concrete and beefier timberframe = more timber? At this stage we'd prefer not to pay a structural engineer to actually work it all out as the design is still a bit fluid and hope we can get an idea from yourgoodselves! Comments gratefully received. thank you
 -
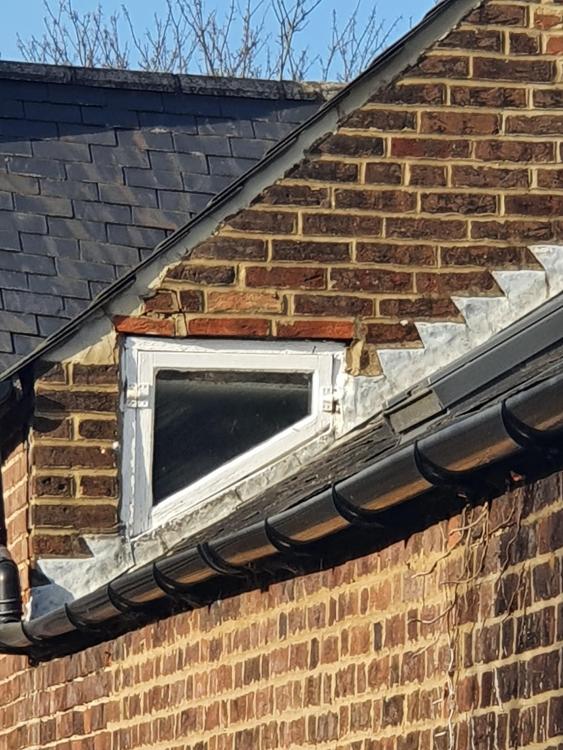
Hi there, I would be grateful for any ideas please as we are struggling to come up with a suitable resolution. We are planning a two storey extension which would ideally project 2m beyond the rear wall of our neighbours house, as shown in the photograph. We were intending on having a shared valley gutter with eaves the same height as the higher section of their roof. However there is currently a high level hallway window in place, as shown on the photo. Our architect has advised that if we build on the party wall, past this, it wouldn't comply with building regulations because water could ingress back into the bottom of the window. Clearly the window would not comply with building regs in it's current form, because the lead flashing isn't high enough. If we lower our eaves to the height of the lower roof, we lose a lot of head room. Struggling to find an alternative design. Any help or ideas would be most appreciated! Many thanks!03 - Proposed elevations.pdf
-
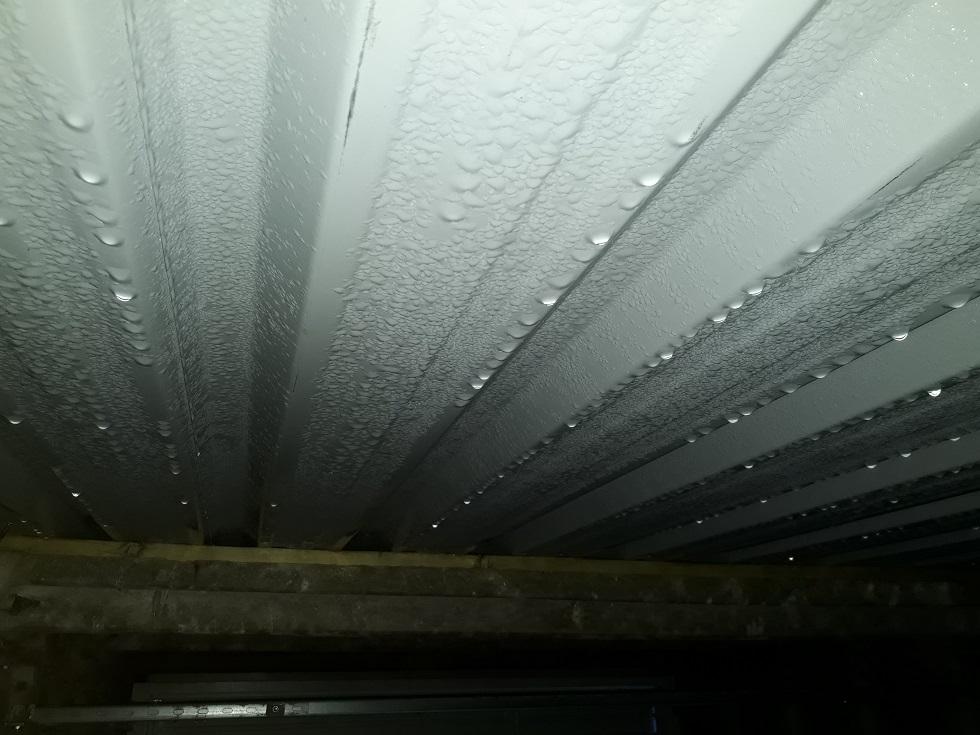
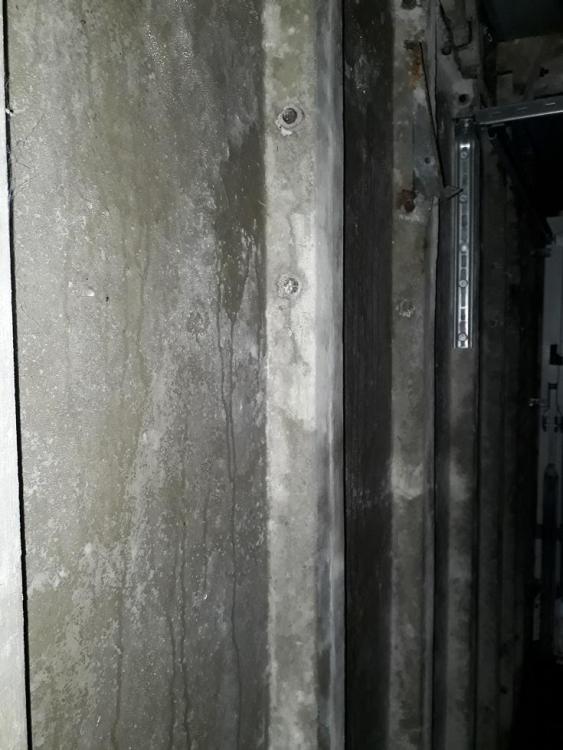
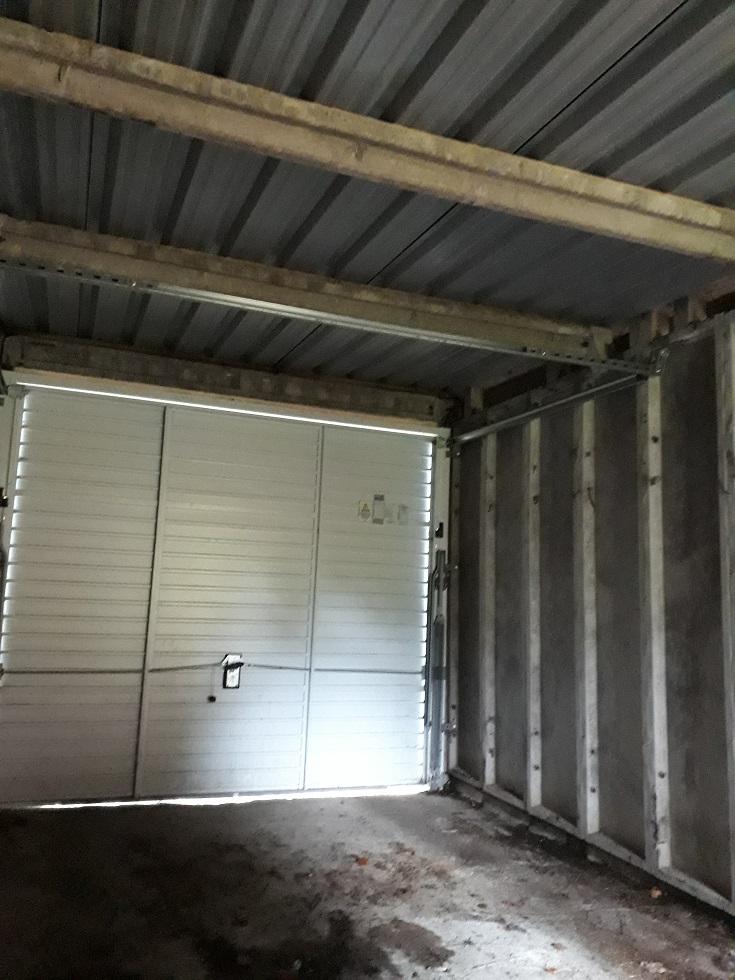
I'm having a condensation issue with our "mid-60s built" garage made of precast concrete walls and metallic roof When outside air temperature drops below 10°c the walls are literally "sweating" and the roof "showering" everything stored underneath (the 2 last pictures are taken in a hotter day so it is dry inside). Worth also noting that there is an air gap between the roof and the walls, running on each side of the garage and at the rear From what I've read online the most efficient way to fix this condensation issue might be by improving the insulation, I have a limited budget and DIY skills so I'm looking at something not too pricey and fairly easy to do. For now I was considering to glue some aliminium bubble insulation foil similar to this one :https://www.amazon.co.uk/SuperFOIL-Garage-Door-Insulation-6sqm/dp/B01ENLVTBA or some polystyrene insulation boards. (Right now I'm more lining toward the aluminium foil as I'm worried about the durability of the polystyrene). Am I going in the right direction ? ? I would be really interested to have your thoughts about it ?


-
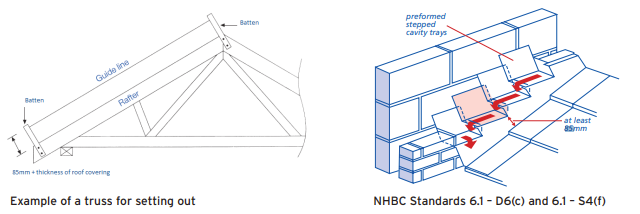
I'm trying to work out where the flashing and cavity trays will sit on a roof abutment. I don't have the rafter to put in place and measure off, but I do have a drawing of the bay window roof exterior surface. I need to work all this out so I can get the positions of the stepped cavity trays correct as they get built in to the wall now. Their corners align with the corners of flashing, so it's lead me to try to understand this (excuse the pun). I can see NHBC recommend at least 85mm (some of their docs have 65mm min) between the roof surface and water line which defines the positions of one set of corners of the flashing. What I can't work out is what sets the position of the other set of corners. Is it just set by the height of courses and drawing a line perpendicular to the roof slope? I've seen something that suggests they sit on a line 150mm from the roof slope. I have attempted to draw this below with the lead shown in grey and the reference lines at 85mm from roof slope and 150mm from roof slope. The red rectangles show coursing and would be the positions of stepped cavity trays. Wider lead flashing or moving it off the roof slope slightly (so up the soakers a bit) would create a tighter angle on the 'saw teeth'. I imagine these must never result in the cut line sloping the other way. Is there a minimum amount of overlap on each step? Finally, can you stop when the lead goes past being vertically above the end of roof slope or is there a minimum amount it has to go past the end of roof slope. In the example below, could I have stopped one brick course higher at the bottom? Lots to understand so thank you if you made it this far.


-
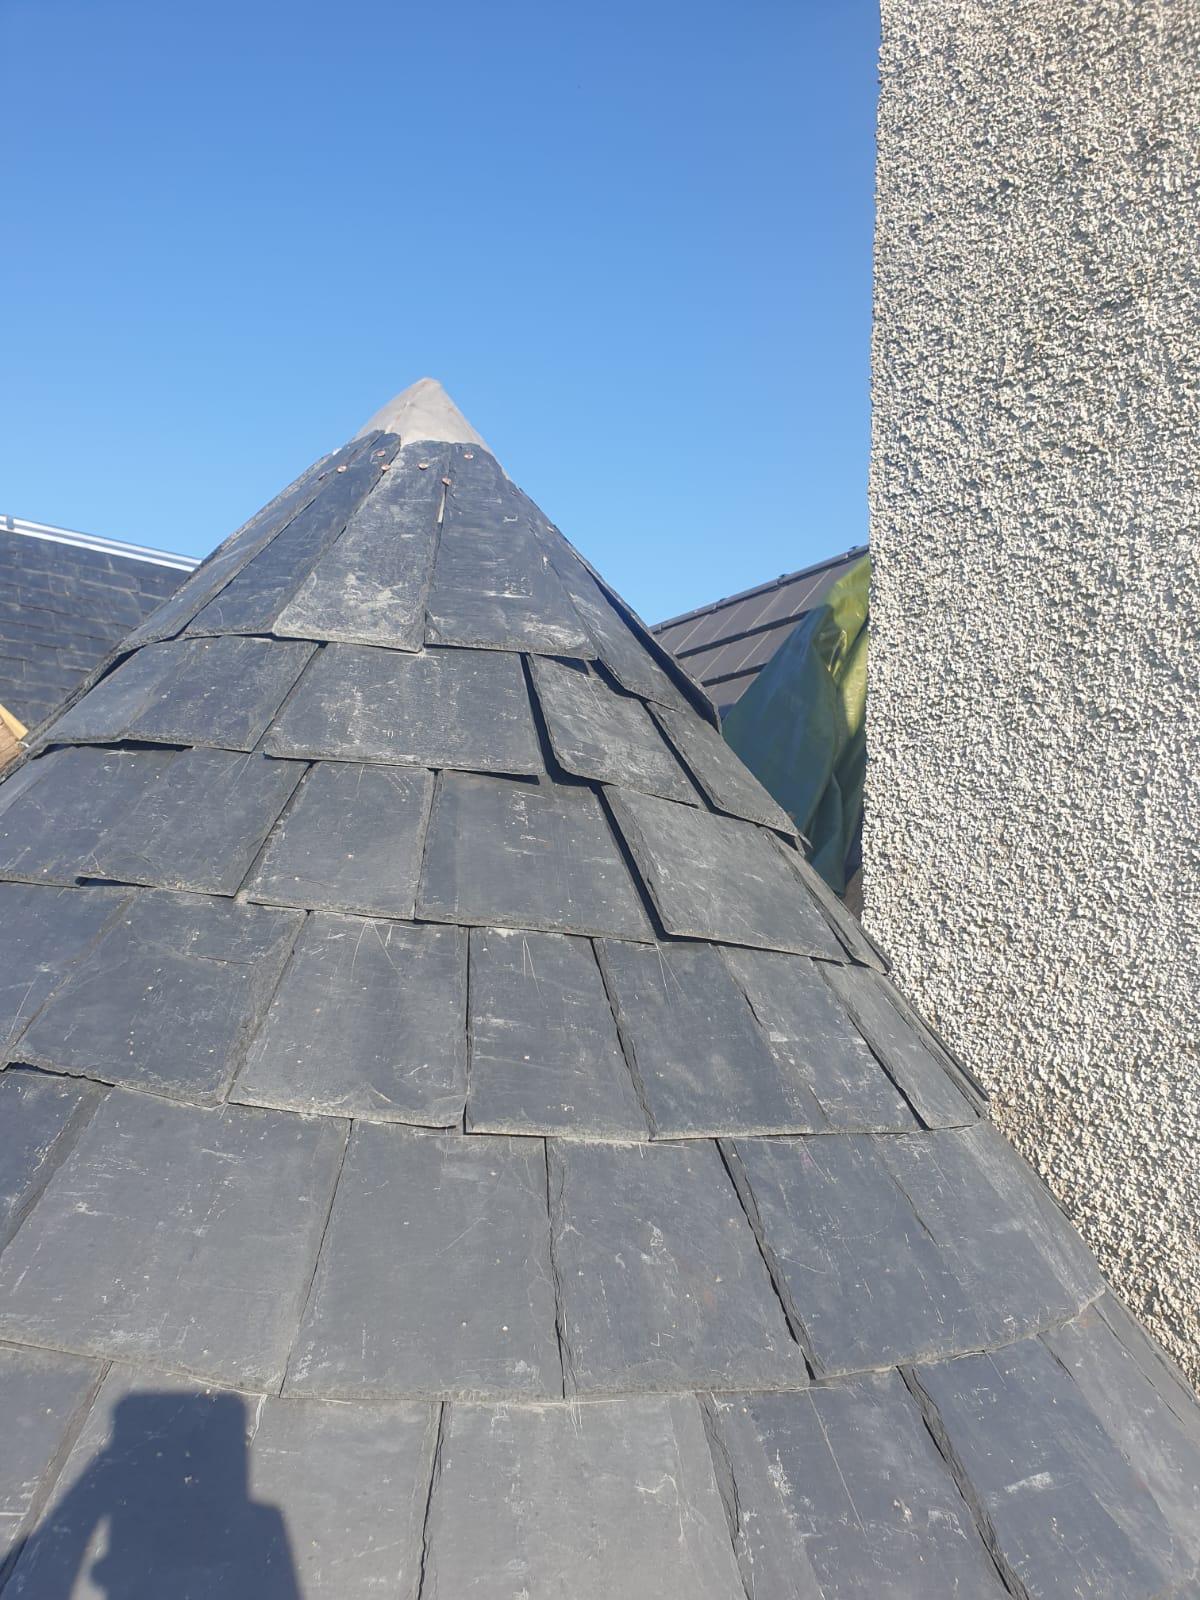
Hi, I’m looking for some advice please. We have had our roof re-slated and this is how they have done the turret. We are worried that water can seep in as the slates don’t seem very flush. The scaffolding is still up so we could push them to fix it, but they are saying that it’s normal and to do with the slope of the turret. Would be good to have an expert opinion on if it’s ok to leave like this?

-
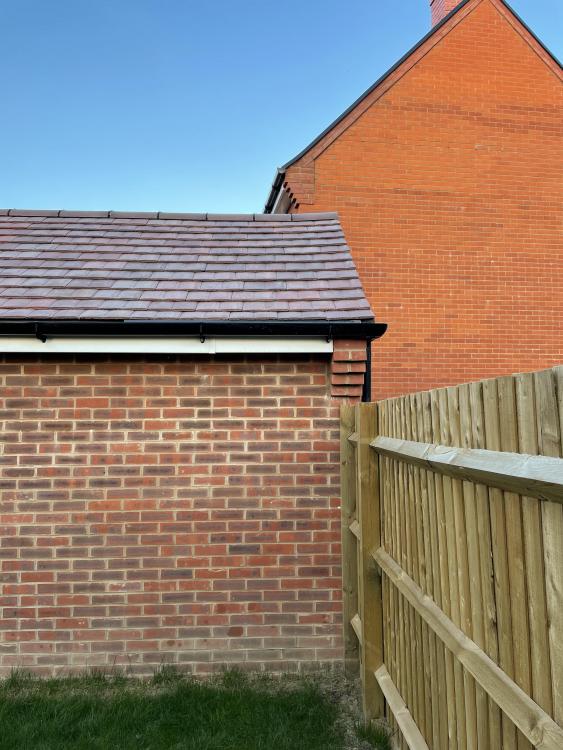
Hi all Hoping for some advise regarding a garage roof. In short, both ends of the garage ‘bow upwards’, and I would like to understand if this is normal, expected, and if it’s in/out of acceptable tolerance. Attached is a pic, which shows the final top tile pointing slightly upwards, and the corner of the bottom tile pointing upwards. In addition to this, the edge of the roof is mortar and doesn’t have a ‘cap’. Is this expected? None of this looks right to my untrained eye, so some input from people more qualified would be much appreciated. Thanks in advance
-
The builder is taking a rest... I've lost trust and am checking everything as it's all down to me now.. The rafters are 200mm. The original spec of the vaulted being was 200mm of sheeps wool, BUT we had to then change to F1 bituminous roofing membrane, non breathable, because of the bats and so was encouraged to change to PIR 150mm and a 50mm gap. Fair enough. However, I need to understand the detailing. On the SE diagram the steels are outside the thermal envelope, except for the one resting on the internal wall. (NB the vaulted ceiling will be the whole area, the diagram is slightly wrong as the design was amended, it seems to me that the vertical steel could go in or out of the thermal envelope). See photo: the steel is bolted to the wooden ‘beam’ of the roof ridge. This means non breathable membrane stops at the top there, so the gap is not contiguous with the ventilation things in the ridge tile. Unless I’m missing something, there’s an 50mm air gap but no actual air circulation. There’s nowhere for the air to be drawn in at the top. Surely non breathable membrane and 'plastic' insulation are a potential problem, even if there is a vapour barrier in the plaster board? I feel it needs air to be drawn over it somehow and not being able to inspect it bothers me. Do I need to change tack and think of a breathable house as its a conversion with all the associated compromises? Steel detail.pdf Steel in situ.pdf
-
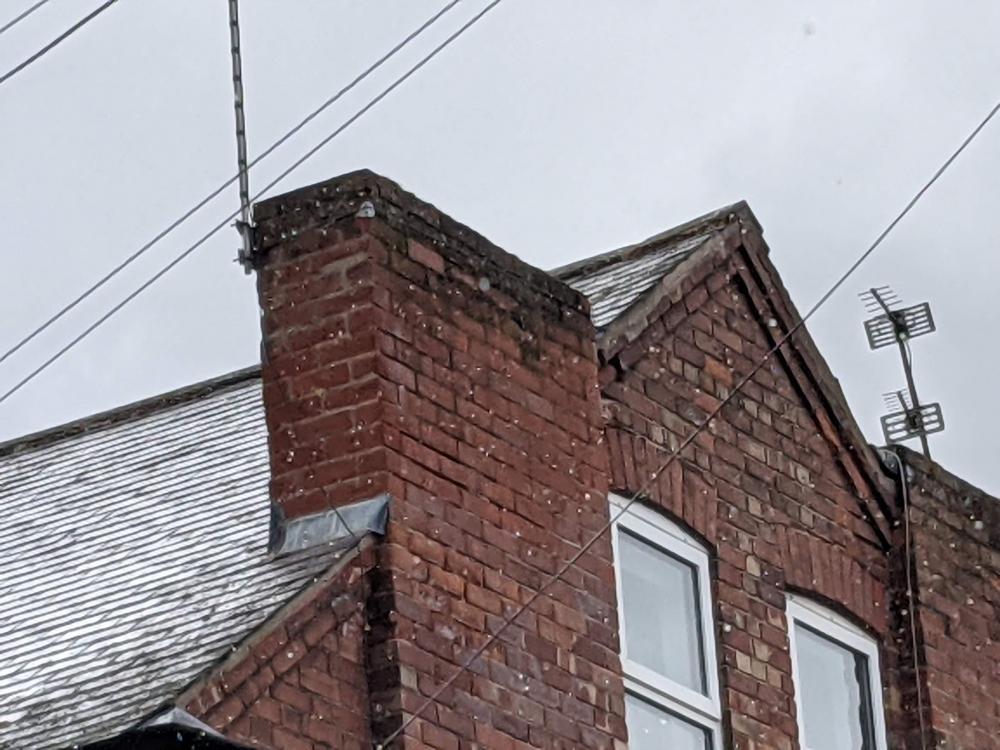
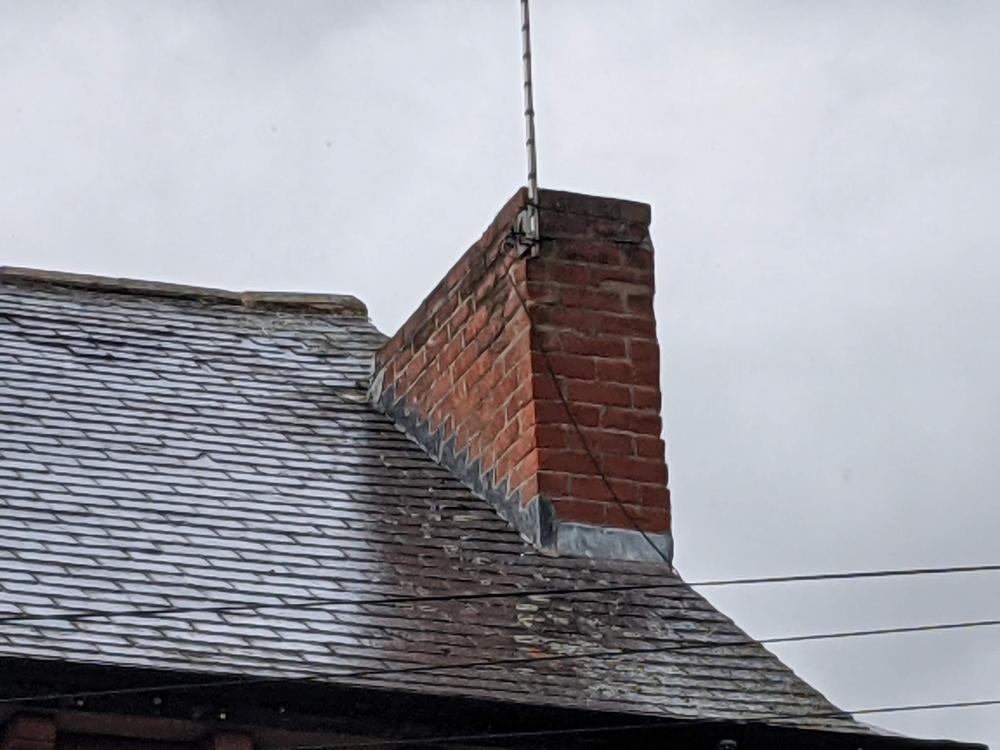
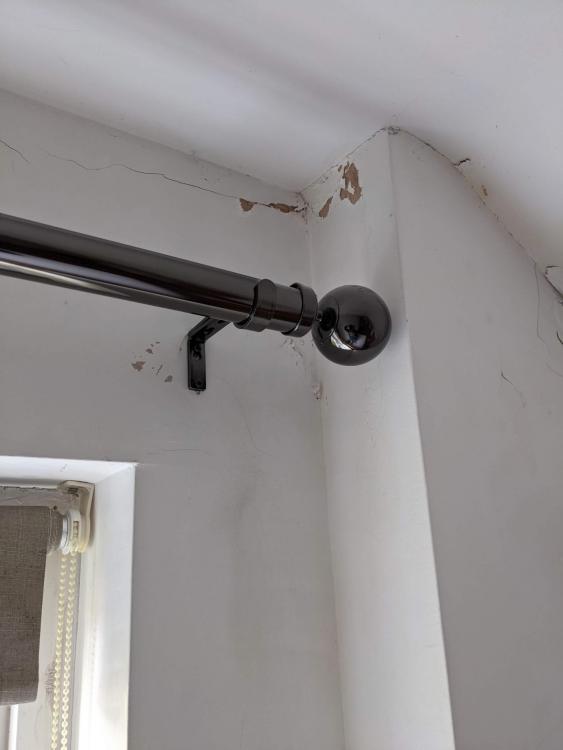
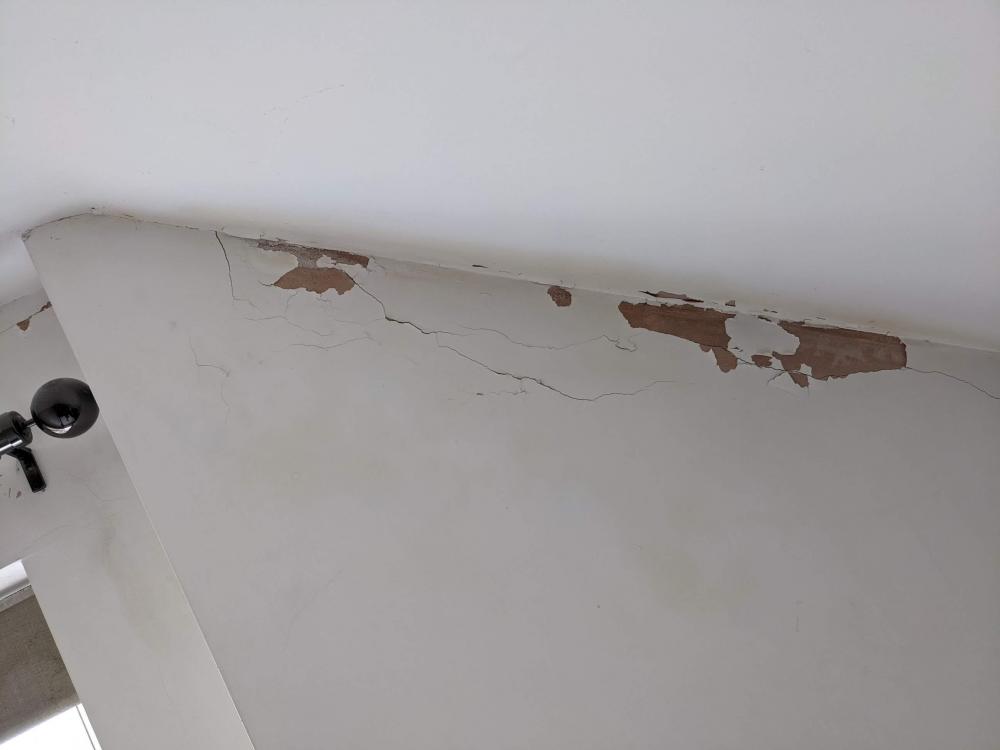
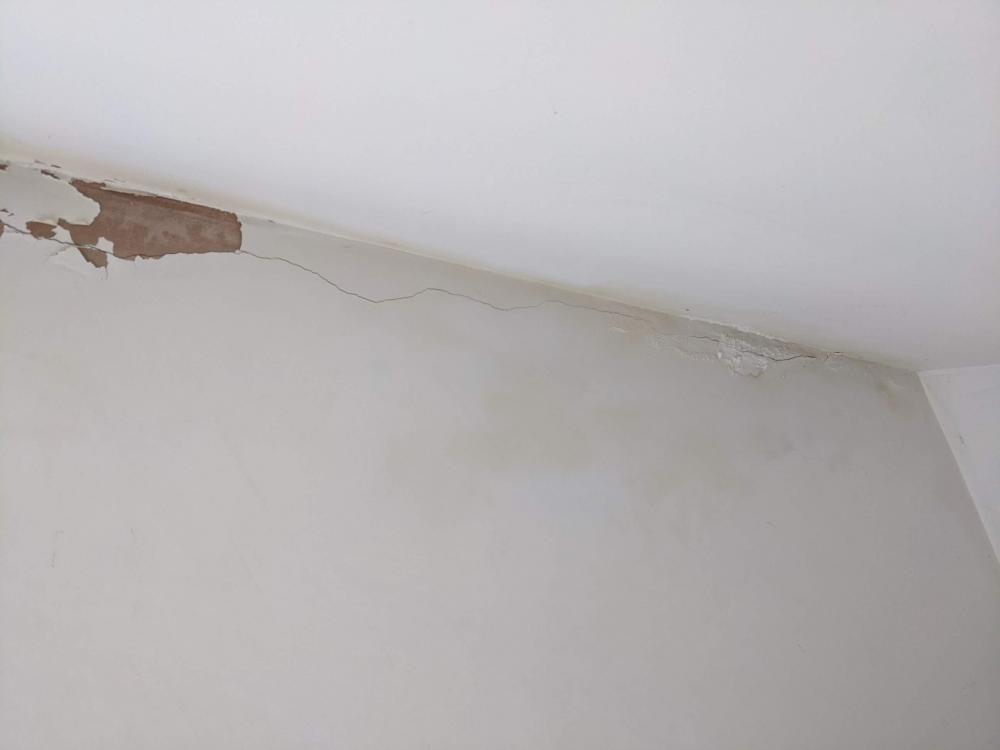
Hi, I have a problem with persistent damp coming through my chimney breast. I had two sides of chimney stack re-pointed a few years ago, and the lead has also been replaced. Unfortunately the problem has not resolved and has slowly deteriorated since. I've attached photos. Could it be that the top plate needs replacing? The Chimney is not in use. Any advise would be greatly appreciated. Thank you.

.thumb.jpg.d1f091d9a1268f3878b6f7dde1891e14.jpg)
-
Hi – I’m trying to organise a few quotes for a complete re-roof. My house is a Victorian building with Staffordshire Blue clay tiles. With the new roof, I believe there are two main types (but please forgive my total ignorance here), dry-ridge (likely more expensive upfront but saves on ongoing maintenance costs) and mortar-based (likely cheaper upfront but will have ongoing maintenance costs). Is someone able to answer my questions, below, as I’m getting really confused about what is best? Dry-ridge – will it be possible to keep the traditional look of the roof whilst using a dry-ridge system? This is the most important thing for me as I don’t want to make the house look silly with a Victorian building and “modern” looking roof if it would look “modern”. Mortar-based – how often are we likely to require maintenance on a mortar-based roof? Especially bigger jobs that will require scaffolding. Can small issues be fixed by climbing a ladder, or will scaffolding be required in all instances? As you can imagine, I’m just trying to gauge what the likely ongoing costs are going to be. I've had a couple of quotes already. One roofer mentioned it would be hard to get the traditional look using dry-ridge and the other said it would look fine with dry-ridge. Thanks in advance. Jpcamps
-
Hello, We’ve recently had a loft conversion and originally we were going to keep the old roof and tiles but they suggested we had new batons and felt for extra 2k to make it watertight. We agreed to this but if you look in the pictures the roof seems to bow inwards? They said they have corrected it and done what they needed to do but to me it still doesn’t look right - please advise?

-
 A apex roof has been constructed with Klober breathable underlay that has been fixed to the outside of the roof. Do I need another layer inside the rafters between the insulation and the sarking, or vapor control layer? The roof will be fitted with 150mm thick insulation (Ecotherm PIR, or Actis Hybris) Note the roof is built on a 800mm thick cottage rock wall (granite)
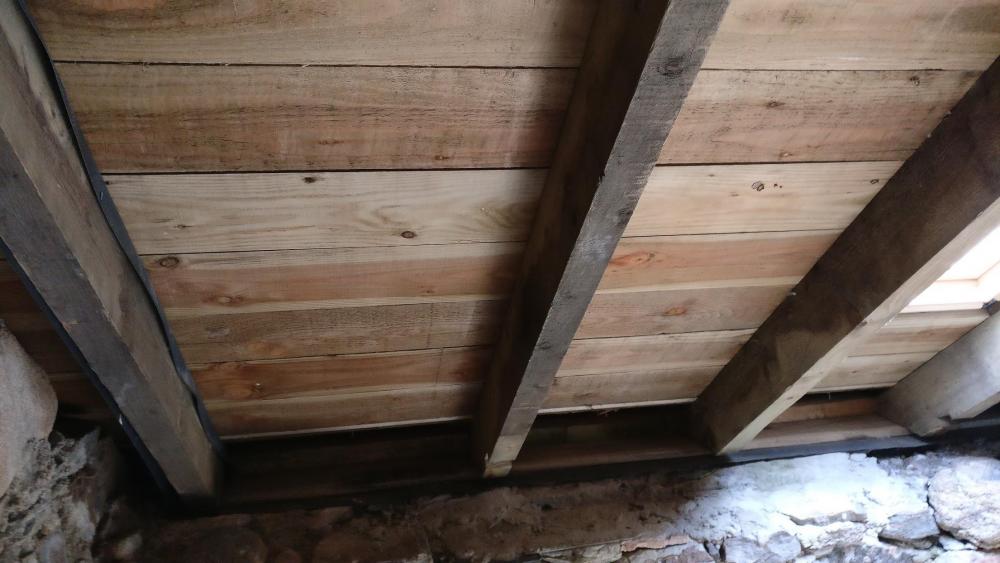


.jpg.c92ee4e9596c3603a4f0dd0280491594.jpg)