Search the Community
Showing results for tags 'level'.
Found 13 results
-
I live on a new estate where all the houses are open plan. I hate my open plan front garden its a cat toilet and plants don't grow as concrete has been laid underneath. Looking at the Planning Portal I can pave over the garden with permeable materials. However, it doesn't say whether I can raise up the height of the garden. I can foresee kids cycling across the property if I pave over the garden. There is also a water meter in the lawn itself. Id appreciate any ideas for improving the front garden if any.
-
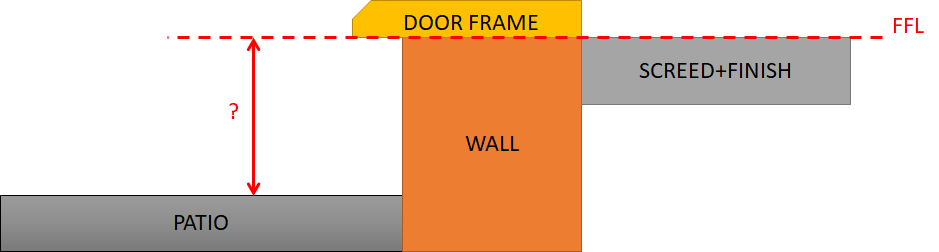
I'd like to lower the level of the patio in the design as there is a gentle gradient along the length of the house that makes the patio quite high at one end. The design has two courses of bricks between the patio level and finished floor level (FFL), so that's 150mm. There will be a door frame which will add a bit more height I expect. The factors that come to mind are: Is there a building reg that limits the height change without the use of a step? Staircases have a 220mm limit and the door threshold is in some way equivalent to a step, but if there is a frame that adds extra height What would feel weird, 350mm doesn't feel viable but is 225mm? How low can the door frame be before it adds expense or looks rubbish. I'd expect the door frame to sit on the two courses of bricks and so have its bottom at FFL. I'd like to have 200mm between patio level and FFL I think, but that is only on paper not based on experience of traversing such a doorway.
-
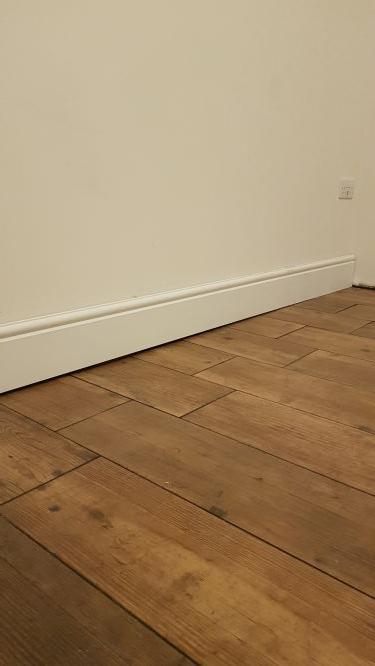
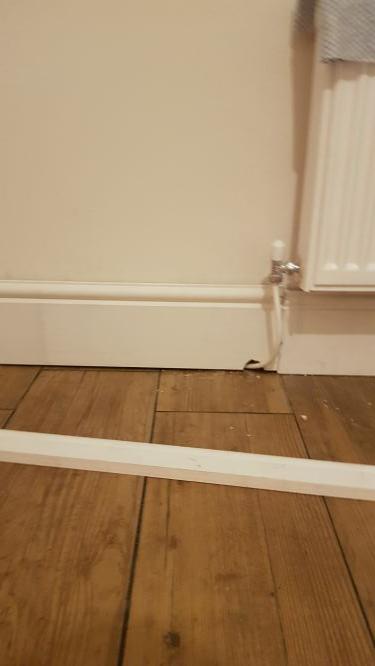
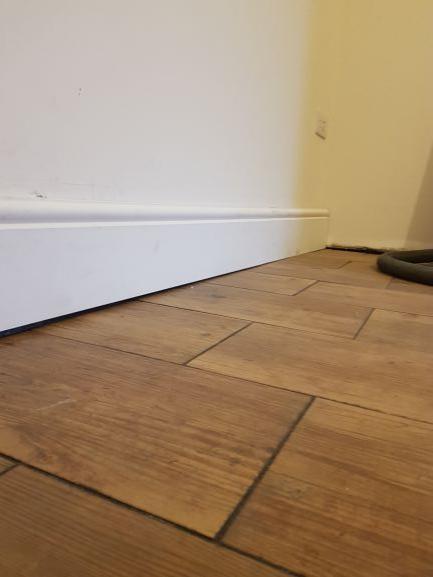
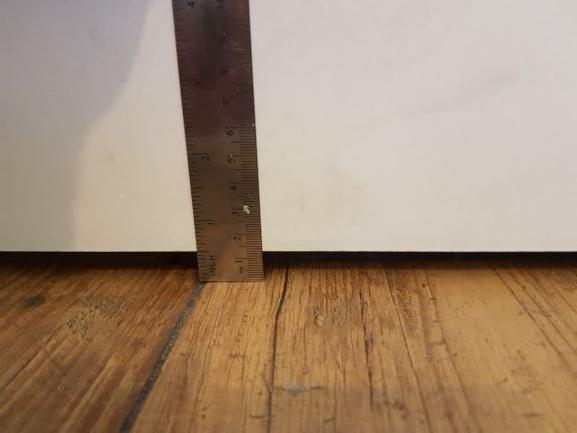
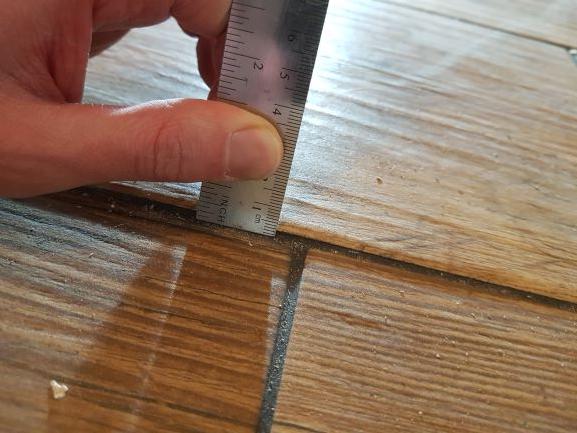
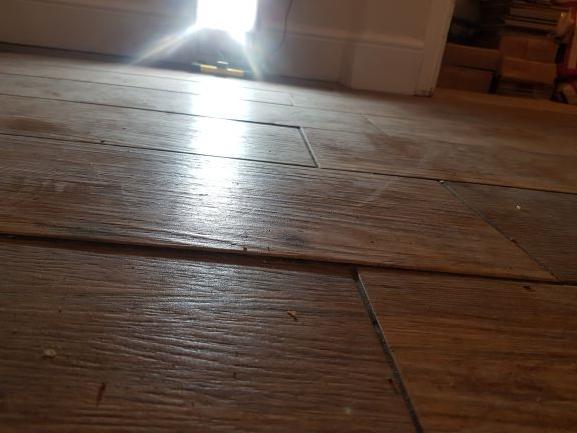
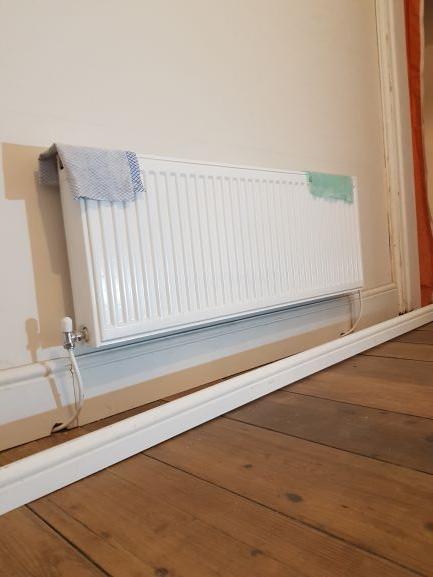
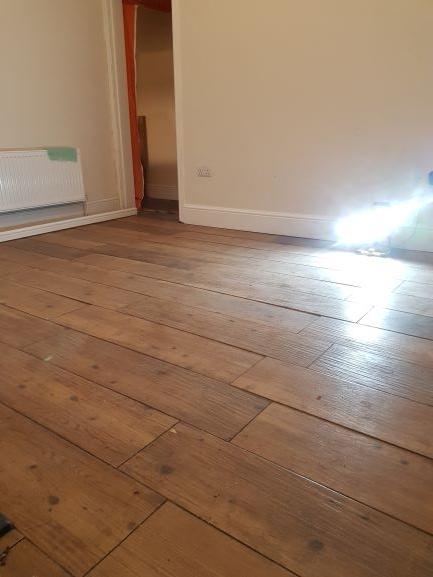
Hi All, I’ve just had 2 rooms tiled with oak effect ceramics and I feel a little disappointed with the final result. The tiler used self-leveller to even the floor prior to laying but I feel that this should have been done with more care, and that many of the subsequent problems are a result of this… I’ve used the closest thing I have to a 2m straight edge to check the flooring and I’m finding regular deviations of around 5-6mm. Offering up the skirting has highlighted a couple of areas far worse at 10mm & 14mm. The tiler has offered to rectify these two areas but I still have my doubts about the overall quality of the job and feel it was rushed. He spent no more than a few hours on the screed and then 3 days to lay both rooms totalling over 30 sq.m. I worry that in correcting these local defects with extra adhesive or whatever, he simply creates new problems elsewhere. There are also several areas of lipping affecting at least half a dozen tiles in each room of 2,3 & 4mm. The British Standard BS 5385 seems to say that 1mm is the tolerance for such narrow 2mm joints? The standards also seem to suggest a tolerance for levelness of 3mm over a 2m edge? I’ve only garnered this info online and haven’t actually read the specific standards but I’m wondering to what extent I could use this as a stick to beat him with? I’ve already paid £1000 in labour for the job but frankly I feel it isn’t justified. I know he’s legally entitled to try and rectify it but short of ripping it all up, I can’t see me getting a result that’s compliant with the relevant standards? I feel the best outcome for me would be to get him to fix what he can then attempt to get compensation for the rest.. Sadly I’ve already had to sue someone for a failed floor in the past so I’m all too familiar with the small claims process! Any help much appreciated., please see attached photos


-
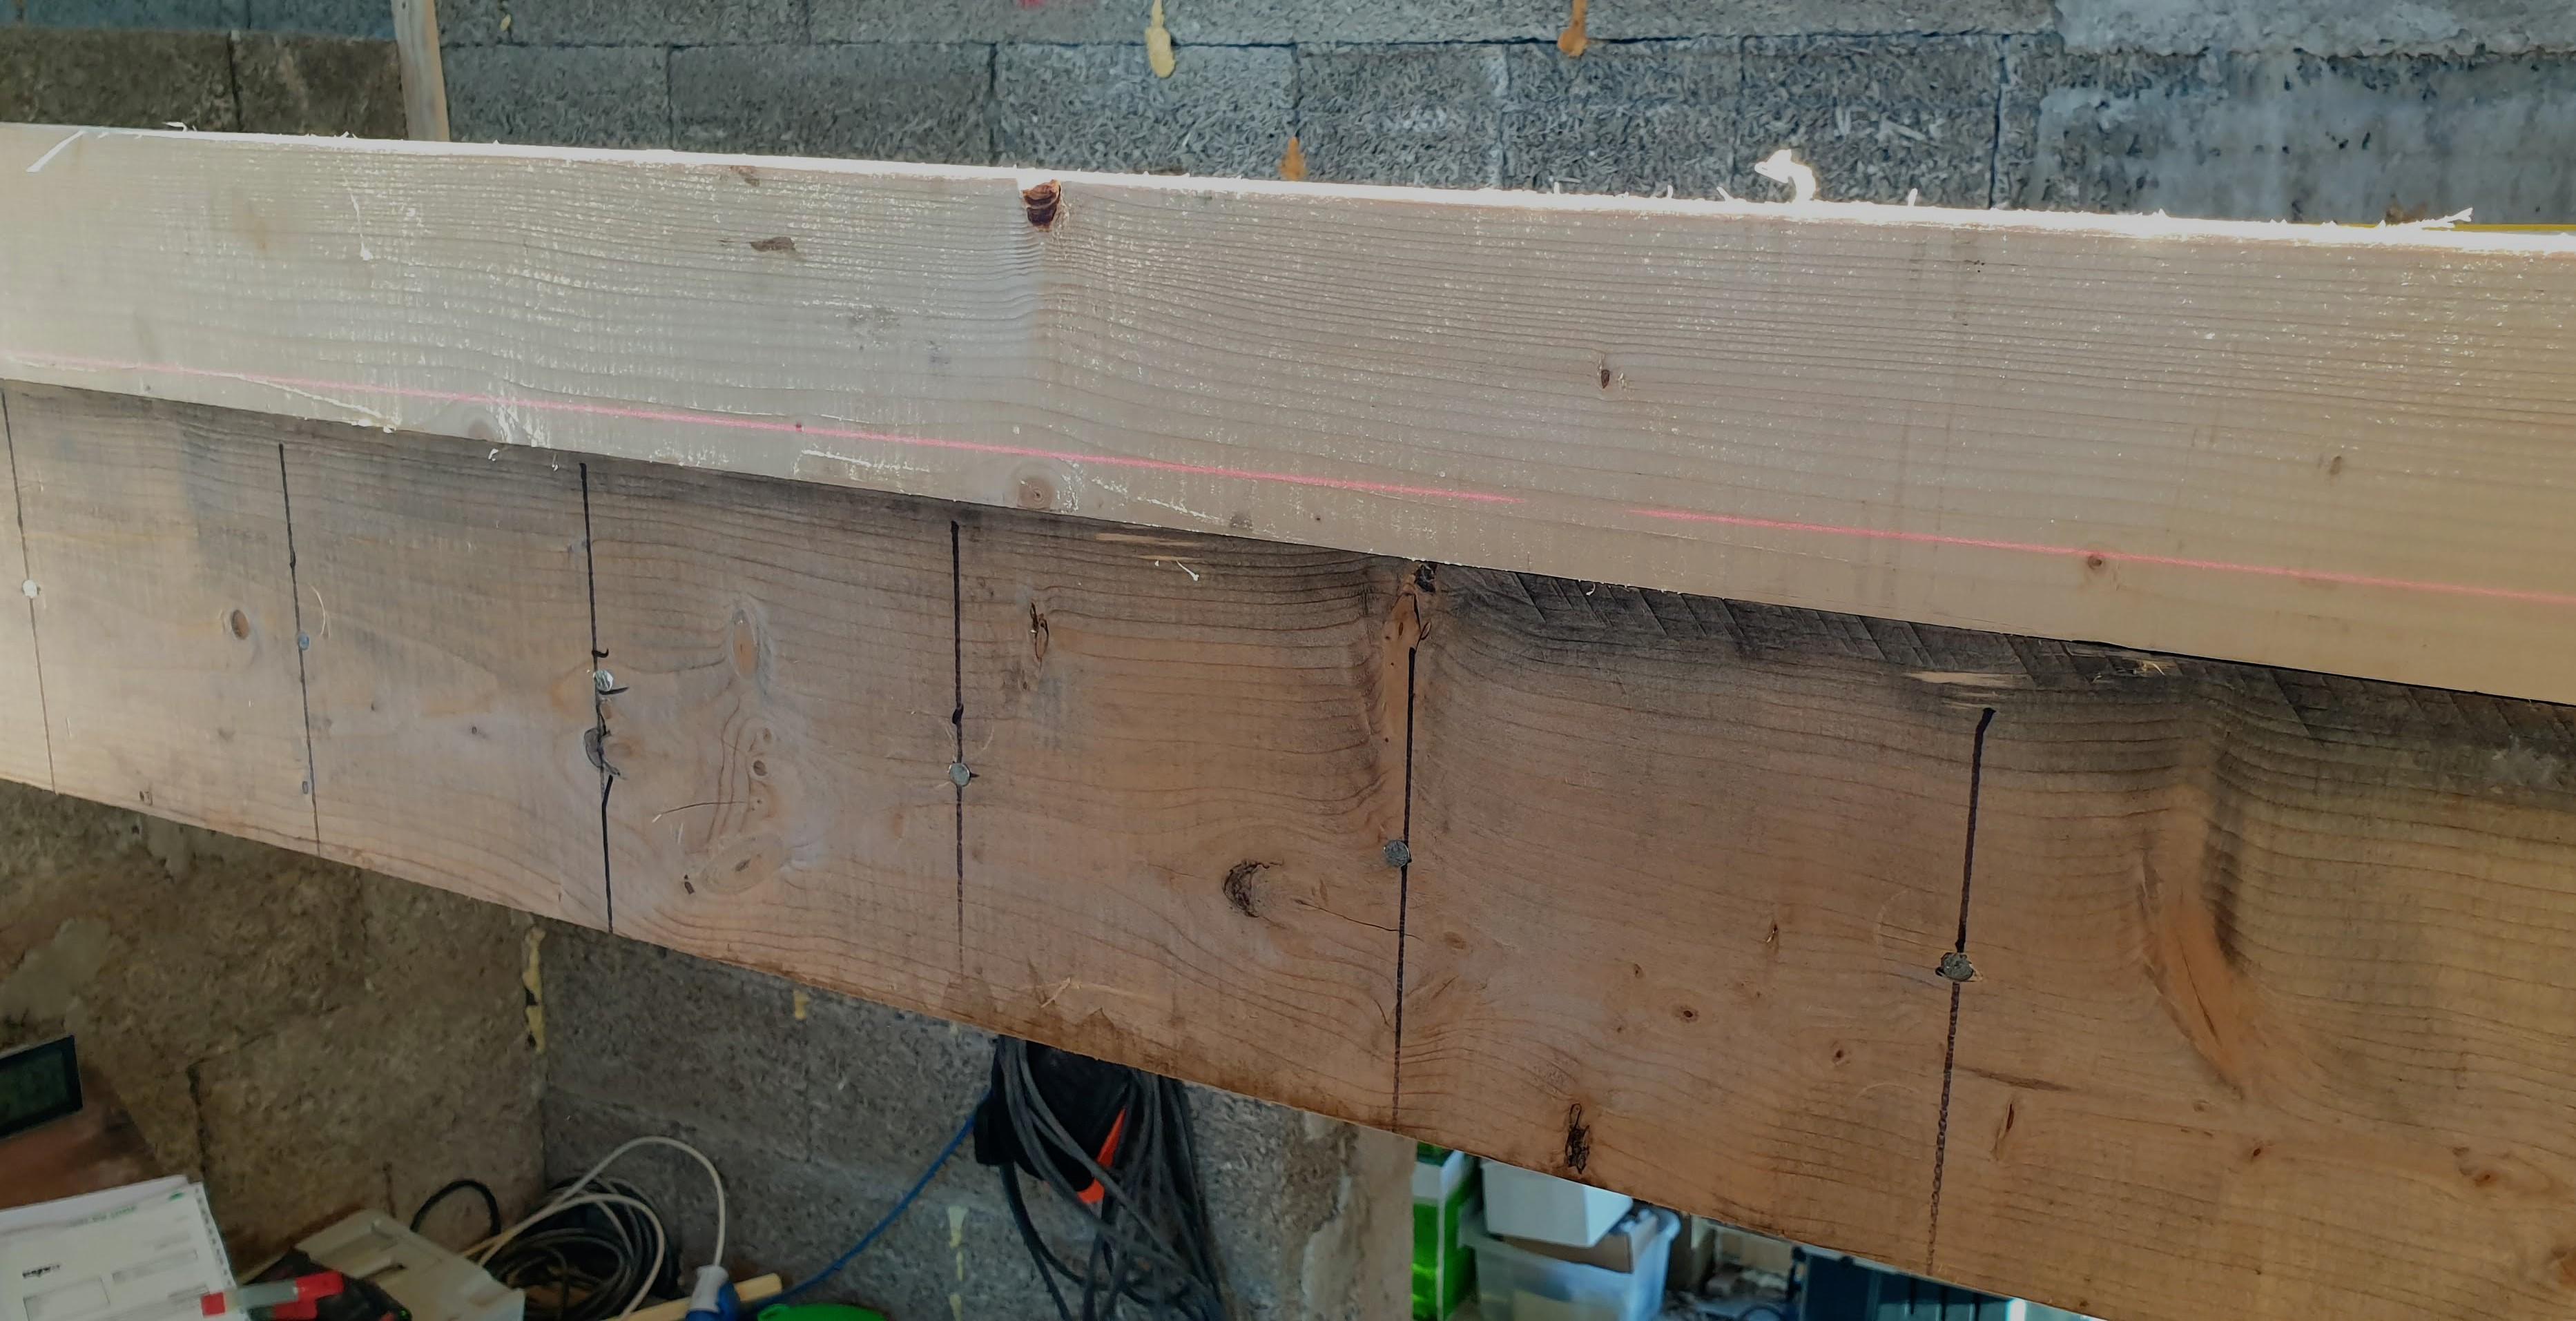
I was glad I didn't do a final check for level when I stopped working on the mezzanine joists last night. I would have had another really bad nights sleep. Look at this.... this is how un-level I managed to nail the joists hanger: no, the red laser line isn't disappearing to infinity, it's 30mm out at one end and 0 on the other - over 2 meters For those of you wondering what self-build does to you - it makes you tired enough to make significant - and sometimes costly- errors All I had to do last night was recognise how tired I was tack the joists in position with cramps and one or two nails go home But no, I had to hammer home 24 nails on the joist hanger with one end of the joist 30mm too low. In the cold light of day it beggars belief . The remedy? Make a 2 meter long stealer piece (wedge) : half a day's work and thank God for Debbie's Christmas cake.


-
This week has been difficult and pleasing in equal measure. Never installed a joist before, but now 8 are up, sitting there waiting to be nailed in place. No nails yet - just push fit. Fussing them into level-ness was interesting. Mostly I managed to get them level enough to of split the laser beam - half on, half over the top. But doing that job made me look at the joists in great detail. The top surfaces have some very small bumps and dips above and below the laser line. Nothing substantial. Since I don't know what I don't know, should I get the belt sander out and make sure that the bumps are levelled out? Planning to nail them in and then put temporary boarding on them tomorrow: quite exciting because it's a bedroom - somewhere to put up guests?
-
Another day, another topic....Today we're fixing our timber soleplate to our concrete block wall. We already ascertained last week that the blockwork wall was not level enough at various points. After reading stuff about packing underneath the soleplate regarding potential condensation problems, and difficulty in filling under the packed plate to achieve air tightness, i decided to get the brickie back to bed the soleplate in mortar. It's done and is level enough running around the perimeter, 18 m x 6.5 m. But it's off level running across the 145 mm of soleplate for a length of about 10m running down one long side. I'm a little upset by this, as not only is my internal FFL affected, but we're still looking at having to pack the sole plate !.......any ideas community?
-
Hi, Thought I'd test my spirit level for vertical accuracy only to find out it's warped. Not sure how this happens on a box section level, but assume being 1800mm with no case, throwing in the car and taking the odd bash would do it. So I just wondered if anyone has any recommendations for an at least 1800mm. So far I've looked at Stabila and Stanley Fatmax and wondered if there's any advantage on box section or I beam? Having one with 2 vertical vials would be handy but most seam to come with the one unless you spend silly money. Anything else to consider? Cheers Vijay
-
I've started designing a remote alarm/air pump pressure system, prompted by this series of posts quoted from the closed Ebuild forum: Following on from the above, I decided it would be nice to have our alarm relocated with an indoor display, that would not only provide the "low pressure" and "high level" alarms at a convenient location, but with the addition of an indoor pressure display, to give early warning of sediment build up, so avoiding (hopefully) the problem that Peter reported. I have the pressure sensors, have tested them and the interface to a wireless data link that will comfortably work for 50 to 60m through walls. I have three choices. I can make the outdoor unit larger and fit a battery a solar panel, and have the indoor unit as a hand-held battery powered unit that could interrogate the external unit on request. The power demands make this arrangement impractical for giving a real-time alarm, it would rely on being interrogated to find out whether things were still OK, its major shortcoming. The next option is to have a solar powered external unit transmitting to a mains powered internal unit. This would provide continuous monitoring and alarm, at the cost of a solar powered external unit that would be relatively large (because of the battery and solar panel size) an would cost more, plus the battery would need replacement every few years. The final option is to have a mains powered unit inside and outside the house. This would probably be the best solution if there is mains power available at the treatment plant, as it would be the most reliable. In terms of power, it would use less than 1W at each end. This post is really to see if anyone is interested, as I'm making one for our build, and it's very little trouble to make one or two extra. I'm probably going to opt for mains powered at both ends, as that suits us better, but there really isn't much to choose in terms of hassle to make other types. Anyone interested?
- 38 replies
-
- 1
-

-
- treatment plant
- alarm
- (and 3 more)
-
I wasn't going to visit the site today, but we've had heavy rain showers today in Dorset and I thought that would be an ideal opportunity to see how level the slab looks after its late night power floating. My reasoning was that whilst I can't identify any high spots by eye, it would be easy to look for the low ones by where the puddles were lying. Here's a photo taken from a slightly elevated viewpoint (the top of a pile of wood chippings!), looking from the south east corner where the snug will be, over towards the north west corner, where the main living area will be. Most of the puddles that you can see are barely a couple of millimetres. I'm not sure how long it had been since the shower that caused these, but it was a breezy day and not hot. The next is taken from the other end of the right hand side of the property, as seen above. Between the brown foul waste pipe and the white UFH pipes, you can just about see that there is a hole in the slab. This is meant to be there right now, but is due to a mishap yesterday. As the concrete was being transferred in the digger and poured from the bucket, the digger rocked slightly and the bucket bounced on the exposed UFH pipes. Harry from MBC reckoned that one of the pipes has been damaged as a result, and so the area around the punctured pipe has been left uncovered. My trusty plumber/UFH person will be coming early next week to fix the damaged section of pipe and make good on the concrete floor, and MBC will be covering the cost of this. Once I have the bill for the repair, I will pay it and MBC will deduct the amount from my next stage payment. This was all agreed this morning without any arguments or quibbles. So far, all the puddles in the photos have only been a couple of mm deep. The deepest is on the far north west corner of the living area, shown below. It's not easy to guage the depth of this area, but I think it's about 4mm at the deepest. The thingies are a couple of end caps that get put on the pile rebar, but the wind was blowing them towards me. You can see how they are tilting. Here's another view of the same: I don't recall the exact tolerance that the slab needs to be within off the top of my head, and I'm not going hunting for it right now as I'm one g&t into Friday evening with a couple more to follow, so no point now. However, the figure of 5mm is scratching away in the deepest recesses of my grey cells, so I think this should be acceptable. If anyone knows otherwise, please speak up! The finish on the surface overall is very nice. I had a walk over the whole thing and couldn't see anything obvious, but then apart from squishy concrete under my boots, I wouldn't know quite what to look for anyone. To my unpracticed eye, it looks pretty good. One very good think that came about from all that excess concrete being dumped all over the place yesterday is that the team spread it all out between the hard standing and the slab, so I now have an even more level and sturdy surface for the crane when it arrives with the timber frame:
- 5 comments
-
- 2
-
-
- power float
- powerfloat
- (and 4 more)
-

Embedding threaded bar in concrete.....
ToughButterCup posted a topic in General Construction Issues
.... shouldn't be too hard - I know now, because I've done it before ? This time I want to keep the threaded bar (inserted horizontally into the hole) perfectly level while the chemical anchor dries. I'm thinking I need some of jig (or thingamajig even) to keep the threaded bar perfectly horizontal while the chemical dries. Anyone done summat like this before? I have 40 to insert..... -

When things go wrong - Concreting of UFH slab
oranjeboom posted a blog entry in Kentish RenoExtension
Been a bit quiet on BH as I've been busy elsewhere - rectifying Bodgit Builder's attempt at laying my concrete floor. I started a thread about that here: Having taken ages to lay my circa 300mm of EPS and mesh-tied UFH pipework, I was keen to get a professional in to get me back on schedule and pour a flat, level concrete floor. No top layer screed. A few local companies quoted, one stated that they could not guarantee the pipework so I didn't go for them and the others I had simply had no faith in. I ended up contacting a local architect's firm and they recommended I contacted some of their regular builders. A couple were either too busy or candidly said that the job was not for them. The other chap came and quoted me for the job with the assurances that he could get a level floor finish. As it was a retrofit internal slab, it took him 2 days to pump 150sqm @100mm depth. On day 3, I inspected the 'finished' floor, and it was nothing but flat. I could really feel the varying levels of the floor by just walking around - I didn't need a level to tell it was way out. I also noted that the datum at the big slider was approx 20mm below where it should have been. Having contacted Bodgit Builder he duly came round and he agreed he would come back to grind down and high spots and fill where necessary with self-levelling (even confirmed the latter in an email). Prior to the day of his grinding, I scraped away at some of the high spots to discover that there was only 1-2mm of concrete/latence covering the UFH pipework. He'd obviously had issues with the mesh/pipework raising to the top (yes, I had fully purged all the air out!) and rather than doing his utmost to push the mesh down, he'd just decided to 'cover' the raised pipework with a bit more concrete. He either didn't have any idea that this would impact the agreed floor height or didn't give a damn (and must have thought I wouldn't notice!). He did admit that he'd had an issue with this section of the floor and asked me how I wanted to have it rectified. I duly informed him that this loop of pipework would have to be dug up and re-inserted at the appropriate depth and re-covered. He spent 2 days grinding high spots with little impact. Moaned at the cost of the grinding blocks and started making excuses as to why he couldn't make it back until a few weeks time. In any case, after nearly 6months later, he has not returned (as I expected) and have had minimal contact (just a few lame excuses) as to why he hasn't been able to rectify his work. Spot the issues: Is that a bit of mesh sticking through the floor? Yes! Luckily in the corner where the kitchen cupboards will be (no UFH). Easy to cut out in the end. Bit of a hump (approx 30mm difference over 500mm) Door threshold? what door threshold? Maybe should have gone for a concrete floor finish! Nice high spot by the door. Inward opening door too. May either need to skim off 30-4mm concrete (risk revealing more pipework or may have to raise the whole door frame - luckily it's timber framed at this section) Bit of a 'dump and dash' job Not that clear here, but concrete is well abobe the red mark (AKA the "do not go above here" mark). Yes Bodgit was wearing specs, but obviously didn't go to Specsavers. Can't get worse than that? Luckily I've found a local flooring company who also have experience in grinding, so they've been busy sorting out the high spots (only to reveal a further 3 rooms that have pipework that needs to be dug up). They didn't want to attempt doing that, and rather than risking getting in another 'professional' I've resorted to doing this myself. Intricate work that few builders would get right - not without damaging my ufh! Various UFH pipes revealed when skimming off the first few mm of concrete: Slab above probably needs another 20mm taking of in order to hit the original datum, so hopefully no further pipes to be found! First set fully revealed and ready to be pushed back although one has been damaged when they skimmed the top. You can just make out the grey inner lining: So this bugger needs to be replaced as the grinder's kinda ground it out. So how do you replace a section if the coupler's aren't supposed to be buried??? "16mm Repair coupling for use with Wunda 16mm Pert/Alu/Pert floor heating pipe, when a repair is the only option. This fitting must be fitted in a clearly accessible location and under no circumstances be buried in screed or concrete." https://cdn.wundatrade.co.uk/wp-content/uploads/2017/08/T03-Wunda-Generic-16mm-nut-and-insert-repair-coupling.pdf Tape coupler with self amalgamating tape? Obviously will fully need to pressurize before I cover. I'll need to add the couplers on the straight sections as adding on the bend will just compromise it all. Should I leave a small void around this join in case I need to access it? Or box in around the coupler and fill with a weaker mix in case I need access in future years? It's in a corner in the kitchen with no units going on top, just the laminate flooring. At least I'm not the only one with this issue: Once the flooring company and I have completed the required work, I'll be looking to get a PI to locate Bodgit Builder as he's started moving house which isn't much use when you want to take the bar steward to the small claims court. Lessons learnt: Don't always trust recommendations! Do it yourself! Pay particular attention to the end and loops/mesh in the corner as these are the areas that seem to rise up when pouring It's not the end of the world, there are things much worse in life that will/can piss you off, so don't let the bar stewards get you down. -
OK, so I know my slab isn't level, you only need your eyes to see that. As an example; on the large sliding door I've got 20mm difference from one end to another (over 4m). I've got 5 sets of doors with level thresholds. Huge amounts of pre-planning detail was put into ensuring the doors would sit correctly into the slab so that the slab floor was 18mm below the FFL to allow for the tiling that is running through the entire house. I was lucky enough to be lent one of these: https://www.powertoolsuk.co.uk/bosch-gsl2set-floor-surface-lasers.html?gclid=EAIaIQobChMIuZPQ3tiI1gIV6rDtCh3uSwV-EAQYAyABEgJ3z_D_BwE so in a spare hour yesterday (whilst nursing my severe man flu, sympathy please) thought I'd have a look at "how the land lies" (quite literally! ). Its an incredible peice of kit, very clever. But alas all it did was make by brain hurt . The floor levels run all over the place and I'm failing to see how a tiler is ever going to create the beautifully flat level access around the house which was so important to us. But im no pro tiler and so perhaps I'm just worrying too much (as we all know a self builders biggest affliction). So what now? MBC have offered to come back and level the slab but from the measurements I've taken where they will level one door they'll throw the levels out elesewhere. I was was wanting to use the laser above to gauge out the various level changes so that I got what I wanted (I'm not entirely convinced MBC have got the skill set to put this right). But with so many conflicting levels I just got myself lost. So so some specific questions: 1. How do you choose a rooms datum point. I assume it's normally the highest point and work out from there. Or do you just go with the middle of the room? 2. Can a pro tiler (like our resident @Nickfromwales) "loose" these level changes? Presumably by feathering out across as big a distance as possible? 3. Is it sometimes better just to grind off an area of high spot? Presumably there are tools for the job that are designed to do this and get into corners? (Without trashing my expensive frames!). Many thanks in advance.
-
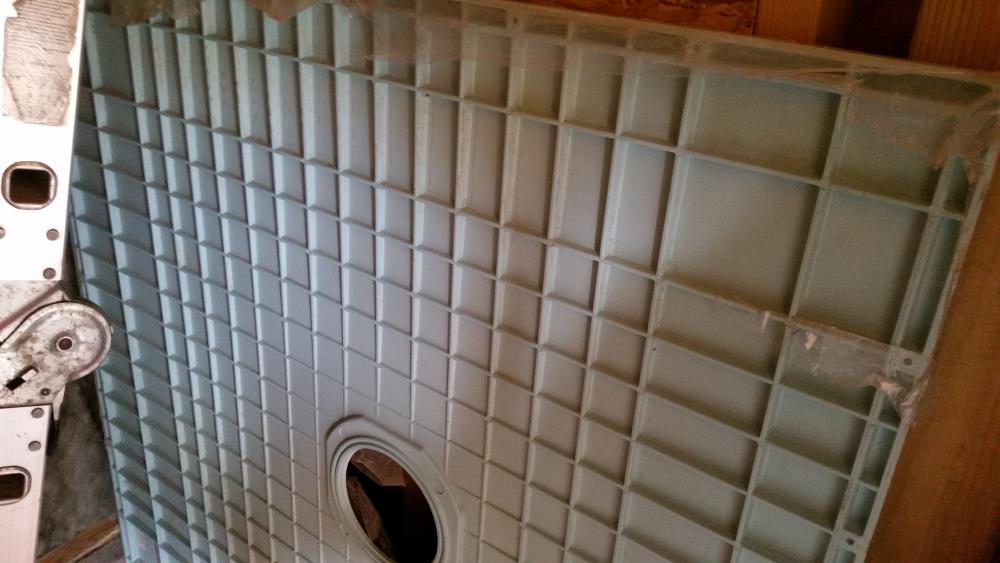
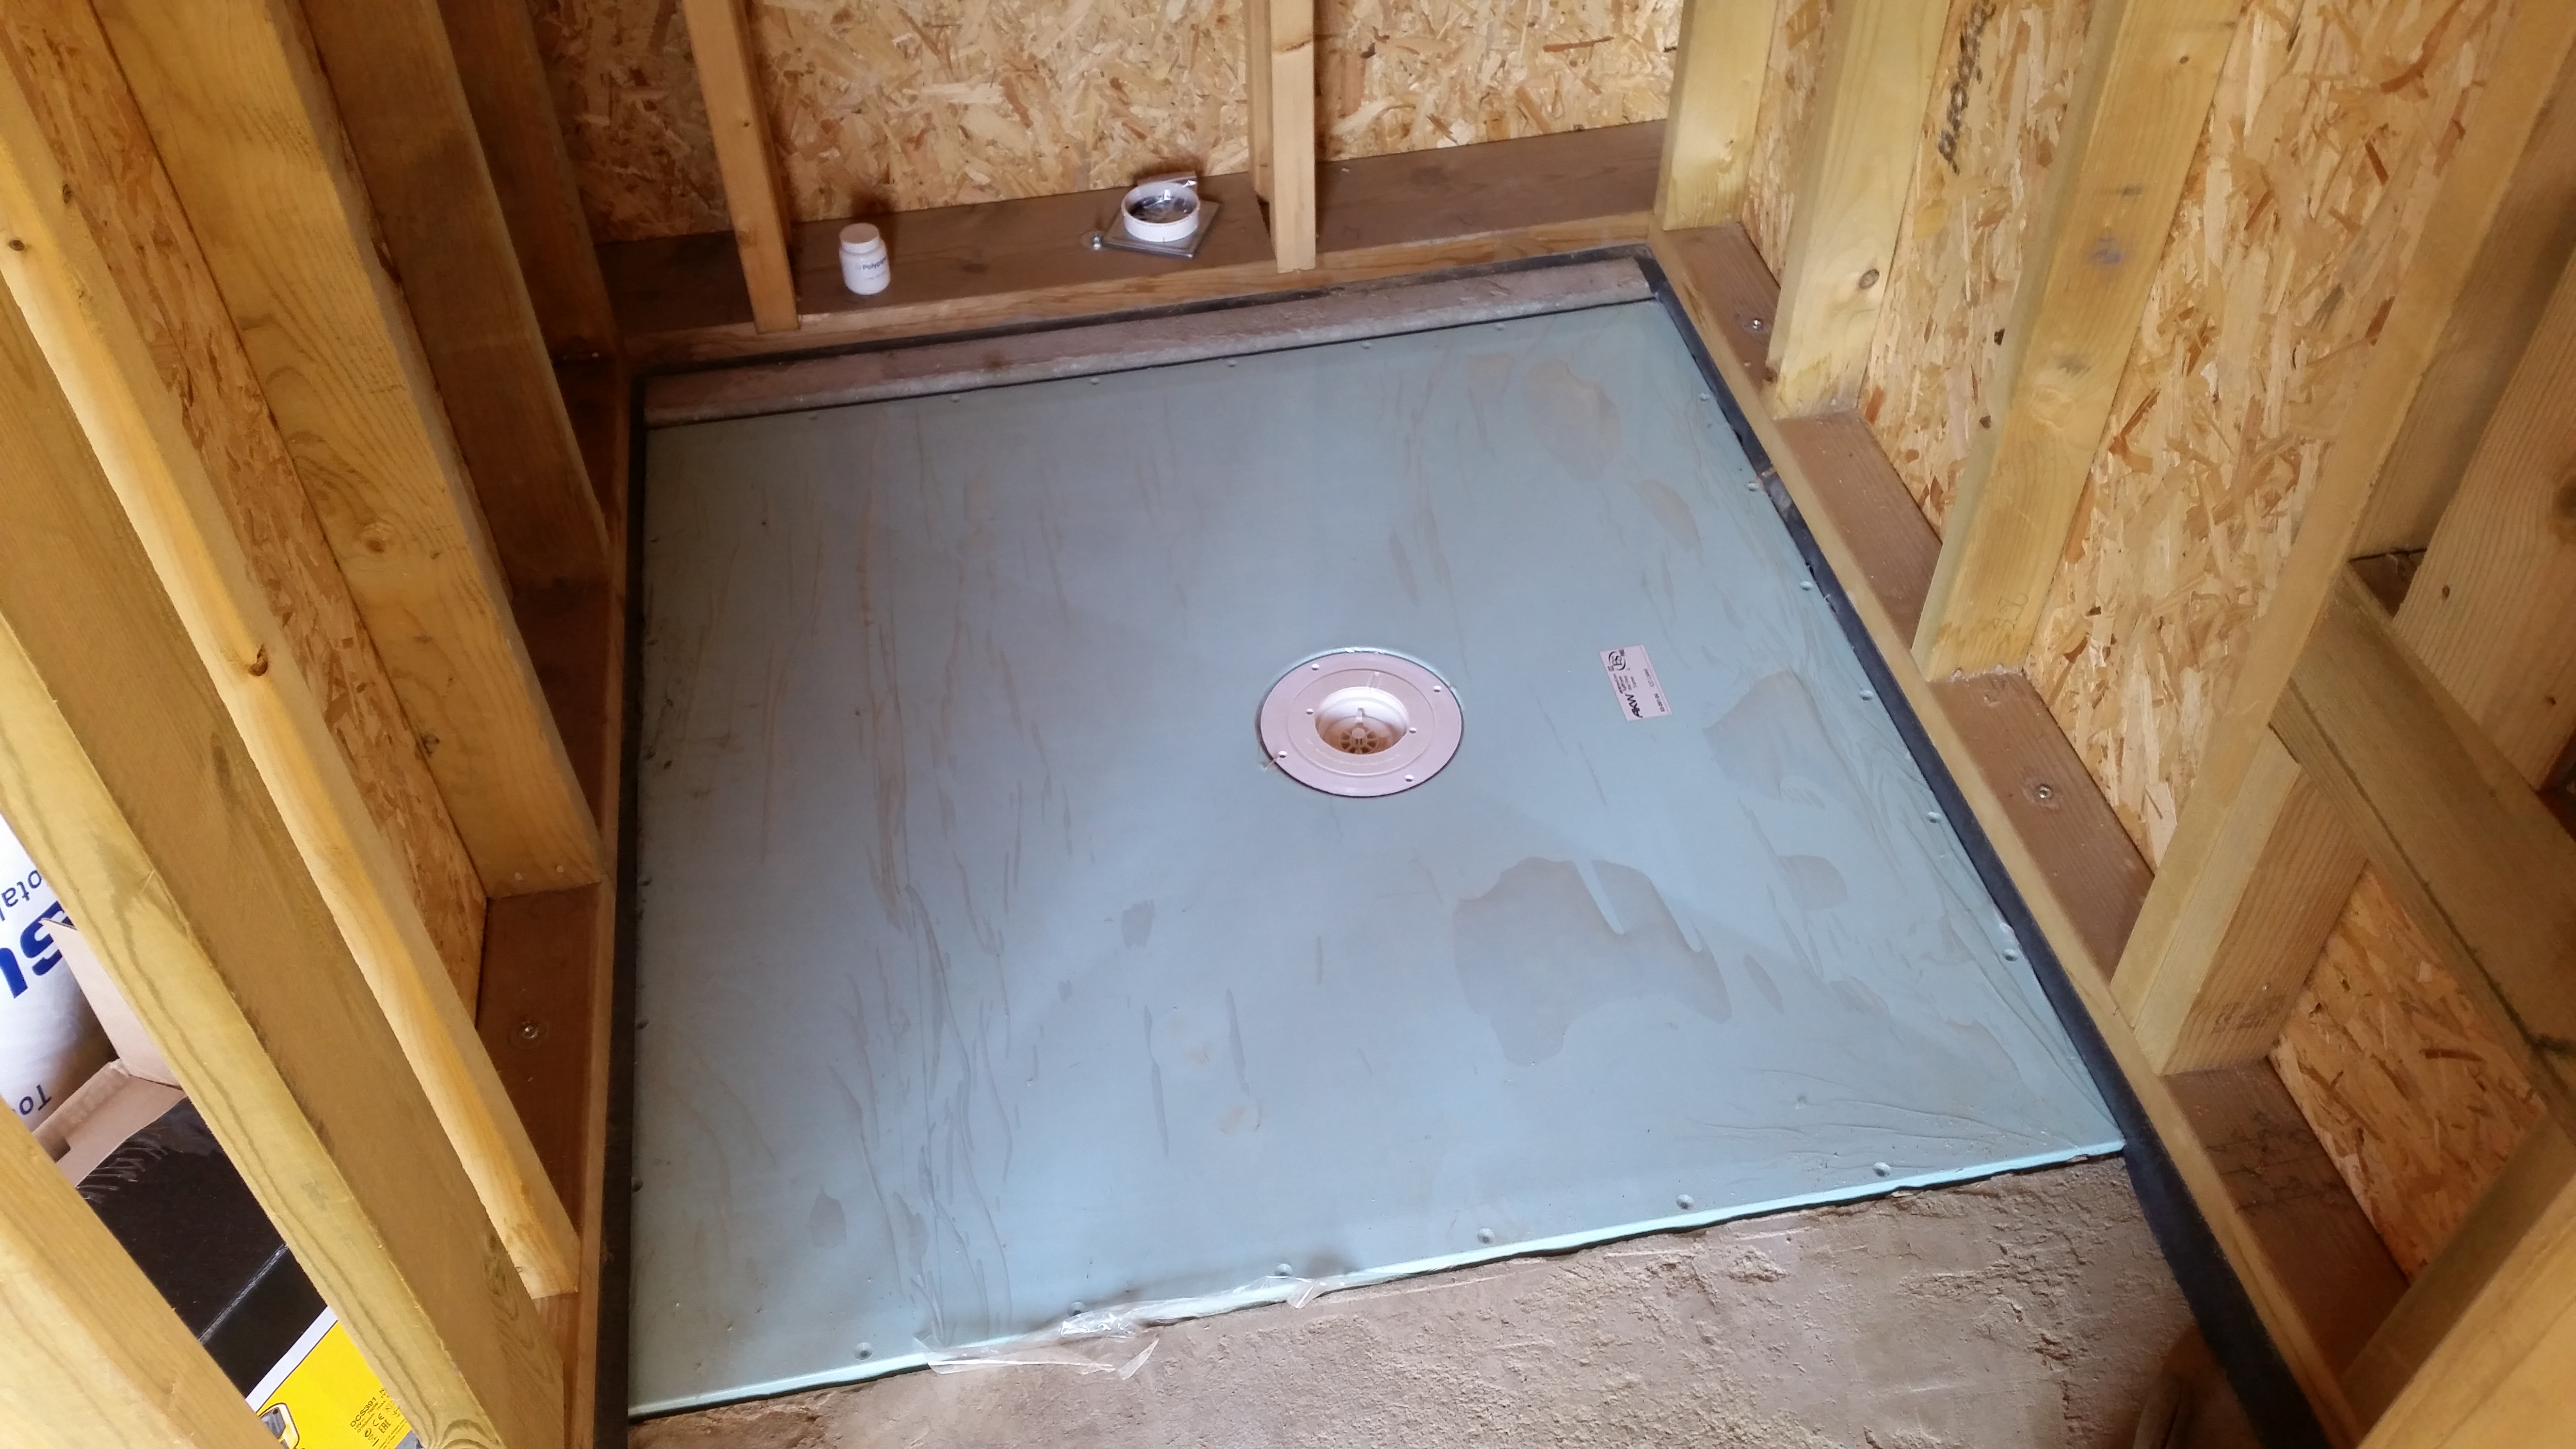
 Well after a few months of work from laying the concrete around the mould / pattern or whatever the time has come to fit the actual wet room shower tray base and I am looking for ideas on how best to do this and what compound to use. The pic shows the underside of the tray with a lattice of ribs. The recess in the slab is flat bottomed and concrete. The tray fits into the recess in the slab perfectly but I now have to bed it down and I can see some possible issues. I have 5-8mm of height I need to make up so whatever I bed it down on has got to make that up or I will have very thick grout under the tiles. What would be a good compound to bed it down on. A sharp sand / cement mix or some such? My second concern is / are the air pockets that will form in the lattice structure and may make getting it to bed down a problem and indeed might cause it to move if the air expands while the bedding material is drying. I could fill the pockets with the bedding compound, whatever it is to be, before I lower it into position to cure that problem but whatever happens I don't want it moving off level while the compound dries. Any thoughts welcome.