Search the Community
Showing results for tags 'icf'.
-
My initial plans were to have rainwater harvesting, build hub taught me no.. so with that scrapped I needed an alternative, soakaways are difficult due to bed rock levels. In addition to this we have lots of run off on the croft, and the track to the house floods. We have already installed a pond for the ducks and this has a large berm to the back and sides so that the runoff is held back and slowly soaks away, but this winter has proved it overflows regularly, that's around 3000L extra. So the plan was to install an overflow pipe from this pond to a new larger pond. The larger pond also acting as rainwater run off capture. The larger pond will have 2 levels, a pond and then an extra layer to act as a overflow that can evaporate and or be pumped to the rubble drain in drier times. I got a big carried away with the backhoe and ended up with around 10M x 8M and over a meter deep. The overflow capacity will be around 30k - 35k L. We had to peck out some of the rock to get depth, and at the front used "as dug" rock from the quarry to form a rough and rugged stone wall, quite in keeping in Caithness. Time will heal the scars and soften the edges with planting. Due to the two levels we came up with the idea of hiding the liner under some camo net, that we intend to plant up in time. Not sure how this will stand the test of time. From the house the rainwater enters a rock filter, an idea loosely based on a post from @ToughButterCup- thanks. From the rock filter we have created a little stream that the rainwater will flow down and into the pond. In addition to this we have a pump that will take the water via a home made skimmer from the pond and filter the water from the pond through the rock filter and stream constantly. This also has a diverter to pump the water past the house and into the field to reduce the overflow capacity in drier times. This is the rock filter, and some of the pipework yet to be buried. Getting to this stage ticked a box for building control as we now handle our run off. We got our completion certificate on the house this week, yeah. There are some things to finish, the second bedroom needs decorating and trim work. And a few small jobs here and there, but in general the house is decorated, and fully functioning. We started the build in earnest around May 23 I think, so quite pleased with the effort and timescale we achieved. It's was built by me and Mandy with the odd person helping with concrete pours. 3 months in summer were busy with the cabin rentals that saw Mandy spend 3-4 hrs a day turning them around for the endless NC500 travellers.😁 We're embarking on the VAT reclaim soon. To summarise the build: 89sqm True bungalow Floor 0.094U (300mm EPs 120mm concrete) Walls 0.139U ICF with 50mm EWI and 25mm PIR IWI Cold roof 0.1U 25MM PIR 400MM mineral wool. UPVC triple glazed windows and composite doors MVHR, 4kW PV in roof, 5kW ASHP, UFH. EPC A103, Airtightness 0.83 ACH.
- 6 comments
-
- 7
-

-
- the windy roost
- highlands
- (and 2 more)
-
HiMy initial plans were to have rainwater harvesting, build hub taught me no.. so with that scrapped I needed an alternative, soakaways are difficult due to bed rock levels. In addition to this we have lots of run off on the croft, and the track to the house floods. We have already installed a pond for the ducks and this has a large berm to the back and sides so that the runoff is held back and slowly soaks away, but this winter has proved it overflows regularly, that's around 3000L extra. So the plan was to install an overflow pipe from this pond to a new larger pond. The larger pond also acting as rainwater run off capture. The larger pond will have 2 levels, a pond and then an extra layer to act as a overflow that can evaporate and or be pumped to the rubble drain in drier times. I got a big carried away with the backhoe and ended up with around 10M x 8M and over a meter deep. The overflow capacity will be around 30k - 35k L. We had to peck out some of the rock to get depth, and at the front used "as dug" rock from the quarry to form a rough and rugged stone wall, quite in keeping in Caithness. Time will heal the scars and soften the edges with planting. Due to the two levels we came up with the idea of hiding the liner under some camo net, that we intend to plant up in time. Not sure how this will stand the test of time. From the house the rainwater enters a rock filter, an idea loosely based on a post from @ToughButterCup- thanks. From the rock filter we have created a little stream that the rainwater will flow down and into the pond. In addition to this we have a pump that will take the water via a home made skimmer from the pond and filter the water from the pond through the rock filter and stream constantly. This also has a diverter to pump the water past the house and into the field to reduce the overflow capacity in drier times. This is the rock filter, and some of the pipework yet to be buried. Getting to this stage ticked a box for building control as we now handle our run off. We got our completion certificate on the house this week, yeah. There are some things to finish, the second bedroom needs decorating and trim work. And a few small jobs here and there, but in general the house is decorated, and fully functioning. We started the build in earnest around May 23 I think, so quite pleased with the effort and timescale we achieved. It's was built by me and Mandy with the odd person helping with concrete pours. 3 months in summer were busy with the cabin rentals that saw Mandy spend 3-4 hrs a day turning them around for the endless NC500 travellers.😁 We're embarking on the VAT reclaim soon. To summarise the build: 89sqm True bungalow Floor 0.094U (300mm EPs 120mm concrete) Walls 0.139U ICF with 50mm EWI and 25mm PIR IWI Cold roof 0.1U 25MM PIR 400MM mineral wool. UPVC triple glazed windows and composite doors MVHR, 4kW PV in roof, 5kW ASHP, UFH. EPC A103, Airtightness 0.83 ACH.
-
 All the reading of posts on here at the design stage and the hard work implementing the experience of others on your own self build can be summed up / justified with just 1 image. Even when building on a very tight budget. This is my energy usage @ The Windy Roost since we got here. Upto January 24 we were in the static, we were never really warm used Air to Air heatpump for heating, hot water and cooking was LPG. We also had around 4 summer months of our cabins being used, again electricity for heating and cooking, DHW is LPG. The blue line makes me feel warm and fuzzy inside. That's our electricity for the self build, a whole house fully electric and blissfully warm with ample DHW. (With some limited cabin usage). To all self builders going through this, it's worth the effort👍.
- 5 replies
-
- 6
-
-
- the windy roost
- highlands
- (and 1 more)
-
Around 11 months ago, we started from a stripped site, the treatment plant was in and running the cabins / static so drainage just required connecting up. we had to wait for the warrant to be amended (change to the certificate of deign) this held us back ma month or so until the BCO just said "get on with it, we can sort that later"- top guy!! If we had waited for the amended certificate of design we would still be building, it took him 5 months to get it to us. I've documented most of the build in blogs on here, partly to have a refence to remember the process, partly as pay back to Buildhub for the inspiration and pointers in the planning / design stage. I'm so glad I spent hours looking at and reading others blogs that we made the switch to ICF. I'm convinced there is no way I would have achieved the efficiency I have for the money spent. Budget was always tight, so some decisions have been made due to Hobson's choice, leading to triple glazed UPVC windows and composite doors. The front door, south facing GRP Composite with low threshold and a slim glass panel leaks with 40mph winds, this leaks through the gazing cassette, and the low threshold. as I know we wont use this door much, we went for a slam lock, another mistake, it blows a gale through. To be fair the company are re making, I'm just not sure if there re-making the panel or the full door, I did ask, if they were remaking the full door to change to standard handle and lock, so it can be adjusted to minimise the drafts. we will see what happens, a full door replacement will mean taking off the reveals in side so a complete PITA, but worth it for no drafts. We had the airtightness test carried out, and they used the front door for the blower door to mitigate any issues with that door. I had put caps in the MVHR. so he just cracked on, the back door is not perfect again due to the low threshold. He didn't seal the blower door to the frame, not sure what the procedure is but seemed a little frustrating. We achieved 0.88 Air permeability, which I'm very happy with, budget wise we didn't spend hundreds on airtightness tape, just designed good solutions, and the doors leak a bit . Our As built EPC came back at A103 , with a possibility of A128.. the report say A105 if we install Thermal Solar EST saving of £40 pa , and A128 with a wind turbine EST saving of £1100 pa, so pretty much the best we could hit. To finish we need to sort out some paths outside, ramp, and the rain water pond, but other than the second bedroom need decorating the house is done. Next week we will hopefully get building control around to see what he 'needs' to get a completion cert. I'm hoping for some flexibility on the ramp and pond, . We need the VAT refund to pay for this stuff. We are working our way through the invoices, but we built for less the 90K and we still need the VAT refund. I've enjoyed it all, and we both agree we have a home. Good luck to all of you with your current builds.
- 6 comments
-
- 12
-
-
Just a very short blog to show the windy roost ( not fully finished, is a self build ever?) plant room. I'm quite chuffed I got it all to fit, and I think it's quite neat. It's full DIY and house's the UVC and combined buffer, UFH manifold, MVHR unit, inverter, consumer unit, network hub. All in 4M³. Plus storage to come. Yes, the printer doesn't fit, but it's coming to its end of life so that's all it's getting for now. Jobs to do: Ceiling Insulate MVHR ducting / box in Shelves on the left hand side Clothes Airer ( a Scottish requirement to have one)
- 5 comments
-
- 8
-
-
- the windy roost
- caithness
- (and 1 more)
-
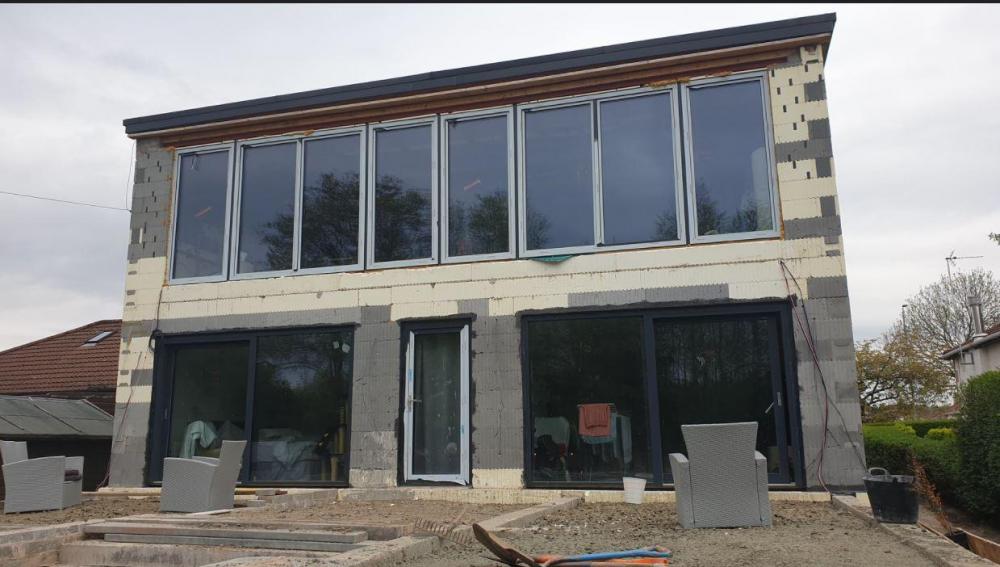
It's been a while since my last blog, but we've not stopped, the days are shorter and the weather skipped autumn🍂 and dived into winter with a few storms and loads of rain. Our windows are budget friendly triple glazed UPVC, and composite doors. The external EPS was sealed at the cill with EPDM airtight tape, the tape has reinforcement in it and can be moulded, it does crease but creates a water tight junction and sticks like the proverbial to the EPS. We created a cheek reveal with an additional layer of 50mm EPS and sealed the upvc frames against this, I then ran a bead of sealant against the face and edge of the EPS giving two seals. Then when clad a third seal. I used soudal air tight foam and I thinks it's LMA sealant, soudal's airtight solution. The winds gave good opportunity to test for air leaks when had several days of 35mph winds. This proved a good test with a smoke pen. The internal frame was sealed with soudal sf40 which adheres very well to the upvc and timber blocking, when cured it is like rubber. The cladding is larch boards in 2 widths 150mm for the bottom layer and 100mm for the top. We finished the top of the windows with a custom palistol coated drip The bottom of the EPS footing was finished with reclaimed slate. Inside we are having a cold roof. We needed to add 25mm pir under the truss cord to satisfy the tightened regulations in Scotland. We tapped the foil boards with foil tape, and the perimeter boards were pushed to touch the wall plate. Then used airtight foam between the PIR and internal IFC wall creating a seal. Under the PIR I used plastic membrane that I spray glued to the PIR, and this draped down the perimeter walls. The under ceiling was battened and counter battened, this created a service void for the cables and not penetrating the loft. The plastic was jointed with EPDM airtight tape on joins and walls. Cables were put inside Flexi conduit that was cut into grooves in the ICF. (All water pipes were run under the slab.) This picture shows the detail for the airtightness and the service void. MVHR ducts (7 plenums ) were run in the loft, and under 400mm of loft roll. The manifolds are also under the loft insulation. I made these airtight using the same EPDM tape. I made gaskets out of the plastic with a circle cutter and stretched it over the plenums, then air tight tape to seal everything to the plastic/ PIR. The walls also needed some IWI to meet the tighter regs, so decided to go with 25mm PIR. This also added another seal for the plastic airtight layer and walls. The poly steel ICF has these metal plates at 150mm ctrs that allow the cladding battens to be secured externally and the plasterboard internally, we used self tapping drywall screws and insulation discs to hold the PIR in place before installing the plasterboard. Picture for detail below. At this stage we've got a large airtight box. Now it's a case of installing the stud work. I lined the plant room with pre painted 12mm OSB, and the bathroom with 18mm OSB ( a Scottish building regs requirement needing the ability for future hand rails etc) Electrics are simple, a few Ethernet points and sockets and spotlights. One pendant over the dining( and if I get my way, and budget allows pool table). The only penetrations from the loft are a light, PV cables, TV aerial, and 4g antenna cables. These are in conduit and sealed both ends. All other cables run in the ceiling void or stud work. I've put a few sensors in the studwork for future Arduino projects to accompany the in slab sensors. The plant room is compact, and work in progress. The PV is up and running and to date produced just shy of 300KwH in 5 winter weeks With the first fix complete it was time to plasterboard, we got 80 boards delivered Wednesday midday, just as storm Babet hit, it was too windy to bring them in, I tried, I failed so it had to stay outside 😭, covered in plastic, tarpaulins, scaffold boards and the obligatory ratchet straps. 3 days of constant 35mph gusting 50mph gave opportunities to check for airtightness. I managed to install the flush shower tray during this downtime. Once the storm blew though we got the boards inside and cracked on, the open plan lounge, diner, kitchen was boarded first and as soon as it was complete I skimmed the ceiling, 11 boards was too big for me and my tennis elbow, that coupled with not plastering anything for several years. I split the room in two and used several layers of scrim tape to plaster up to, then remove the scrim tape and skim the 2nd part. It worked well, and it's painted and the join is seamless. The next few days we mixed it up skimming in the morning and boarding in the afternoon for the next day. Today is day 182 of the build, this is basically from the cleared site that was down to rock with the pecking already done. Currently the house is fully skimmed, most of the ceilings have been primed and painted white and we started the kitchen install today. All the bathroom is here waiting to be installed, and some appliances are here most arriving this week. This has been pretty much 7 days a week, with only around 12 to 18 days off to earn some money and pay off some labour debts. We're hoping to move in, in 2 weeks with a working bathroom and kitchen 🤞, the static has now reverted to ice box during the night🥶
- 14 comments
-
- 14
-
-
- the windy roost
- icf
- (and 1 more)
-
Day 31 of the build. (this is taken from the day we started shuttering the foundations) The weather up North has been spectacular for about 3 weeks, so we (Mandy and I) pushed to prepare and pour the slab before the weather changed, as I'm sure we will get a few weeks of low pressure, wet changeable weather after this spell. Following on from the foundation ICF walls, I'd already loaded around 20ton of 40mm to dust in a pile the slab area. Sat on the sand blinded radon barrier. Job one was to sort the drainage. I'd posted previously about my plan, and some constructive comments suggested changing my planned route, but with the extra length of run to the drain invert level I would have had to increase the floor height even more. So stuck with my original sketch. We ran string lines to mark the main areas, namely WC, SVP in the plant room, shower, WC and Bath, a need ran the drainage to the locations, as the utility backs onto the plant room I didn't add a drain in here as I'll run through the stud and use the SVP. Once the drainage was in place and is tested. We spread out the hardcore and compacted it. I used 10mm crush and run to bed the drainage and cover the pipes, I also ran ducting at this level, bringing in water, power, treatment plant feed plus some future ducts. To get the hardcore level / flat I used 3m lengths of galvanised conduit set on mortar pads all level to each other and used a 4M ally beam to screed the slab. I compacted the first layer then used another screed pass to fill in any deviations and used this as the level for insulation. I used a combination of 200 mm EPS 70 (50mm sheets and 100mm sheets all layed to stagger the joints, and used foam to seal to the ICF. The top layer was 100mm EPS150 this gives a firm hold for the UFH staples, and a firmer feel to the insulation layer. We plan to use a large shower tray and have this level with the floor, so I made this area sunken with two layers of EPS150 and a layer of 50mm PIR. As we were installing the insulation I installed 2 * 100mm ducts for the ASHP in the second layer of insulation these were only 800mm long, and a duct for cables. I also added flex ducts in the insulation for Hot & Cold services to the kitchen, utility, WC,Shower,bath, all these were cut using a hot knife. Lastly I cut some pipe for floor sensors in the kitchen, lounge, bedrooms and bathroom. The underfloor heating consists of three loops around 95M length, planned using Loop cad. The manifold was plumbed , filled and a pressure gauge to ensure no leaks. We have good water pressure so could pressurise to 6 Bar. ( With the heat ☀️ this rose to 9 bar one day). The above picture also shows K Steel screed rails. I used these to break the slab into smaller bays, and mainly will be under stud walls. The slab will for the foreseeable future be our finished floor, so I wanted to introduce expansion joints and force any cracking to these locations🤞. I also used Tibmix metallic dry shake topper on the concrete, the dry shake should help suppress the fibres and also increase the surface hardness. The pour happend on Friday 16th June, the first 5cube arriving at 8.30. we did the kitchen bay first which needed the 7t 360 to move / place the concrete, then, poured the WC / plant room and utility bay. This was an error, I wanted to pour the lounge next so both bays could be finished at the same time, but under the pressure of the pour took advice to do the awkward section next. This resulted in only a 3rd of the lounge bay having concrete, so this was spread out lower so the next load could fill the bay. By the time the second load arrived, the kitchen and utility bay was ready for power floating. The pan worked well and I had some time to start edging the slab, the rebar didn't allow the power float to get to the edge of the slab. By 13.00 all bays were in and leveled, but not floated, but the sun was very hot, and the kitchen bays was getting hard rapidly, I managed to float this but was struggling to to get a perfect finish. To dry shake makes the surface hard and this was apparent, the lounge and bedroom bays floated better, and to the main the dry shake suppressed a lot of the fibres but there are still some visible. The kitchen bay was rock hard by the time I managed to float again, and although it is fairly flat you can see, but not feel, the path of the power float. I used Setseal 6 as an acrylic sealer, which seals the surface and aids the curing process. By the time we finished the floor was rock hard, I mean hard, the idea being that the slab will slowly cure now but will not be affected by rain etc. Time will tell. Due to the temp, and the float not getting to the edge, I will have to carry out some remedial work on the edges of the slab, as by the time I go to troweling these it was too late. Today the slab looks great, it's flat and level, but the perimeter 2 inch will need some polishing, as will a section in the plant room. I'm confident I can get this fixed. Time will tell. The following picture doesn't do the slab surface any justice. It looks rough, but it's glass smooth. So 10.5 cube of fibre reinforced concrete. Power Floated, and this was non stop until 17.30. My chest and fore arms are wrecked from trying to tame the power float. I'm a little disappointed in the edge finish, but looking at it another way, it's way better than if it would have started raining, or the wind that we have today. I'm sure a few hours with a wet diamond polisher will rectify the edges. Maybe another hand would have been good. 🤔. Onwards to the ICF walls... .
- 14 comments
-
- 6
-
-
- the windy roost
- icf
- (and 3 more)
-
Sunday in the Highlands, and the weather has a feel of changing, we've been so fortunate on the build so far, day 105 today, but the last week or so has been wet, windy, sunny, overcast usually everyday. So autumn is on the way. July and August have been busy with the 2 cabins with around 100 nights occupied, that's over 250 people staying, and 30 +dogs 😂. The upshot being we can afford to eat, but the labour for the build has been affected with Mandy continually cleaning and washing. We've got a roof. Again the labour for all this is me and Mandy. The ICF allows the wall plates to be bolted to the core. Getting the trusses, 44kg, onto the roof was going to be by using a borrowed small loadall. We used this to take them off the truck and set them next to the house, but lifting them onto the walls was proving tricky with access and wind. So we resorted to leaning two lengths of 4x2 against the gable end , leaning 1 truss at a time against it and then sliding the truss up the 4x2 onto the wall plates. Then dragging them into place. We had a scaffold erected at 1 end of the house and used this to raise the first truss. Then it was repeat the process. Untill it was done. At either end of the house we used an additional truss to form a timber gable wall, this saved money on the ICF as we are having a cold loft. I drew the gable frame on CAD and created a cut list, then framed the gable out of 8x2 Insitu. I used 4x2 as a sub fascia to support the eaves trays, allowing the use of capit fascia boards keeping a keen eye on the budget🙈 I held off boarding as I had some labour debts to repay to the local farmer, and the wind was up and down. Once we had a clear window The roof and gables were boarded with OSB. At this time I also fitted membrane and battened / counter battened the gables. Black fascia boards, over fascia vents and eaves support trays were installed. The Highland vernacular is for small soffits / no soffit. So working back from the board on board cladding thickness and the battens I should end up with just the return on the fascia showing, about 30mm. I used some 4x1 as the sub soffit that will also act as a fire stop / smoke from entering the loft. Our location, and elevation suggests we can't use enough fixings for the tiles, we opted for Marley Edgemere thin leading edge tiles in anthracite. These were fixed at the eaves, every tile nailed and every tile clipped, more on this with the GSE trays. (Mandy back to real work🤣) I also taped the joints of the membrane with tyvek membrane double sided tape. We tiled the North elevation first as this was straightforward with only two roof vents (for MVHR) These were klober 25000mm2 universal vents as the Edgemere vents only ventilated to 10,000mm2. These are a good vent but it's a struggle with thin leading edge tiles to get them to sit flat. I ended up grinding a little of the back of the adjacent tiles and drilling an additional hole and nail to get them to sit as best as I could. There is a slight kick where the rubber flashing sits under the adjacent tiles but this doesn't affect the rows above, so decided I have to live with it. (Picture from a distance to stop you zooming the vents😂) The south elevation has 10 longi 405w PV panels, so I was using the GSE trays. Incidentally these trays and flashing were 50% more than the panels😔. GSE panels...... The instructions are very in-depth, but to be fair I just struggled with them. They suggest you don't need flashing for the top course as the tiles can sit over the trays, I doubt this works for any flat tiles / slates. Possible for pantiles if your lucky. A few on here @Dave Jones, and @dpmiller (I think) suggested this was the case, and I confirm you need the flashing kit, or use Flexi flashing, but IMO the detailing of the raised sections of the trays ( between panels) would be tricky and ugly. The thin leading edge tiles also caused slight kicking issues on the side flashing as well. So I had to be creative. (maybe this is standard for a proper roofer?) For the bottom flashing I used a 4x1 and timber wedges and used a replacement self adhesive flashing. Annoyingly the width of the trays with the raised section etc and the side flashings made the overall width 6.2M wide, so I had to order another length, and this was held up with Evri for 10days🥲. Fitting the extra battens for the clamps and tray support was painful for my brain, just too much timber. I ended up fitting a row of half trays at a time. Once the trays were fitted we tiled the RH side of the roof upto the GSE tray lateral flashing. This is where I needed to think out of the box, the tiles on there own kicked up into the air a looked terrible. I also had narrow tiles (120mm) cuts to allow for the half bond. These tiles needed the nib on the back of the tile grinding off which in turn meant they had nothing to hang on, and couldn't be nailed as they were on the flashing. So I used a hanging valley clip. To get these to sit flush I had to grind a little slot into the tile face, then to stop the tiles tipping into the flashing, and to give them a second fixing, I ground a groove in the rear of the tile, then once the next row was installed used a c clip to hold it all in place. Picture shows the valley clip and wire to hang the tile. Groove for C clip. C clip in place. This was repeated on all rows, so all tiles have at least two fixings. (Overkill?) The top flashing as I mentioned, had to be ordered and the corner flashings need modifying to ensure they sit flush over the PV panel. I installed two panels, then test fitted the flashing and corner flashing, which needed snipping with tin snips, then the overlapping cut edges pop riveted to reduce the height. This was sealed with lead mate. Once I fitted the flashings, I tiled the remaining roof and top rows. The flashing kit is expensive, but works and looks neat from the ground. Dry ridge installed,l and end caps finishing the roof. Then the panels, these were simple with 8 clamps per panel. Just the gutters to fit and scaffolding can come down. Some more EWI to fit then onto the windows and doors which are sat patiently waiting for us to pull our fingers out.
- 4 comments
-
- 3
-
-
- the windy roost
- highlands
- (and 4 more)
-
With the great weather in the last two weeks, following on from the slab pour, we will endeavour to pour the walls of the house tomorrow. I'm thinking I won't sleep tonight. Mentally listing all the things I wanted to do, and re ticking them off. First 7 cube is arriving at 8.30. 🤞 I'll leave this picture with you....

- 39 replies
-
- 8
-
-
- the windy roost
- icf
- (and 2 more)
-
Looking at one of these, haggling on price with City Plumbing and there 15% off using there APP. Anyone any experience with them? they do a Coastal protection option which has some appeal for me being 500m from the sea. They offer a control pack but at £500 I'm looking for alternatives. The house is 88sq M with UFH well insulated ICF. and a 200L heat pump tank. so happy with the size etc, Anybody know If I can just use a standard controller on this unit?. I would speak to Samsung, but I'm sure there will be a lot of pressure to use their kit even if not essential.
-
Anybody got any quick tips to get my layout working. I downloaded a trial few weeks back and made a start but was struggling to make any progress. The weather has been ace, and if I can get a layout sorted, and ufh installed might be able to pour my spab by next weekend.
-
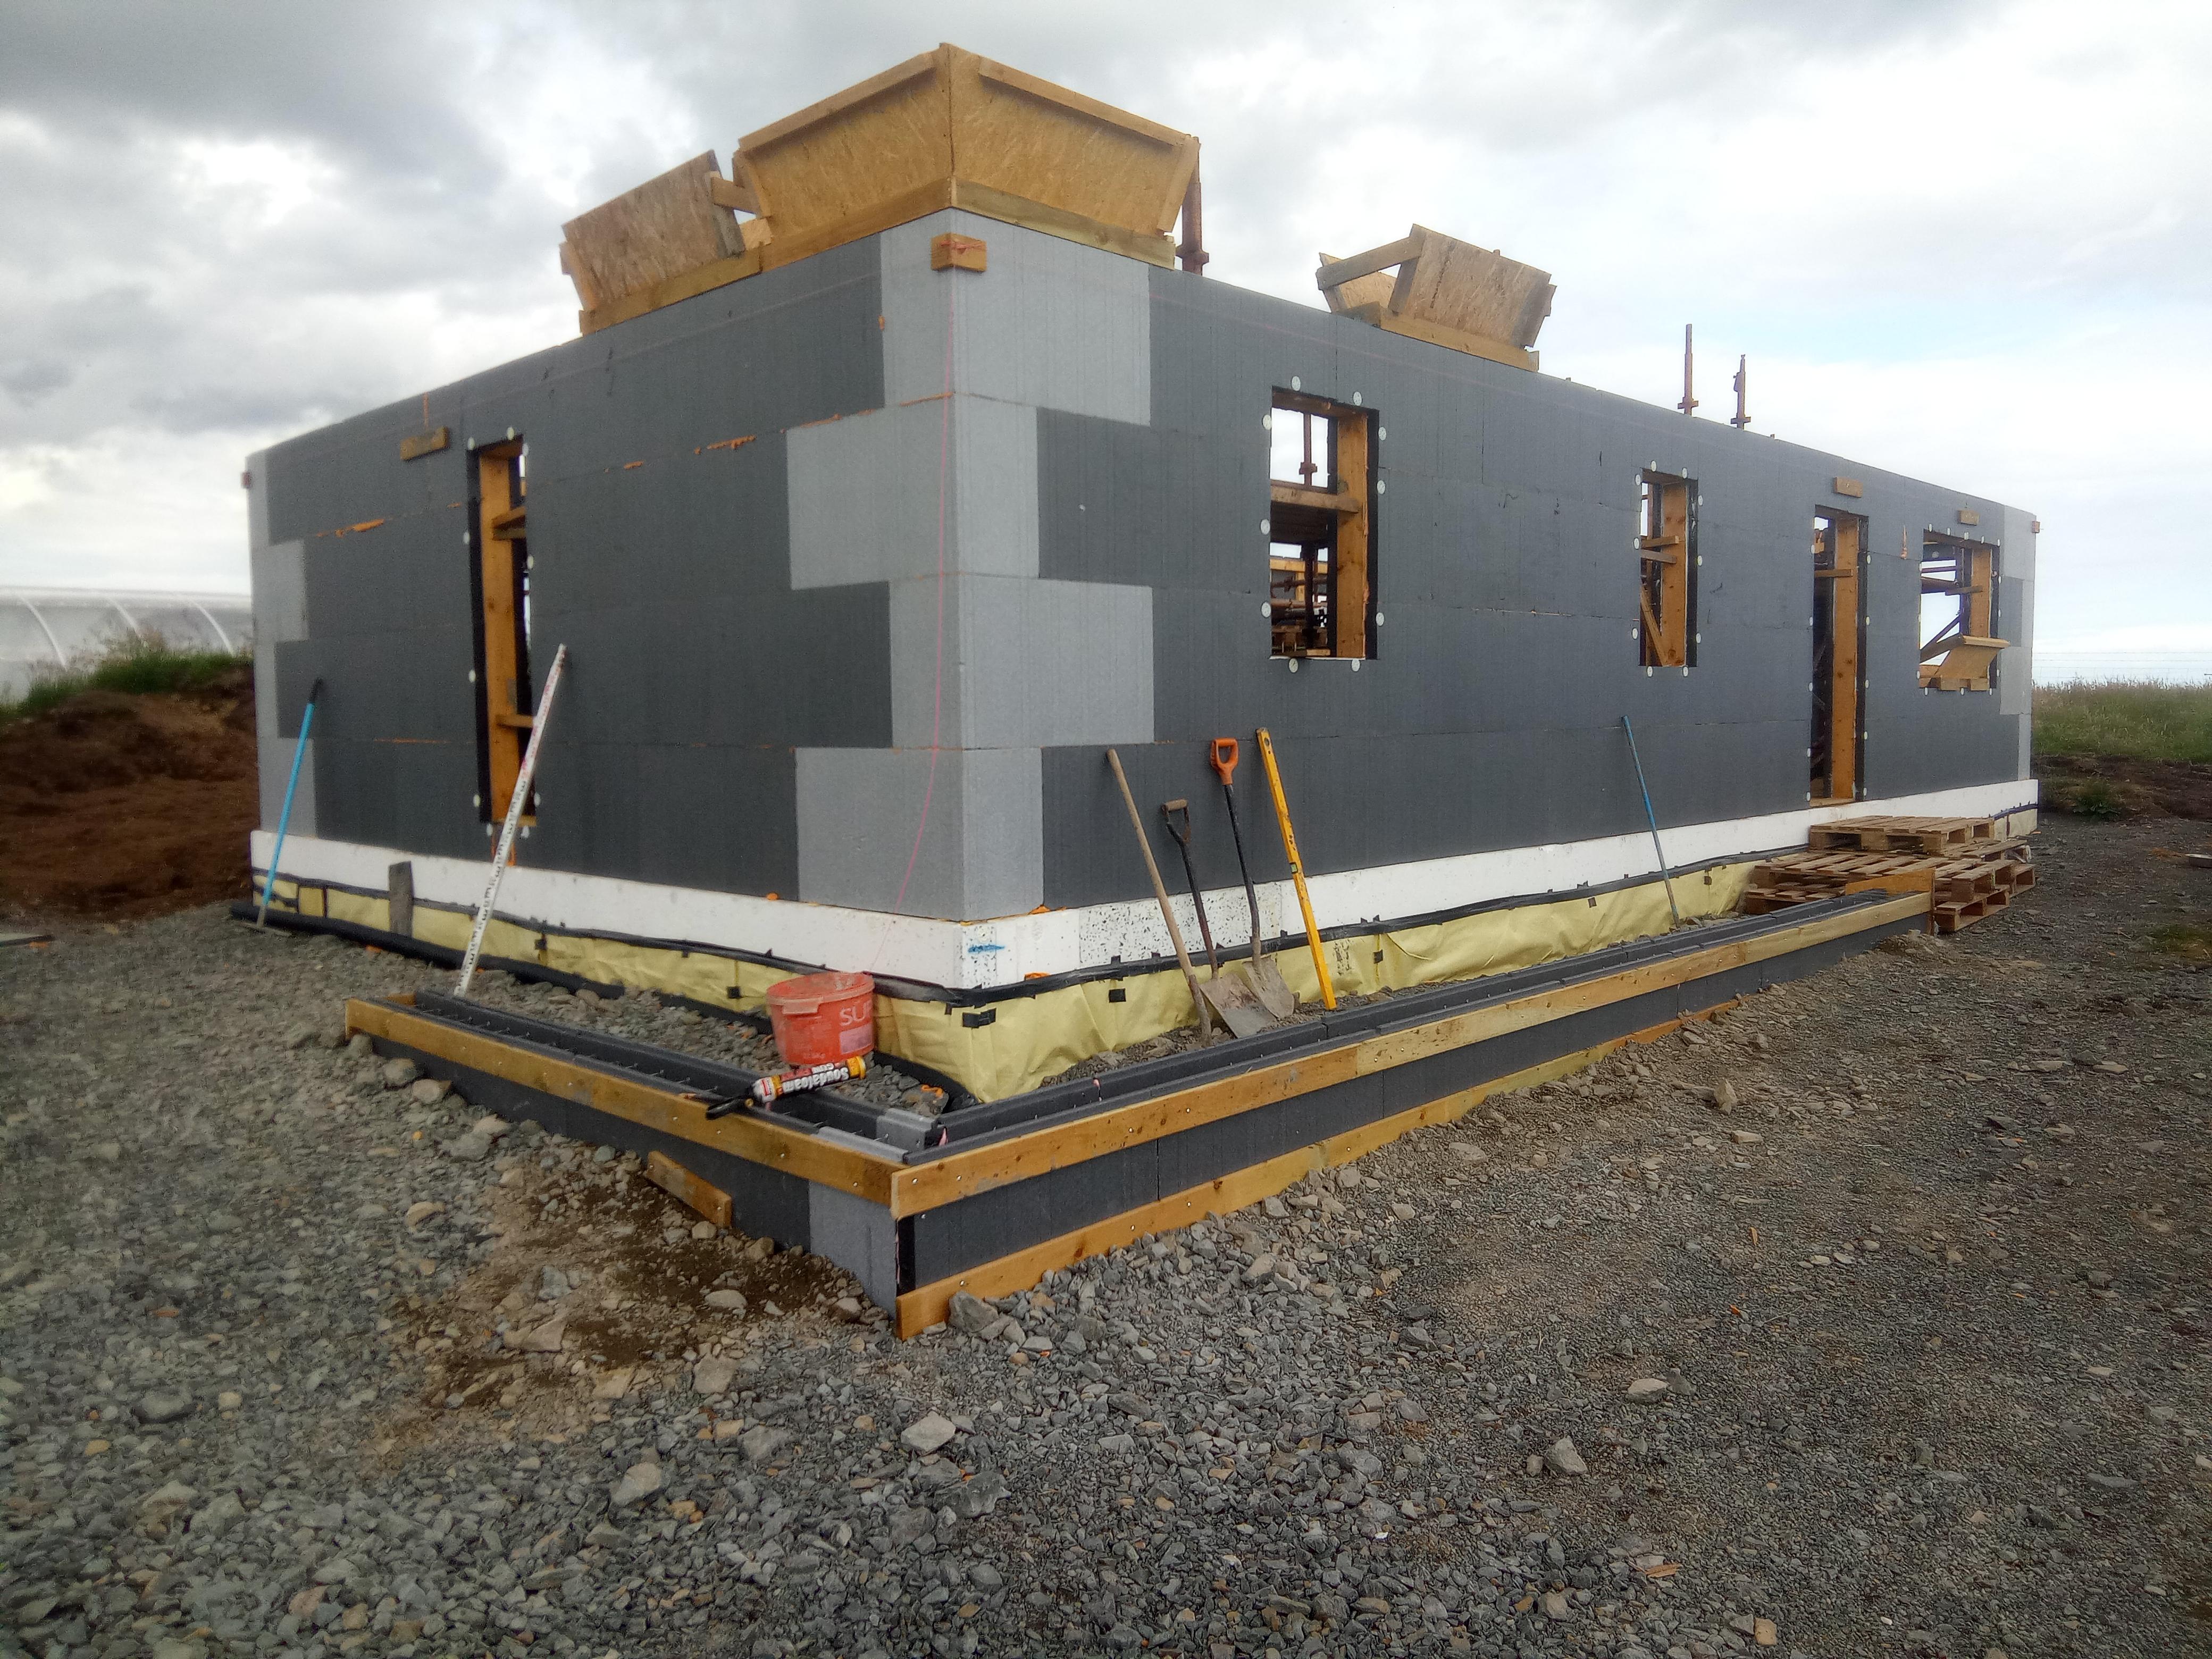
A busy couple of weeks and favourable weather has seen some progress at The Windy Roost. When in use the word I, or we, I mean Mandy my wife, and me. So far that's the only labour on the build. Mandy has worked office based for 40 years before we moved here, so this is an all new world for her, and although she regularly tells me she's older than me, and she's needs a day off, I can't be more proud... It seems that the engineers really worry about the wind here, which is fair enough, but you would think no house has ever stood the test of time. The 40M perimeter of the house required 288 H10 starter bars, after installing the radon barrier inside the shuttering, I used some 8x2 timber, (that will later be used to frame the gables), and drilled lots of holes and feed the L bars though. These were spaced as per spec and to suit the poly steel blocks. Checking the dimensions, diagonals and rechecking this was all secured in place. The 8x2 timber made pouring the shuttering difficult. I made some pour boxes, but this had limited success, so ended up using the 7 ton 360 & bucket method, a Caithness speciality, and the bonus was the concrete truck driver is also a very skilled 360 operator, which speeded up the pour. I think Stuart now counts as the 3rd bit of labour on the build. Rebar work in progress. 4 cube of concrete and all dimensions still bang on. Next day stripping the 8x2 was to be honest, a pain in the ass. But a few hours later all the shuttering was removed and we were ready to install the radon barrier over the sub slab joining it to the previously installed barrier now under the footing. Sand blinded, and then added 20 ton of 40mm be to dust in preparation for the slab after the foundation block pour. Installing the poly block we loosely set all four corner blocks, leveled them using plastic folding wedges, and measured the lengths, widths, and diagonals. We strung string lines around the blocks to ensure the corner blocks were in line. We sprayed the footing with marker paint, and then marked the blocks in position onto the footing. Then one by one we set the blocks in position and fixed in place with fire rated expanding foam. Checking the level with a laser level and double check with a dumpy level. Next day we filled in between the corners, gluing the blocks in place and ensuring the blocks are straight level, again using the string lines and levels. We cut holes for drains, ducts, and sealed the gaps with foam. The poly steel block are t&g and also come with clips that lock the blocks together. Before we closed the sides we needed to feed in horizontal H10 rebar🙈. We tied the horizontal and starter bars together, and also tried the rebar to the metal grids in the blocks. To close the runs the blocks needed cutting, luckily our cuts didn't cross the metal firings in the block, so it was simply cut with a hot knife. Then glued (foamed) in place. These cuts were braced with 4x1 screwed into the metal firings with bay pole screws. Foundation course in place. Mandy starting to tie the bars, you can also see the clip between two blocks. Concrete day. 3 cube. Concrete pumps don't exist up here, I was quoted 2k to bring one up from Inverness. I fabricated two 1200mm OSB form boxes, which sat between the top of the ICF block and formed a funnel, and used the 360 and Stuart to pour the concrete into the forms. We had two pokers on the go and filled one funnel, and while the bucket was being re filled, vibrated and leveled the concrete, filling the forms alternatively, and moving the empty form along. Mandy was a demon and just got in with it. The whole 3 cube took one hour to place. So paid £15, waiting time and a drink for the 360 operator. It went really well. We cleaned up the top of the forms, then checked the walls. We didn't prop the forms before, and used the rebar to be sure it wasn't going anywhere. Inspection showed there was some movement especially in the areas where a I removed one side of the ICF for door ways. This was easily rectified with some timber wedged and screwed in place. About 15 props in total were required. I was really impressed with the strength and quality of the poly steel blocks, only slight issue is they do have a slight wave along the block, but screwing timber to the metal firings lessons this and over all after the pour the walls are straight. Next slab prep, drainage, and lots of insulation.
-
- 4
-
-
- the windy roost
- highlands
- (and 2 more)
-
Finally made a start in earnest. The original plan was to stick build on site, but the cabin builds opened my eyes to the winds up here, and established concern for getting the house airtight. I priced ICF, and although the costs are higher in the begining I think, I can self build for similar money, but get a far superior product. This is a budget build, most of the nice to haves have been dropped. The only redline is we want to ensure this is future proof, so all on the ground floor. Around 12 months ago the area where the house is going was stripped down to bedrock. The initial plan was a DIY insulated raft, but the move to ICF opened up a more traditional strip footing using the ICF. Back in February we hired a 360 with a pecker to break out some of the rock to lower the NE corner, as the bed rock slopes to the SW. Bed rock exposed looking East NE corner We broke out and removed around 400mm of rock along the W and N elevations, the break out got shallower towards the SW corner. The main aim here was to reduce the height of the house on the SW corner, we will be bringing the ground level up to minimise the impact. We also need to strip some rock of the slab area to allow for the 300mm insulation. This week, thanks to an understanding BC officer, ( still waiting for the revised certificate of design to change the building warrant, but he's happy for me to proceed with the old warrant for the time being👍❤️). We made a start preparing. The plan is to shutter the strip foundation. First step was to level the strip with layers of compacted 40mm to dust stone, and also level the bedrock for the slab. Ready for stone looking W Starting on the North trench we barrow in the stone and compact. Adding more stone in layers and compacting, the backhoe loader was doing some of the grunt, but the leveling was all by hand, 100mm layers at time. looking NE Took the decision to build the sub slab to what will be the same level as the strip footing, this allows for the Radon barrier to be put under the strip up the side and then on top of this sub slab, then all services will be above the radon barrier and below the insulation in another layer of compacted hardcore. The main reason for, what will be a fiddly taks of having the radon barrier under the strip, is that the strip footing has 288 starter rebars and sealing these penetrations would be worse. Once the strip is poured we will finish of the back filling and install the radon barrier. More stone looking East So 5 days in me and Mandy have moved levelled and compacted 70T on 40mm to dust. And around 5 ton of quarry dust, this is used up here as an alternative to grit sand for blinding and pipe bedding. The shuttering is 150*50 timber that will be leveled then the radon barrier folded to form a tray, later to be joined to the slab. I'm going to use 6mm threaded rods to link the two shutters together, preventing any spread when the concrete is poured. Hopefully next week the ICF arrives, in I've got a 10 hour round trip to collect rebar. For a tank of fuel and a days driving I can save around £500 collecting from Central rebar in Aloa. For info, £930+ / ton direct Inverness suppliers (100miles away) we're after between 1250 & 1500/ton plus delivery charges ranging from £200 / £350 plus vat.
- 13 comments
-
- 11
-
-
- the windy roost
- caithness
- (and 2 more)
-
Hi everyone, im still at the dreaming stage of my build and my enthusiasm is not yet lost . I hope to start building this time next year . I have a small plot in Devon with full planning for a 1.5 story 3 bed. However I don’t like the design as reduced headspace on first floor is restricting. This is due to ‘overlooking privacy’ with a nearby building, I’m still 4.5m away from it but the architect said due to this and another garden, first floor windows needed to be Velux 🤷🏻♂️ anyway my thought were you could do a Clerestory roof have a row of windows letting in the light on the first floor and increase the headspace on the outer sides of the rooms 🤷🏻♂️ . I think I may build with ICF maybe Durisol… budgeting to do a lot of the donkey work, can use a straight edge, dot and dab, run plumbing, flooring decoration etc . Shall give up work to complete the build and budgeting for around the £1500 m2 excluding plot …. What could possibly go wrong 😂
-
Hello everyone, Occasionally a lurker here over the years but finally decided to change things up and join up and ask for advice (and maybe add some in the future?). My wife and I are looking at how realistic it is to do a self build (ICF preferred) of approx 100m2 (either 1 or 2 storey) with a total budget of £150K (excluding plot cost), right down to the kitchen /bathroom fittings (midrange). I intend to DIY as much as possible, paying trades for the skilled aspects etc. Now I know it's a how long's a piece of string question and I suspect that I'm missing something / seriously underestimating costs but some "rough" calculations look like this (excuse the ordering!) : Carpet etc inc. fitting £3,000 Electrics £5,000 Plumbing & bathrooms £10,000 Triple glazed windows £15,000 Kitchen complete £10,000 Stairs £3,000 Foundations £12,000 Fencing £3,000 Heating, solar, pump, etc £15,000 Legal fees etc £10,000 Roof £11k ICF walls & concrete £25,000 Flooring frames £3,000 For a rough total of £125,000. How wrong (or right) am I? I appreciate any answers because currently I'm reading so much that one moment my budget seems reasonable and the next it's nowhere close!
-
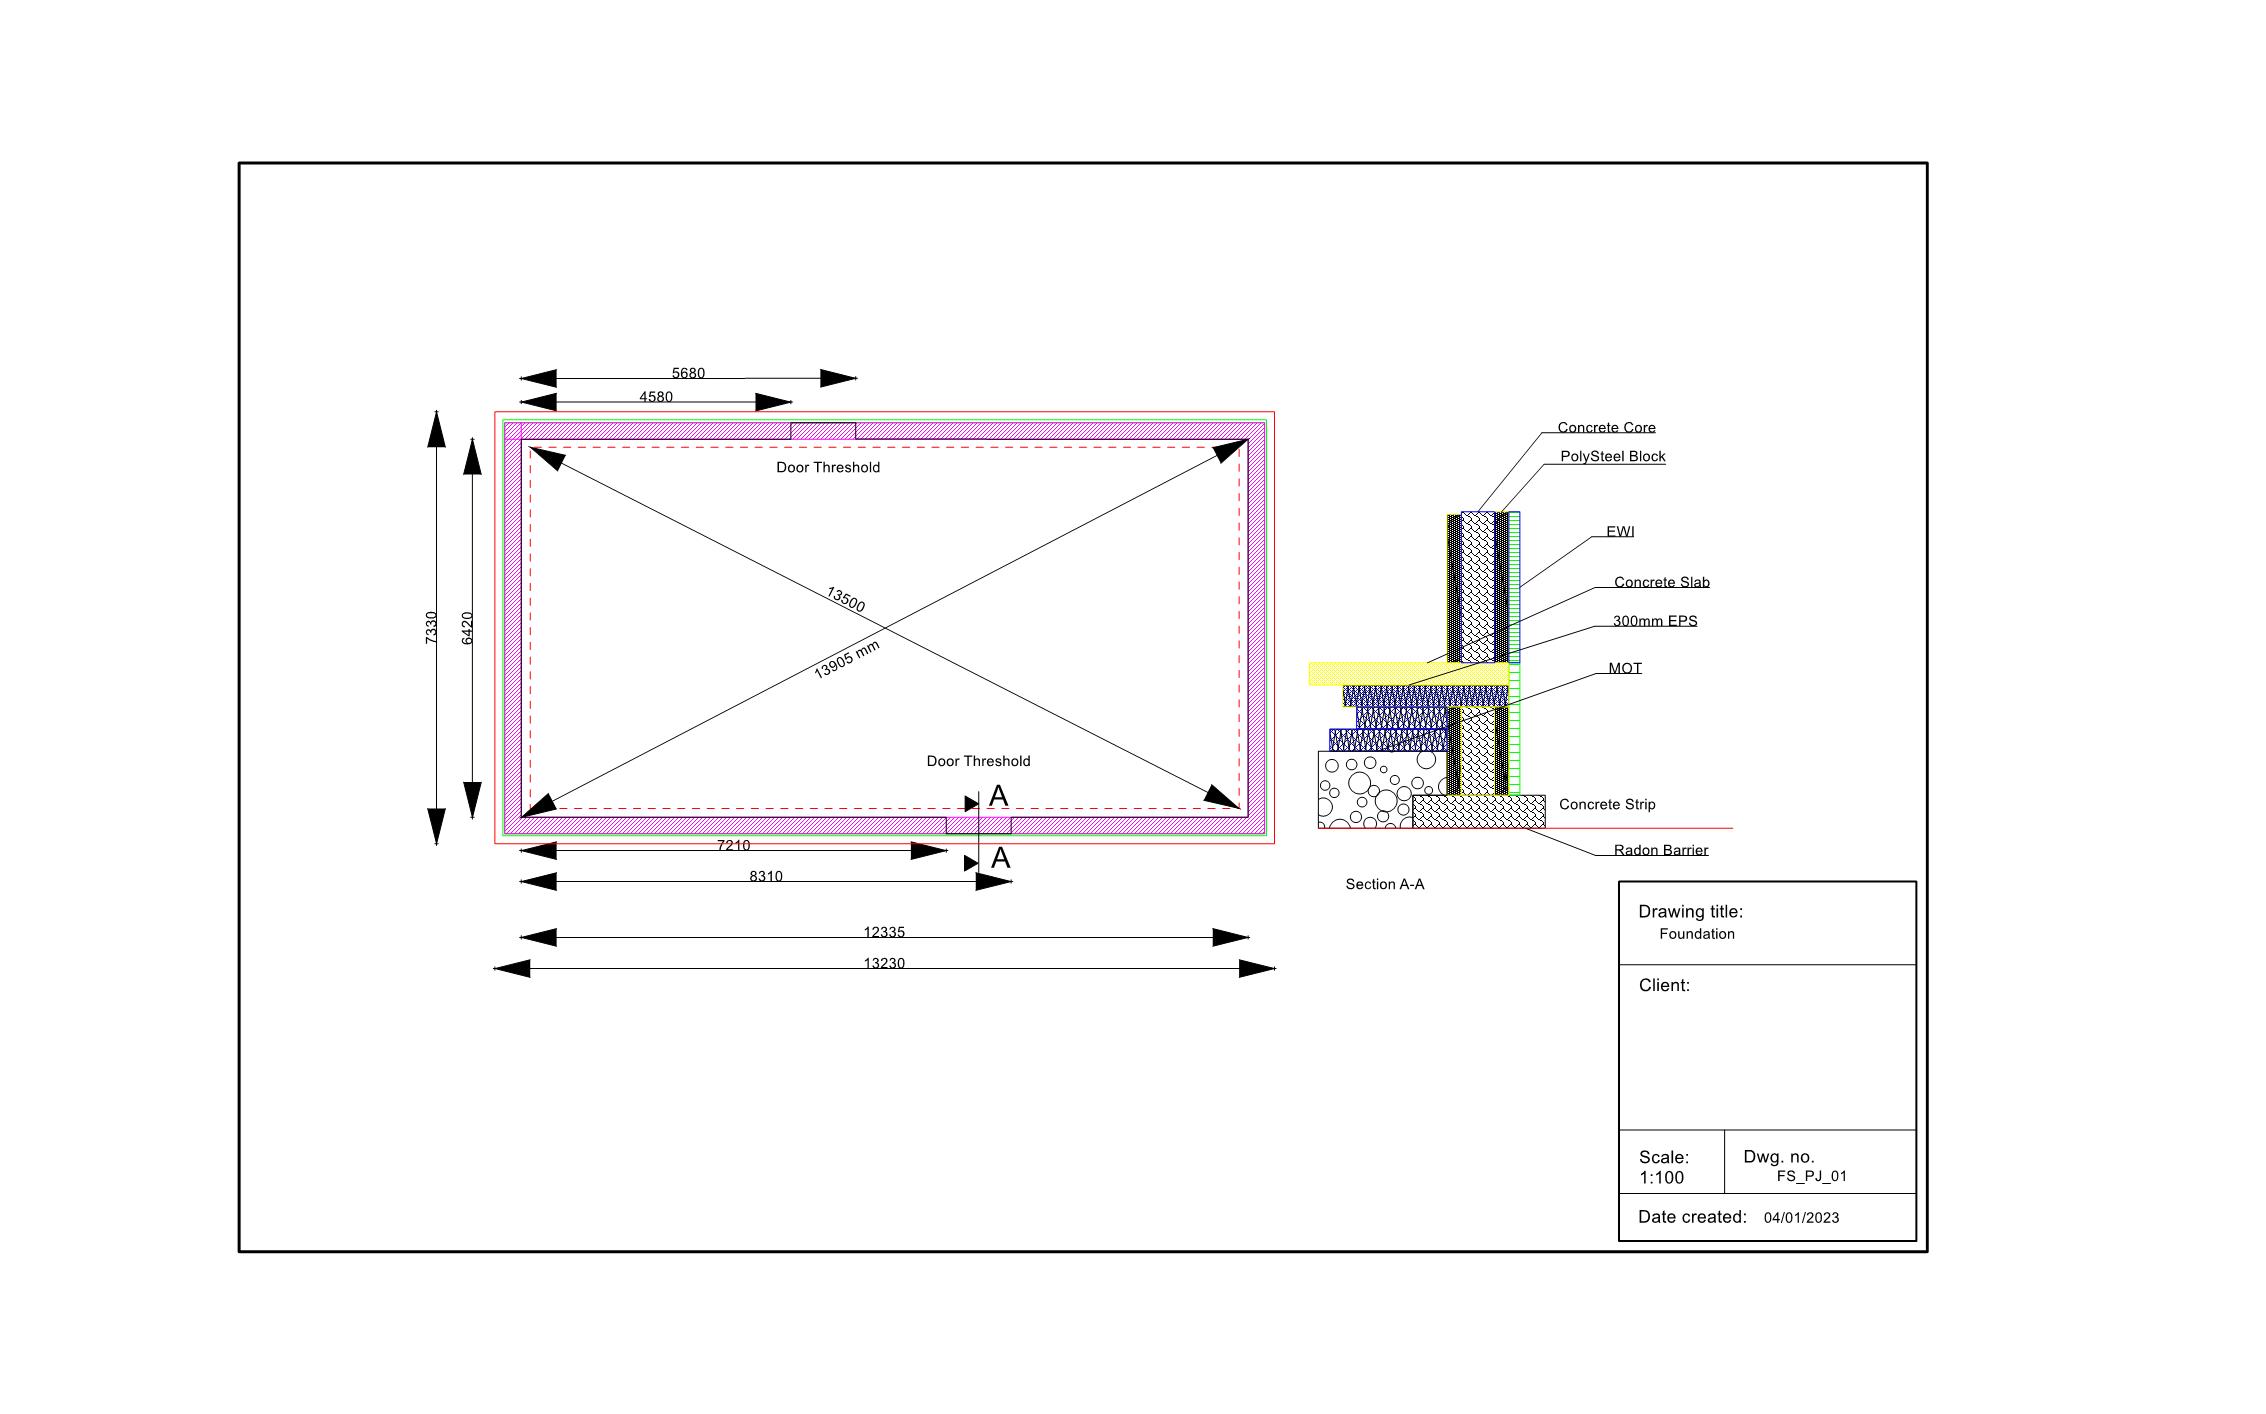
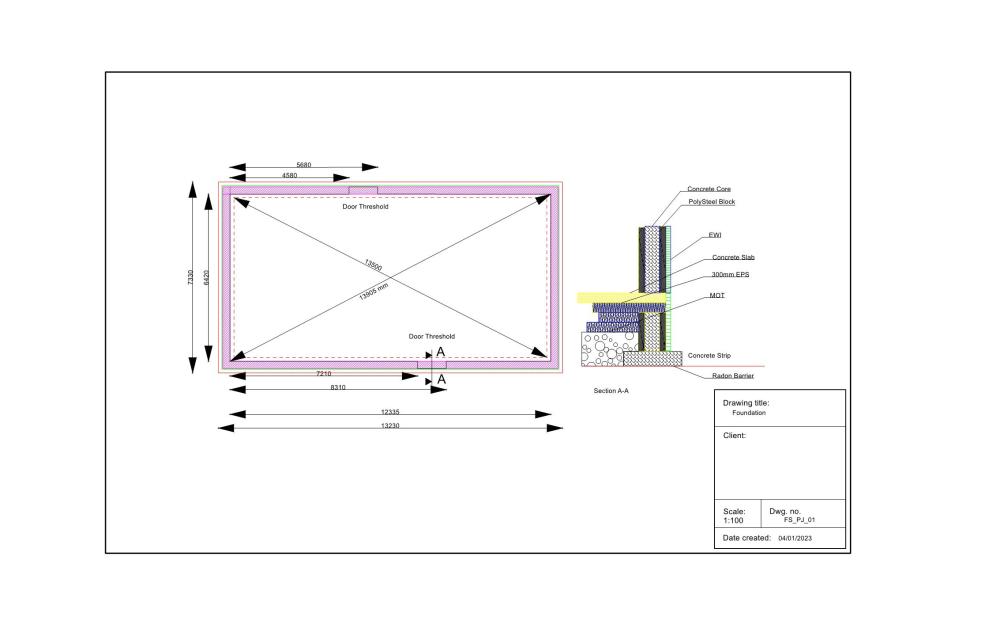
First of a few posts, Having lived in the Highlands for a long time, (5 months and counting), We have had a re-think on the construction of our house. The decision is two fold, firstly the increased cost of stick build and insulation, plus the delivery costs, secondly the Weather. Its windy and I've never really experienced the issues with (constant) driving rain until now. If it rains its driving rain. ICF will be dearer, but not by much, and then with some tweaks to the design and the foundation, a simpler (thus cheaper) Air tightness detailing I'm not sure there is a lot in it. SO that's it, were going to build with ICF, and the decision is to use POLYSTEEL blocks, with EWI on the exterior. SO down to the Questions. My site is rock, the house plot is currently stripped of all top and sub soil down to the bedrock. The excavation results in depths of 350 - 500mm below the original ground, but this is sloping to the SW corner approx. 800mm drop to this corner. I will be breaking out some of this rock to reduce the slope. Once I've got this more level, the initial idea is to lay the radon barrier on the rock (sand blinding under the slab area) then shutter a 600mm trench strip for the concrete footing. The idea being that the radon barrier will not have any protrusions for services. 1, DPC - Poly steel says I don't need a DPC - ? Thoughts and comments please. The sketch shows the section. 600mm block sat on the strip foundation. If I opt for adding a DPC, then I'm introducing a moment in the footing and thus more reinforcement will be required. 2, The Visqueen would then be lapped up the wall, but not returned into the blocks? 3 How does my detailing of the thresholds look? - With Poly steel, the cavity is closed with 6*2 treated timber. I was thinking that as the doors need low thresholds the the door should be positioned on the external EPC of the block, and strapped back to the timber. Be Kind... 040123_Foundation.pdf
-
 I know the answer is ours and ours alone to make. Testing my thinking is what this post is about. Am I too involved; missing the wood for the trees, too cross to make a sensible judgement? And if I am minded to go it alone, can I follow through? Writing about it will help me think too. Our builder is being evasive. Over promising. Disorganised or absent paper work. Withholding vital information until a few seconds before disappearing from the site. Some aspects of the work have been excellent, others not. He struggles to retain staff. Some are oafs. (Oaves?) Others the opposite: accurate workers, polite, funny, interesting. We've had some meteorological bad luck. But that hiccup has been overcome to the extent that the replacement blocks are here. Calm analysis and talking to the loss adjuster has been reassuring. I have (until now) had a misplaced faith in the value of a promise. I had a verbal agreement to pay, and did so when I said I would. I accepted that detailed invoices to substantiate the charges would follow. They haven't. In simple terms, we've paid a good deal on account. We are now at least a month behind schedule. "... We'll be down towards the end of the week..." Right. That's been said so often now, it's hollow. I know enough about Durisol to - with the help of this community - to build the shell myself. On my own. Very often there's a gale at the beginning of September. And I do not want the rest of the 'unpoured blocks' on the floor. That's the real driver Do I sack them and get on with it? In an instant I would if I could get one reliable, thoughtful, fit building partner. I'd be pushing it on my own. But it can be done. Just. What needs to be done? Blocks laid to just above first floor: skill level - very easy And then poured. (tricky, but I've seen it done three times now and I am not stupid) Rest of the blocks laid and poured : skill level easy to tricky (trimming the gable will be interesting), but not impossible. If I do it slowly and carefully its well within my fitness and competence level If I do that I will have taken this mess by the scruff of the neck and got on with it. Yes, it's our decision. But poke my thinking, ask uncomfortable questions. My deep instinct is to get on with it, while seeing if I can recruit someone to work with me - for safety as much as anything.
 -
Building extension with ICF
-
Hi All, I have multiple Durisol blocks left over from a self-build extension, would suit anyone looking to build small garden building, retaining walls, or similar. I was planning to build a sunken hot tub but plans have had to change. D365/120S-PIR = Qty.143 D365/100S-PIR = Qty.57 D365/100C-PIR = Qty.20 D170 Face = Qty.6 D170 Standard = Qty. 27 D250/180 Standard = Qty.40 D250/180 Face = Qty.48 Please get in touch if these could be useful to someone. I'd rather rehome them than break up and destroy. Tks.
-
Hi - Does anyone have any ICF supports / braces for sale / rent or know where I can get some? Thanks James
-
I'm trying to work out best option for external render onto an ICF woodcrete block (Isotex). Architect has recommended K Rend but their tech suppot does not seem to have experience of the woodcrete type ICF block and their recommended build up is based on a Polystyrene type ICF build. Has anybody used K Rend or similar on a woodcrete type ICF block? What basecoat/topcoat would work best?
-
Hi guys, Any Structural Engineer recommendations for my ICF Basement?
-
Hi all, Just to introduce myself. We are just about to finalise our renovation/extension project in the West End of Glasgow. Detached bungalow which we have pushed out the back 6m and also added another storey to it. The last two years, to be quite frank, have been pretty hellish, not only in terms of financial outlay (budgets - lol, aye ok) but, personal energy investment. I don't think we really realised how big an undertaking it was until one day, standing with my brother in law and we had no roof and it was just basically a shell. My brother in law looked around and went "fk me" and then it kind of hit me, square in the face or what we have taken on! We would have been quicker and cheaper, flattening the house and doing a fresh build but we weren't allowed to do that (a story for another day). Anyway, external wall insulation has just been completed and we are about to to start the roughcasting externally. Because we look at the building everyday we don't kind of realise how impressive it is and its totally out of context with the neighbours single storey 85m2 detached bungalows(we have 18 objection letters from the neighbours and even neighbours as far as 1.5 miles away, councillors, mp's the lot) as ours rises 6.2m at the back (the neighbour calls the wall facing him The Berlin Wall!). I work in the insulation industry but to be honest, I have learned so much more about insulation, insulation u values, lambda values - the works. We have made mistakes yes but fixed them. At the end of the day, we have built a house in which we are only temporary custodians but this house will stand proudly (Berlin Wall-esque) for a long long time and with excellent insulation and air tightness values, solar panel power generation and we are really proud of what we have achieved. Incidentally - never again!
-
 Hello, We are designing a 4 story carbon neutral, built for purpose office block on stilts (as it is in a flood zone). ICF was originally specified for the walls during planning phase to achieve the best thermal performance, air tightness, security and acoustics outlined in GBS's Sustainability SPD and client brief. This was also backed up by our sustainability consultant. Over the last year of waiting for planning permission, the client has taken a liking to the single faced ICF system (based on aesthetics) and the Architect seem to prefer the more traditional methods with steel frame with light weight metal stud, sheathing, cladding railing system and all the insulation/membranes/tapes/etc. In my opinion, I feel like we will struggle to achieve the above requirements outlined in the SPD with steel frame while the RC frame/ICF will provide these properties inherently. The only negative I can think of for the ICF although will be a heavier build and therefore more piles/thicker caps. If anyone has had any experience achieving almost passive standards with Steel frame/light weight metal stud and possibly also has ICF experience to compare the two, it would be greatly appreciated? Also, I was hoping to see if anyone has had any experience with the 'off the shelf' single faced ICF systems (Nudura/Integraspec) as well as potentially using systems like Quad-Lock that don't offer a single faced solution but could easily adapted to do so. (Fixings 8'x4' ply sheets too the ties at 12" H&V centres). The main reason for trying to "re-invent the wheel", is mainly cost of the material, cost of importing the smaller/expensive sections of pre-drilled wood from Canada and also speed of build. I am however, concerned about how well the wall will hold with pour heights of ~3m. Any suggestions would be appreciated. Many thanks
-
I've begun the process of designing an extension and an fairly certain I'm going to have an insulated raft with icf walls. This will be adjoining a (likely strip foundation) cavity wall house. I've had a quote from isoquick for the raft approx 6m² but I'm not sure if it's worth extending this to cover the garage floor? It would essentially double the price, but the alternative is going to create a strip & Insulated raft & strip or raft monstrosity combo. Is it going to lead to problems? should I just swollow the extra cost even though its going to be a waste of resources and is an insulated raft even suitable for a garage floor? The upside I suppose, is that if the raft is continuing then it simplifies things and if someone decides they need another huge room downstairs in the future the prep will have been done....