
Leaderboard


Popular Content
Showing content with the highest reputation since 03/19/24 in Posts
-
I see a few mentions of the expense of MVHR. I self installed a simple system complete for less then £1500 in a 260m2 house. It has no sensors just manual boost which we use occasionally, otherwise it stays on trickle rate 24/7, even when some doors and windows are open. Really happy with the air quality (which I monitor with sensors), best value for money in the whole project and a no brainer in a new house IMO.6 points
-
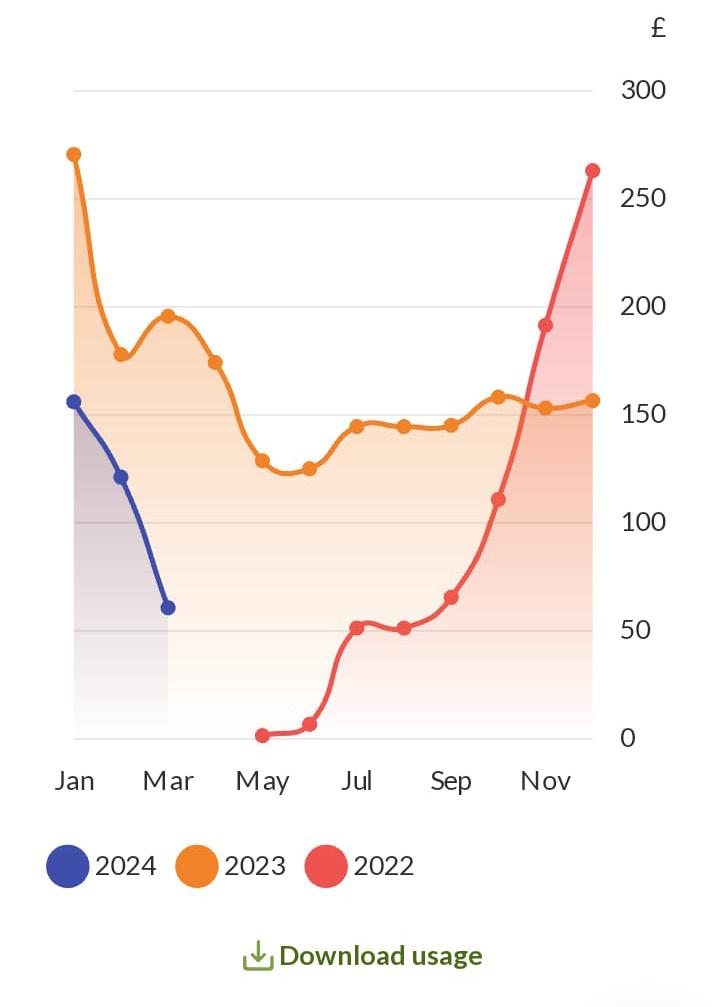
All the reading of posts on here at the design stage and the hard work implementing the experience of others on your own self build can be summed up / justified with just 1 image. Even when building on a very tight budget. This is my energy usage @ The Windy Roost since we got here. Upto January 24 we were in the static, we were never really warm used Air to Air heatpump for heating, hot water and cooking was LPG. We also had around 4 summer months of our cabins being used, again electricity for heating and cooking, DHW is LPG. The blue line makes me feel warm and fuzzy inside. That's our electricity for the self build, a whole house fully electric and blissfully warm with ample DHW. (With some limited cabin usage). To all self builders going through this, it's worth the effort👍.
 6 points
 -
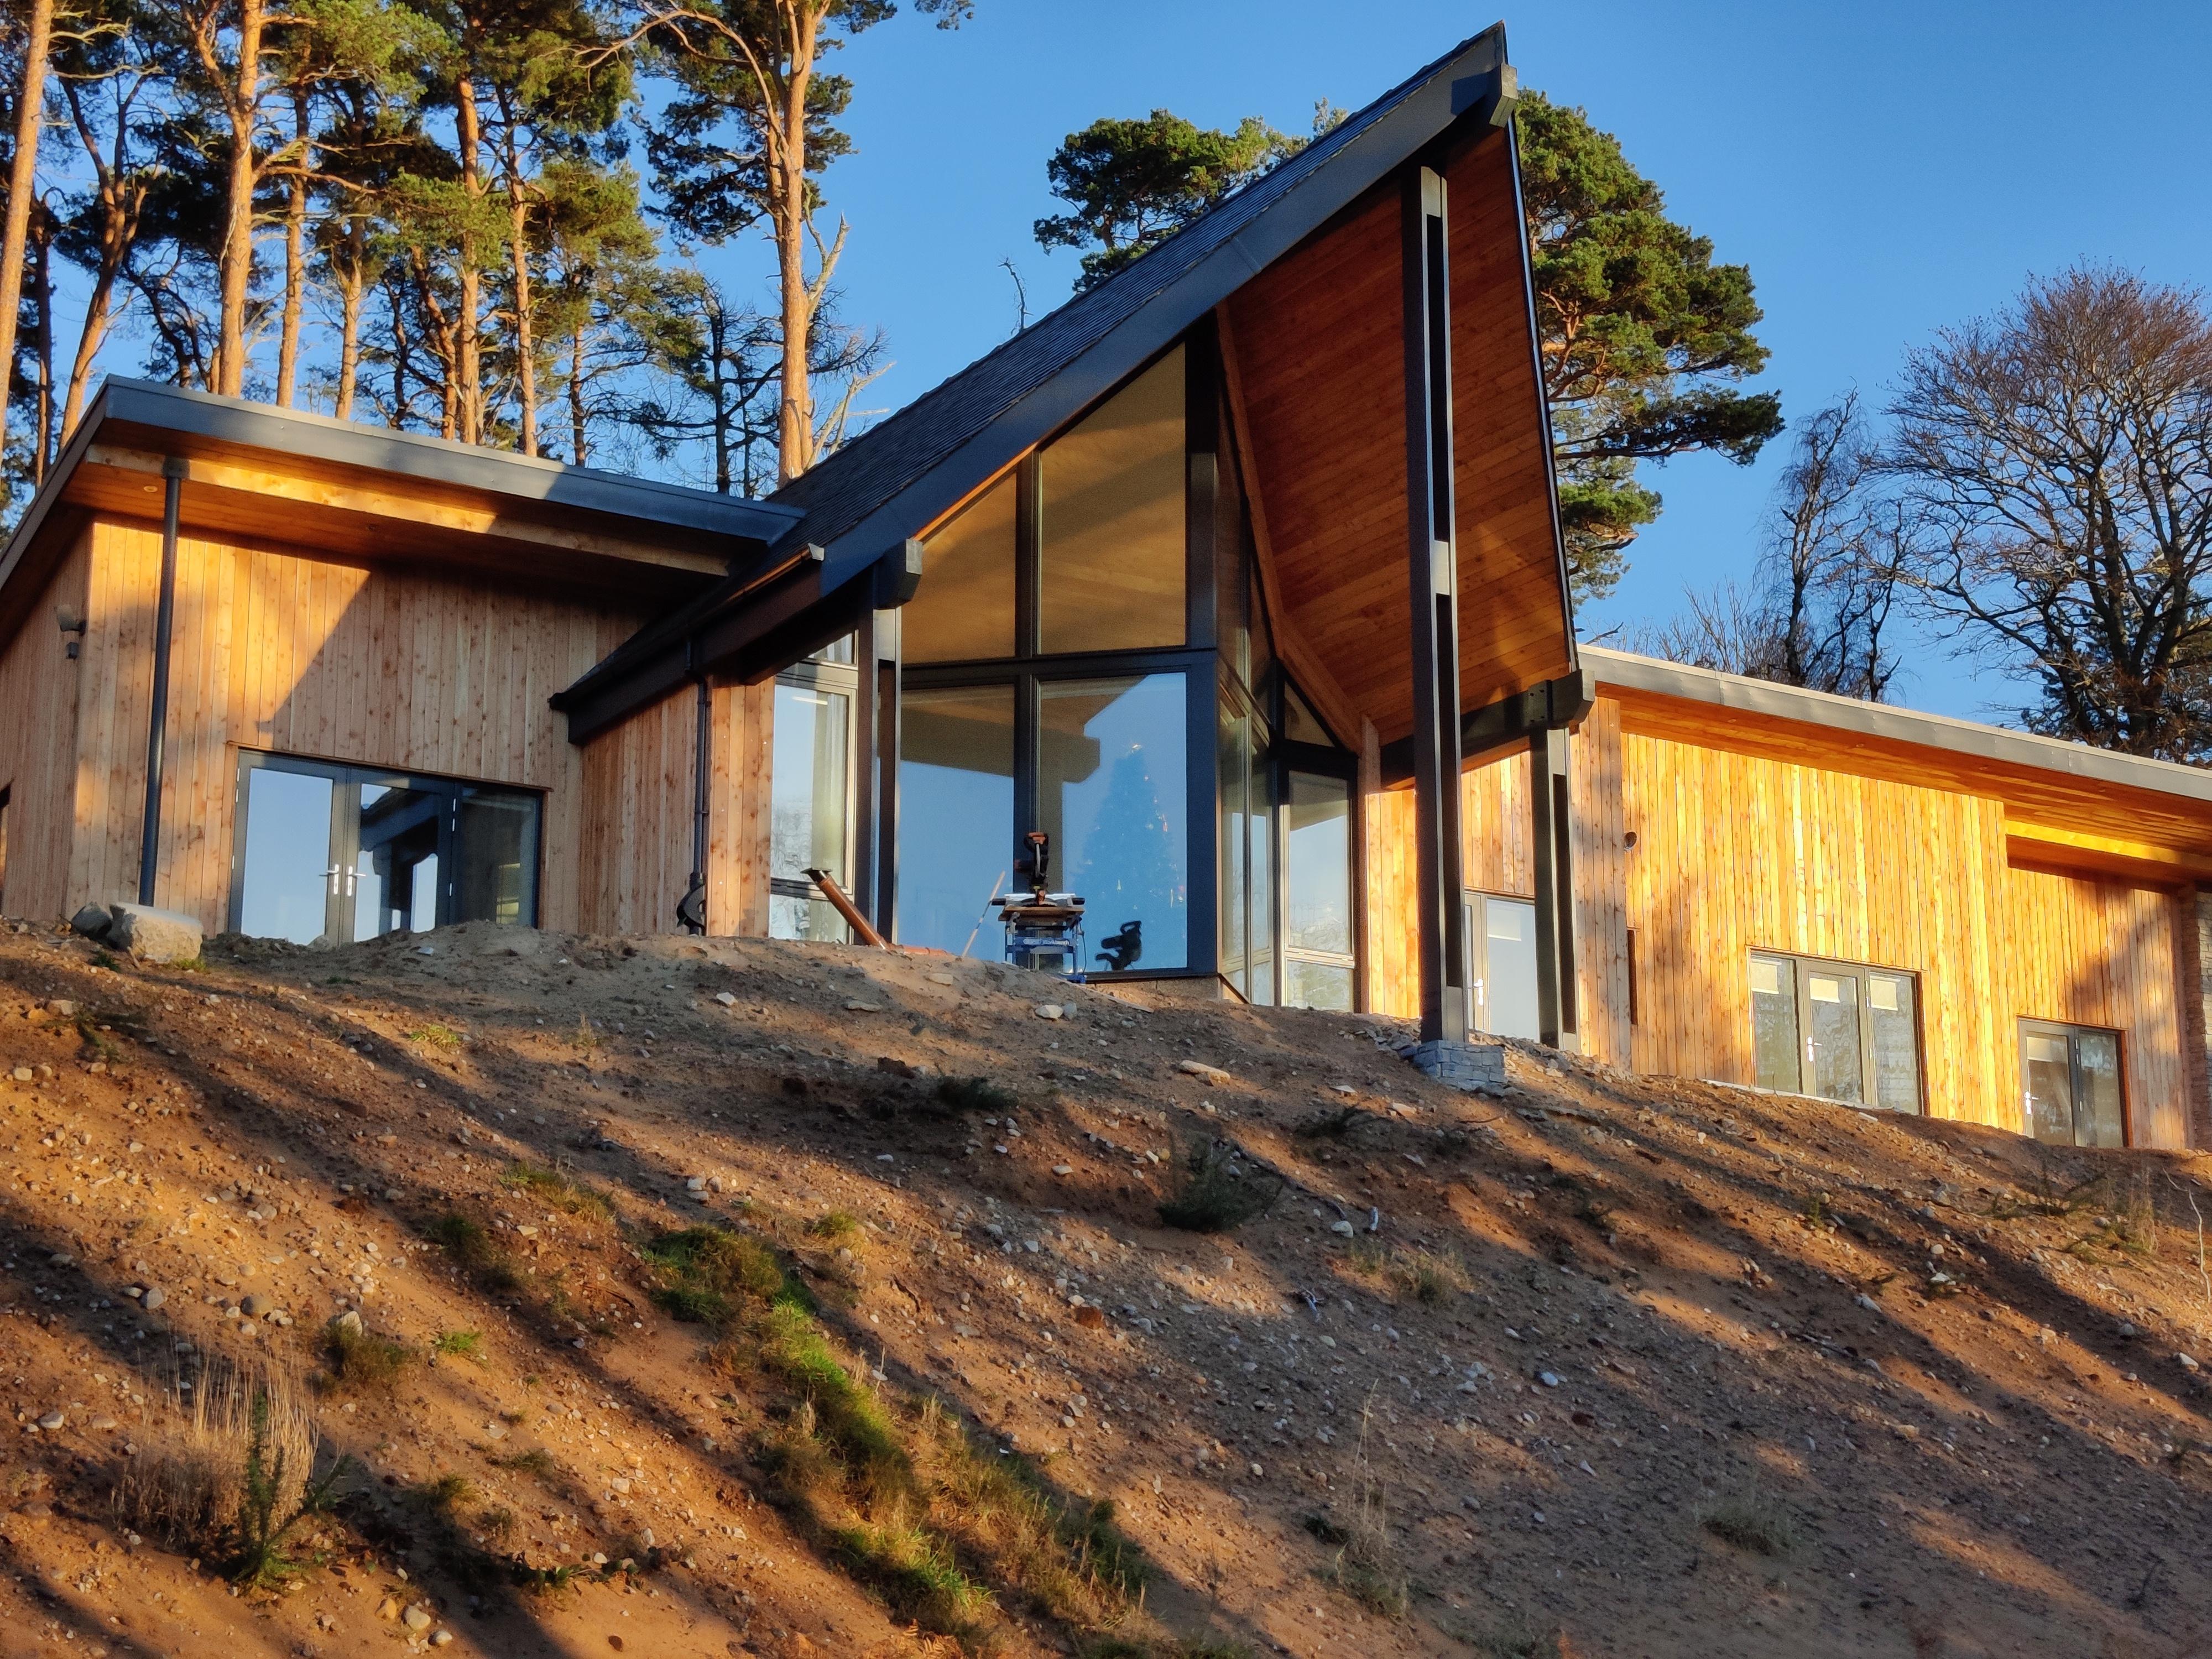
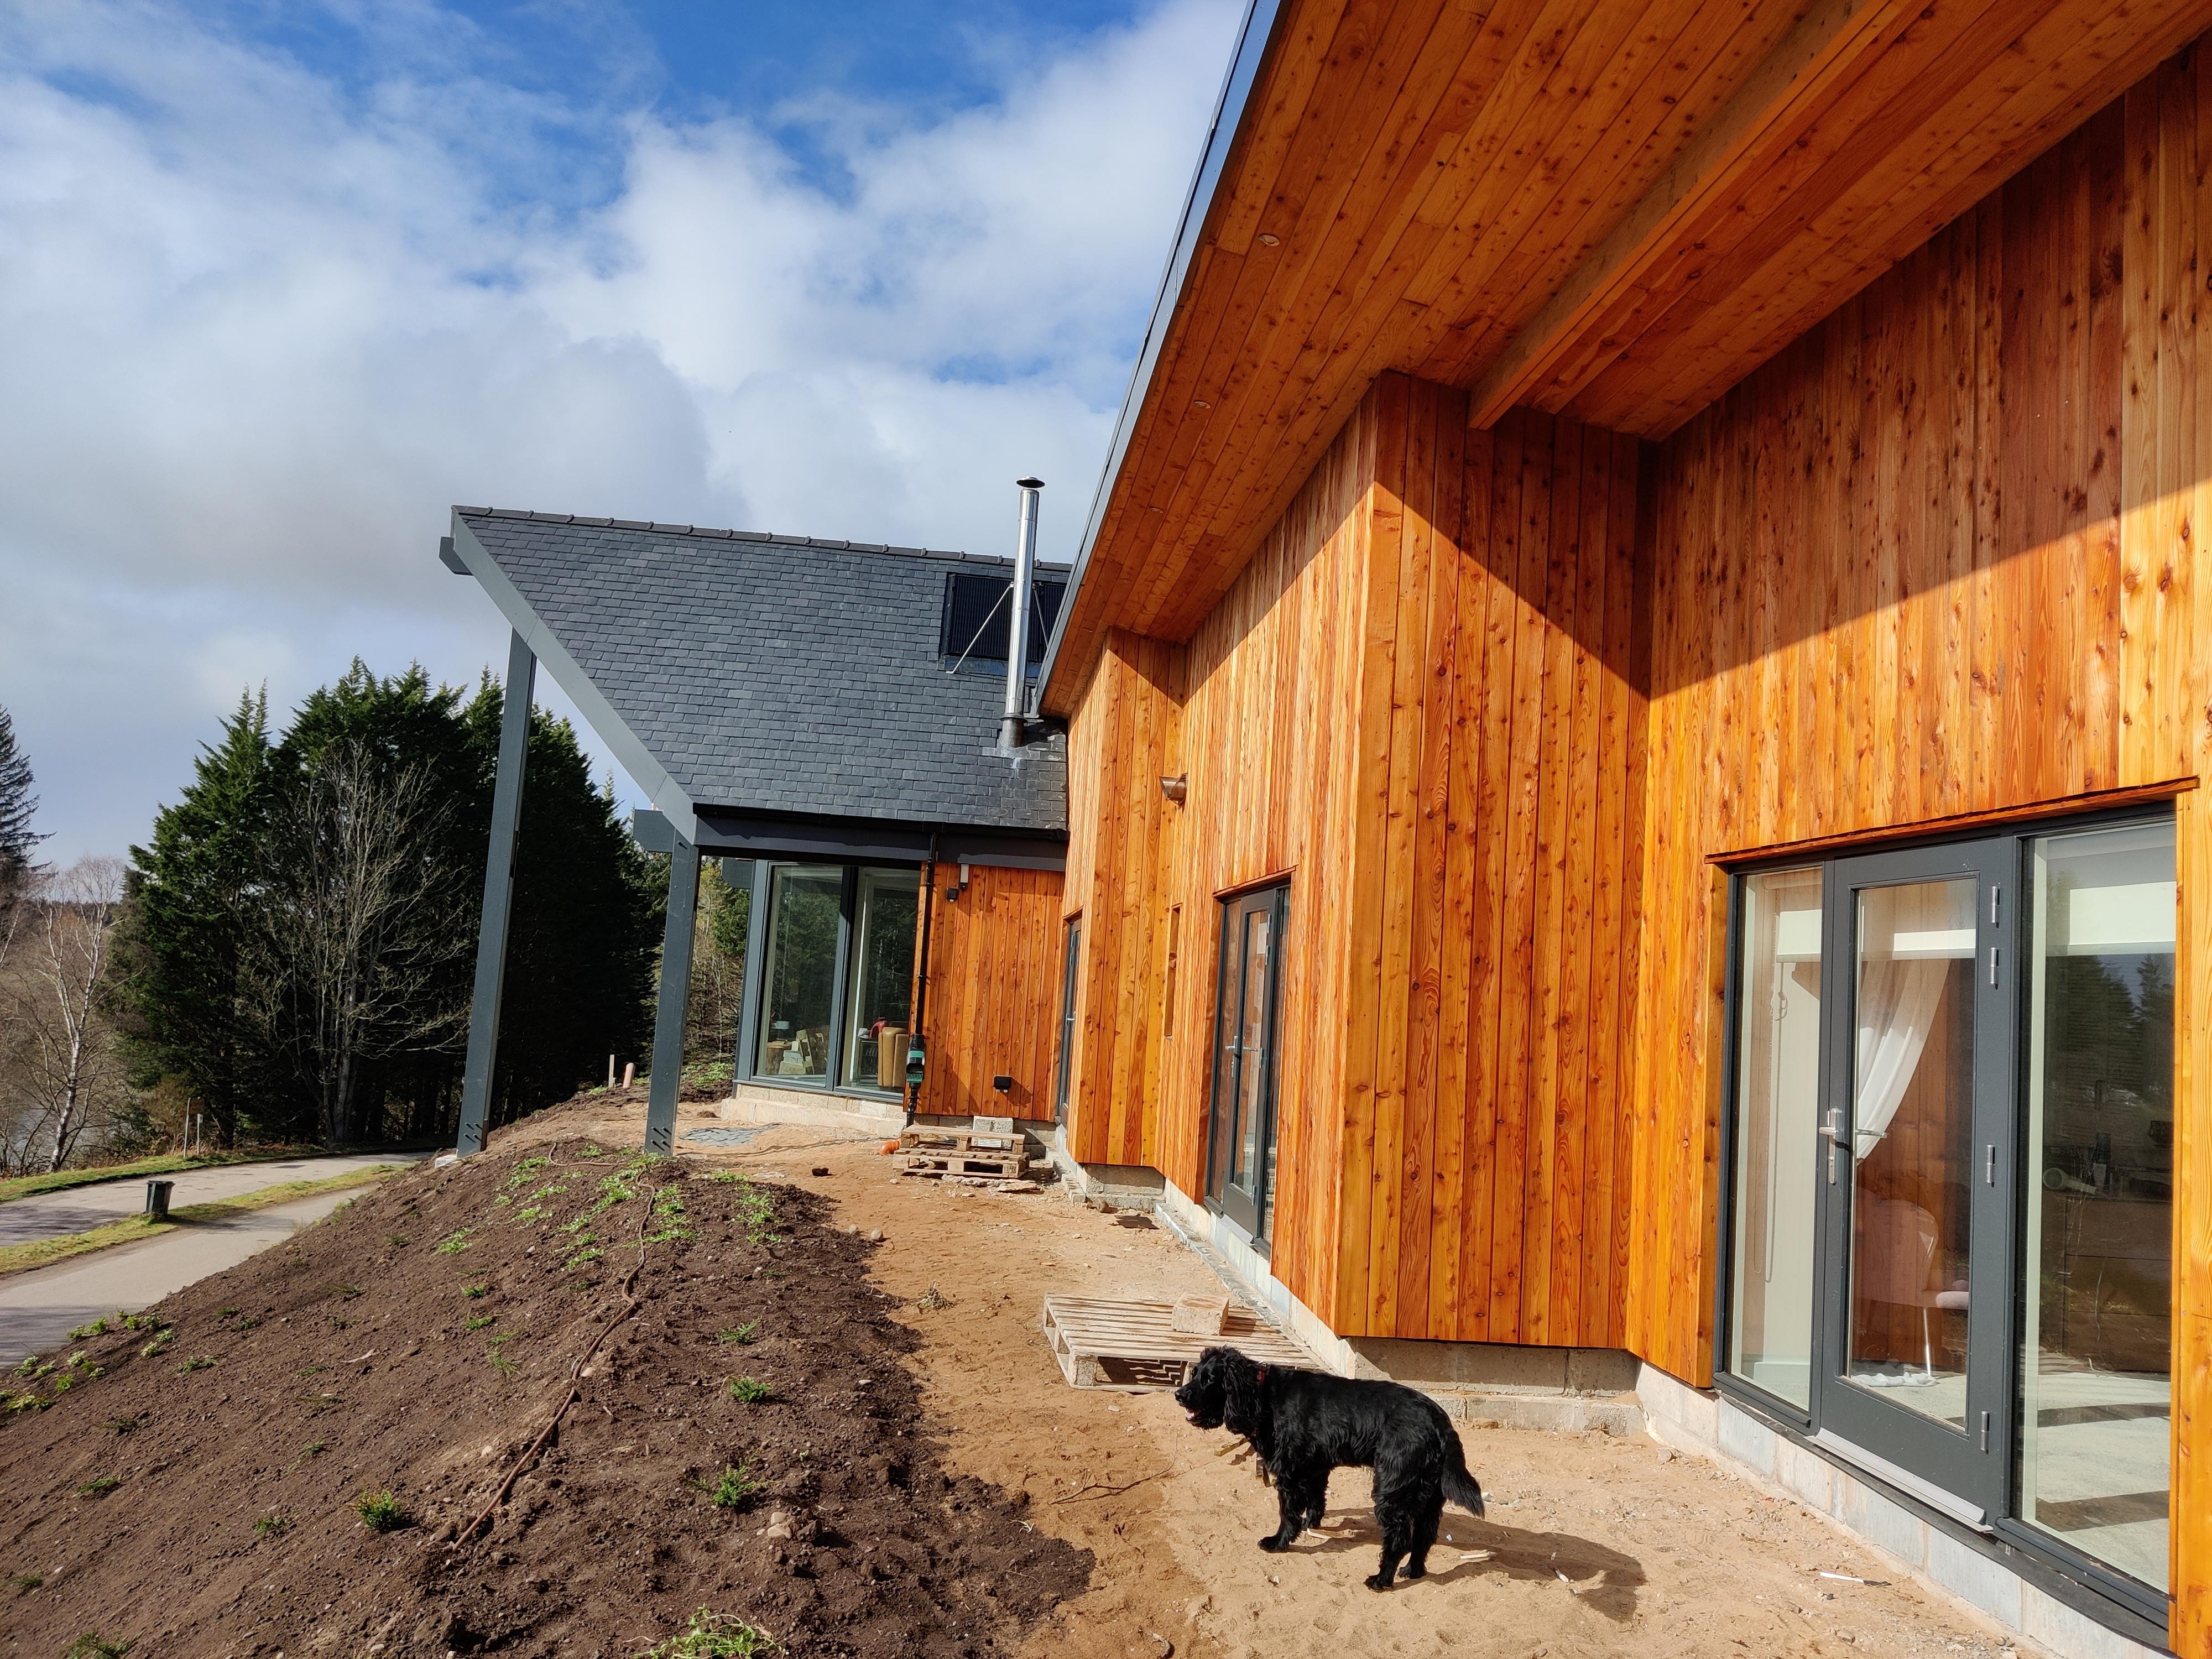
I thought these photos might interest you ..... the first one taken a few minutes ago The slider in the kitchen has been open all morning - right hand side of the image is to the North, and thus the Winter Garden is in wind shadow (wind NW) , but in full sun (it was raining when I took the photo) There is a 2.5 meter overhang for a 'veranda' shown here earlier in the build. We call it a Winter Garden - yet to have anything in it , but won't be long now. SWMBO intends to fill it with - knowing her - a jungle or as close to that as she can get. There's one episode of Grand Designs where Kevin WotHisFace showed a similar design, but he calls the area a Breeze Corridor. The look of triumph on Debbie's face was a picture. First time she'd ever been 'on trend' she remarked.
 5 points
 -
We leave the window in our bedroom for much of the summer. I support we could turn the MVHR off but it's so cheap to run and as it guarantees fresh air regardless we don't bother. Despite my statz-esque approach to kids leaving the entrance door open I try to remember a house is there entirely for our benefit and and enjoyment and not as a science project.5 points
-
I don't mean to be harsh, but don't you think you kinda brought this second mess on yourself? You actively chose to get back a tradesperson who you already know made a potentially life-threatening mistake and he wasn't even able to fix it when told about it originally! What made you think his second-fix plumbing in your bathroom would be any better? If he didn't provide a quote, what did he agree to? What do you have in writing? Did you take detailed photographic evidence of his mistakes before you fixed them? If you've got pics, ask him for an itemised bill, and then you can prove that he didn't actually fulfill those things properly and therefore you're not paying. But to be brutally honest, I think you partially brought this on yourself and might need to chalk it up as not-too-expensive life lesson.4 points
-
Sorry but I can't see ANYTHING in that kitchen that will make it £55K. Howdens could replicate that, or any other kitchen supplier for that matter. Choose the best of their range, and fit yourself, Get good stone worktops and splashbacks, and buy the same top end ovens and hobs and other appliances as the German supplier is proposing. (yes this is an answer from a man)4 points
-
You must get to the bottom of this before parting with your cash. I see this a lot.. the vendor claims no knowledge.. but I know they know that they are not offering a clean sale. Ask this.. are you the first punter that has pitched up or have there been others who have clocked that the vendor is not playing the game? I have seen this over the last 40 years.. If you can't get a rural plot soakaway or similar to work etc then the plot is often only worth the agricultural value.. it's a fact folks and there is usually no magic bullet. It may be that the plot is worthless.. you don't want to be the idiot that buys it. It may be that you can do a deal where they give up more of their land and you share the soakaway say, now the plot has value. It's time to say to them.. look we need to sort this out or we are off. If you are not firm now you could lose your shirt. Forget CCTV survey for now and get the big stuff sorted. Who owns what and what rights of servitude exist. Understand that first.4 points
-
Ventilation, ventilation, ventilation, stick a living, breathing, cooking person inside a box wrapped with plastic and you are going to get damp and mould.4 points
-
I used my theodolite’s optical plumb to sight over my corner markers and help get my strings in position. 3D printed some adjustable string holders to move the strings into position easily. Now I’ve transferred the points to strings it’s time to strip the top soil and add the type 3.


 4 points
 -
I didn't put in any central heating in our passive house. None. These are the reasons. 1. Believed the evangelical true believers that seems to think energy is like magic. 2. Stubbornness driven by a desire to outsmart everyone else. 3. Complete confusion with the range of options. 4. The outrageous prices charges for ASHPs by plumbers who can't count their own fingers. 5. Option to fit an A2A was always there. We use a single resistance heater now . It works fine the rooms are all comfortable but it's dear to run. About €700/year I think. I put extra infrared heaters in the bathroom for comfort. I had expected it to be cheaper but we can't bank enough heat overnight on a TOU tariff. Also electricity is after triplling in price since 2019. Time over again I would ..... Fit UFH with a willis heater and the option of an ASHP like @TerryE with electric UFH in bathrooms too. Or install an A2A from the start with electric UFH in the bathrooms.4 points
-
You can calculate and design it pretty easily. 75mm rigid ducting is ok for 2.5m/s flow speed so 28m3/HR. Assuming normal ceiling heights and a desired ACH of 0.3 then each pair of 75mm ducts will supply 37m2 floor area. So if you have a floor area of say 35m2 that'll be ok with one 75mm supply and one extract. If you have a floor area of 300m2. Then you'll need 8.1 pairs of supply's and extracts. Manifolds only come in 8 or 10. I would be happy with 8 in this instance as it's pretty close. Then sketch out on your plans one duct to each supply and extract room. Double up extracts for the kitchen and then for the dampest/furthest room until all the ducts are used up. Similar process on the supply side. Easy. Keep sketching until you can draw it without any ducts over lapping. That'll make it easy to install. As for materials, It's all much the same stuff. I would buy the cheapest. About £113/50m roll at a quick Google. Leave space for two of these between the mvhr unit and the manifolds. Install your supply plenums opposite the room door, usually over a window. Install the extracts close but not directly over the source of steam. Say 1-2m away and again opposite a door if possible. These ones are cheap and work fine. For the larger ducting to outside I like the rigid insulated stuff. Nice and tidy and doesn't leak as much heat as the metal. Finally site the MVHR unit inside the heated envelope, with short runs to outside for the inlet and exhaust, where it won't cause noise or vibration issues and can be serviced easily . I wouldn't skimp in the unit or buy something too obscure as you'll need parts in future. Aim to have one with a headline M3/HR of about your house volume. That way at normal rates the fans run at about 30-40%. Bargains can be had. This one is ok for about 120m² floor area. If you post your plans I'm sure we could collectively design it for you in about 15 mins.


 4 points
 -
I worked on a PH project last year (south of England) where the clients decided against any heating and it's been on an ongoing effort to retrofit it ever since. They also based the decision on talking to other people that live in Passivhauses and claim they only turn on the heating twice a year. Be very wary of those sort of claims: the people making them are often highly invested (financially and emotionally) to push the performance of their building. Also just because one PH building does not need active heating it means nothing for the next. ASHP is a bit of a red herring. The question is, do you need heating, and if so where and how much, and then ASHP is one possible solution to that. What is the max heating load and annual heating demand in your PHPP model? This is key. The project I mentioned before had a heating load of 3kW. This can be provided by a plugin 3kW heater - but then they baulked at having 3kW heater on 24/7 through the cold parts of winter (£25 per day). Mains gas or a heat pump are the options to reduce that cost.4 points
-
But an ASHP will do DHW as well with a COP of 3 - 4.4 points
-
Where they are not installed correctly for a passive house. Bollocks. Because people here have proved they work if designed properly 🤷♂️(I know mine did).4 points
-
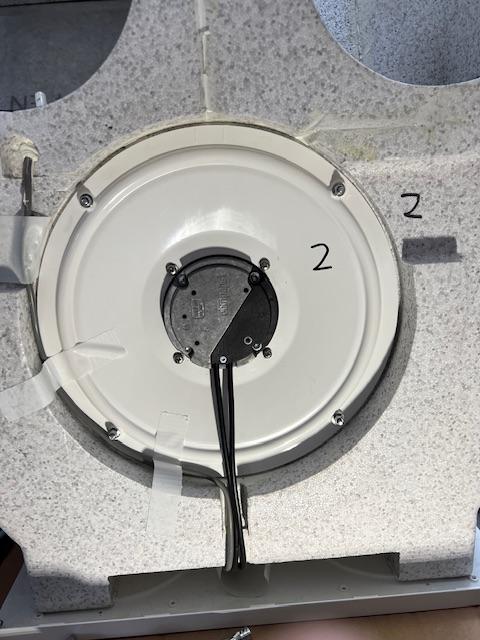
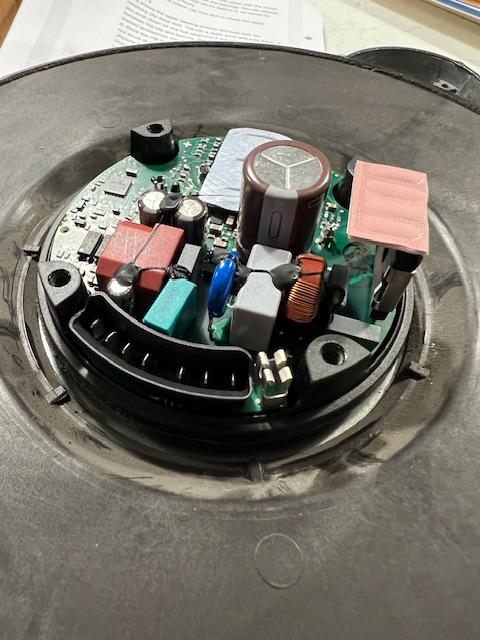
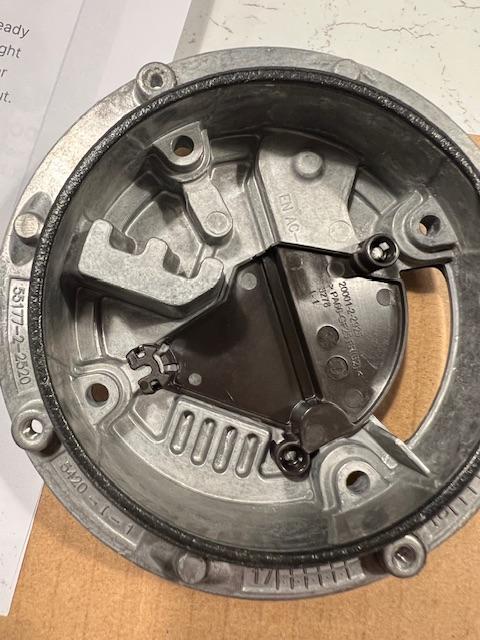
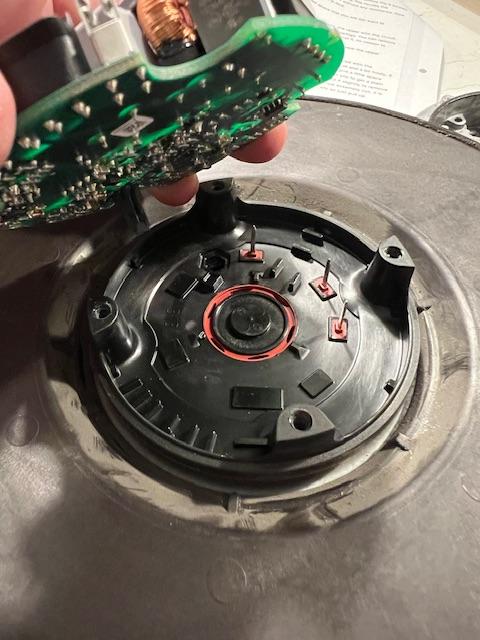
Many thanks to those who’ve contributed to this thread. I’ve just replaced the bearings in my Vent Axia Kinetic MHVR following the directions above. Unit is 6 years old and had become more noisy with some louder squeaking which sounded like a bearing being tortured. I encountered two issues: when disconnecting the motor cover the circuit board was left on the motor - there are a number of pins connecting it to the motor holding it in place, though was fairly easy to lift off and carefully put to one side. The second was that the bearings were a different size than those above! I’ve shown the motor number and bearing measurements from my unit, so a bit of a setback though quick enough to come from Bearing King - I ordered some high efficiency SKF bearings, more expensive though still only £24 for four. Enclosed are some photos of the process - including one of the poor old bearing that had clearly failed (one of the motors was much less free spinning than the other). While I had the unit off the wall, we took the opportunity to clean the vent pipes using a pull tape and home made microfibre “sweep” - photo included for those interested.
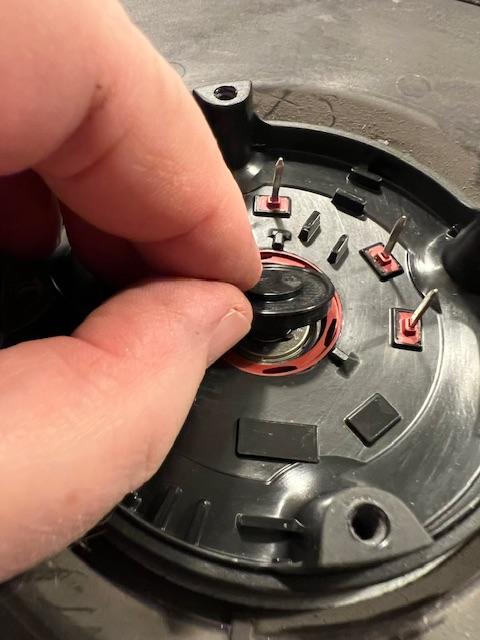

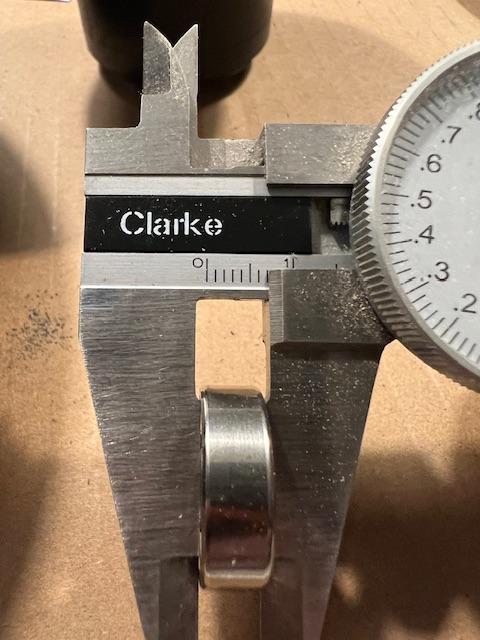
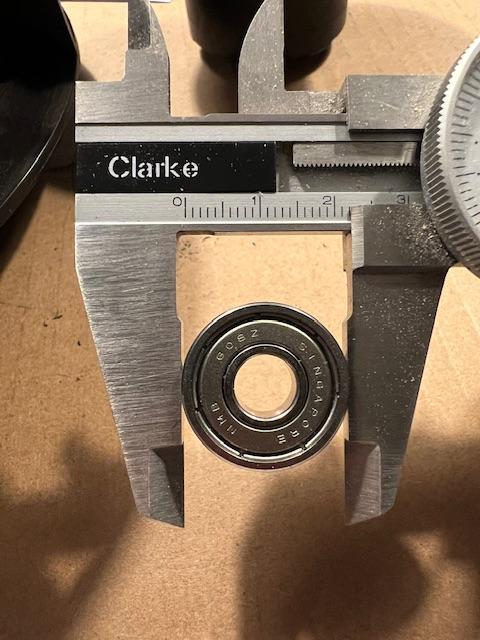
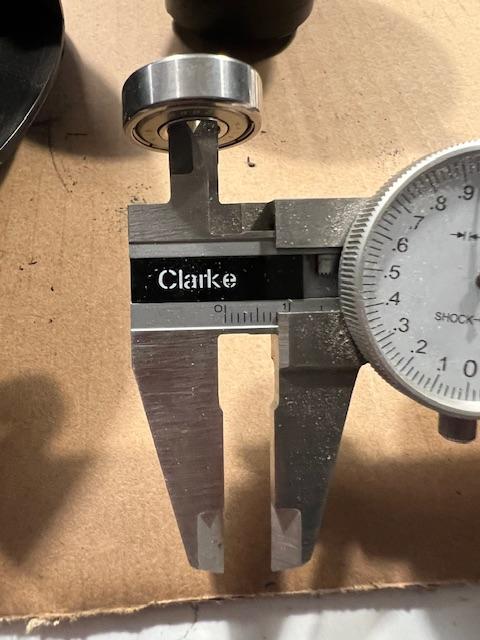


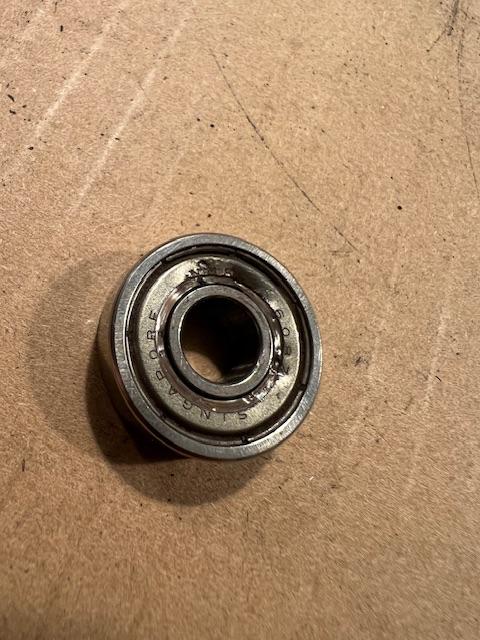


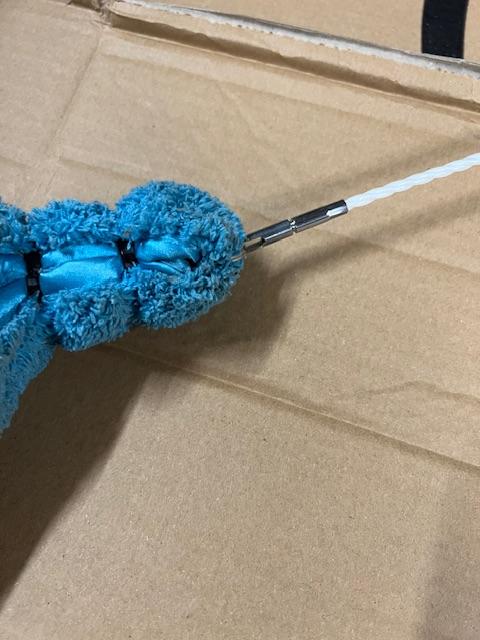

 4 points
 -
I think it has dramatically improved productivity. EG getting the same job done with less time and less people. Take an average DIY project. We get inspiration from something like Pinterest or Instagram Vs trekking to a library to borrow a specific book. Then we research how it's done on youtube and Buildhub. Avoiding many of the pitfalls of doing it the wrong way and wasting loads of time through trial and error or asking our 1 mate who has tried it before. The I draw it up on my laptop in SketchUp, make a Google sheets doc for the quantities. Try calculating by hand the amount of OSB to sheath an awkward roof VS just clicking on the surfaces in 3d model and you'll soon see how much time it saves. We order materials from Screwfix and the merchants on our phones, pay with cards and they magically appear the follow day. No need to take time off out day job. Before we'd have needed to drive into town, go to the bank, withdraw cash, visit the BM, load it all into a trailer and haul it home. Then look at all the amazing things that weren't available to my grandfather at an affordable price that massively speed up building and often enable a job to be done safely by one person. Here's a few I use that springs to mind. 1. Cordless electric tools. Take on a 9*3 a few times with a hand saw and then tell me technology hasn't improved things. 2. Cable ties 3. My mobile phone. I use it for everything. From all the above bits up to "walkie talkie"ing my wife to flick a remote switch or valve while I investigate the other end. 4. Laser levels. 5. Modern adhesives, tapes and expanding foams. 6. Cheap safety equipment like gloves, disposable overalls, dust masks, goggles and hearing protection keep guys out of the sick bed and in work every day of the week. 7. Cherry pickers Vs ladders 8. Cement mixers. 9. Volumetric concrete lorrys. 10. Conputer designed roof trusses. 11. Cranes, including those wonderful truck mounted remote control ones. 12. eBay gumtree etc allow me to afford stuff like ASHPs at a cheap price. 13. Led Headtorches4 points
-
Having now lived several years in a near passive house with it's low heating bills and constant comfortable internal temperature, my view of old houses like this has changed considerably. To properly upgrade it will cost a LOT of money. You either upgrade it, or pour lots of money into it every year in heating. I firmly believe that the market value of old inefficient properties like this should be much lower than a well performing house, to reflect either the high heating bills or the work needed to upgrade it. I am not saying don't buy it, but buy it with your eyes open, and I hope you are not the one owning it when the market finally wakes up and people realise poor performing houses really are worth less.4 points
-
Go to band p eps, they are a manufacturer not a re seller, save a fortune they will cut what thickness you want so you could go 100mm eps 90eps 80mm traditional sand and cement screed. good thickness to keep the ufh pipes well covered and a good lump to use as a big radiator.3 points
-
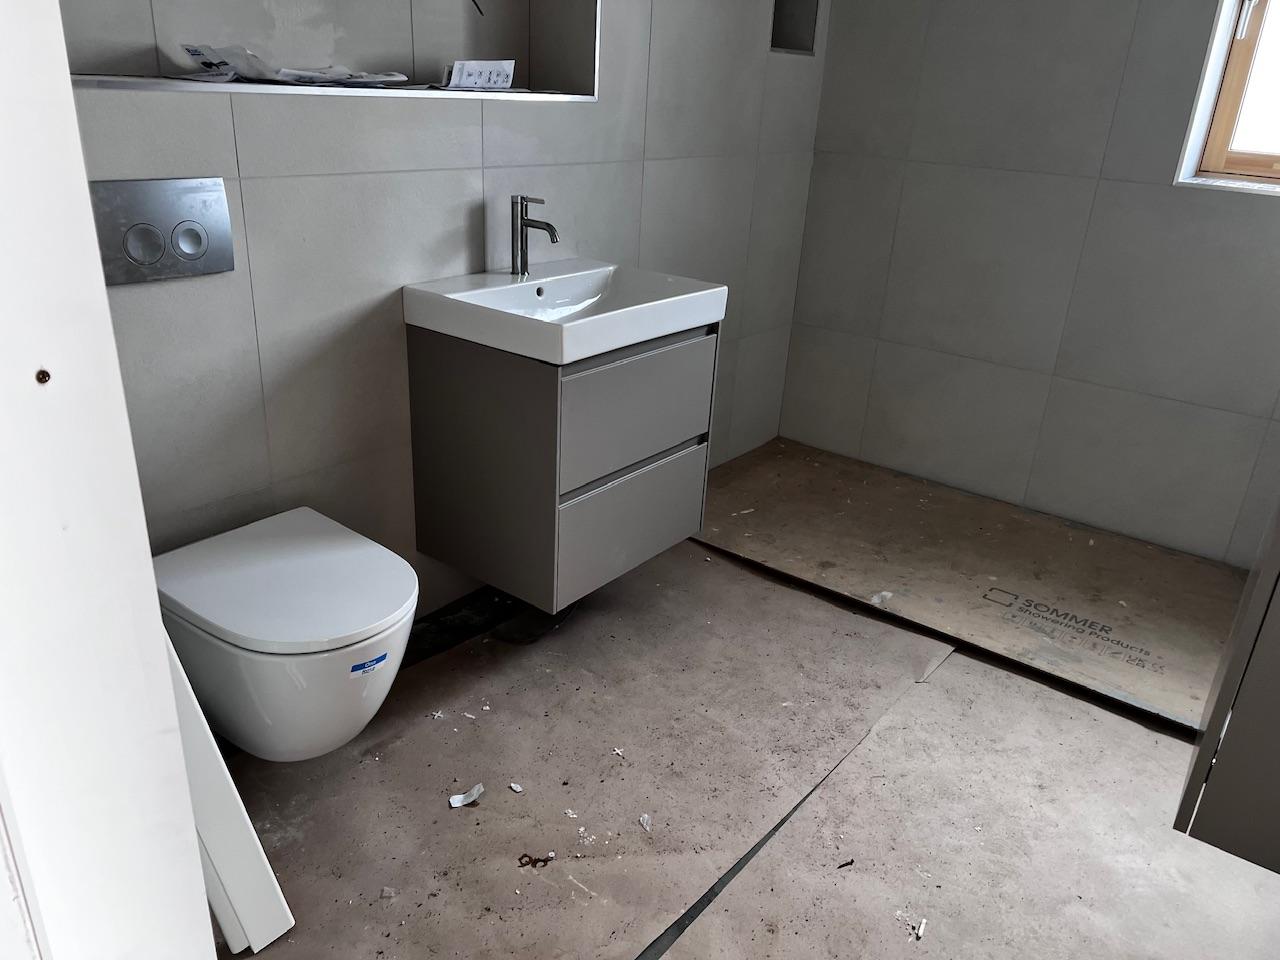
We finally have a flushing loo that isn’t a fly ridden blue plastic box. I claimed the right of jus primae. Shower next so we’ll have one working bathroom. Doors will be finished this week too so we can move in at the end of the month.
 3 points
 -
For completeness it extracts to a duct that attaches to the back of the hob and runs down behind and underneath the cabinet. This was a fiddly thing to put together. A bit like the scene from Apollo 13 where they have to make a CO2 filter out of bits that don’t quite fit. The duct doesn’t come with the hob though so you need to buy that separately and they do different types to suit different installations.3 points
-
Ultra / Mapei / Bal etc are all fine and usually on the shelf in most decent outlets. Been installing bathrooms for over 30 years with all of them, never missed a beat . My 2 cents, do not use silicone for fundamental sealing, just use it as a cosmetic seal; I don't EVER use silicone to seal trays before tiling, instead use CT1 as it is a completely different product without the short service life that silicone(s) tend to have.3 points
-
I disagree. I think it's a knowingly unpopular move led by clear science on particulate emissions. But let's just agree to disagree on this.3 points
-
I think you are into a case "ask 100 engineers and you get 100 right answers". What you need to do, initially, is break it down into important parts i.e. structural forces, thermal properties, looks, easy of construction, price etc. Then analysis each part and how they go together. Some construction methods have developed over millennia and it is only in the last 250 years that post rationalisation has happened. An example of this is one of my favourite discussions about lime versus Portland Cements. They are both interesting and do their jobs well, but many think that the traditional lime mixes are better 'because the Romans used them' (even though the Egyptians beat them to it by a 1000 years at least). Another example is, as you have found out, is to do with cavities. These are a relatively late development and were originally just a rain screen over a solid structural wall. Trial and error, plus improvements in materials and manufacturing processes, the simple wall has changed to a two walls, tied together, with some being single load bearing, other both load bearing, and sometimes filled with insulation. The designs are used differently for different purposes, sometimes it is just decorative, other times it is structurally important. Another area you will soon find out about is the thermal performance, again, there are many different opinions. Some say that you need the insulation on the inside, other say on the outside, this is because while mathematically the U-Value of a wall is the same in both directions, the energy inputs may not be i.e. a heated house may be putting 5W.m-2 though a wall at night, but when hit by bright sunlight it may go to 100 W.m-2. Totally different regimes for the same structure. Then there is air and water tightness. Traditional masonry walls are inherently 'leaky', so putting insulation in a cavity may cause thermal bypass problems or the insulation type may absorb water. This is why internal insulation (on the room side of both cavities) can give a better performance than the same amount of insulation value within the cavity. The same may be true for external insulation, but could be harder to fit because of roof overhangs and window reveals, but is often easier to install because there are no joists or wires to move (this is more about retro fitting than new builds) So basically, it is hard say if there is a best system, it is a case of 'it depends'. All systems can work well if designed right, just as all systems can fail if executed badly (by twat builders). The main things to keep in mind are: Will it be strong enough Will it keep the weather out Will it look right Will it last Is it affordable (the space station is strong, thermally brilliant and air tight) Can it be repaired and modified That is enough to be going on with I think.3 points
-
If you don't use a prepared for- or installed- MVHR how do you deal with humidity and "odours" in the wetrooms?3 points
-
The other "trust the theory" thing, is from the experience of others, I believed my house would be well insulated enough not to need any heating upstairs. So I didn't for any in the bedrooms. Instead I fitted an electric point on the wall of each bedroom for a panel heater if they proved to be too cold. I have never needed to fit those panel heaters and the points for them remain unused.3 points
-
Another point, I stayed in a passive house many years ago before I knew much about them. And like you, thought it was stuffy. The house was empty and we were offered it as workers accommodation for a few days. It was well into the stay that we realised the mvhr unit was turned off, probably because the house was empty before we were given the keys.3 points
-
There’s no advantage to you in fitting a GSHP. Loads of installers have pulled out of the market and are just installing ASHP now. They may make more sense in larger installations or community heating. For near passive house specs it’s a lot of cost for no benefit and more likely more downsides. We looked at it ourselves as we happened to have a spare borehole that we never paid for so I thought it might have been a way to use it. But it was still expensive, added a degree of extra complexity, was possibly too close to our water supply borehole, and we had limited space inside for the plant needed. Arguably even an ASHP was overkill for us. I heated the place for months with two small radiators. Took a while to get it up to temperature but once it was there it was fine.3 points
-
I think we've developed too much of a bias about degrees and the value they actually bring. I've met plenty of non-degree, non-formally trained engineers that will blow the socks of many engineering degree holders in both theoretical and practical knowledge. I also think we've developed a problematic prejudice towards manual work versus the degree holder. I hold a Master's degree, I studied aerospace engineering at degree level (but changed course during the degree as I got bored with the extent of mathematical modelling in front of computers) and then also studied acoustics, thermodynamics and fluid dynamics during a period where I designed exhaust systems. Now I am a heating 'engineer' installing heating systems, gas boilers, doing reparis and servicing part time - I actually find quite a lot of it very rewarding. Now, with all that being said, I do have an issue with the level of training and certification in the heating industry - I think it's appalling. But the problem with that is that is turns from protect to protectionism which becomes counterproductive. There would need to be some careful definition of what engineer actually meant and recognise various routes that can be taken to achieve this. Am I an engineer if I can take a lump of metal and form it to become a useful component part of a machine, whether as repair or new design, or am I an engineer only if I can sit in front of a cad/cam and produce design drawings along with some calculations?3 points
-
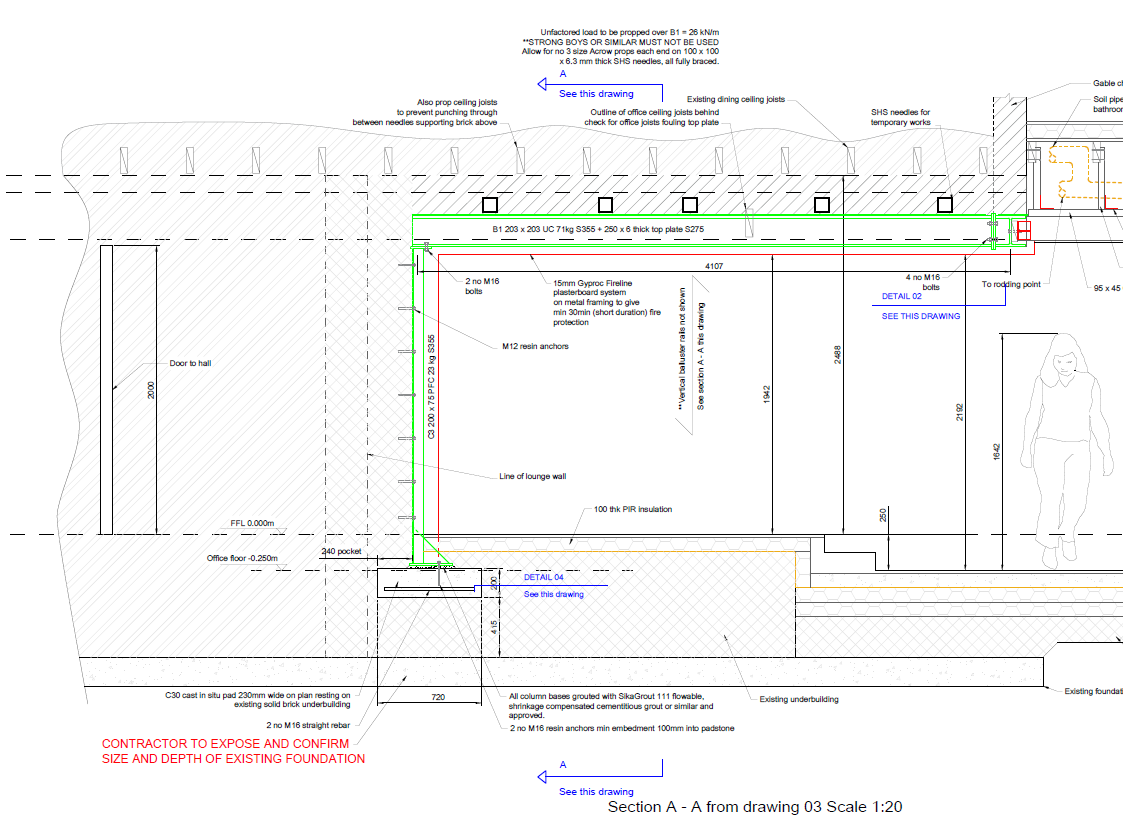
Well done you. As @ETC says annotate this up. Admire what you are doing, if you can get handle on this then the world is you oyster. Here are a few quick comments, some are obtuse but you'll learn this as you go.. don't be disheartened mind. Have a look on the internet for some of the terms I use if not clear. 1/ On the curtain wall where the glass comes down you show a flashing to shed the water outwards. Flashings need a safety lip. Show add that as the manufacture of the flashing will recommend it as a standard, so folk don't get cut on the sharp edge and it weathers much better for example, also stiffens the edge of the flashing. 2/ Make sure you show any mastic and note it as say flexible polysulphide mastic or similar and approved. BC can pull you up on this. Contractors will love you as it gives them room for manouevre. 3/ Your concrete anchors look a bit off SE wise. The two near the glazing are too close together (causes anchor spacing problems at detailed SE design stage, you could have to redraw it all!) and too close to the edge of the concrete.. all will trip you up later once the SE gets going. The two holding the I shaped section down are too long. Show them embedded into the concrete by 130mm. Also show the thread of the bolt extending above the nut by 5mm unless you are using expanding anchors. 4/ I think your mansard roof is too close to the box gutter as: (a) You'll need to get a drill etc into fix it... buildability. (b) The box gutter will have a run on it.. how do you achieve this and make all look tidy at the end of the day. (c) It will choke with debris / moss as the cladding is too close to the bottom of the box gutter (d) You will get spashing back up the cladding which could void the manufacture's warranty. BC regs in the spirit of things like to keep things 150mm above the spash zone. Simple solution.. just lift the cladding clear of the box gutter by 150mm? Ok don't get too hung up on the above. The best advice I can give you is to be brave when drawing. If you don't know something just put a note " to be confirmed" and then say why it needs to be confirmed.. it's ok to say you don't know! Below is a screen shot from a section drawing from one of my jobs. I use red colour to flag up a big structural safety issue and softer colours to pick out the bits that make the drawing easy to read. At the top there is a note where I say "also prop the ceiling joists to prevent punching through.." here what I'm doing it to try and communicate why I want something done in a certain way and what other folk need to do to make it all work. You'll also see how I'm flagging up stuff about temporary propping ect SE wise at the top of the drawing, no strong boys etc. This drawing also has a figure of a person.. bit odd .. I do this as soon as you open the drawing you get a feel for the scale, yes it's not true SE / technical detail stuff but my job is to make it easy for everyone to read an understand what I want them to do. I also dimension where I can the height of the person to avoid later "complications" and accusation that I may have shrunk / increased the figure height to make things look bigger / smaller. @ETC? surely not sir? But other's are not so honest as we know.. some folk alter the drawing aspect scale for planning purposes. The drawings above are telling a storey and targeted to the reader who will be a local builder, BC, the checking SE and the Client who has a technical background. The real objective is.. yes to provide the technical detail and that is what @ConnerR you'll probably get assessed on. But run this by you lecturer and see if they will add marks by using colour, adding explanatory notes which shows that you understand what you are drawing and how someone can take your drawings and build something from them. The annotation notes on a drawing are often as important as the detail. I'm not talking about the massive long text list down the side of the drawing.. more the annotation. I use arrows as the reader can see what I'm pointing at! It takes a bit more time but helps avoid errors. Contractors are busy folk and don't have time to read pish. Below is a bit of a fascia detail from the same job. Again I'm using colour and notes to try and pick out the important bits on this drawing. Also see how I offer alternative warm roof fixings to the Contractor but make it clear how I want them to penetrate the timbers. I use a technique to denote things on the near side and far side.. steel fabrication drawings often have this annotation. But if you do this you need to have a text box that explains the annotation.. It can be a good tool as it declutters the drawing if the annotations gets too congested. Below is a totally different style of drawing from the same job but using a specialist steel designer software package. It's two fabrication drawings for the steel fabricator..who take no prisoners if you get it wrong! The first is a general arrangement 3d drawing, the second is what is call an assembly drawing of beam B2. Beam B2 I hope the above gives you and insight into how we communicate by drawing what needs to be done and the different syles / ways of doing it. Keep posting as you make progress with your studies and all the best.

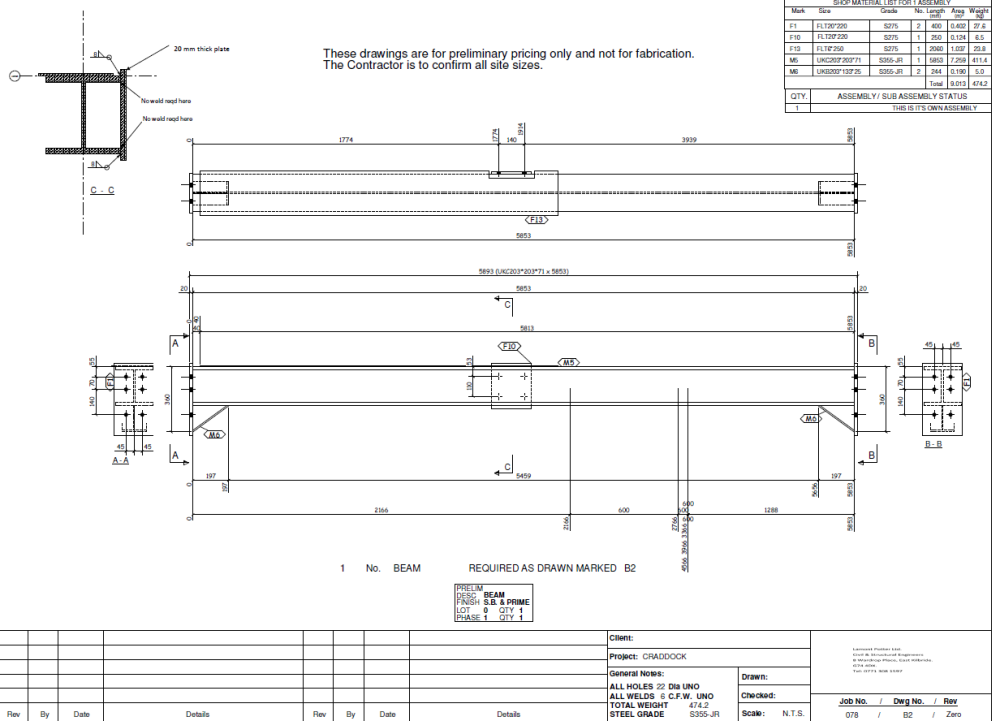 3 points
 -
Only for offsite systems or kits. Stick build is a load of timber from the BM and will come on account or with credit card guarantee. Plus it is from stock so can be bought just in time. ditto masonry.3 points
-
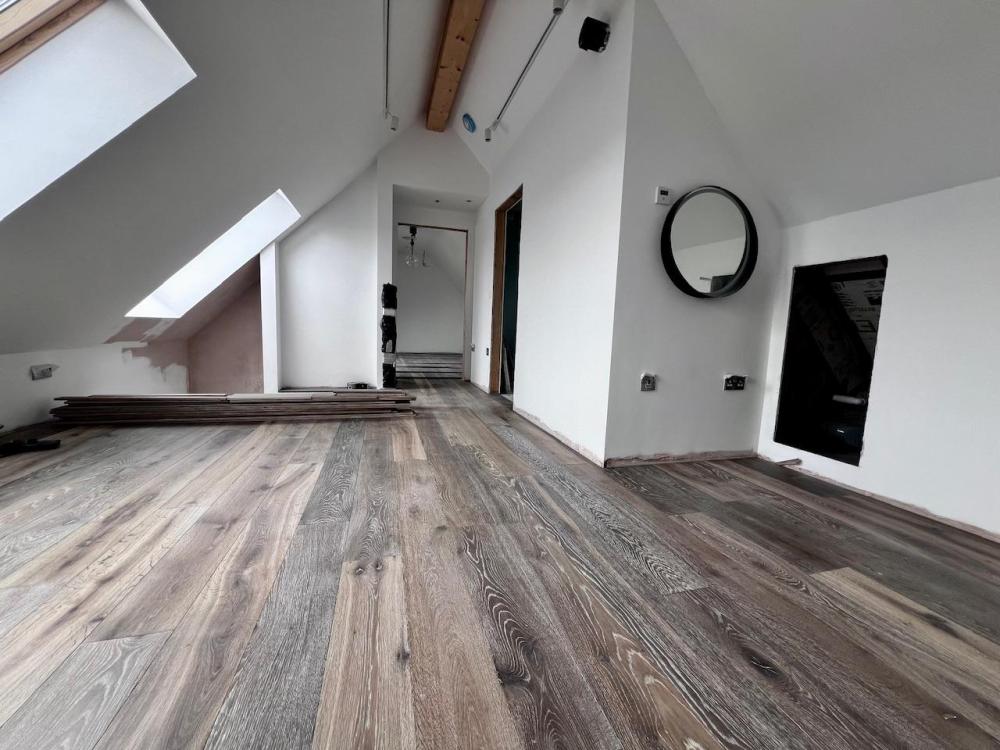
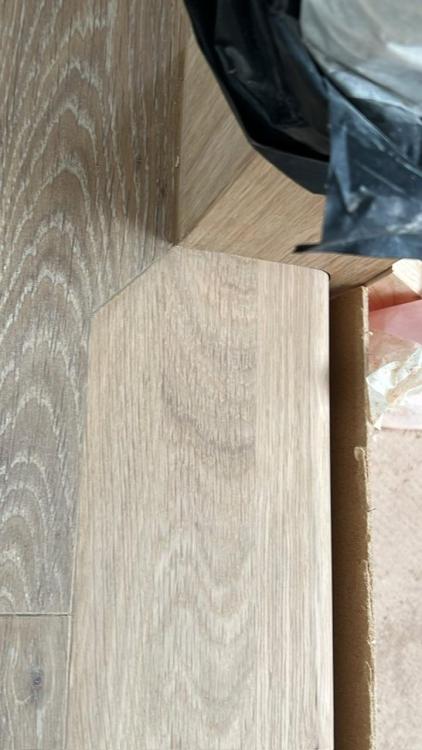
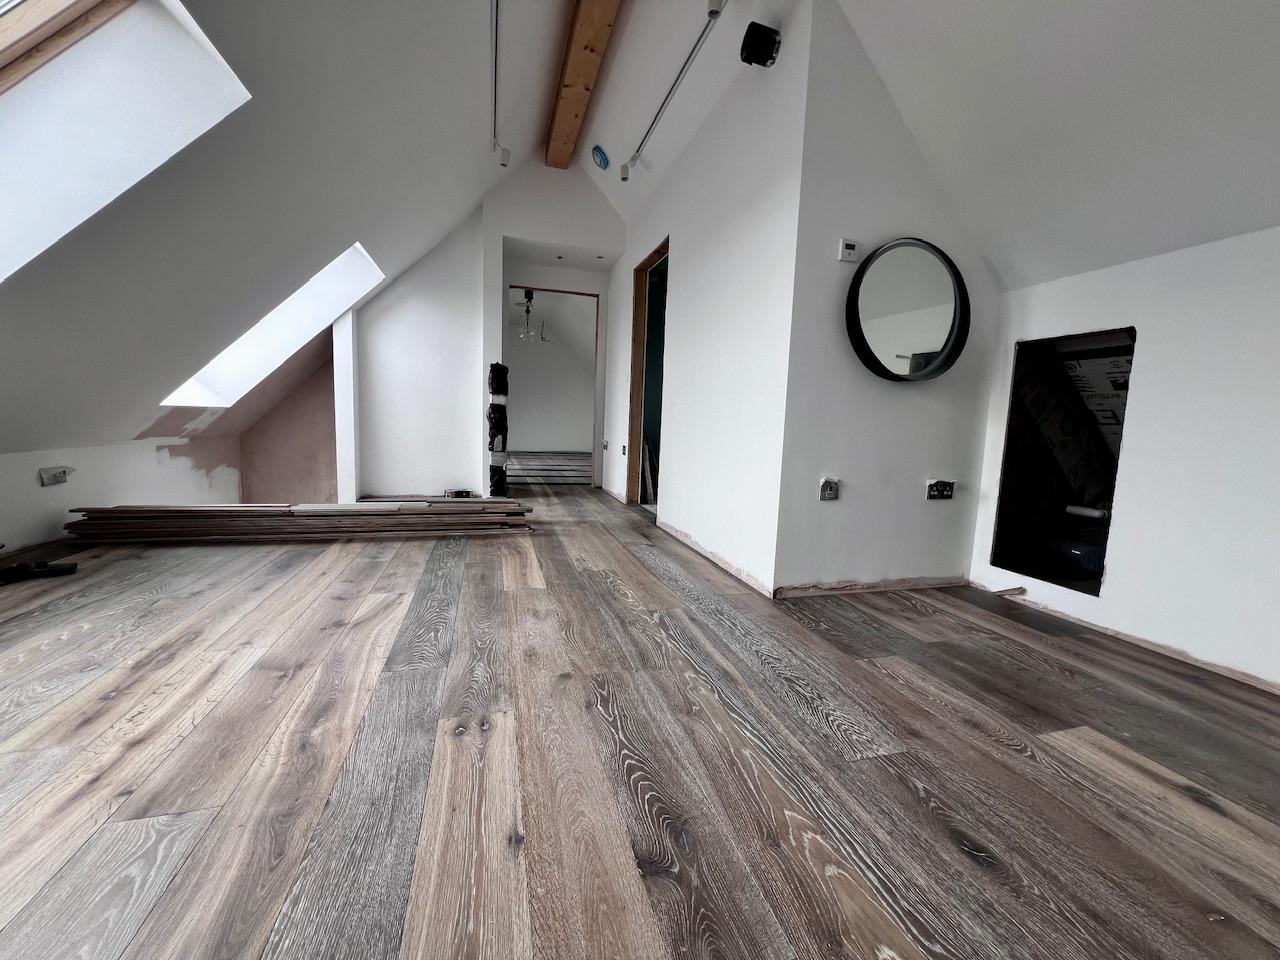
Very pleased with our wood floor upstairs. It’s not as dark as the picture shows. The second picture is how it matches against the top tread of the staircase which is yet to be oiled. It’s clearly going to be different but I’ll get it close based on some trials I’ve done. Also just about finished the bathroom downstairs. I have the loo, sink and vanity unit to fit this week then the complicated looking shower! The doors, linings, architraves and skirting arrive this week so we are getting close! End of May is the plan for moving in. Stupidly we are also doing the Cateran Yomp (54 miles in 24 hours) which is on the 8/9 June. We did it last year and I can barely walk for two weeks after it!
 3 points
 -
Hello. I am an MVHR Designer and I thought I would weigh in on some of the posts made, as I think they are a bit misleading. This is incorrect. Where i-joists are used, rigid ducting is the norm. The major advantage being the ease of cutting holes in i-joists, and the amount of holes that can be made (following guidelines on the data sheets). People often think of semi-rigid (flexi) ducting as space saving, but clearly with this type of joist you would require far more holes because there are far more ducts. A good designer will ensure the guidelines for holes are not breached. It is straightforward to cut duct with a hand-held grinder, even with a 1mm cutting blade. See my post above, rigid ducting is the norm where i-joists are used for the floor structure. 28m3/hr down a 75mm duct is fairly standard for a lot of companies, however, an optimal design will use two ducts for this flow rate (or higher). Bearing in mind that lower air velocity = lower pressure = lower sound. Most people would rather spend a bit more, have more ducting etc to have an inaudible system, over saving a few quid but having a system they can constantly hear. This is generally true. Rigid steel ducting tends to be lower pressure/sound. Semi-rigid does get unnecessarily harshly judged in my opinion. I have designed perfectly good systems for Passivhauses. In my experience it is due to many early systems being in semi-rigid, and were poorly designed and/or poorly installed. Even though it is straightforward to make connections airtight, I see more often semi-rigid systems with leaks due to improperly connected ducts to manifolds, plenums, etc. With rigid steel duct you just push it together once and it is airtight. And lastly the high volume of air many companies design for each duct. When I design I aim to put less than 26m3/hr down a 75mm (ID) duct, and less than 18m3/hr down a 63mm (ID) duct. To the OP, it looks like a nice system.3 points
-
Thank you for that, I might have a word and see if they can offer something for us.3 points
-
This is a copy of Andrew Jones's on stage presentation at The Home Building & Renovating Show in March 2024 at the NEC (Suggest you watch on youtube) -3 points
-
My justification was, I am earning, if I don't spend on this, it will go on rubbish elsewhere. The spend now, while I can afford it, is a reduced utility bill when I can least afford it - retirement. It's a better return than a same money in a pension pot.3 points
-
Yes, an extractor to the outside. It's through a gravity flap which has a rubber seal on and is pretty airtight, certainly not entertaining any backflow. It will very rarely (depending on wind direction) flap open briefly on very heavy gusts and so I've considered going to a motorised damper, but it's just not bad enough to really worry about...3 points
-
When I signed the contract for our timber kit I hadn’t fully appreciated the financial exposure we’d let ourselves in for. It wasn’t clear in the contract that for several months the timber kit company would have 80% of the total kit price. I tried to get them to put some kind of financial protection in place in case they went bust and despite them saying they would look into it they never did. Fortunately it turned out fine and the kit turned up etc. However during that period three companies went bust with clients losing significant sums of money (some documented on here) so my fears about it were real enough. There are a few kit companies that put your money in Escrow so you have protection and I’d only do it that way in future or stick build on-site as I’d at least own the materials regardless.3 points
-
Recirculating cooker hood with carbon filters and MVHR extract vent nearby but not directly coupled. Boost the MVHR rate while cooking if you want to.3 points
-
I would never mount a CU on plasterboard fixings. Mark out the exact size of the CU on the wall, cut that shape out of the plasterboard, and extend the cut out sideways to reach the centre of the adjacent studs. Fill your hole now with a sheet of at least 12mm plywood, securely fixed to the adjacent studs. Fix CU to plywood. I would probably even attach a batten to the inside of the plywood in line with the mounting holes so the screws can go through the plywood into the batten. Fill joints and paint plywood.3 points
-
To make sure the roof leaks in future I imagine. 😮💨3 points
-
WHAT temperature does she need to be comfortable? In a well insulated house, forget the concept of fast heat. A properly well insulated house will keep it's heat for a very long time, so forget the old concept of turn the heating on in the morning (when you might well want it to heat quickly) and turn it off at bed time and let the house cool down overnight. A well insulated house simply does not work like that. It heats up and stays warm. So just choose what temperature she wants and set it. It does not matter if on first heat up it takes a while to get there. It barely cools down any overnight so takes little time in the morning to heat up again. Or just leave the ASHP running 24/7 just controlled by a thermostat.3 points
-
See Also I guess Granny is not going out much so will need heat 24/7 so I think most ASHP and UFH works on the principle of constant temps not neat up and cool down. Therefore a well designed ASHP system will work with additional Granny’s instant heating.3 points
-
I had Part O calcs done for £200. I will DM you details.3 points
-
All plumbing done. You can just about see our tundish behind the new OSO UVC. The small extension to the consumer unit contains the 240VAC power relays to switch the Immersions and the slab Willis and pump. Everything neat and tidy. Jan is a happy lady. We've also had a couple of deep baths to celebrate. Still got to tidy the last power lead. The shelf above is my "network rack" 🤣
 3 points
 -
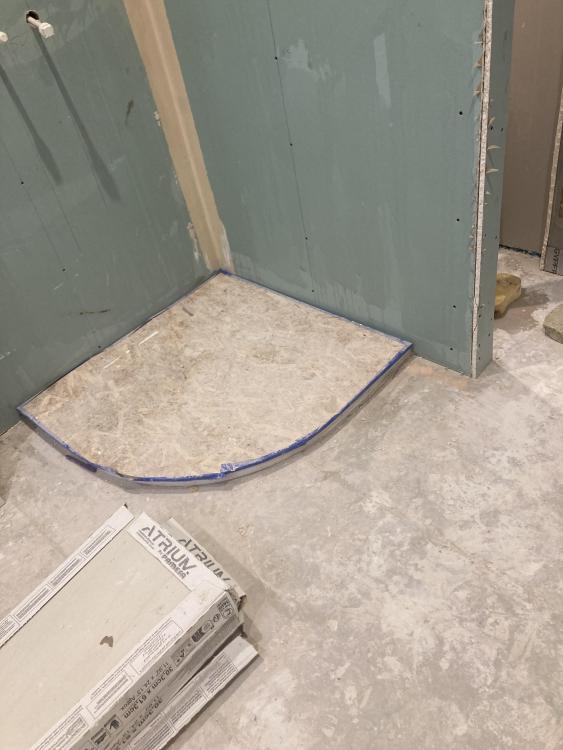
Yes get your shower tray in and protected
 3 points
 -
Well, when I have done a cut roof I use the “template” one and make sure it fits everywhere first, if you offer it up and it’s 10mm out make that adjustment for that one (not that any of mine were out of course 🙄)3 points
-
I guess it depends where you are. Up here in the Highlands no passive house will be comfortable in winter without any heating. My ASHP bills are not huge, and it is completely controlable including OFF3 points
-
I have always held the view an electric boiler is a solution looking for something to solve. If you are going to heat the house with electric resistance heating, just fit individual panel heaters, controlable room by room. An electric boiler just adds complications and cost to achieve the same aim (if you are lucky) of heating the house by direct electric resistance heating.3 points
-
Depends where you are and your climate (you price in € as the only clue to your location) Under floor heating from an Air Source Heat Pump will be the cheapest "electric" heating. Roughly 1/3 the cost of direct electric heating. And it can heat your hot water as well.3 points


This leaderboard is set to London/GMT+01:00