
Leaderboard


Popular Content
Showing content with the highest reputation on 12/20/21 in all areas
-
And put a couple of small desk fans in there, running 24/7 and oscillating, to keep the air from stagnating under the units.2 points
-
We left you with a poured slab and we were chomping at the bit to get the ground floor Nudura walls up before the end of the year. Well, I am glad to report we got there - almost ? After getting the slab done, I figured I'd get ahead a bit and it would be a good idea to talk to someone about the waterproofing we would have to put on the outside the walls before we started backfilling. To cut a long story short using waterproof concrete in walls such as these is a complete non-starter, so Type-B waterproofing cannot be used. Visqueen's R400 Radon barrier is not an effective waterproofing method and so we now face having to use a Type A and a Type C waterproofing method - basically this will mean for us a waterproof screed being added to the floor with channel ducting where the walls meet the floor and the "egg-crate" plastic material across the screed and up the inside of the walls. That should eat into our contingency ? ? ? But also it meant a dash to get some waterproof slurry to paint round where the Nudura blocks would be laid the following morning and mixing and painting it on under floodlights (it's the dark grey stuff in the picture to the right). Oh what fun!! But, the following day we were up early to welcome out walls, the bracing and two fine chaps (Louie and Harry) from The Fell Partnership who would be helping us Day 1 to get the first row in place. We then scurried around unloading things off trailers and flat beds, and installing the waterbar between those pieces of upright rebar. By 10am we were ready to go. By about 2pm we had most of the first row in and part of the second row (see below). If it hadn't been for some non-standard corners in the design, we would probably have been at Row 3, but that's what you get for following a design religiously ✝️ (FYI - the T-corner is all to do with the design - don't ask yet) On the second day we were left to our own devices, I had to make a dash to collect some extra Nudura parts and some waterproofing equipment (due to the direction our waterproofing system now had to take) so we made a later start but still we were very pleased to get up to 4 rows installed. Day 3 we were ready to begin installing all the bracing system, and after hitting her head SWMBO was made to wear the Christmas present from her children. and on Day 4 it inevitably rained in Cornwall ? , but before our help arrived again we had managed to just squeeze a block on to Row 6 (the final row before the first pour of concrete) After the help on Day 4, we continued to finish things off on Day 5 by constructing part of an internal load bearing wall, and a wall with the only window opening at this level which will be for the family bathroom. FYI - the rest of that side of the house will consist mainly of windows into bedrooms plus some extra small sections of walling (to be determined) Where we were not able to complete things before the pour happened (time didn't allow) was where the internal wall meets the external wall and there are two doorways to construct (this is why I said we almost made it). I will have to do these in the New Year, mixing and pouring the concrete by hand (just under 1 cubic m) so that'll burn off the Christmas pudding ? A week later (during which we had some more high winds) I came back down to finalise a few bits (like lack of scaffold planks and bracing in some places) to be greeted by a snaky ? wall. so that was all straightened up, the rest of the bracing fitted, and the Nudura joist hangers inserted. (Between straightening and the pour we had Storm Barra, but my remedial work held up nicely) I won't bore you with pictures of hunky men doing manly stuff with concrete pumps etc. but suffice to say it all went very well, with no leaks or blow outs so "he who shall not be named from Channel 4" would have been very disappointed if he was allowed onsite. And so, last weekend (after a midweek pour in the remnants of Storm Barra) I was able to deconstruct the bracing and we are now the proud owners of some freestanding, high-wind-proof walls. Really happy at the attention to detail that Louie and Harry paid to ensuring the walls were straight and true before the pour began - right up my street. So now we have a tidyish site again (for a short while) ready for steels installation in the New Year. We have to finish off the internal wall, then waterproof and backfill outside, and install joists and flooring before we can continue with building the upper floor walls. We're hoping that by middle of next year we can start on those upper floor walls. So until 2022, and the inevitable next lockdown, I wish you all a very Merry Christmas ? and a Happy New Year ?1 point
-
Sounds a pain in the arse. ? I have different roof overhangs on an elevation. No hip though mine ends as a glazed gable with big overhang. But you could do a angled soffit to make it work, that's what I have but mostly for the look, I didn't want pork chop soffits box ends.

 1 point
 -
Draw the soffit first then the rafters then decide how to support the rafters above the inner skins of the walls1 point
-
Houses should be symmetrical. Simple, clean design is a winner.1 point
-
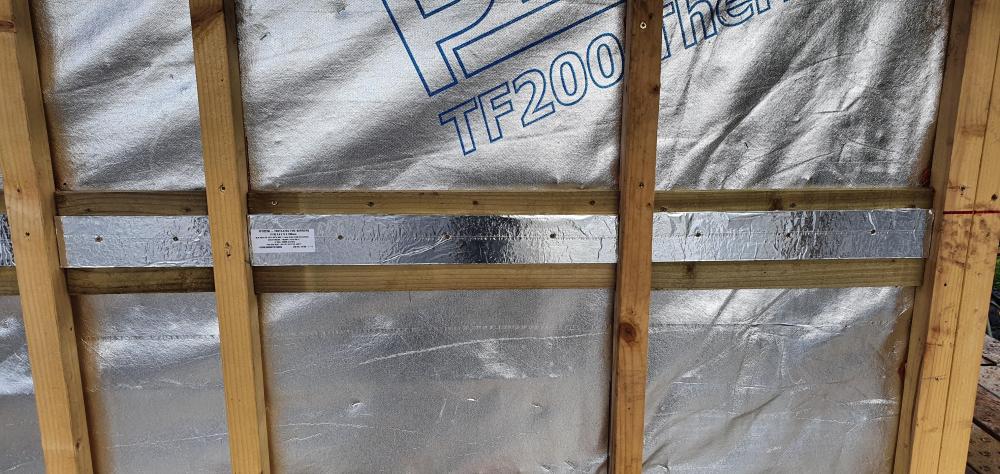
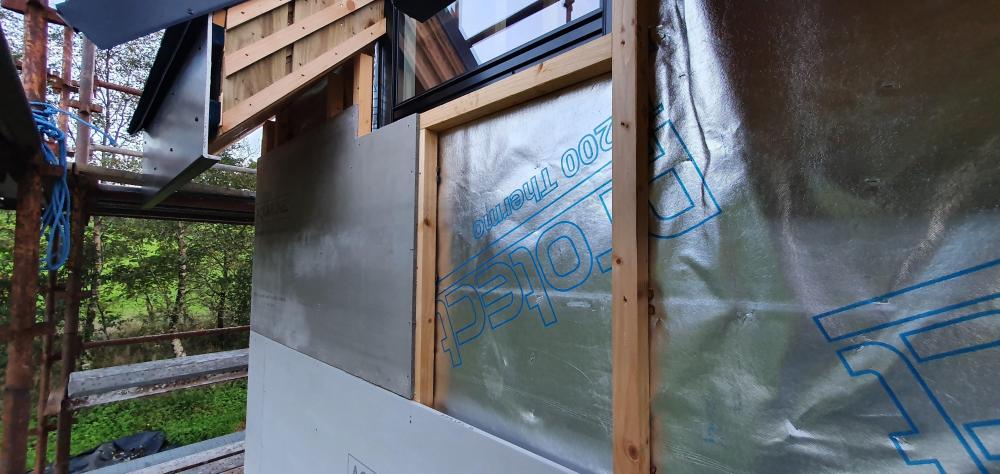
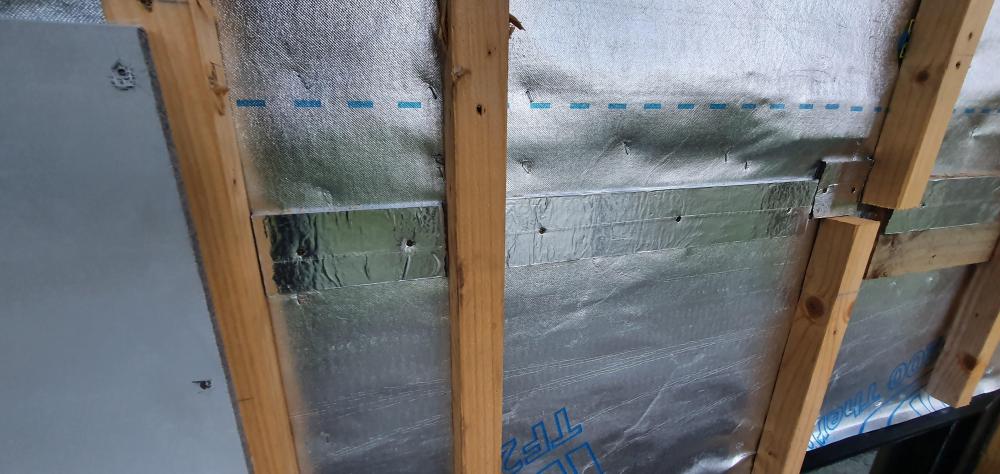
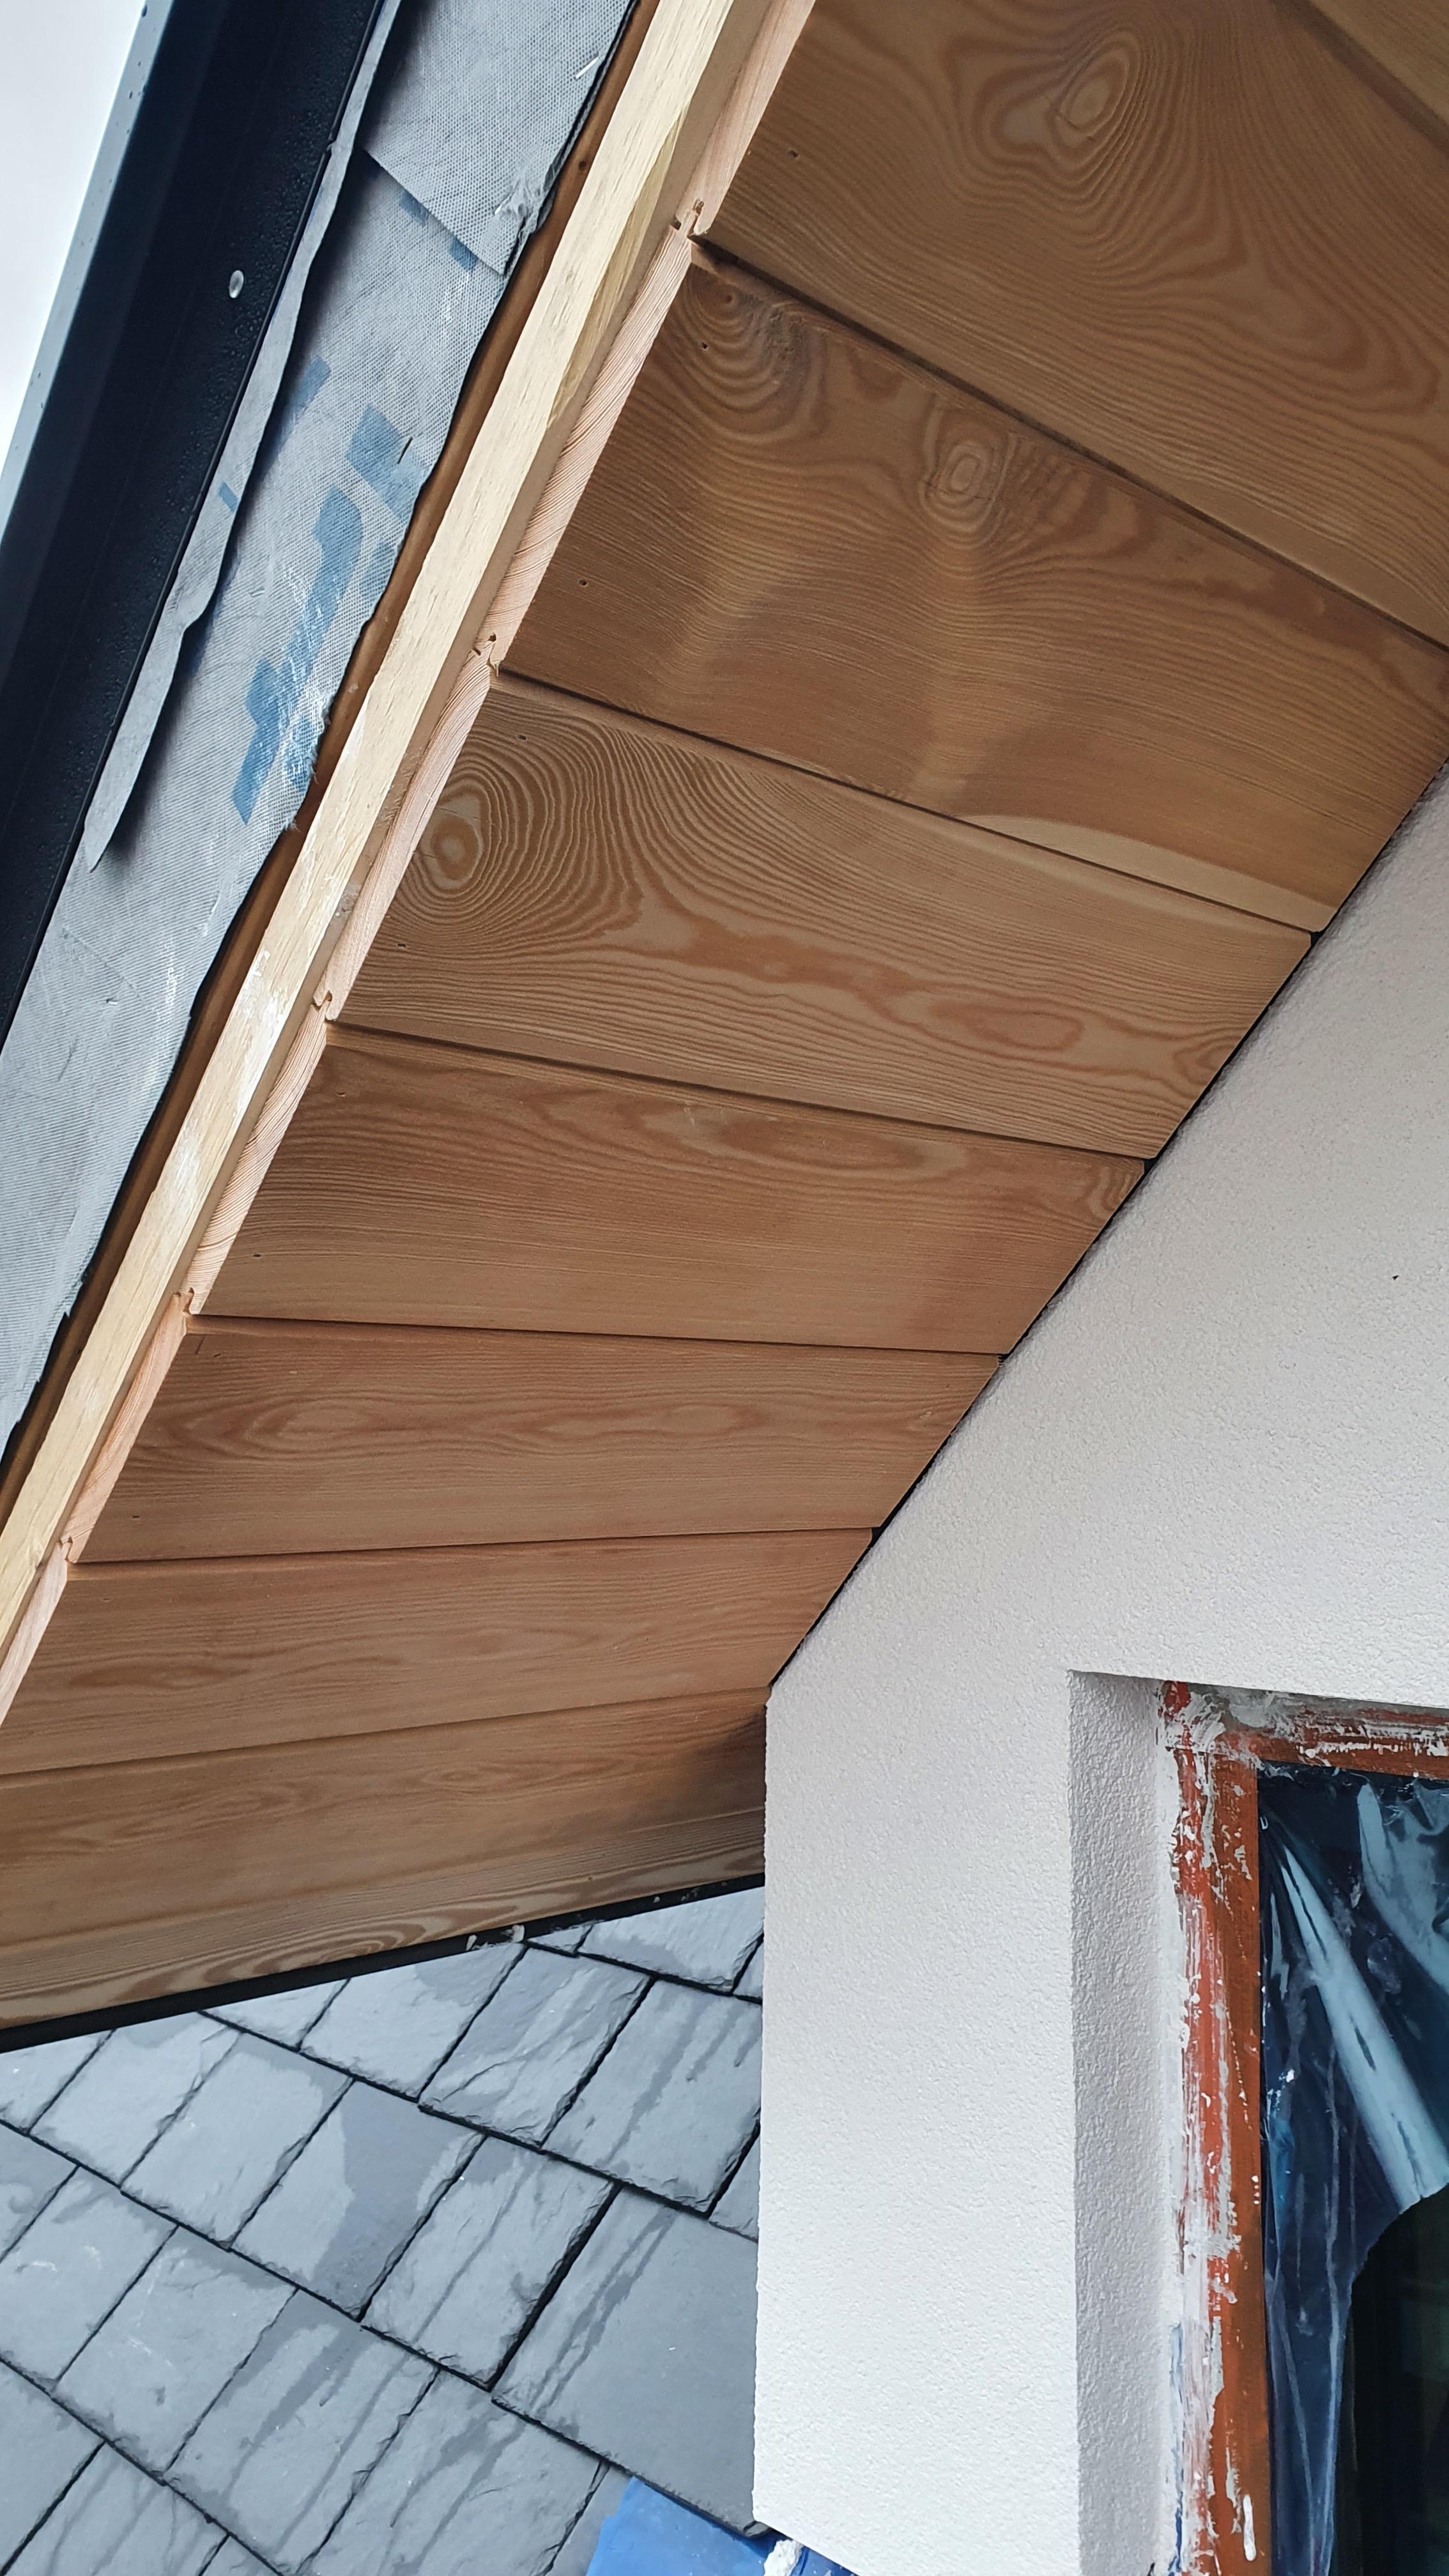
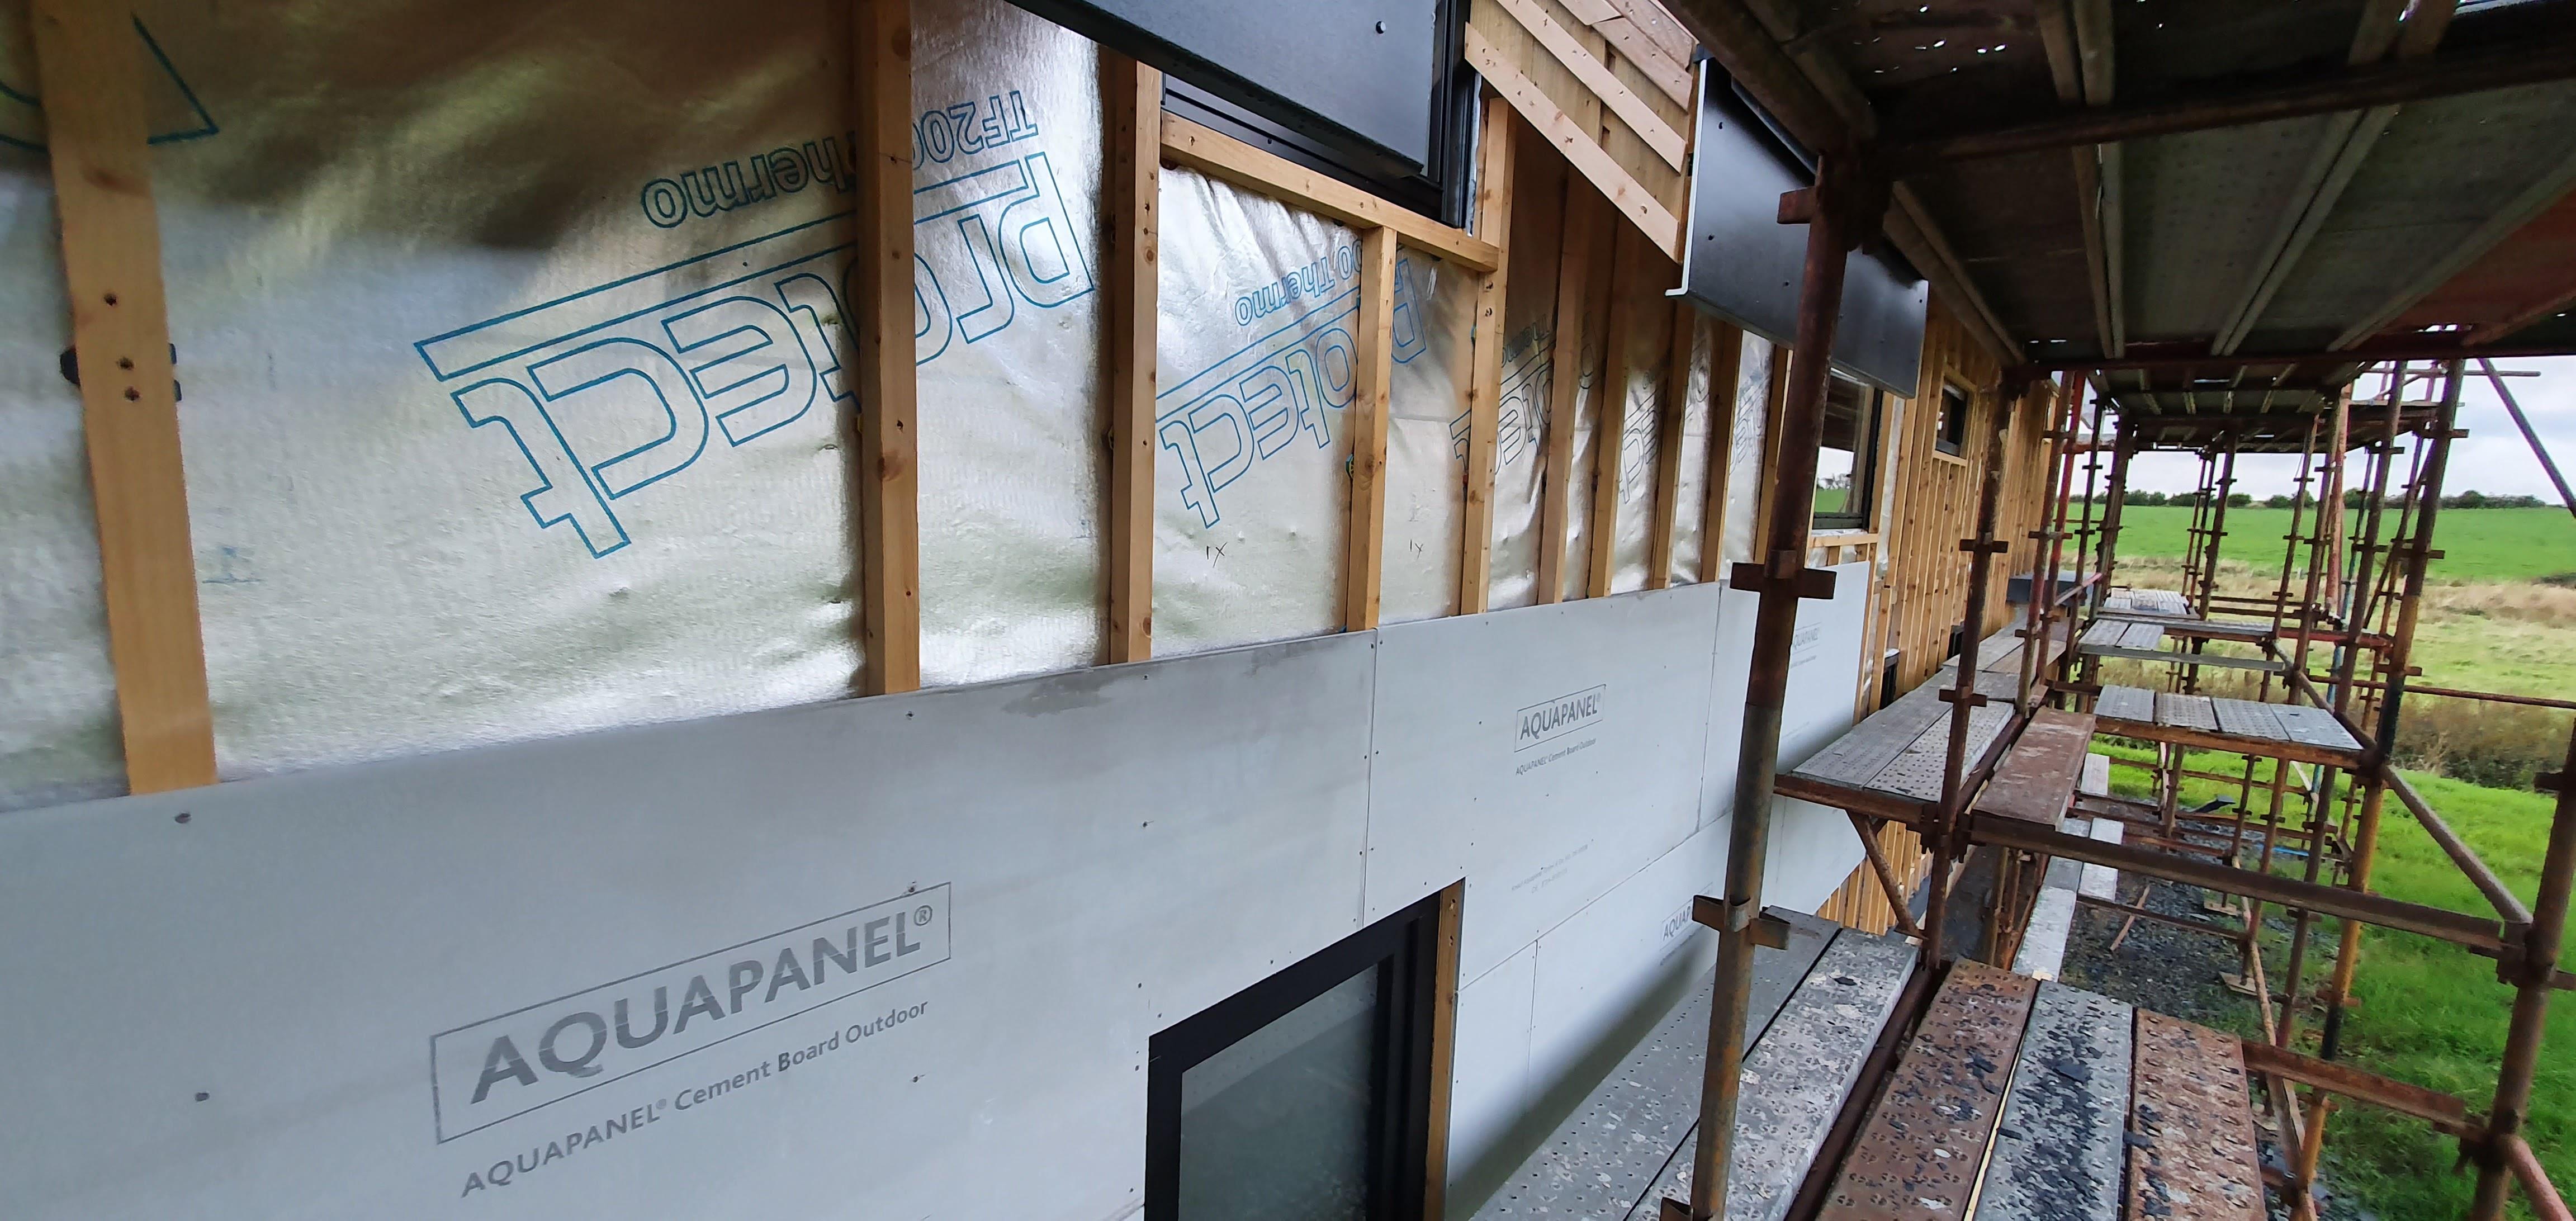
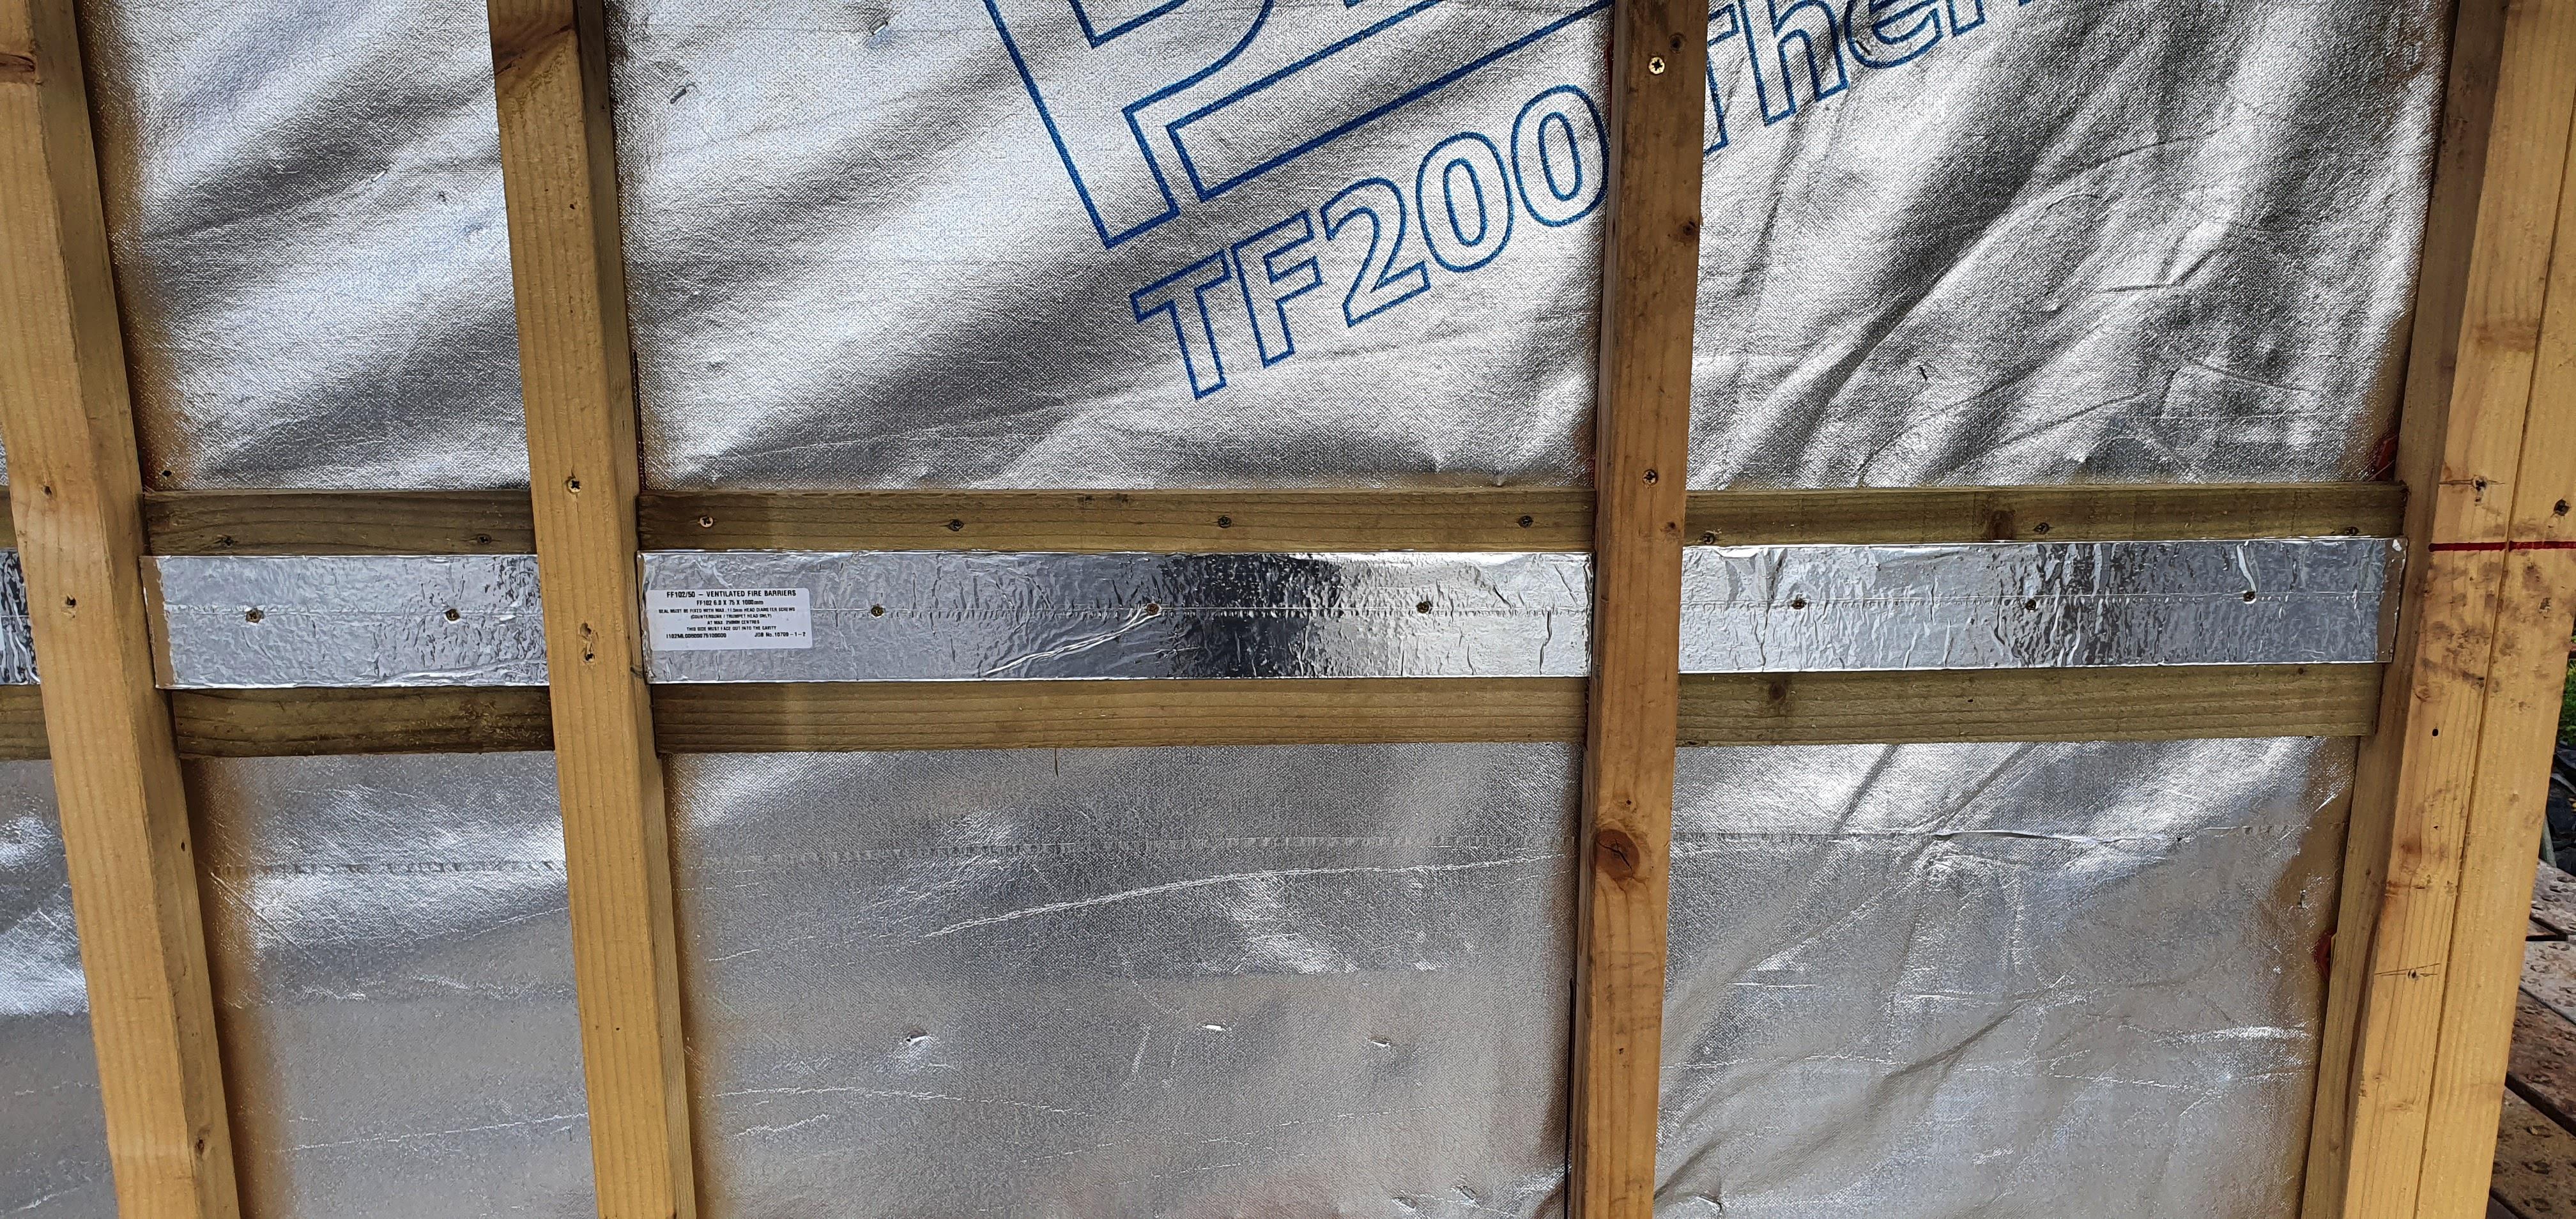
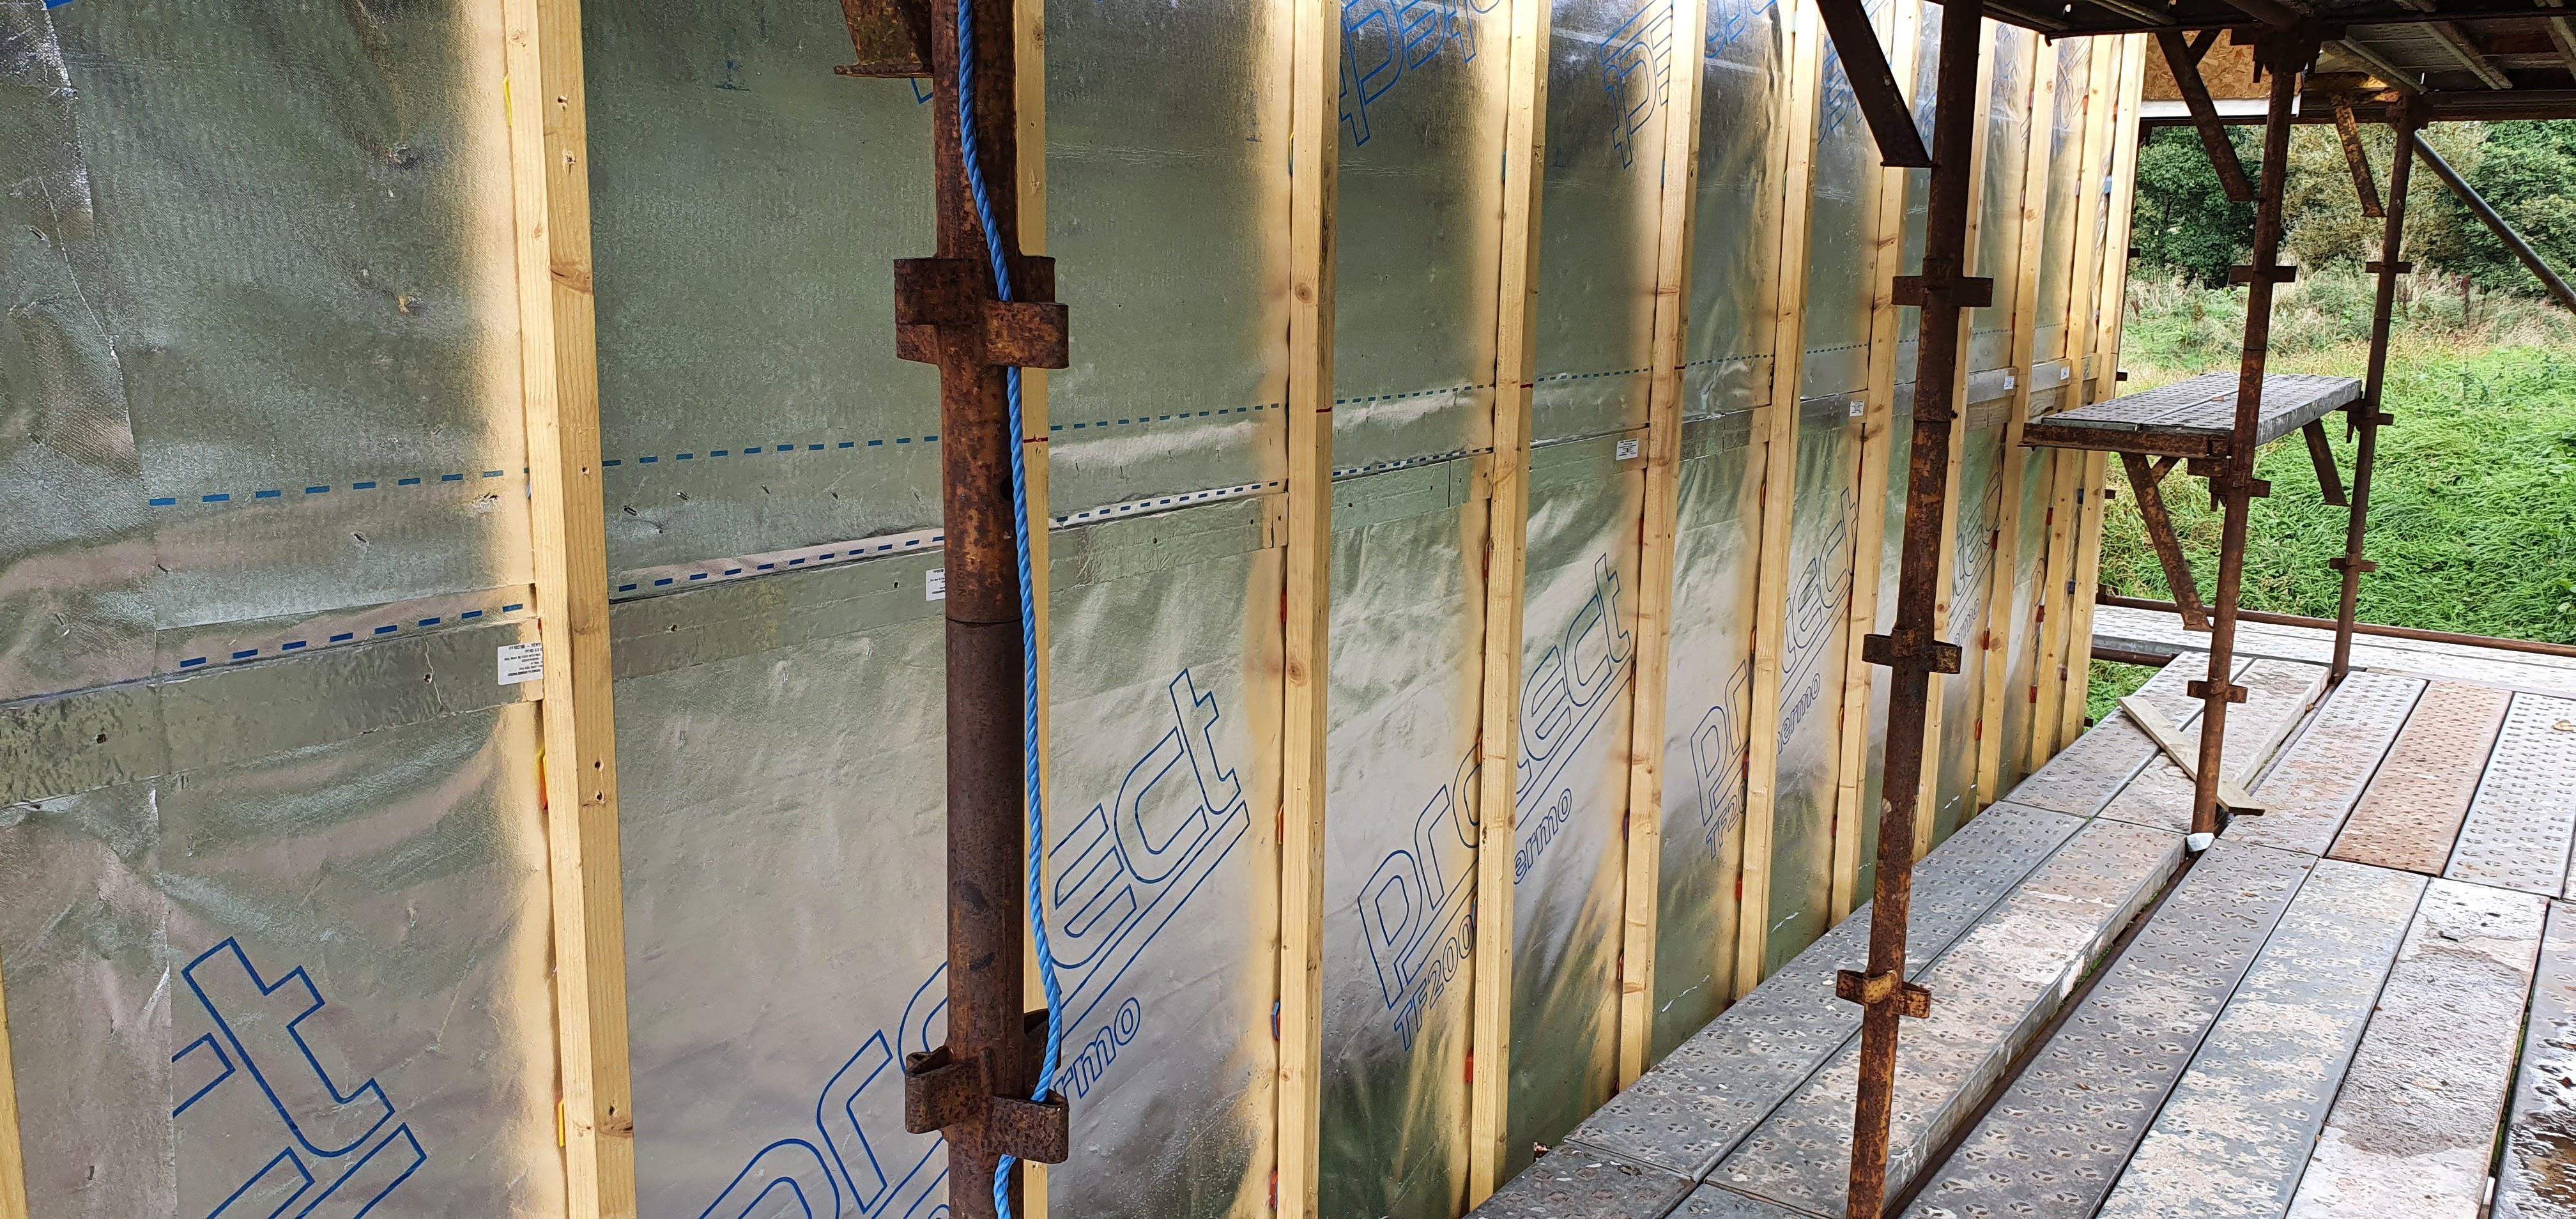
I spent considerable amounts of time trying to rationalise the rules as both the handbook and the images in it are not very clear. I'd visited others and found they had cavity barriers actually at the base of the cladding, between floors and also at the top of the ventilated gap- which seemed insane. In agreement with my BCO I have one single strip around my main house between ground and first floor, which would stop a fire in the ground floor reaching upstairs through the cavity theoretically but should also be stopped by the window firestops from coming in the cavity. I didnt need at the bottom as it's a slab and the didn't need at the top as it's a SIPS kit and I have fully vaulted ceilings so no loft space. I did add it at a point where I added loft space over the kids rooms as technically it's a new compartment. I didnt add anywhere the top of the cavity I don't need it as I dont have standard eaves where it could get into that loft space as its a SIPS overhang and solid. I didnt add anywhere around on my single story vaulted space as its double height but the same space so no compartment to transfer into. Of course all around the house horizontal travel is stopped by battens and where the battery wasn't straight I used Firefoam to fill gaps. I mounted the intumescent barrier straight on the kit where the void was small enough, but some areas the void was above 44mm and that was its rated width so I mounted on 22mm sarking to close the gap to within tolerance but maintaining the ventilation gap. some pics to help. You have to look close to see the barrier as it's silver. It's not in some pics, just battens.


 1 point
 -
Anything other than replacing that ducting would be a bodge, and defeat the object of the better fan. Changing the corrugated to a solid plastic pipe would make more difference than increasing the corrugated size, or any mix-up of old and new. The new plastic pipe would go in the same hole. Maybe just maybe you could push a new 100mm pipe in from the outside, if there was a gap in the insulation. OR Use a rectangular duct in the kitchen as it looks a bit tidier than round. BUT for a proper job you have to lift the floor, then use a 100 or 150 solid pipe. The hole in the wall is the easy bit once you decide what to do.1 point
-
Picture of the bulkhead in the kitchen? That floppy duct that is there is about the worst sort you can have. I would replace it with 110mm rigid (drain pipe) but you will really need access into the bulkhead. That is going to be one hell of a noisy cooker hood, just what are you cooking?1 point
-
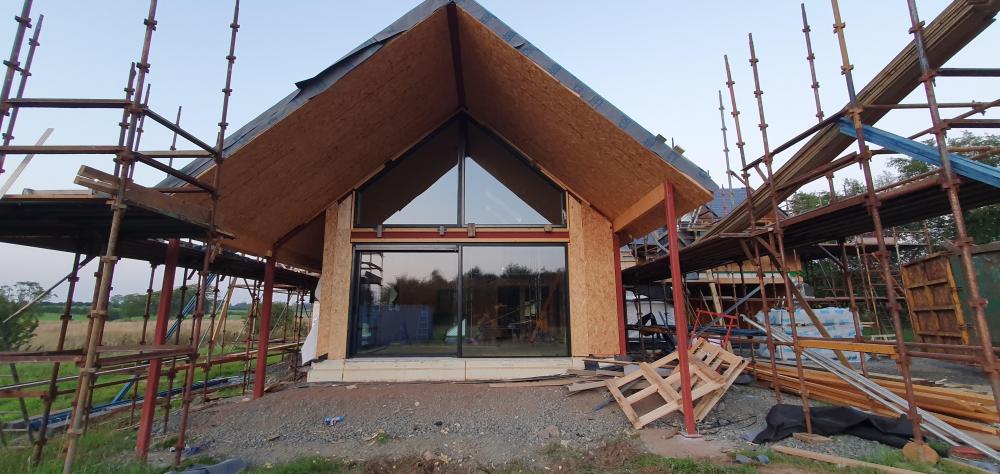
Call me mr boring but I just love the symmetry of the whole house. The oak porch just makes it come together. What’s up with the window on the right?1 point
-
Perhaps build a motorbike ground anchor or two into the slab somewhere or even just tie a knot in the end of some chain and put that in the concrete.1 point
-
My point was that they are uninsulated and still score better than @Marvin's place which is highly insulated.1 point
-
roush stage 3 0 60 Plaster boarding mostly complete opted for acoustic boarding in the utility and in the airing cupboard1 point
-
I would not fancy tiling once the units are in. This is the second one of these kitchen onto damp screed topics this month. I think it is best to delay the kitchen install. Get the floor tiled and grouted first.1 point
-
A little 5kw ASHP would suffice, if a big enough hot water tank was fitted, and the heating load was equal to or lesser than, it would simply take much longer to recover after depletion. Why a GSHP? Seems a massive ball-ache and no support from RHI = big capital costs and a far longer break-even period. ASHP seems far more practical and attractive for a number of reasons. Forget solar thermal, go for more solar PV as ST is a PITA to own and maintain, has significant losses, and is a one-trick pony. PV can be converted to heat with an immersion, and when the tank is satisfied the excess electricity can go towards the house base loads. ST just heats and heats, and then carries on doing that all summer which is of little or no use if you're not there to keep drawing off DHW. Needing bags of DHW is not necessarily managed by the heat source, more the hot water device, so the position of the horse and the cart may need a bit of adjusting here1 point
-
Told ya.1 point
-
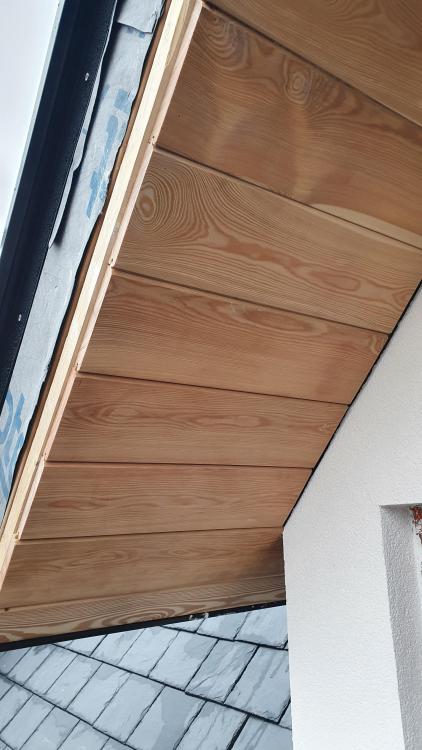
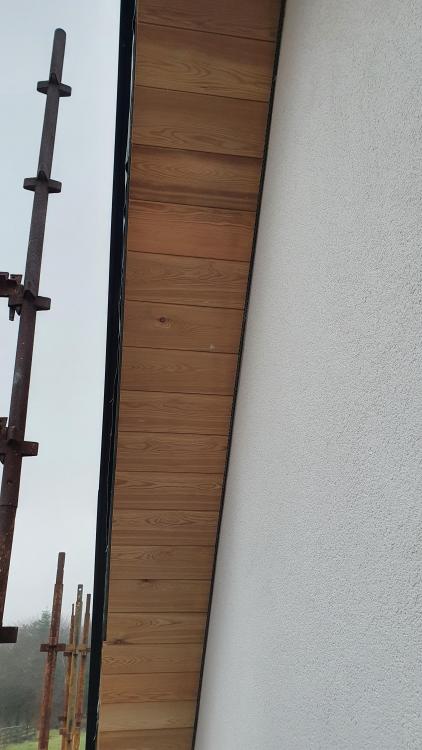
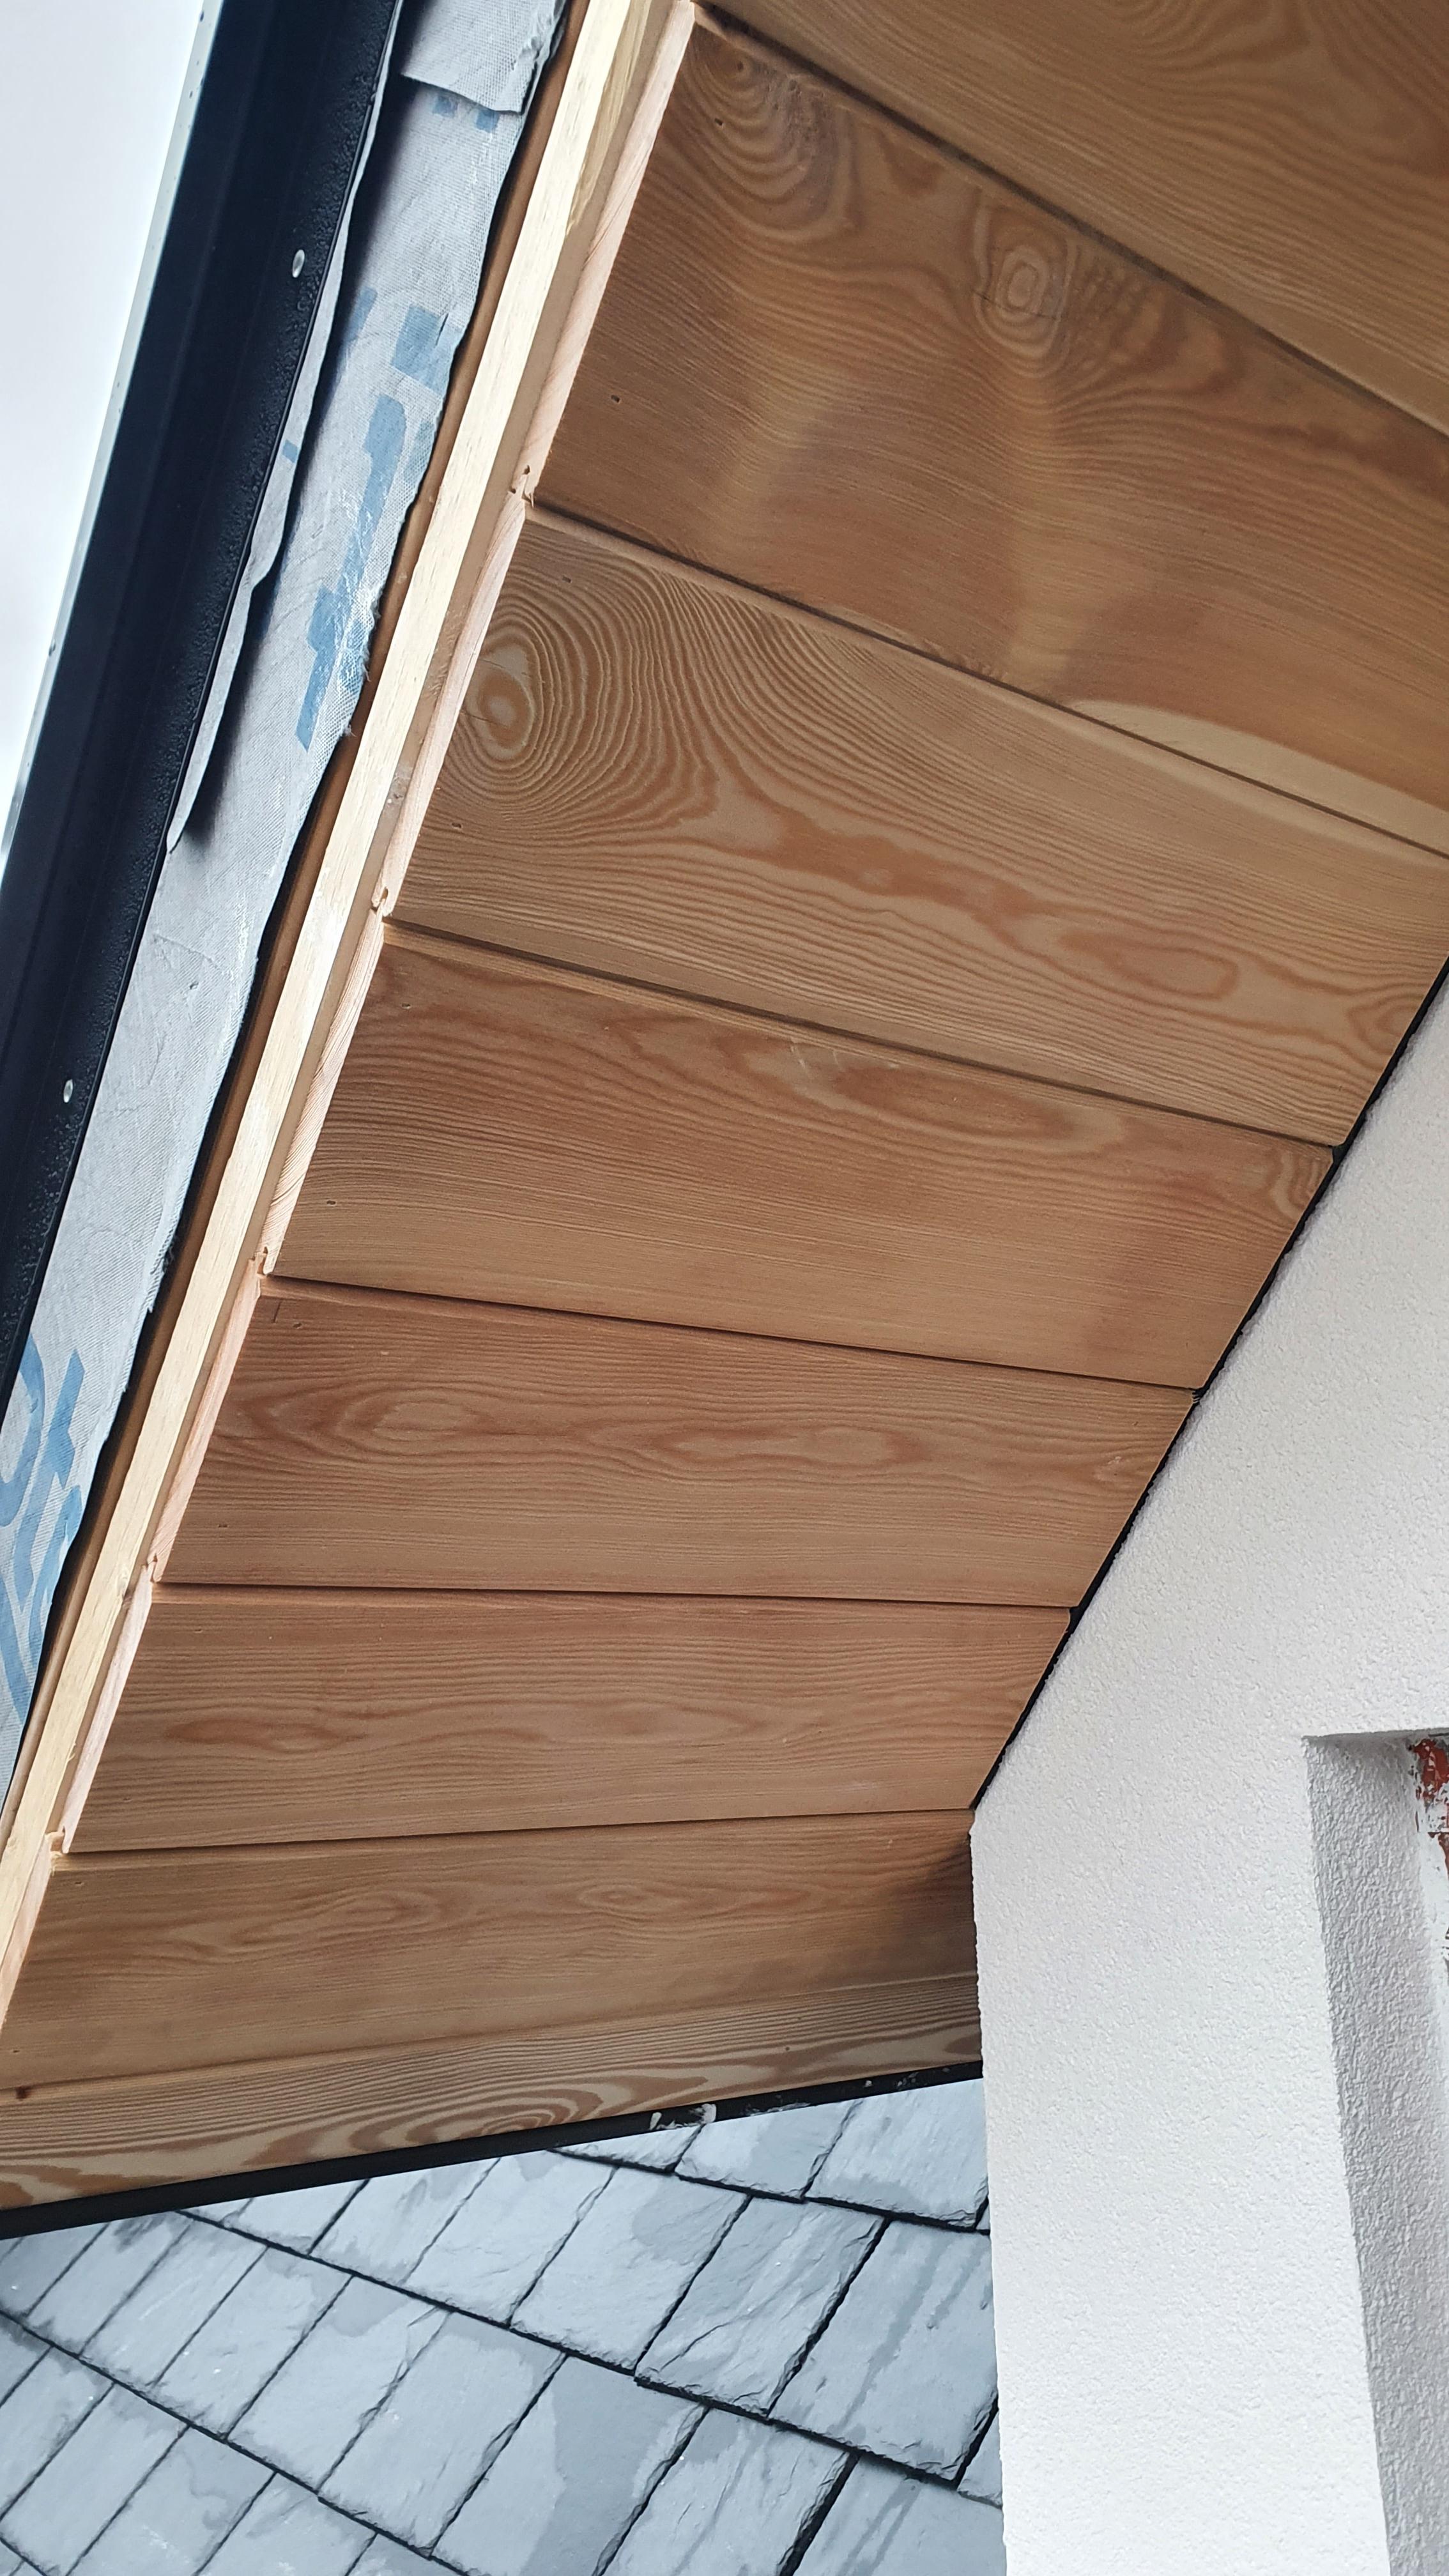
Now started fitting at the weekend. The paslode brads work perfect, great hold and ant see a thing. So far no pre drilling required at the ends. Can't see the fixings from 2m away.

 1 point
 -
even though I haven't ordered our cladding yet I have had quotes and believe that my chosen supplier will be Permachar (https://permachar.co.uk/product/charred-timber-cladding-deep-char/). I'll be looking to order early in the new year. But the shadow gap profile is pretty standard with most timber cladding suppliers tbh so if you have a cladding supplier of choice then they'll probably do it. I'm also sure you can get the profiles with extra grooves but I don't think Permachar do that. but there are many other suppliers that might!1 point
-
You can either do that Or give it Ten days and tile under the units and bath There’s very little chance of problems in areas that arnt walked on The majority of commercial jobs that I tile have not been down long enough to fully dry Its very rarely practical1 point
-
Which is one of the many reasons I chose it, we had to instal a 6 person unit (three bedrooms) but in reality there are only two of us normally .1 point
-
I think it depends on the tank - not all package treatment plants are equal. For example, the vortex that @joe90 mentions above spurs the air from the blower off into three areas - one to breakup the incoming waste, one to aerate the broken down waste (where the main treatment occurs) and one for a vacuum to recycle the sludge back into the incoming waste (the vortex is a bit unique in this case as it is one of the few plants that can be adjusted for low occupancy). What should be common to all EN certified plants is that they aerate the waste, so digestion is aerobic, rather than anerobic as for a septic tank. Whether they then move the sludge about using air is a bit dependent on the plant I think.1 point
-
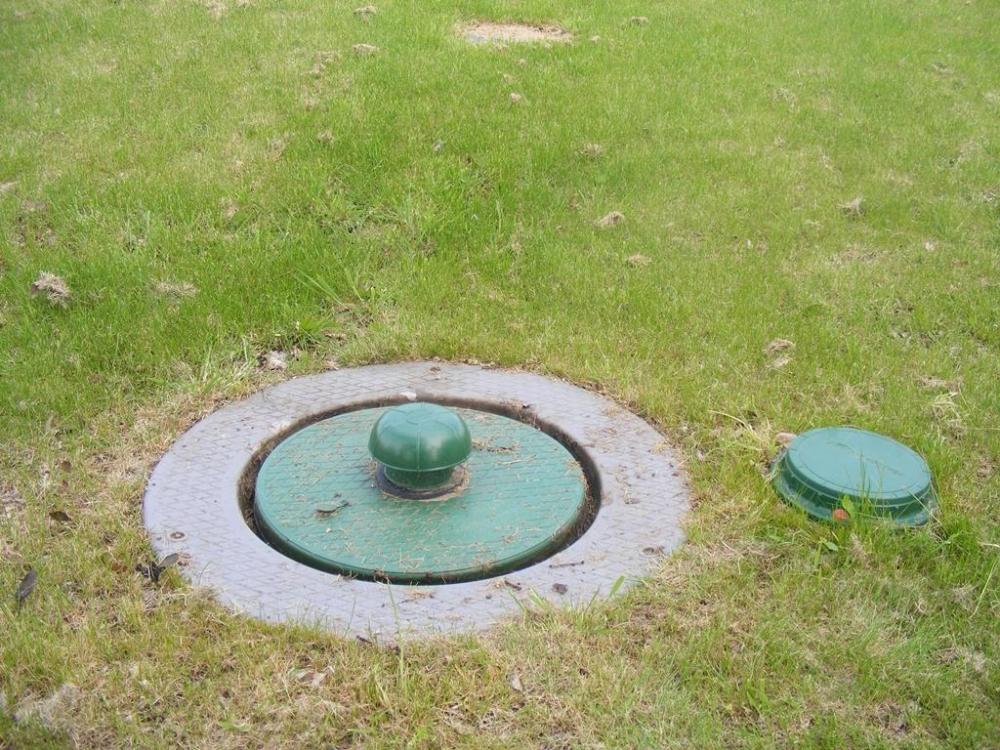
Yes you can hear the blower a few metres away but it is not very loud. In the Conder the pump sits in it's own chamber in the middle of the tank. In the picture below it's under the big green lid, and the mushroom vent on top is what allows it to breathe. In the case of the Conder it is emptied by unscrewing the smaller cap off to the right in this picture. I believe the BioPure tank while looking very similar to the Conder, requires you to lift the box containing the pump put to empty it.
 1 point
 -
I have a Solido Smart, it has the air pump inside a sealed housing inside the neck of the tank (under a double-skinned lid) A hose is fed in from a remotely-mounted inlet, which in our case is beside a hedge and unnoticeable. It's an SBR system so the pump doesn't run all the time anyway, but the only time any sound is noticeable is during the pumpout phase and it's more of a splashing/bubbling sound. Highly recommended.1 point
-
The hole I dug was above the outlet pipe which was a rumble drain (perforated pipe buried in drainage stone) so any ground water can drain away into that. I used some black waste pipe (40mm) and put one at each end with four bends to let air flow into and out but letting no rain in. When I had it serviced the chap said it was very adequate.1 point
-
Have only installed 3 from memory, and had no call-backs so presumably all ok. My inclination is to choose the simplest design, so air blower rather than rotating wheel. Having the blower in an adjacent chamber (not in the sludge make sense). Of course the tank works to some extent without the help of rotation or bubbles. I currently favour Marsh Industries, if you want to add them to your list. Very helpful tech advice too. The blower motor can be heard from very adjacent, but not from a couple of metres away. When you have an air pump in a fish tank it is the disturbance at the surface that allows oxygen to enter the water, (and the line of bubbles is for show)...is that the same principle for the sewage tank, or is it more simply, moving the sludge around?1 point
-
Hide an air tag on the bike too.1 point
-
For completeness, the inline attenuators have a full bore uninterrupted airflow through them. 180mm hole from end to end, ergo zero influence on flow, maximum reduction of nuisance sound.1 point
-
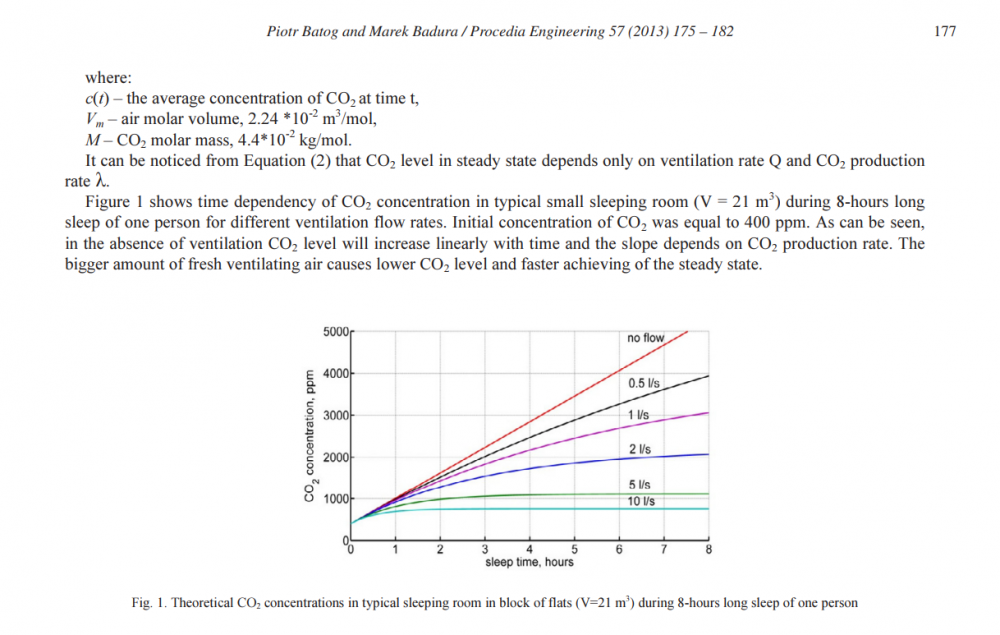
Start your design at your bedrooms. Bedrooms are the most limiting rooms for ventilation for 2 reasons. 1.They are the most noise sensitive 2. When occupied the doors are closed and air mixing with other rooms is limited. CO2 levels need to be controlled to ensure good health. As per the above graph 5l/s per person will keep CO2 levels acceptable. I worked on the principle that maximum bedroom occupancy would be 2 individuals or 10l/s. Every meter of 75/63mm ducting contains 3.12 litres of air so at 10l/s in our master bedroom our design velocity is 3.2m/s. It is above the recommended 2.5m/s but I followed Jeremy Harris's notes about noise where he suggested that it was almost exclusively caused by the MVHR unit itself and the room terminals. From my experience I would agree. Even at boost (4.5m/s) there is little duct noise. As long as you take care to have straight duct runs in the vicinity of bedrooms 2.5m/s is very conservative. More important is to consider your choice of MVHR unit. The passivhaus component database is the only independent comparison of noise I could find. https://database.passivehouse.com/en/components/list/ventilation_small Important also is how the unit is mounted. If it is in the attic it needs to be physically isolated from lightweight structures like ceiling joists. Either by hanging form the rafters or using acoustic mounts. Alternatively mount it on an external wall or on the floor of a plant room. Another thing to consider is the location of external vents. Don't put them near bedroom windows. I used flexible acoustic silencers from BPC ventilation on both the extract and supply sides of the unit. They were cheap and cheerful and I don't know how well they perform. @joe90 diy foam lined distribution boxes may well outperform them. I only doubled up on the 75/63mm ducting for the kitchen extract. Through experimentation i found that the maximum a 63mm duct could transfer without restricting any other outlets was about 5.1m/s or 16l/s. Again just using this trial case the noise was primarily from the terminal and the MVHR unit. TLDR. I used 75/63mm everywhere. Only doubling up for the kitchen. We have no issued with duct noise or air volume restrictions but were careful to have straight short duct runs and shallow bends only. If I was to reduce noise further I would probably install a larger volume acoustic silencer first. Then possible upgrade the MVHR unit to a quieter model. P.S on positioning rooms terminals. Aim to have them: 1.Across the room from the door. ( not vital if you can't manage it ) 2. Where high furniture won't obstruct them ( over a window works well) 3. Not over a bed or other occupied area where drafts might be noticed.

 1 point
 -
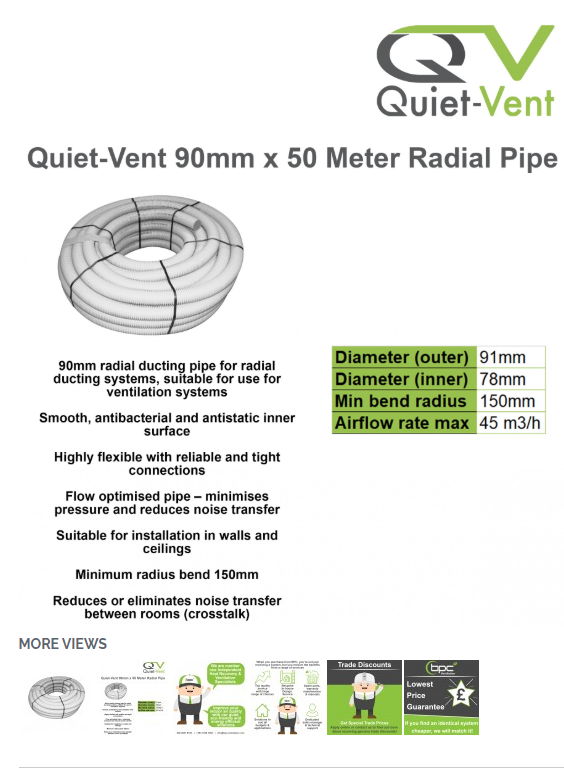
I bought the comfotube first actually before I was committed to installing MVHR straight away and didn’t want to be left with loads of pipe, I needed some to use as airtight underfloor conduit for electric cables. in the end I ended up doing the mvhr install and needed another 50m and went with quiet vent thinking there couldn’t be much difference but there certainly was. I think price difference was about the same when I bought. If I was buying more pipe I’d stick with the comfotube over other products for ease of use and also a better fit into the terminals1 point
-
Also consider jumping up to a 92mm duct for any one adverse run for a get out of jail card as it's the resistance that dictates the max length of the run at x dia.1 point
-
I routinely double-up on anything that looks remotely adverse, particularly to bedrooms, and the doubled run also makes for a slightly quieter solution also. Another thing to consider is two runs, but single runs to two ceiling valves instead of two runs to a single valve. I often do that in kitchens where the extract 'area' was large and it was better to cover more area. Again, a quieter solution especially when on boost. Good to remember when the kitchen / bathrooms boost the whole house boosts with it, as there is only one fan group servicing the whole system at a unified speed eg boost rate or trickle rate.1 point


This leaderboard is set to London/GMT+01:00