
Leaderboard


Popular Content
Showing content with the highest reputation on 07/24/21 in all areas
-
I'm pleased to say finally we are insulated and have render. Credit to our plasterer who has been brilliant and done an amazing job. The colour is Ecorend marble white so is a very clean white looking colour rather than the yellow/grey looking off whites we saw but we like it. The plasterer came in the early hours before the sun as it was blinding trying to apply it in direct sun over the past couple of weeks. Once we have the aggregate round the house and plants etc I don't think it will look too crazy. Waiting for the anthracite guttering to be fixed on and some of the plastic work and roof edging needs some TLC and if I hear the word 'mastic' again - which seems to be the answer to everything cladding and plastic related I'll strangle the builder. Also need fan covers attaching and our lights putting on which should be next week. Thought I'd share these pics. We have started to apply Bitumen paint on the bricks below DPC and this has smartened up the area where the bedroom/dressing room is where it is the split level inside with steps and rooms are higher than the rest of the house. We haven't finished all the way around yet. Loving the front door now with the render. Despite it being black in a silver frame and the anthracite windows we think it looks fine. This is the back of the house into our utility with the stable door. The hose pipe isn't on the render it's fixed onto a galvanised post. Of course we still have lots of garden work to do, no double garage and no dressing room etc but prices so high we have shelved things for now. Probably the most exciting non-house related news is we bought a boat which took a chunk out of the house budget!4 points
-
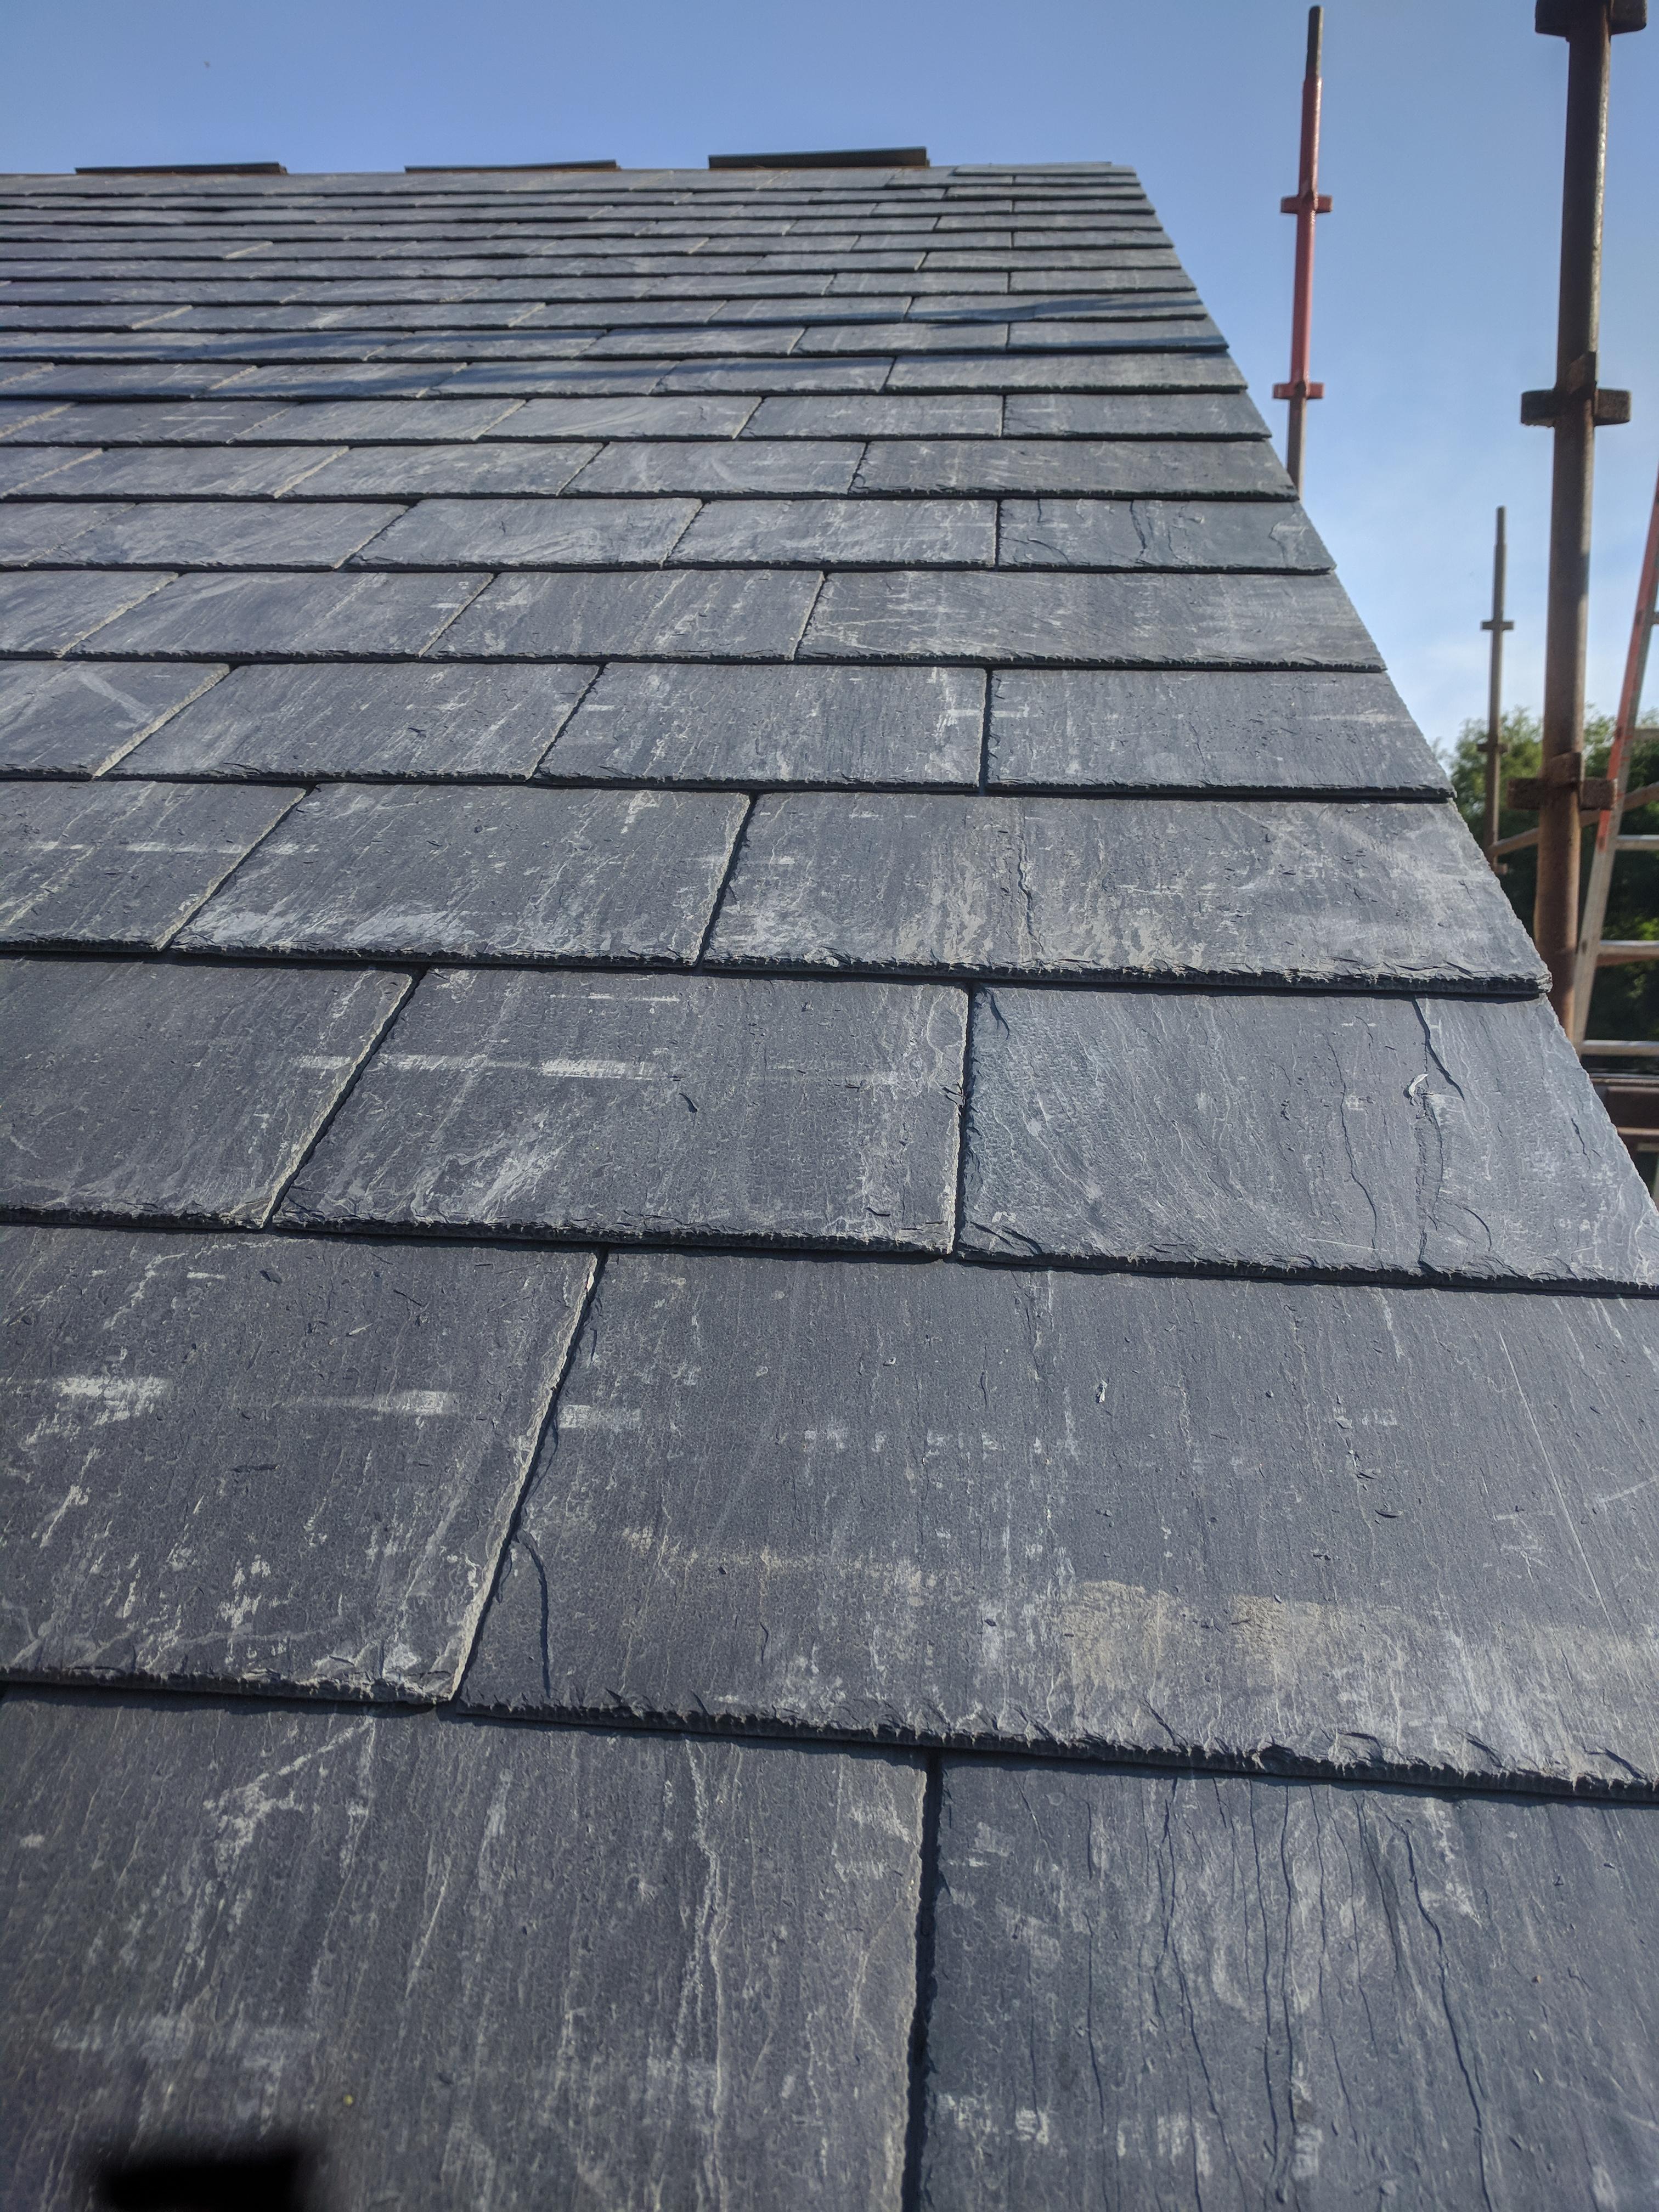
It's depressing to see so many dodgy roofing job posts here. Our Slater's have nearly finished, here's their work to date: I've never had a roof slated before, or seen one close up. But I'm very happy.
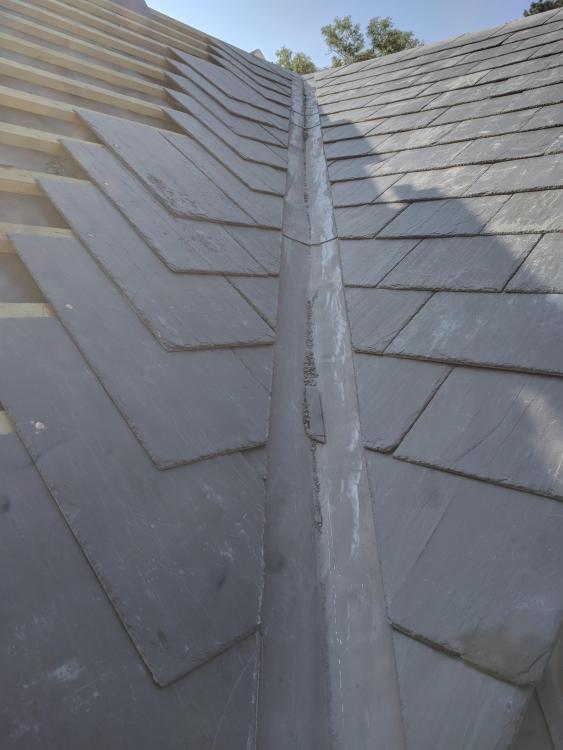

 3 points
 -
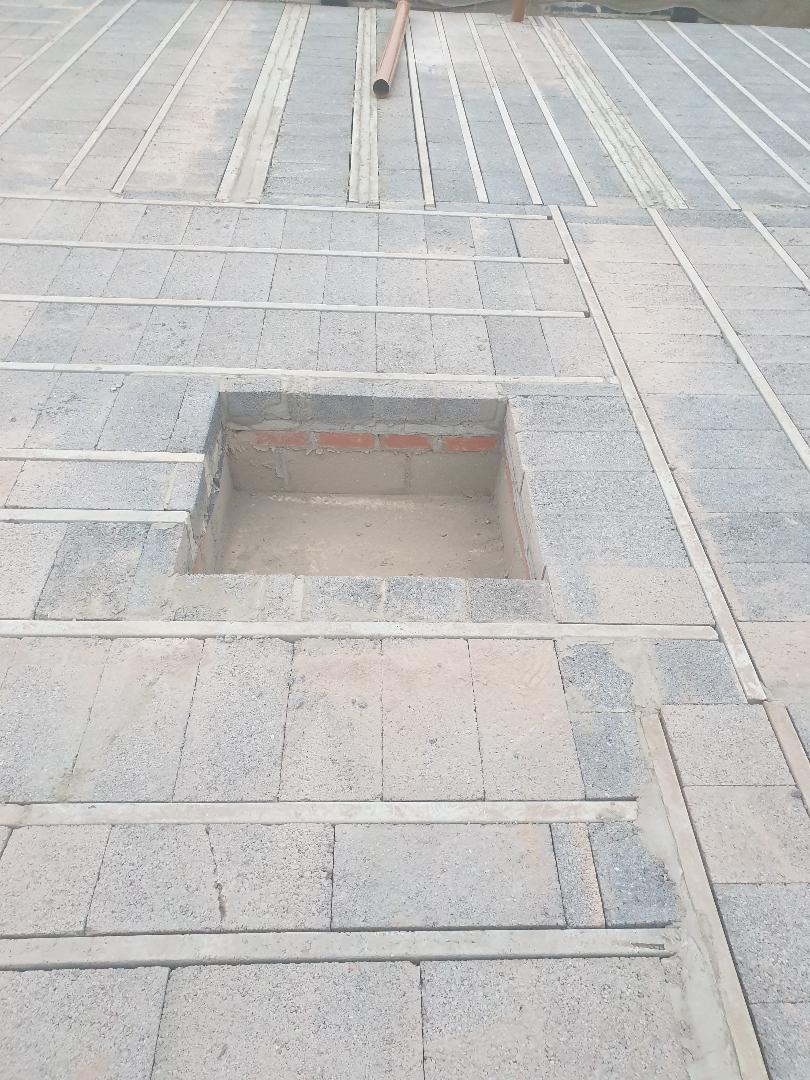
Concrete too wet when laid, then dried too quickly. And esp too much wet paste at the top. Probably inappropriate reinforcement, and lack of debonding at joints. Hot day and fast evaporation. (The difference between curing and drying is for another essay). This is a very common problem and I am constantly amazed that groundworkers do not know this. I can only assume that they have not been docked for it before. Adding extra water makes it much easier to move around and level. But then that water evaporates and leaves voids, where there should be concrete. In any ready-mix delivery there is a space on the chit to record added water, and the driver will fill it in and want it signed, because the supplier knows this can cause problems, and they don't want the blame. A concrete mix is an exact science. When 'just right' for strength it is awkward to shovel, so they will add water, without asking anyone in authority.. They may well have sprayed some sealer on top, supposedly to keep it from evaporating, but it hasn't worked, probably because it has just sat on the free water. polythene/wet hessian are more fool-proof. It may not fall apart, or maybe it will. As stated above it will let water through the cracks, and that will freeze, and that will break the concrete. I think the top surface of paste (no stone) will abrade quite quickly. Also, all concrete cracks, and it is a matter of controlling it to a minimum and to multiple invisible microcracks. The reinforcement , and debonding at earlier edges, helps with that, and I can't comment on what you have in that regard. whether it was appropriate, and whetehr it reached the edges/ overlapped etc. The choice of appropriate steel mesh is well proven, but I have no idea with 'thickish basalt' mesh. Certainly plastic fibres don't work as well as was originally trumpeted, or as steel mesh. More info would be interesting. I would worry that a small mesh would reduce bonding at the layer. But it is new to me and I don't know. Depends what you have paid really. If you have employed a bunch of labourers who don't know the science of it ( and simply have not been paying attention) then perhaps it is your problem, and is decent value, as you have saved 25% oh and p, and management. If there is a specification or a known performance requirement then you have an argument. If this was for a formal contract it would have to come out and be redone. as a private job for yourself it is up to you. Whatever, keep the whole roadway damp throughout the warm weather and for a month in total, as the cement needs that time being damp to do its job.2 points
-
Looks like cracking from too warm and not protected after pouring in this really hot weather concrete would really need damp Hessian at a minimum. Don't look like they'll be too much of a worry but I'd war h them and see. If caught early you can brush some raw cement in which will help seal some. Biggest problem with small cracking like them is it's a route for water which can cause larger problems with the freeze thaw affect in winter time2 points
-
Here's a link to how valleys should be constructed. https://rcimag.co.uk/sandtoft-blog/how-to-ensure-the-correct-detailing-of-pitched-roof-valleys Ask your guy if they did any of this. Wish I hadn't found this article now though, since I'm pretty sure the mortar in my valleys was laid directly on the lead ?2 points
-
There was an article on this in one of the nationals during lockdown telling everyone they'd laid their decking the wrong way up/wrong way down; it's as @Onoff says, grooves go down.1 point
-
We have a pit ready to take a lift in the future , as you say most of the retro fits do not require a pit but having one available does mean all options are available when/if we want one . As for cost a few meters of beams missing and a few blocks not laid vs a bit of extra insulation and detailing cost neutral .
 1 point
 -
And Elica; don’t miss them out ?1 point
-
I do , I do1 point
-
@Tom, assuming OAT is about 5°C I would add 50% to handle -3°C days and add a factor to allow for running the heating less than 24hrs/day. I would add at least 2kW for DHW1 point
-
Is that 1807 kWh the monthly heat load figure, or does it include DHW? Assuming just the heat load, divide it by the number of hours in January (31 x 24 = 744 [hours]). Divide the kWh by the January hours and that will be the power needed. 1807 / 744 = 2.43 [kW] So about 3 kW is needed to keep your house warm and allow a little bit of headroom temperature changing and improved efficiency for the ASHP.1 point
-
Fit plywood to the wall first and then fit the radiator brackets to the plywood1 point
-
Yep in roof solar, something which is great - with the excess solar doing the hot water we haven't had the ASHP heating the hot water for months.1 point
-
Had to drive 110 miles £350 well spent If it makes it home in one piece ?
 1 point
 -
Disagree with @Onoff. Decking is normally raised on a framework, so I don't see how grooves-down actually adds much. I do mine grooves up. Which matches your situaton. Maybe grooves down if you are installing it directly on eg concrete. Horses for courses. Anti-slip is a good call, but I wonder if those microbeads are plastic? Or do it with a more normal thing and sprinkle sharp sand on before it dries.1 point
-
Not everyone will agree with all of these but this has my thinking, relative to a render on blockwork external skin: can be quicker, can be more accurate (e.g. around window reveals), can DIY some of it (battening for render board and the boarding itself if you have time). Not sure on relative costs as I never looked closely at the blockwork option. The house is a modern design and the render looks really 'crisp' and 'sharp'.1 point
-
Now that I think about it we had similar advice. We went for fiber cement weatherboard, Cedral over timber frame/SIPS on the ground floor and standing seam on the 1st floor and roof. I did not want to have to deal with the maintenance of full timber and I don't like the weathered look, although Cedral is not without it's issues.1 point
-
Minimix not man enough for u mate1 point
-
We have a render on render board outer skin on timber frame. The mortgage lender is fine with this, but the surveyor acting for the lender said it would have been a different story if we had specified timber cladding on timber frame.1 point
-
All you need now is some cement!1 point
-
I don't think you would have any issue with Ecology for the self build, they're very helpful. The problem may come once you want to move to a standard mortgage.1 point
-
Central cylinder with all runs to fixtures meeting AECB guide will work nicely. (nothing 22mm unless serving bath fill taps capable of high flowrates) If incoming DCW is 22l/min and you're expecting DHW of 18-19l/min then you may have a problem though. What are your blended flowrates? What are the DHW and DCW flowrates needed to meet these? DCW temp varies. Assume 10C. Blended temps vary. Assume 40C. DHW production temps are flexible. Assume 45C for HP or 55C for gas. (being conservative) 40C shower uses about 86:14 in HP scenario or 66:33 in gas scenario. So you have enough DCW to satisfy your wishes or would you be putting in DHW capacity that goes unused? https://www.spiraxsarco.com/resources-and-design-tools/calculators/water-mixing/water-mixing1 point
-
All ceramic scratches. The premium ranges from Bora, Novy and Gaggenau use K Ceramic which the mainstream ones use Schott Ceramic. K Ceramic is a harder more scratch resistant material. But if you are going to buy a nice hob and be scared of scratching it, buy a cheaper one that you will use. Like others have said, its a tool - dont become a slave to it.1 point
-
Don't discount wastewater heat recovery on the most frequently-used showers too...1 point
-
My major concern would be if that's how shocking it looks then clearly a competent roofing person didn't do the work. So then what else is wrong? - They put the first few battens up, realised they messed up the spacing, but rather than fix it properly they just slapped on an extra batten to add an extra row of tiles, which is why you have those far smaller looking tiles at the top. The tiles on the main part of the roof seem to be spaced closer together towards the top as well. - They couldn't even get the battens straight. All that talk of the structure of the roof means this is how they had to do it is total [expletive deleted by forum]. The only thing that could force such wonky looking battens is if a tiny black hole - or other similarly dense thing - has warped the very fabric of reality up on your roof. Wait...similarly dense thing? Was your builder/project manager up there when they were roofing it? - One technique to get a nice line on the cut tiles in the valley is to lay whole tiles and then run a disk cutter down them in one go. Which is fine if you put something over the lead to protect it, but if not, one slip and there's a gash in the lead that is easily hidden by the mortar. - There is a house near me that was renovated and it was well known as the wonky house because that's how it look. Took aaaaages to sell. I would not buy a house where some of the roof looks like that. - Someone pointed out that the flashing beneath the velux is the wrong type i.e. not designed for your tiles. - The cement work looks poor, and there look to be shrinkage cracks in it already (could just be tricks of the light in the picture though)1 point
-
Make it bigger if possible - if you can get a 300 or 350 with a coil rather than a PHE you have no moving parts either.1 point
-
These links might assist: https://www.ageukmobility.co.uk/stairlift-advice/how-are-stairlifts-installed Plenty of pdfs on the web and YouTube vids: acorn-installation-manual.pdf 926.pdf My mate services them if you've any specific questions.1 point
-
If the test holds at 40mm for a couple of minutes then you should get a pass.1 point
-
Yep, I reckon it is fairly shallow, though my earlier attempt at an air test was testing to get it to 100mm. It seems to hold at 40mm when full of water.1 point
-
A few thoughts from experience. Make sure you use the dia, make and colour of duct they specify or they will refuse to use it. It is something to do with heat generation. The specified duct is more expensive than others, and than you will like. Also use only straight lines or the cable may snag. Don't forget a draw cord. there will be a mx length between drawpits. Often they quote a high price to cover risk of obstruction, and will rebate if it goes smoothly. Don't fall out with them. You have nowhere else to ask. And a word about the original post. Best not be rude, however justified, on here. Google picks this all up. I did a search recently and my own earlier Buildhub post came up on page 1. Therefore I ty to avoid quoting manufacturers or businesses names, or referring to recognisable persons if it is a negative matter.1 point
-
Here they just direct bury into your pre-dug trench. No duct, just marker tape.1 point
-
SSE will spec it in the connection agreement, usually ENATS (spelling might not be right) approved. For a single phase I had a roll of single wall black 63mm.1 point
-
Hobs can scratch but at the end of the day they are a tool, not just to look at. If you don’t use a kitchen then it’s a waste of money … like saving something for best but then never using it.1 point
-
We are completely booked for two years now1 point
-
...so now speaking from experience.... Plan A was to use the Illbruck TP600 product mostly in the 8 to 15mm size (and 20mm width). I bought 19 rolls ?. Stored it for at least 24 hours in the fridge, then took one roll at a time to the window in a cool bag. Ambient temperature was 15 to 20 deg C. The experience was really poor - despite the cooling, the product expended so rapidly I could not get decent lengths in correctly. As I cut off a length from the roll, I applied a clip and put the remainder back in the cool bag. I ended up wasting a significant portion of each roll. In the end I used it only for gaps that were 10mm+ and uniform gaps at that. I purchased more of the Pro Clima CONTEGA FIDEN EXO product, which expended much more slowly - giving time to get the product into the gap effectively and neatly. When fully expanded, the Pro Clima CONTEGA FIDEN EXO product has a darker appearance that the TP600 and if anything feels to be more impregnated. A note on gap sizes: Our gaps were designed to 12mm for most windows (with wider cill gaps in some cases). In practice the gaps tended to be slightly smaller as the render could be slightly proud of the timber frame opening, especially where the render overlapped with breather membrane in the window reveal as pic... So basically the gap to seal could be as low as 6mm in practice and in some sections even narrower. With the Pro Clima CONTEGA FIDEN EXO product I bought in a wider variety of sizes: 7 to 12mm, 5 to 10mm, 3 to 6mm (and 2 to 3mm but did not use). A note in Velfac V200E windows - I should start by saying I'm very happy with the quality of the windows. One challenge though when applying compriband is it needs to be pushed some way into the gap - because there is a void behind the outer aluminium profile and the wooden window frame behind it (see pic) and the compriband needs to adhere to the wooden frame. This is especially challenging when the actual gap is less than the 12mm designed.
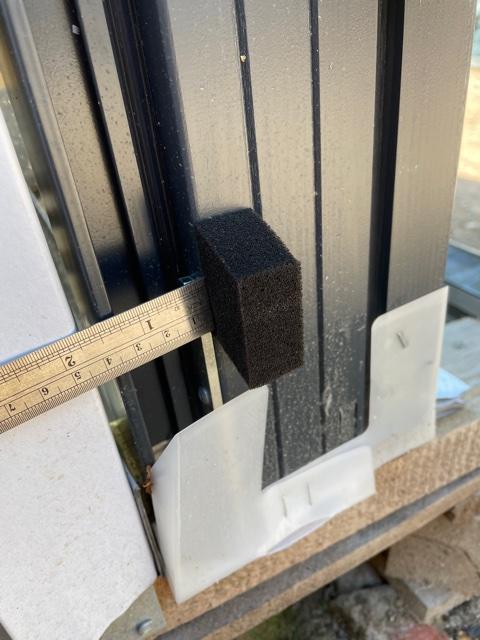 1 point
 -
Never been to bed with an ugly one, but woken up with a few.0 points
-
Not gnomes then?0 points
-
personally, I think you're mad too...0 points


This leaderboard is set to London/GMT+01:00