
Leaderboard


Popular Content
Showing content with the highest reputation on 05/21/21 in all areas
-
I've been watching for sometime the discussions surrounding per m2 costs. I've always felt these comparisons on per m2 are flawed and not a fair reflection (even when comparing per m2 cost with one another and potentially from the same supplier). The quantity of fixed versus openable can be different and the amount of doors for example and type. So I thought I would put a quick excel calculation tool together to get m2 based on the entered info. Which can then be filtered through the relevant options. There is a couple of minor points to make. It's basic but does the job. Due to the sheet being locked (password supplied), it won't expand the table as new data is entered, so I extended the table to accommodate. This presents an issue when calculating subtotals as it includes zeros and in the average cost per m2 field, this presents an incorrect figure for "all items" as they aren't filtered. I have entered a cost per m2 field for all items to combat this. It doesn't take quantities into account, each item needs to be entered individually. When you filter, it will calculate only the visible cells in the "Average cost per m2" cell and displays the correct per m2 cost. So you can filter by style for example (tilt and turn, top hung etc.) and it will always calculate the per m2 cost on the selections made. Discount amount (if any) can be entered and it will advise the percentage of discount supplied and then the cost per m2 cells will adjust to the discounted rate. I have tried to cover all the bases, including uPVC, Timber, Timber Alu Clad, Aluminium, timber type, internal finish, glazing etc. I've also put linear meterage data in plus install costs, which will display install cost per m2/linear meterage as well for a further breakdown. If you find this useful and can use this for comparisons with other suppliers / Buildhub members or if anyone would like to expand on it, feel free to download and amend accordingly. cost_per_m2.xlsx
 4 points
 -
All I will say is I went round the mill with this on here when I was planning my build. Ignore it, all the talk of rot is a load of bollocks that people on here and GBF have used to argue against SIP (the same conversations are generally shilling the larson truss!). The soleplate setup in SIP is exactly the same as a standard 140mm stud build - its not different, yet I have never seen anyone mention the risk of soleplates rotting with that type of build! I have fixed 20mm of insulation to the outside of my soleplate, but I don't see it really doing much tbh and I don't care - I just don't rot this being an issue.2 points
-
I agree with @Carrerahill, our last house had joists, the ufh pipes had a biscuit mix over them before flooring2 points
-
We've all had the conversation with visitors to our sites. Polite gushing , happy faces, big smiles....and .... wait for it "We've always wanted to self build, BUT (...) " . Or just as frequent, the selfbuild " ...blew our marriage to bits...". Sad. I've come to see our selfbuild as a privilege and large slice of goodluck. And I am very grateful most days. But today, is a @Russell griffiths size growl day. A proper Foxtrot Uniform Charlie Kilo day. Friday night, pub's open at last. Don't ring me early tomorrow please.2 points
-
Just watched homes under the hammer A couple in Wales who have there own lettings and building companies Renovated a property for an investor Total wreck Back to brick New sash windows doors small extension NES kitchen bathroom re wire and plumb Boiler Full re plaster and damp course 15 months Total spend 16K Even with lower regional wages I find some of these hard to believe Im sat here working out the CG for a rental that we are selling We fully done out 10 years ago 2k spent on an electrician to do the rewrite and £ 200 labour to straight swap the boiler We did the rest ourselves £11400 on materials If I had charged for labour we would have been close to 20k Whilst these programs are good to watch They an be misleading1 point
-
Think this may have come up before but can't find old thread.. https://uk.news.yahoo.com/planning-bosses-order-mansions-demolished-dispute-100526374.html "Owners had appealed against an order to demolish the houses but their claims were rejected and a planning inspector has now given them 12 months to demolish the structures and return the site to its previous state."1 point
-
thanks for the tip! but that would mean taking off the knob and all wouldn't it? I don't think it is easy to remove. Not sure if it is cast iron to be honest? p.s. loving your quote, 'my pressures' hahahha. It made me laugh!1 point
-
I am in Ramsey - if you want me to swing by and have a look I will try (I was a Chartered Surveyor for 25+ years until I got fed up of sending the RICS £700 a year for nothing!). Doing my own developments now. I am not offering to do any works there btw - got my hands full where I am at tbh!1 point
-
Got advice from a gardening expert: "should be ok if only one side of the hedge has a trench dug it should recover regrowing the roots. ... its important to use the same soil thats dug out then refilling the trench as it will contain the fungi in the soil which will reconnect with the roots. adding some potting compost will help maintain the moisture in the soil, plus adding a leaky hose along the base of the hedge will help to water the hedge also thin out the top of the hedge, in effect removing some of the foliage to reduce water loss until the roots regrow" Might still look for an alternative position for the trench1 point
-
Yes - it was the yellow Ampetex. I think my build was their first with the green airtight OSB board, we had the company rep come out to look and take pics.1 point
-
Correct, buildings must breath or you will be signing large cheques to cover rot issues and damp and all sorts.1 point
-
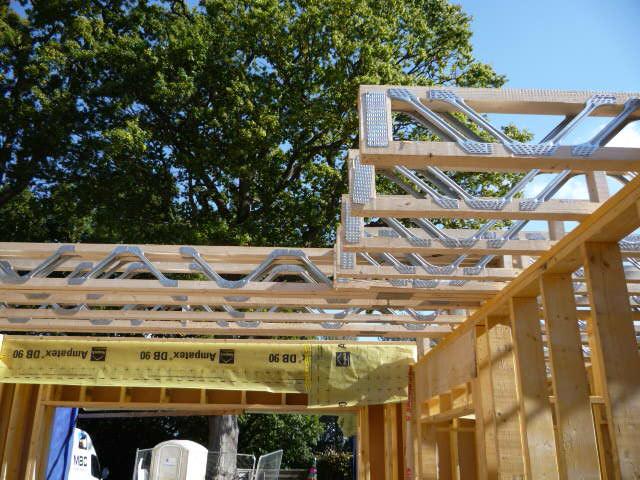
Hi MBC probably used the same membranes as for my build, which was a couple of months ahead of @bitpipe. They used some AMPATEC DB90 but mostly SIGA-Majpell -5 to wrap the joist ends and between floors and, for mine, they used SIGA-Majpell -5 for the walls and roof. ( the airtight board was introduced after my build) - see photos.

 1 point
 -
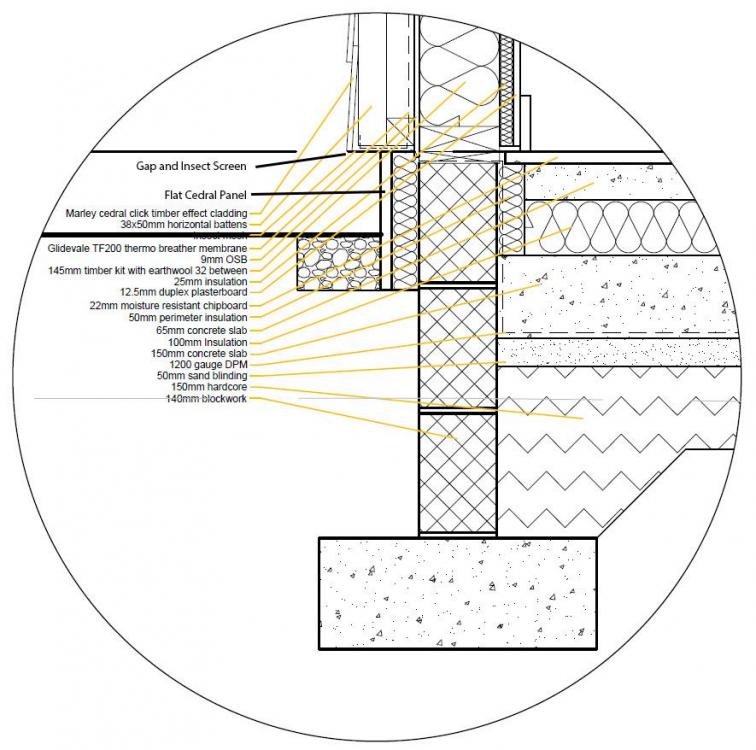
I don't see any issue with this. It looks very similar to what I have. Instead of SIPs I have a Scotframe kit which i s really a SIP hybrid. Looks a bit like this except polyurethane instead of rockwool.
 1 point
 -
you could use a space blanket under and across the joists+tape joints-something to stop heat and drafts getting from under house to inside your house through the floor --if you can get to underside of joists--underside of joist needs sealing somehow as the insulation is obviously not a good tight fit to joists --maybe even spray foam --all depends if you can get to underside of floor then can you push celotex+UFH piping up hard to your wood floor and pin it there and seal all edges with tape or something ?1 point
-
Nope, all I know is that it was bright yellow! MBC took care of it, my interior wall was an airtight board and the fabric was only used in between floors and on the warm roof. It was secured to the concrete wall and airtightness layer above with green / yellow airightness tape.1 point
-
Things to think about. Will the hedge survive ? Probably is there an alternative position for trench ? is the trench position this close a good idea ? No not really.1 point
-
You will be cutting through roots but the hedge will survive and roots grow back1 point
-
How tall is the hedge? and what will happen to the trench after it has been dug?1 point
-
^^^ That's the standard "no name" cheap pillar drill like I bought nearly 30 years ago for about £30.1 point
-
In a modern well insulated, airtight house with MVHR, lots of different heating zones are less useful. I'm on about houses insulated to passive or near passive level with an ACH of 1 or lower. If you've the main living areas set at 21 degrees and an unused room set at 17 degrees then the MVHR unit (depending on efficiently and other factors) is probably supplying air to the unused room at 19 degrees. Having all these thermostats and zones then becomes pointless. Depending on the design of the house (eg open plan/ an atrium / gallery / double height / etc. helps heat rise) you might not need heating upstairs. Between the heat rising and the MVHR unit dispersing the heat around the building the upstairs will probably be warm enough. Again this is presuming its well insulated and airtight. Otherwise you've one stat downstairs and another upstairs.1 point
-
My girlfriend had been watching Homes under the Hammer before she bought her house. Didnt mind that it was cold and damp and needed a new kitchen because she had seen how they all did a full renovation in a few months for less than 10 grand. ... then she started getting quotes and thought she was being ripped off.1 point
-
1m isn’t really that high, the time you put down a couple of course of blocks then block n beam floor then 200mm of insulation and 80mm screed your up there. Alternatively I would have a row of Gabon baskets around the house site and back fill with 600mm of stone then an insulated raft. i did mine on block n beam floor, but wish I had done the raft idea.
 1 point
 -
That looks like a haven for rats. Unless the ground conditions dictate piled foundations, just do strip footings and raised beam and block.1 point
-
More footings going in, when marked out in spray paint foot print doesn’t look that big!1 point
-
I have no individual zones just the ground floor (6 loops) controlled by a stat in the hallway, to make the lounge a little warmer I upped the flow to that loop from the manifold.1 point
-
I think your piccie shows exactly what is going on . new section the pipes are showing very bright and concentrated --other piccie shows the heat dispersed all all round the pipes, so the actual pipes not showing as hot --so its likely you have avoid around pipes so heat is going out the bottom and anywhere it wants to and not being directed upwards only to the floor . can you get under the old floor to add insulation to stop heat going down and block any holes at end of floor joists where it can leak out?1 point
-
I suspect the issue is the floor make up between the new and the old. The new floor will have been built with proper amounts of insulation. The old floor will probably have less. Did you see what they did to the old room by way of adding insulation under the floor before laying the pipes? The sollution is likely to be to raise the water temperature by adjusting the blending valve on the manifold, and then slowing down the flow rate to the new rooms so they don't heat up too fast wile leaving the flow rate to the old room as high as possible.1 point
-
Cut all brass fittings off the copper tell them it's clean. Then your brass fittings and copper bits are more mixed1 point
-
BPC advised me to definitely not site the extract directly over the shower cubicle.1 point
-
Sodium nitrate dissolving in water in the masonry and as water evaporates leaves white or clear crystals behind. pinch a small sample, it will dissolve in water1 point
-
Hi SaveaSteading. Your approach is much appreciated and interesting. Hope this helps. The geology of the Highlands is unique and fascinating. Here are some avenues and my thoughts on how you could continue to explore this. Some may well not apply to you but BH is a journey! Say you look at this in the context of a two supply system. One supply is for the bogs and watering the plants when the good dry weather comes, the other for drinking / washing water. You mention an ample burn and that it may have a journey before it gets to you.. say past a few silage pits, crofts and other folk's septic tanks ,which have yet to be upgraded. If many of the old septic tanks etc upstream have been upgraded (wishful thinking) this only tends to reduce the BOD (biological oxygen demand) but not the pathogens and other undesirable chemical compounds so much. However, the water that falls on your garden will generally make its way to the burn . You could maybe dig a relatively shallow trench that intercepts the surface ground water flow in your garden as it travels towards the burn. In other words your garden acts as a partial filter. In a dry summer it may be that the flow is reversed to some extent. Here your garden would act to partially filter the water as it makes it's way from the burn to the trench. In other words during a dry summer you still get more rain on the higher ground so even if your water table drops locally in your garden you can still draw off a sensible amount of water from the burn. When the next winter comes the flow is reversed back to the burn so your garden filter could be "self cleaning". This is how a sand filter in a sewage treatment plant works to some extent. I digress a bit here but it's worth a mention for other BH members too. SUDs requirements. There are a good few posts on BH about this and folk are aware that it relates to say flood prevention. However, there is another aspect to this. If you have dry spell of weather then contamination can build up on your roof. Many industrial buildings have roofs that are plastic (say) coated and the UV sun rays degrade this. Also, you get birds nesting and so on. If you then get a short burst of rain you wash a high concentration of contamination into a burn / stream that is at a low flow level. You don't get the dilution and this kills the fish and other organisms. Saveasteading.. the same principle could apply in your case. If you are on the West coast of Scotland you'll get more frequent rain.. but the East can be very dry for a few months. If you can find a way of storing enough drinking water/ washing for the dry months then you could in principle be drinking the best water in the world! Once you work your way through this then you can weigh up the economics / practicality of boreholes / spring supply (reliability / security of supply as not on your land) vs say harvesting. Have a look at how you can get rid of your waste water. Mortgage.. maybe some lenders will pick up on the fact that you have an unusual scheme. If you present a good technical case and compare with say a bore hole that may choke up in ten / twenty years time then it's food for thought. One avenue is to show that your scheme complies with the current regs, say in terms of a potable supply of water. From a pratical point of view if your borehole pump breaks down then they are nearly impossible to recover.. I have seen them stuck fast after a few weeks! You often can't get them back out and you have a cable in the way plus a steel recovery wire, try getting a same sized pump back down the same hole! You could get all this to work out with a fair wind. If you wish then post more info about what you know about the ground, the slope, geometry of your plot ect. Your geotechnics and topography could well be a key here to getting this to work.1 point
-
You will need either to elevate the building or have a sacrificial floor, like parking etc. For 1m I would just elevate and where possible build up the surrounding ground levels. Only 4 courses of blocks so no biggie.1 point
-
the humidity threshold for the internal sensor should be adjustable in the menu.1 point
-
Highland pump centre in Inverness are also useful for treatment kit and advice.1 point
-
I used this company for my kit James Rolland Sales Director (Commercial/Trade) https://www.gmautoflow.co.uk/ They were helpful and the kit was top quality and reasonably priced. I have no connection at all beyond being a happy customer! I already had a good idea of what I needed as council had already done a survey so it was just a matter of asking them to provide me with the equipment that would satisfy the council’s requirements.1 point
-
You must first support the road with a membrane as this will stop the stone punching through and disappearing endlessly into the clay. I prefer the non-woven kind as it doesn't puncture so much. It will cost you close to £1/m2 but will pay itself many times over. There are other, fancy geomembranes but probably not necessary for you. Then you lay cheapish hardcore, or whatever is the local stuff, complete with whatever muck and junk they leave in it, working up to better stuff at the top, The sales people at the suppliers will generally be delighted to advise the best make-up based on what they have. tell them what you want to achieve. I have had very good advice in similar circumstances. Re recycled tarmac, this is usually good value if from carriageways, but not if it is from footpaths. Warning re price £/ton. This is not like £/m2 and varies. Ask for the conversion to £/m3. Loose rubble with voids might be 1.6 t/m3, whereas compacted can be like rock, and 2.2t/m31 point
-
Go and visit all your local farmers.1 point
-
I know someone was looking a while back for a pillar drill. ex demo but looks like a bargain https://www.rutlands.com/sp+16mm-bench-pillar-drill-ex-demonstration+eddk7228
 1 point
 -
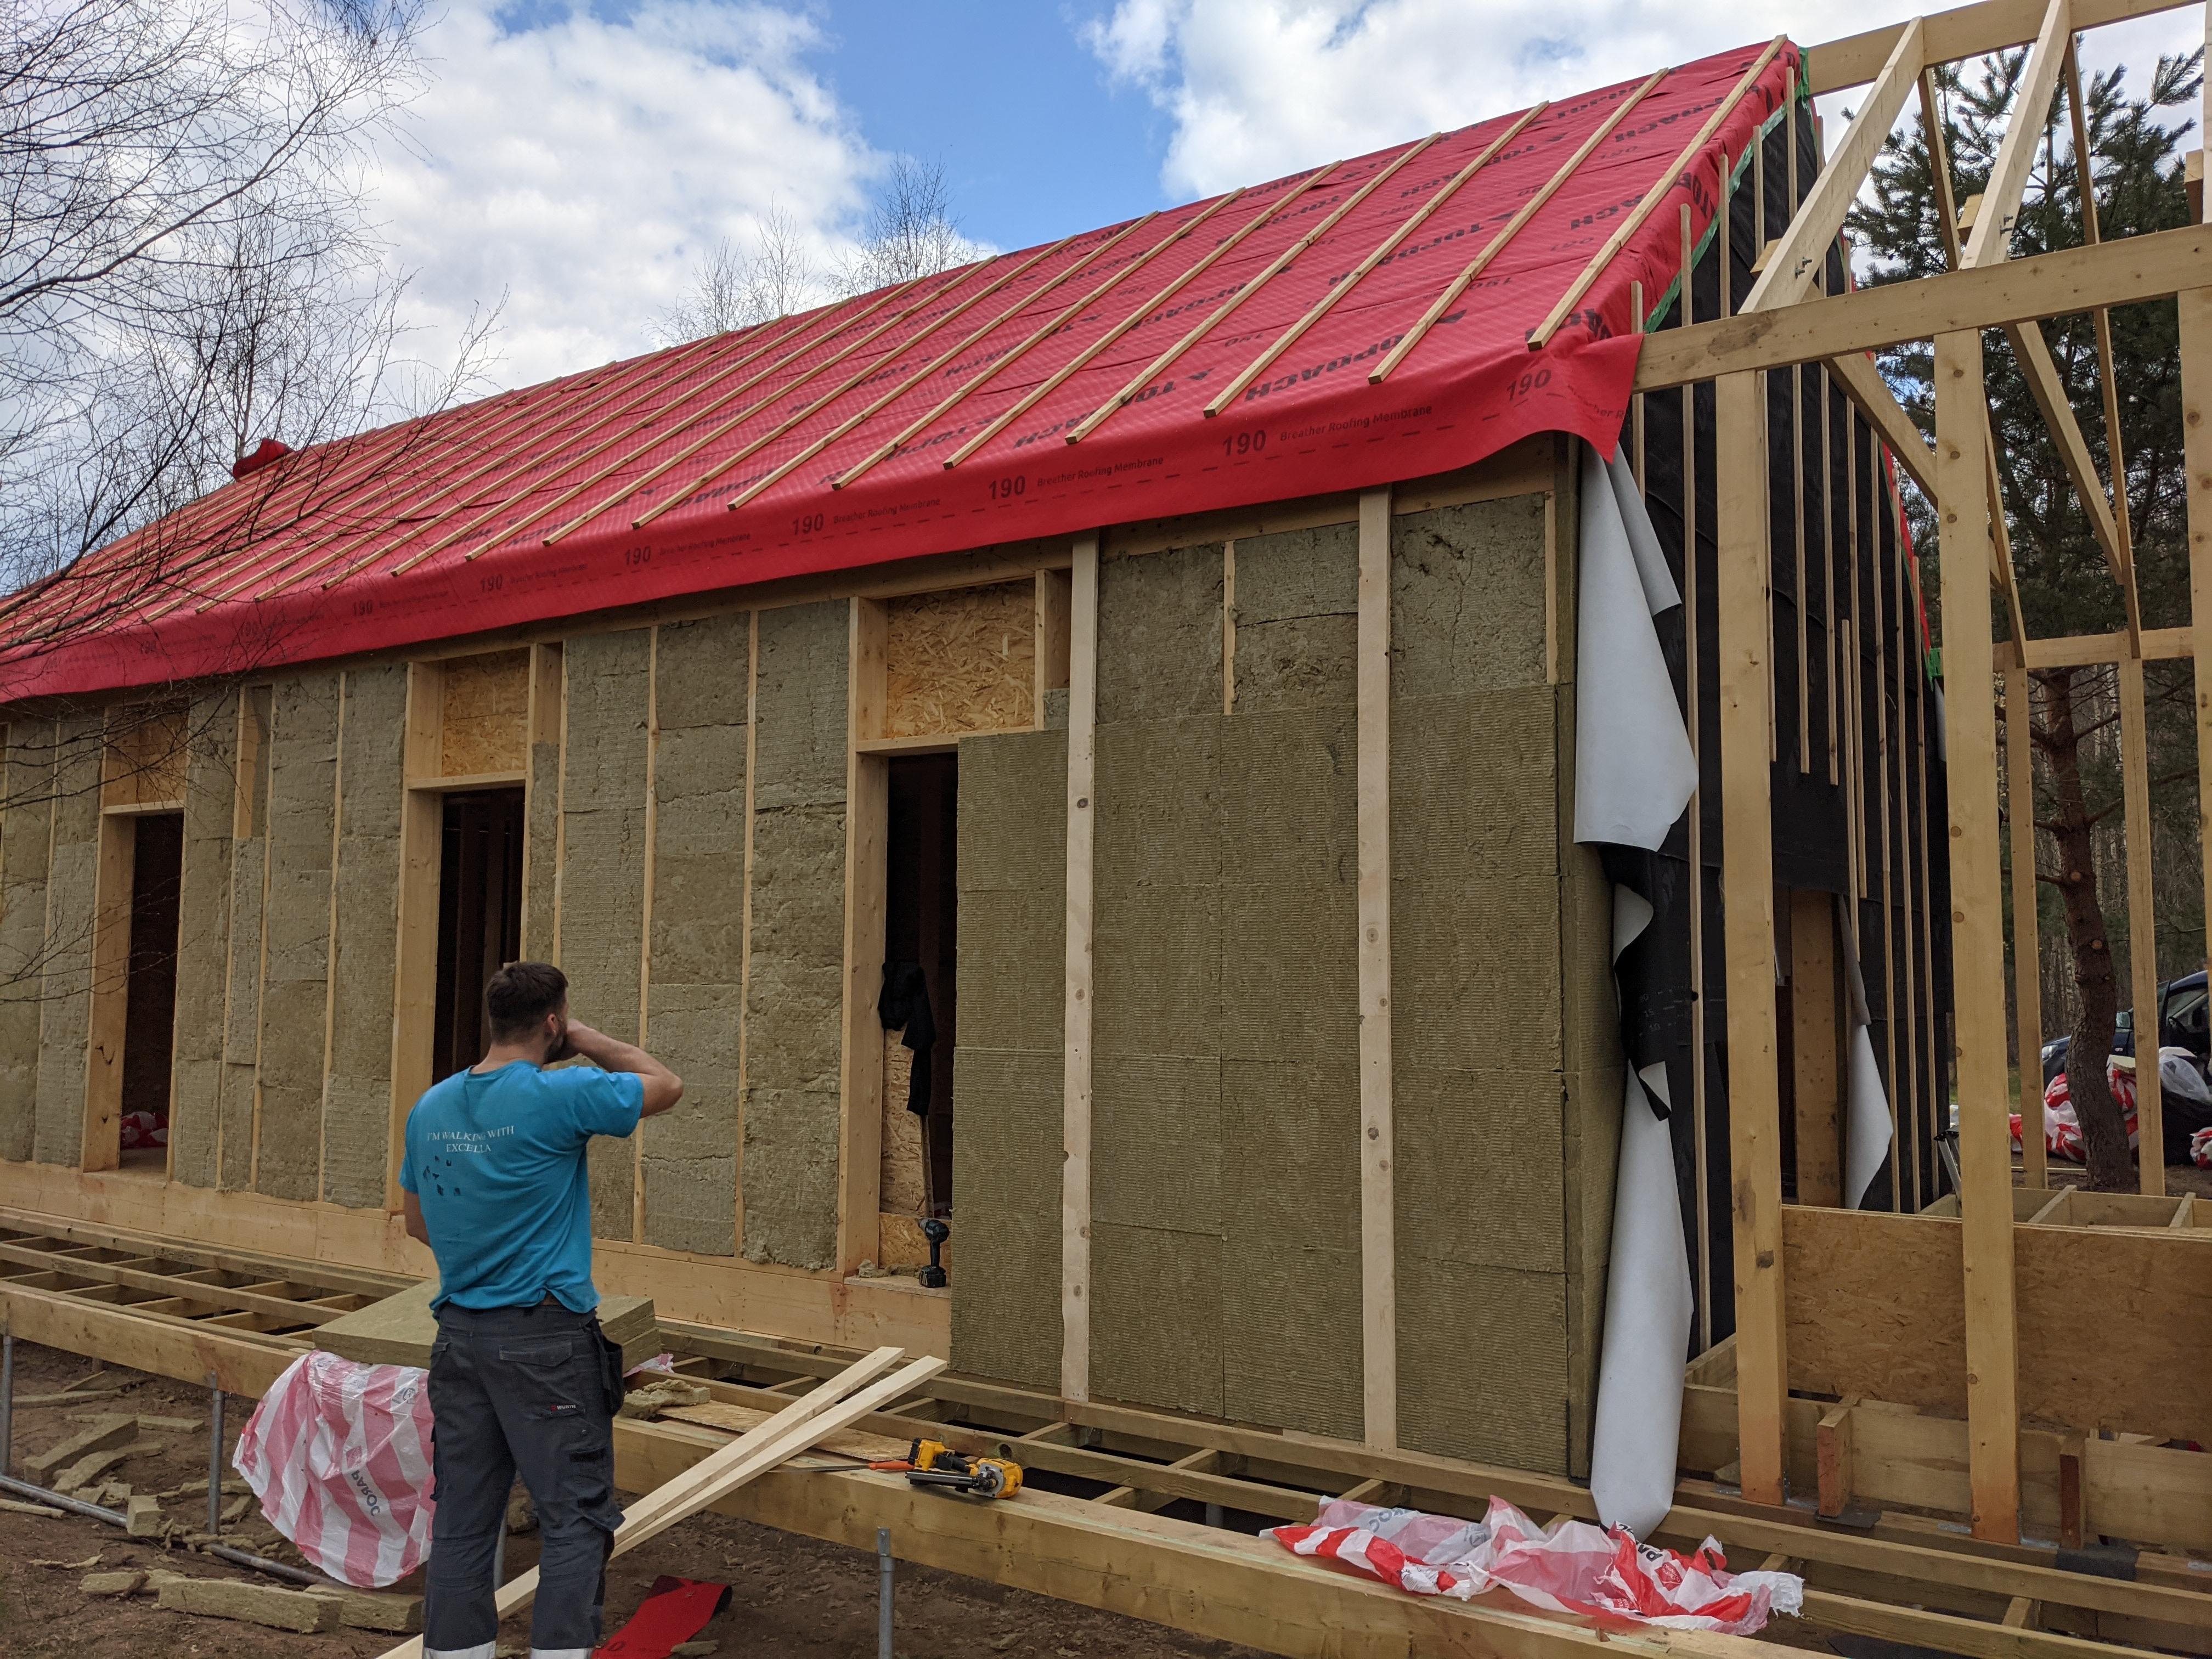
Stacking insulation behind loose strapping (fix at 1200 centres first, then add the others later it makes adding the insulation easier)
 1 point
 -
The Boost switches that CVC sell do exactly that. They are "bell press" switches. You press and forget about it as it automatically rocks back to the off position. It just boosts for a progammable amount of time.1 point
-
Somebody loves me! ?0 points
-
Here's a random one: If you're suffering from really bad trapped wind and weigh yourself, are you lighter than after you "release it"?0 points
-
Homes under the hammer is a bigger BBC scandal than Jimmy Saville and Martin Bashir put together. Thousands of episodes of fantasy, peddling bullshit to fools ill-equipped to be landlords and property speculators.0 points
-
and copper cylinders are half full of sand.0 points
-
Bring Me To Life? Great tune.0 points


This leaderboard is set to London/GMT+01:00