
Leaderboard


Popular Content
Showing content with the highest reputation on 01/06/21 in all areas
-
Thanks @recoveringbuilder, there are some discrepancies in those numbers, but lets go with the lower from the RHI of 15,787kWh per annum Based on a reasonable spread and some use of Met Office data. I've got the following : January February March April May June July August September October November December Heat Input 2263 2044 2010 1456 998 354 113 239 721 1504 1823 2263 DHW kWh 214.8 194.0 214.8 207.9 214.8 207.9 214.8 214.8 207.9 214.8 207.9 214.8 Heating kWh 2477.9 2238.1 2224.9 1663.4 1212.8 561.6 327.3 453.8 928.9 1718.8 2030.7 2477.9 Per Day/avg kWh 79.9 79.9 71.8 55.4 39.1 18.7 10.6 14.6 31.0 55.4 67.7 79.9 Hours @ 12.2kW 6.55 6.55 5.88 4.54 3.21 1.53 0.87 1.20 2.54 4.54 5.55 6.55 You'll see the bottom line shows the burn time for the boiler in hours - that is a big number in November - March, and by the sounds of it the boiler isn't running flat out so needs to be longer than that in reality. Also, the EPC shows a Primary Energy of 105kWh/m2/year for 269m2 but that would equate to 28,245kWh a year which is nearly double what the RHI calculation shows. I would hope someone somewhere has made an error on that number, but... if the RHI number is wrong, it would give even more support to the claim that the calculations are wrong and the boiler is much too small. In fact, if the RHI calculation is that far different to the SAP score I would suggest you may be in the negligence territory and insurers would possibly get involved at this point. Possibly not what you want to hear, but it may help clarify a few things !2 points
-
Network cable to TV location Network cable to PC/Xbox location. have Alexa sitting on top of the microwave in the kitchen when I want to play music while cooking. that’s my smart technology.2 points
-
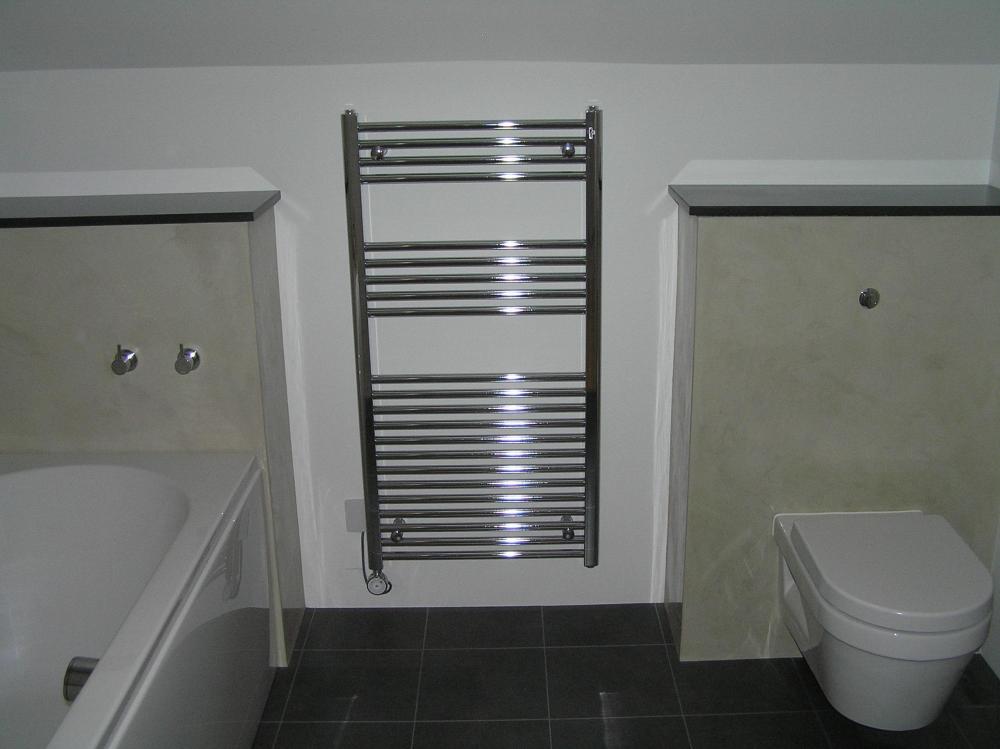
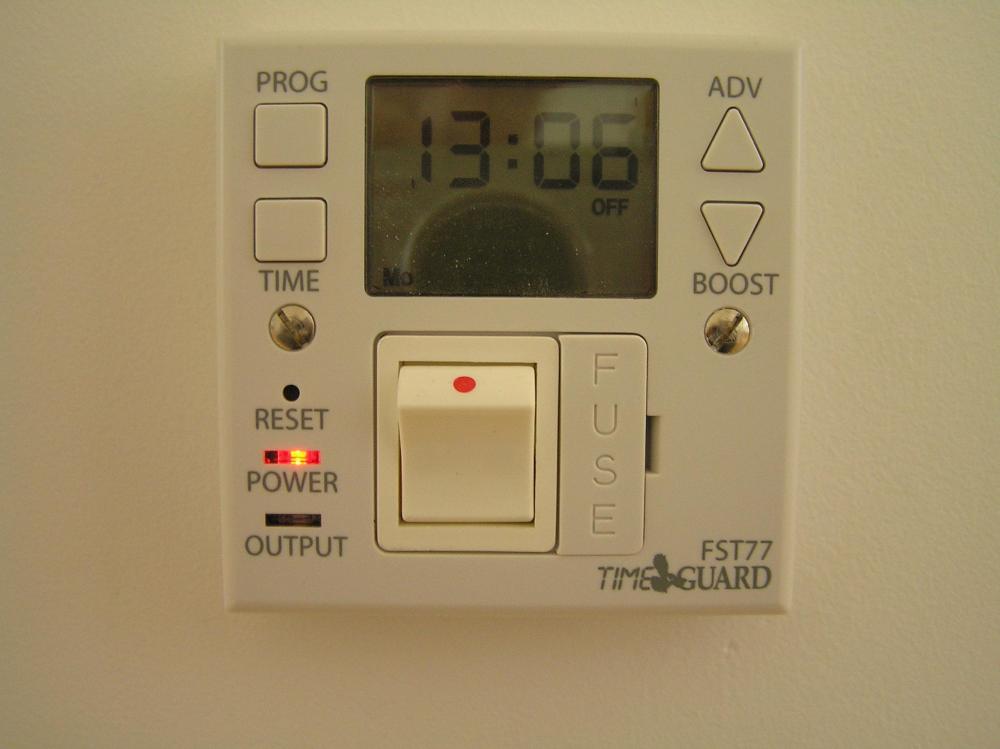
Our towel rails are 150mm off the floor and the electric cable loops down from the thermostat to the wall plate. The thermostat controls the temperature of the towel rail and a timer controls when it's on.
 2 points
 -
Disappointed you did not ask me to help you Ian, could have got this from Morecambe Fire Station if you had only contacted me!
 2 points
 -
I’d be more concerned the corner posts are sat on wooden wedges and appear not to be bolted to the floor correctly ..! Have they had grout poured under them now ..??2 points
-
That may not be the best idea. The airing cupboard is likely to be the warmest room in the house, probably only filled with clean clothes that are maybe slightly damp. With an extract in there you’ll be sending that warm air straight outside (via the heat exchanger) and getting slightly less warm air back. If the airing cupboard could vent to the hallway you could spread some of that warm clean smelling air around the house before expelling it.2 points
-
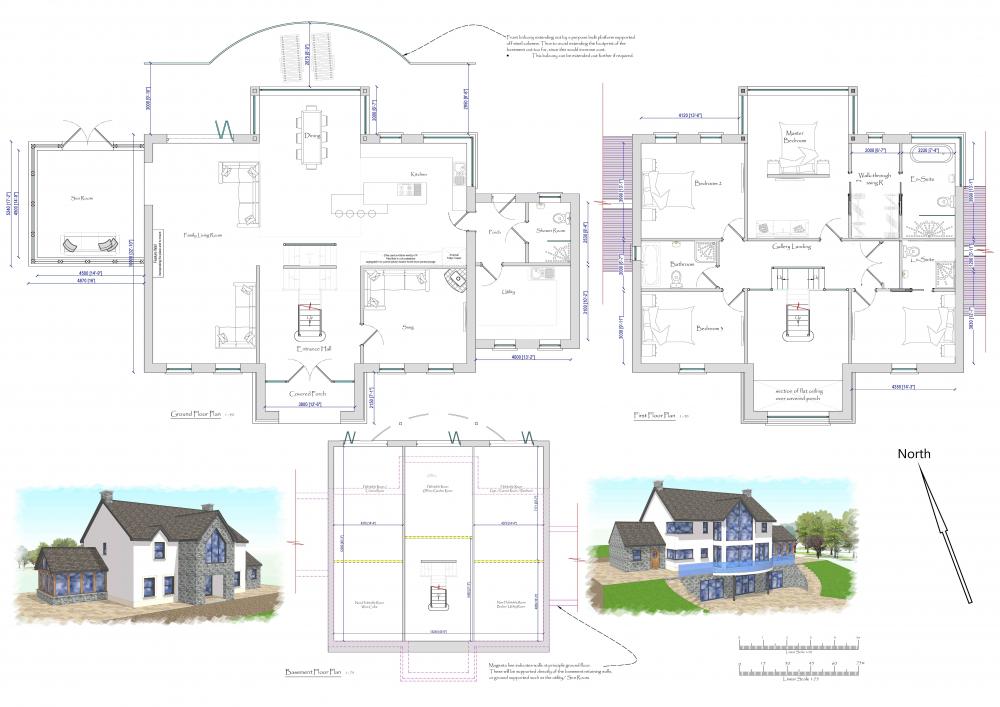
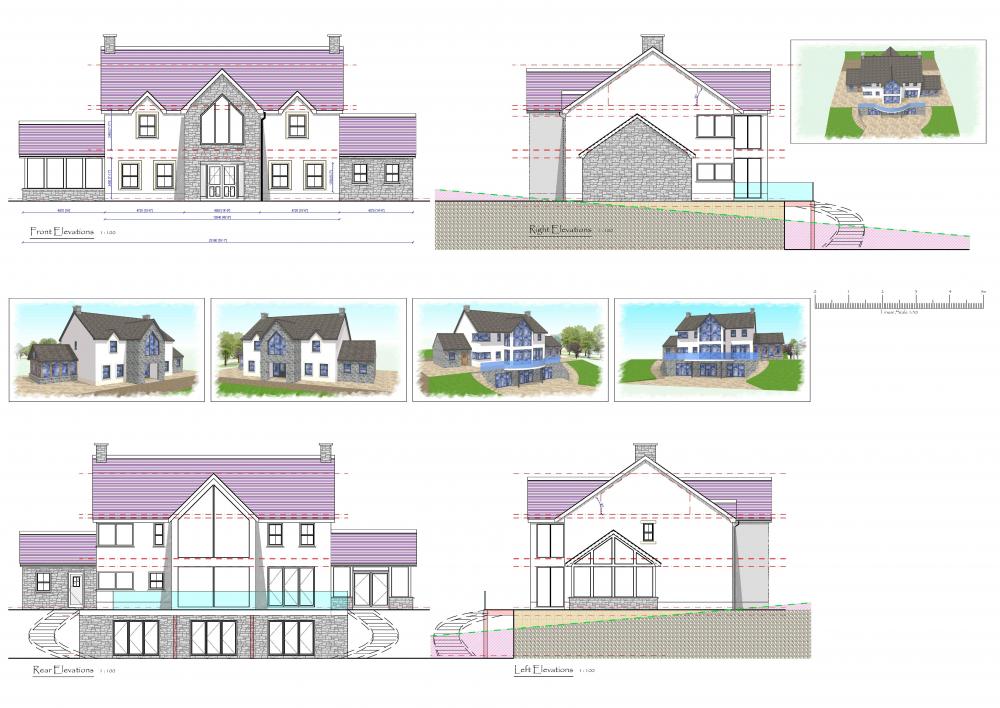
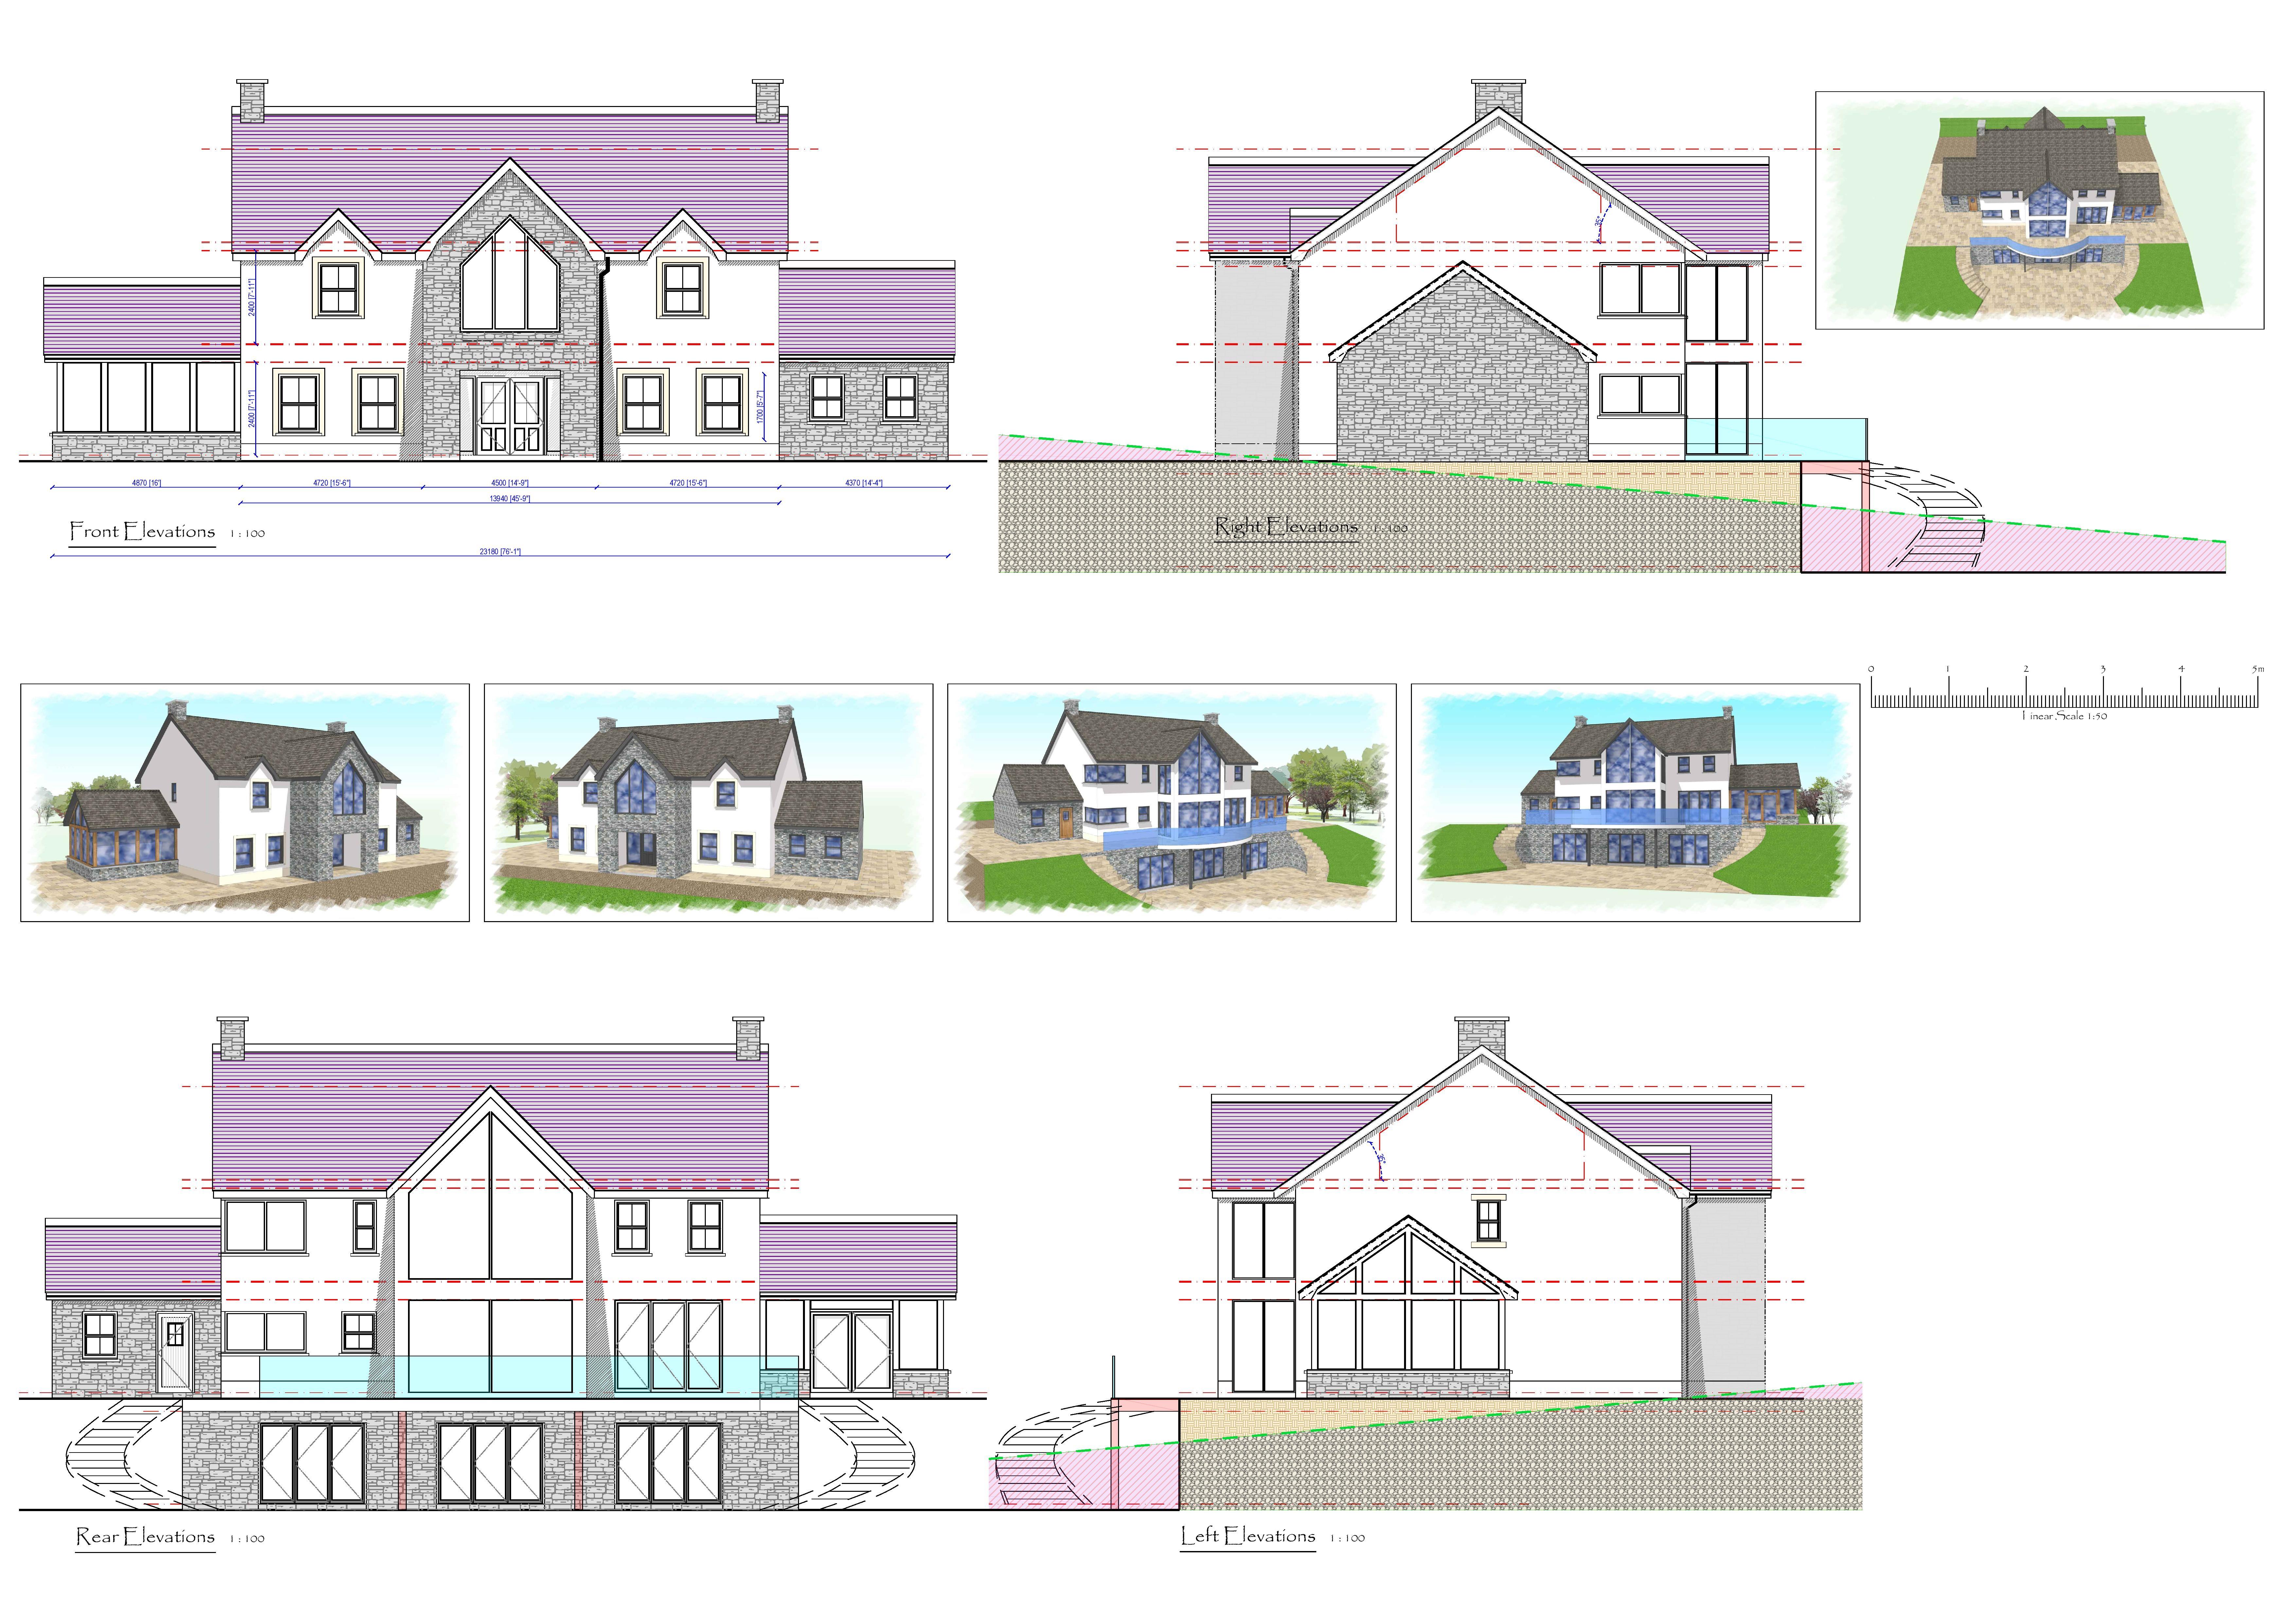
Good evening all. We are about to submit these drawings for planning, and just wanted some feedback of what you all think. Any improvements and recommendations will be highly appreciated, as we may have missed something amidst the excitement of planning a new home. Many thanks Elevation Drawing:
 1 point
 -
Ahh you are alive ! 10mm Plug Cutter is what you need - fits in the drill and cuts a nice plug out of a bit of timber. If it won't release from the source wood just flick it out with a chisel. Glue it in, leave the glue to go off then cut flush with a sharp chisel. https://www.amazon.co.uk/Faithfull-5023969227566-Plug-Cutter-No-10 You can buy them in sets too - I use them a lot and the erbauer ones from Screwfix with the countersink and the matching cutter are brilliant for the price https://www.screwfix.com/p/erbauer-plug-cutter-countersink-set-4-pieces/6418V Nice little video to show you how1 point
-
Happy New Year to you too Zoot! This recent cold weather had me wondering how you were getting on, and I must admit to being quite relieved that you've posted again!1 point
-
Hi chaps, happy new year. I've made my brace & ledge door, trimmed to fit as best I can do. So just to fill my screw holes.. got a shock with price of 'endgrain plugs' @ £ 17. Any other ideas i could use? 10 mm flat bit I've used to countersink screw heads 5 mm deep or so. Ive seen somewhere an eg of making them with a whatnot, but what whatnot's not very clear. zh1 point
-
Thanks , ok I’ll see how we get on , I’m sure that it’s fine. Peter , yes the steels are all grouted in with the correct grout to the pad stones . this was just after we had levelled the steels , fixed down with chem anchors. Well spotted thanks . Rich1 point
-
Yes your better using an impact driver when you attach ply Fine thread screw nice and slow in singles1 point
-
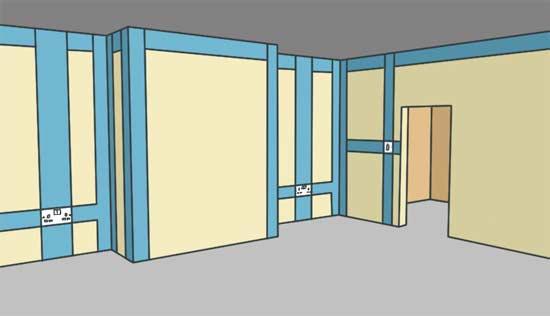
May favourite scheme is have at least one socket on each wall of a room, and run the socket cables around the room horizontally at socket height. Then you can add further sockets anywhere you want to in the room easily when the need arises.1 point
-
Or horizontally at the top of a wall within 150mm of the ceiling. I think this is current (pun).
 1 point
 -
Yer a star Joe + Pete. I was worrying about why just the one..... so when i get a proper roof crawling ladder, I'll tap them all and give each a long hard stare. You've both been a big help. Thanks very much indeed.1 point
-
Yes, as Peter says, release those ridge tiles and have a proper look. When our builder was slating our roof he tapped each slate with his hammer before he fixed them, when i asked he said sometimes the slate has been stressed and will crack later (frost/heat) so a tap with the hammer will break them before they are fixed.1 point
-
No, not at the time, but maybe, yes. I might have tweaked it tight enough to cause an almost invisible fracture, which (after two winters) opens enough to let a bit of water through. Brilliant thought Pete. That hangs together in my mind ..... Thanks a lot.1 point
-
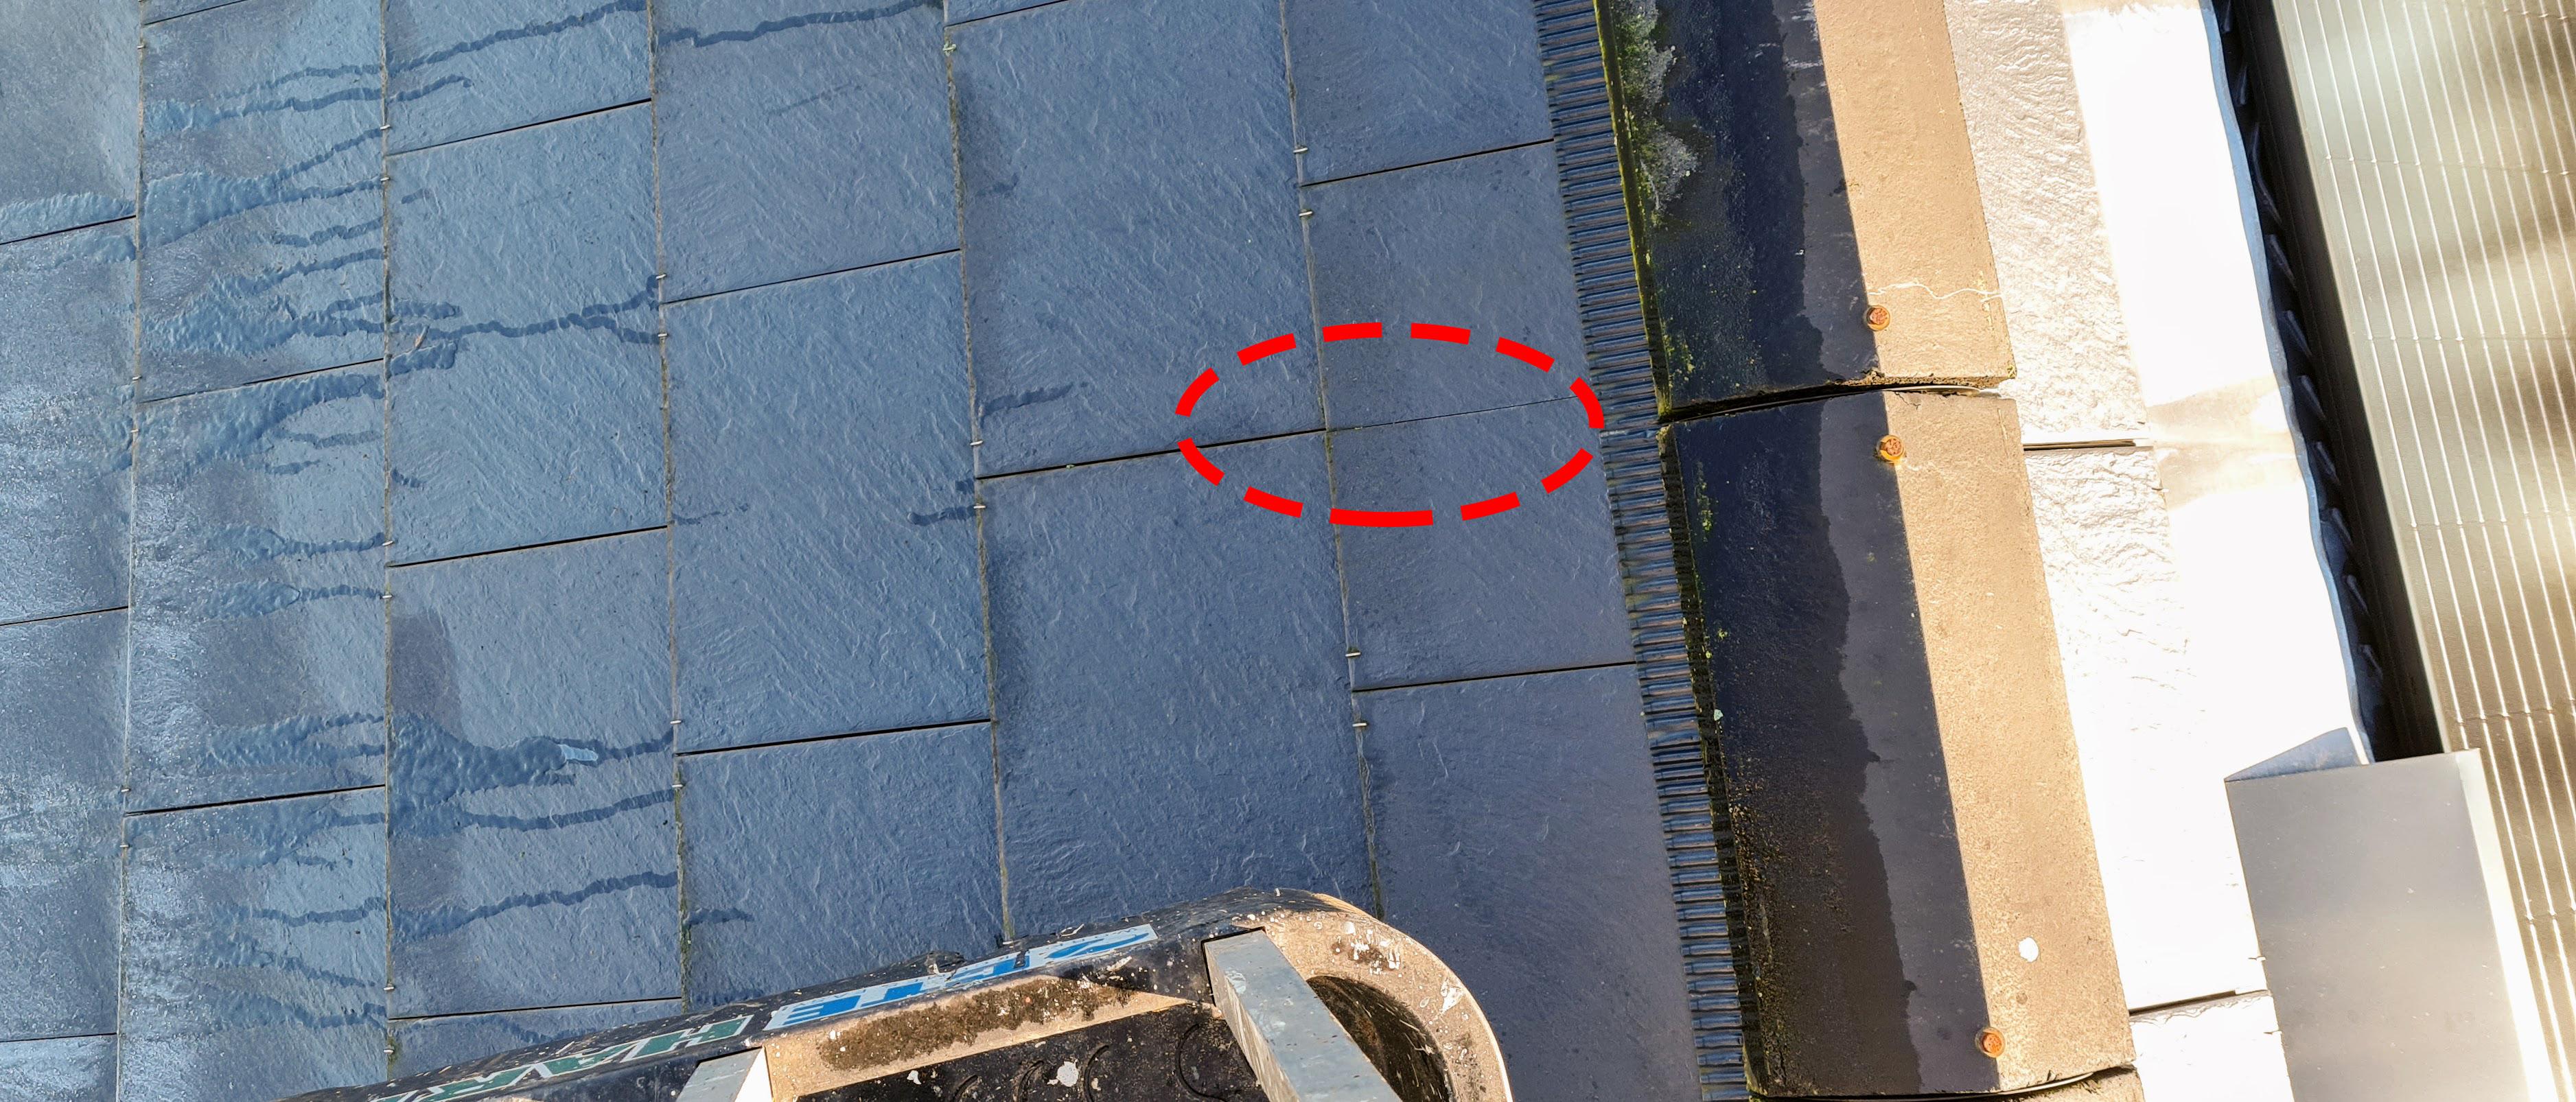
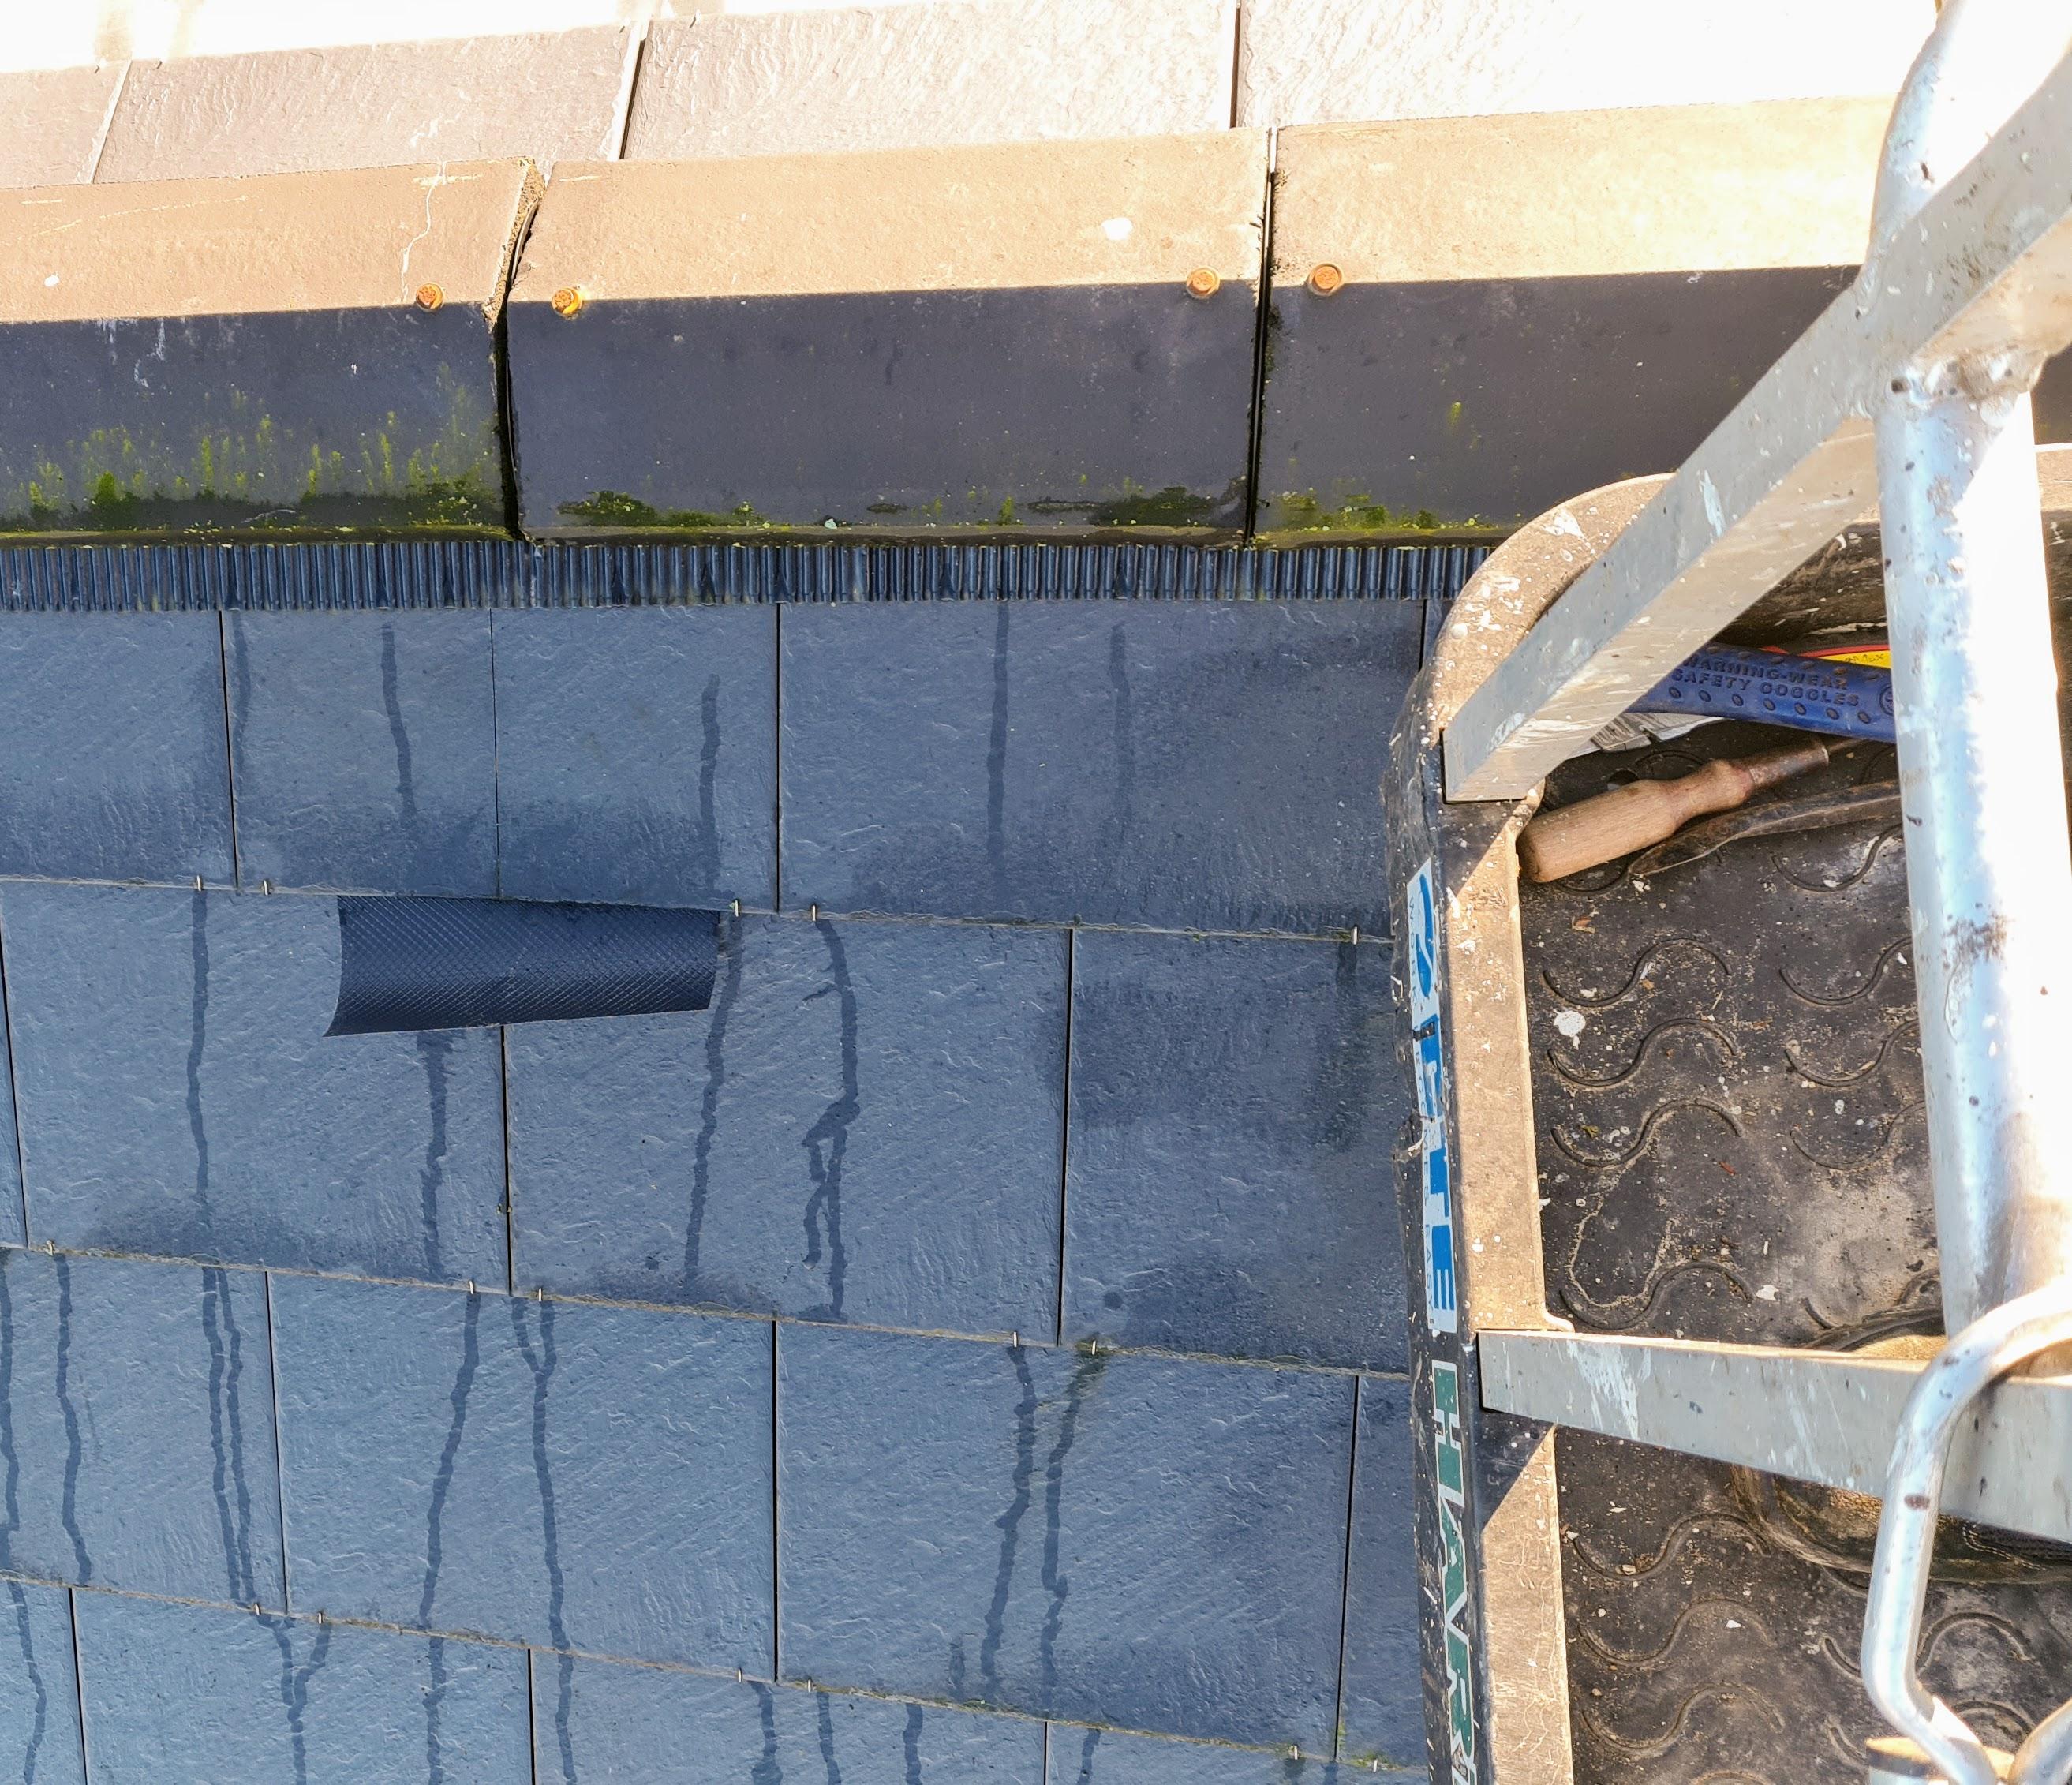
Did the crack in the tile appear just after the ridge tiles were screwed down. The crack appears to line up with the join in the ridge tiles. Could you unscrew or loosen the ridge tiles as they may be holding the cracked tile a lot more firmly than they are held further down the roof.1 point
-
I think it will be fine, the important question is your supply earthing PME, as you don’t want to be exporting the earth if you are using it for a hot tub. normally gland the swa as normal but don’t use a swa gland if it’s going into a metal box use a stuffing gland, so that the earth isn’t touching the metal box, then an earth rod in the ground and a conductor up to the earth termination and connect that earth in. so the DNO earth protects the swa uo to the point of termination and your earth rod takes over for the equipment such as hot tub, where bare feet, water and electrics and PME create a higher risk.1 point
-
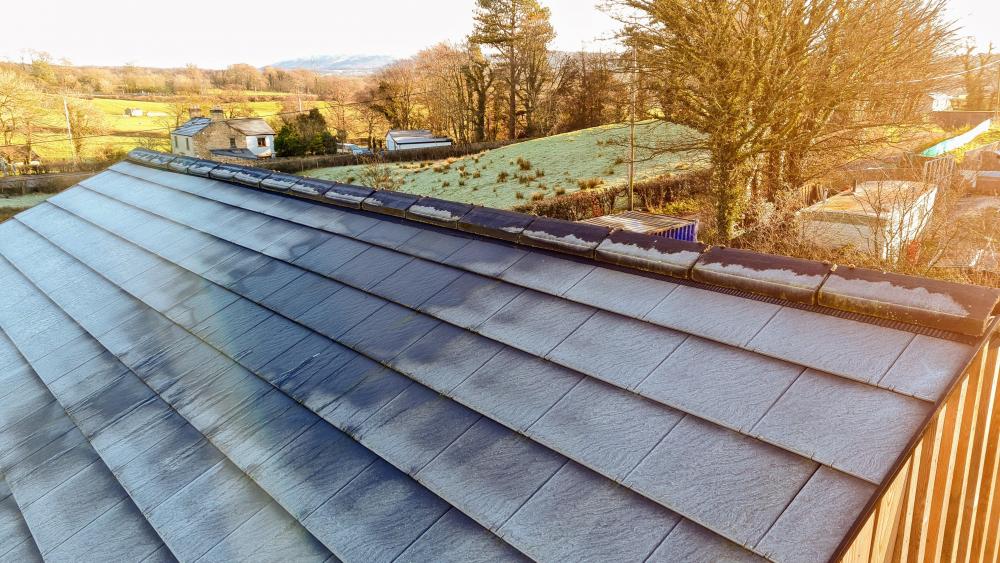
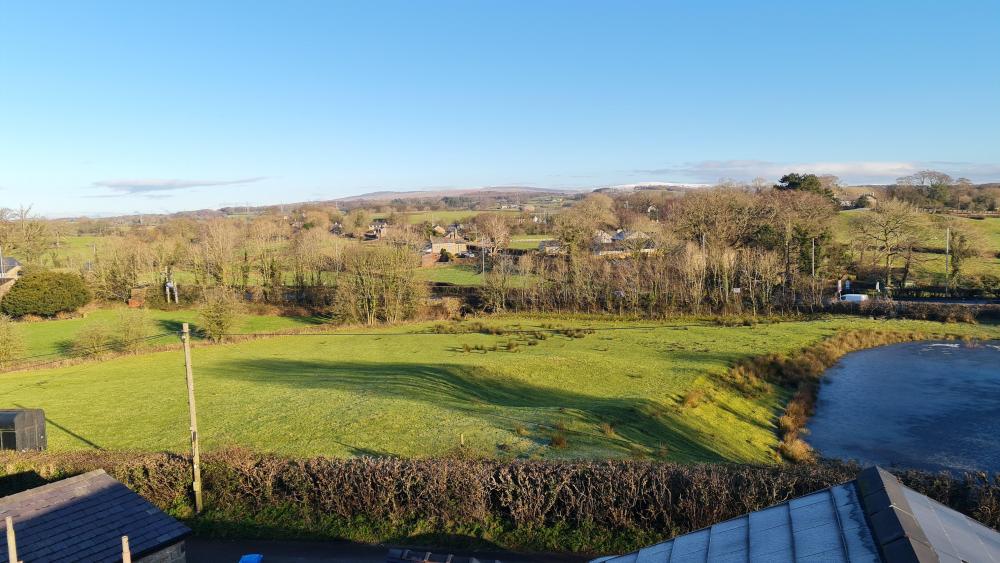
Here's the promised piccies. A general view - you can see the problem area because its (the cracked tile) above part of the house that we have not underboarded with 100mm of insulation yet (already 200 between joists) : all the ice on the roof has melted and the roof has started to dry off - but the rest on the North face is still iced up. The south face (out of sight) is already dry and almost hot to touch. A bit closer in reveals that the broken tile is smack in the middle of the dry patch, right on the ridge over 2 meters in from the edge of the house. The part of the roof on the right - in bright sunlight - was appreciably warm to the touch. You can also see how close the solar panels are. It was so nice up there, I took this photo facing East towards the M6 - which is just out of sight. For a few days during the first Lockdown we had an Osprey fishing in that - now iced - pond: he flew past me (working on the roof) at head height, completely unconcerened. Now for the bad news. Reaching down to the cracked tile was easy: " Assume the position and push, lad " an old instructor used to hiss while we were shivvering with fear and training to parachute from balloons. Flat on my tummy, head shoulders chest out of the basket. Praying that Debbie wasn't watching me hang out of the basket over the roof. She was. ? That tile will be out in a few seconds, I thought. Shove hard upwards. You're probably there before me ... all I did was displace the basket (to the left in this case) by an amount equal and opposite to the effort I put into the shove. Bastard. Newton's Third Law innit. Bummer. Again, harder. Same thing Hang on to the ridge with one hand shove the tile with the other. There are times when I wish I was built with shoulders like an American Oarsman, but my upper body strength isn't what it was - and I never was that strong. It is such an easy job off a scaffold. Two hands, push up on the bottom of the tile, it pops out of its clips, throw the bits away (satisfying smash sounds - tom cat goes haring off into the hedge) and replace with the new one thats in the bag you take up with you. Down. Tea. Biscuit. Think. Pop out to the stillage, get some DPM, lead and lead-replacement , a hammer a knife and some snips . Back up. Will the lead get under the crack? Will it heck. Will the lead replacement get under the crack. Nope. 30 second job to shove the DPM under the crack and cut to size. What have I learned, what's still puzzling and what's next? If you are operating 6 meters up and 3 meters to the side of the CofG of a cherry picker, the basket sways (almost as much as a microlight in a gale). If you are working across yourself (pushing sideways) the basket will duplicate the opposite of that movement. The problem may still have two sources : a rip in the felt ( a split tile shouldn't on its own give rise to a leak) and the cracked tile Hire a cherry picker with proportional controls. In nil wind, I could put the basket almost exatly where I wanted to with ease (and no training). Proportional control means that inputs to the control levers gives proportional output. A gentle smooth nudge means gentle movement. Gross input means larger movements. Why did the tile crack at all? Hmmm ? Temperature contrast? Its not underboarded below crack ( see image above) . Osprey crapping on it? Maybe the felt is touching the insulation between the joists and the water is wicking through the felt to the surface foil on the insulation - and dribbling downhill? Whats next? Design a proper roof ladder for this house, build, test and use along the lines suggested by Ed ( see earlier post in this thread) Buy 4 long scaff poles to use as vertical struts (adapt diagonal braces?) thanks @Construction Channel , so I can brace the scaffolding firmly so it doesn't move away from the side of the house. What have I missed?

 1 point
 -
Not even that. Small ASHPs are reasonably priced, a 30 kW one isn't. In some ways, people that consider swapping should do some research they should start with a basic energy course. I tried to get funding for one a decade ago, was told there was no interest because it had numbers in it.1 point
-
I grew a pair and went for it ?? First 2 fittings up .
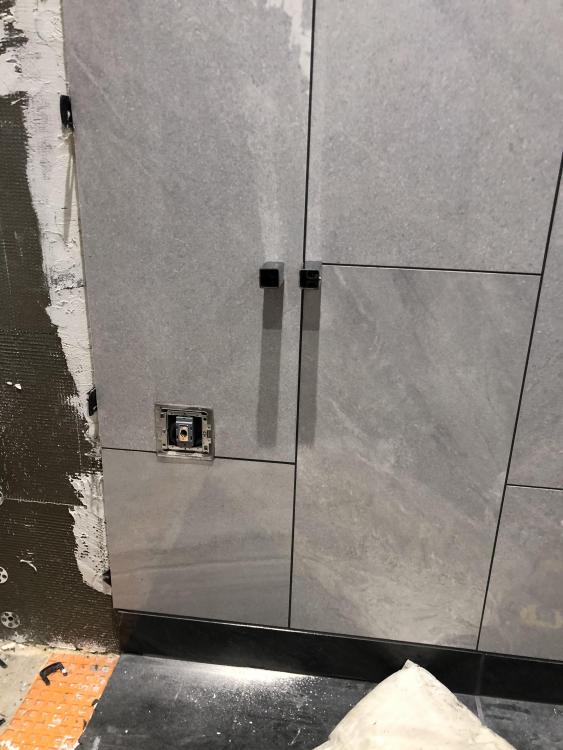 1 point
 -
I have the rads about centred horizontally on the flex outlet and the bottom rung of the rad about 250mm off the floor.1 point
-
Make the flex short enough so it does not catch on anything / trip hazard.1 point
-
You either space it out with slightly bigger perps or when it gets to around 50mm you tighten up to allow you to squeeze a brick in. Make a height stick with the heights of the block coursing marked on it, 225mm,450,675,900, etc. And nail it plumb to each external corner. A corner block on each side and a string set at the mark and build to the line. The height is much more important than the width. You can always put extra mortar on a perp. Cutting blocks down as your heights are out is a problem you don't want.1 point
-
I checked a minute ago and it looks like they join together.
 1 point
 -
We've got three electric towel rails which I fitted. Once connected up I turned them on with the top vent plug removed to allow the fluid to expand. Some fluid may come out of the plug hole when it's hot so best to drape an old towel around it. When it's up to temperature turn it off and refit the vent plug.1 point
-
Easy peesy to put the element in, they have a rubber o ring to make water tight so hand tight then a “tweet” with a spanner but don’t overtighten.1 point
-
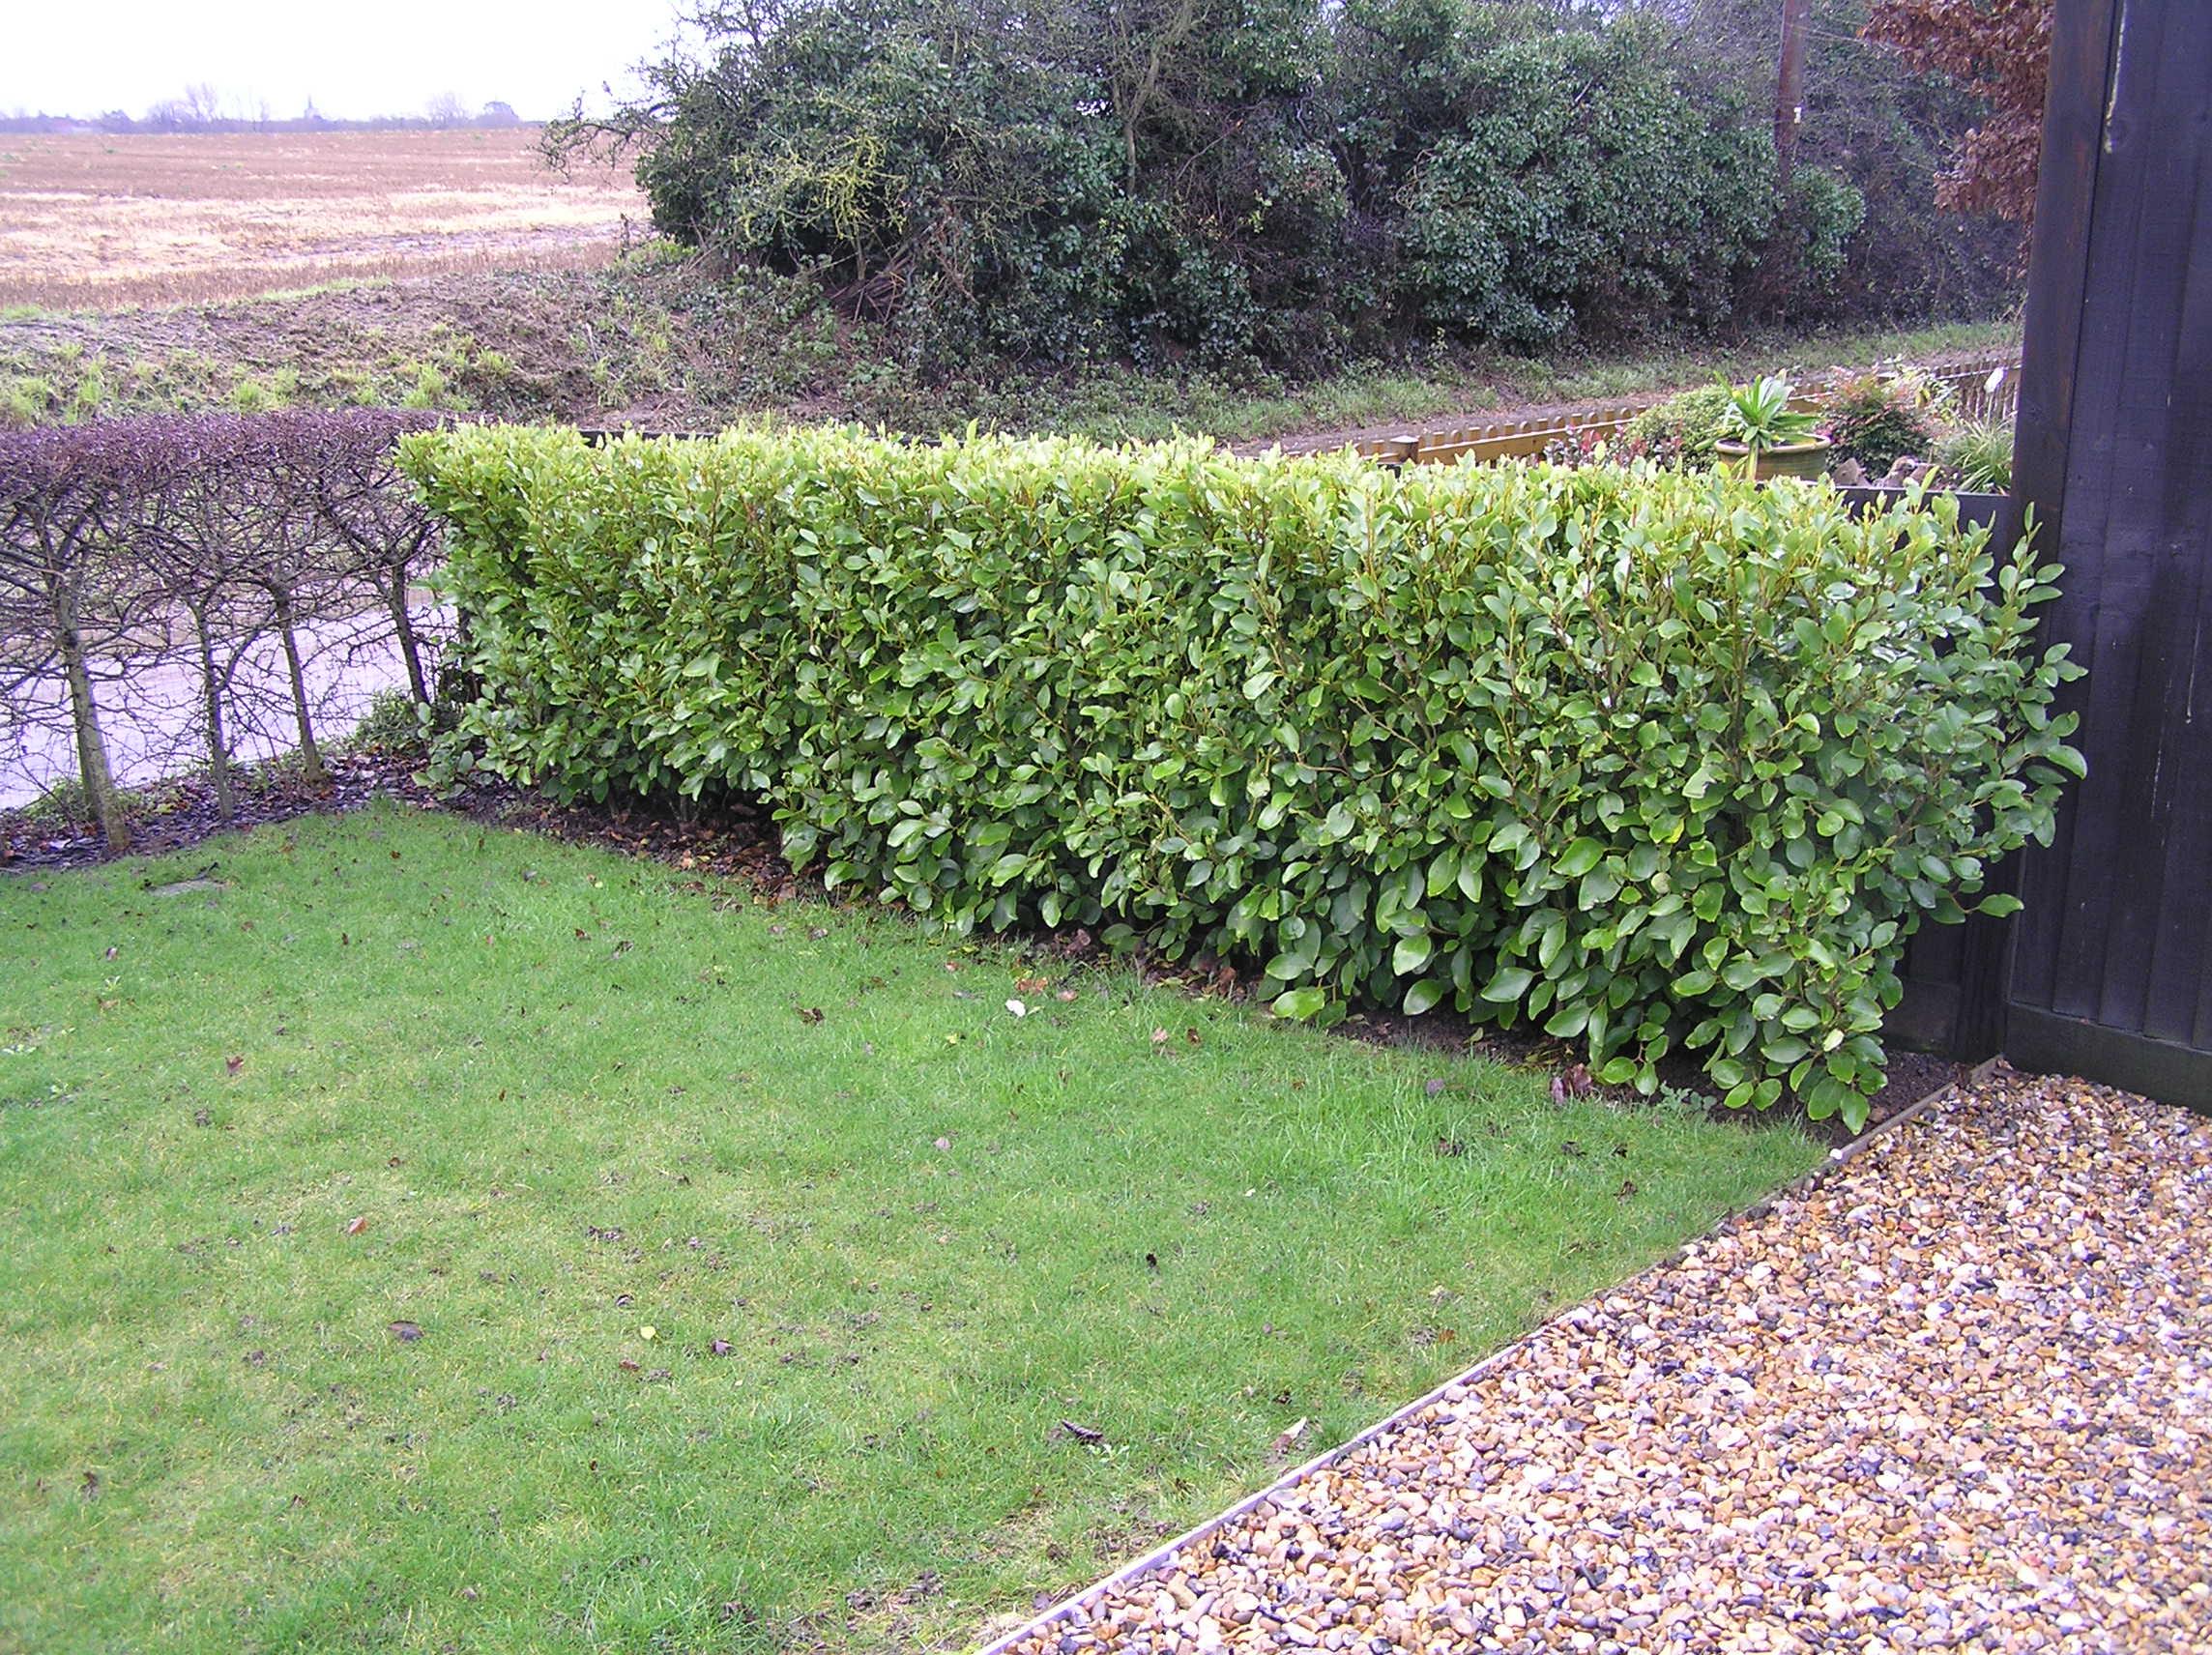
We have a short section of Griselinia littoralis which is perfect for a low level hedge, 1m high. It's evergreen, nice shade of green, not fast growing and easily trimmed.
 1 point
 -
We dry our washing in the wet room which has an electric towel rail and a MVHR extract vent. It dries overnight.1 point
-
For that reason I have a hood with a bfo remote external fan with 150mm ducting. Good for stir fries.1 point
-
70w is pretty decent. Around 1p an hour. She has a thing against tumble driers... Damage to clothes and unnecessary power consumption. But throw a new born in to the mix with the increased washing load, and I can see that opinion quickly changing!!1 point
-
Yes, the COP of the ASHP but as we had no UFH upstairs the work/grief was not worth it for the short time they are on and only in winter (IMO). Ok, so overall the cheapest way to run these rads is to use water, and taking advantage of the COP offered by the ASHP. However low wattage options are available. What are the wattage of your elements? But the better temps and simplest route for installation is electric. This cuts out the need to take any heating solutions from the ASHP upstairs saving on the plumbers time needed for the job.1 point
-
Benefit of pressurising them is that you proove them once fitted, but also stops them collapsing when walked upon, and people will step on them regardless of how careful you expect them to be. They won't freeze while the slab is curing due to thermal rise in concrete. If you want to drain them once concrete will bare your weight (a few days) you could blow them out with compressed air.1 point
-
With a vented dryer you are throwing energy straight out of the wall. You could get rid of the MVHR and just leave the windows open! Why the rush for quick drying?1 point
-
I've got the cartoon from the last one. (Except if I understand the physical jerks correctly, the ropes were attached to the tighty-spotty-polka-dotties, Wedgie Benn style.
 1 point
 -
I concur, I didn’t put an extract in the airing cupboard, it’s central to the house so any (minimal) heat that escapes warms the upstairs (in fact SWMBO says the airing cupboard is not warm enough ?).1 point
-
for that reason I used a recirculating hood with charcoal filters and the extract 2 mtrs away. Works well Aint going to happen Why, I just made sure 13amp sockets were in position for a small portable electric rad if required (and they haven’t).1 point
-
The only problem with that approach is that if in the future a lot of frying of food takes place the oil droplets will condense on the inside of the ductwork. Not an easy job to clean.1 point
-
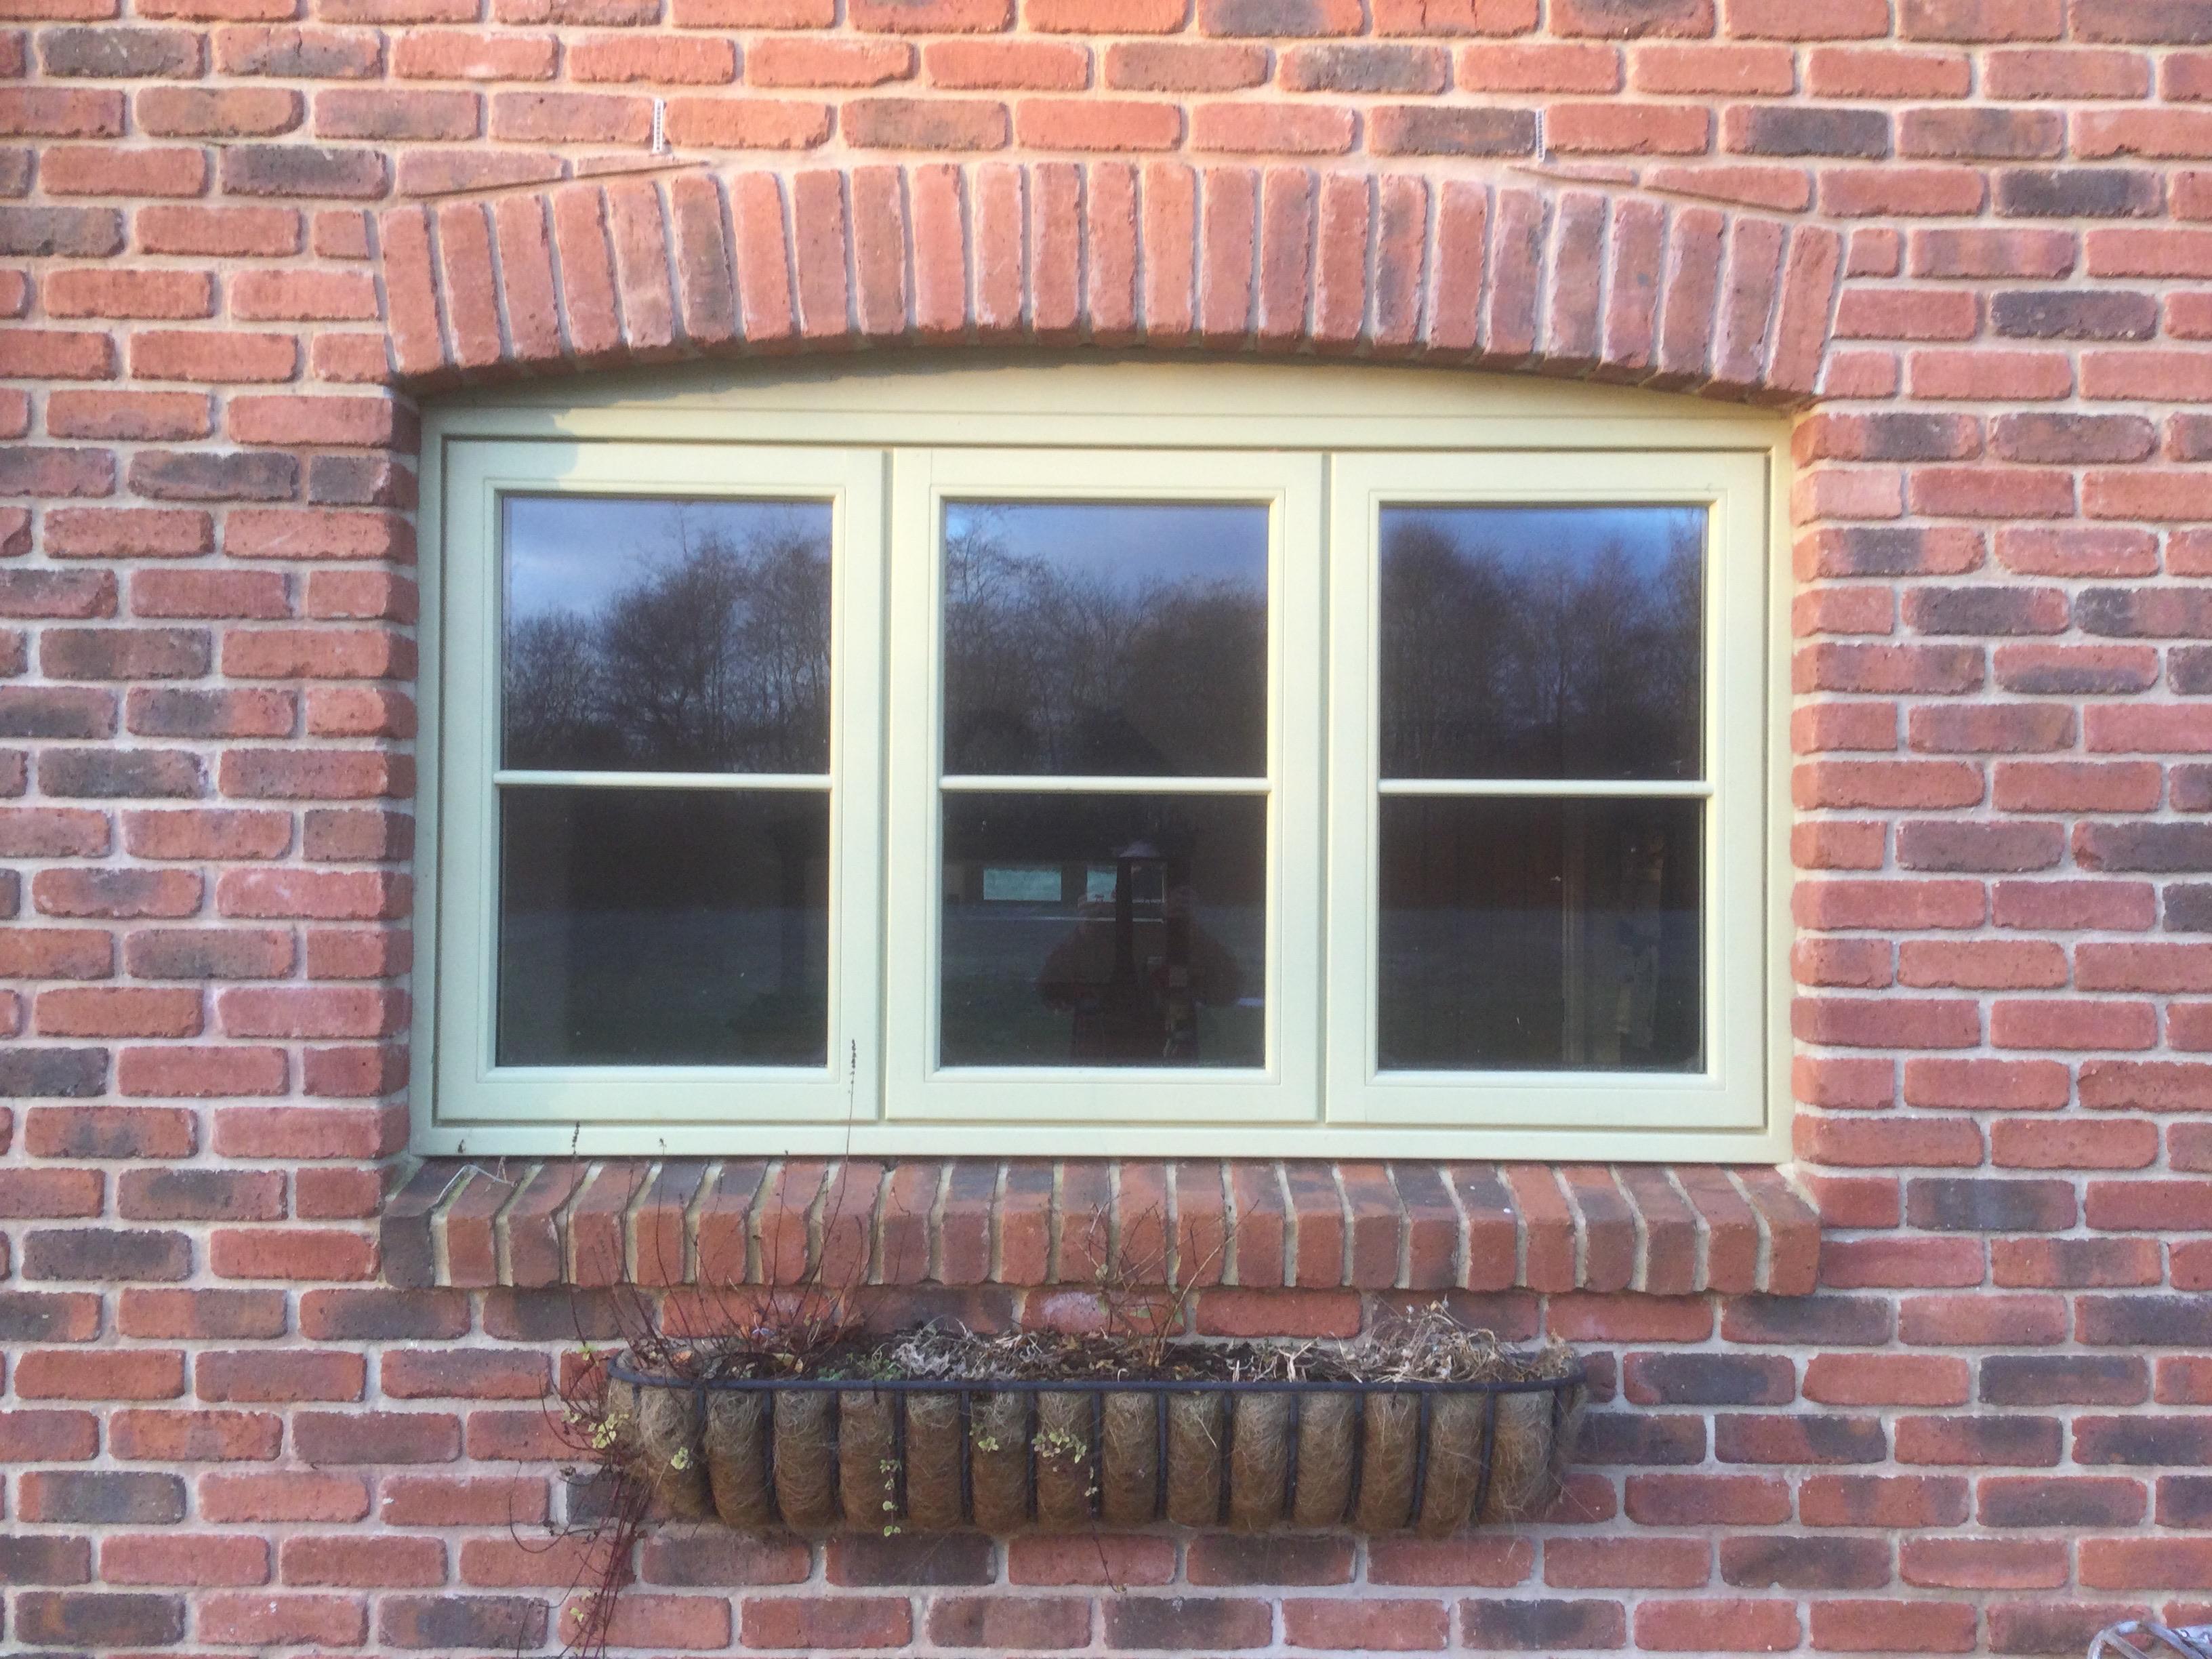
Better pic ? I don’t think that arch is a problem as the pillars each side are substantial. The only brickwork the arch supports is a triangle of bricks above it at 45’ and I guess that does not reach the bedroom window above. It’s amazing how low an arch can be and still self supporting, just check there is no cracks in the joints which will indicate movement.Here is a pic of one of mine .
 1 point
 -
We have used Miele dishwashers and washing machines, both integrated and free standing, for the last twenty years, in different houses, without any problems.1 point
-
Davejura.. I suspect that you secretly you want it too!...but.. just and so on. I built a house with UF on both ground and upper floors, suspended solid timber joisted floor on both the ground floor and first floor. The first floor had the plaster board ceiling, 195 mm deep joists and 22mm chipboard, carpet on top. Glass wool between the joists 100 deep, netting over the top of the joists to which the UF pipes were attached to with bits of garden tie wire we cut up. The netting tended to hold the pipes up against the floor and surprisingly it all worked pretty well. Didn't destroy the carpet. It was all done on a shoe string budget a good 25 years ago. I still keep in touch with the folk that bought the house and it is all still working. With hindsight I would have gone for the plaster board ceiling, some 9.0mm thick OSB board on ledgers attached to the sides of the joists, with a lean mix screed encapsulating the pipes. This adds mass, thus sound protection and spreads the heat more. The down side at the time was that this extra load of the screed added to the cost of the joists so I took a chance. We know heat rises so keeping the bedrooms on the ground floor is a good idea as you know if you want a cooler bedroom to sleep in. All I would say is that at the concept design stage make an allowance for the extra weight of the screed when sizing your floor joists, keep your options open, at the very least if you don't at the end of the day go for a heavy screed then you'll still have a good stiff, non bouncy floor. Oh, and the West of Scotland is a great place to live. All the best1 point
-
190mm for £7: https://www.ebay.co.uk/itm/110-200mm-Bi-Metal-M42-HSS-Hole-Saw-Cutter-Drill-Bit-For-Aluminum-Iron-Pipe-Wood/264636749412?1 point
-
I am eagerly awaiting the tale of how this goes..... I have used some varying sized machines and they all sway/bounce a lot more than you think. BUT they are pretty hard to get to tip over as they come with so many alarms. When was the last time you cleaned the gutters on the old house?1 point
-
As a consumer, you can not usually contact Openreach directly as they only deal directly with the service providers (BT, Talk Talk etc..). However, you can engage with them when they're on site. Here's my suggestion, based on what I did for my site where I wanted to avoid re-connection to the pole and instead route underground (I had done all the ducting & drawstring on my side). 1) pick a provider and submit an order for a new connection, should be free or near to but you will need to sign a 12 /18 / 24 month contract. 2) OR will book a visit, sometimes the attending engineer can survey but they may need to come back with a more qualified head. This is when you can quiz them on what needs done and what the options are. i.e. doing your own ducting, digging, road crossing and cable laying - you can buy the OR approved grey ducting and gel filled cable which, if you leave at the base of the pole they will happily use (or if you're lucky they may give you some). My guy advised that I would be better off doing most of the work independently as it would be much cheaper. 3) OR will generate a formal quote and you can then price up your DIY alternatives. As expected, OR was almost twice what I could do independently as they're using 3rd party firms for road work etc who charge by the metre. However, ensure your own option has priced necessary permits for road closures and will do the correct finish etc. Also consider 'moleing' under the road which can work out cheaper. 4) If you want to use OR, accept their quote. If not, decline quote and allow order with the service provider to lapse. Go get your enabling works done independently. 5) When ready, go back to step 1 (you need to wait at least 30 days for the original OR quote to expire) and when OR come to site to survey they should be happy with what has been done.1 point
-
But we love toys.1 point
-
When I did one of these it was a Vent Axia Sentinel Kinetic Plus and I got their approved supplier to do a design. It worked OK. It was not a radial system based around manifolds and used 125mm rigid duct with tees / branches. On a small 3 storey there were only 2 main ducts vertically - for the supply and extract. Make sure there is space around the unit to remove the filters for cleaning. It can be better to have the extract vents within the shower areas. The supply vents were sited away from the door into the room, so the air travels across and under the door gap, leaving no dead areas. Avoid clashes with SVPs.1 point
-
Xmas has been well spent working on MVHR research and calcs. Does someone mind having a quick check over my calcs? A few points of note: - I've narrowed it down to four possible units, each with a max rate of between 300-350 m3hr. Based on the calcs, this would be a 36%/67% usage of unit capabilities (regular/boost) for 350 m3hr units, or 42%/78% for 300m3hr units. Is 78% in boost mode still acceptable if we were to choose a 300m3hr unit? - I'm aware that rooms under 4sqm don't need to be included in the extractions. However, there are two rooms in the property that are smaller, but will be damp rooms. The drying room is small, but will be used over the winter months to dry clothes. The cloakroom will be on the groundfloor, so will have UFH and will be used to store boots/coats etc, so there will be water vapour in the room. I presume it is ok to include extraction points in these rooms? I have these spaces with a minimum extraction rate of 8L/s. Is this correct, or is it better to categorise these as WC's, which only require 6L/s as per building regs? - Is it best to leave the hall/landing/vestibule areas - which are centrally located to rooms with extract/supply points - as transfer space? Or can supply valves be added to these spaces? Through my research, I've noticed that these areas don't usually contain supply outlets. - The longest ducting run is just under 15m, so each run is based on single ducting as, based on calcs, it seems our velocity is well below the 2.5m/s advised here on BH as a maximum so each run is single duct. This, in addition to the unit usages in point one should result in low noise output from the unit?
 1 point
 -
Why not get her to quote for as far as the planning application stage and after that they agree to hand over CAD versions of the material should you choose not to go with them for building regs?1 point
-
I think you've answered your own question there, the best people cost the best money generally! Only you can decide if the value is there in having someone you really want to work with and will trust to give you what you want out of the process. It sounds like they have got everything bang on, in terms of what you've asked for (not necessarily what you want to pay for) and they've understood your pain points. We have offered a similar package in the past of a building regs+ package for self builders, the building regs drawings are made for the purpose of proving the design meets the buidling regs so there will be a good bit of interpretation on the specifics for construction - again it sounds like they've offered you the best fit for your needs but it's up to you whether you see the value in it - I would imagine that the drawing package won't be significantly different but the specifics will be (i.e. they might show threshold details for specific manufacturers doors in your specific construction etc) A word of advice, don't go down the hourly route when you can't define the scope into very small chunks, no one likes working on an hourly rate and it introduces a bit of mis-trust when you get the invoices in - the lump sum route is better for everyone. The planning conditions and committee service is an interesting one - yes, not every application will go to committee, but if it does, then you have the worry of how much in additional fees you are racking up, if it goes to a second hearing etc there could be significant unknowns in there. Conditions generally should be straightforward enough to discharge, but again there is potential in there for something to become sticky so it's all about your attitude to risk, whether you want to be certain of the maximum costs or want to be hopeful of the minimum costs1 point


This leaderboard is set to London/GMT+01:00