
Leaderboard


Popular Content
Showing content with the highest reputation on 08/03/20 in all areas
-
Yes of course i’ll do that.. i’ll do it in sketchup tomorrow before sending it to the engineer to check it all out.2 points
-
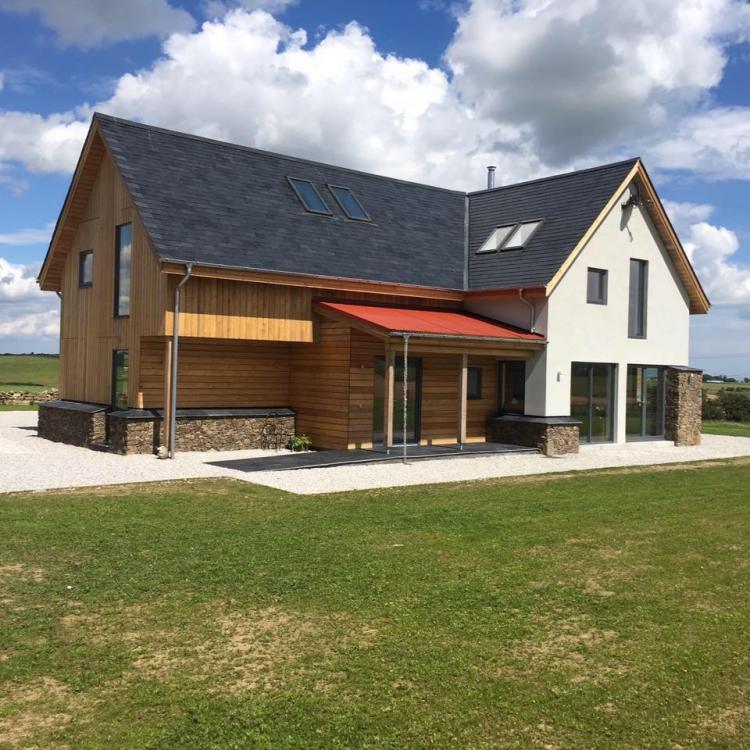
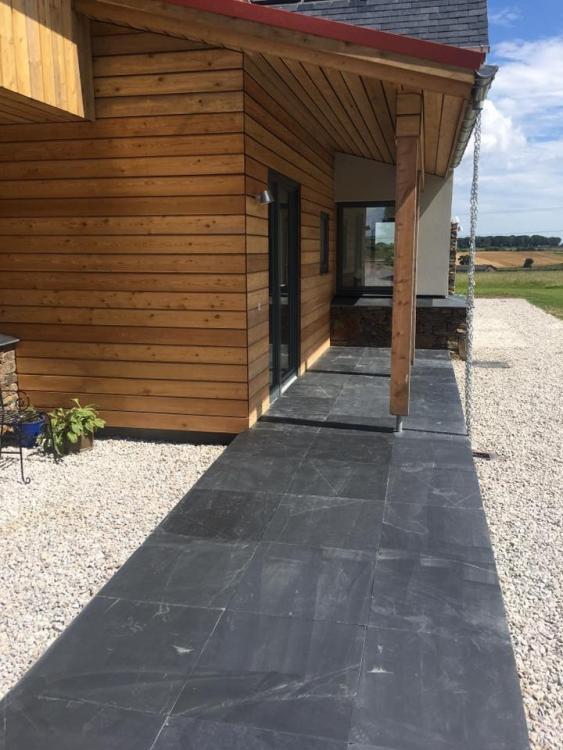
First all my apologies as this blog entry is about about a year late given that we moved in August 2019, but better late than never as they say ! Moving on from finishing the shell, we moved onto completing the inside. We knew from previous experience this would be the most intensive part of the build and had tried to make as many decisions up front as we could regarding bathrooms, kitchens and flooring, nevertheless there were still a lot of decisions to make. Everything went broadly to plan with the electricians, plumber, carpenters and decorator all working well round each other and coordinated by the builder who had put up the shell. There was an awful lot of work ordering everything and making sure that material was on-site at the right time. There was the occasionally thing that didn't go to plan, most notably the kitchen where i had the bad luck to have my kitchen delivered with many missing and damaged components and a supplier who took 8 weeks to sort everything out. The trades were proactive and happy to suggest how we might achieve what we were looking for which was a great help, but by the end of the project we were both fit to drop. Self build is a very rewarding but exhausting business. Here are some pictures of the finished house. There is still a little bit of landscaping work, the fencing and some furniture to sort out and I guess at some stage we will sort out some blinds to replace the high-tech cardboard that is doing the job at the moment. Following the build, we sorted out the VAT refund - 500+ invoices and a £32,000 refund for VAT. I ordered just about everything and given the number of invoices I got someone to prepare the submission to HMRC this for me which was money well spent. The electrical certificate, certificate for the unvented cylinder, building certificate and warranty were sorted out and finally the last submission for the CIL exception was made. The Dog seems to like her new home ! Still a bit of work to do in the garden View from the study window1 point
-
Hello Folks My name is John and i live on the South Coast of England in Portsmouth. I love woodworking and have a workshop full of heavy English machinery such as three spindles, an up and over planer and a tennoner to name a few. At this present time i am carrying out a DIY loft conversion which i am about 20% of the way through. I stumble on this forum while surfing the net carrying out research. The loft conversion i am working on is probably the hardest project i have ever taken on and it is certainly challenging in so many ways. For my loft conversion i have had drawing and structural calculations done. The drawings have turned out to be absolute rubbish and have cost me quite a few days in redoing things such as moving floor joists and getting steel cut down. I apologise in advance for any confusing rubbish that i might post as writing anything clear and sensible is a trait is a skill i have yet to master. I hope i can put in more than i take from this forum but it probably be more take lol John1 point
-
Aka "when" then!1 point
-
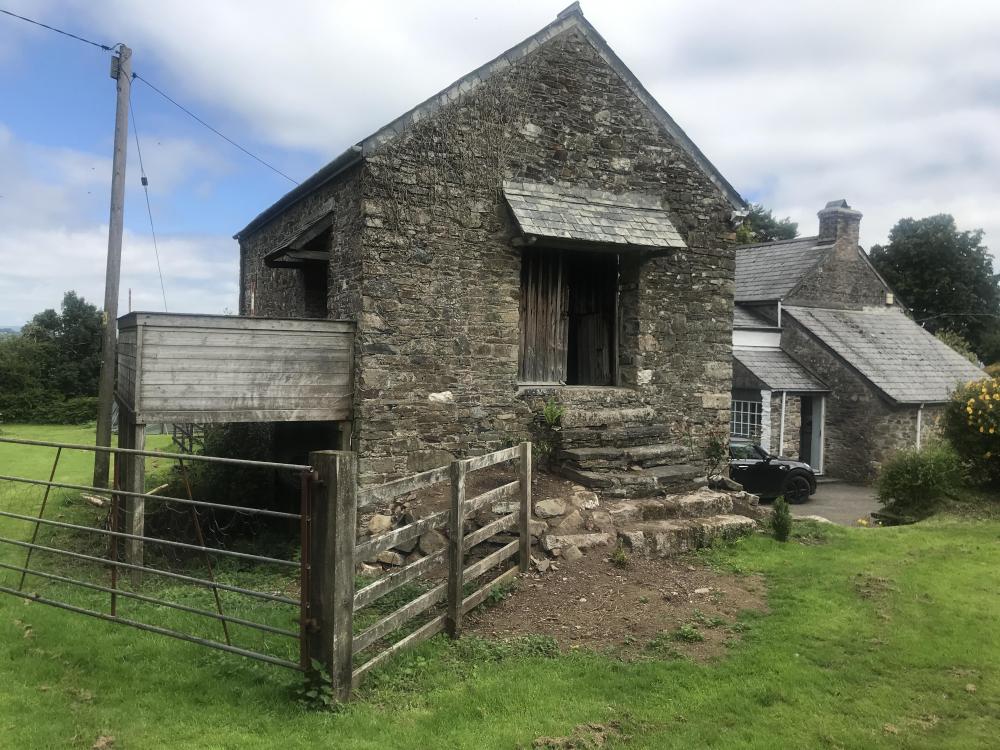
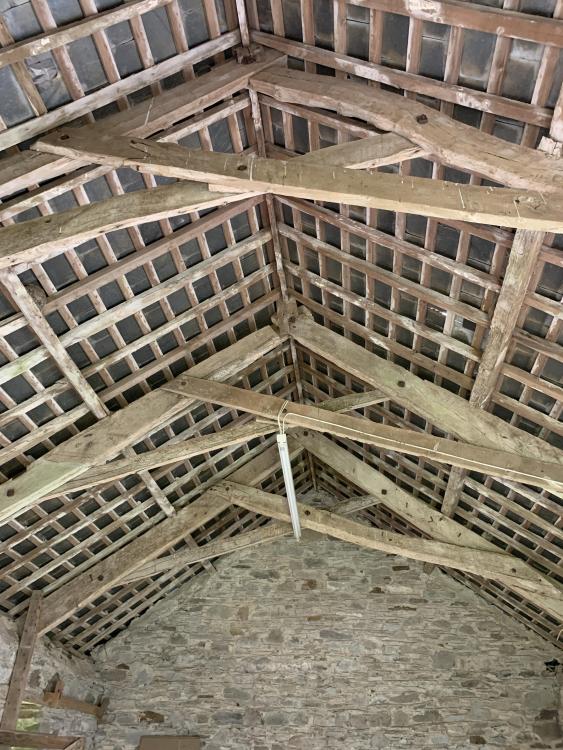
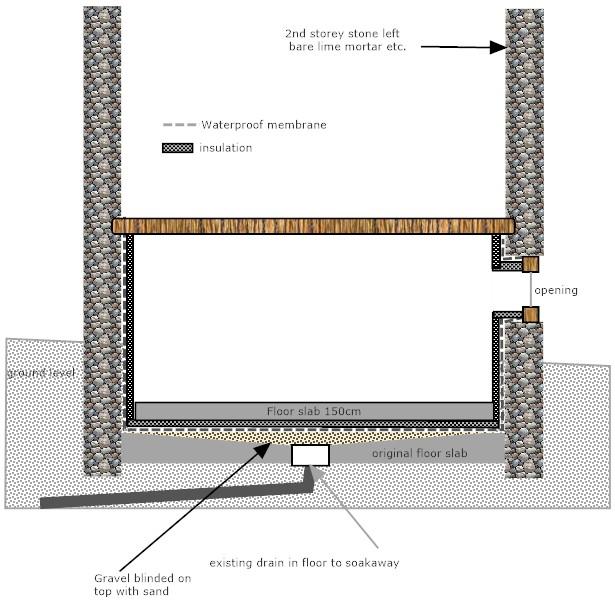
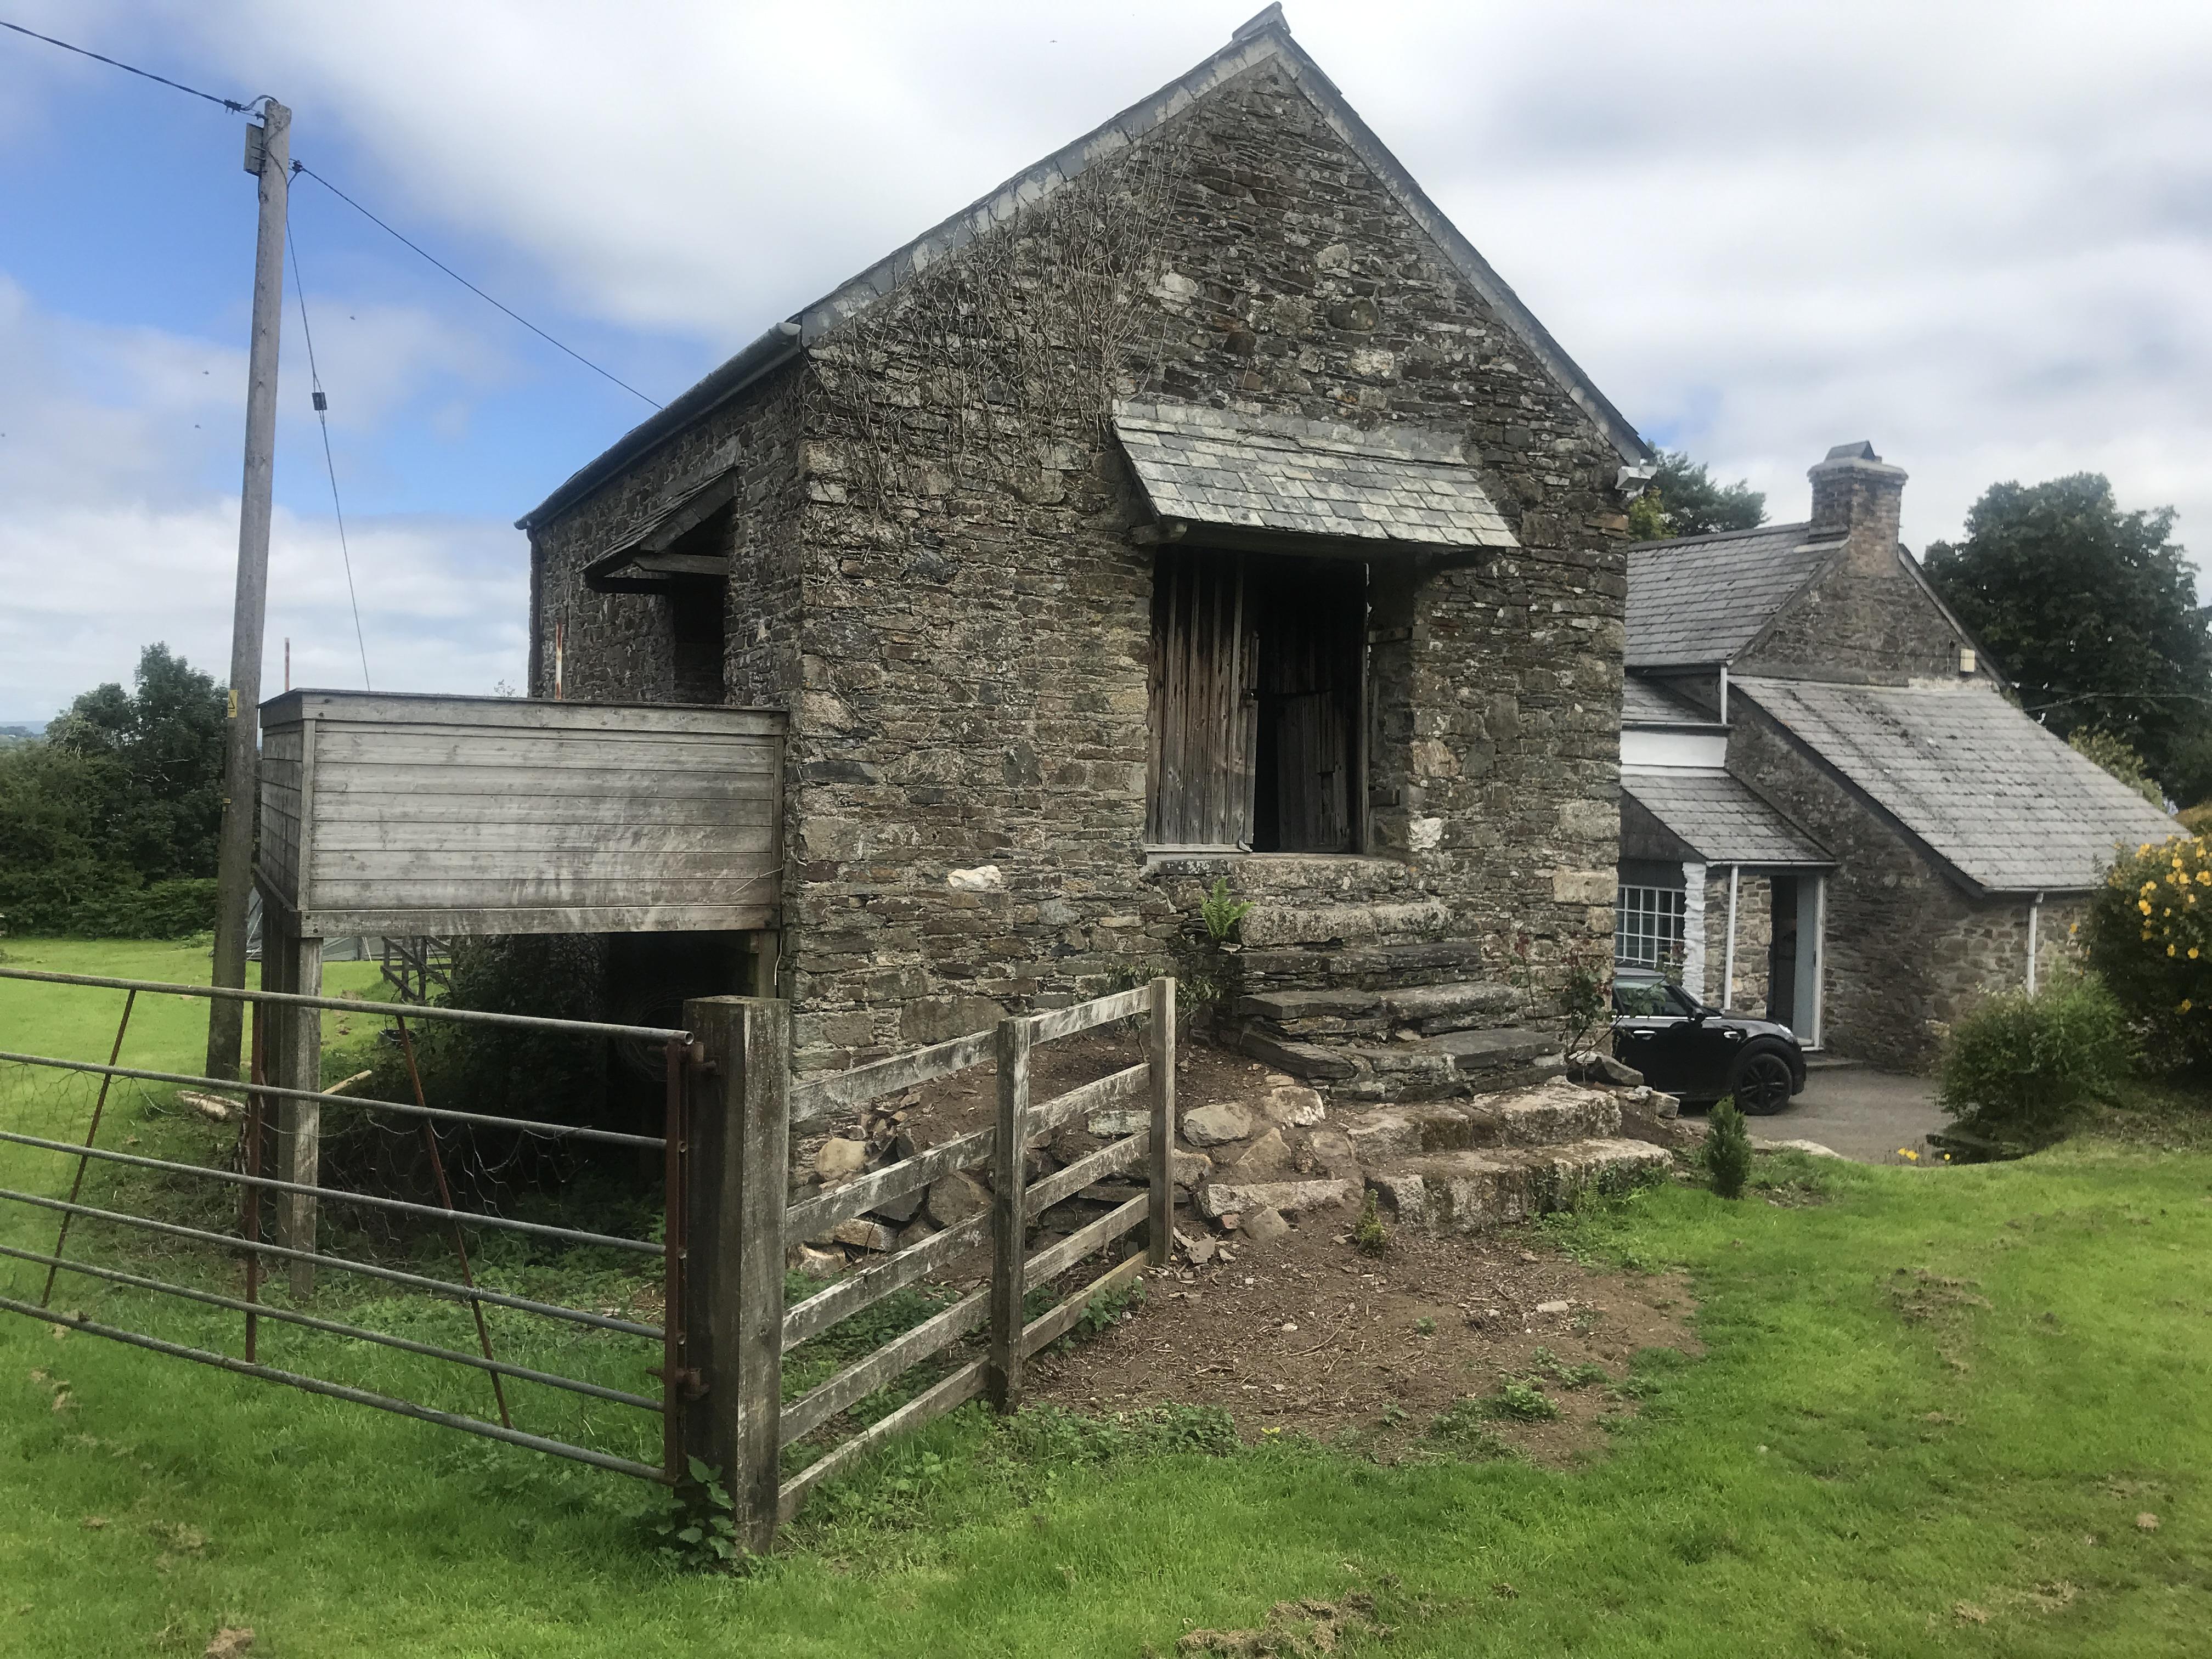
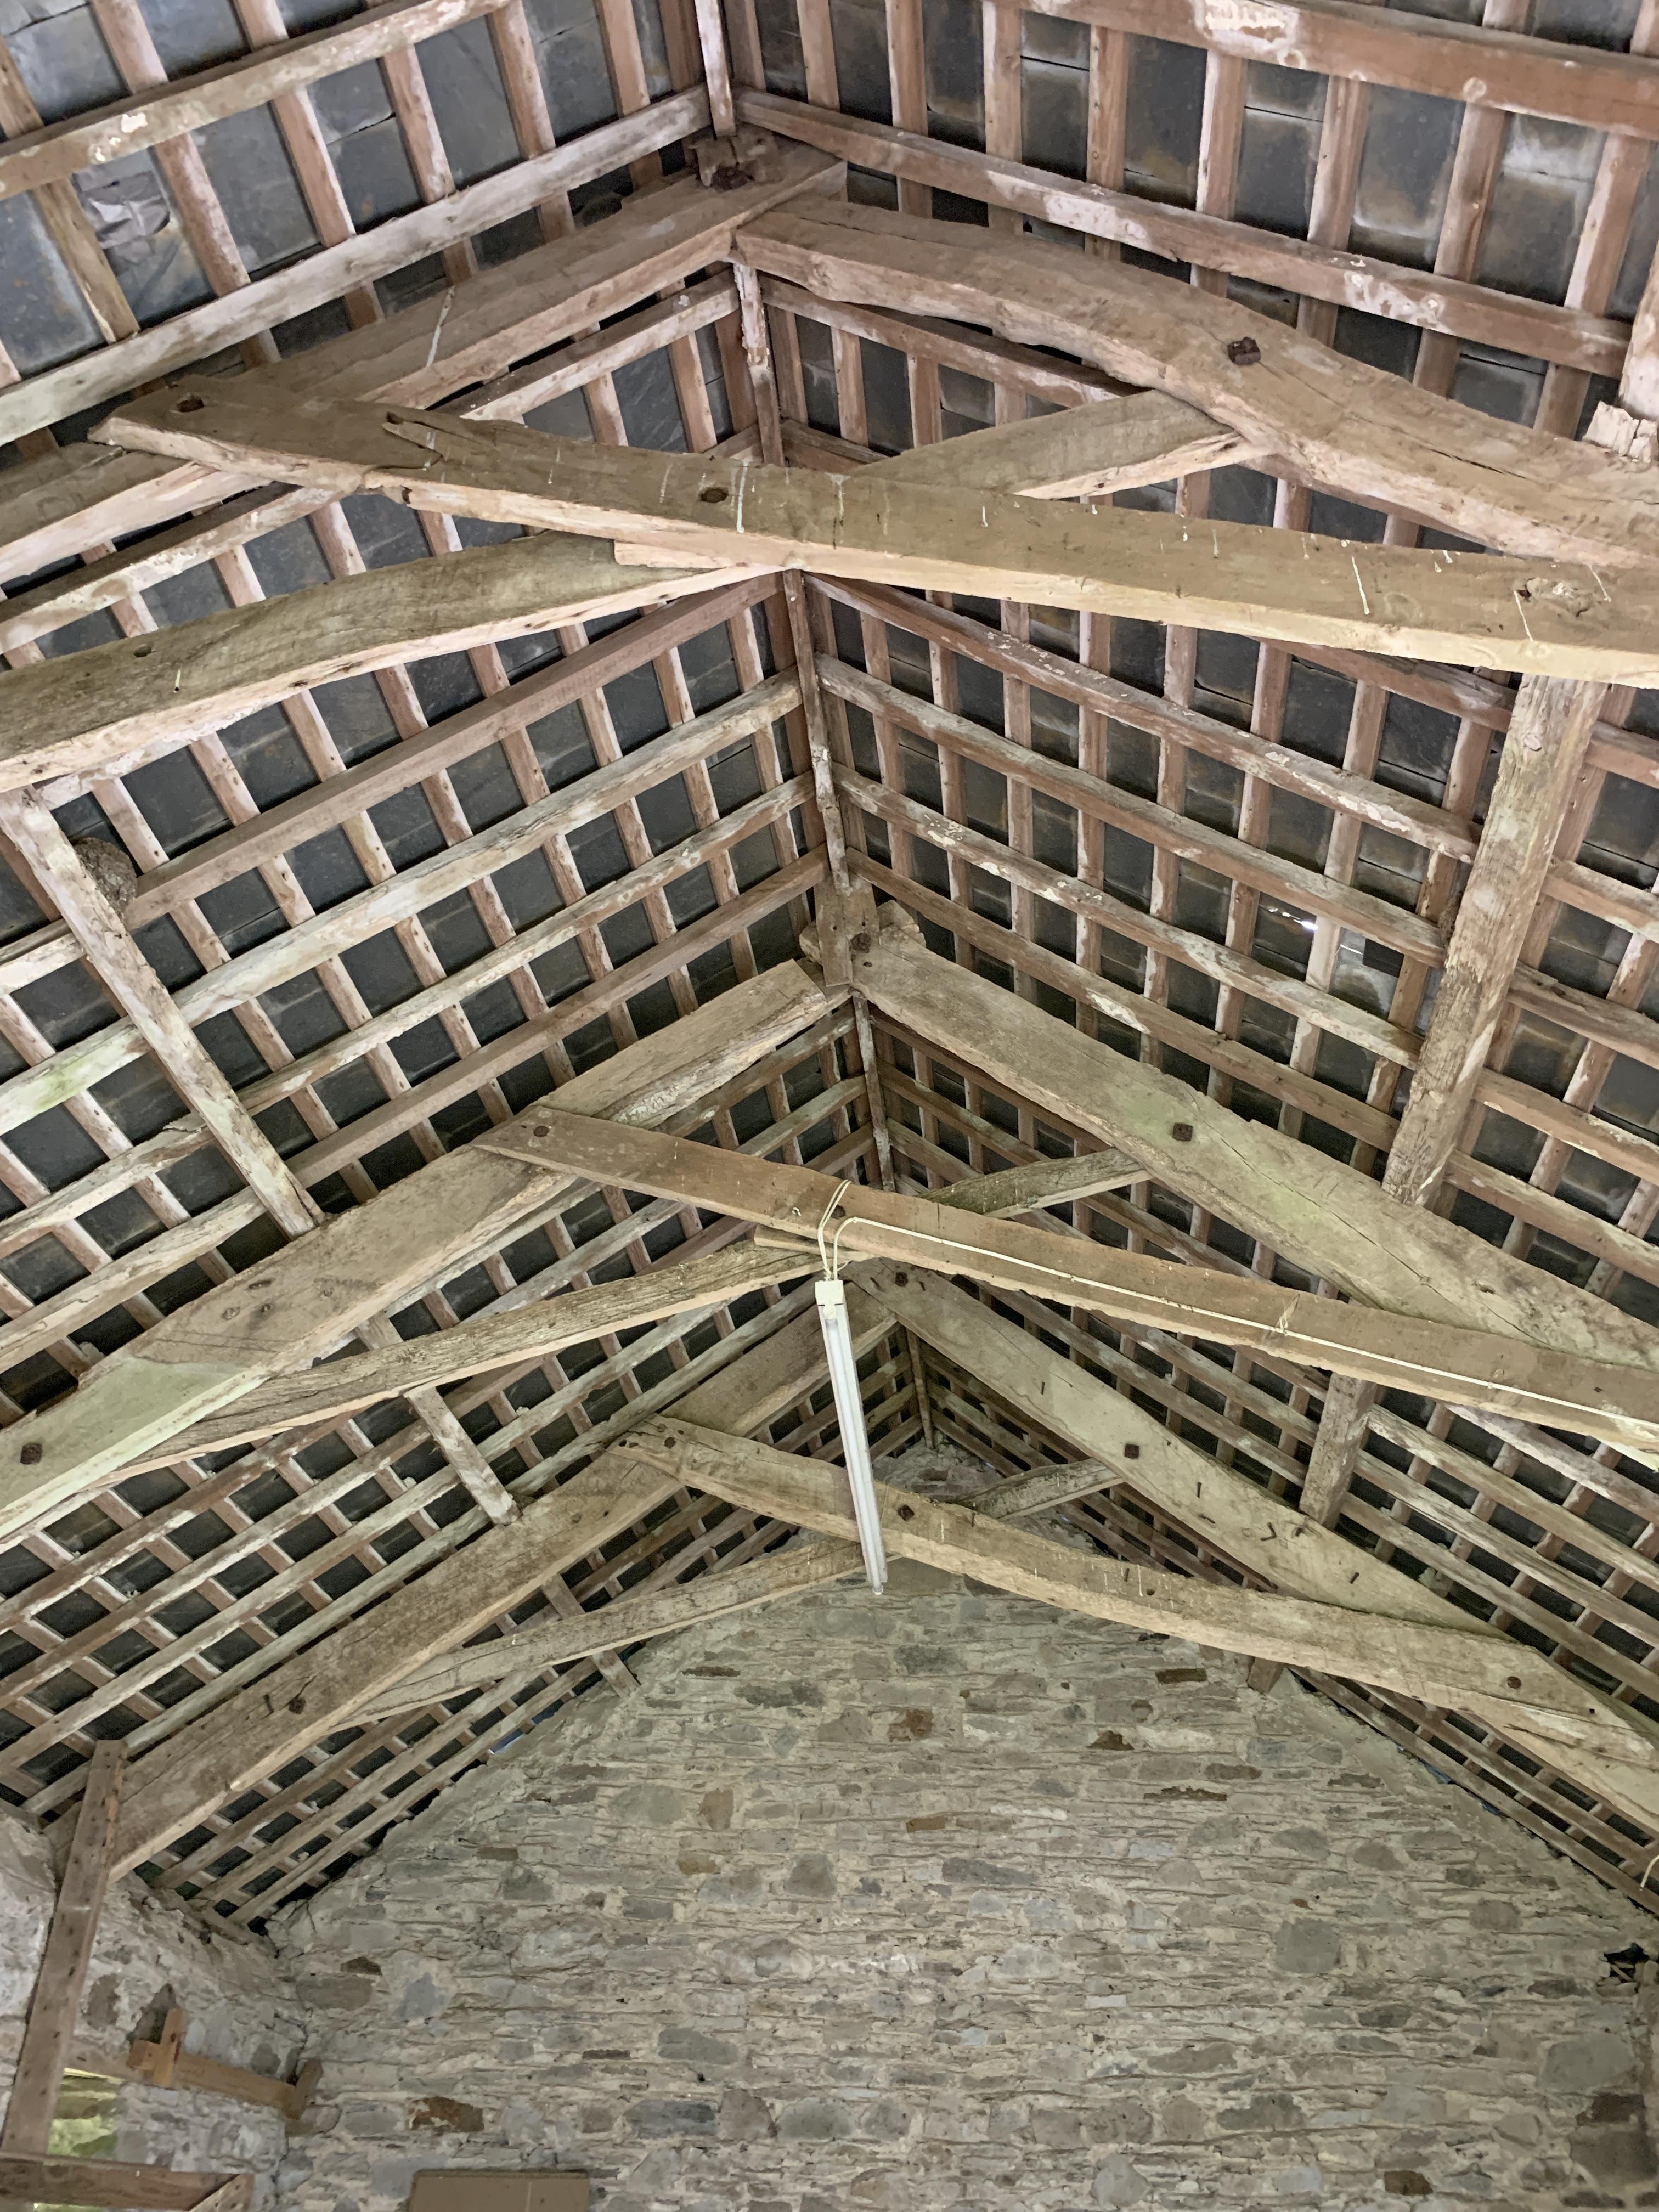
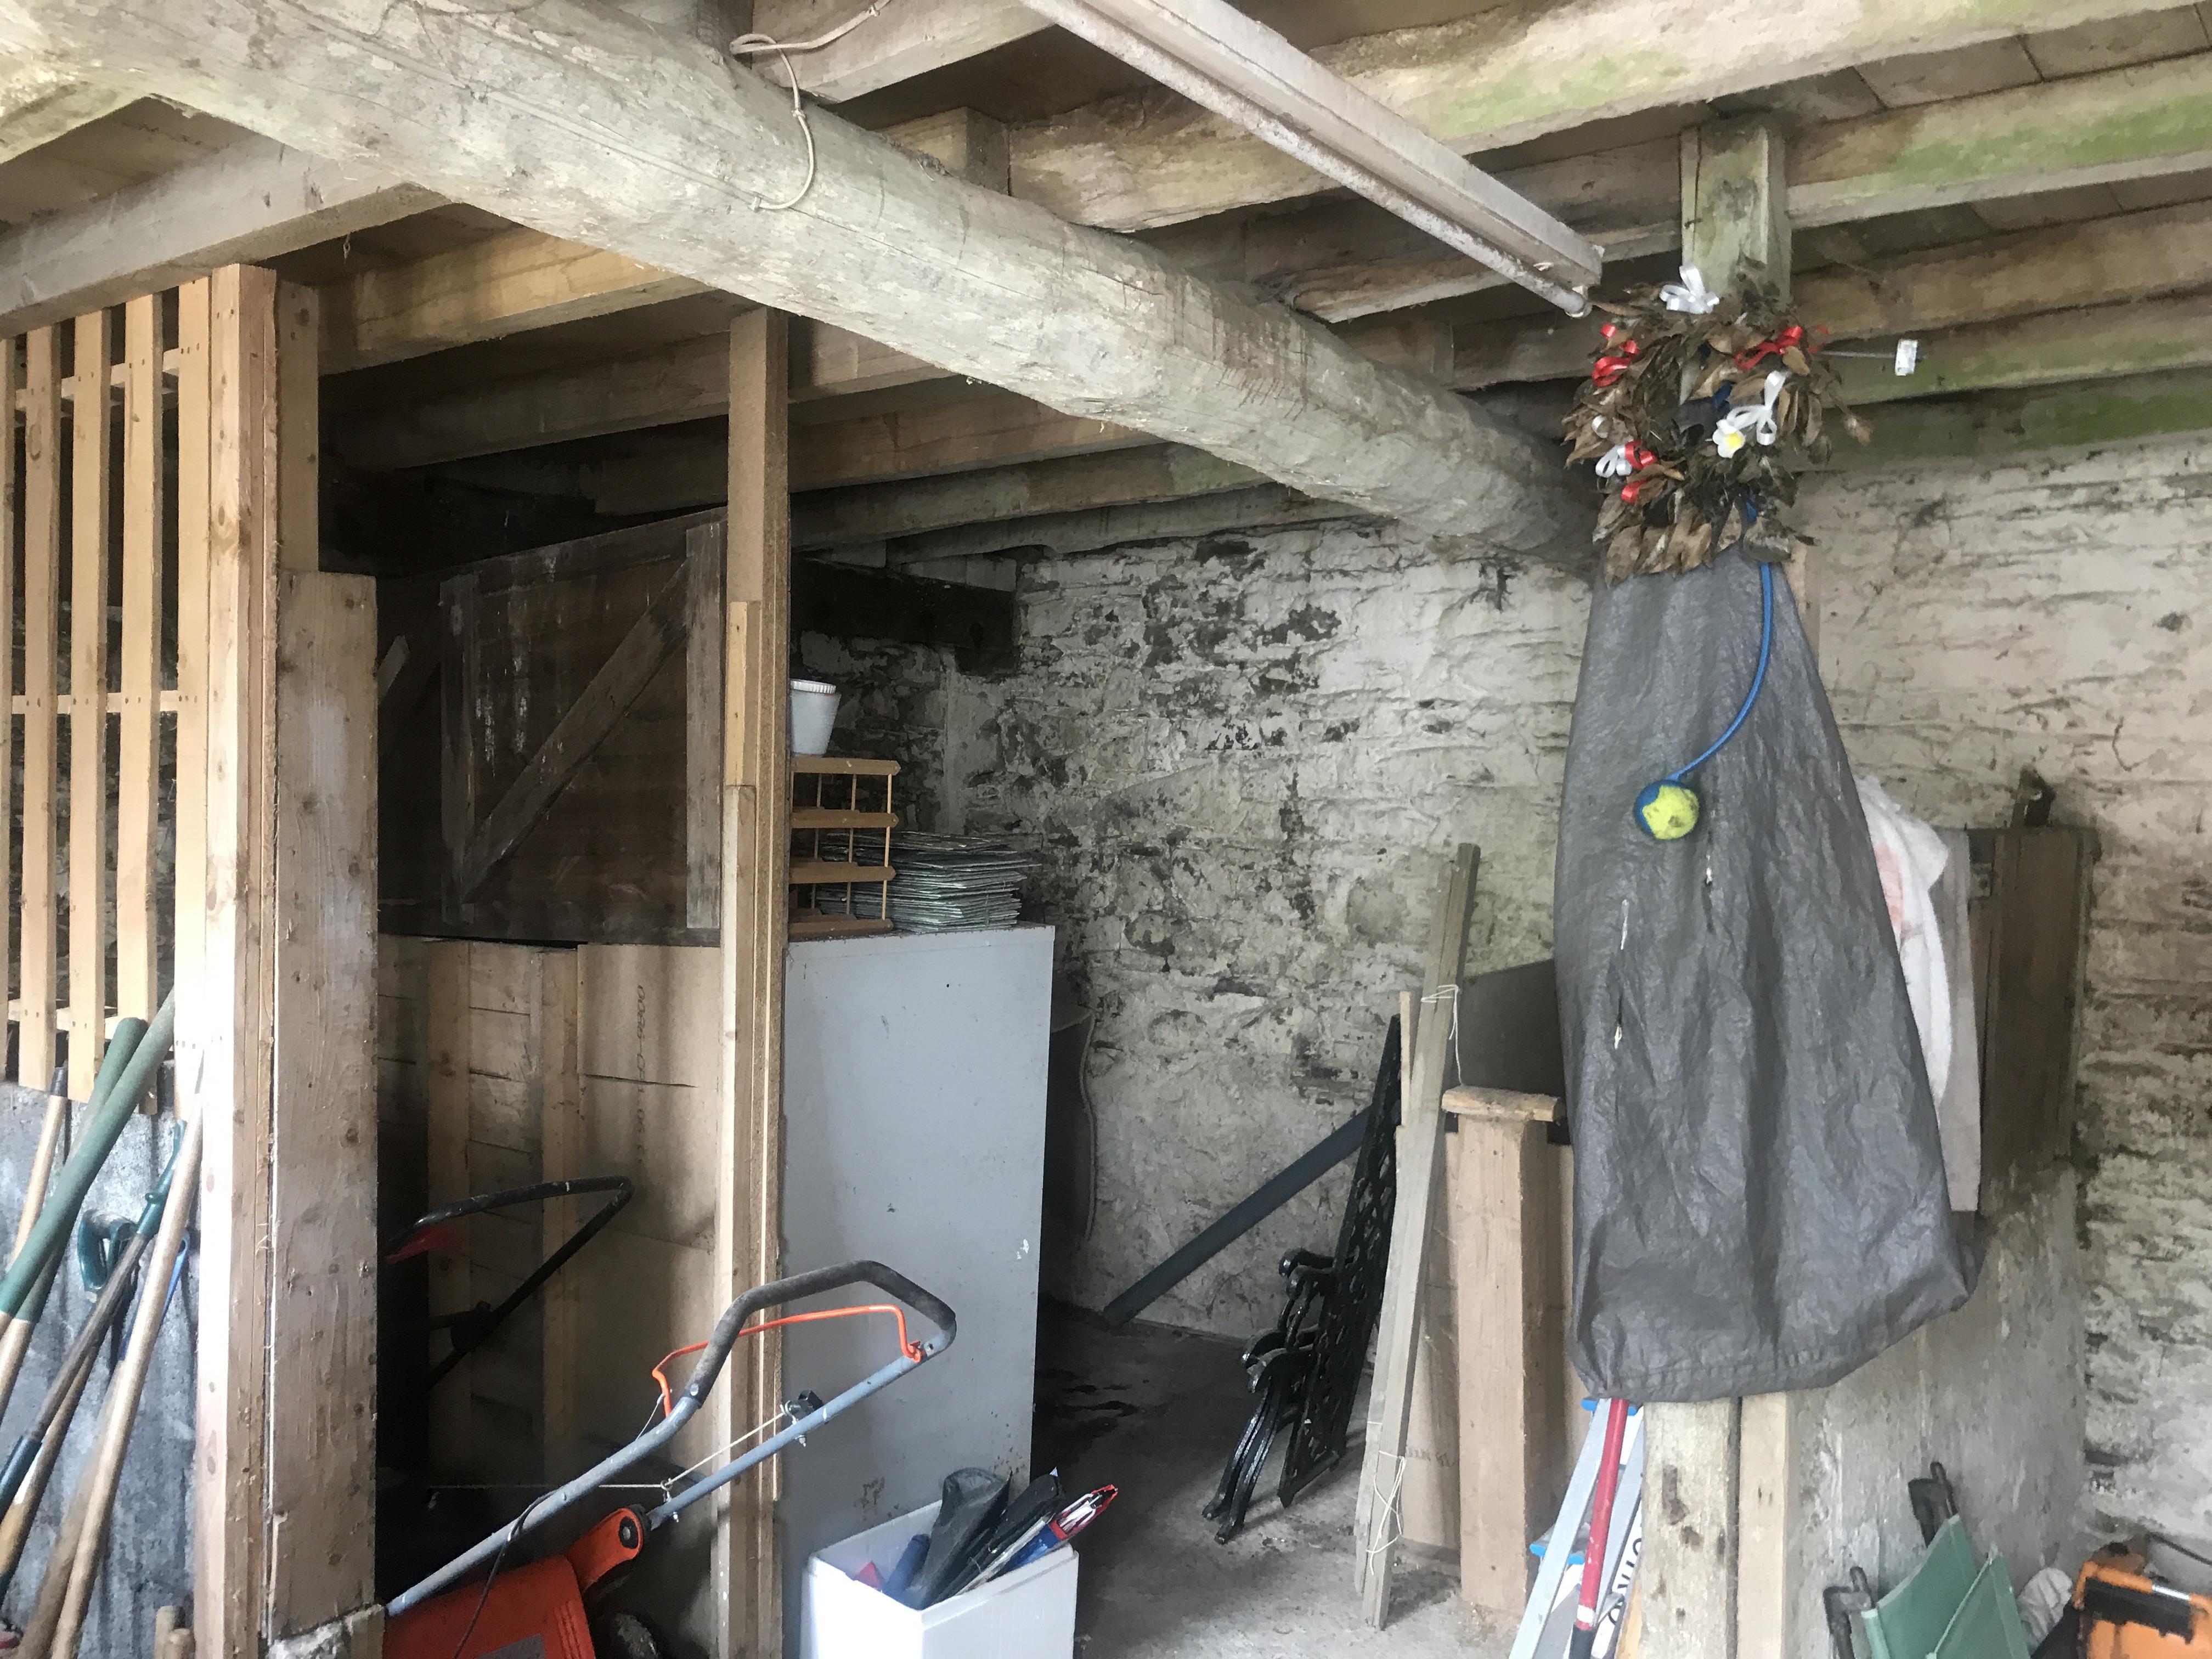
Hi - my first post - I have spent most of my like as a keen DIYer refurbishing and extending a couple of houses in the past. We are just about to buy a farmhouse which has 2 separate 2 storey stone barns on site one which has been converted to garage and flat and is okish and the other not touched although in good state with intact roof and generally dry inside few cracks in the walls but nothing thought to be too serious. We are not planning to get planning or formally convert this barn the top floor is one open plan room with a nice wooden roof and slates - we will just repair the walls repoint etc and repair the roof as required and use as a store or party or play area for extended family. The ground floor however has a good sized room with solid concrete floor this is not flat but slopes down to a central drain and drains to an external soakaway the barn has animal stalls in it and i guess the floor was designed to be easy to wash the stalls down for mucking out etc. I would like to convert this room to a dry warm machine workshop for a lathe and milling machine and other machine tools. To do this i need to create a flat dry insulated concrete floor and dry walls. The stone walls appear dry at present but have clearly been wet in the past and as the barn is half in the hill the outside ground level is half way up these walls as the back and one side so water will presumably easily penetrate through the wall from the ground on the other side. So i was thinking i need to somehow dry line or tank this room. After doing some research i wondered if it would work to put a studded cavity type system and utilise the existing drain in the centre of the floor. So i would line the walls with a studded membrane and plastic plugs I would then level the floor with simple gravel and a sand blind and then run the same membrane on top of the gravel this would allow water coming through the walls to trickle down behind the membrane into the gravel and find its way out through the gravel to the drain in the existing floor. I would then line the walls with insulation and plywood cover maybe even sips and then some insulation on the membrane on the floor and a new floor slab layed on top of this with some kind of sealed acces through to the drain to rod it if required. I have created a section plan below to explain this. Any views gratefully received.

 1 point
 -
I think you should do it in copper.1 point
-
Same problem, tidier solution. Same idea could be achieved using a inline kink in a piece of copper pipe. Would require a pipe bender though. I also fitted a bunch of valves so that I could test the system / make a mess from air & water shooting out unexpectedly.
 1 point
 -
I can see at least two Medieval torture devices in this thread. Why don't you just fill it with banzai spikes, cover it with camouflage, and have done with it? Find some sheep and you have homemade mutton kebab. Sod your cellar.1 point
-
Okay, just wanted to check they'd actually got back to you ? Can't really add much to what @Dan F has said, but don't lose sight (if you'll pardon the pun) that one of the main benefits of SageGlass is that you can still see out when fully tinted. Shame to ruin all those views with blinds imho, but it's your project and I as I said before, that's a heck of a lot of glass!1 point
-
Can't you have a bit more wall and a bit less glass? 100m2 is a lot. You will probably suffer glare, overheating and unpleasant acoustics, as well as the poor insulation values. Bear in mind that if you are outside of conservation area and not listed, you may be able to have external shutters / shading after the development is completed as permitted development.1 point
-
Before looking at glass options, have you: 1) Built in any overhangs and/or modelled the design in something like Sketchup that will allow you to design a south-facing elevation that avoids direct sun during the summer? 2) Done any modelling to understand how much a overheating problem you might have e.g. PHPP? (model can also be used to test different solutions) It all depends on how much you need to reduce solar gain, which will depend on orientation, tree shading and overhangs etc. Solar glass itself with a low g-value might be enough, but it might not be.1 point
-
Don't forget edge insulation so your slab doesn't touch the wall.1 point
-
It wouldn't be sitting on top of an insulated slab. Its a 1970s house with zero floor insulation. I think after all of the comments and I am going to scale back this project and only fit UFH in 2 of the smaller rooms which are currently being renovated. Rather than just remove the screed I will take out the whole slab and start the floor from scratch. The manifold will be in an empty room so I don't mind leaving the floor and pipes exposed here so that I can add UFH to the other rooms at a later date. I am thinking 10mm type 1, 150mm PIR and 50mm liquid screed over the UFH pipes. Should I add more insulation to the floor or is 150mm enough? The big radiators in the living/dinning room area only have 8mm pipes going to them for reasons only the previous owners and explain. I will fit 15mm pipes to them and that should help things this winter. Hopefully next year I will be in a position to extend the UFH into this space.1 point
-
Once the principle of a house being on the plot is established, it's usually not too difficult to vary a permission (there are always exceptions!) But I would seriously consider making an offer subject to planning if the permitted house isn't what you want, then at least you don't have to sink a huge amount into it before knowing you can get the house you want1 point
-
If you want your architect to do CML's you need to tell them at the outset, we charge separately (and additionally) to do them as it increases liability for us (at least on paper!) - our pi cover has been mental since grenfell so it has an additional overhead for us to sign off a CML1 point
-
@Carrerahill thanks. I'll have a wee look for your post and have a read. IPA works well for removing any marks and glue etc, I usually have a bottle of this lying around for various jobs and its cheap if you get it off ebay. Once I ran out of that I used my wife's nail polish remover which I then finished and had to get more...?1 point
-
I have found that when you start to go into the 5000 to 6000k range the white is very much too blue for me. i like 3000 to 3500k in bedrooms and living rooms 4000 to 4500k in bathrooms and kitchens1 point
-
Daylight is generally referred to the 4000k temperature range. 6000k is cool white.1 point
-
ahh. reading too fast ?1 point
-
Looks good John. I did a post on Amtico at the beginning of the year, for me it was about dispelling the myth that it is a "specialist" fit only but I would say you need to have some good abilities at working with your hands and understand the process well. We are happy with it, been down since about late March now, there are a few marks on it already but you only see them if you look across the floor with your eyes near the floor scanning across, so I can live with that and having a building site the room over doesn't help! We will be continuing it across to the next room too. My experience of Amtico previous relates to a 28 year old floor that still looks good, I think the stuff is different now though. As with anything these days, little is made as well. What I need to do is clean the Ardex adhesive off some of the joints as I never did it at the time! I am thinking a light solvent of some sort will work but I will need to investigate on a sample before I go for it!1 point
-
You could consider leaving a 6mm gap between the boards.1 point
-
We are a flooring company, we lay thousands of meters everyday, now mostly in Europe. I also had Amtico in my kitchen, it lasted 33 years, well actually it was still looking good when I knocked the house down! I think the product has changed, I don't believe it's quite as good as it used to be. In the new silo's we have used Spacia, probably the same colour as you SuperJohn G, (well done by the way, excellent job) herringbone style. All the chairs have buffers on the bottom of the legs and I try not to drag stuff over the floors (it will scratch) worse if you use a dark Amtico. I've used ceramics (dangerous if shiny and wet) cold underfoot unless UFH, things definately break if you drop them on this. Bit cold looking. Laminate flooring, used this on a refurb, scratches, squeeks in places, won't last the test. Daughter going for concrete in her Cow Shed, should be interesting, although large store went for this and then changed back to Amtico! Everything scratches.....but you can live with scatches on a light coloured floor...NOT on a dark one!1 point
-
We wanted to change and move the approved house back on the plot. The planners fought us for over a year. Then we discovered a letter they had sent a previous owner saying "a larger house further back might be better". When we produced it they gave in and allowed what we wanted. Cost us >£10,000. So its near impossible to predict with any certainty how things will go. Sometimes they can be very bloody minded and other times just agree immediately. Best advice is to try, but be prepared to build the approved house, perhaps with only minor modifications, if it all gets too much. Just don't give in too easily.1 point
-
Interesting looking back at this thread. In the end we had a SAP rating of 78 and used a different building society for the mortgage. Although we upgraded along the way slightly, I would expect our score to remain the same. Our built has around 20m2 of south facing glazing and our designer mentioned that this would help our score. There are loads on here who know more on this than me, but your report @SuperJohnG shows 6.00 for your air tightness I would have expected it to be a lot lower if you are having MHVR?1 point
-
...and finally, the last three digits on the back of your card please.1 point
-
The SAP rating is based on energy cost. Using an ASHP means electricity is the main fuel. Whilst this is the expensive option it is offset to a degree by the efficiency of the ASHP. The SAP calculation is not very sensitive to elemental U-values so lower U-values will have little effect on the SAP rating. MVHR unless correctly designed (and installed) can actually increase energy use (uses more energy than it saves) and negatively impact SAP rating and Bldg Reg compliance.1 point
-
Assuming there is a septic tank on the property that discharges to this shared drain to a shared soakaway I see no reason why you cannot put it back into use. Where the rules have changed recently is a septic tank is no longer allowed to discharge into a watercourse. Anyone discharging into a watercourse must upgrade to a treatment plant. they should have done that by 1st January this year but I know at least 2 near here who have not. Perhaps you need to find where this communal pipe actually goes to? If it's to a drainage field on the cliff then you are okay. If it is discharging into the sea then all of you should have updated to a treatment plant. Perhaps the best way to cover yourself is to upgrade yours to a treatment plant.1 point
-
Has there been any extensions done locally to you ? Go and ask what they did. Have a drive around and chat to a local builder doing similar, get a feel for what is generally done around your way. I spoke with 3 local developments and knew I was going to have to pile mine without getting a survey.1 point
-
As the SE what he expects. Our ground condition report involved digging two holes with a digger rather than "micro bole holes". Perhaps even ask him to recommend a company and what he thinks it should cost in your area. You might also get a percolation test done at same time if you will need soakaways or similar.1 point
-
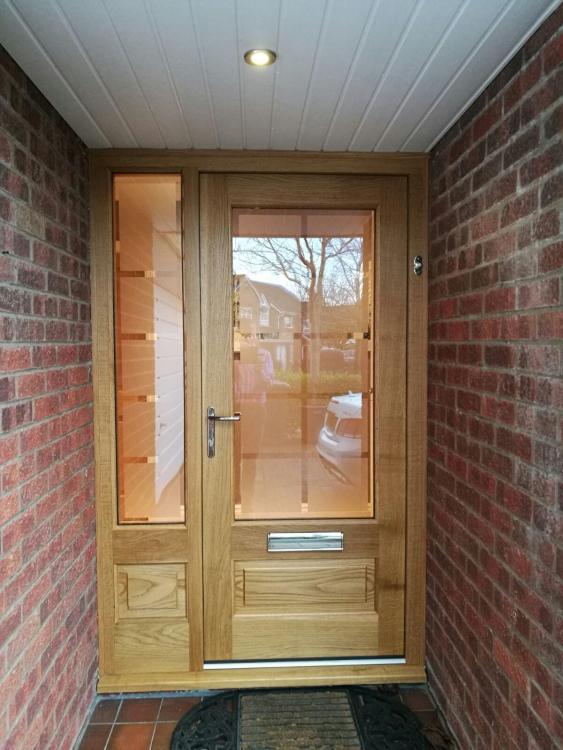
This is one my friend made for me at our last house Cost me £300 plus the glass It sealed up pretty well But like Joe mine was under cover While we have a large oak canopy on our new house The front door is open to the elements and would be likely to sell or contract One advantage with a timber frame is if the seals become damaged or crack they are very easily replaced Unlike UPVC
 1 point
 -
My sister in law has on her new house, she's really pleased with them
 1 point
 -
There's a lot of people on here clearly partial to a joint!0 points
-
I'll set 'em up, you knock em down! You'll never see it tbh. (But we'll know!)0 points
-
Does the Hall not have a front door?0 points


.thumb.jpg.bac90f3bbf6868cf2118d010d936c99d.jpg)


This leaderboard is set to London/GMT+01:00