
Leaderboard


Popular Content
Showing content with the highest reputation on 07/30/20 in all areas
-
bottom line is If your house is very well insulated then the amount you will get is diddly squat only works out if you are revamping an old house with bad heat retention and poor insulation the better it is the less they give you - so for your house --no it worked for me cos the man that did the survey was sensible and told me not to upgrade the insulation and windows etc level till after he had done calculation or i would end up with too good a rating got the grant -then upgraded the insulation new house yours will be far too good to get anything3 points
-
Nope, don’t do it. Although they are bullet proof fittings, how will you get to it if it has a problem. Full length of pipe from out side to inside, in a duct just in case of problems. To prove this i have already changed my new pipe by just pulling a complete new one in through the duct. I wanted a bit more pipe to come up into the plant room so just pulled out the old and slid in a new pipe. You will not do that if you have joins or elbows.3 points
-
+1. How do I know?2 points
-
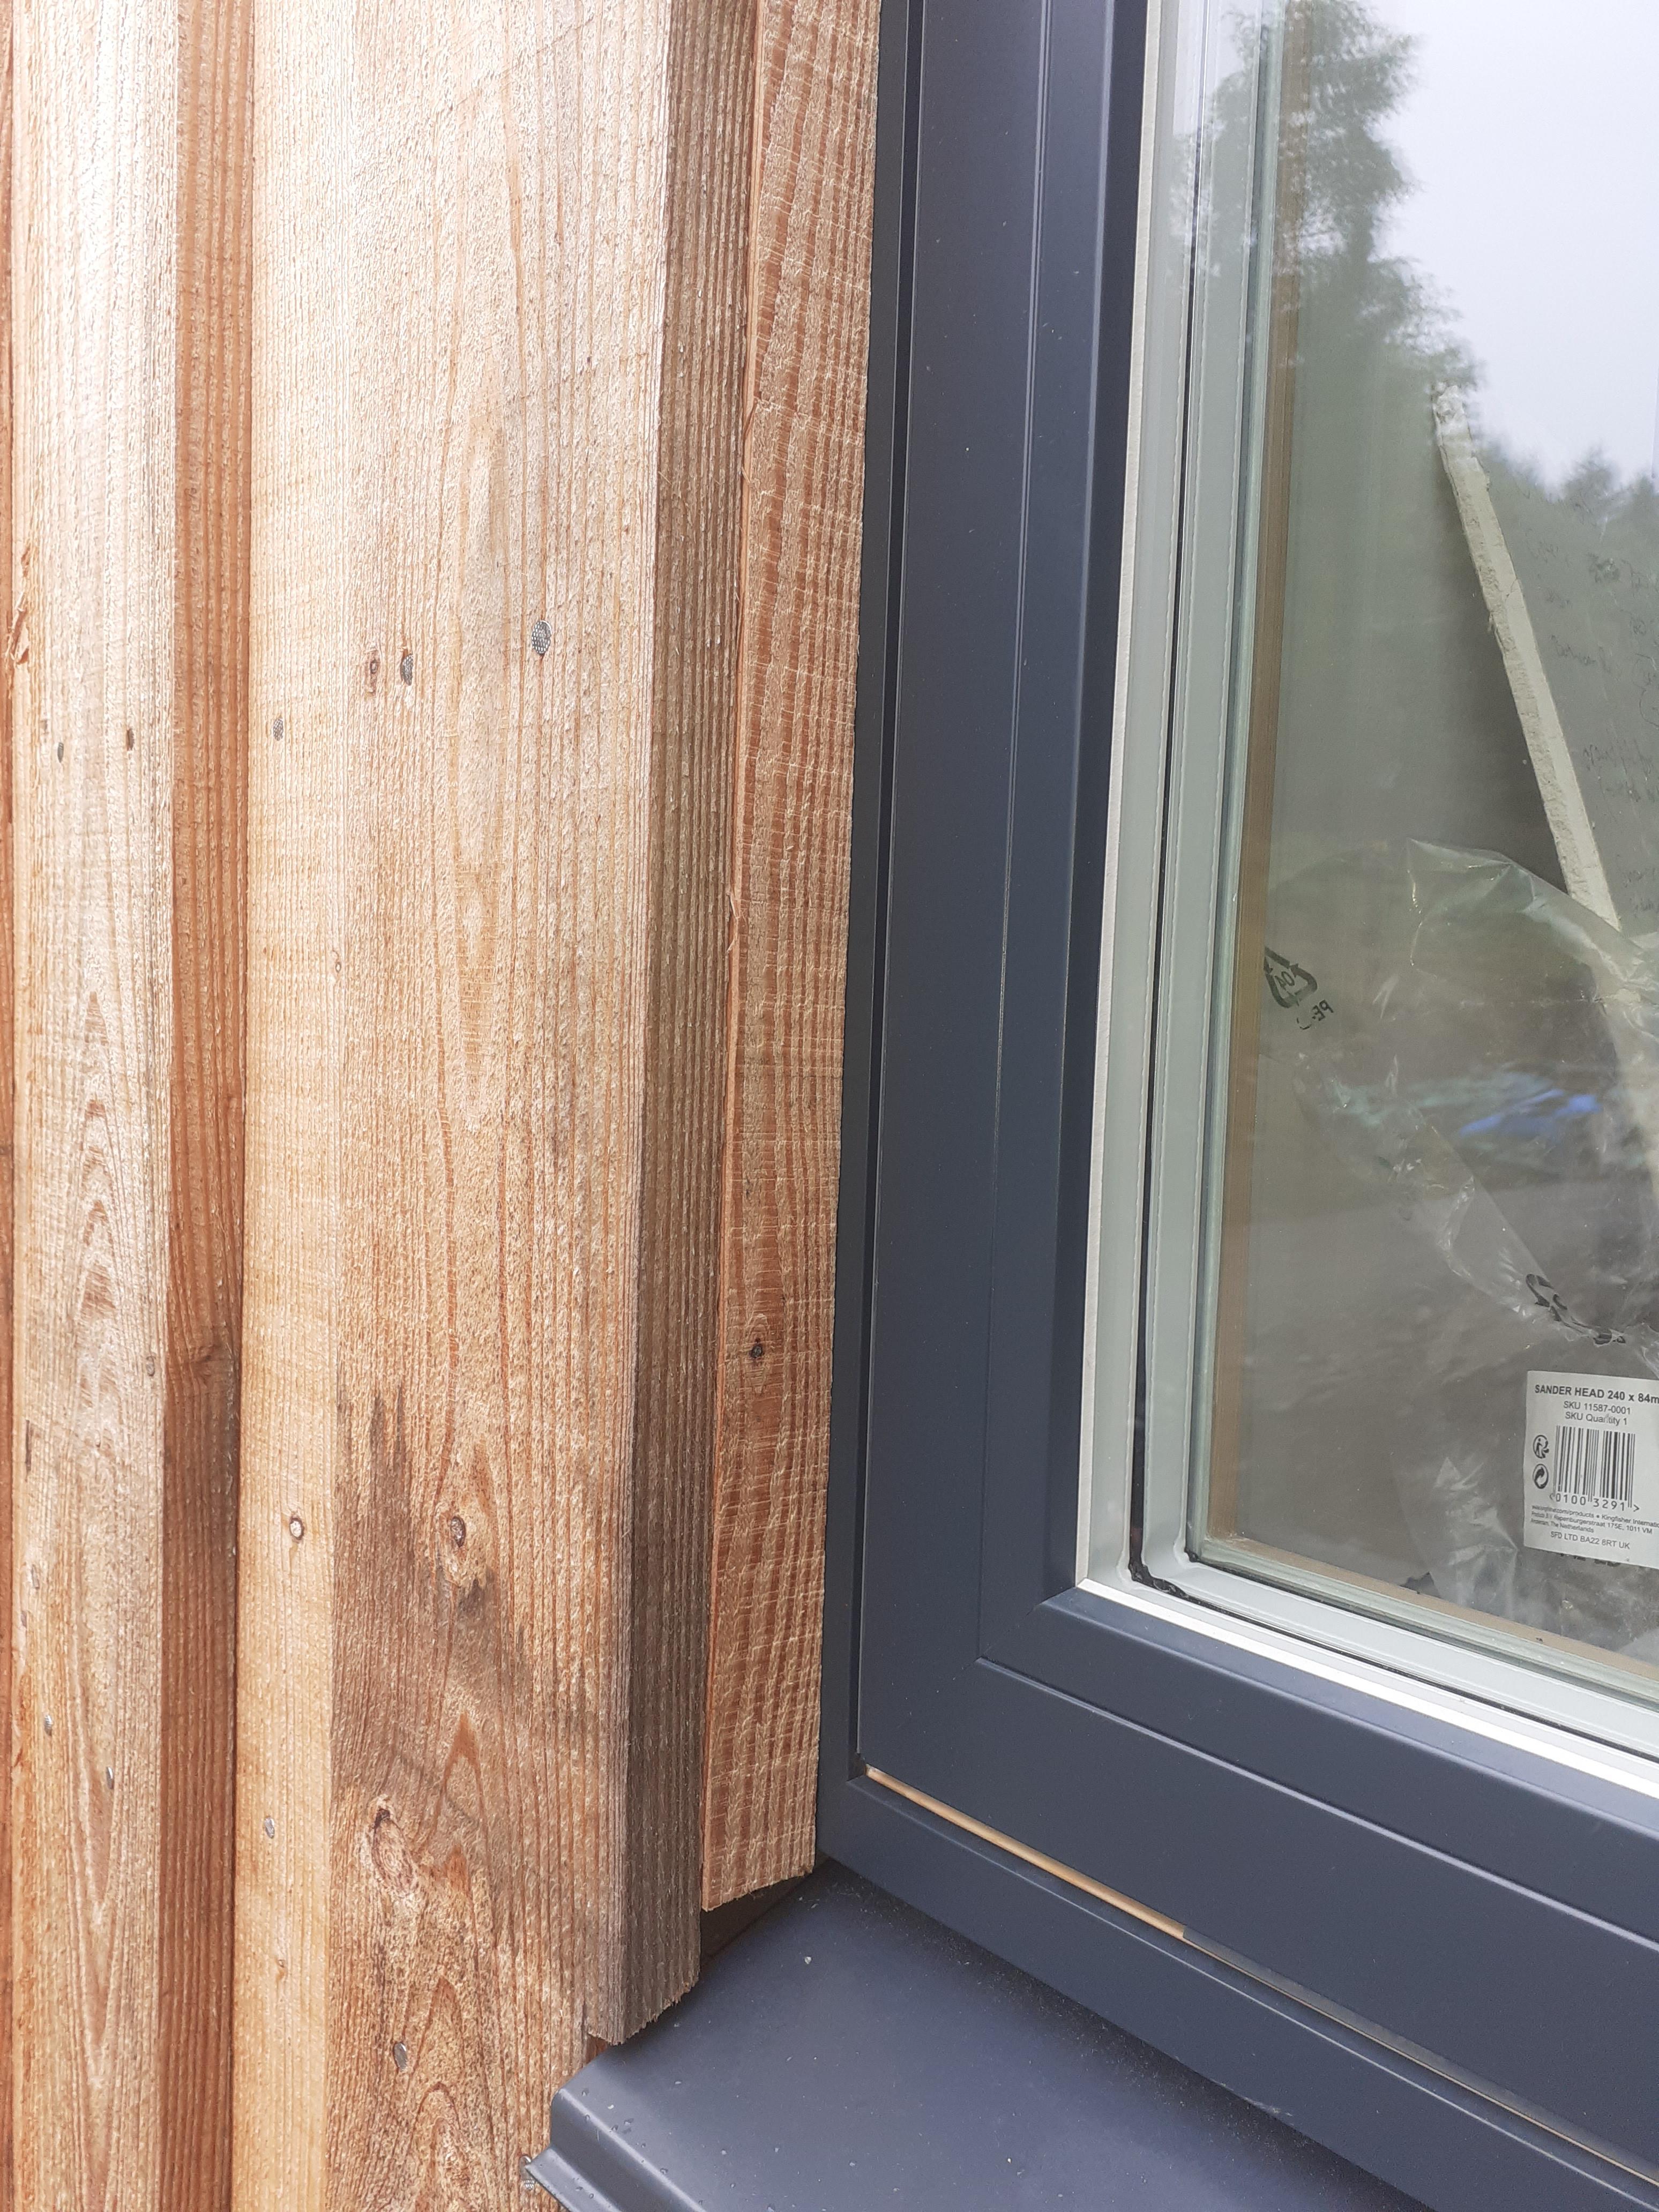
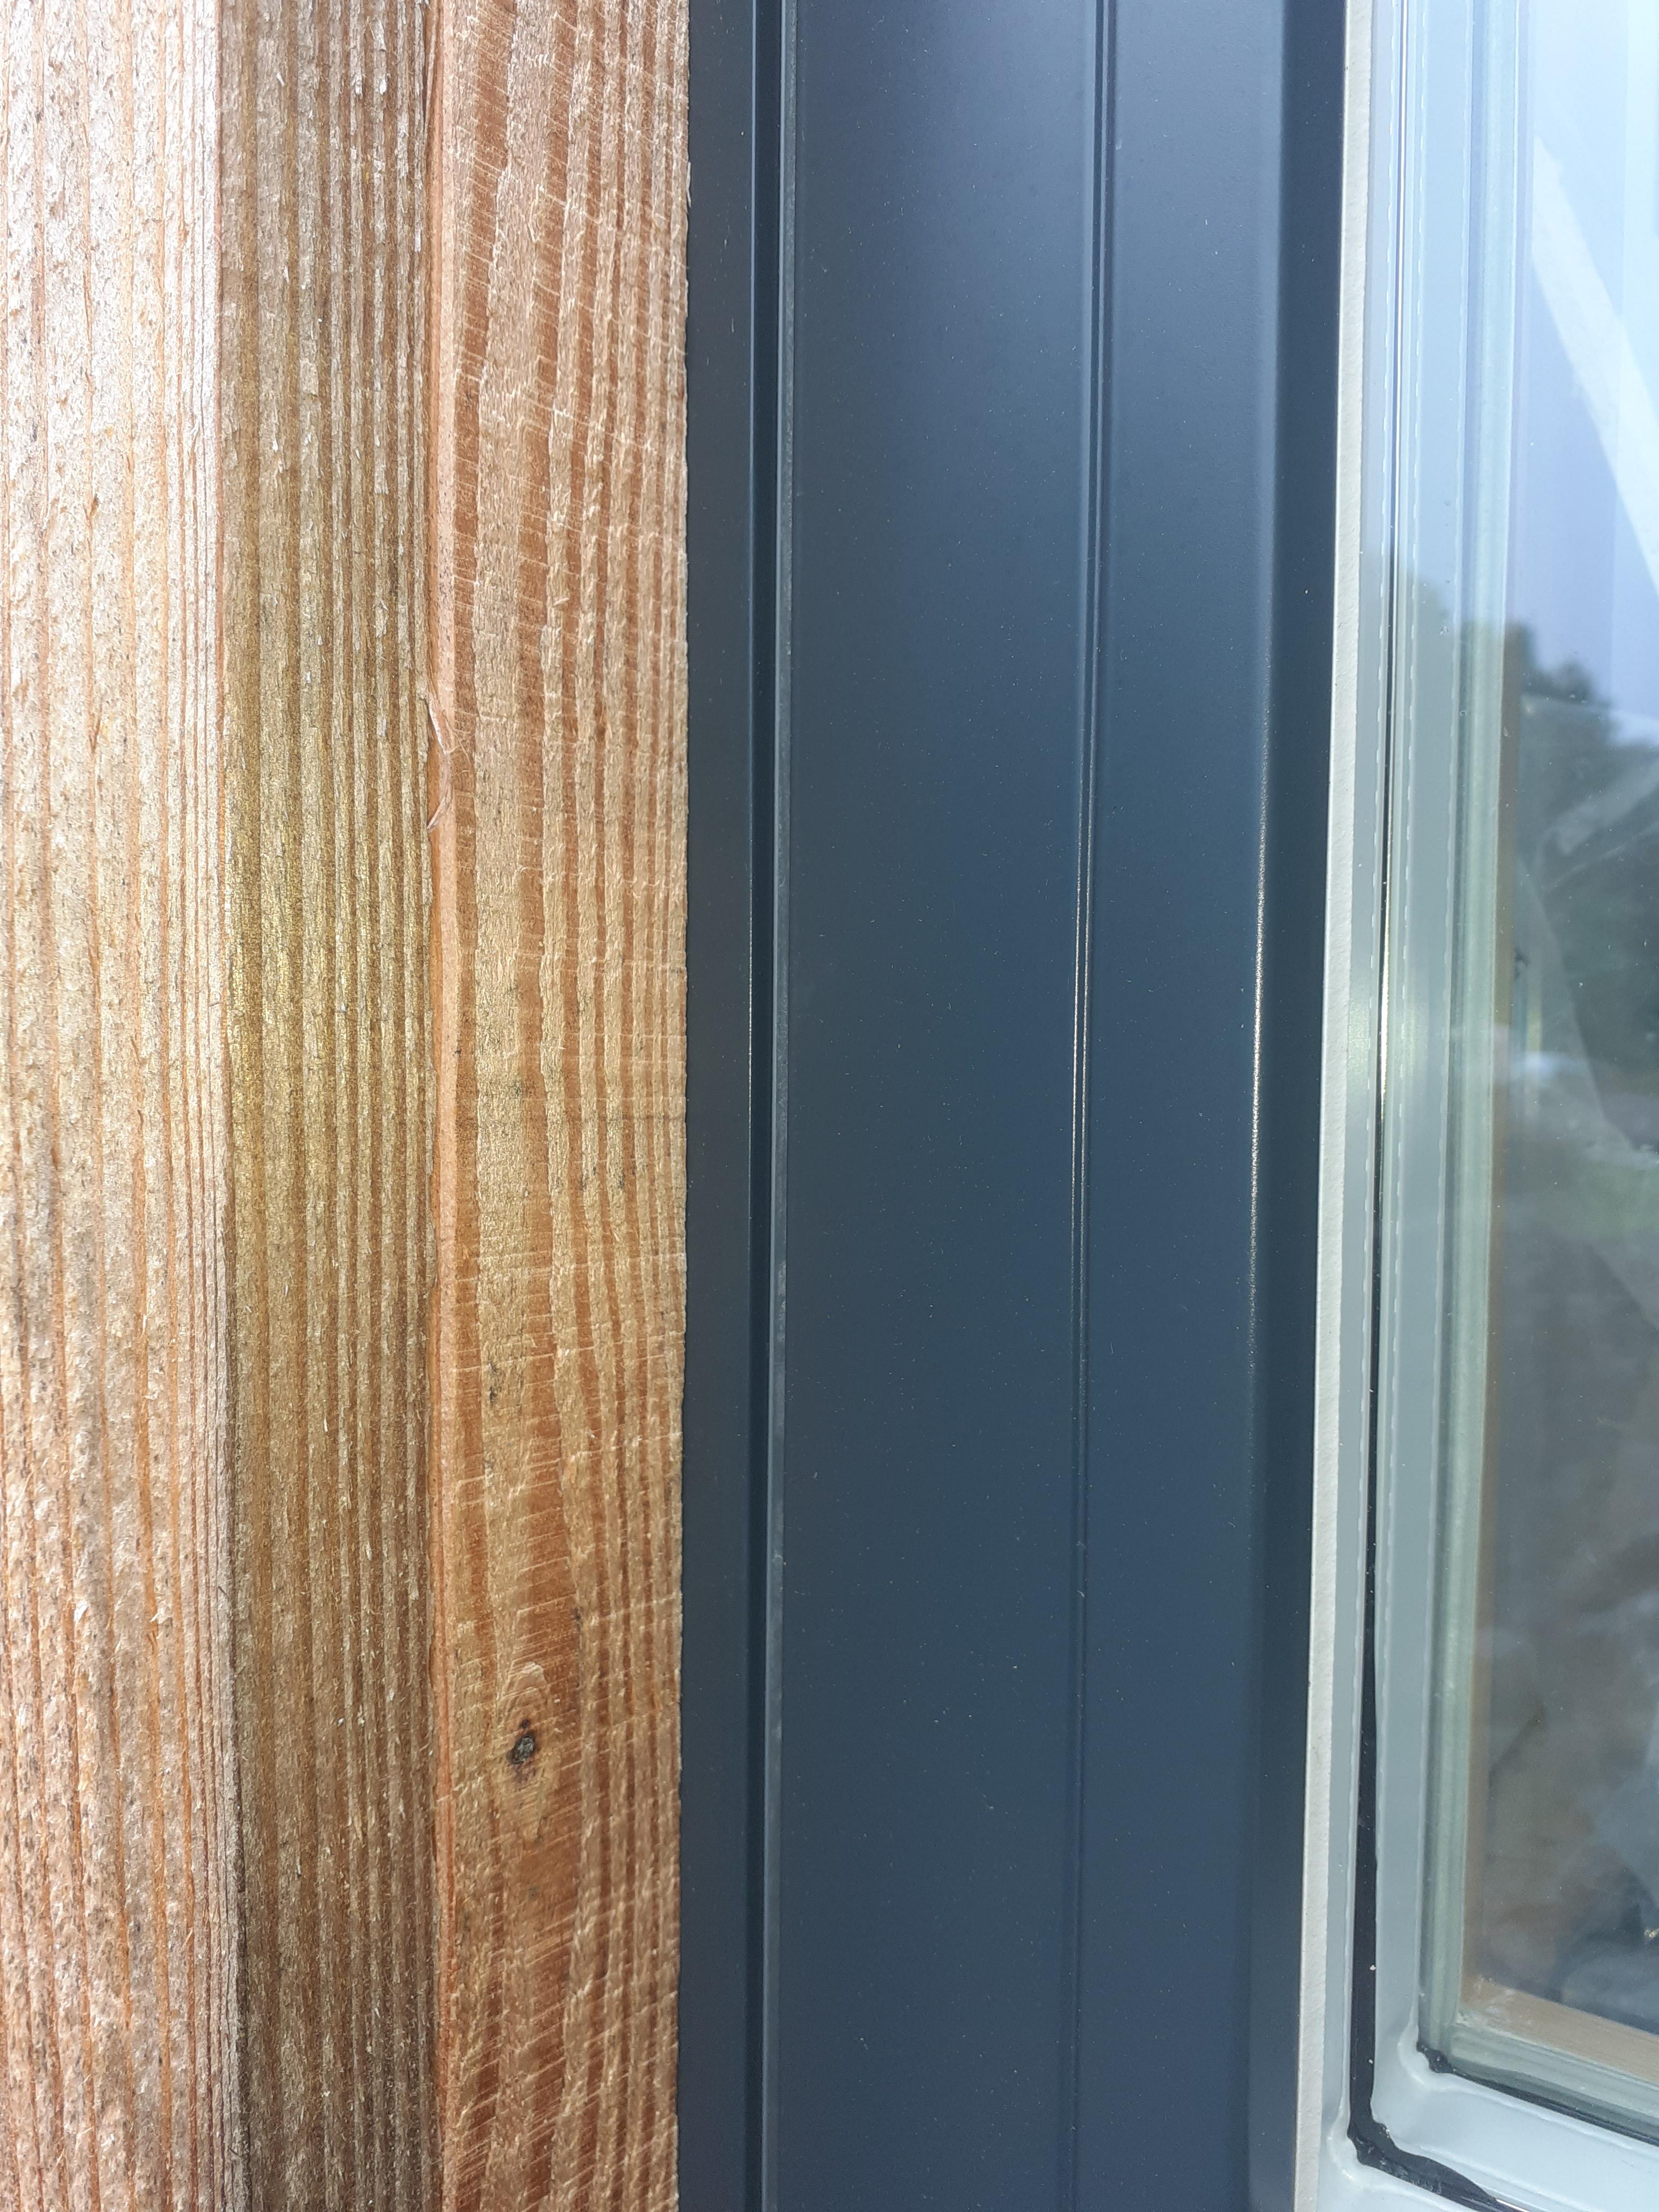
Here's ours, though you can't see the compriband. I ripped the cladding for the external reveal.
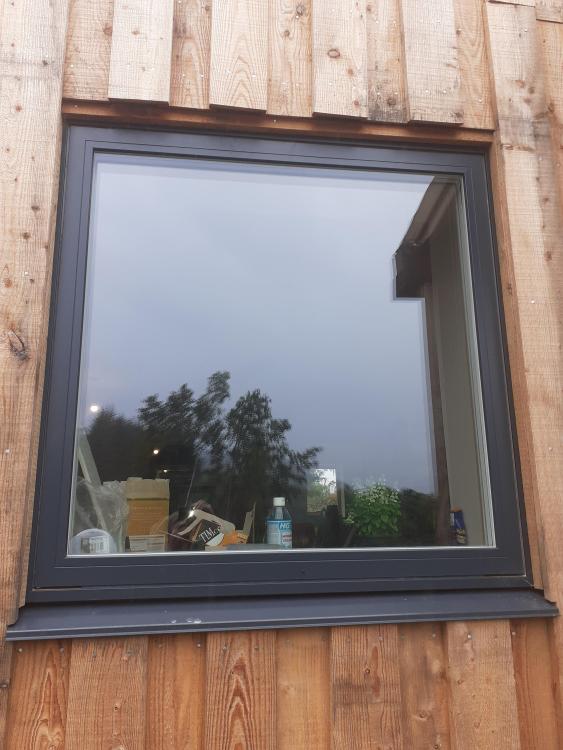

 2 points
 -
yes... because I'm that sort of nutter who does those sorts of things !! If you are handy then you can make this work for you, and you can make it fly. I looked at something similar and what we came up with was a floating box system in the main church itself - steel framed, not even touching the sides. That way you steer clear of the conservation monsters, and you build something with comfort built in. As it is "internal" you can build a cassette system you make yourself with 8x4 modules - think Walter Segal but inside. Build these with standard timber - even make the I beams yourself - and you can put a lot of insulation in the bedrooms/bathrooms etc and potentially an office or snug on the ground floor and you've got a house within a house. Make the windows from this from things such as standard DG units, or even use office partitions that have the built in blinds and you've solved another problem too. Then think about the tower rooms - they will never meet regs but you will need to do the minimum to get close. If you use those as occasional rooms then in reality you can heat them as and when you need them. A lovely bell tower bedroom is lovely in summer when the walls keep you cool, but your OH will not thank you when its -6c outside and I mean outside the duvet... One thing that a church conversion can live with - and is possibly a good move - is an Aga or similar heat store stove. Yes they are expensive to run, but the constant low heat in the winter will keep the place warm and dry. You can pick up decent oil ones for £500 on ebay, a recon burner is another £500. Use that to pump heat into the old oil rads around the main building or the pipes under the floor, and an ASHP to do the "modern living bit" and you have the best of both worlds. The trick is to think in boxes as @Ferdinand says - build all the boxes, then fit the ones out you need. Think kitchen bed and bath, then work outwards.... I think your £20k for landscaping is barking mad btw.... A JCB for 2 hours, a roll of geotex and 40 tonnes of crushed gravel and you will have everything you need for change of £2k and 2 days...!2 points
-
Hey, yes, sorry, don't be down beat because of me, I guess the £400k figure just came from extrapolating from my costs and watching Grand Designs ... there are people who have build new inhere for £1k/m22 points
-
Honestly, a 230vac coil is running at the higher end of its voltage range at circa 240V. A dedicated 240vac contactor is better "suited" here in the UK. Might seem a small thing but it is a thing.2 points
-
Coming to the end of our build and we have not used one skip!!1 point
-
thanks Nick!1 point
-
Hobbiniho makes some good points. I’ll weave some other TF stuff in as I go which I hope helps all. In reverse order. Yes, when you look at the configuration of the roof it appears to be fairly standard. Generally, truss designers start out with 600mm spacing as this fits with the spanning capability of standard tile battens and so on. You can then close the spacing / double up if need be when you start to get stuck, say where you have extra localised loads – dormers etc. What you try and avoid is to start changing the depth of the members as this starts for example to cause problems with the alignment of the roof bracing. If you have a good height and want to convert the attic later and the ceiling joists / rafters are different depths then how do you floor / line it out easily? A lot of TF houses throughout the UK don’t have sarking or boarding on the roof. This sarking/ boarding stiffens the roof and often stops people from falling though during construction and maintenance. An SE will often take advantage of this stiffening (called diaphragm action) to shift horizontal loads (loads cause by the wind for example) to where they are more easily dealt with. When you go in the loft you may just see a vapour / moisture control layer and you can feel the tile battens and so on through this. If so, you should see more diagonal type timbers bracing the roof. In old money you’ll often see roofs in Scotland say with rafter spacing of 18” (~458mm).. this keeps the roof member sizes down a bit and lets you use a thinner sarking board. If you are slating onto sarking you don’t want “bouncy” sarking as it’s really difficult to drive the slate nail to just the right depth to keep the slates tight. The closer truss spacing can help here. In other words you need to look at things holistically and not just the trusses in isolation. As a general point. If you are building a single storey extension on a house that has big roof you need to think about snow drift loading. The snow can blow off the main roof and overload the extension roof below. It can drive against any wall above the extension roof and fall back. Snow drifts can be heavy. Another great example is where you have an large span, high eaves height agricultural shed..lots of snow available to pile up on a lower lean to roof. Glenboy posted a couple of drawings. There may well be others that show more detail. While some features of Glenboys drawings may look a bit odd under scrutiny they look to me like concept / early stage provisional drawings. Often a designer will just add rough stuff or notes when a Client is just trying to get a budget price for the works. What I think these drawings are doing is to say to the builder... We need some kind of beam in here, we need some trusses and so on and this is the size of the thing... so give us a rough price for that. The detailed design comes later in the process. In terms of the timbers stacked vertically. I would like to see the rest of the end detail and the TF panel drawings before exploring further. For all. Every house is different and has it’s nuances. Sometimes, where you are tight for height for example you need to go back to first principles of design and this can throw up some less commonly seen details.1 point
-
Get a quote for your heating system you want with the RHI. Then look up the price of the equipment and work out what they are charging for install Vs the RHI you will receive. Then we can work out how much of the RHI will just end up in the pocket of the installers.1 point
-
CML say... https://www.cml.org.uk/lenders-handbook/pcc/1 point
-
Correct1 point
-
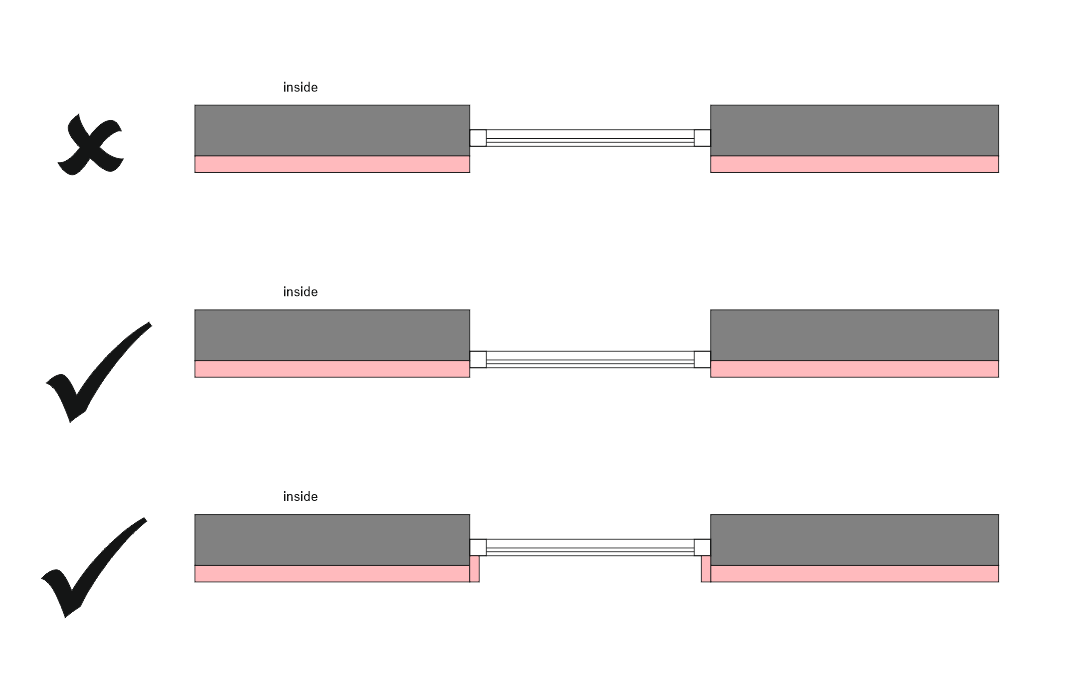
When I was window shopping I mentioned to some suppliers at a show that I was going to do the third version in that drawing above. They all seamed very glad and gave me a big thumbs up as that really is the best way to mitigate cold spots.1 point
-
I just started to build a three bed holiday home in Stromeferry overlooking Loch Carron. Just Completed the foundation.1 point
-
You are doing a good job asking questions about all the details. Keep on keeping on. Your window supplier should be able to talk about extended sills. The last one I did I fitted extended sills to windows and thresholds to doors just in case I want to do EWI later. Our local BCO take the view that they seek to encourage any improvement and have people talk to them rather than jumping on people for not doing the EXACT regs. Ferdinand1 point
-
You need to avoid having ANY uninsulated window reveal exposed to cold outside, as the cold will track through to the inside and cause damp and mould issues. You can get around this either by moving the window outward to the frame overlaps the insulation or adding some insulation around the outside reveal - which is often not practical as it reduces the effective opening size.
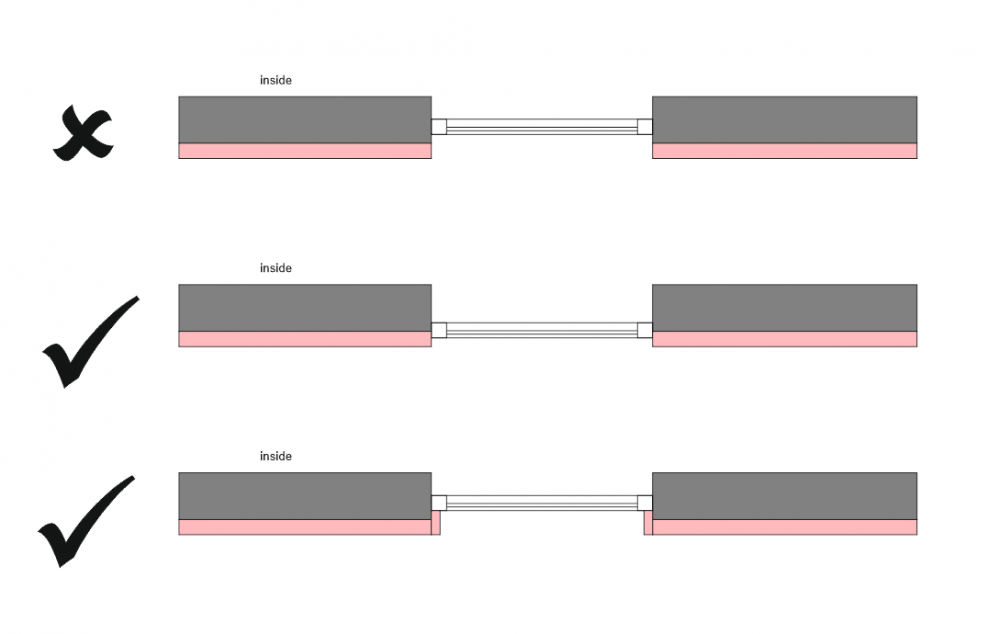 1 point
 -
the metal web ones we had put in at 600mm centres I wish we had put them at 400mm centres...... I like a nice solid floor.1 point
-
We were advised to avoid any/all joints in MDPE if at all possible. Also for any joints, if required, to be accessible. That doesn't mean an elbow won't work, it will, I just think that most people would typically try to avoid it. In our case, it needed a bit of help, but 32mm went round 200mm bend OK.1 point
-
Hanging the window out into the EWI layer in its entirety. There are some posts on here about it using steel angle irons to hold the weight of the window, with brackets to support it in place, a very robust solution.1 point
-
You generally use metal web joists when you need to run lots of services, they are normally dearer than I joists, and a lot dearer than solid timber, if it’s for a roof you probably won’t have a lot of services. Also how are you insulating it, warm roof no problem all on top, hybrid- cold roof they are a pain to insulate because of the metal strutting.1 point
-
Yes. Heavy, dense stuff at the bottom , neatly stacked wood and kitchen units ... and there'll be space for all the God-have-we-still-got-those? In our case the kids' A Level notes. ?1 point
-
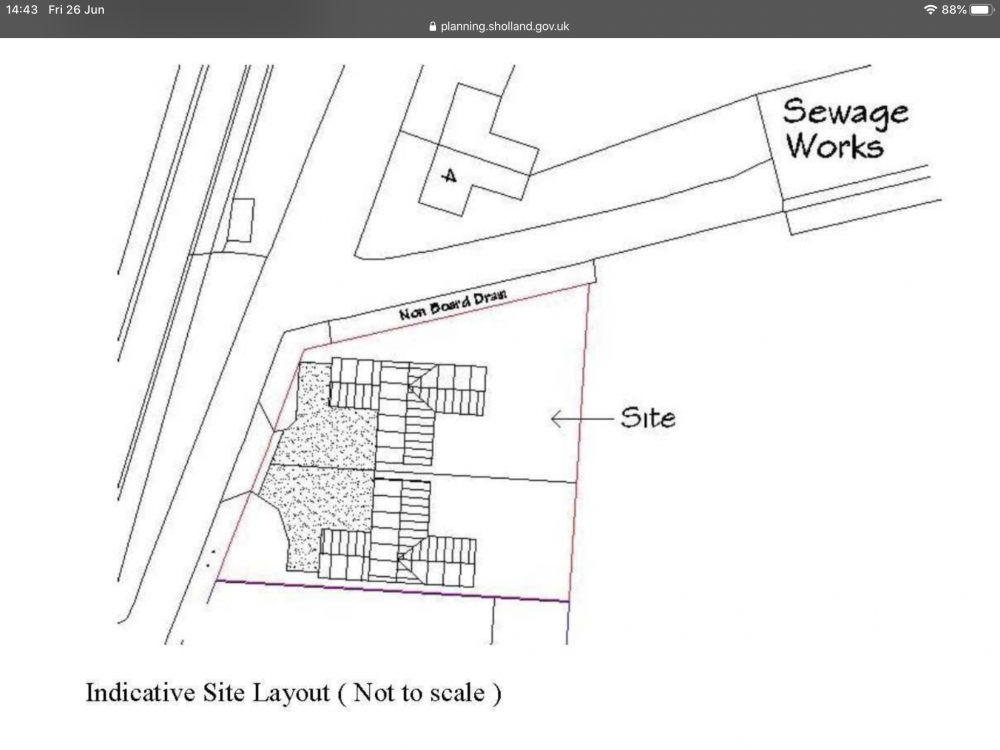
Hello, I’ve purchased a building plot with planning permission for two detached properties. I am getting started with some work including creating an access to the site, commissioning a designer, and trying to get the new boundary with the neighbours who sold the plot properly fenced. I'm trying to get my head around the VAT situation with supply of materials by tradesmen, and struggling! Will post separately in the relevant section. Indicative site plan attached for those interested.
 1 point
 -
I am indeed though Lincolnshire is one of the larger English counties, Stamford to Grimsby is a 2 hour drive. South Holland (District Council) is 40 minutes away from me, even so the OP is welcome to visit. There is another timber frame forum self build going up a further 30 minutes north of me.1 point
-
I use copper where it is on show and Hep2O everywhere else. A lot of it is soldered but if I need to have easy access / no soldering in cupboards then I use Tectite fittings.1 point
-
Yeh will fit fine but make sure they know it’s having bricks / hardcore in it as some will send different wagons to collect as a full skip of concrete and hardcore can weigh over 12 tonnes1 point
-
My first thought is that weight would be the problem and this limit it affected by ground stability when the loaded skip is lifted back onto the truck. A bit of maths suggests I am wrong. You have 3.5 + 3 + 3.5 = 10 linear meters. x 2.3m high = 23 m2 of wall. 23 x 60 bricks per m2 = 1380 bricks + render + mortar = 3 to 4 tons.1 point
-
I guess it's the nature of I-Joists, and their thin webs in particular?1 point
-
The 40db minimum reduction is a very low target. Achieving this will not stop noise transfer. This is one of the few areas where there is a big difference between the Scottish and English regs. The 43db minimum target in Scotland requires 22mm osb glued and screwed and accoustic roll. It would be hard to build a ceiling with much less than 40db of noise reduction.1 point
-
Not sure who is doing your slab or what they do, but a typical approach is to use a 110mm UPVC pipe with a shallow bend for water supply and then to put MDPE through this afterwards. A 200mm shallow bend will just about work with 32mm MDPE assuming you feed it through from inside. (we were worried about this).1 point
-
I have worked with Hilliard Tanner in Ireland for four years: slab, Durisol, steels, louvres. He has been on site exactly the same number of times as the other SEs with whom we have worked. 0 , Zero.1 point
-
+1 to above. We did exactly the same on our build1 point
-
This is what out building inspector asked for: All drains are 110mm UPVC and have straight runs with minimal connection points below the slab. All drains are to be bedded and backfilled with 10mm pea shingle and the slab is reinforced. Drains serving as SVP’s to first floor are to have 200mm long rest bends at base with concrete support. Could it be there is a mix-up regarding the concrete supports? What passive slab system are you using? This is exactly what we did. See this post, you can just about see the concrete support in the drainage picture.:1 point
-
Just fit 40a or even 60a relays, simple. >Twice the CCC of the stock offering and much, much higher longevity. That's what I have had to do to 'load shift' SA's in the past on dual-fuel installs, fitting relays outside in project boxes and got my spark to fit the highest rating we could get hold of in a single module ( as it was a couple of tenners uplift for a lot of sleep ). On a previous SA install with their bespoke 'load shifting' controller, there was a time-clock inside the OEM equipment which made a lot of sense ( so the system only regenerated during the 3 x E10/24hr windows ). Options for that on the HW+I or eDuals would be handy as the electricity grid is becoming quite attractive for recharging, or at least topping up, even when gas is the primary fuel.1 point
-
I've used 225x25mm a few times in passive builds where there has only been the 35mm service batten depth to play with. 300x25mm is also available if the runs are excessively long, but I know the dynamics for airflow aren't favourable with rectangular vs round so you'd need to do some checks for airflow vs distance inc deductions for bends etc. These guys do the fittings so assume the duct too? I am super-sceptical about retro-fitting MVHR into refurbishments though, at least anything worse than EnerFit standard refurbs, and would warn against it if you cannot get the 'air-tightness' addressed properly ( consistently ) according to the systems minimum requirements.1 point
-
70 is very high Special self builder rate1 point
-
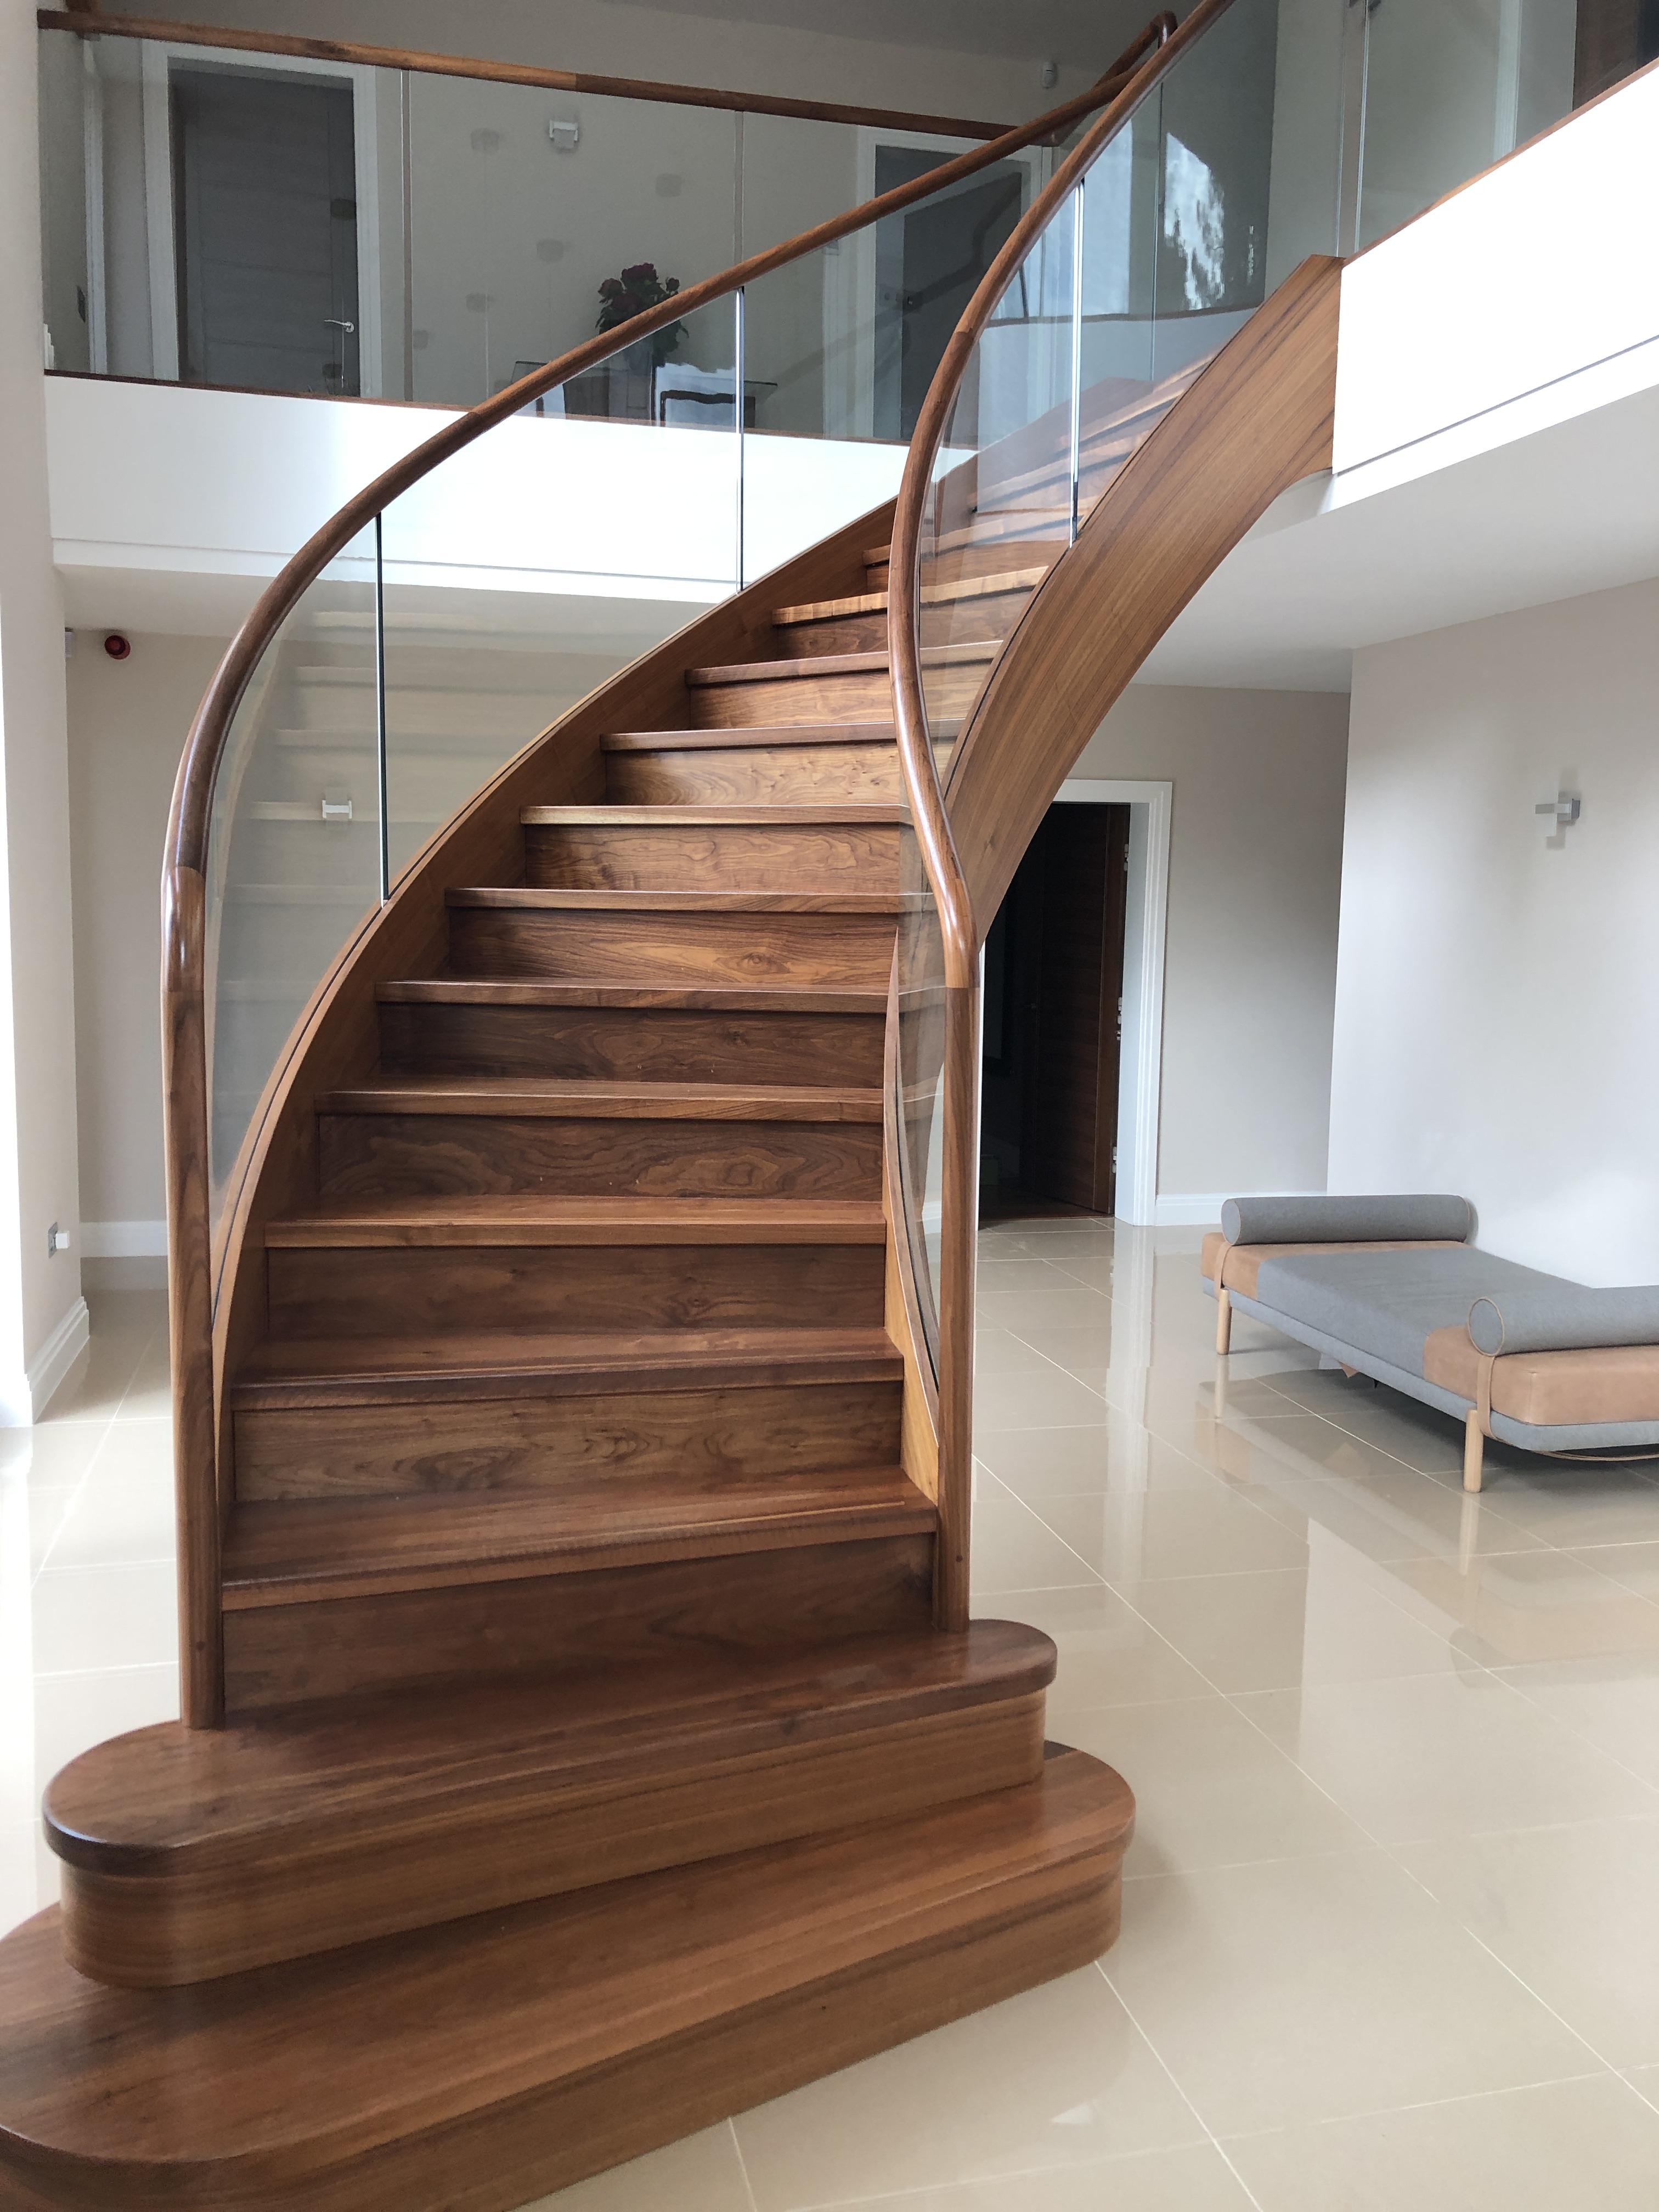
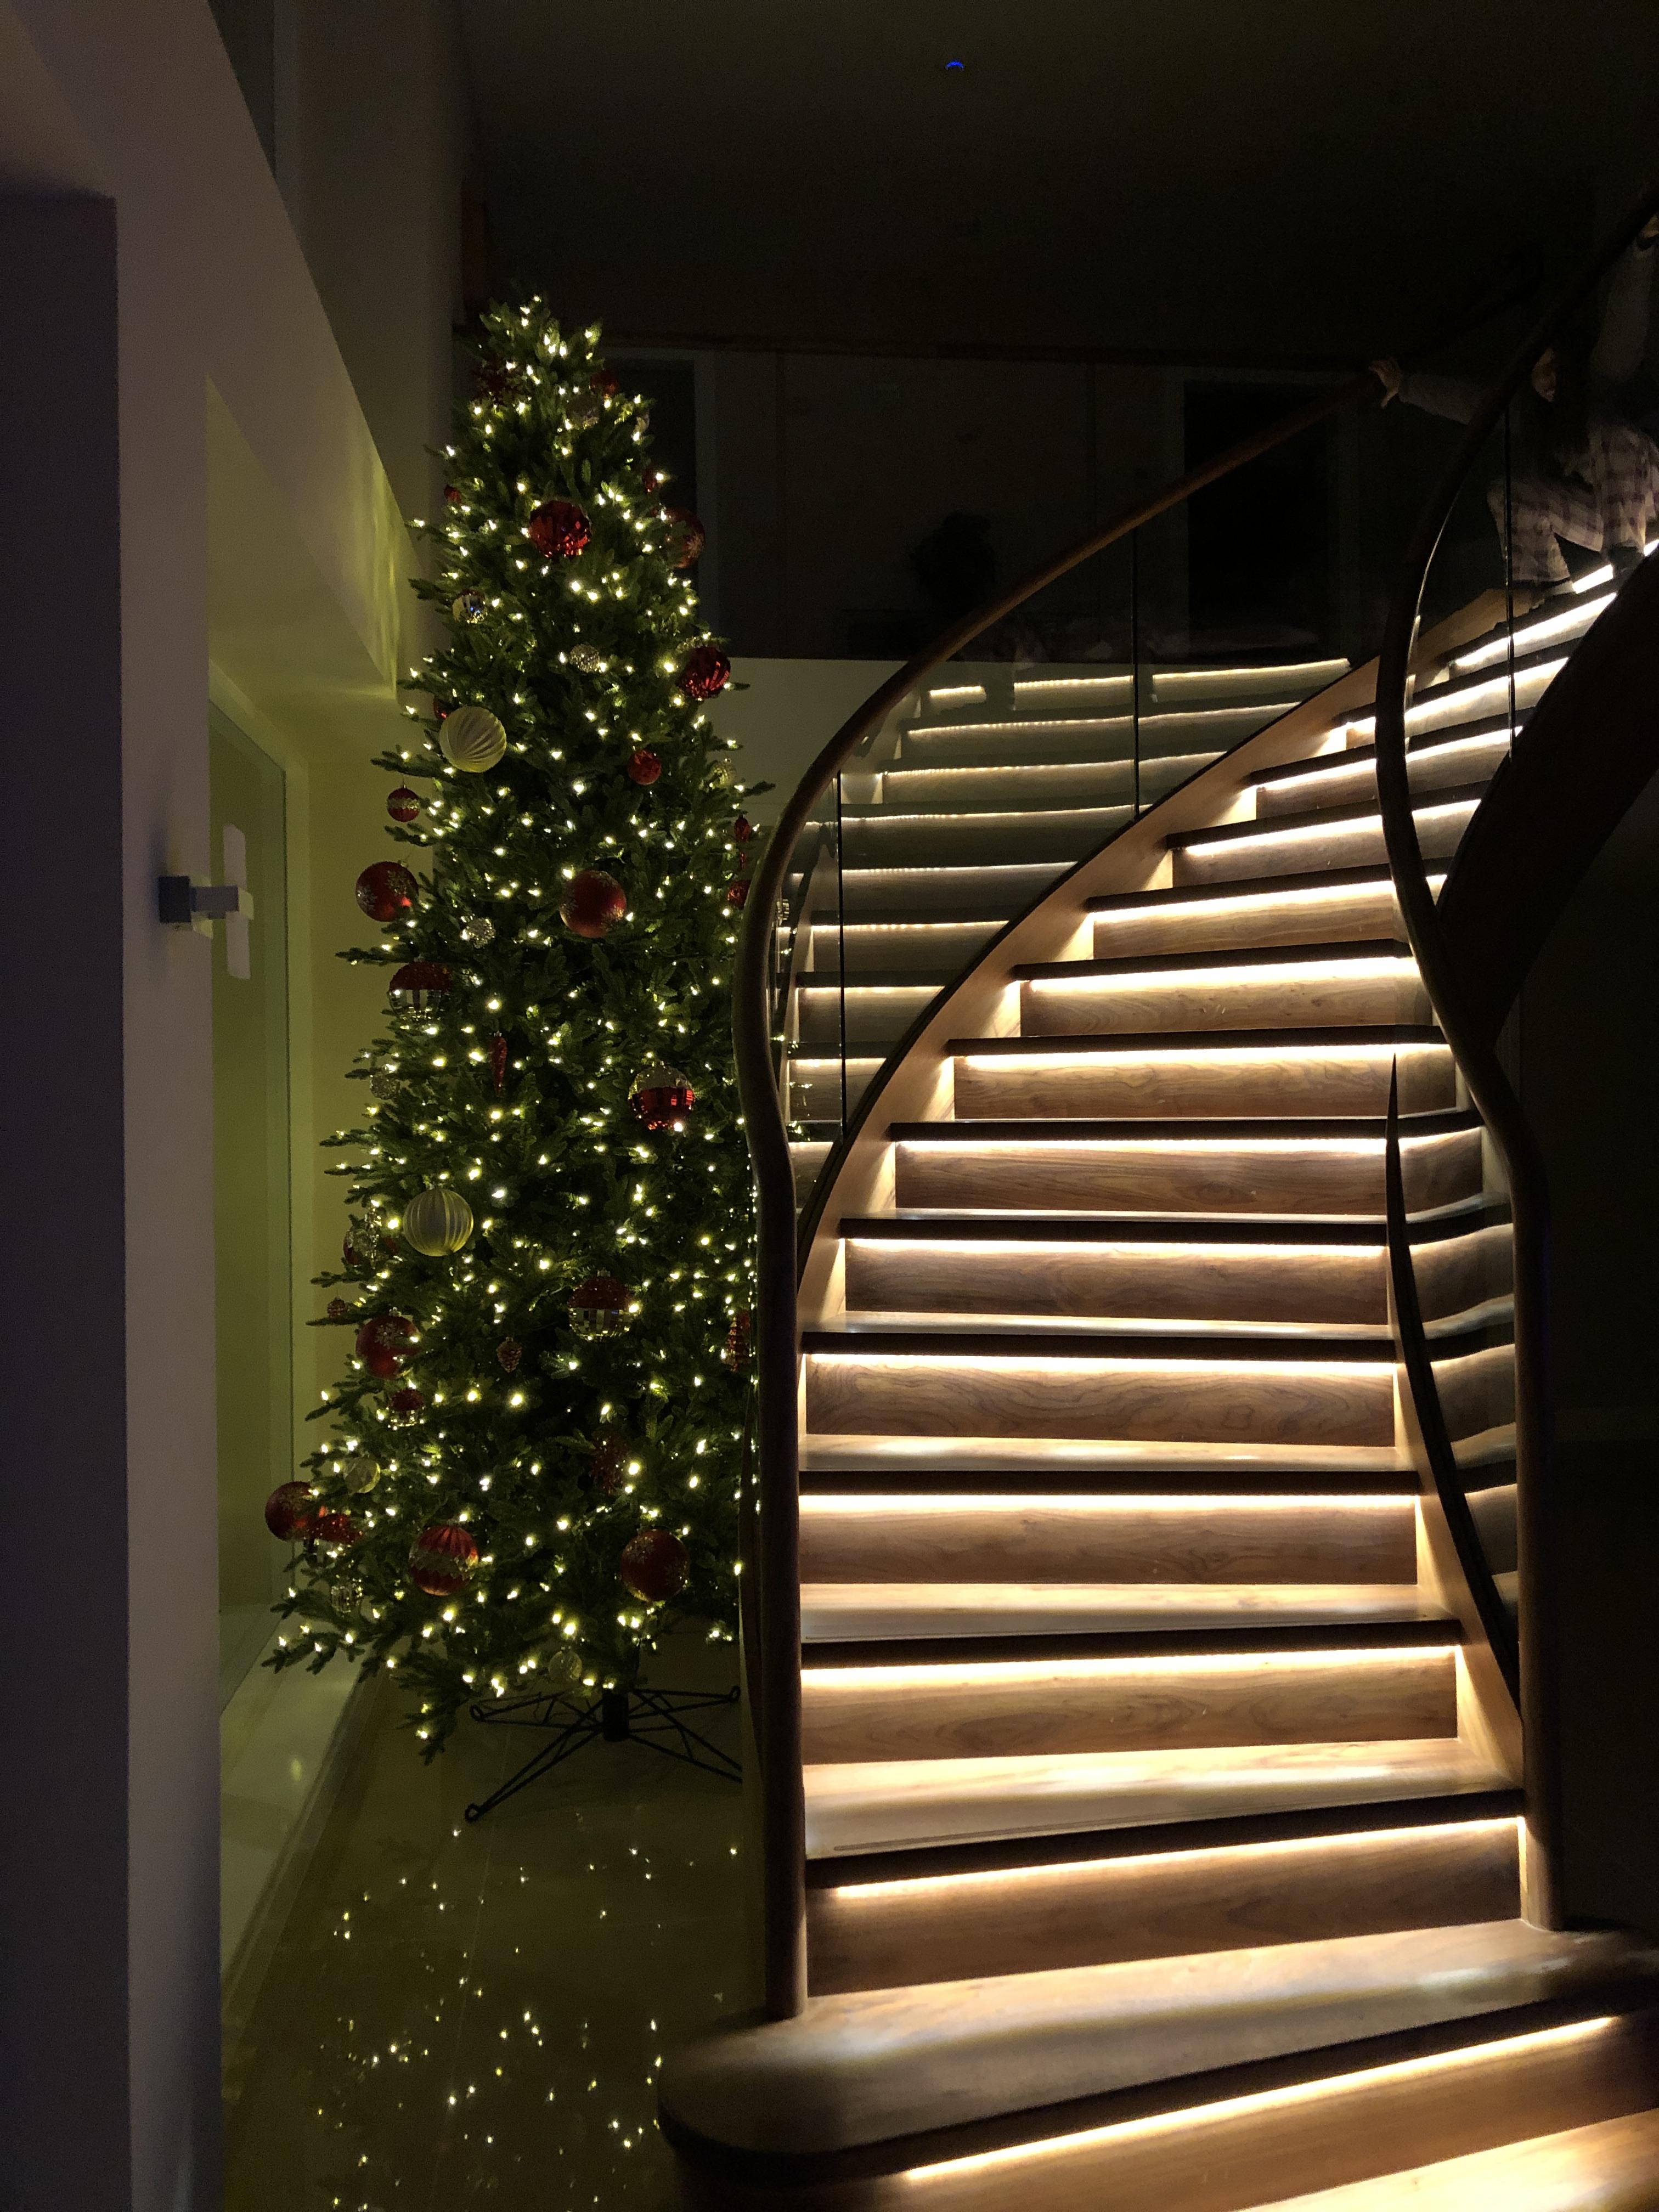
Thanks, I was prepared for it to be over £30k having looked at prices. I got 10% off for buying 2 stairs and a bookcase. With the 10% off it was 29K including 14m of balustrade on the upper hall. So the stair itself would've been somewhat cheaper. However, we have a matching walnut and glass stair up to the second floor that isn't curved and it was less than half the price, showing the premium for curves. As the first thing you see when you come into the house, we wanted something special. I remember an episode of Grand Designs where someone put in a curved stair that I don't think was a nice and I think they said it cost £35k. Picture from today and from Christmas.

 1 point
 -
Hello Glen. Hope this helps. Coming off the main house you have a gabled portion (call this gable 1) then you have another bit on the end of gable 1.. call that gable 2. When you are forming timber lintels in a TF kit you can generally nail them together. Common spec would be " nail timbers together with pairs of nails at max 250mm horizontal centres, for deeper lintels you use three nails vertically. You need to keep an edge distance between the nail and the edge/ end of the timbers. In other words you if put the nails too close to the edge / end of the timber it is no good. Also, if you put the nails too close together this is less helpful as you start to encourage the timber to split and so on. To support the ends of the lintels you commonly use what is called a cripple stud arrangement. The window you have on gable 2 looks fairly wide so you may have two shorter timbers under the lintel to hold it up, these are the cripple studs. Smaller openings tend to have just one cripple stud each end of the lintel.. the reasons for this are a bit lengthy to go into detail here. Then you have another stud which is the same height as all the other studs and this is nailed to the cripple studs. You nail through this full height stud into the ends of the lintel. Over the top of the whole thing (unless you are tight for height) goes what is called your top rail and on top of this you have a head binder.. this is the bit of timber that ties all the panels together. Once you nail all this up the lintel is held in place. If you search internet for timber frame cripple studs you''ll see drawings and so on as to how this all fits together. Some of points I make above are conservative in nature, you can fine tune stuff later. Turning to the tying. It's good to get this out the way early on as it's just as important to stop things moving sideways as it is to stop things falling down vertically. Well done picking up on this commonly missed feature. As a further word of encouragement! There are a few ways you can approach tying gable 2 into gable 1 and gable 1 into the main house. The starting point is to determine the ceiling height.. are the ceilings flat or is there some vaulting going on? There are trusses called raised tie trusses - see internet. Here you would line through the ceilings and tie them all together at this level with wind bracing, usually 100 x 22 timbers. Lastly I see the are some UB's (universal steel I shaped beams) on your drawing. It could well be that unless you have a very big main house roof that you can swap these out for timber beams, solid timber or laminated type. I'm a big fan of trying to mimimise the trades, simplify the material procurement process and so on. Here, if you can use timber instead of steel then it's easier for the joiner. You need them for the kit anyway. It's often a lot easier to connect old/ new timber to other timber than connect it to steel. Also, if you get / measure the steel wrong it's often harder to fix. If you cut a bit of wood wrongly.. nip to the mechants, buy another bit and try again. You can use the " reclaimed" timber on the wood stove if you are lucky enough to have one..or cut it into dwangs (Scotland) noggings (England and mostly else where?) That's what I do "occasionally"1 point
-
After around 18 months of planning things have finally been moving a lot faster over the last couple of weeks which is great! I'll try to summarise the interesting bits: Type 2 vs. Type 3 Our EPS was installed on a sub-base of 150mm MOT Type 2 and 50mm sharp sand for blinding. Structurally this is absolutely fine, but there was an awful lot of and fro with the foundation designers about if permeable type 3 + grit should actually have been used as specified in the system certificates. I believe the only potential down-side of this approach is the potential for capillary action causing water uptake in the EPS and reduced thermal performance, but, given we upgraded to 300/400mm EPS this shouldn't be a significant concern. Drainage below EPS While it was a challenge with the invert levels (especially with the 400mm EPS) we decided to try and ensure that all drainage went through the sub-base and not through the EPS. This resulted in a redesigning the drainage runs as well as ensuring we use inspection chambers without drops, but it all works in the end, with just small notches being required in the underside of the bottom 100mm of EPS in a couple of isolated locations. "The bend at the foot of the stack should have as large a radius as possible and at least 200mm at the centre line" One warning when putting drainage in. Make sure the correct shallow bends are used! Our building inspector had, in theory, given us a pre-pour approval, but then when he got the drainage photos it was clear that the correct bends hadn't been used for first floor SVP's which he flagged up, so we had no choice but to mine through 300-400mm EPS and change them! Why so much EPS? Given our house design has stepped sides (something to do with street scene according to our architect) this means there are numerous steels and load-bearing walls internally. What this meant in practice for the foundation design was that around 60% of the slab needed reinforcing and would have 250mm concrete and only 200mm EPS. We had a u-value calculation done based on our actual foundation design and as we expected the u-value wasn't great, so we decided to go ahead and upgrade the EPS to 400mm which ensure there is a minimum of 300mm EPS across the while slab. It might have been overkill, but the price to upgrade wasn't that much and our PHPP calculation was already assuming 0.10.1 point
-
I would spend a while and look at how you can improve the road junction, spending £5000 now will help you all the way through your build. If you think a concrete pump is £600 a time, spending it on road improvement could be money well spent.1 point
-
You're a guy who likes a challenge, yes? Sorry if I am repeating stuff you have covered. I think we would need to know more about where you are with planning for detailed comment, as there seems to be no-PP post-2015, which means that if that is so you need to repeat the whole thing, including the Bat and Tree reports, and possibly the Archaeology one, too. Guestimating, that would be up to 5-10k for the Planning App if it all has to be redone. It would be useful to know how big the floor area is. As a Grade 2* listed church, it is one of the top 6% of listed buildings, and one of the more (ie in the middle between most and least ? ) important church buildings. There's a lot of detailed stuff mentioned in the listing (below), with a lot of bits going back to Medieval (you won't be able to lay a finger on any of that). You will have close supervision by conservation officers, as well as Bat Men, Tree Officers and Archie the Ologist. I think for work on the most important building in the village, in the High Street where everyone can see it, with a diverted public footpath round the edge of your site, you will be doing it by the book - though you can probably create a less expensive version of the book than otherwise by adjusting the scope of your work. I think the Heritage Report which is part of the Design and Access from 2015 is important. I think you have some tension between the statement therein not to divide up the interior vs your proposal for a mezzanine (are you even allowed to bolt it to a Grade 2* listed wall - I have no idea?). Also if I am correct it says that the roof needs work, but also gives hope that you can change some of the 19C and early 20C accretions. It says that the building was unsafe and in need of urgent repair - that counter to your suggestion that the roof is usable, and the 2015 scheme involves raising the roof. One problem is that if any one of these type of issues explodes in your face, it can be a 50k hole in your budget overnight (KEY ISSUE - Risk Assessment up front). Little villages routinely raise 6 figures for repairing the structural elements of church buildings eg roof or chancel or porch. You need to have confidence that the once-a-century need will not land on your watch. Was this building ever on the Buildings at Risk register? An FOI to English Heritage for all their information may be very fruitful. Is there any risk of disturbing skeletons and bodies? That could be painful, though the churchyard being closed since 1900 may help. One technique I have seen used is to fill in discovered voids with sand rather than doing archaeology. So what to do? Suggestions All those drains through the churchyard and the French Drain look bloody expensive for archaeology. The quotes may sound expensive; unfortunately it is. It will have to be done if the ground is disturbed, so scope out the need if you can. Need to focus on minimising archaeology. if the interior floor was disturbed by Victorians or 20C people, then I would consider running drains and pipes etc under the floor or a raised floor rather than digging up a medieval churchyard - unless you can show it is previously disturbed. There may be a lot of value for you in running things under the path. Or perhaps there is a plague pit and voids underneath? We found one in a church in Nottingham where I was once on the Church Council while reordering - would have required us to find somewhere for an extra 4 months for a congregation of 500, so we filled it with sand and put the new floor in with cantilevers, rather than let Archie back. Do you have good advisers to argue your side? Thinking of eg the architect who used to do Quinquiennial Inspections when it was a church, or the one who worked on the 2015 application. This is important, and needs to consider your proposals - are you allowed, for example, to stick insulation between the beams of an ancient roof? Are you familiar with how church buildings work - consider taking up churchcrawling, perhaps especially the Churches Conservation Trust buildings. I think you need to consider yourself in attitude the custodian - almost long-term janitor - of the building, and make everything reversible if you can. Doing nothing where it is not necessary is an important technique, and beware of ologists and officers who want to spend your money on their enthusiasms. You should be able to find a lot of info about the interior and the fabric, perhaps from the Ecclesiological Society or former church warden etc, or perhaps the "Church Recorders" from the Arts Society have done this one at some point since 1971. If all else fails Cameron Newham has had a 20 year project to record photographic surveys of every building mentioned in Pevsner, and especially rural churches, and has now done about 70-80% or rural parish churches and his photo archive is getting on for a million - he will talk to you but will probably want money if you want photos. I think he did Bedfordshire quite early, so you may be lucky. Or find someone who crawled it whilst it was still a church; just find a group and ask the question or email bedfordshireparishchurches.co.uk . I very much like the suggestion in the heritage statement about re-rendering the walls that were stripped back to stone due to former fashion, though some "freeze it in aspic when it was listed" people may have a blue fit (probably a good thing for their mental attitude). I am not at all sure that UFH will work in this sort of space. Take great care with ducting fat and stuff out of your kitchen. Much potential to damage the old fabric. I think the key is exploring the cost and risk of each element before you do anything substantial. I can't overstate that. (Update: should have mentioned that some parts of the listing will be out of date by now, but I think eg the bellframe and bell are stil there - or were in 2015.) Really, really wishing you all the best. Ferdinand -------------------------------------------- TL 13NW GRAVENHURST HIGH STREET 4/65 Upper Gravenhurst 23.1.61 Parish Church of Saint Giles GV II* Parish church, originally a chantry chapel. C12, C15 and c.l900, the latter work by Sir Arthur Blomfield (Beds. Times and Independant, 14th March l902). Coursed ironstone rubble witn ashlar dressings. Chancel, N vestry/organ chamber, nave, S porch, W tower. Chancel: c.1900, replacing a brick structure. 3-light E window, 3-light and 2-light S windows in C15 style. Embattled parapet. C12 round-headed chancel arch with zigzag carving to W side, the paired columns and scalloped capitals being c.l900 replacements for Jacobean wood columns. Flanking round arches also c.1900. N vestry/organ chamber: c.1900. 3-light and single-light windows to N in C15 style. Plain parapet. Nave: C12, with some C15 reworking. C15 2-light windows to E bay of N and S elevations. Blocked round-headed doorway to N. C15 S doorway with 4- centred head. Embattled parapet, patched with red brick to N elevation. S porch: c.1900 replacing a brick structure. Pointed arched doorway, single lights to sides, plain parapet. W tower: late C15. 3 stages. Diagonal buttresses to NW and SW angles. Semi-octagonal stair turret projects from lower stages of S elevation. W elevation has 4-centred 3-light window to lower stage. Bell stage has 2-light pointed arched window to each side. Embattled parapet. Pointed tower arch. Interior: Plain 12-sided font, Cl5, reworked C19. C15 nave roof has moulded beams and braces, carved bosses, and angels holding shields and musical instruments, some parts of roof retaining traces of painted decoration. Other fittings C19. Listing NGR: TL11305359871 point
-
Just liked the way you can open a few inches without them protruding out too much, we still haven’t moved in but I do really like them. We had norrsken windows.1 point
-
I had tilt and turn windows in my first house, casement on my second and now have side hung , this was something I never gave a lot of thought to but if I did it again I’d go back to casement. My problem is a couple of cats that I can’t let out because of the proximity of the road and I find it impossible to open the side hung windows enough to let air in but also keep cats from escaping, wouldn’t have had this problem with the casement and the ones we had from quick slide could also be tilted for cleaning.1 point
-
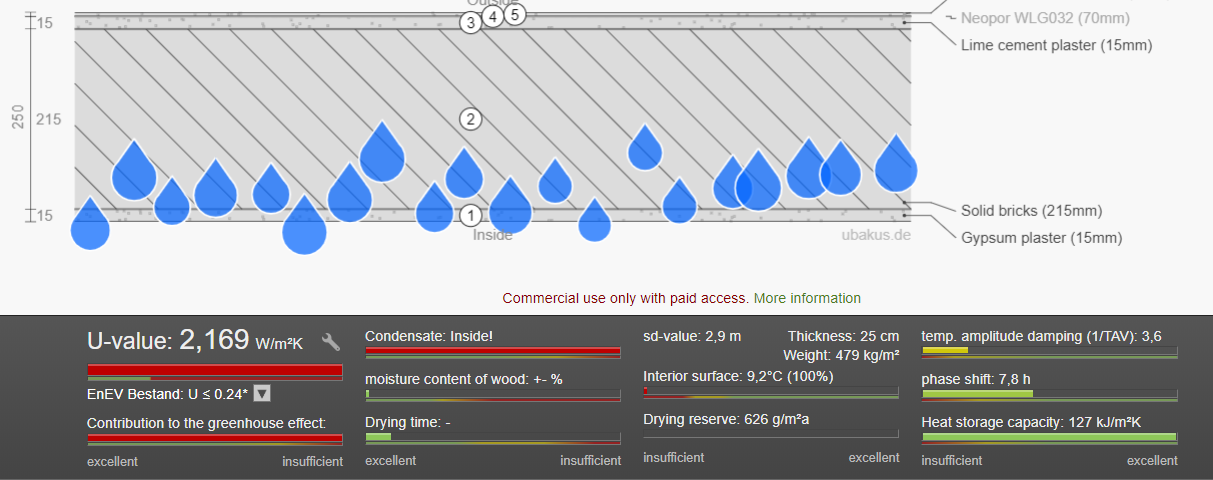
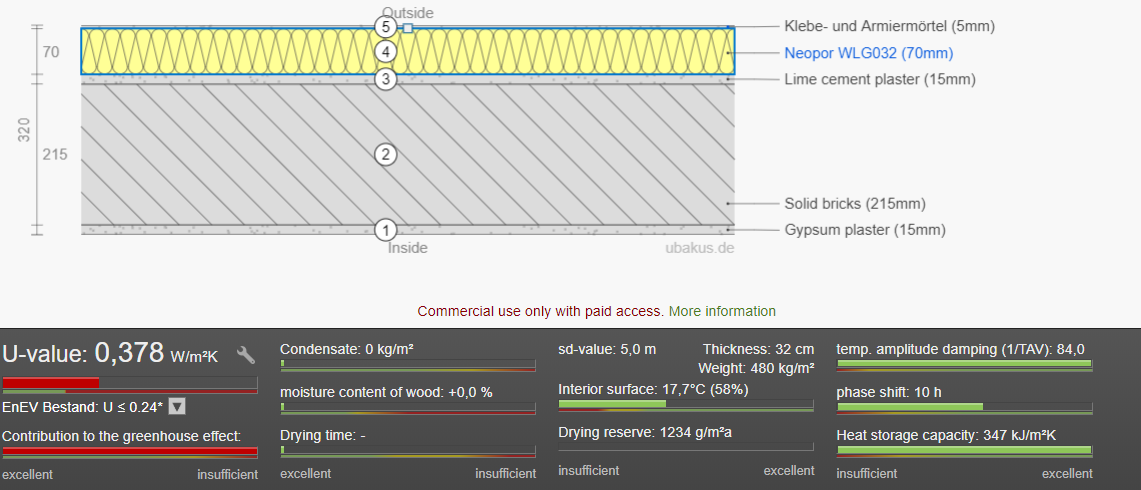
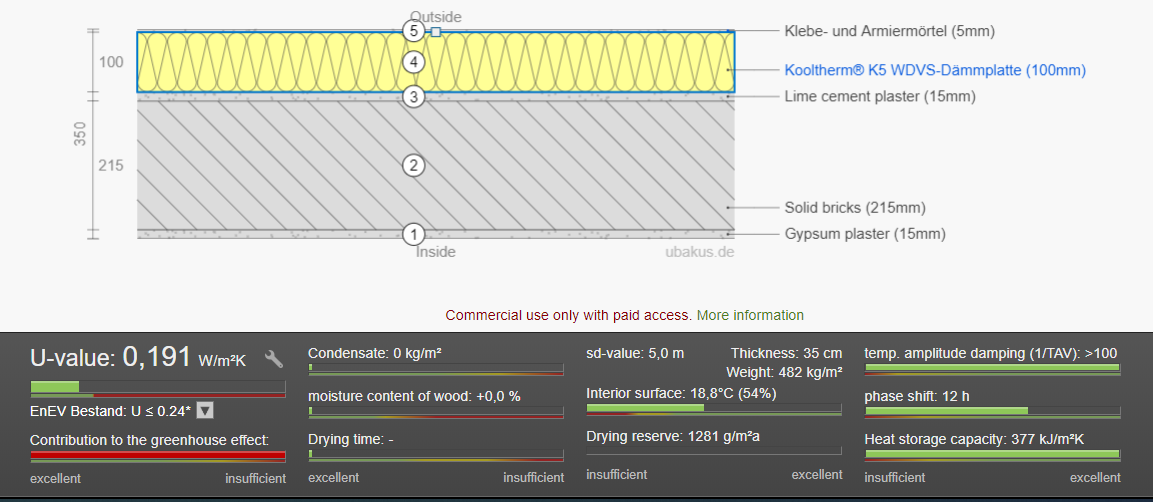
Majority of people use Graphite EPS, for cost vs performance. 70mm will get you to 0.38U, however bear in mind that at the minute you are probably around 2.2U, rather than 1.8U you suggested, thats still a massive improvement. You can go over the amount you have available in your soffits, but in my opinion this is when it starts looking horrible. Before After with 70mm EPS After with 100mm Kingspan K5 Phenolic Hope it helps in making your decision. Regards Mike

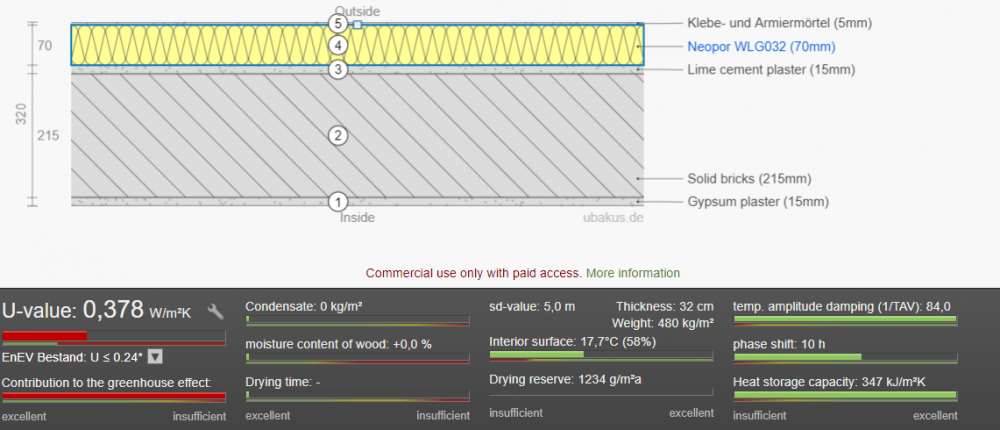
 1 point
 -
I refuse to click on any emails whether I know they’ve come from the bank or not. I also hate it when the bank calls out of the blue and starts asking security vetting questions to verify identity. The calls go something like this. Bank - hello, this is X bank we’re ringing from the x department. We need you to answer some questions before we can proceed. Me - I wasn’t expecting a call from you so I’m not giving you any personal details. Bank - without the validation we can’t proceed with the call. Me - that’s fine, I don’t know what you want anyway so am not bothered about having a conversation with you. If you really need to talk to me tell me where I can find the number of your department on your website and I’ll call back.1 point
-
Regarding the MDPE water pipe and its inflexibility, and relying on a swept-bend to get it in, why not simply place a 90º MDPE elbow at the bottom where the pipe turns vertical? I have been told such joints are fine to be inaccessible. Is that wrong advice?0 points
-
You must have a bell tower bedroom. And a sign saying "Up the stairs to Bedfordshire" over the tower door to embarrass your teenage children in front of their friends to the max.0 points
-
For some reason I read all three as "vented" - ignore me and carry on!0 points


.jpg.c21f3ac78c9b7efd90cbdcb312744dc5.thumb.jpg.7adcad4c0e384f5ecd7d56b0618df6e5.jpg)
This leaderboard is set to London/GMT+01:00