
Leaderboard


Popular Content
Showing content with the highest reputation on 07/28/20 in all areas
-
Love this stuff! Don't bother with a slate cutter. To get you started, buy a slating axe. I have a left handed one..as I'm cack handed. I use an off cut of a steel I beam over which I dress the slates. Some basic points which I hope may be of use to someone. You need to grade the slates. The thicker and wider ones go at the bottom near the eaves. I grade second hand slates ( you need to do this with new slate too to make a proper job) into three piles. You can do four but you may lose the will to live. Grading the slates basically helps you keep the roof tight and flat. Have a look at an old slated roof and you will see thicker wider slates at the bottom, thinner narrower ones at the top. When you get to the verge or a valley you need to turn the slate and trim it the other way. What you are doing here is to encourage the water to move back into the roof in the case of a verge.. so it does not drip down the gable walls. In the case of a valley you are trying to stop constant dripping on to the lead valley and making a hole over the years. You try and channel the water down to the gutter so it drips here and this is where you often have a thicker lead piece. You call this "tailing" of the slate. This can't really be done with a machine..it's a craft. In Scotland it rains a lot, much is light rain.. so it drips a lot. In England say you tend to have much more intense rain.. thus the flash flooding but more dry spells and less of that constant dripping. I want to have a rant now! The new home warranty providers and a lot of the slate providers require that all slates are double nailed at the head. Great if your poviding a 10 year warranty, eg if a slate cracks you often don't see it as it does not fall out like a single nailed slate. But a good well maintained roof should last for at least 80 years? For the roof pro's.. repairing a double nailed / every slate roof is hard going? You can fix the slate but the slate ripper causes more damage that is hidden? Yes there are repair type clips and so on but.. A common traditional method of slating in Scotland is to single nail each slate in the main part of the roof. Every third course you cheek nail a row of the slates, these slates now have three nails and stop the ones below from lifting off in the wind. This way when you want to maintain the roof you can get into turn the slates and easily extract the broken one without damaging the felt / membrane underneath. It's worth I think trying to master this skill, it can be very rewarding. I have left this out but make sure you choose the slate nails carefully depending on whether you are near the sea or not. You'll have a bit of wastage until you get the hang of it. Use the trimmings / wastage as decorative material for paths etc? What is worth while doing is investing in a slate holing machine. You turn the slate upside down. The punch makes a concave hole in the top side of the slate and the nail head sits nicely inside so it does not tip up the slate on top..helps get the " tight roof". You can hole the slates by hand but I would suggest getting a feel for cutting / shaping / tailing them first. All the best. Gus3 points
-
Hello everyone Coming back to update those of you who were kind enough to give us advice and opinions. The main contractor has dropped the ridiculously high hidden elevations amount in the variances they’ve presented to us. Yay! They said they agreed with our sentiments, and therefore dropped it. There are still 3 other variances we are discussing - one of which we are flatly refusing to agree to as it’s plain wrong (and they know this as it was agreed long before we signed the contract), but the other two we may well have to cough up on. Anyhow, they’re by the by. The hidden elevations has been dropped so it’s a result. Thanks for your comments and for giving us a different pair of eyes on looking at the problem.2 points
-
Indeed.... but that would put the manufacturing cost up some. It's obviously "cheaper" in their eyes to fit a rather stretched mechanical relay and then pay an employee to send out a replacement when it fails. Having spent most of my working life designing electronic/electromechanical stuff I do bash my head on the bench in despair sometimes these days.2 points
-
Hopefully no bats? If you weren't asked by ecology for a survey, then you are in the clear (add another £5-10k if you have bats). I'm doing a very simple 60m2 conversion and have a working quote of about £100K. It's relatively expensive to convert. However, if you can live on site in a static and go slowly and allow yourself plenty of time to research everything you will save a lot. It's a really steep learning curve. You will make lots of surprise discoveries: for example, I had read that conversions attract just 5% VAT and you must ensure each and every invoice is charged at this rate if possible. But I've just discovered that I can actually claim back this 5% (!), seems daft, but there you go. Also, once the building is habitable and signed off, any future extensions will be charged at 20% and this can't be reclaimed, so it pays to plan properly and do your pros and cons calculations. My experience with structural engineers (SE) was that I needed a second opinion and saved £15-30K.I needed calculations to prove I wasn't changing the loading. The first SE wanted to underpin everything. Advice I have had is to start with the SE, as an architect may design something fancy but expensive. Good luck. I'm guessing at the very least you can camp in there if you have services, to avoid rent?2 points
-
You're a guy who likes a challenge, yes? Sorry if I am repeating stuff you have covered. I think we would need to know more about where you are with planning for detailed comment, as there seems to be no-PP post-2015, which means that if that is so you need to repeat the whole thing, including the Bat and Tree reports, and possibly the Archaeology one, too. Guestimating, that would be up to 5-10k for the Planning App if it all has to be redone. It would be useful to know how big the floor area is. As a Grade 2* listed church, it is one of the top 6% of listed buildings, and one of the more (ie in the middle between most and least ? ) important church buildings. There's a lot of detailed stuff mentioned in the listing (below), with a lot of bits going back to Medieval (you won't be able to lay a finger on any of that). You will have close supervision by conservation officers, as well as Bat Men, Tree Officers and Archie the Ologist. I think for work on the most important building in the village, in the High Street where everyone can see it, with a diverted public footpath round the edge of your site, you will be doing it by the book - though you can probably create a less expensive version of the book than otherwise by adjusting the scope of your work. I think the Heritage Report which is part of the Design and Access from 2015 is important. I think you have some tension between the statement therein not to divide up the interior vs your proposal for a mezzanine (are you even allowed to bolt it to a Grade 2* listed wall - I have no idea?). Also if I am correct it says that the roof needs work, but also gives hope that you can change some of the 19C and early 20C accretions. It says that the building was unsafe and in need of urgent repair - that counter to your suggestion that the roof is usable, and the 2015 scheme involves raising the roof. One problem is that if any one of these type of issues explodes in your face, it can be a 50k hole in your budget overnight (KEY ISSUE - Risk Assessment up front). Little villages routinely raise 6 figures for repairing the structural elements of church buildings eg roof or chancel or porch. You need to have confidence that the once-a-century need will not land on your watch. Was this building ever on the Buildings at Risk register? An FOI to English Heritage for all their information may be very fruitful. Is there any risk of disturbing skeletons and bodies? That could be painful, though the churchyard being closed since 1900 may help. One technique I have seen used is to fill in discovered voids with sand rather than doing archaeology. So what to do? Suggestions All those drains through the churchyard and the French Drain look bloody expensive for archaeology. The quotes may sound expensive; unfortunately it is. It will have to be done if the ground is disturbed, so scope out the need if you can. Need to focus on minimising archaeology. if the interior floor was disturbed by Victorians or 20C people, then I would consider running drains and pipes etc under the floor or a raised floor rather than digging up a medieval churchyard - unless you can show it is previously disturbed. There may be a lot of value for you in running things under the path. Or perhaps there is a plague pit and voids underneath? We found one in a church in Nottingham where I was once on the Church Council while reordering - would have required us to find somewhere for an extra 4 months for a congregation of 500, so we filled it with sand and put the new floor in with cantilevers, rather than let Archie back. Do you have good advisers to argue your side? Thinking of eg the architect who used to do Quinquiennial Inspections when it was a church, or the one who worked on the 2015 application. This is important, and needs to consider your proposals - are you allowed, for example, to stick insulation between the beams of an ancient roof? Are you familiar with how church buildings work - consider taking up churchcrawling, perhaps especially the Churches Conservation Trust buildings. I think you need to consider yourself in attitude the custodian - almost long-term janitor - of the building, and make everything reversible if you can. Doing nothing where it is not necessary is an important technique, and beware of ologists and officers who want to spend your money on their enthusiasms. You should be able to find a lot of info about the interior and the fabric, perhaps from the Ecclesiological Society or former church warden etc, or perhaps the "Church Recorders" from the Arts Society have done this one at some point since 1971. If all else fails Cameron Newham has had a 20 year project to record photographic surveys of every building mentioned in Pevsner, and especially rural churches, and has now done about 70-80% or rural parish churches and his photo archive is getting on for a million - he will talk to you but will probably want money if you want photos. I think he did Bedfordshire quite early, so you may be lucky. Or find someone who crawled it whilst it was still a church; just find a group and ask the question or email bedfordshireparishchurches.co.uk . I very much like the suggestion in the heritage statement about re-rendering the walls that were stripped back to stone due to former fashion, though some "freeze it in aspic when it was listed" people may have a blue fit (probably a good thing for their mental attitude). I am not at all sure that UFH will work in this sort of space. Take great care with ducting fat and stuff out of your kitchen. Much potential to damage the old fabric. I think the key is exploring the cost and risk of each element before you do anything substantial. I can't overstate that. (Update: should have mentioned that some parts of the listing will be out of date by now, but I think eg the bellframe and bell are stil there - or were in 2015.) Really, really wishing you all the best. Ferdinand -------------------------------------------- TL 13NW GRAVENHURST HIGH STREET 4/65 Upper Gravenhurst 23.1.61 Parish Church of Saint Giles GV II* Parish church, originally a chantry chapel. C12, C15 and c.l900, the latter work by Sir Arthur Blomfield (Beds. Times and Independant, 14th March l902). Coursed ironstone rubble witn ashlar dressings. Chancel, N vestry/organ chamber, nave, S porch, W tower. Chancel: c.1900, replacing a brick structure. 3-light E window, 3-light and 2-light S windows in C15 style. Embattled parapet. C12 round-headed chancel arch with zigzag carving to W side, the paired columns and scalloped capitals being c.l900 replacements for Jacobean wood columns. Flanking round arches also c.1900. N vestry/organ chamber: c.1900. 3-light and single-light windows to N in C15 style. Plain parapet. Nave: C12, with some C15 reworking. C15 2-light windows to E bay of N and S elevations. Blocked round-headed doorway to N. C15 S doorway with 4- centred head. Embattled parapet, patched with red brick to N elevation. S porch: c.1900 replacing a brick structure. Pointed arched doorway, single lights to sides, plain parapet. W tower: late C15. 3 stages. Diagonal buttresses to NW and SW angles. Semi-octagonal stair turret projects from lower stages of S elevation. W elevation has 4-centred 3-light window to lower stage. Bell stage has 2-light pointed arched window to each side. Embattled parapet. Pointed tower arch. Interior: Plain 12-sided font, Cl5, reworked C19. C15 nave roof has moulded beams and braces, carved bosses, and angels holding shields and musical instruments, some parts of roof retaining traces of painted decoration. Other fittings C19. Listing NGR: TL11305359872 points
-
If you're doing a new build then you will need to have done a SAP calculation to satisfy building control that you'll meet the minimum standard. You can do this once you have decided the fabric and design of your floor, walls, roof and windows, plus your heating system. This is where you can see how improvements to the fabric impact on heating requirements etc. and figure out whether its a good investment or not. As Declan says, a standard raft is reinforced concrete, with additional strengthening where there are load bearing points, usually cast onto a compacted layer of type 1 with a membrane on top. Normal shuttering methods used to cast it. It is a cold slab, directly connected to the ground below so any heating upon it (UFH) needs to be thermally disconnected from it by means of insulation, usually 100-150 XPS. The UFH pipes are clipped to this insulation and a screed is poured on- top of that. When the UFH comes on, only the screed layer heats up which means response times are quicker but you tend to need to run the system hotter and the insulation under the screed is isolated from that in the walls, so less thermally efficient all round. However you can still get a decent standard. An insulated raft is built out of 200-300mm thick EPS formwork which acts as both insulation and shuttering. the UFH pipes are connected to the slab reinforcement steel (whether bar or mesh) and the concrete is taken up to near the finished floor level - sometimes power floated to give it a finished surface. This is a warm slab, completely insulated from the ground and with good design, the perimeter insulation can be tied into the wall cavity insulation to give a highly insulated envelope for the whole house which will greatly reduce energy requirements. The UFH is usually run at a low temp (usually 35o) as one big zone and the slab has a slow response time, but if very little heat is required then this is not an issue. if you're using an ASHP vs gas, this can nicely drive the slab heat requirement and some people here run it in a cooling mode in summer, keeping the slab just above dew point. Even when heating is not required, running the UFH pump can distribute heat away from areas that get direct sun and even out the temp. Downside of an insulated slab is the increased cost of the formwork and labour to place it properly, plus additional excavation. You save on avoiding the traditional screed sandwich though so needs thinking through.2 points
-
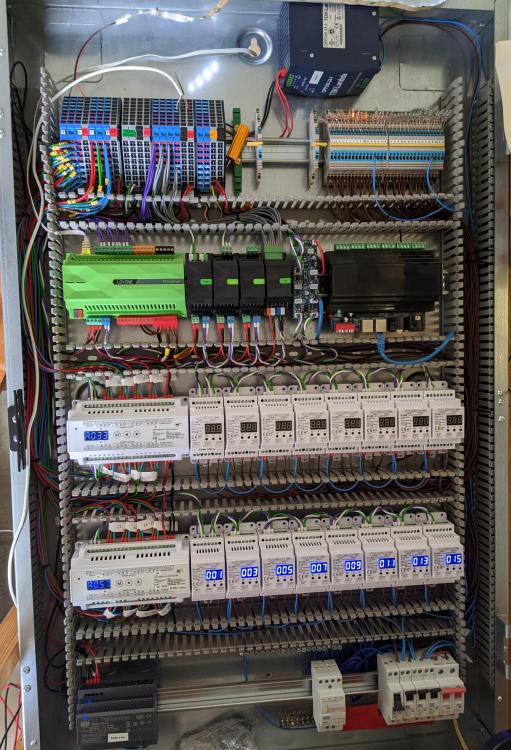
The light switches are - we went through a lot of options, visited the Loxone showroom, compared alternatives, and settled on this plan. The tablet in kitchen is entirely untested, but we need something to replace our underused and unloved Google assistant. We're both very keen to avoid relying on voice commands for everything, but need to live with the options for a while and see. I'm fairly confident we can adapt that over time, the key thing at this stage (1st fix) is knowing what wires to bury in the walls where, which is largely about light fixtures and switches, motion sensors, and lots of extra cat6. Thanks! Yeah unlike the top rail, the bottom rail is "visible" even with the cover on (to access the trips) so I'd need to find rail mounted terminals that have no wires exposed in that central 45mm part (i.e. to look like a blanking plate), or install a cover over the top of them or something.2 points
-
Hey Just thought I'd share updates on this Incase it helps people in the future. I haven't managed to replace all the mortar due to a hectic work schedule but I did manage to put a thin bead of sealant over the existing gap as a temporary/emergency measure. I poured water all over it just as a quick test and i couldn't get it to leak so looks like it's definitely in this area. Next step is to do it properly! I'm not looking forward to it I must admit... Regards
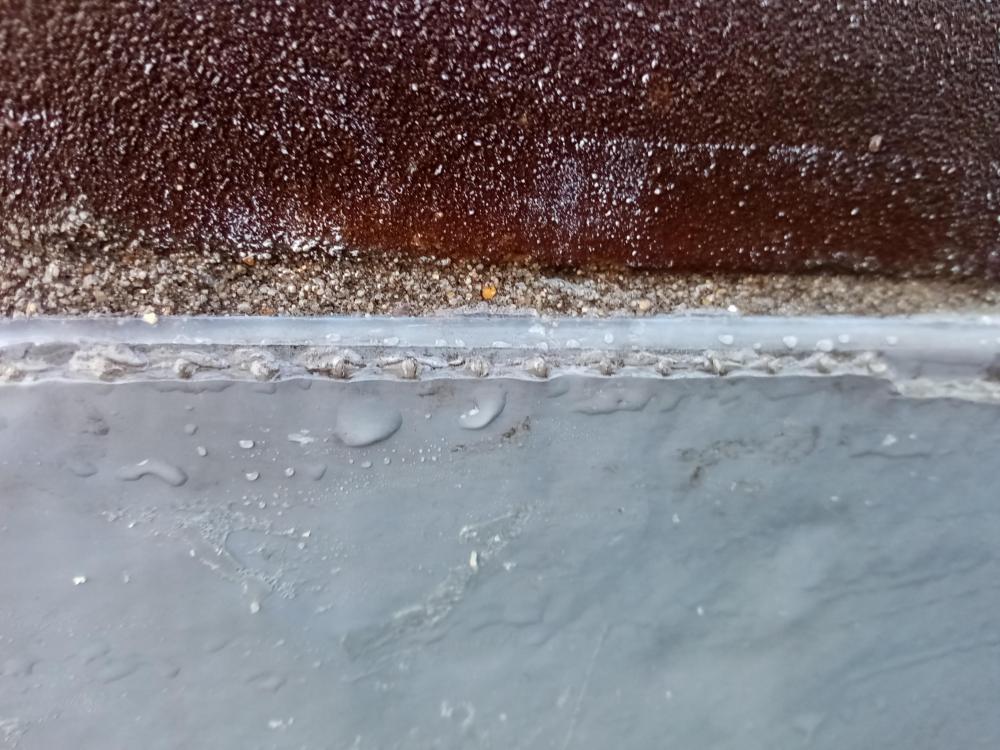 2 points
 -
I'm about 95% done for the "benchtop" build of my Loxone LXN5 cabinet. Couple more tweaks to the doorbell transformer and bring out the connections for the DMX Relay board, before I pack it away until 2nd fix. (The plan is i'll get it put in place in 2nd fix, then the part P sparky will populate the RCBOs as he or she wishes them, and terminate the lighting circuits into the top of the board, and sign it all off. From top to bottom I have: [TDK PSU for LED strips] Low voltage LED and sensor connections | 25 ohm resistor for doorbell | Mains dimmed connections for lighting (populated with neon lamps for testing) Loxone server | Tree extension | DMX extension | RS232 extension (for texecom connect) | DI extension | DMX amplifier PCB | DMX 12x relay board (DIY case) DMX 24 ch LED strip controller | 8x 2ch DMX Mains dimmer ("upstairs LX") DMX 24 ch LED strip controller | 8x 2ch DMX Mains dimmer ("downstairs LX") Mean well HDR-150 24V psu | Doorbell chime transformer | RCBOs (for testing)
 1 point
 -
There was not much in the way of progress from the last entry as we were already close to moving in. The plumbing was completed in the last entry and connecting some final electrical fittings was done soon after. After a decade since putting in outline planning it was time. Our furniture delivery has taken longer than anticipated and we are living with a bean bag for the living room seating and a mattress on the floor for our bed. But we are here. The first few days were spend getting used to living in a new space. As a family four we had spent the last six years living in a relatively small space, it is now great to have a room for each of our children and an extra bathroom. I am pleased with how the house is performing from an energy use point of view. We don’t typically get really high temperatures here and the external average temperature has been about 12c over the last few weeks, the house temperature has remained a comfortable 20c. I have been monitoring our electricity units on a daily basis and we are using between 9 to 10kw which is promising as my hope is that we can go six months or so in the year without heating. The real test will come in the winter as the electricity usage will probably be double, but we plan to make good use of our centrally placed wood burning stove. Once we are furnished, I’ll post some more photos. For the moment just enjoying the new house with the family. The next jobs are: - Ordering decking for a small decked area and for our access ramp - Spreading gravel around the house site - Gardening - Putting more material on the access road - Order some down pipes Thanks for reading.1 point
-
I have a somewhat vigorous mature Clematis and Wisteria, rambling over a frame dividing the leisure garden from the kitchen garden. This is an exchange from during lock-down with a friend, but I would welcome any further comments before I tackle this. These are a few "high summer" dripping wet piccies from this morning: o This is the type of frame that is under all that greenery; a 2m tall horse fence. And these are the replies from a friend who posts as "Cyclefree" over on http://www.politicalbetting.com/ Thanks in advance for any comments.1 point
-
So this one has been 10 years in the making, which is when I originally built this extension, and not long after i'd built it, the outdoor bunny became an indoor bunny! So the glorified rabbit hutch has now become the kitchen it was intended to be. Worktops just been installed. Will crack on with tap, dishwasher, hob, and oven later this week. Really pleased with it all, just need to choose some paint, but will sort that in the autumn, as I've got the old kitchen to rip out and the room to bare brick, and floor to replace first!1 point
-
We only agreed that we would explore the possibility of building our own home in January, and now somehow seem to be well and truly on our way to seeing that happen in the coming year. Very exciting, but also quite daunting. Like most self-builders, I watch episode after episode of Grand Designs, Build the Dream etc, wondering why people fall into the same financial pitfalls almost every time, and more importantly, how we might avoid doing the same. Having found a plot with planning consent pretty much straightaway, we are now making great strides with our potential builder, Dan, who is a passivhaus enthusiast and all round eco-builder. We think we have arrived at the actual design, and will be in touch with the planning department shortly to see if we can have the changes to the original planning consent considered as material minor amendments rather than making a fresh full planning application. We have copied the scale and footprint of the design that won the original planning consent - a rectangular box that is both generously proportioned and an efficient use of space - and are designing in efficiencies where possible to make the best use of our budget. Three weeks ago we went down to the plot for the first time since having completed the purchase to began clearing debris and strimming the long grass. My parents, who live 10 minutes away, just over the border in Devon, gave us a hand. After four days of physical labour we were all absolutely exhausted, but very satisfied with our handiwork (see photos). We also met several of our future neighbours who almost all were absolutely lovely. We had a remote meeting with eco-builder Dan yesterday to discuss timescales and the build method. He proposed that we consider a stick build due to our very tight access (a 50m long driveway to the plot with only 2.2m width and restricted height in places), and to begin next Spring. With the likelihood of a second wave of Covid striking in the winter, and with me working for the NHS, we think that planning the build for the spring is probably sensible. It gives us plenty of time to deal with planning and do some thorough research on the various options for AHSPs, MVHRs, windows, external finishes etc. Below are photos of me, my parents, and my husband Darren, all hard at work. C63ACCAC-732D-438E-A3D4-11048661E3F6.mov IMG_7771.mov1 point
-
Thanks for your post. We are considering Amtico for our build. It was laid in our last house in 1990 and still looks amazing to this day.1 point
-
The experts can clear them. They use a rotating head that attaches to a power hose. It spins round cutting the roots. It's only a temp fix as they will continue to grow back though.1 point
-
Copper sulphate into the drains works over time but also screws up the tank at the other end ...1 point
-
If there is not much you can get rid the culprit trees / shrubs and cut the roots out internally. You can re-line sections, but probably simpler to replace the offending run.1 point
-
That was a hard watch without gagging ,very funny though.1 point
-
I've used a lot of both but now always favour Hep2O. As Peter says the inserts are a bit better (assuming he's referring to the bigger bore and barbs helping prevent pullout) and they just feel a bit better quality to me. I also like the 'In4Sure' feature which proves the pipe is fully inserted. All Hep2O pipe is polybutylene (PB) and so of the 'lay flat' variety (unlike cross-linked polyethylene (PEX) which has a coil memory so can be a right pain). The tool-less feature of JG Speedfit might be considered an advantage for some (perhaps a disadvantage for others!) but the Hep2O release tools are compact enough to have never been an issue for me even where space is tight. You can get a free sample of Hep2O here. Both systems are perfectly fine though and well regarded. P.S. You should've started off with the question 'copper or plastic?' Guaranteed to get a hundred replies (and you'll still be left undecided).1 point
-
It would not be that difficult nor very complicated. Any changes to an approved application would result in a revised or new application to be submitted. There are some options as to the type of application along with application fees, e.g. Section 73/Variation of Condition or Full application. As you are already considering changes to the facade, I do not think the LPA would accept a Non-material amendment application, which is why I haven’t mentioned that as an application option.1 point
-
After around 18 months of planning things have finally been moving a lot faster over the last couple of weeks which is great! I'll try to summarise the interesting bits: Type 2 vs. Type 3 Our EPS was installed on a sub-base of 150mm MOT Type 2 and 50mm sharp sand for blinding. Structurally this is absolutely fine, but there was an awful lot of and fro with the foundation designers about if permeable type 3 + grit should actually have been used as specified in the system certificates. I believe the only potential down-side of this approach is the potential for capillary action causing water uptake in the EPS and reduced thermal performance, but, given we upgraded to 300/400mm EPS this shouldn't be a significant concern. Drainage below EPS While it was a challenge with the invert levels (especially with the 400mm EPS) we decided to try and ensure that all drainage went through the sub-base and not through the EPS. This resulted in a redesigning the drainage runs as well as ensuring we use inspection chambers without drops, but it all works in the end, with just small notches being required in the underside of the bottom 100mm of EPS in a couple of isolated locations. "The bend at the foot of the stack should have as large a radius as possible and at least 200mm at the centre line" One warning when putting drainage in. Make sure the correct shallow bends are used! Our building inspector had, in theory, given us a pre-pour approval, but then when he got the drainage photos it was clear that the correct bends hadn't been used for first floor SVP's which he flagged up, so we had no choice but to mine through 300-400mm EPS and change them! Why so much EPS? Given our house design has stepped sides (something to do with street scene according to our architect) this means there are numerous steels and load-bearing walls internally. What this meant in practice for the foundation design was that around 60% of the slab needed reinforcing and would have 250mm concrete and only 200mm EPS. We had a u-value calculation done based on our actual foundation design and as we expected the u-value wasn't great, so we decided to go ahead and upgrade the EPS to 400mm which ensure there is a minimum of 300mm EPS across the while slab. It might have been overkill, but the price to upgrade wasn't that much and our PHPP calculation was already assuming 0.10.1 point
-
MBC (EPS is from KORE) did the whole foundation and are also doing frame. They started yesterday, but I'm behind with the blog posts..1 point
-
Well, from reading this it seems that SunAmp has had its day on this forum. I've seen enough to put me on the 'well trodden' path of ASHP & UVC for DHW ?♂️1 point
-
Now you have planning, have you had it re valued ? unless you are in love with it you might be better off selling it.1 point
-
Totally. @Dan F has pointed out several times that depending what specific ASHP you buy they need to ship out a different custom controller. Doing this sort of customization via bespoke hardware changes rather than software/settings in 2020 seems completely archaic.1 point
-
Are here any special requirements? I had quotes from the local council dept and other people they regularly worked with, then decided to look outside the county and found a self employed guy who was very good for less than half the price. He even gave me a hand for a day on the tools demolishing the old building, which helped me but also gave him the chance to do a better job reporting on the site history because he could see the methods of construction and date things better. He was on site for foundation digging and again happy to assist on the end of a shovel rather than watch everyone else. Drop me a message if you'd like to contact him and I'll dig out his details. I think Bedfordshire should be within his area - he's Leicestershire based.1 point
-
Hi all I'm a serial DIYer who's done a fair bit prior to this covid business but have been given free rein now that I work from home all the time. We bought the house 10 years ago and I did all the inside of it up, just a bit of plastering and painting, new kitchen and what not. Now I'm tackling the garden, an old boundry wall had collapsed when we moved in and it's stayed that way until now, I've dug down footings for it and got most of it back up to where it keeps the neighbours garden from sliding in to ours and from toppling over. My wife saw that it was going well enough so I was told to build a seating area at the back as well, the back bit is on a slope so more digging for footings and a few block walls are needed there too. Now I'm told to build a little covered area that attaches to out house where we can sit and have lunch/dinner on nice enough days. This is where I need some input, as I'm unsure of the load and span width calculations and would prefer to be able to eat my dinner without having to worry about the roof falling down on me. Thanks for having me1 point
-
A pic would help us understand the problems with access better. How wide is it?? What is on either side , fence or a wall or trees?? How long before it widens out if it widens out??1 point
-
Hey Don’t worry always a solution . My plot has awkward access also . Obviously without seeing your plot I can only make rough suggestions . Material deliveries use a hiab . If that’s still a problem gets lots of materials delivered then crane into place . Or purchase a jack pump and move yourself . Concrete no problem . Use on a craned hose can reach 50 metres or more . Pumped in no issue . Have you got a site plan ? Easier to see your specific issues . Necessity is the mother of invention... ?1 point
-
Then plan to spend £150,000, and no more. It doesn't matter who thinks you are mad. It's the measure of your ambition that matters. This is not the time for grandiose 'big pictures' . It is the time for realism, based on evidence. If the ambition matches 75% of your budget, then you will have the last laugh Identify the size of the problem: pay for a thorough survey done by a really reputable company. A really reputable one. Identify what I call The Knitting: stuff that has to happen before (say) the mezzanine. Plan. Network. Stress realism in relation to the money you have. Accept that some expenditure headings might well have to wait for a while. Stick to The Knitting. I bet @Ferdinand will have some good ideas..... Ferdi? Welcome - by the way1 point
-
^which is unnecessary for a heat pump as the condensate is from the air, not flue gas.1 point
-
200-300mm what has it got to do with the builder, it’s down to the structural engineer to design a raft foundation, and then you to say what you would like to achieve, then you jiggle the ideas around and come up with a plan, most builders haven’t a clue about new technologies, he would be the last person to talk to unless he is used to doing insulated raft foundations.1 point
-
Purple Toadflax? My new app “Seek” says so. Is it right?However it doesn’t say whether it’s a weed or not - one person’s weed is another’s wild flower meadow?
 1 point
 -
As an aside to this, when the project manager came out to see us prior to starting the job and we explained to him about what had happened he said this is what they do, produce a large quote and if you’re daft enough to pay it that’s great for them but you should always challenge it. He also was extremely helpful in putting in the ducting for water and telephone at the same time as he did the road crossing.1 point
-
Slotted panel trunking. For example: https://www.google.com/amp/s/uk.rs-online.com/mobile/amp/p/cable-trunkings/1446409/ I just happen to need a bit of this 20x20 right now but I'm buggered if I'm buying 32 lengths! Smallest I have here is 25w x 37.5h. Got a whole bloody carton of it!1 point
-
Personally I would make it 6" deep (as long as you have already removed any topsoil) and twice the width of the proposed wall. No to cavity. I would fill the void with clean materials you have about - left over bricks, blocks etc - I would personally bed these in place (4:1 sand : cement mix) - straight onto a compacted base. I then put a concrete skin ~ 3" over the top of this rubble - to give a solid surface to walk on while you wait for slabs to be laid. If you haven't got rubble around then I'd do a weak (6:1) mix of ballast to cement. Just my opinion.1 point
-
Bin lorries and deliveries may also be an issue. They will need a proper unobstructed turning head at the top as well.1 point
-
Developers never seem to have this issue which is galling!1 point
-
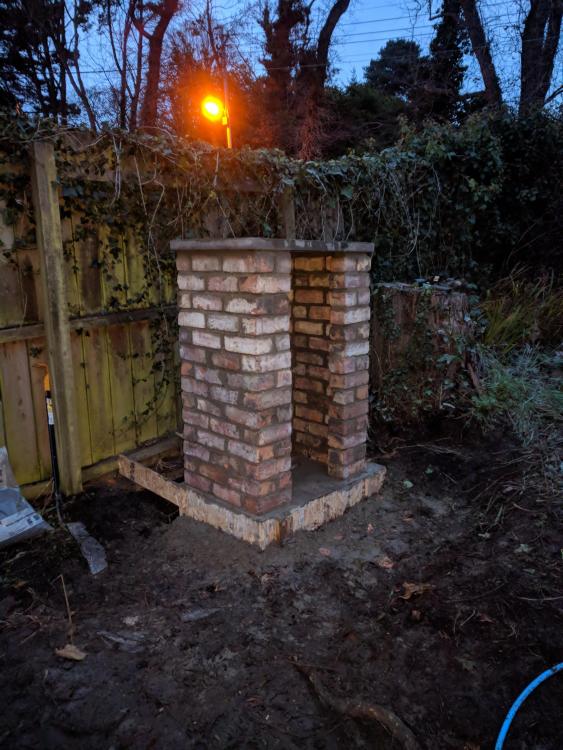
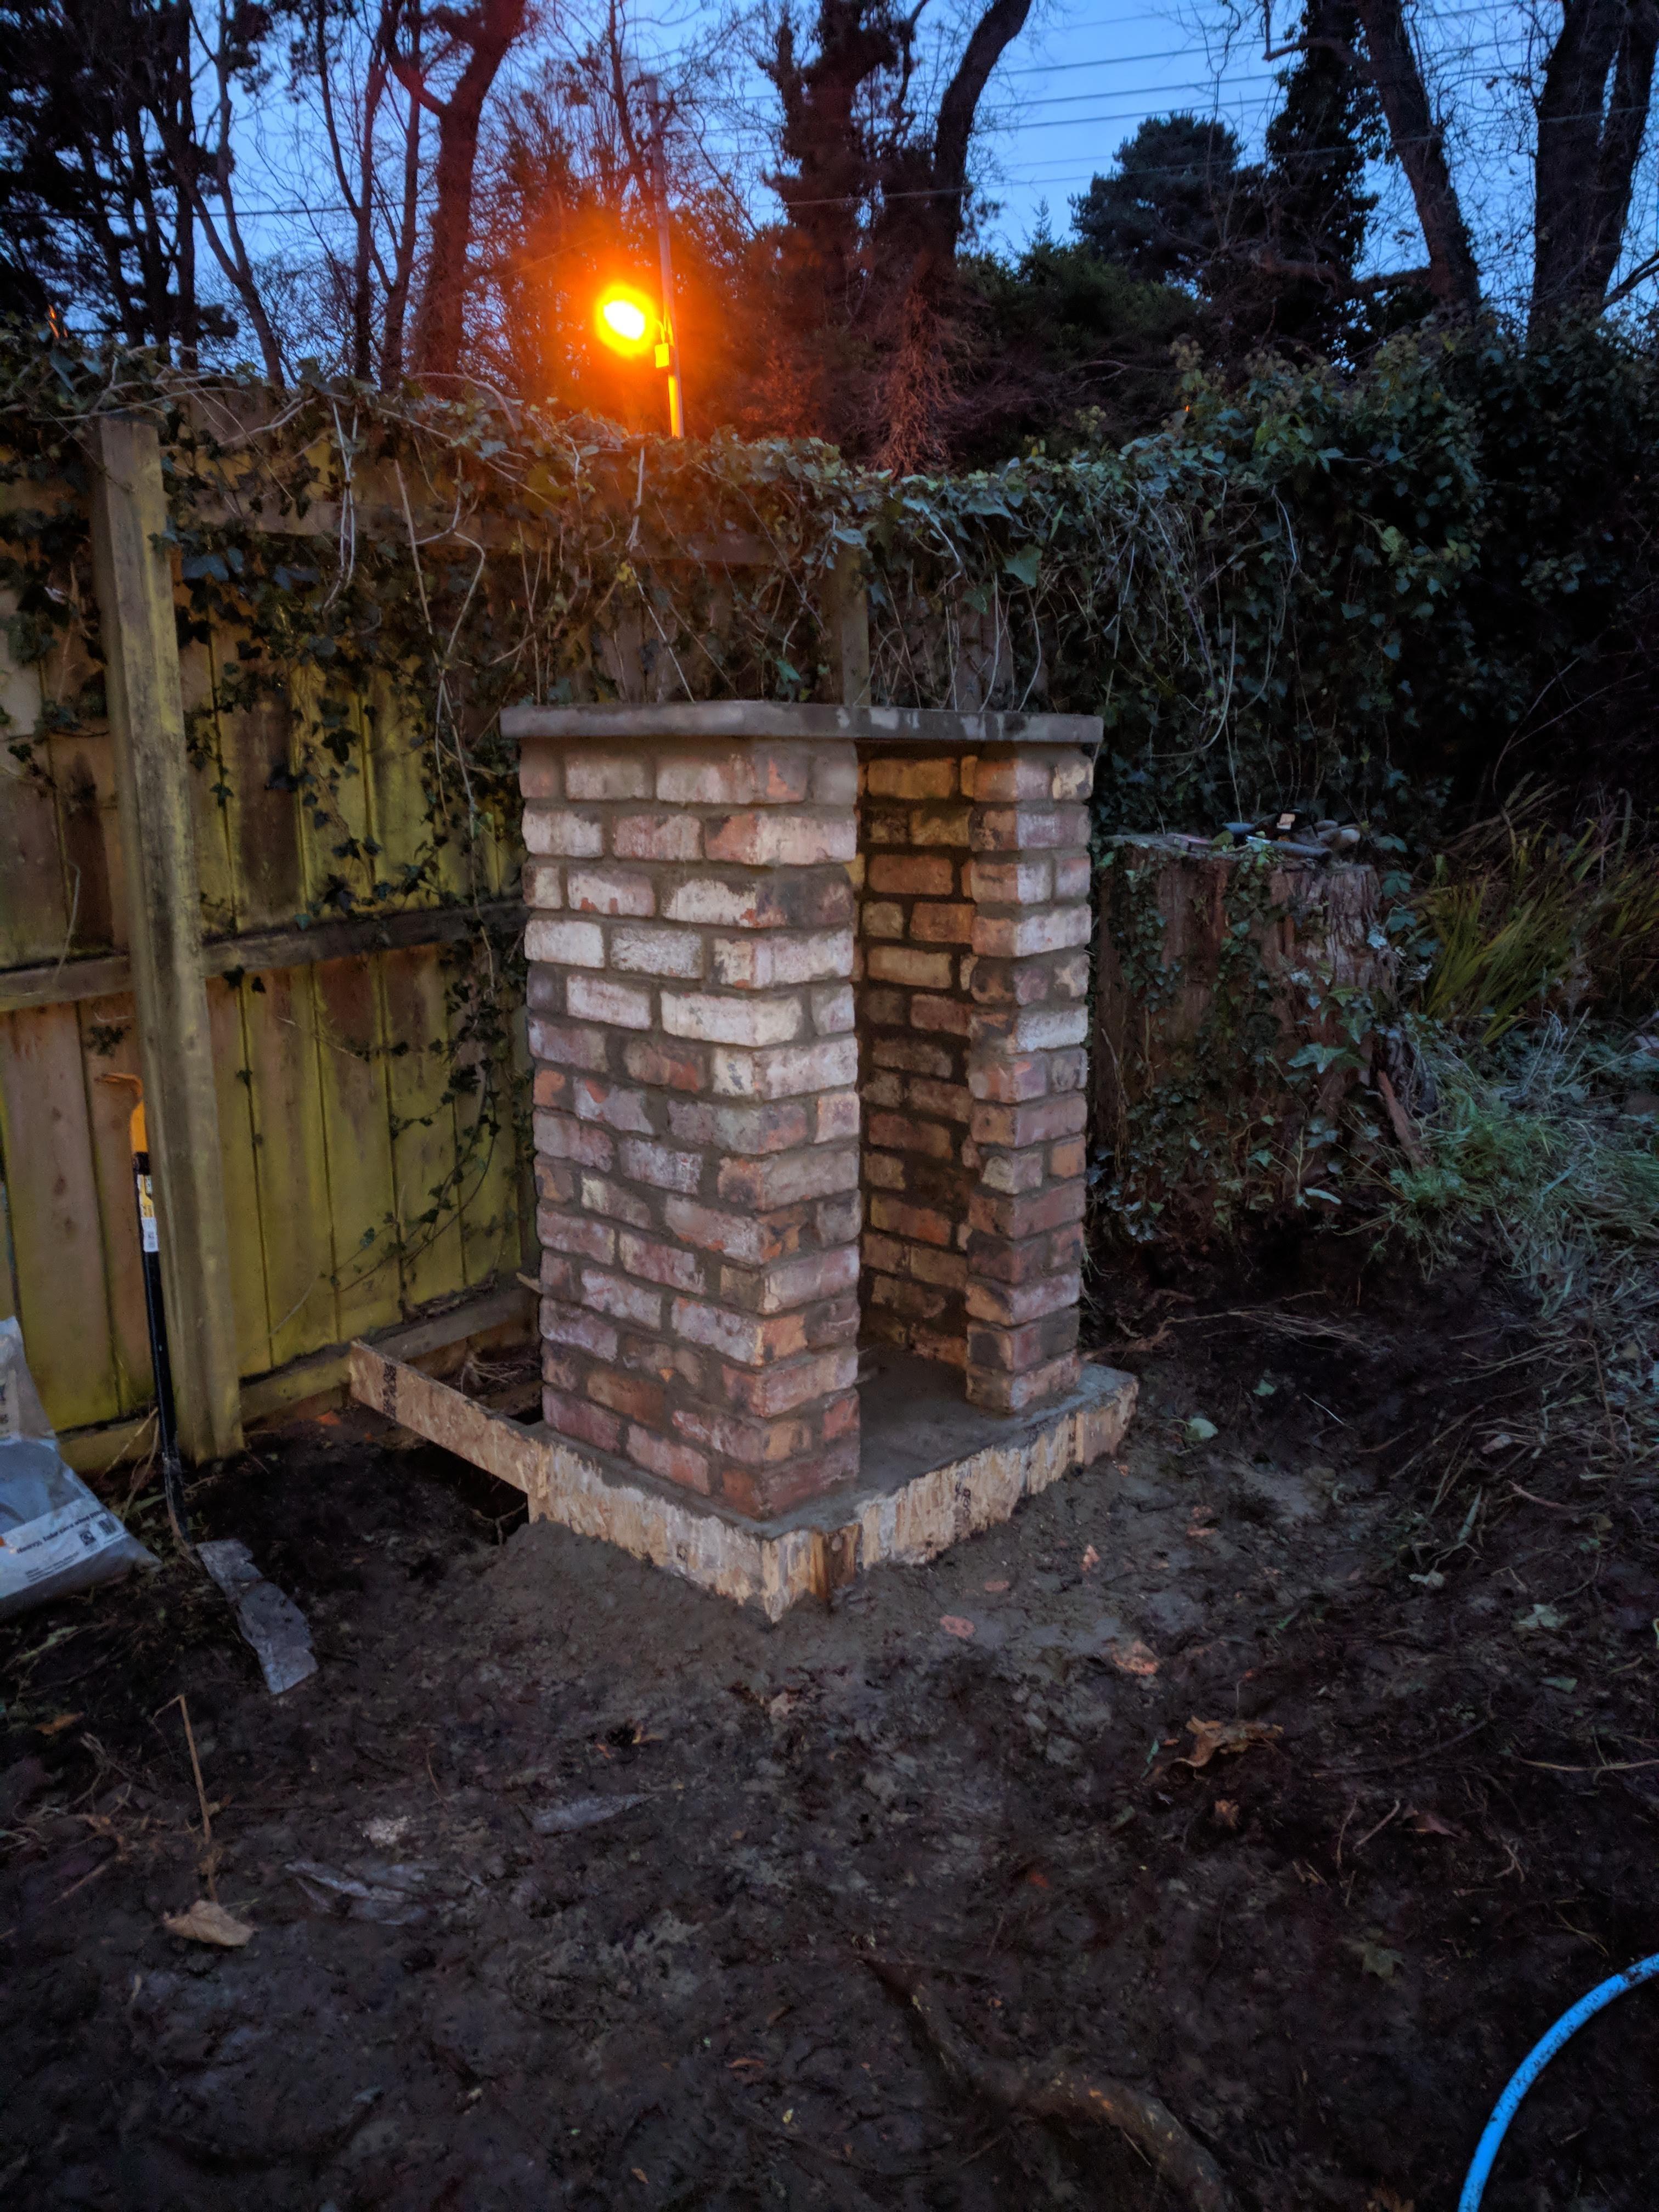
Demolition, site clearance, reduce dig and installation of pre-insulated pipes for ASHP and potential future garden room. The pre-insulated pipe we used in the end was "REHAU RAUTHERMEX 25mm+25mm/111mm DUO PIPE". The ground was luckily fantastic, apart from one area with some roots and a couple of soft spots left over from the demolition. So we managed to avoid the extra 800mm reduced dig that had been specified based on 2 trial holes in the old front garden. At over 200m2, that would have been a lot of muck-away and hardcore..1 point
-
Always reminds me of the Jackass lads when one of them is fastened inside a portaloo which is FULL if you know what I mean. The loo is fastened down while a crane extends a bungee that is attached to the loo until it is released,when the entire contents of the loo are released, enough said.???0 points
-
The guys who clean them out need given a knighthood when they retire. No amount of pay would Make me do that job.0 points
-
Matters not one jot. And your solution for someone needing..... .......is? May need a "shatoff" also next to the urinal for when someone 'overloads' it, typically after walking to it 10cm dilated only to find out you just fitted a pissoir0 points
-
I worked on a shop conversion a couple of years back I went down to the basement where the site manager and worker where having there lunch Asked for the loo and the site manager told me there was an open six inch drain and could I push the board back over 5 minutes later I popped my head around the door and asked if there was any toilet paper There was a five second pause before everyone laughed Very tight site Most where directed to Sainsbury’s Ten minutes walk away0 points
-
In the early stages of our build I had nothing. I told the builders the loo at our house 2 doors down was available should they need it. They all chose to pee behind a tree. Then one lunchtime, one of the builders announced very loudly "I'm off for lunch and a sh1t"0 points
-
I understand that we are required to make reasonable provision and I think the urinal does this. The urinal is also Covid compliant as the only thing you need to touch during the process belongs to you (or at least I hope so).0 points
-
'x' perhaps should say oops!!0 points
-
She loves you .... Yeh Yeh Yeh (sorry - too much gin in my blueberries) (Update: Cameron Newham project link: https://www.parishchurches.org/)0 points
-
0 points
-
Yes you are mad ?. (Will try and do a bit more later) Isn't that a quote from Mrs Icarus? ? We probably need to bring Sisyphus and Prometheus in as well, but I'll start thinking constructive thoughts.0 points
-
Our supplier specified a weatherproof kiosk to specific dimensions along with a easy sweep conduit up through the base for their cable. They also specify the supply must be fused and can only use 16a outlets. All DNOs have different requirements. If you don't meet their spec, they may not install your meter- as happened in our case as we had a standard 13a socket alongside the two 16a. As I was demolishing a brick house, this cost about £30 to build. Others here have got away with fitting a standard meter box to a boundary wall and even fence.
 0 points


This leaderboard is set to London/GMT+01:00