
Leaderboard


Popular Content
Showing content with the highest reputation on 07/27/20 in all areas
-
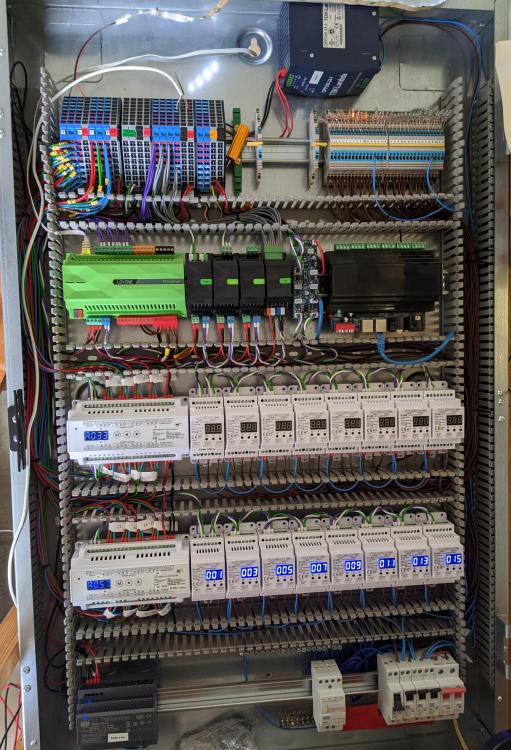
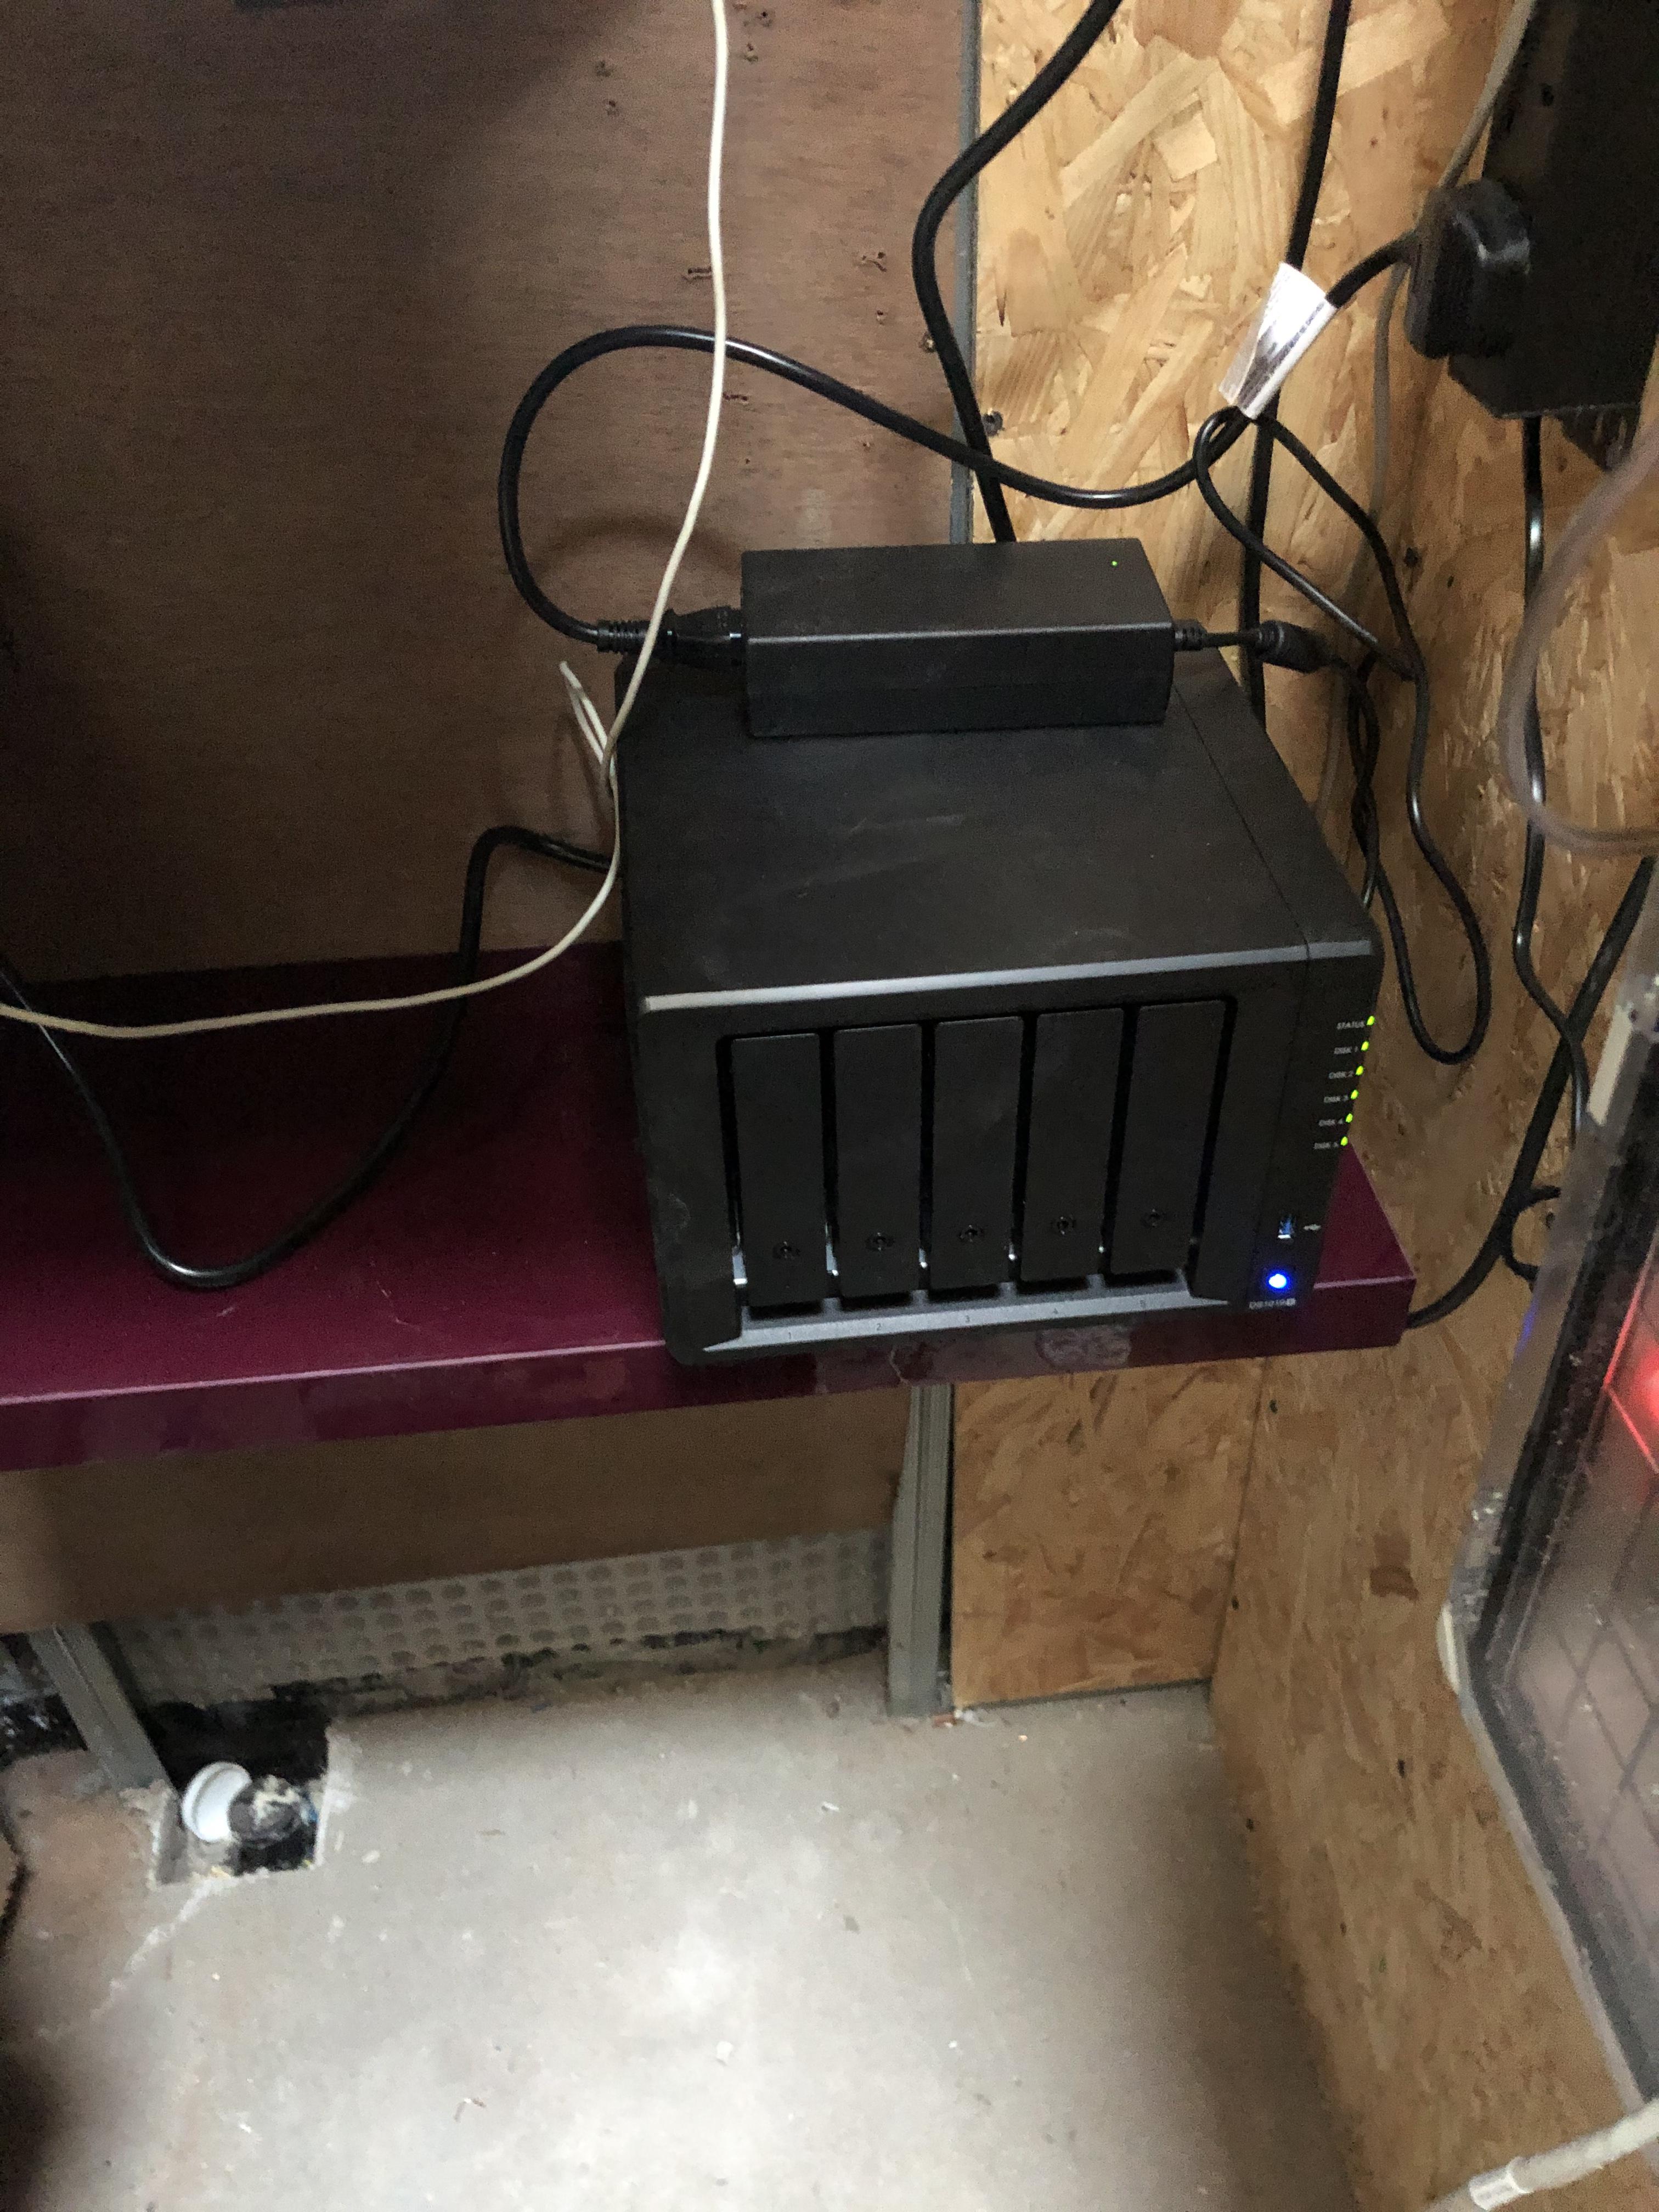
I'm about 95% done for the "benchtop" build of my Loxone LXN5 cabinet. Couple more tweaks to the doorbell transformer and bring out the connections for the DMX Relay board, before I pack it away until 2nd fix. (The plan is i'll get it put in place in 2nd fix, then the part P sparky will populate the RCBOs as he or she wishes them, and terminate the lighting circuits into the top of the board, and sign it all off. From top to bottom I have: [TDK PSU for LED strips] Low voltage LED and sensor connections | 25 ohm resistor for doorbell | Mains dimmed connections for lighting (populated with neon lamps for testing) Loxone server | Tree extension | DMX extension | RS232 extension (for texecom connect) | DI extension | DMX amplifier PCB | DMX 12x relay board (DIY case) DMX 24 ch LED strip controller | 8x 2ch DMX Mains dimmer ("upstairs LX") DMX 24 ch LED strip controller | 8x 2ch DMX Mains dimmer ("downstairs LX") Mean well HDR-150 24V psu | Doorbell chime transformer | RCBOs (for testing)
 3 points
 -
I would have this somewhere fairly focal with a glass door. Alternatively you could set it into the floor in a corridor under some beautiful walk-on glass.3 points
-
If he is not vat registered and you get him to provide the materials I doubt you will be able to reclaim the vat on them, normally what would happen is (if he was vat registered) he would bill you for supply and fit and zero rate it to you. I would imagine the best plan would be for you to have an invoice for the materials in your name, if he buys them and he’s not registered he cannot reclaim the vat. The other thing is, are you building the two houses to sell? I don’t think you can reclaim vat if that is the case.2 points
-
Hi Russ We use a fluted plastic strip 6 mil x 150 Then cut it off afterwards2 points
-
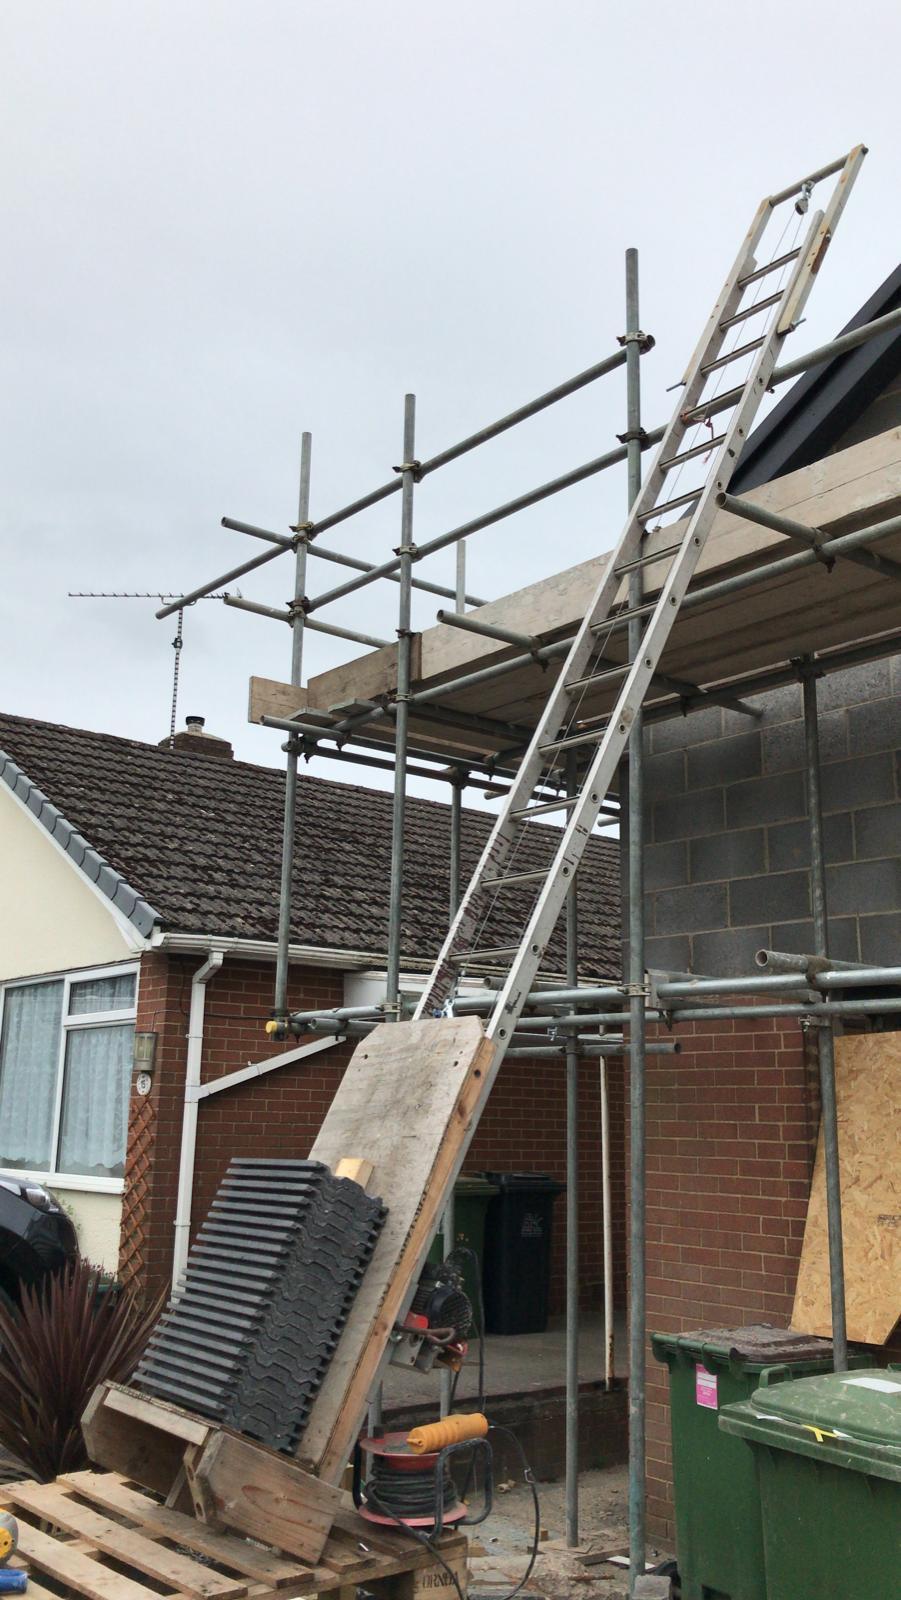
I'm a bit late to the party on this; I made a ladder hoist some years ago when tiling my roof I used a 7m ladder to get to the height I needed. A friend borrowed it recently for his own place, assembled onto a 4m ladder this time. I'd happily out 100kg on it. Wouldn't need much extra work to take more weight. Hoist was a 125kg jobbie for sub-£50 at the time.
 2 points
 -
Just roughly. The drawing looks like you have a roof load. The 3no 150 x 50 vertically is fine and this is what I would expect to see. Using three timbers in this orientation gives you more capacity; strength, deflection and so on. You''ll often see this when you have a 6 inch TF kit (old money) metric sizes - 145mm deep studs or similar. If you have a 4 inch kit (89 mm deep studs or say 95mm) then you'll often see just the two lintel timbers vertically aligned, but they need to be deeper to carry the same load as 3no 145 mm timbers forming the lintel on your drawing. Using three timbers means you get a shallower over all lintel depth, all other loads and so on being equal. The thickness of each timber is often 45 mm (actual timber size as opposed to nominal size) so you need to pack out by 10mm on the inside ( 3 x 45 = 135mm but the studs are 145mm hence the 10mm) , you carry your inner insulation envelope round the lintel on the inside and this is a recognised way of mitigating the cold bridging. The horizontal lapping and the orientation of the timbers you may be thinking about is to do with how you connect each timber frame panel together at the top, bottom and where you have a corner. This is essentially to do with tying the panels together rather than supporting a roof load say. There is other stuff to do with TF shrinkage. Wood shrinks by differents amount in each direction relative to the grain. In summary you are best to put the timbers the way your drawing shows rather than on the flat, although they still may be strong enough.2 points
-
basically if you buy and replace roof --could you resell and get all or most of your your money back --if not the price is wrong that would be my view2 points
-
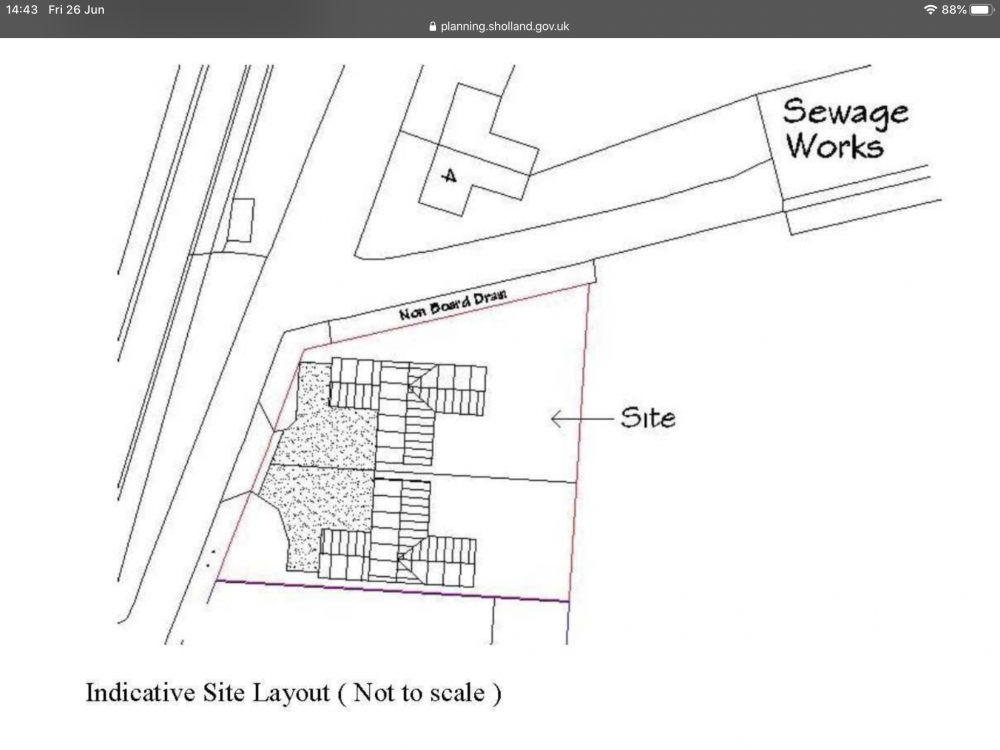
Hello, I’ve purchased a building plot with planning permission for two detached properties. I am getting started with some work including creating an access to the site, commissioning a designer, and trying to get the new boundary with the neighbours who sold the plot properly fenced. I'm trying to get my head around the VAT situation with supply of materials by tradesmen, and struggling! Will post separately in the relevant section. Indicative site plan attached for those interested.
 1 point
 -
You can only install it into a fully insulated raft, otherwise you will just lose all the heat into the ground. Does your design not show this ? it needs to be insulated underneath it as well as a large insulated upstand to stop the heat traveling out of the sides.1 point
-
Hi and welcome! I'm 300m outside of your planning district; happy to share experience if if helps, and good luck!1 point
-
I use Fluteplas We cut a sheet into 200 mil strip Just cut them off flush and leave 75 mil in the screed Once the screed has set1 point
-
Basic VAT rules for a new build are.. * Labor MUST be zero rated to you. You cannot reclaim it from HMRC if you pay in error. * You can only reclaim VAT on materials you buy. Eg it must have your name on the VAT invoice. * If you get someone to do "supply and fit" then BOTH labor and materials MUST be zero rated to you. The contractor can reclaim the VAT he paid, or rather it will be accounted for in his regular VAT return. So since your man isnt VAT registered your best bet is to buy the materials yourself and "free issue" them to him to errect for you as others have suggested. Is the CIL operating in your area? If so you must live there for 3 years after completion if you claim the self build exemption. I believe you can use the self build VAT reclaim scheme if building a house for a relative BUT not if it's a build for sale. I'm not sure the same applies to the CIL. Your parents might have to claim the exemption. Beware the CIL rules. One missing form and you can become liable to pay it.1 point
-
Already have my own NAS (linux box with bunch of drives and plex and stuff). I tried an Amcrest NVR but was distinctly underwhelmed. (Their camera doorbell is OK though. Forgot to mention that). Out of stubbornness I'm on a "no raspberry pi" policy. I find they just miss the spot for me between a proper embedded system (ESP32 or Loxone proprietary where I must) and a proper server box. I'm also, not quite by choice, on a double "hub" design. Loxone for lighting, shading, and motion sensors and "basic" automations from them, and Home assistant for the more complex stuff. The idea being Loxone works without any router/IP network/ethernet, and is part of the fabric of the house (i.e. it would stay here if we ever moved). The Home Assistant bit is more convenience layer over it, and would move out with us. It'll be interesting to see how this plays out in practice. One tablet in the kitchen, by large the plan is to get must stuff through automation and motion sensors, and the mutli-touch light switches.1 point
-
Slotted panel trunking. For example: https://www.google.com/amp/s/uk.rs-online.com/mobile/amp/p/cable-trunkings/1446409/ I just happen to need a bit of this 20x20 right now but I'm buggered if I'm buying 32 lengths! Smallest I have here is 25w x 37.5h. Got a whole bloody carton of it!1 point
-
our guys used a foam strip with a selfadhesive base, and that was set to *just* be submerged under the flowscreed.1 point
-
Looks like it belongs in the back of a DeLorean! We had a guy from a tech forum spec our house with cabling diagrams to cover various circuits from CCTV to home network, but how they will all link together is beyond me. Running the cable for now and anything about the integration of the systems that my sparky doesn't have experience with (probably most of it) I will likely need to hire a smart home professional to figure out. Only one I asked so far is asking for £500/day in just his labour, and he was familiar with all the tech.1 point
-
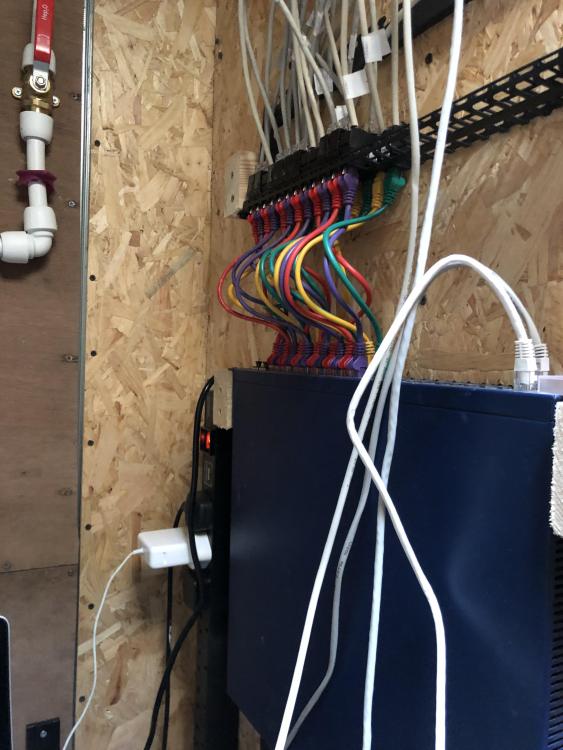
Work of art there! Whats the proper name for the cable management 'finger strip' type stuff? Been looking for that for a while but not sure what to google! My only comment would be 'earths'/CPCs!.. although most of that kit is low voltage, looks like the TDK transformer in the top has an earth terminal. I guess you'll probably want another large set of connectors to common up all the earths on your lighting feeds out, not sure that metal block in the bottom would take them all. Normally only one conductor per RCBO/MCB unless it's a ring final circuit... but thats more a nice to have.1 point
-
That's some super tidy work there @joth, good effort bud - wish I kew what to do and where to start with that kind of stuff.1 point
-
I like the advice in the final paragraph - "cut right down". Far easier to start again than correctly manage a big mess. My neighbour's very vigorous passion flower has violated the laurel tree I wish to prune/cut down. I need to have the conversation with next door as I am not waiting till spring (advised passion flower pruning season)1 point
-
Coooooorrrrrrrr home automation super porn ! I’m not familiar with dmx - but I know it’s expensive! . What are you doing about house wide audio , Cctv , sensors for automation? ? You showed me yours so I’ll show you mine !


 1 point
 -
Probably 99% of sole traders are not vat registered So if you don’t purchase the materials yourself The vat is hidden within there quote1 point
-
I've nearly finished our self build on the basis of just dealing with subcontractors. Buying materials yourself takes time if you are not familiar with the products. The only materials I didn't supply were the brickies stuff, underground drainage pipes and the staircase and balustrade. Sometimes I just had to be realistic as to what the wastage would be and difficulties knowing on the quantity order. All these trades charged VAT at 0%. Contractors not registered you should buy the materials. Some contractors that are not registered might want you to buy the materials to keep their turnover under the registration limit.1 point
-
I would disagree with this. I went backwards and forwards with our DNO. The first quote came down by thousands when I suggested an alternative routes. In terms of time spend to £s saved this probably added the most value to our self build. I would rather send out three or four emails then lose thousands of pounds.1 point
-
Personally I would make it 6" deep (as long as you have already removed any topsoil) and twice the width of the proposed wall. No to cavity. I would fill the void with clean materials you have about - left over bricks, blocks etc - I would personally bed these in place (4:1 sand : cement mix) - straight onto a compacted base. I then put a concrete skin ~ 3" over the top of this rubble - to give a solid surface to walk on while you wait for slabs to be laid. If you haven't got rubble around then I'd do a weak (6:1) mix of ballast to cement. Just my opinion.1 point
-
It’s not crap . It’s work in progress . You can’t limit and stem creative juices . They must be allowed to flow unrestricted.1 point
-
Just had a read of your thread, thanks. You have indirectly answered my original question, I should open the yellow pages at "Topographical Surveyors".1 point
-
if both parties agree and you both have evidence (written) of that agreement why would land registry contest it?1 point
-
Yes. Think also big american fridge freezer. So it's not just about getting materials up/down otherwise I would just use a simple winch and gantry. I reckon - I can build something than I can dismantle and then ( as others have said and indeed I have already thought of ) with the freezer etc. breaks down and needs to be replaced I have a easy setup lift to utilise. Waining on @Onoff 's contact to get back to me.1 point
-
I think it's down to a combination of the acid content of freshly laid cement/concrete and the haunching interfering with the depth of the soil at the edges. Eventually, the acid dissipates and the roots become longer/stronger and once they have, the problem goes away. I imagine you'd have the problem wherever you are but if the climate is wetter, I guess it'll recover quicker. The main problem with ours was that we edged with square 'pavers' that were only about 60-70mm thick, so we had to come close to the surface to provide a good haunch. Even with the best effort to work around it, the inch or two of width right at the edge only had about an inch or two of soil depth. Better thought out, we'd have used deeper edging stones, which would have left the concrete much deeper, with a thicker soil bed on top and would have provided a better chance.1 point
-
Still Purple Toadflax though...?1 point
-
@Ferdinand Google do an App which is fantastic for auto identification: and this is a screen grab from the app after uploading the photo you posted:

 1 point
 -
I purchased all my tapes from Passivehousesystems but could not find the tape that I used. There is a black and green coloured tape that I used against the VCL but the colour of the tape that I used on the concrete floor/wall junction was a light green split 50/50 tape but it is not on their website now. May be others can recommend a tape for you, sorry.1 point
-
A really good old school tiler doesn't need a levelling system. A bad tiller will mess up the job with or without a levelling system.1 point
-
Got any windows high up?1 point
-
Nope, not seen that before. Usually only 2 and laid flat. A stack of 3 like that vertically is usually used as a lintel over a door.1 point
-
@Thedreamer We got ours from a company advertising on Etsy.com - about £30 if I recall correctly.
 1 point
 -
Air bricks should be clear for a suspended floor - unless you have done something which removes the need for cross ventilation such as sealing it all and filling the entire void with insulation (which is a different ballgame aimed at doing different things). They need to be 150mm above the outside ground level to keep water out. When I had a problem was because somebody had topped up the concrete drive to the level of the bottom of the air brick. So I fitted one of these to raise the outside above the driveway surface: https://www.toolstation.com/9-x-3-telescopic-vent/p38967 Where the cavity insulation blocks an air brick you take it out and fit a sleeve: https://www.bes.co.uk/air-920x-set-terracotta-white-7656/ Where possible you can lower the outside ground level, by simply digging a trench or creating the French Drain mentioned, which will take the water away to a soakaway you dig somewhere. Once you have solved the issue then the water should go away slowly or quickly, but pumping it out may be useful if you have Lake Windermere down there rather than a puddle, or if it lets you see where it comes back in from. Think of the different things you can do as a toolkit, and look at the different bits of your circs and see which one will work where, or how much you need to do. If you floor or joists is rotten in places then tackle that after sorting the damp. HTH Ferdinand1 point
-
That ladder hoist I linked to just now is dead easy. Low component count too. Decent industrial ladder bolted to the wall. Cheapo engine hoist. Some Unistrut supporting a 1m x 1m lifting deck. What's the worst that can happen? ?1 point
-
it is a serious consideration how he can replace fridges etc in time to come not just getting them in once1 point
-
Ha, I'm with everyone else here - get the fence moved and deal with the fallout when she notices. If she then tries to move 'your' fence from its correct position, kindly ring the police and report criminal damage against your fence. In theory she will get told to get back in her box and take you to court, at which point the burden lies with her to prove/disprove etc. I suspect she won't bother.1 point
-
She cannot call the police if she doesn’t live there1 point
-
Can you construct a French drain?1 point
-
Depending on how bad the wet rot is I would be asking my wife how badly she wants to live there. Then get quotes to replace whole roof and use that to haggle the price.1 point
-
Just to add to what others said, you roofer seems to have done a good job with the Roof Inspection report, I really don't think you'll get much more value (for the additional cost) in having further surveys done vs getting your roofer to give a full cost to re-roof (ask to include any likely "surprise" extra costs that builders may normally be tempted to leave off an initial quote....) and run with that1 point
-
As above; I'd re-roof if it was mine. Don't bother with a surveyor; just get a reputable roofer to assess and quote.1 point
-
Yes this needs stripping and replacing. Probably some structure as well if it is sagging. Did your roofer give you a quote? He knows what he is doing.1 point
-
Welcome, if you are looking to stay in the property for any period get that roof renewed, get a good quote (high) and use it as a bargaining chip to reduce the price, any repairs will have a very limited effect in my opinion.1 point
-
Single phase with an old twin fuse head. Let's HOPE the neutral fuse holder has a solid link and only the line fuse holder has a real fuse.1 point
-
There is nothing in the regs that say there needs to be increased sound insulation in walls for bathrooms. The regs do say for internal walls and floors the minimum acoustic specification is Rw 40 dB, but.... this does not apply, where; An internal wall contains a door An internal wall separates an en-suite and the associated bedroom For a 100 x 50mm stud you can achieve Rw 40 dB with 1 x 15mm wallboard either side, with only 25mm 12 kg/m3 mineral wool in the cavity. Now this is a minimum, if you want to improve it and keep the single stud, you have three routes. Increase the mass of the plaster board, e.g. 2 layers of 12.5/15mm SoundBloc Increase the density and thickness of mineral wool in the cavity, e.g. 75mm of 24-48 kg/m3 Mount the layers of plasterboard on resilient bars for an up lift in acoustic performance. What is you floor construction? as it is likely that as it stands it achieves the min Rw 40 dB, and additional insulation will help bring up the performance, as well as those type of improvements listed above for walls.1 point
-
+1 to all the contributions so far. I have built a MBC timberframe house and used an independent BCO. I started off by sending a full MBC design package, including SE Caculations and foundation design, asking to be advised of anything else that was required for BC approval. I received the following " Do you have a building regs specification as I need to do a plan check and comment on compliance with the building regs ..." I then responded "Not sure what you require for the "building regs specification" - can you please clarify for me? I have sent you a calculation and drawings package for the timberframe and the foundation. What else do you require and I will arrange to provide it? " He responded " with all jobs we normally see a detailedspecification to cover aspects such as fire/ means of escape. ventilation,staircase design etc the plans provided so far cover the structural aspectsand thermal requirements " I asked "Do you an good example that I could use to ensure that I cover everything and i will then quickly develop a detailed specification specific to Eastcroft?" I never received a response. So I did some research online, including Websites such as http://www.buildingregs4plans.co.uk and looked at what @JSHarris had done and what @Bitpipe was experiencing with questions from his BCO at the same time . I then proceeded to develop my Building Regulation Specification and sent it to the BCO with the following note " I have done some research, looking at similar documents, and produced the attached Building Regulation Specification for your review and comment. I have endeavoured to detail all the relevant information but if you require more detail the please advise and I will revise to meet your requirements It refers to various drawings, calculations and related documents (which I attach for your reference and convenience, as I have already submitted most of these documents to you before) and have included them all in one zipped folder for your convenience " I never received any nore questions or comments, though he did visit site on a few occaasions and I kept him updated with regular emails and photos. I requested approval of a couple of areas - proposals for fire/smoke detectors installtion and forjuliet balcony fixings - to which he responded and gave approval. I attach my Building Regulation Specification without the attachments. On reflection, it is not particulalrly good document and I could have included a lot more detail/definition of various systems. I thought that it would require updating with specific information, as the BCO asked questions but the questions never came and I never updated it... On the positive side, it did force me to read and understand all the Buiding Regulations as they applied to my build. Building Regulation Specification for new build house.pdf1 point


This leaderboard is set to London/GMT+01:00