
Leaderboard


Popular Content
Showing content with the highest reputation on 07/06/20 in all areas
-
Old fashion chimney brace
 3 points
 -
We have seen huge changes on site in the last couple of days. The SIPS team have worked very hard to keep things on track. I can't fault anything they have done. All the walls are in place now and we're waiting for the scaffolding to have the last lift built so the roof lift can happen, planned for early afternoon on Monday. Craning the roof panels into the assembly area. The small part of the L shape roof that goes over the master bedroom sitting waiting to be lifted. The front gable end is nearly completed. The rear elevation as seen from the lower part of the tiered garden. This is the veiw we'll get when driving in to the driveway. It gives a good view of the lounge and front door. Steico joists, a few steels and glulam beams for the ceiling of the first floor. The racking walls are waiting for covering. This leaves me with one or two sections of stud wall to install myself to complete the first floor layout. The master bedroom. We now have a view on what the vaulted ceiling is going to be like in here. The other side of the bedroom half round window, looking at the racking wall to support the far end of the purlin. Here's hoping the scaffolders will show up promptly on Monday morning having been allowed to go to the pub for the first time in an age!3 points
-
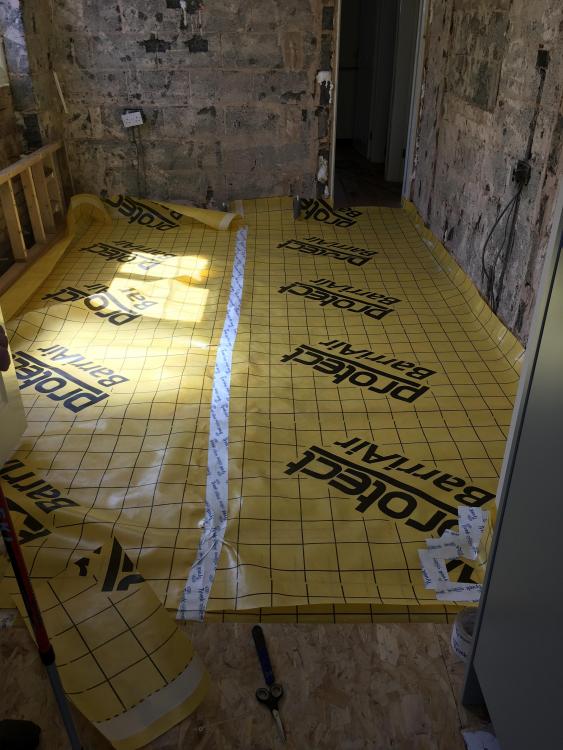
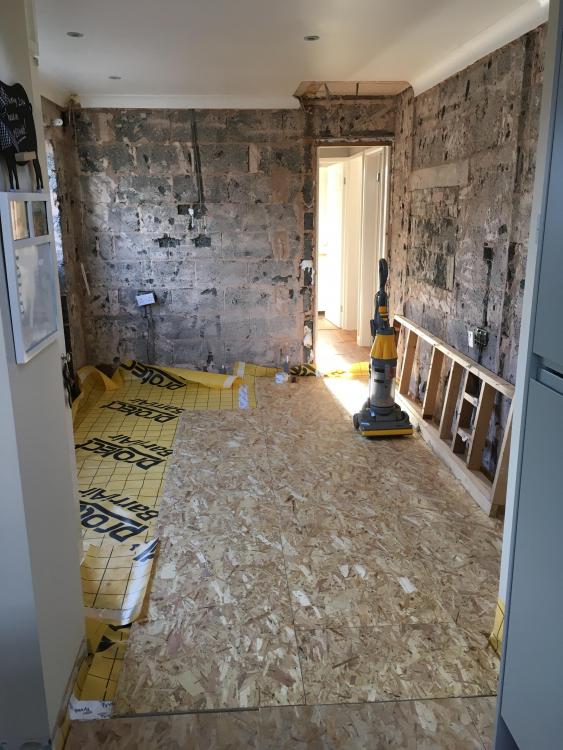
Just use dry sharp sand before the DPM and then lay the insulation. It won’t move after that.2 points
-
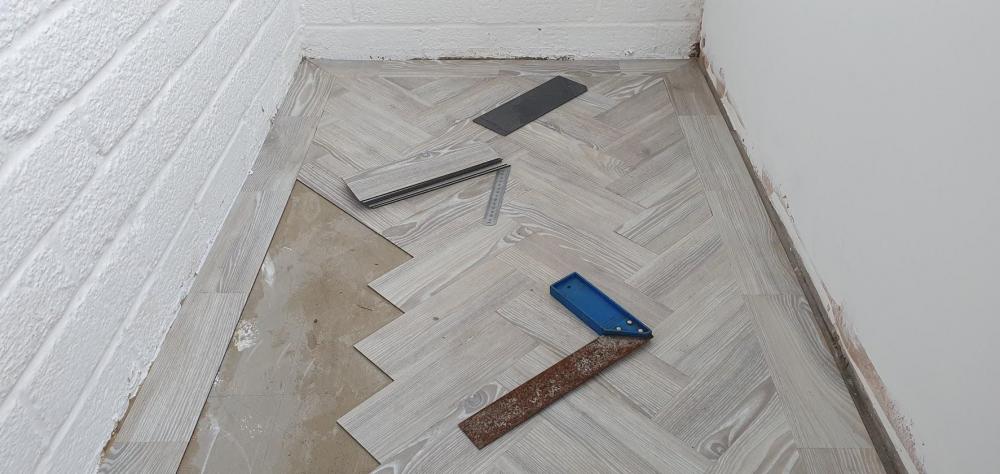
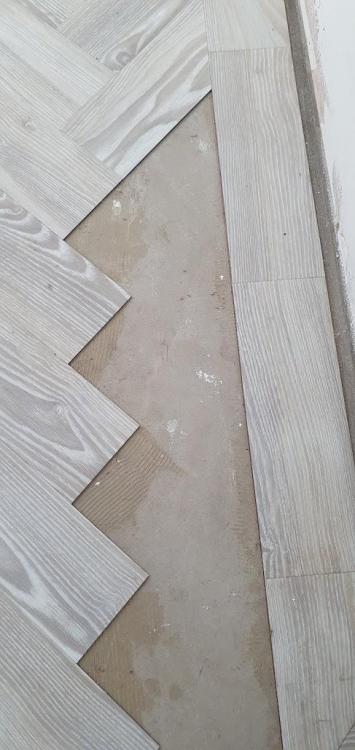
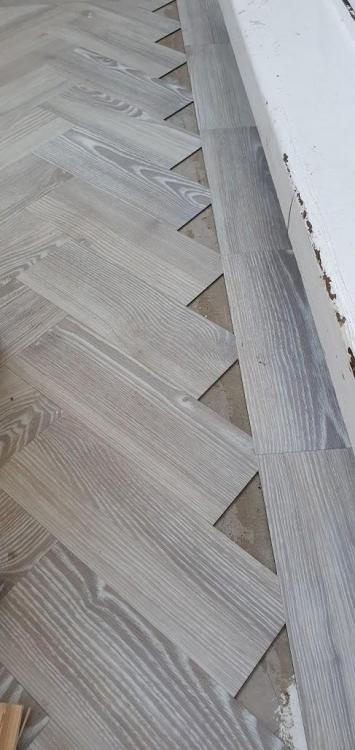
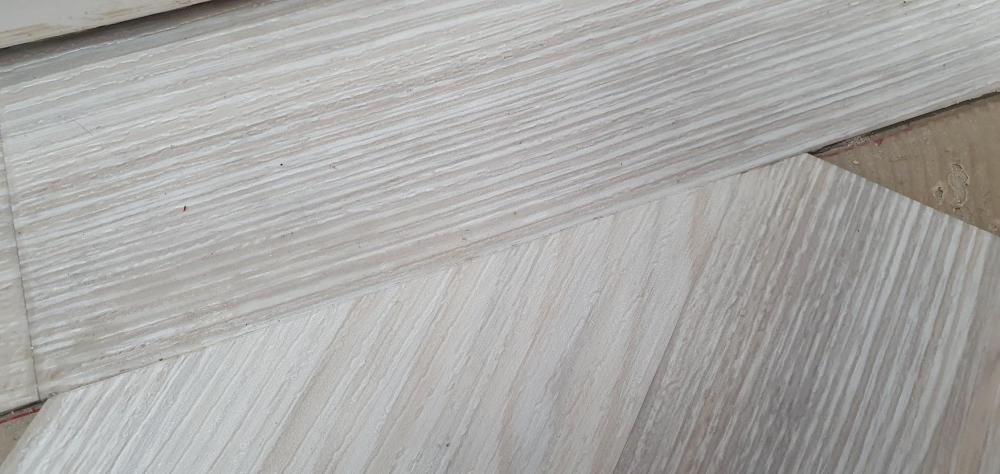
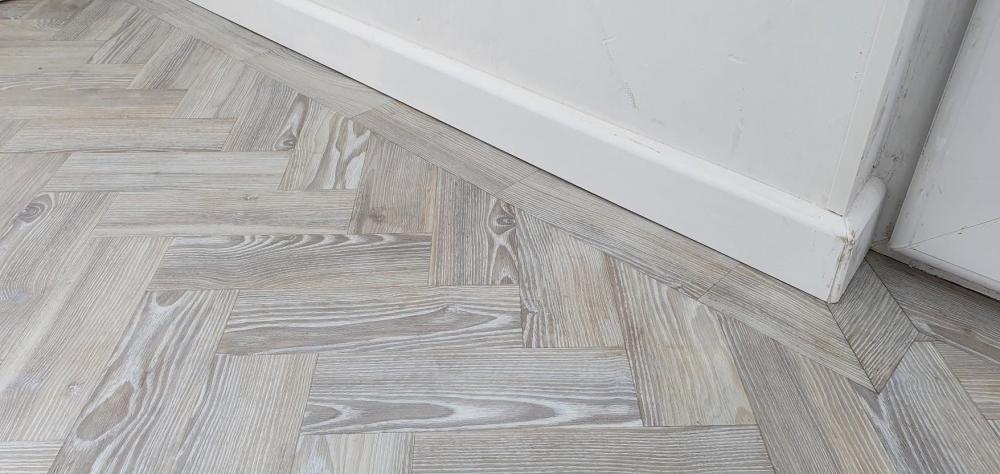
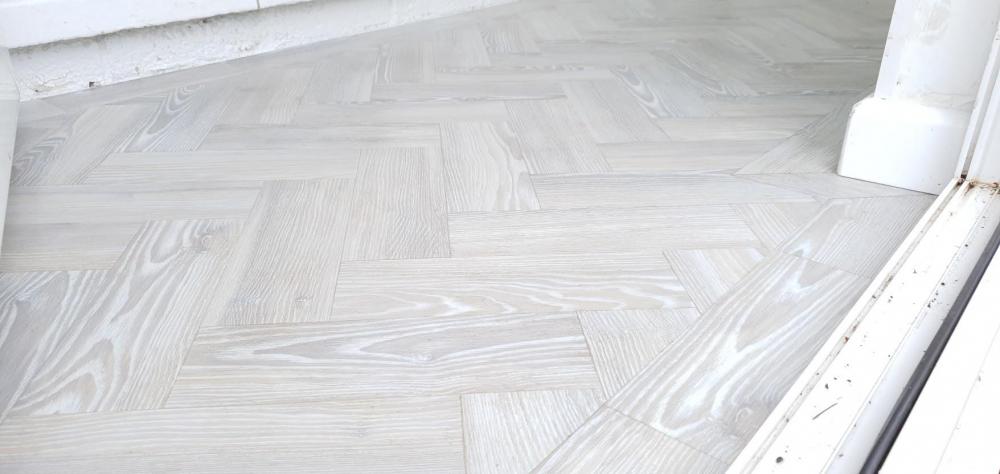
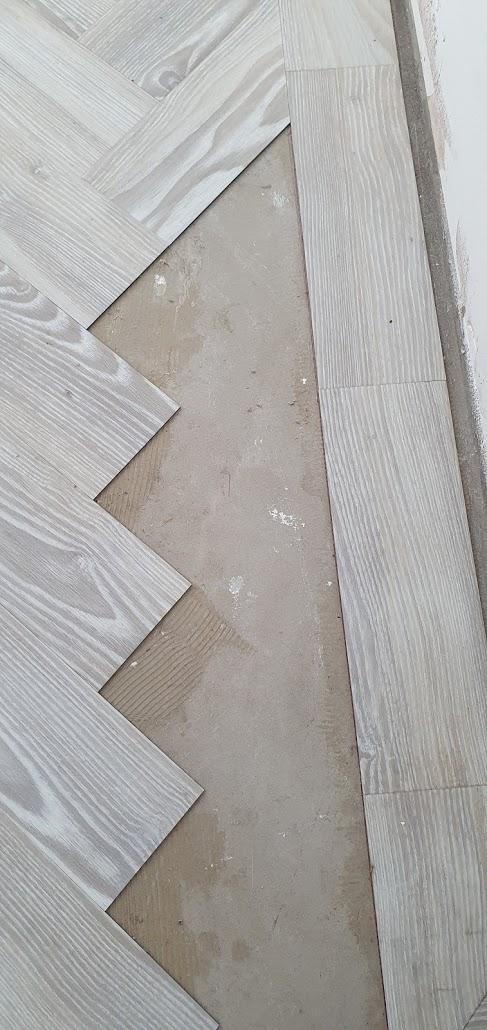
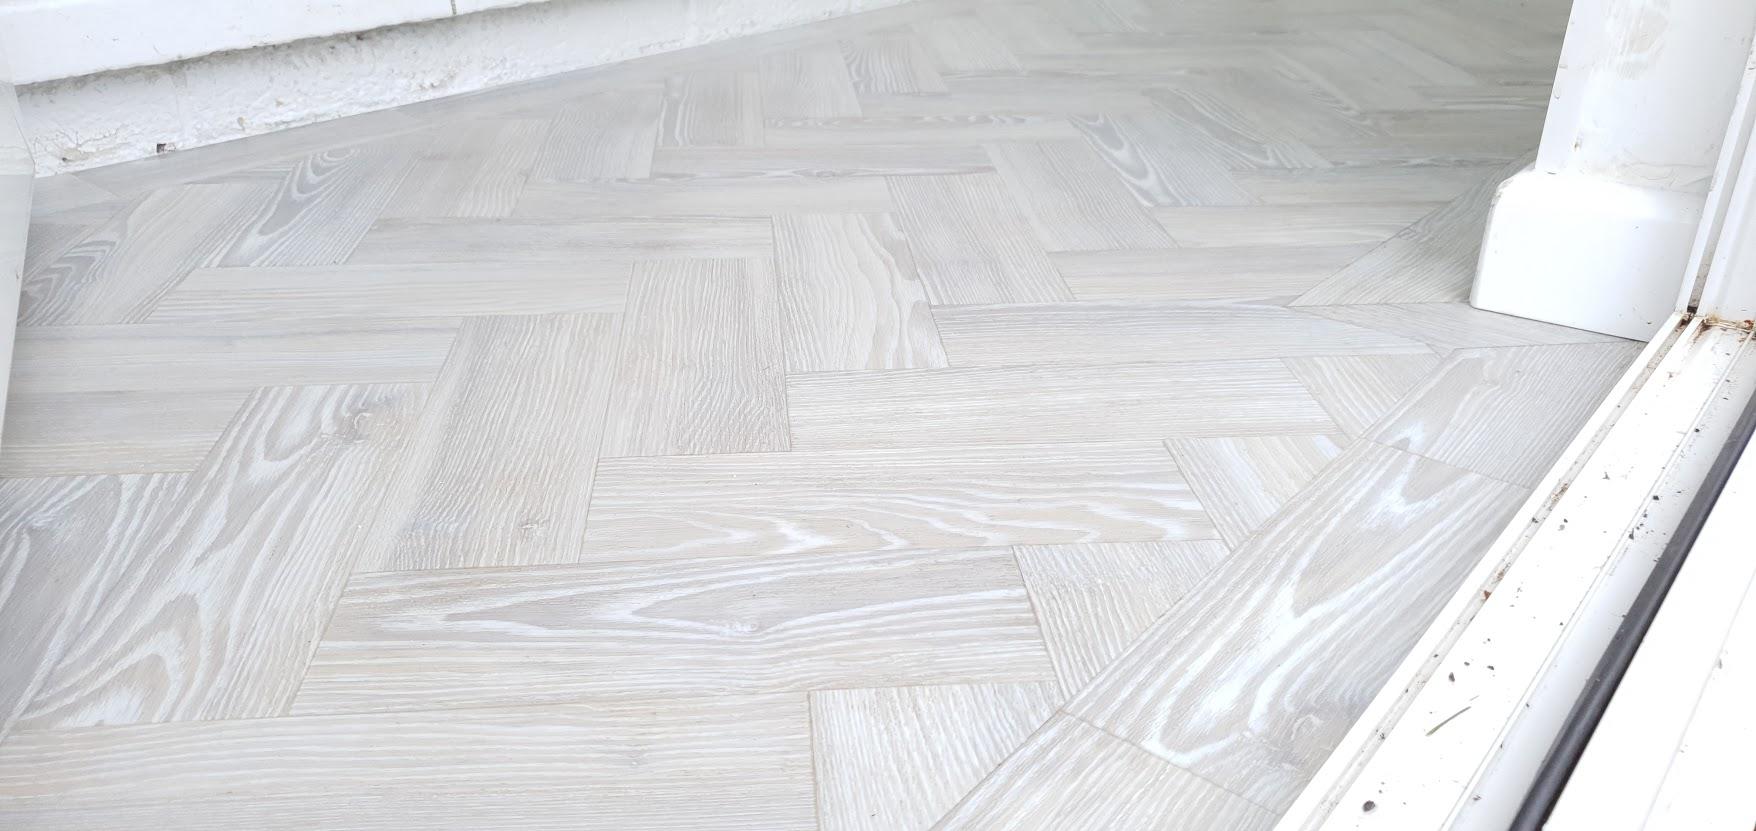
I wanted to add some info about Amtico/LVT as I couldn't locate much when I was searching previously. We are going to specify Amtico for our whole house downstairs (130Sq.m) however had never actually had any so wanted to ensure we liked it before committing to FFL's to suit this as it is considerably thinner than tiles and has a big impact as we are doing an insulated foundation and no screed to pour at a later date. The reason we were veering towards this is, we didn't want engineered wood as it will mark - I know you can rub it down etc. But I have two young kids and we are in the country etc. We didn't want tiles throughout either just as it's cold underfoot, albeit we have UFH, but we still preferred not to have it. Hence Amtico fitted the bill on paper being warm, high wear layer etc. I wanted to try it out for 4-6 months before finally committing. I bought a box of White Oak, Spacia to fit in my current porch. £70 quid off ebay, with another 30-40 in levelling compound and adhesive. I levelled the floor which was about 9mm out in places with Mapei renovating self levelling from Screwfix. Worked really well and easy to use. I then spent an hour drawing up the design in ACAD just to make sure it was all correctly laid out. I was doing a parquet style. Originally I wasn't going to add a border, but after laying it out for a test. The fact that two of my walls ran off, made it look bad. So i added a border which finishes it off better. It took me ages to to lay it out, I must have quadruple checked the measurements to get it right, making sure cuts were in the right places and would look good etc. Measure twice..cut once all that Jazz. I was using the smallest size (76 x 228mm). I laid out the border first, lots of cuts here and tapers as my walls are off. But allows you to then start with an inner square where you have fixed all the running off issues. Then I laid the parquet effect. The main planks are easy, but if you get out of shape butting them up it can run off a little so be mindful of this. My first few cuts were a little shabby, and left spaces. However once I got going I could cut them to match perfectly with no spaces. There was a trillion cuts to take......around the edges as I had the parquet effect, but finished up really well. I'll see how it fairs over the next 2-3 months with the abuse of being the porch (dirty, wet, stones etc.) When I was laying, I put some extra glue in the shoddy cuts to fill the holes but it looked rubbish and just made all the dirt stick there. So after a couple of days I used Colorfill (for kitchen worktop sealing) in grey in any tiny spaces. Worked really well and fill them perfectly to cover up my initial amateur-ish cuts. All in it took me 2 full days to lay that floor (not including self levelling), my knees were dead (no pads). I'm no stranger to DIY, and very practically minded but it's the first time I've laid a floor that's stuck down with adhesive (I've never tiled). It has told me to add a cost in for supply and fit in our main house budget now as I think 130 sq.m might break me....this was only 2! If anyone is looking for costs it's 50-80/m^2 supplied and fitted for Spacia or signature series (that is the final price with zero VAT) 50 being simple plank laying, with 80 being basket weave, parquet etc. Which for me seems to be reasonable. This is Glasgow area Some pictures below. Ill try and update in a few months with my experience.
 1 point
 -
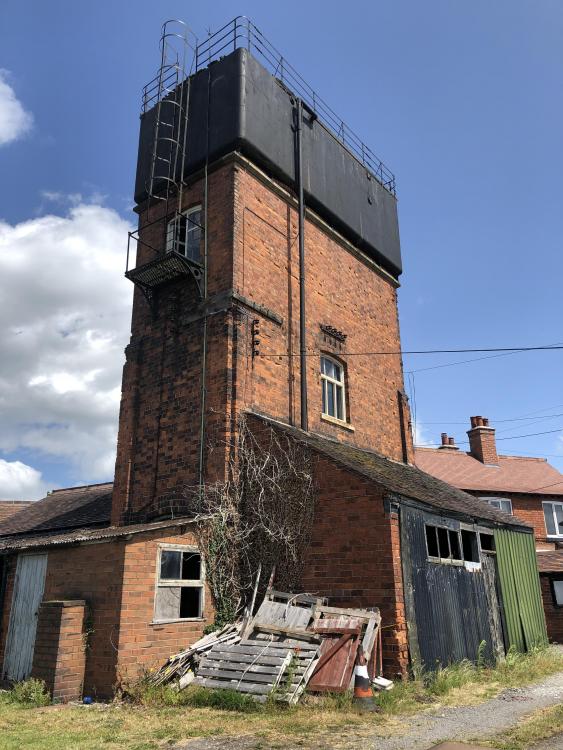
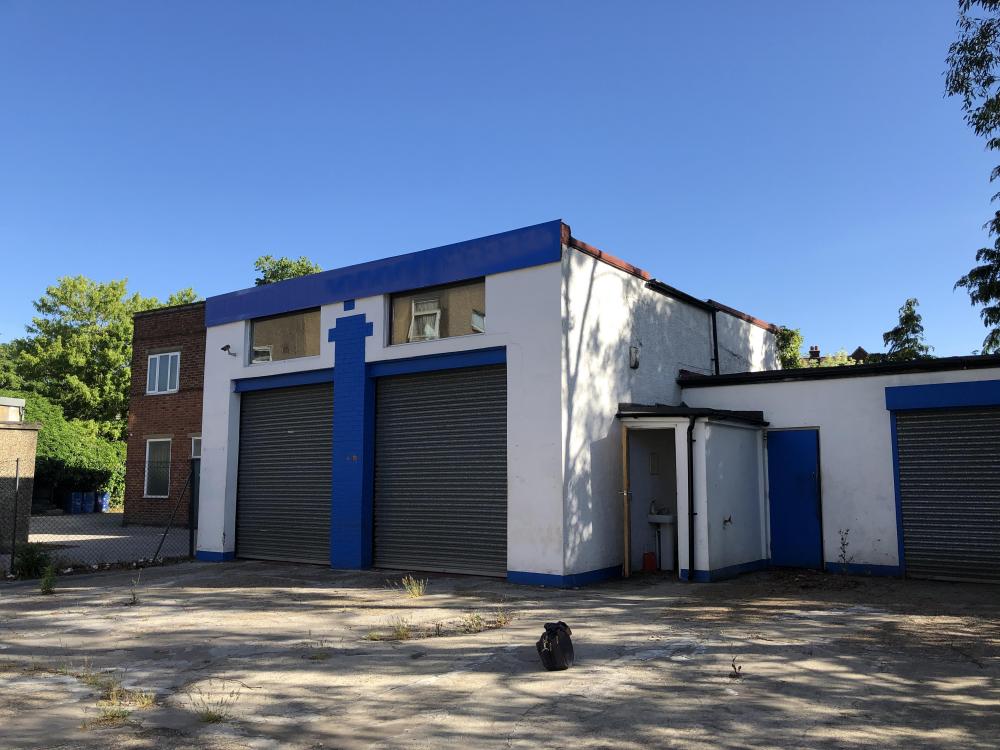
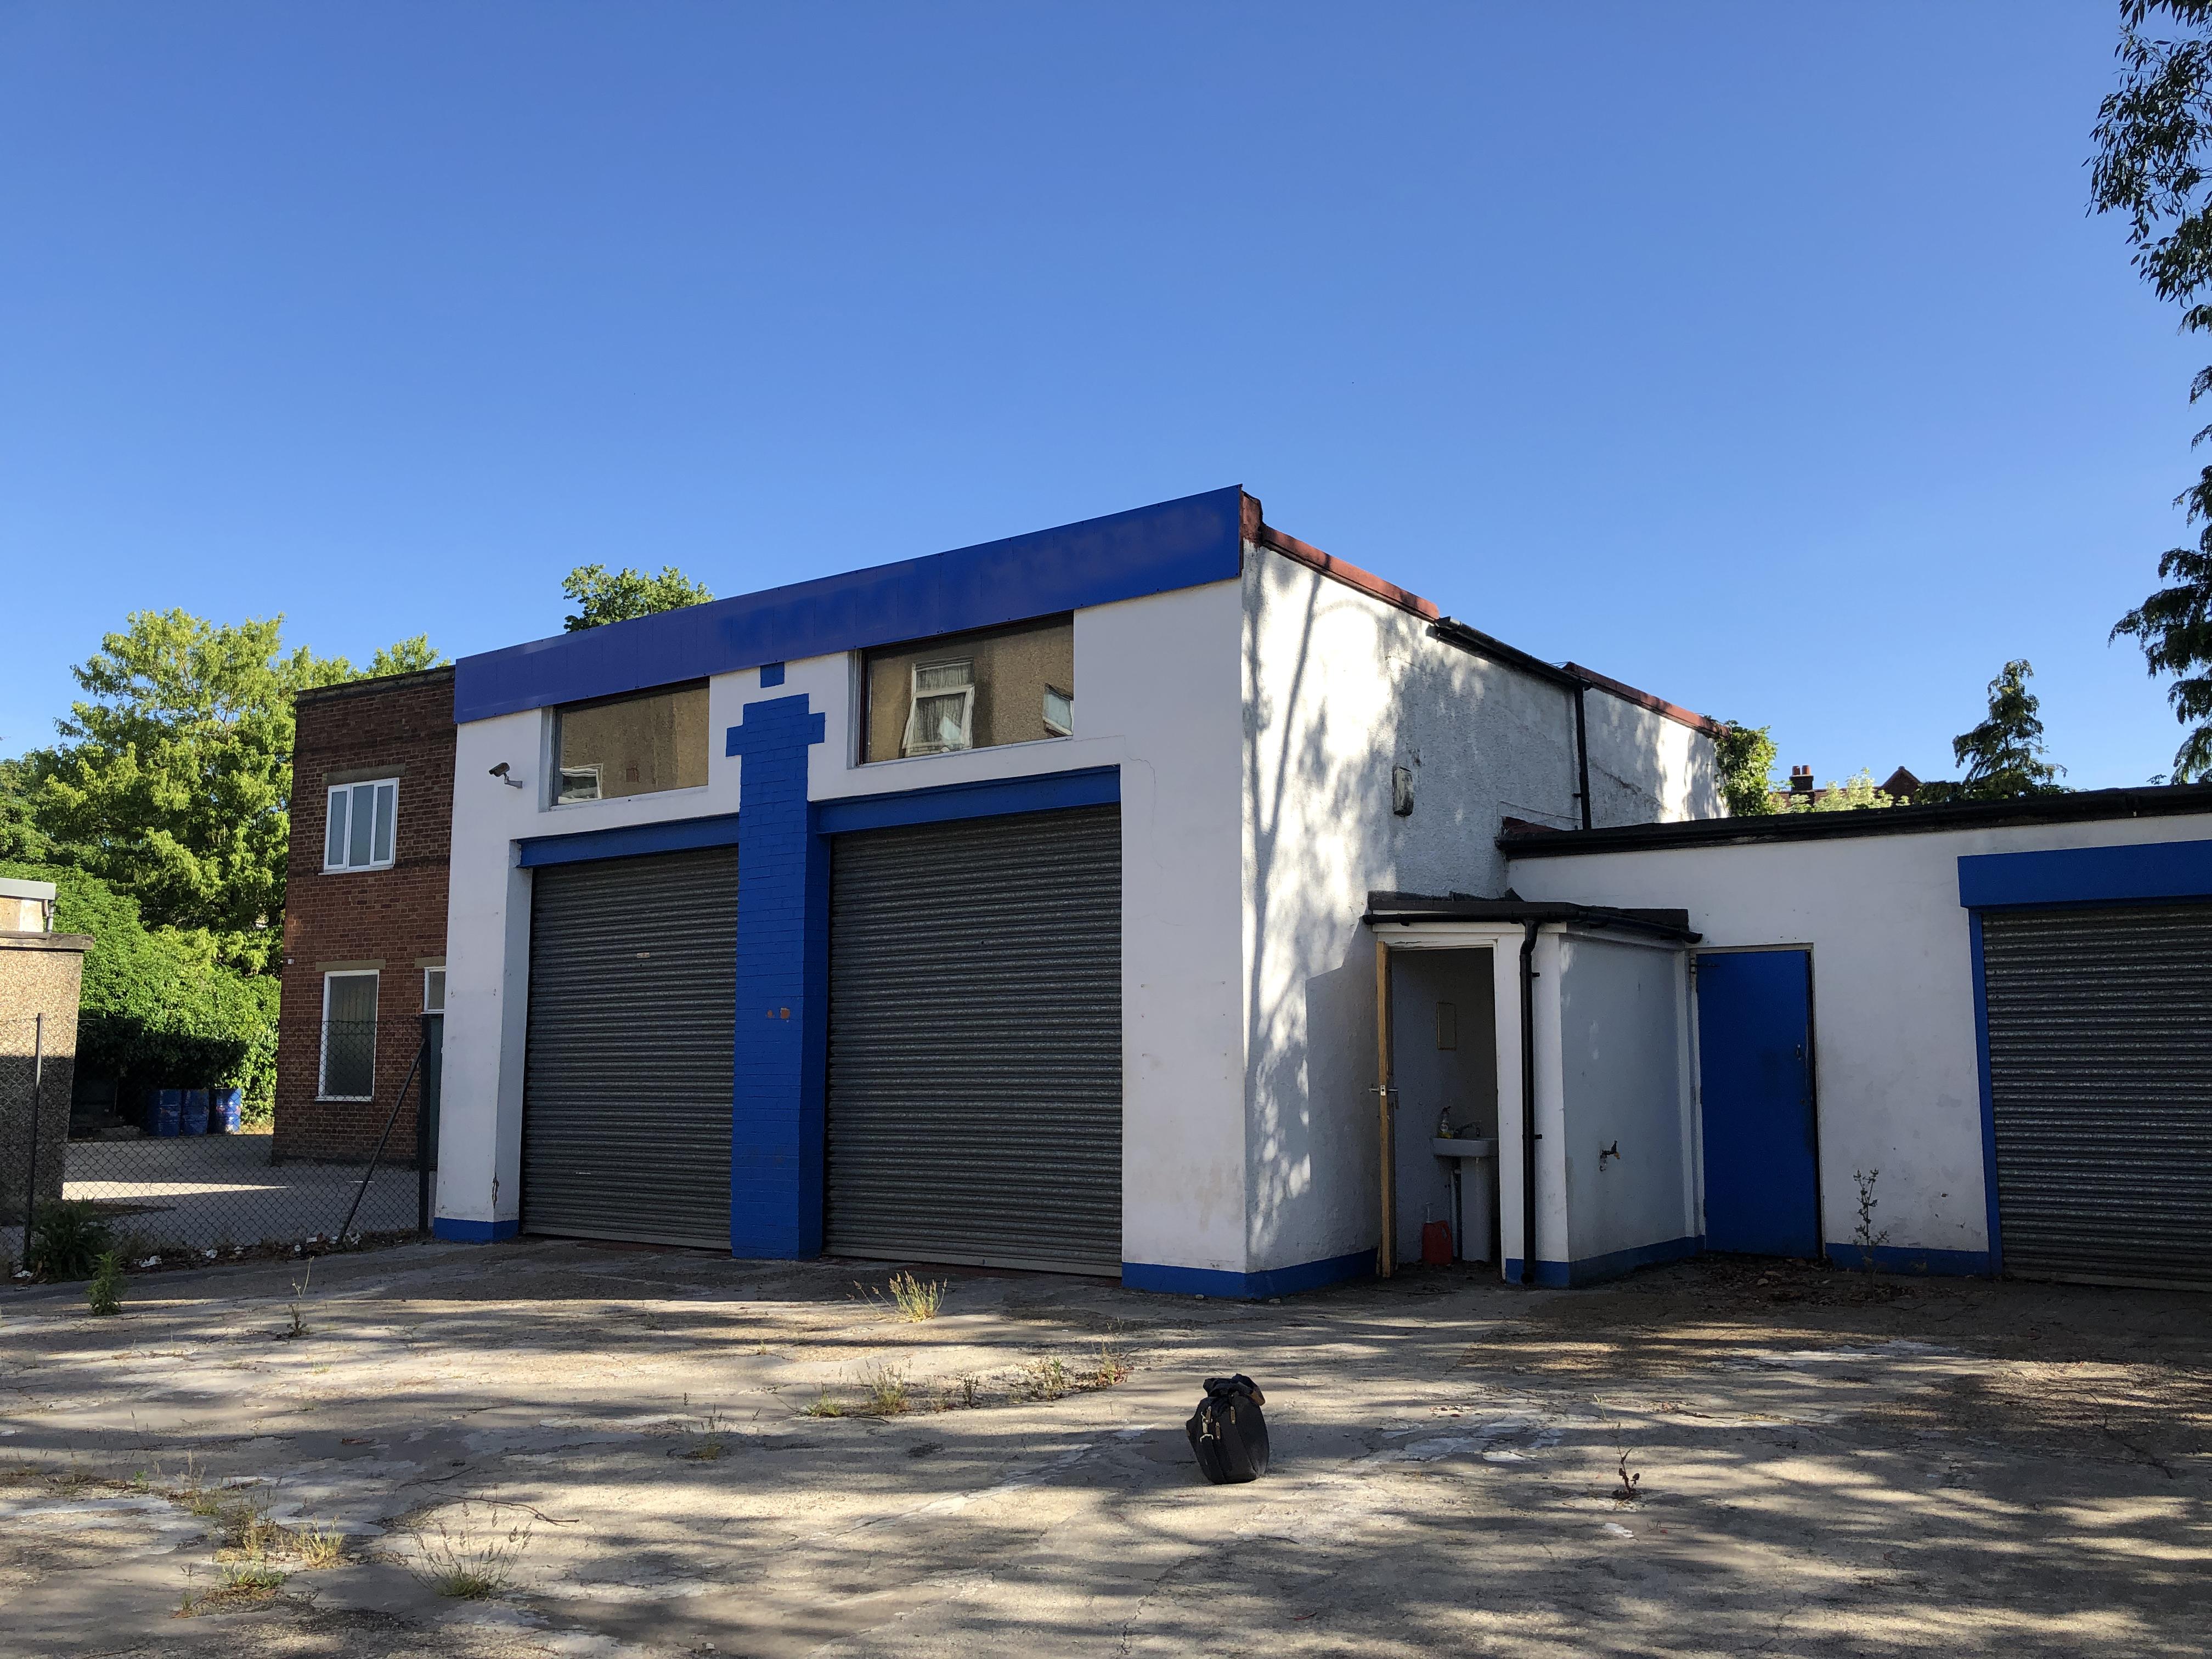
Hello, we just wanted to introduce ourselves as we might be spending a lot of time on here! My wife and I currently have at least 1 self build on the cards [we own a small Water Tower in Shropshire which we're converting as a weekend bolt hole for ourselves]. The other is hopefully for our family home; we have an opportunity to buy an old MOT station and convert it into a 4 bedroom house, the location is unorthodox to most, overlooked, backland strip etc etc, but we're not normal people, and we don't like normal buildings so it suits us, it's close to the train station, in a lovely conservation area and near the decent schools...and my favourite pub is 3 mins way. This is the one I'm out of my comfort zone with as A: it would be the family home so a lot riding on it's success as a building, and B: we need to borrow a fair amount money to buy it and i'm not sure that is even possible yet as we're in the middle of a global pandemic, plus I own my own business so low-ish salary + dividends etc I fear the odds are stacked against us but it's one of those things we have to at least attempt. The Water Tower: We own this one out right, it's is currently in for planning for the change of use - we did pre-application on this one and I'm pretty comfortable we have the backing of the planners, the conservation officer and pretty much the entire village it's in to get it converted and restore. We were due to start works properly on it this spring but with everything that's been going on the scaffolders closed down, as did the local company who were making the windows so other than installing a new drain, removing some asbestos and doing some emergency lime and brickwork repair to the inside and ground floor external it's on hold until we know where we are at with the family home in the next few months. The MOT Station: So we don't own this yet, we know the owner well and the building is not on the market, and we have an option to buy on it subject to planning. This site is contentious, but we have given it everything we can to try and do the best for the site, we've had very good engagement from the neighbours who have put in letters of support, and whilst with out local council anything could happen, I'm quietly optimistic it will gain permission...this is with the planners and due for a decision towards the end of August. I've also had to detail & specify this project up to construction level to ensure we can build it for the money we want to spend - as you can imagine having got this far we're far too emotionally invested in this one if it all falls apart but that's the nature of the beast I guess! I suspect I'll start a few threads over the coming weeks and annoy everyone immensely, in the meantime I'm attaching a picture of each of the offending buildings for you all to shake your heads at ?
 1 point
 -
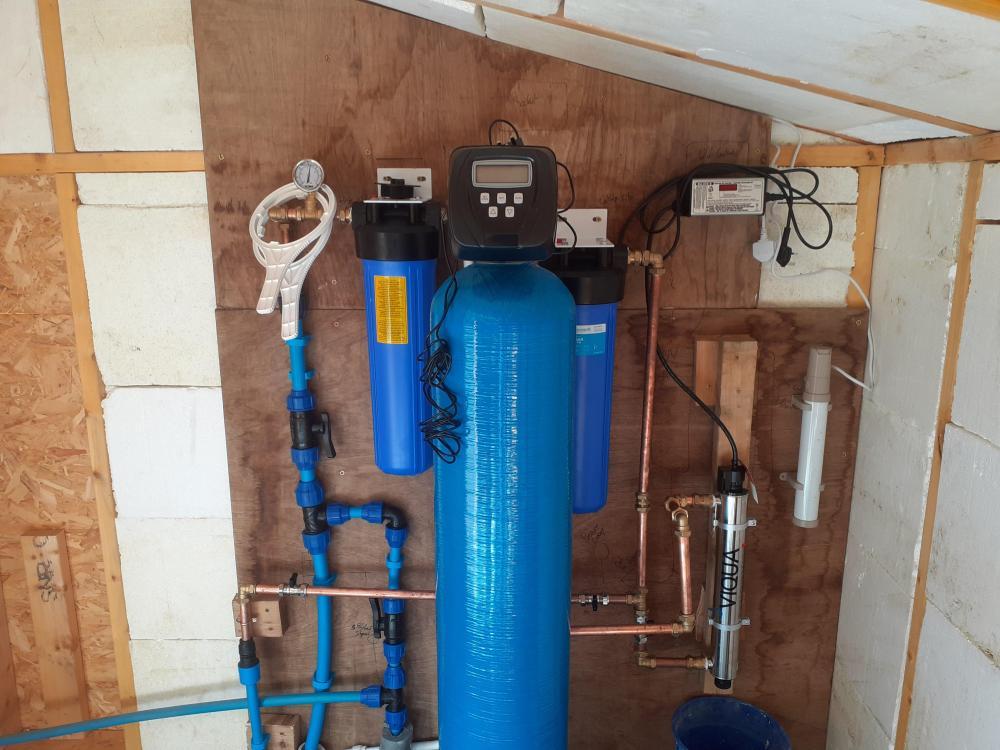
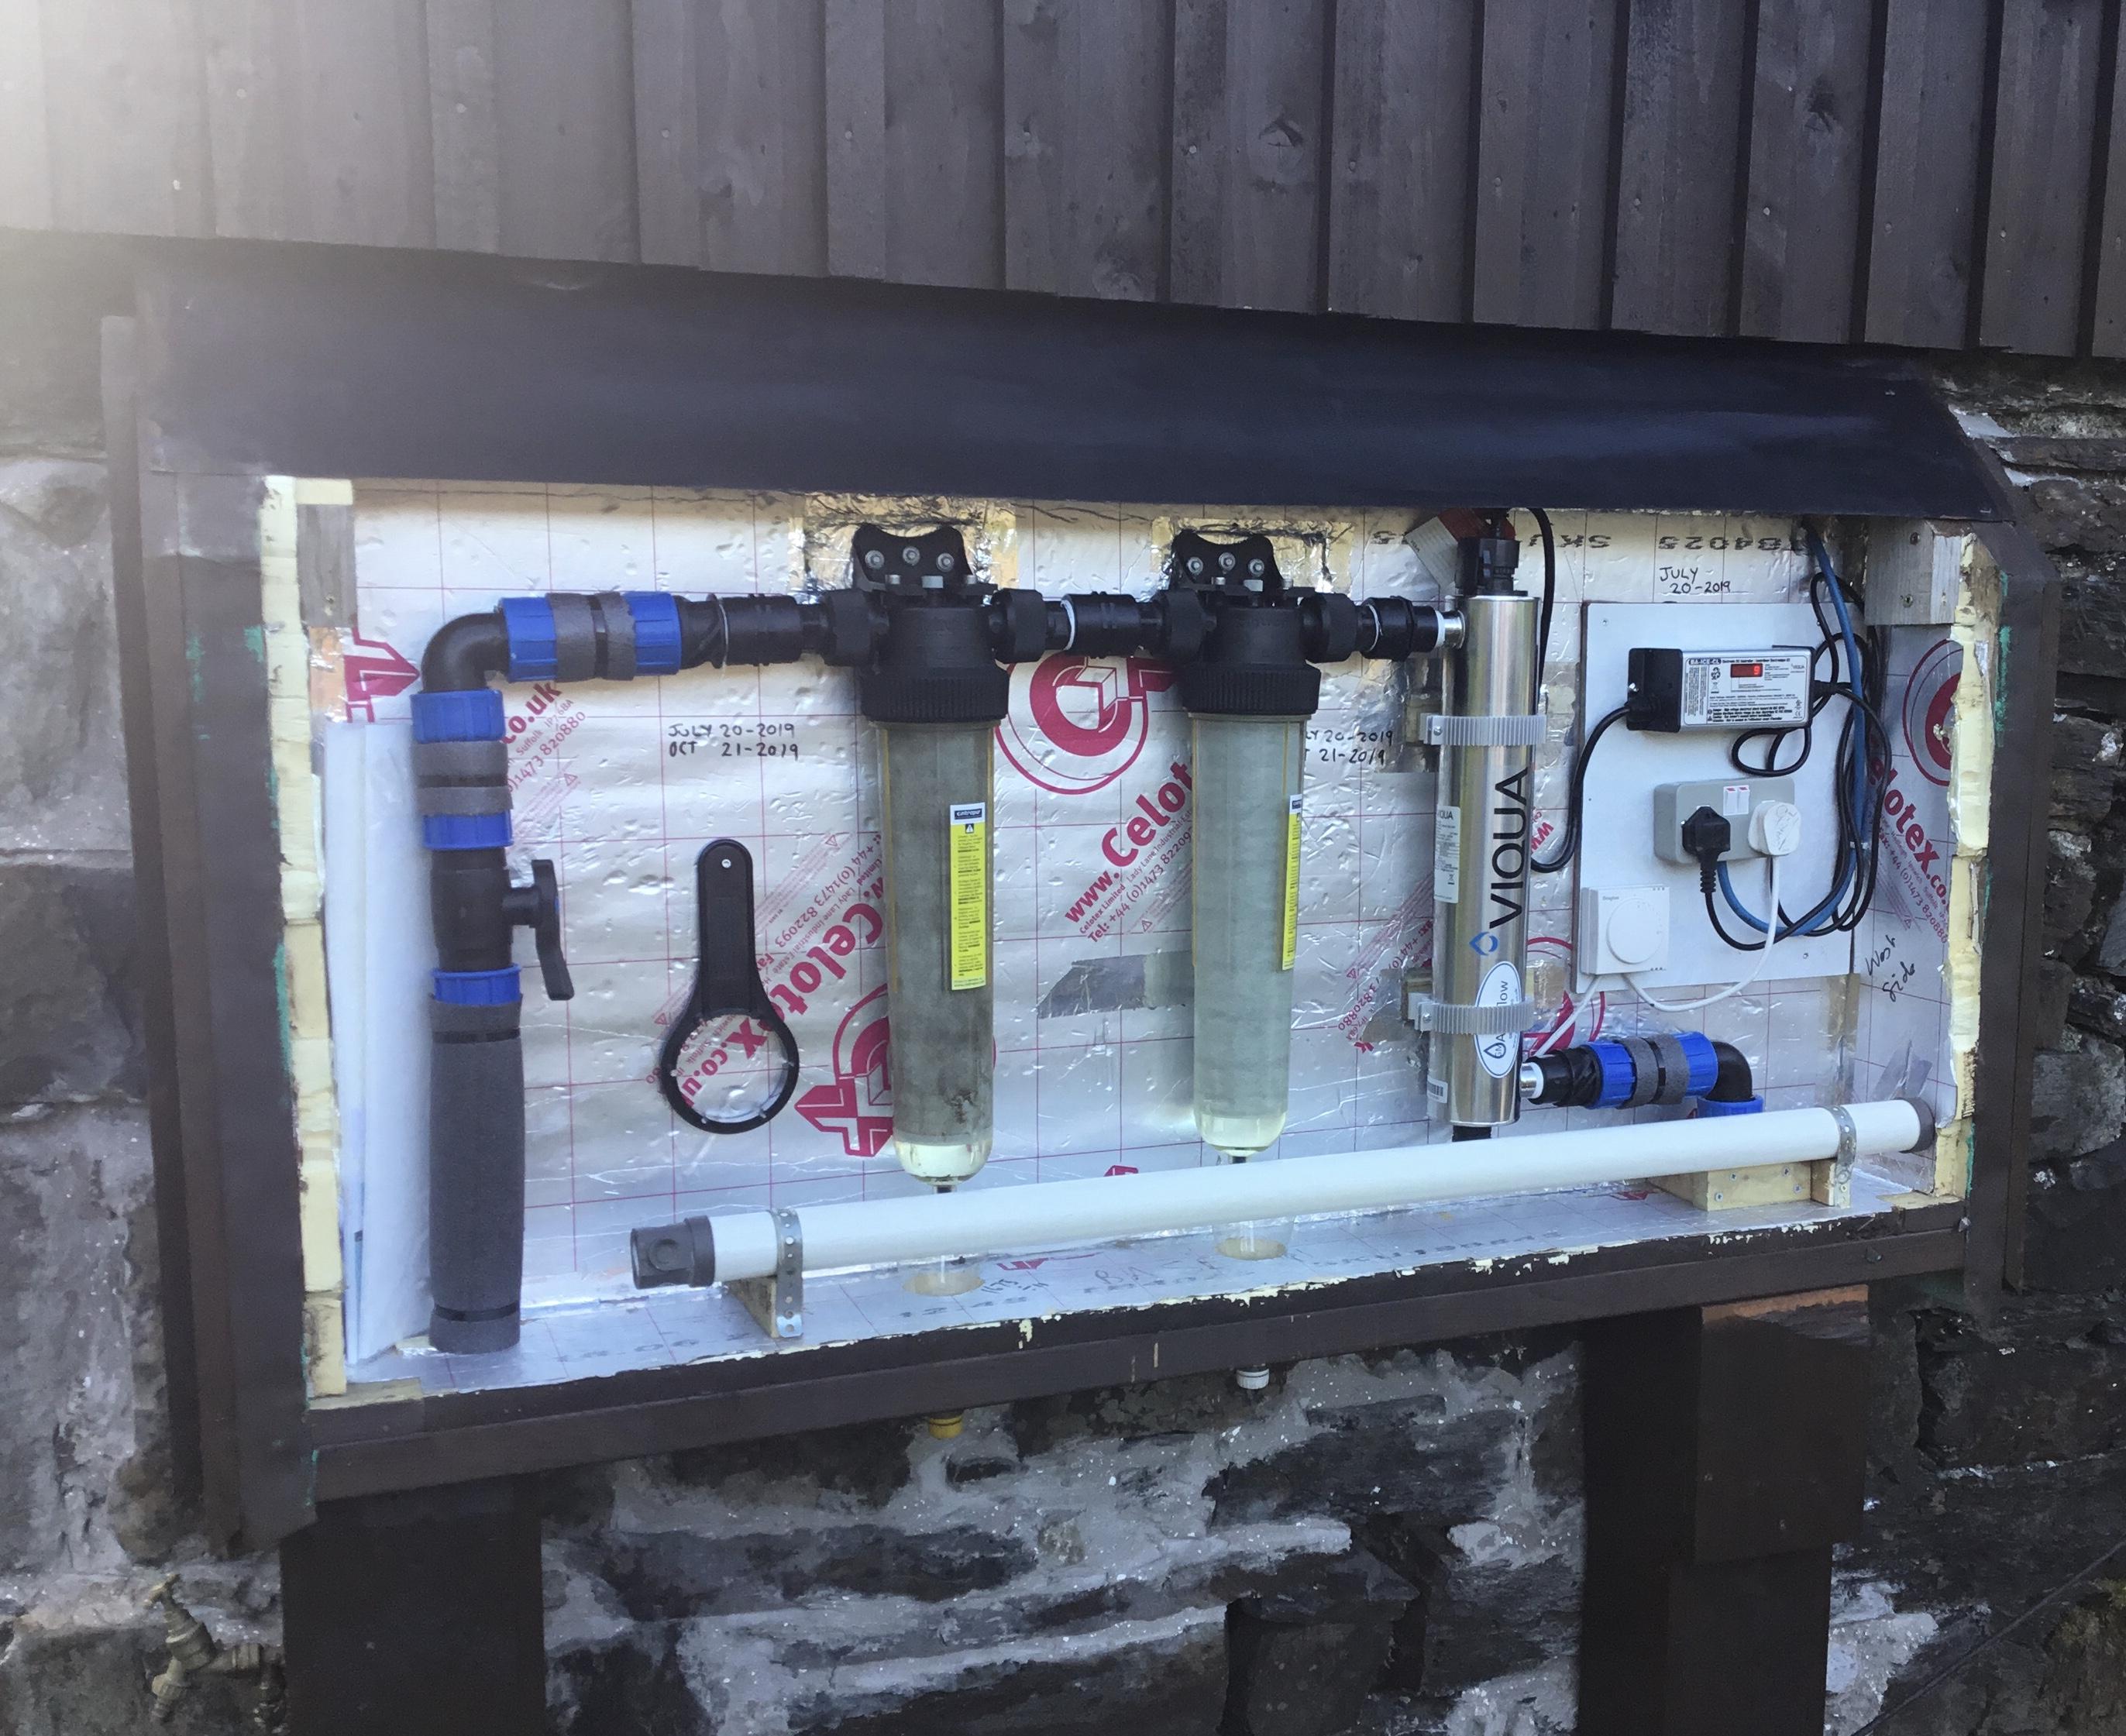
I installed two tank, the first 3000 litre tank is for back up and acts as an initial sediment catcher, the second is 5000 litres. I have installed both with Purge taps at the bottom so that I can empty either one independently. i have a tap on the outlet pipe so during maintenance I can shut this to stop any crud from going into the main pipe line. my water comes from the spring where I have some basic wire filters into the tanks and then the overflow runs into a small 500 litre tank that I have as an Independent water pipe installed for the garden and for the kids to play with, that way if they forget to switch of the hose or I forget to switch of the garden watering system I will not drain the main tanks. having an independent line or a pre filter take off like this is a good idea as when your doing anything that requires a lot of water you don’t have to run it all through the filters and potentially shorten there life, obviously if you have super clean water this would not be a problem. when you come to purify the system the VERY BEST and easiest Way is to use MILTON disinfectant fluid, trust me on this one...... I mix the Milton with a bright food grade dye so that I can easily see when it’s reached all the outlets, I have LONG runs to various buildings and I needed to keep topping up the filter housings with MILTONS So that the whole system was full and could then sit for the correct time before flushing out. If you did not have the dye you would NOT know when to add more disinfectant. The dye is also good as when you are flushing the system out you can be sure you have completely flushed it at all points as the water will run clear. When you clean the system your going to be putting a lot of chemicals into your septic tank / sewage treatment plant and this could kill off all the stuff you need to brake down the waste.... I am considering the possibility of building in some sort of diverter so that should I need to re clean the system I won’t bugger up my septic tank.
 1 point
 -
If you are doing work and you hit any kind of utility and it's under 1.2m your insurance company will fight you over the costs. This is the standard distance your should be hand digging to and using a cat scanner. After that depth and you hit something its just bad luck. I have hit everything going over the years. Put me in a field up a mountain and I will dig through the only pipe or cable in it.1 point
-
I think you will be fine. I have seen some footage of piling in London where they have drilled into the London Underground and you can see where the auger has gone through into a tunnel. Fibre optic cable seems to be the most expensive to repair if you hit a major one and it twists around the auger.1 point
-
My house is meant to look as though Jane Austen might have visited 220 years ago, a chimney brace could help reinforce that impression.1 point
-
A big old house near where I lived in Bristol had these which is where I got the idea ?.1 point
-
Will you retain ownership of the land above you where the spring is?.1 point
-
I’d be storing a minimum of 10,000 litres and taking it off with a floating pickup - they sit about 8-10” down and you get none of the top surface or the silt. You will need filtration - @jamieled has just done his and it looks really tidy. Add a 500 litre accumulator after this and you’ll have plenty of water.
 1 point
 -
You would need to have the water tested. You should be able to collect a sample as it is without any expense. The results of the test will tell you what treatment is necessary. What does a sample look like if collected and allowed to settle? is it clear or coloured? is there any sediment or smell? I come across lots of private water schemes here, from the dark brown peaty ones, the dubious ones from surface streams with sheep grazing the land, to the downright hard borehole water we get here. One local farm pumps water a long way up a hill with a hydraulic ram, so no power other than the flow of the water. It arrives as a trickle into an underground holding tank from where it is pumped into an accumulator. He seems to be drinking that with no treatment at all. As it only arrives as a trickle, there can't be much overflow or throughput. The only issue with water not originating on your land, is what might happen in the future. the farm mentioned above only installed the hydraulic ram pump system a few years ago. He used to get water from a spring up the hill. but that spring "went bad" when the forrest above was clear felled.1 point
-
Have you had the water tested?, our water here has iron and a few other nasties so had a special filter system till we demolished it and went with mains as it was available in the road. I would love spring water as a supply. Previous owner (wifes father) used to drink the water with no filtering and lived to a ripe old age.1 point
-
https://www.linesearchbeforeudig.co.uk/ Should be of some help. Has all th records and notifies everyone .I used it to check our rural plot. Although it doesn't pick up BT stuff.1 point
-
Our piling company would not proceed unless I showed them evidence of our correspondence confirming no known services on the plot. (They all ran alongside the plot in the road)1 point
-
I also wonder if it's a language thing and she didn't mean exactly what was written. not until the end of the year. that would've been a lot more useful. but there are many other external blind manufacturers and so I'll just move on.1 point
-
Wow, that's amazing. I do wonder whether something's been lost in translation. We don't really do "direct" in this country, and it's like a kick in the guts whenever people put things bluntly.1 point
-
no indeed, but if I can kill 2 birds with 1 stone I might as well make use of it!1 point
-
The site supply needs to be far enough away so that it is not in the way for scaffold, diggers and other works so 10m seems a good distance.1 point
-
Google earth historical satellite images may help identify the shed etc?1 point
-
@Gardenlover do your neighbours want to do the same? If they do you can help one another with statements of use.1 point
-
The semi-peds don’t take any weight they just support themselves and cover the pipes. Can you not find the stud ..?? Other option is to cut a hole behind where the new sink/pedestal will be going and feed a noggin into the wall. Can be done, and surprisingly easy to do. Other option is to cut the wall from behind where it is being fitted and retrofit noggins that way.1 point
-
I've seen plenty of extensions built right up to the boundary, so don't see a problem with this. Usually permission is the only issue, but as you say, you are OK on that front.1 point
-
It worked for me the last time I used this approach. I’m sure the solicitor called them Statutory Declarations.1 point
-
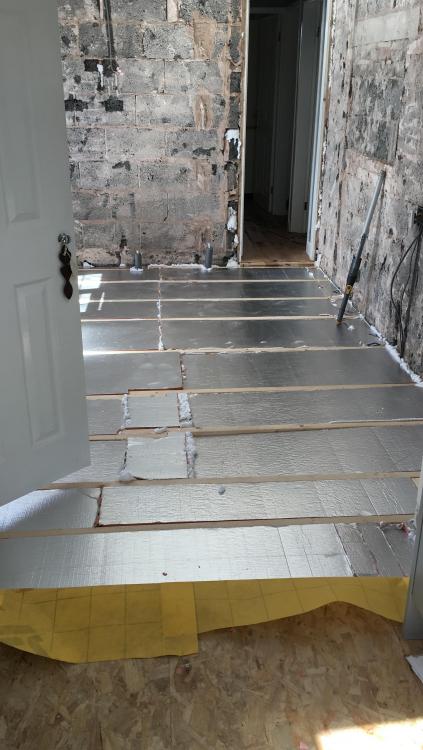
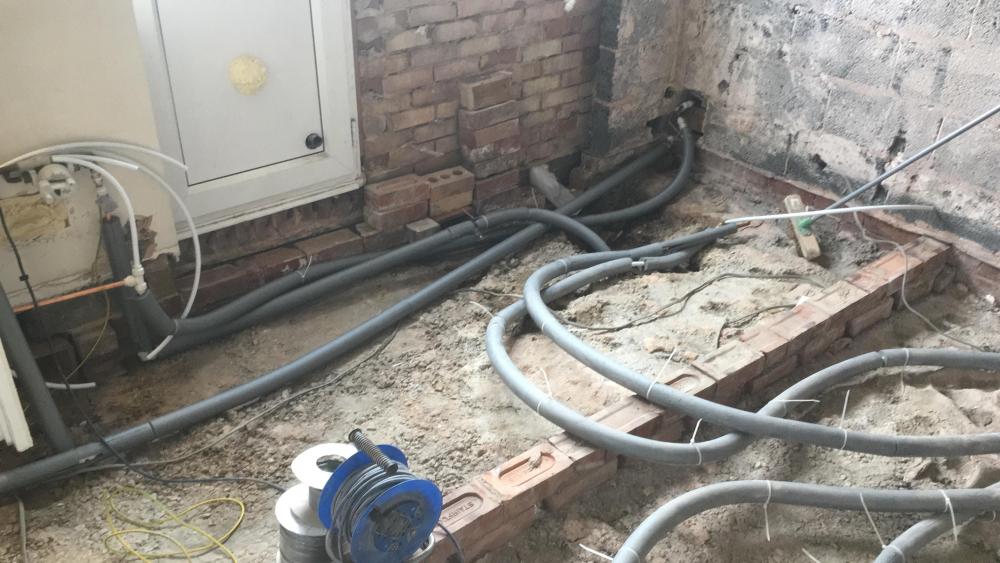
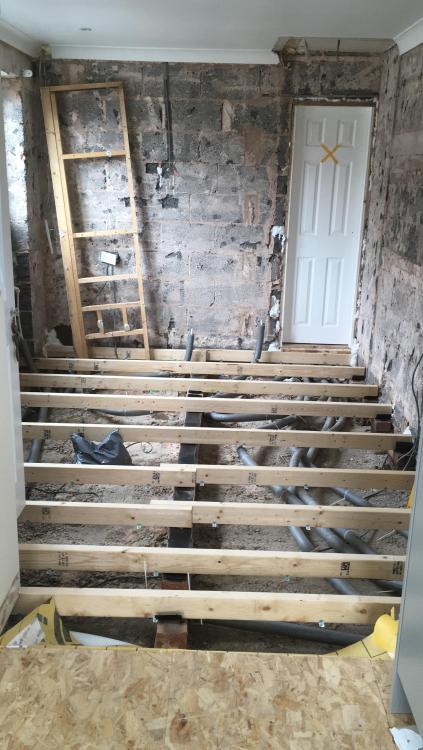
Pipes Lagged: Joists installed: Insulation boards installed and foamed with FM330: Airtight membrane laid: And then ran out of steam! I'm a little on the achey side today! ?
 1 point
 -
This is usually the point where your wife says "oh the kitchen is not tiny after all"1 point
-
This too may help: https://www.grohe.co.uk/en_gb/uniset-distance-pipe-3-42766000.html1 point
-
interesting! have sent this on to a client who is looking at using warmcell (and I'm also working for another client about 10 miles away who is looking into it too!)1 point
-
My hands-on self build means I have reached peak life-time personal physical fitness this year though mental wellbeing is in doubt. The lockdown has not affected the pace of my slow selfbuild.1 point
-
Bit of a thread here:1 point
-
In the last few months work on the house was on hold because of the COVID 19 pandemic. With the rules starting to be relaxed we have now been able to make some progress. A few months ago I posted on BH about being a bit concerned about the bath being a tight fit as it’s 1800mm and the distance between the wall was 1802mm. Not sure how the plumber got it in but happy that it fills the space. The bath is made from Carronite so it should feel more rigid when showering. Our joiner fitted the hydro lock panels and the plumber came back to fit the shower fittings. The Joule Aero tank has now been connected up. The tank holds 260 litres and utilises a heat pump which draws air from the bathroom, utility and ensuite. We visited a couple of properties that utilised this set-up and although they were happy with the efficiency of the system the feedback we got was to consider potential vibration noise from the tank. We took some steps to do this, firstly sitting the tank in a cupboard in the utility room, using a thick anti vibration mat with 22mm plywood on top. The ducting throughout the house is metal but we switched to flexible ducting for the last bit to ensure any vibration would not travel through the ducting. We also fitted a silencer to reduce the noise travelling through the ducts particularly to the ensuite. These steps have had the desired effect. Because we have yet to move in, I was able to monitor the electricity consumption of the tank when it heated the first 260 litres. To get the water to 50 degrees it used 4 units of electricity which would be about 50p. The tank also has a dual immersion which could be used to heat the tank more quickly if desired. After the air has gone through the system it passes through an external vent through the utility wall. In the last entry I mentioned that we wanting to prepare the ground for grass seed. The first job was removing a lot of stones. I’ll probably use the smaller stones to extend the parking area slightly and it would be good to use the larger ones for a small wall or some other feature in the garden. After the stones were removed, we raked the ground and then sowed the seed. The grass is starting to come through which is promising but we will need to fill in any patchy gaps. I can see why people go for the more expensive option of turfing but a big bag of seed is very cheap and although it takes some time and effort it’s satisfying to see the grass come through. I guess this is a good analogy for our self build! We had a sunny weather spell which allowed me to finished off some painting and my wife put some oil on the cladding. This had been previously left to weather but as this is on the southern elevation this could now do with some oil. We chose one which had a slight pigmentation and after applying the finished result was that it looked very similar to the pre oiled look but helped to even out the upper areas that had yet to sliver as they are shaded by the soffit. We plan to work our way around the house with the oil. We have used various tins of Osmo throughout the house and although it is quite pricey it does the job well. This is the tin what we used on the cladding. What is next? We had hoped that we could order some furniture from Ikea to furnish the downstairs but I think the pandemic is affecting stock issues and delivery. We now need to decide whether we want to move with limited furniture or wait a few more weeks. The next jobs: - a little bit of electrical work, lighting fittings, connecting up cooker, towel rails etc - BT due to connect us up on Tuesday - need to get some tiling work done for splashbacks - order some chips to spread around the site. - need to decide what to put as a finishing layer on the access road. - need to order materials for ramp, decking and downpipes for guttering. I hope everyone is keeping well and thanks for reading.1 point
-
and you have definitely got all your CIL paperwork sorted (pre-commencement conditions discharged, CIL exemption claim form 7, Notice of commencement date Form 6 etc)? Get any of that wrong and you loose the CIL exemption if you start work. A fair bit of the missing data is more to do with Planning than Building Regs (eg the position of the house on the site and dimensions of the house are Planning issues not Building Regs issues). Unfortunately its up to you (the builder) to ensure the house is in the right place. There is also a difference between Building Regs drawings (which are to show how your house complies with Building Regulations) and Construction Drawings (which tell a builder how to build it). The above subset would be on a setting out or foundation plan. Typically you would start by getting a site survey done. This would be like a site plan with height data points on a 10m grid. Someone (you, your architect, or SE) would then add details of your house and founds to it together with two or more reference points (Control Stations). These reference points should be marked on the site by hammering in two posts that remain for the duration of the build (you can also set them out before the site survey and ask them to be shown on it). They should be somewhere out of the way such as in diagonally opposite corners of the plot, ideally on or near a height marker points. The posts should have height reference datum lines on them. They serve as reference points for the people setting out the house in the correct position on the site. Get these wrong and you end up building the house in wrong spot. The drawing should be dimensioned from the reference posts so the location of everything on the list can be read off and marked out on site. Drainage invert levels tell the ground workers how deep to set manholes, rest bends and the pipes between them. I can't remember if these are normally referenced to FFL or a site datum height. They probably need a cross sectional drawing of the foundations. This (these) will show: a) Foundation depth and thickness. They need to know how many courses of brick/block below FFL/DPC there will be. That way they know how much concrete to put in the trenches. Too much and you can't fit a whole number of brick courses between the top of the concrete and the desired height of the FFL/DPC. There are standard combinations for cavity walls but I'd have to look it up. Its something like two courses of blocks on the inner leaf are same height as 6 courses of bricks on the outer leaf. b) the width and minimum depth of the foundation trenches. The width may depend on the load bearing properties of the soil. This is usually determined by an SE who may need you to commission a soil condition report first (sometimes combined with a soil percolation test for soakaways). The depth of the founds may also depend on the soil type and proximity to trees and species. On some types of clay you need the sides of the foundation trenches lined with compressible boards before pouring concrete. How much of all this you actually need can depend on the project, site and soil type.1 point
-
oh! That’s me told then. ?♂️0 points
-
Read this before you do anything https://www.dailymail.co.uk/news/article-7817277/Hundreds-furious-customers-left-no-internet-days-Virgin-Media-goes-down.htmlhttps://www.dailymail.co.uk/news/article-7817277/Hundreds-furious-customers-left-no-internet-days-Virgin-Media-goes-down.html Sorry DM link.0 points
-
a friend is having a timber frame and their ground-workers doing the insulated slab brought their own microwave.0 points
-
Come on , man up, get on with it ?, no really, well done, best not to over do it, rest up them it will feel better to crack on later. Looking real good ?.0 points


.jpg.c21f3ac78c9b7efd90cbdcb312744dc5.thumb.jpg.7adcad4c0e384f5ecd7d56b0618df6e5.jpg)


This leaderboard is set to London/GMT+01:00